programming arduino next steps -...
TRANSCRIPT

Programming Arduino™ Next Steps
About the Author

Dr. Simon Monk (Preston, UK) has a degree in cybernetics and computer science
and a PhD in software engineering. Dr. Monk spent several years as an academic before he returned to industry, co-founding the mobile software company Momote
Ltd. He has been an active electronics hobbyist since his early teens and is a full-time writer on hobby electronics and open source hardware. Dr. Monk is the author of
numerous electronics books, specializing in open source hardware platforms,
especially Arduino and Raspberry Pi. He is also co-author with Paul Scherz of Practical Electronics for Inventors, Third Edition.
You can follow Simon on Twitter, where he is @simonmonk2.
Programming Arduino™ Next Steps
Going Further with Sketches
Simon Monk
New York Chicago San Francisco Athens
London Madrid Mexico City Milan New Delhi Singapore Sydney Toronto
Copyright © 2014 by McGraw-Hill Education (Publisher). All rights reserved. Printed in the United States of
America. Except as permitted under the Copyright Act of 1976, no part of this publication may be reproduced or
distributed in any form or by any means, or stored in a database or retrieval system, without the prior written
permission of publisher, with the exception that the program listings may be entered, stored, and executed in a
computer system, but they may not be reproduced for publication. ISBN: 978-0-07-183026-3 MHID: 0-07-183026-X e-book conversion by Cenveo® Publisher Services Version 1.0 The material in this e-book also appears in the print version of this title: ISBN: 978-0-07-183025-6, MHID: 0-07-
183025-1 McGraw-Hill Education e-books are available at special quantity discounts to use as premiums and sales
promotions, or for use in corporate training programs. To contact a representative, please visit the Contact Us pages
at www.mhprofessional.com. Information has been obtained by McGraw-Hill Education from sources believed to be reliable. However, because
of the possibility of human or mechanical error by our sources, McGraw-Hill Education, or others, McGraw-Hill
Education does not guarantee the accuracy, adequacy, or completeness of any information and is not responsible for
any errors or omissions or the results obtained from the use of such information. TERMS OF USE This is a copyrighted work and McGraw-Hill Education (“McGraw-Hill”) and its licensors reserve all rights in and
to the work. Use of this work is subject to these terms. Except as permitted under the Copyright Act of 1976 and the
right to store and retrieve one copy of the work, you may not decompile, disassemble, reverse engineer, reproduce,
modify, create derivative works based upon, transmit, distribute, disseminate, sell, publish or sublicense the work or
any part of it without McGraw-Hill’s prior consent. You may use the work for your own noncommercial and
personal use; any other use of the work is strictly prohibited. Your right to use the work may be terminated if you
fail to comply with these terms. THE WORK IS PROVIDED “AS IS.” McGRAW-HILL EDUCATION AND ITS LICENSORS MAKE NO
GUARANTEES OR WARRANTIES AS TO THE ACCURACY, ADEQUACY OR COMPLETENESS OF OR
RESULTS TO BE OBTAINED FROM USING THE WORK, INCLUDING ANY INFORMATION THAT CAN
BE ACCESSED THROUGH THE WORK VIA HYPERLINK OR OTHERWISE, AND EXPRESSLY DISCLAIM

ANY WARRANTY, EXPRESS OR IMPLIED, INCLUDING BUT NOT LIMITED TO IMPLIED WARRANTIES
OF MERCHANTABILITY OR FITNESS FOR A PARTICULAR PURPOSE. McGraw-Hill Education and its
licensors do not warrant or guarantee that the functions contained in the work will meet your requirements or that its
operation will be uninterrupted or error free. Neither McGraw-Hill Education nor its licensors shall be liable to you
or anyone else for any inaccuracy, error or omission, regardless of cause, in the work or for any damages resulting
therefrom. McGraw-Hill Education has no responsibility for the content of any information accessed through the
work. Under no circumstances shall McGraw-Hill Education and/or its licensors be liable for any indirect,
incidental, special, punitive, consequential or similar damages that result from the use of or inability to use the work,
even if any of them has been advised of the possibility of such damages. This limitation of liability shall apply to
any claim or cause whatsoever whether such claim or cause arises in contract, tort or otherwise.
Click Here For Unlimited Access
CONTENTS AT A GLANCE
1 Programming Arduino 2 Under the Hood
3 Interrupts and Timers 4 Making Arduino Faster
5 Low Power Arduino
6 Memory 7 Using I2C
8 Interfacing with 1-Wire Devices 9 Interfacing with SPI Devices
10 Serial UART Programming
11 USB Programming 12 Network Programming
13 Digital Signal Processing
14 Managing with One Process 15 Writing Libraries
A Parts Index
CONTENTS
Acknowledgments Introduction
1 Programming Arduino
What Is Arduino? Installation and the IDE
Installing the IDE Blink

A Tour of Arduino
Power Supply Power Connections
Analog Inputs Digital Connections
Arduino Boards
Uno and Similar Big Arduino Boards
Small Arduino Boards
LilyPad and LilyPad USB Boards Unofficial Arduinos
Programming Language Modifying the Blink Sketch
Variables
If Loops
Functions
Digital Inputs Digital Outputs
The Serial Monitor Arrays and Strings
Analog Inputs
Analog Outputs Using Libraries
Arduino Data Types Arduino Commands
Summary
2 Under the Hood A Brief History of Arduino
Anatomy of an Arduino
AVR Processors ATmega328
ATmega32u4 ATmega2560
AT91SAM3X8E
Arduino and Wiring From Sketch to Arduino
AVR Studio Installing a Bootloader
Burning a Bootloader with AVR Studio and a Programmer
Burning a Bootloader with the Arduino IDE and a Second Arduino
Summary
3 Interrupts and Timers Hardware Interrupts
Interrupt Pins Interrupt Modes
Enabling Internal Pull-Up
Interrupt Service Routines Volatile Variables
ISR Summary
Enabling and Disabling Interrupts Timer Interrupts
Summary 4 Making Arduino Faster
How Fast Is an Arduino?
Comparing Arduino Boards Speeding Up Arithmetic
Do You Really Need to Use a Float?
Lookup vs. Calculate Fast I/O
Basic Code Optimization Bytes and Bits
ATmega328 Ports
Very Fast Digital Output Fast Digital Input
Speeding Up Analog Inputs Summary
5 Low Power Arduino
Power Consumption of Arduino Boards Current and Batteries
Reducing the Clock Speed
Turning Things Off Sleeping
Narcoleptic Waking on External Interrupts
Use Digital Outputs to Control Power
Summary 6 Memory
Arduino Memory Minimizing RAM Usage
Use the Right Data Structures
Be Careful with Recursion
Store String Constants in Flash Memory
Common Misconceptions Measure Free Memory
Minimizing Flash Usage Use Constants
Remove Unwanted Trace
Bypass the Bootloader Static vs. Dynamic Memory Allocation
Strings
C char Arrays The Arduino String Object Library
Using EEPROM EEPROM Example
Using the avr/eeprom.h Library
EEPROM Limitations Using Flash
Using SD Card Storage
Summary 7 Using I2C
I2C Hardware The I2C Protocol
The Wire Library
Initializing I2C Master Sending Data
Master Receiving Data I2C Examples
TEA5767 FM Radio
Arduino-to-Arduino Communication LED Backpack Boards
DS1307 Real-Time Clock
Summary 8 Interfacing with 1-Wire Devices
1-Wire Hardware The 1-Wire Protocol
The OneWire Library
Initializing 1-Wire Scanning the Bus
Using the DS18B20 Summary
9 Interfacing with SPI Devices
Bit Manipulation

Binary and Hex
Masking Bits Shifting Bits
SPI Hardware The SPI Protocol
The SPI Library
SPI Example Summary
10 Serial UART Programming
Serial Hardware Serial Protocol
The Serial Commands The SoftwareSerial Library
Serial Examples
Computer to Arduino over USB Arduino to Arduino
GPS Module
Summary 11 USB Programming
Keyboard and Mouse Emulation Keyboard Emulation
Keyboard Emulation Example
Mouse Emulation Mouse Emulation Example
USB Host Programming USB Host Shield and Library
USB Host on the Arduino Due
Summary 12 Network Programming
Networking Hardware
Ethernet Shield Arduino Ethernet/EtherTen
Arduino and WiFi The Ethernet Library
Making a Connection
Setting Up a Web Server Making Requests
Ethernet Examples Physical Web Server
Using a JSON Web Service
The WiFi Library
Making a Connection
WiFi Specific Functions WiFi Example
Summary 13 Digital Signal Processing
Introducing Digital Signal Processing
Averaging Readings An Introduction to Filtering
Creating a Simple Low-Pass Filter
Arduino Uno DSP Arduino Due DSP
Filter Code Generation The Fourier Transform
Spectrum Analyzer Example
Frequency Measurement Example Summary
14 Managing with One Process
Making the Transition from Big Programming Why You Don’t Need Threads
Setup and Loop Sense Then Act
Pause Without Blocking
The Timer Library Summary
15 Writing Libraries When to Make a Library
Using Classes and Methods
Library Example (TEA5767 Radio) Define the API
Write the Header File
Write the Implementation File Write the Keywords File
Make the Examples Folder Testing the Library
Releasing the Library
Summary A Parts
Arduino Boards Shields
Components and Modules
Suppliers
Index
ACKNOWLEDGMENTS
Many thanks to all those at McGraw-Hill Education who have done such a great job
in producing this book. In particular, thanks to my editor Roger Stewart and to
Vastavikta Sharma, Jody McKenzie, LeeAnn Pickrell, and Claire Splan. I would also like to thank Adafruit, SparkFun, and CPC for supplying many of
the modules and components used in the preparation of this book.
And last but not least, thanks once again to Linda, for her patience and generosity in giving me space to do this.
INTRODUCTION
Arduino has become the standard microcontroller used by makers, artists, and
educators due to its ease of use, low cost, and plethora of interface boards (shields). Plug-in shields can be attached to the basic board, extending the Arduino into the
Internet, robotic, and home automation realms. Simple Arduino projects are easy to make. As soon as you start to stray into
territory not covered by the introductory texts, however, you’ll find that things can
rapidly become confusing and frustrating as complexity—the enemy of all programmers—rears its ugly head.
This book is designed as a companion and sequel to the very successful book Programming Arduino: Getting Started with Sketches. Although this book
includes a brief recap of basic Arduino Programming, it leads the reader through the
more advanced aspects of Arduino programming. Specifically, this book will help you with:
• Working effectively with minimal memory
• Doing more than one thing at a time, without the luxury of multithreading • Packaging your code in libraries for others to use
• Using hardware and timer interrupts • Maximizing performance
• Minimizing power consumption
• Interfacing with different types of serial busses (I2C, 1-Wire, SPI, and serial) • USB programming
• Network programming
• Digital Signal Processing (DSP)
Downloads
The book includes some 75 example sketches, which are all open source and available
on the author’s website at www.simonmonk.org. Follow the link to the pages for this book where you will be able to download the code as well as an up-to-date list of
errata for the book.
What Will I Need?
This book is primarily about software. So, for most of the examples, all you really need is an Arduino and an LED or multimeter. Having said that, if you do have other
Arduino shields, these will come in handy. You will also need an Ethernet or Wi-Fi
shield for Chapter 12. Throughout the book, several different types of module are used to illustrate different interfaces.
Although the book is mostly concerned with the Arduino Uno (the most
commonly used Arduino board), it also covers some of the special features of other Arduino boards like the Leonardo and Arduino Due for USB programming and
Digital Signal Processing. The Appendix at the end of this book lists possible suppliers for these parts.
Using This Book
Each of the chapters deals with a specific topic relating to Arduino programming.
Apart from Chapter 1, which is a recap and overview of Arduino basics, the remaining chapters can be accessed pretty much in any order you like.
If you are an experienced developer in other areas, then you might like to read Chapter 14 first to put Arduino programming into context.
Following is a description of each chapter:
1. “Programming Arduino” This chapter contains a summary of Arduino programming. It is a primer for those needing to get up to speed quickly with basic
Arduino. 2. “Under the Hood” In this chapter, we take a peek under the hood at how the Arduino
software works and where it came from.
3. “Interrupts and Timers” Novices often steer clear of using interrupts. They shouldn’t, however, as they can be handy on occasion and are not difficult to code for.
Although there are some pitfalls, this chapter tells you what you need to aware of.
4. “Making Arduino Faster” Arduinos have low-speed, low-power processors and sometimes you need to squeeze every ounce of juice out of them. For example, the
built-in digitalWrite function is safe and easy to use, but is not very efficient, especially when setting multiple outputs at the same time. In this chapter, you look at
ways to exceed this performance and learn about other techniques for writing time-
efficient sketches. 5. “Low Power Arduino” When you want to run your Arduino on batteries or solar,
then you need to look at minimizing power consumption. In addition to optimizing the
hardware design, you can also set up the code to reduce the Arduino’s energy use. 6. “Memory” In this chapter, we look at minimizing memory usage and the benefits
and dangers associated with using memory dynamically within your sketches.

7. “Using I2C” The Arduino’s I2C interface can greatly simplify talking to modules
and components, reducing the number of interface pins you need to use. This chapter describes how I2C works and how to use it.
8. “Interfacing with 1-Wire Devices” This chapter focuses on 1-wire bus devices such as Dallas Semiconductor’s range of temperature sensors, which are extremely popular
for use with the Arduino. You learn how the bus works and how to use it.
9. “Interfacing with SPI Devices” Yet another interface standard used with the Arduino is SPI. This chapter explores how it works and how to use it.
10. “Serial UART Programming” Serial communications, either through USB or the
Arduino’s Rx and Tx pins, provide a great way to exchange data between peripherals and other Arduinos. In this chapter, you learn how to use serial.
11. “USB Programming” This chapter looks at various aspects of using the Arduino with USB. You’ll learn about the keyboard and mouse emulation features provided by
the Arduino Leonardo and also the reverse process of allowing a USB keyboard or
mouse to be connected to a suitably equipped Arduino. 12. “Network Programming” The Arduino is a common component in the Internet of
Things. In this chapter, you’ll learn how to program the Arduino for the Internet.
Topics include Wi-Fi and Ethernet shields as well as using web services and the Arduino as a mini web server.
13. “Digital Signal Processing” The Arduino is capable of fairly rudimentary signal processing. This chapter discusses a variety of techniques, from filtering a signal from
an analog input using software rather than external electronics to calculating the
relative magnitude of various frequencies in a signal using the Fast Fourier Transform.
14. “Managing with One Process” Programmers coming to Arduino from a background of programming large systems often signal the lack of multithreading and concurrency
in Arduino as some kind of deficiency. In this chapter, I try to set the record straight
and show how to embrace the single-thread model of embedded systems. 15. “Writing Libraries” Sooner or later, you will make something really good that you
think other people could use. This is the time to wrap up the code in a library and
release it to the world. This chapter shows you how.
Resources
This book is supported by accompanying pages on the author’s website
(www.simonmonk.org). Follow the link for this book, and you will find all the source code, as well as other resources such as errata.
1
Programming Arduino
This chapter summarizes the basics of Arduino. If you are completely new to
Arduino, then you might find it useful to also read Programming Arduino: Getting
Started with Sketches (McGraw-Hill Professional, 2012).
What Is Arduino?
The term Arduino is used to describe both the physical Arduino board (of which the
most popular type is the Arduino Uno) and the Arduino system as a whole. The system also includes the software you need to run on your computer (to program the
board) and the peripheral shields that you can plug into an Arduino board.
To use an Arduino, you also need a “proper” computer. This can be a Mac, Windows PC, Linux PC, or even something as humble as a Raspberry Pi. The main
reason that you need the computer is so you can download programs onto the Arduino board. Once installed on the Arduino, these programs can then run independently.
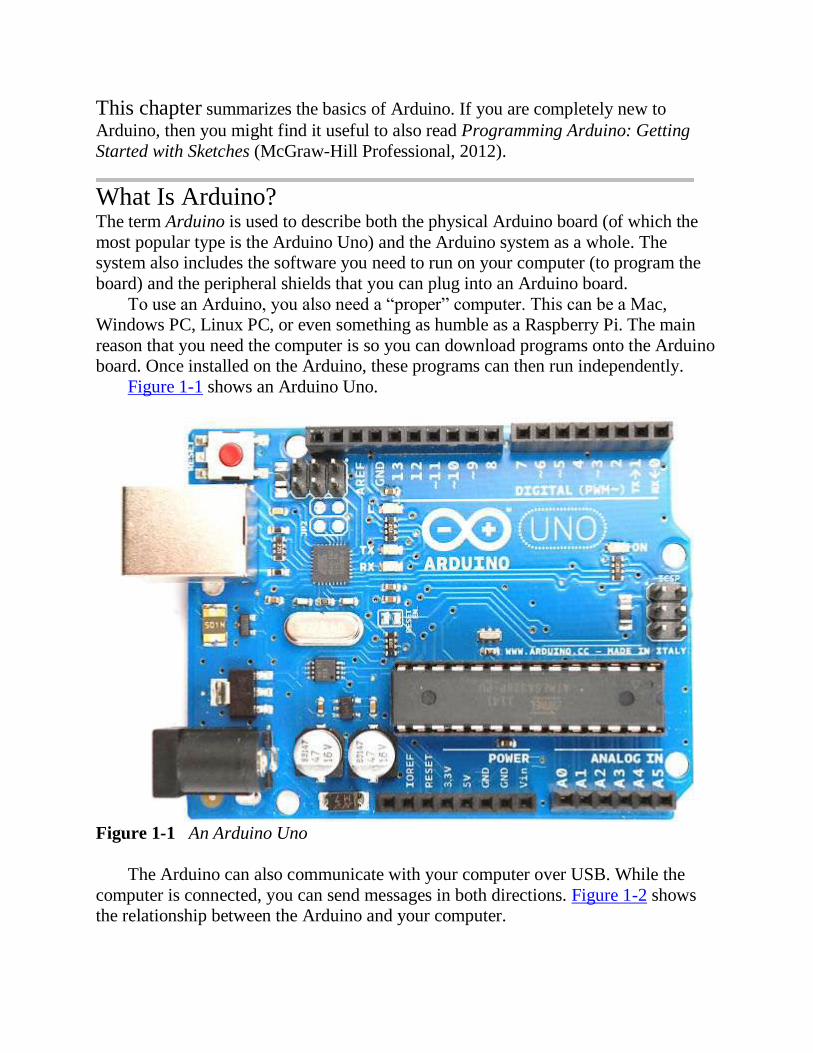
Figure 1-1 shows an Arduino Uno.
Figure 1-1 An Arduino Uno
The Arduino can also communicate with your computer over USB. While the
computer is connected, you can send messages in both directions. Figure 1-2 shows the relationship between the Arduino and your computer.

Figure 1-2 The Arduino and your computer
An Arduino is unlike a conventional computer in that it has hardly any memory,
no operating system, and no keyboard mouse or screen interface. Its purpose is to control things by interfacing with sensors and actuators. So, for instance, you might
attach a sensor to measure the temperature and a relay to control the power to a heater.
Figure 1-3 shows some of the things that you can attach to an Arduino board. There are no doubt many more types of devices that you can connect to an Arduino
board.
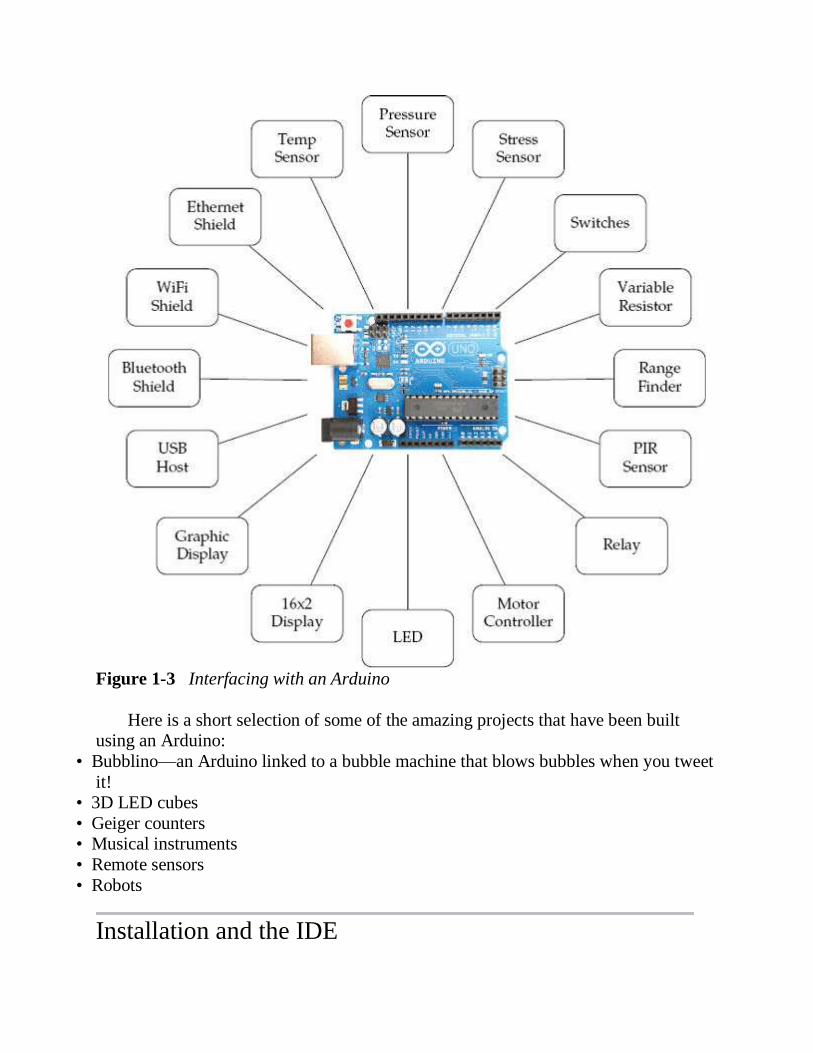
Figure 1-3 Interfacing with an Arduino
Here is a short selection of some of the amazing projects that have been built using an Arduino:
• Bubblino—an Arduino linked to a bubble machine that blows bubbles when you tweet
it! • 3D LED cubes
• Geiger counters • Musical instruments
• Remote sensors
• Robots
Installation and the IDE

The software that you use to program the Arduino is called the Arduino Integrated
Development Environment (IDE). If you are a software developer and accustomed to using complex IDEs like Eclipse or Visual Studio, you’ll find the Arduino IDE very
simple—and possibly find yourself wishing for repository integration, command completion, and the like. If you are relatively new to programming, you will love the
Arduino’s simplicity and ease of use.
Installing the IDE
The first step is to download the software for your type of computer from the official Arduino website:http://arduino.cc/en/Main/Software.
Once you’ve downloaded the software, then you can find detailed installation
instructions for each platform here: http://arduino.cc/en/Guide/HomePage. One of the nice things about the Arduino is that all you need to get started is an
Arduino, a computer, and a USB lead to connect the two. The Arduino can even be powered over the USB connection to the computer.
Blink
To prove that the Arduino is working, we are going to program it to flash an LED that
is labeled L on the Arduino board and hence is known as the “L” LED. Start by launching the Arduino IDE on your computer. Then, from the File menu,
(Figure 1-4) select Examples | 01 Basics | Blink.
Figure 1-4 The Arduino IDE loading Blink
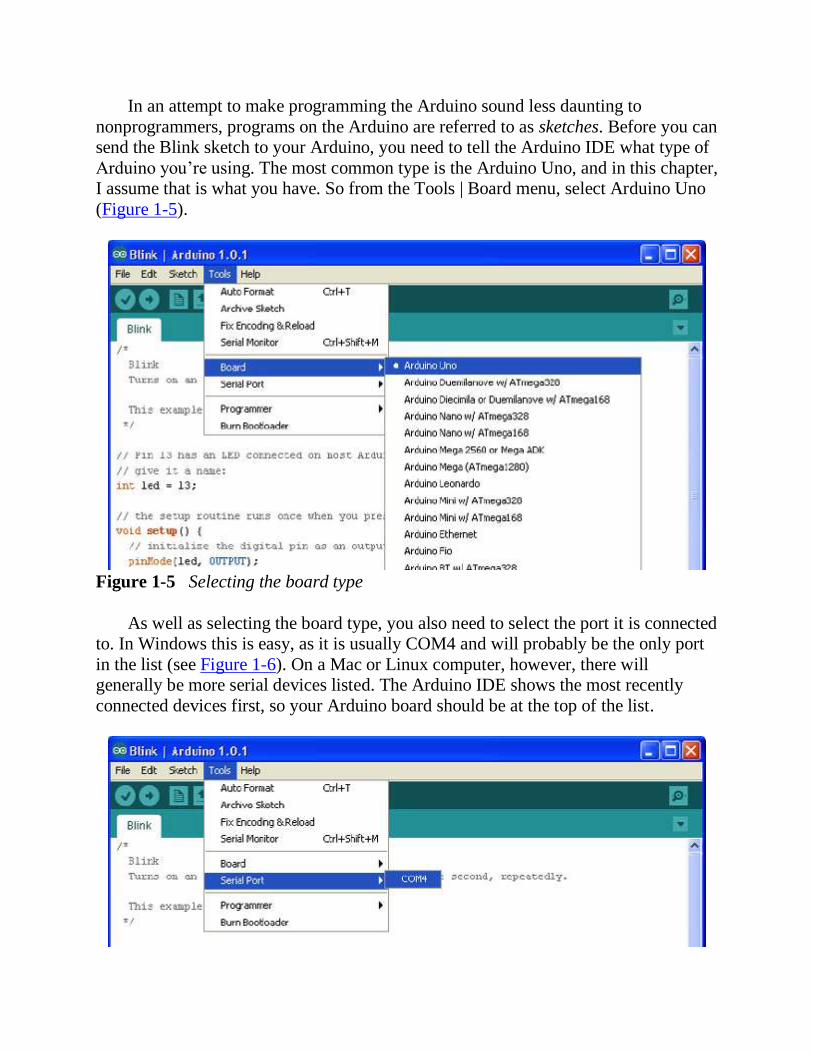
In an attempt to make programming the Arduino sound less daunting to
nonprogrammers, programs on the Arduino are referred to as sketches. Before you can send the Blink sketch to your Arduino, you need to tell the Arduino IDE what type of
Arduino you’re using. The most common type is the Arduino Uno, and in this chapter, I assume that is what you have. So from the Tools | Board menu, select Arduino Uno
(Figure 1-5).
Figure 1-5 Selecting the board type
As well as selecting the board type, you also need to select the port it is connected to. In Windows this is easy, as it is usually COM4 and will probably be the only port
in the list (see Figure 1-6). On a Mac or Linux computer, however, there will generally be more serial devices listed. The Arduino IDE shows the most recently
connected devices first, so your Arduino board should be at the top of the list.

Figure 1-6 Selecting the serial port
To actually upload the sketch onto the Arduino board, click the Upload button on
the toolbar. This is the second button on the toolbar, which is highlighted in Figure 1-7.
Figure 1-7 Uploading the Blink sketch
Once, you click the Upload button, a few things should happen. First, a progress
bar will appear as the Arduino IDE compiles the sketch (meaning it converts the
sketch into a suitable form for uploading). Then, the LEDs on the Arduino labeled Rx and Tx should flicker for a while. Finally, the LED labeled L should start to
blink. The Arduino IDE will also display a message like “Binary sketch size: 1,084

bytes (of a 32,256 byte maximum).” This means the sketch has used about 1kB of the
32kB of the flash memory available for programs on the Arduino. Before you start programming, let’s have a look at the hardware that your
programs, or sketches, will have to work within and have available for their use.
A Tour of Arduino
Figure 1-8 shows the anatomy of an Arduino Board. Starting at the top, next to the
USB socket in the top-left corner, is the Reset switch. Clicking this sends a logic pulse
to the microcontroller’s Reset pin, clearing the microcontroller’s memory so it can start its program fresh. Note that any program stored on the device is retained because
it is kept in nonvolatile flash memory—that is, memory that remembers even when the device is not powered on.
Figure 1-8 Anatomy of an Arduino board
Power Supply

The Arduino can either be powered through either the USB connection or the DC
power socket below it. When powering the Arduino from a DC adaptor or batteries, anything between 7.5 and 12V DC can be supplied through the power socket. The
Arduino itself only uses about 50mA. So a small PP3 9V battery (200mAh) will power it for around 40 hours.
When the Arduino is powered on, the power LED on the right of the Uno (on the
left of the Leonardo) is lit.
Power Connections
Next, let’s look at the connectors at the bottom of Figure 1-8. Apart from the first
connection, you can read the connection names next to the connectors.
The first unlabeled connection is reserved for later use. The next pin, IOREF, indicates the voltage at which the Arduino operates. Both the Uno and Leonardo
operate at 5V, so this pin will always be set at 5V, but you will not use it for anything described in this book. Its purpose is to allow shields attached to 3V Arduinos like the
Arduino Due to detect the voltage at which the Arduino operates.
The next connect is Reset. This connection does the same thing as pressing the Reset switch on the Arduino. Rather like rebooting a PC, it resets the microcontroller
to begin its program from the start. The Reset connector allows you to reset the
microcontroller by momentarily setting this pin low (connecting it to GND). It is fairly unlikely that you’ll need to do this, but it’s quite nice to know that the connector
is there. The remaining pins provide different voltages (3.3, 5, GND, and 9), as
labeled. GND, or ground, just means zero volts. It is the reference voltage to which all
other voltages on the board are relative. The two GND connections are identical; having more than one GND pin to
connect things to is useful. In fact, there is another GND socket at the top of the board.
Analog Inputs
The next section of connections is labeled Analog In 0 to 5. These six pins can be
used to measure the voltage connected to them so the value can be used in a sketch. Although labeled as analog inputs, these connections can also be used as digital inputs
or outputs. By default, however, they are analog inputs.
Digital Connections
Now let’s switch to the top connector, starting on the right side (Figure 1-8). We have pins labeled Digital 0 to 13. These can be used as either inputs or outputs. When using
them as outputs, you can control them from a sketch. If you turn them on from your sketch, they will be at 5V, and if you turn them off, they will be at 0V. As with the
supply connectors, you have to be careful not to exceed their maximum current
capabilities. These connections can supply 40mA at 5V—more than enough power to light a
standard LED, but not enough to drive an electric motor directly.
Arduino Boards
The Arduino Uno (Figure 1-1) is the current incarnation of the original Arduino board. It is the most common Arduino board and is generally what people mean when
they say they are using an Arduino.
The other types of Arduino board all satisfy special requirements, like the need for more I/O (input/output) connections, faster performance, or a smaller board, or to
be stitched into clothing, connect to Android phones, or integrate easily with wireless
and so on. No matter how different the hardware, each board is programmed from the
Arduino IDE, with only minor variations in the software features they can use. Once you have learned how to use one Arduino Board, you have pretty much learned how
to use all of them.
Let’s look at the current range of official Arduino boards. There are other Arduinos than the ones discussed here, but they tend not to be that popular. For a full
list of boards, check out the official Arduino website (www.arduino.cc).
Uno and Similar
The Uno R3 is the latest of a series of “standard” boards that include the plain Uno, Duemilanove, Diecimila, and NG. These boards all use the ATmega168 or
ATmega328 microprocessors, which are pretty much the same, apart from differing amounts of memory.
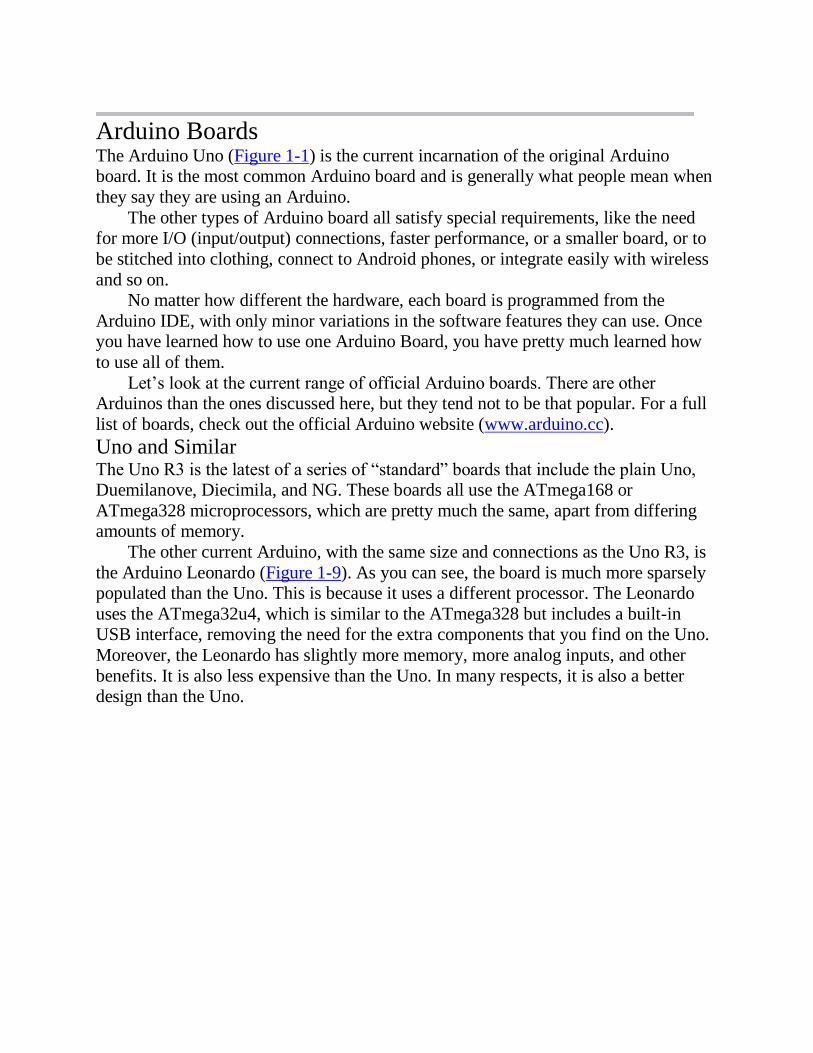
The other current Arduino, with the same size and connections as the Uno R3, is
the Arduino Leonardo (Figure 1-9). As you can see, the board is much more sparsely populated than the Uno. This is because it uses a different processor. The Leonardo
uses the ATmega32u4, which is similar to the ATmega328 but includes a built-in USB interface, removing the need for the extra components that you find on the Uno.
Moreover, the Leonardo has slightly more memory, more analog inputs, and other
benefits. It is also less expensive than the Uno. In many respects, it is also a better design than the Uno.

Figure 1-9 The Arduino Leonardo
If this is the case, then you might be wondering why the Leonardo is not the most
popular Arduino board, rather than the Uno. The reason is that the improvements offered by the Leonardo come at the cost of making it slightly incompatible with the
Uno and its predecessors. Some expansion shields (especially old designs) will not
work on the Leonardo. In time, these differences will become less of a problem. At that point, it will be interesting to see if the Leonardo and its successors become the
more popular boards.
The Arduino Ethernet is a relatively new addition to the Arduino stable. It combines basic Uno features with an Ethernet interface, allowing you to connect it to
a network, without having to add an Ethernet shield.
Big Arduino Boards
Sometimes an Uno or Leonardo just doesn’t have enough I/O pins for the application
that you intend to use it for. The choice then arises of either using hardware expansion
for the Uno or switching to a bigger board. TIP If you are coming to Arduino for the first time, do not buy one of these larger
boards. It is tempting because they are bigger and faster, but they have shield
compatibility problems and you will be much better off with a “standard” Uno. The super-sized Arduinos have the same sockets as an Uno, but then they add a
double row of extra I/O pins on the end and a longer length of pins along the side (Figure 1-10).

Figure 1-10 The Arduino Due
Traditionally, the “bigger” board would be an Arduino Mega 2560. These boards, in common with all the larger Arduino boards, have more of every kind of memory.
The Mega 2560 and Mega ADK both use processors with similar power to the
Arduino Uno. However, the Arduino Due is an altogether more powerful beast. This power comes in the form of a 84 MHz processor (compared with the Uno’s 16 MHz)
but at the cost of further compatibility problems. The biggest of these is that the Due operates at 3.3V rather than the 5Vs of most previous Arduinos. Not surprisingly, this
means that many Arduino shields are incompatible with it.
For the most demanding projects, however, this board has many advantages. • Lots of memory for programming and data
• Hardware music output capabilities (hardware digital to analog converters)
• Four serial ports • Two USB ports
• USB host and OTG interfaces • USB keyboard and mouse emulation
Small Arduino Boards
Just as the Uno is too small for some projects, it can also be too big for others.
Although Arduino boards are low cost, it gets expensive if you start leaving one embedded in every project you make. There are a range of smaller and “pro” Arduino
boards, designed either to be physically smaller than a regular Uno or to keep costs down by omitting features not required in most projects.
Figure 1-11 shows an Arduino Mini. These boards do not have a USB interface;
rather, you need a separate adaptor module to program them. As well as the Mini, there are also Nanos and Micros, both of which have built-in USB but cost more.

Figure 1-11 An Arduino Mini and Programmer
LilyPad and LilyPad USB Boards
One of the most interesting Arduino styles is the LilyPad (Figure 1-12) and the newer LilyPad USB. These boards are designed to be stitched into clothing using conductive
threads and a range of similar LilyPad modules—for LEDs, switches, accelerometers,
and so on. The older LilyPad boards require a separate USB interface, the same one required for the Arduino Mini. However, these boards are gradually being replaced by
the Arduino LilyPad USB, which has a built-in USB connector.
End of this sample Kindle book.
Enjoyed the preview?
Click Here For Unlimited Access