programmer defined classes and objects - 0.tqn.com · chapter 3 programmer defined classes and...
TRANSCRIPT

Programmer defined classes and objects (31 May 2006, all rights reserved) Chapter 3, Page 1
Chapter 3 Programmer
defined classes and
objects
Main concepts
– Keeping user interface and application objects separate: separation of concerns
– Mimicking RAD user interface objects in programmer defined application classes
– Steps in using a programmer defined object:
– define the class,
– allocate a name (reference),
– instantiate the object,
– assign it to the name.
– Inheritance: deriving a new class from an existing one
– Packaging a class in a unit
– The Code Explorer and Project Browser
– Layout of objects in memory
Chapter contents
Introduction . . . . . . . . . . . . . . . . . . . . . . . . . . . . . . . . . . . . . . . . . . . . . . . . . . . . . . . . . . . . . . . . . . . . . 2
Creating a simple non-visual class . . . . . . . . . . . . . . . . . . . . . . . . . . . . . . . . . . . . . . . . . . . . . . . . . . 3
Example 3.1 A non-OO program . . . . . . . . . . . . . . . . . . . . . . . . . . . . . . . . . . . . . . . . . . . . . . . . . . . 4

Chapter 3, Page 2 Object orientation with Delphi (all rights reserved)
Ex 3.1 step 1 Using a ‘global’ variable . . . . . . . . . . . . . . . . . . . . . . . . . . . . . . . . . . . . . . . . . . . . 4
Ex 3.1 step 2 A combined user interface / application object . . . . . . . . . . . . . . . . . . . . . . . . . 6
Example 3.2 An application object . . . . . . . . . . . . . . . . . . . . . . . . . . . . . . . . . . . . . . . . . . . . . . . . . 6
Ex 3.2 step 1 Defining the TItem class . . . . . . . . . . . . . . . . . . . . . . . . . . . . . . . . . . . . . . . . . . . . 7
Ex 3.2 step 2 Declaring a reference and creating an object . . . . . . . . . . . . . . . . . . . . . . . . . 10
Ex 3.2 step 3 UML Diagrams . . . . . . . . . . . . . . . . . . . . . . . . . . . . . . . . . . . . . . . . . . . . . . . . . . . 12
Ex 3.2 step 4 Benefits of encapsulation . . . . . . . . . . . . . . . . . . . . . . . . . . . . . . . . . . . . . . . . . . 13
Ex 3.2 step 5 The Code Explorer . . . . . . . . . . . . . . . . . . . . . . . . . . . . . . . . . . . . . . . . . . . . . . . . 14
Example 3.3 Subclassing and inheritance . . . . . . . . . . . . . . . . . . . . . . . . . . . . . . . . . . . . . . . . . . 15
Ex 3.3 step 1 Subclassing TItem . . . . . . . . . . . . . . . . . . . . . . . . . . . . . . . . . . . . . . . . . . . . . . . . 16
Ex 3.3 step 2 Using the new (sub)class . . . . . . . . . . . . . . . . . . . . . . . . . . . . . . . . . . . . . . . . . . 18
Navigating through the Code Explorer . . . . . . . . . . . . . . . . . . . . . . . . . . . . . . . . . . . . . . . . . . . . . 19
The Project Browser . . . . . . . . . . . . . . . . . . . . . . . . . . . . . . . . . . . . . . . . . . . . . . . . . . . . . . . . . . . . . 19
Example 3.4 Overloaded methods & protected visibility . . . . . . . . . . . . . . . . . . . . . . . . . . . . . 20
Memory layout for classes and for objects . . . . . . . . . . . . . . . . . . . . . . . . . . . . . . . . . . . . . . . . . . 23
Chapter summary . . . . . . . . . . . . . . . . . . . . . . . . . . . . . . . . . . . . . . . . . . . . . . . . . . . . . . . . . . . . . . . 26
Problems . . . . . . . . . . . . . . . . . . . . . . . . . . . . . . . . . . . . . . . . . . . . . . . . . . . . . . . . . . . . . . . . . . . . . . . 26
Introduction
One way to make a computer program more robust and more amenable to change is to
build it in layers. One might have a user interface layer that takes care of the interaction
between the user and the program, an application layer that implements the operations
required by the application, and a persistence layer that takes care of permanent storage of
the data. This approach is sometimes called ‘The Three Layer’ model and is one
implementation of a principle called the ‘Separation of Concerns’ principle.
Delphi’s GUI generator addresses the user interface layer very effectively. But what
about the application layer? To begin we look at defining and instantiating our own classes
to provide application logic. While it is possible to add application logic to the RAD
generated user interface objects, it is good programming practice instead to separate the
user interface from the application and it is from this perspective that we will develop our
own classes.

Programmer defined classes and objects (31 May 2006, all rights reserved) Chapter 3, Page 3
Figure 1 User interface for counting items
Figure 2 Components on the
user interface
Creating a simple non-visual class
When we create a new form in Delphi, we reuse a number of existing classes, such as a
TForm, TButton and TLabel, and combine them to create a single, new, visual user interface
class. Our early programs consist of single form objects and the entire program operation
occurs within these self-contained objects. However, an object oriented program is a system
of cooperating objects, and we soon move on to programs with several form objects. Each of
these has a separate user interface object that communicates and cooperates with other user
interface objects in the program.
But a realistic program does not consist only of user interface objects. It also contains
application objects and these are the focus for this chapter. Application objects are
programmer generated since the RAD support for generating user interface objects is not
possible in the same way for application objects.
To establish a context for programming an application object, we’ll use the example of a
conveyor belt that moves items in a warehouse from storage to a despatch area. To keep
track of the number of items, an ‘Add Item’ button is clicked as each item goes past on the
conveyor belt. A supervisor displays the total number of items by clicking and holding
down a Display button. When the button is released, the display is cleared. At the end of
each shift, the total is reset to zero.
The user interface appears in figure 1 and the Object Tree View, which is available in Delphi
6 and 7 and shows the components on the form, appears in figure 2. (Delphi 8 has the Model
View, which is a bit more sophisticated.) We’ll develop the program in stages to help clarify
some of the important characteristics of OO programming. First we’ll create a non-OO
program, where we use a simple variable to keep track of the number of items. Then we’ll

Chapter 3, Page 4 Object orientation with Delphi (all rights reserved)
make the item count part of the form, which leads to a combined user interface / application
object. Finally, we’ll create an application object separate from the user interface object.
Example 3.1 A non-OO program
Start a new application. On the basis of the Object TreeView (figure 2) add components to
the form either from the Component / Tool palette or, in Delphi 4 to Delphi 7, by using the
menu sequence View | Component List. To make our programs more readable we’ll use a
three letter prefix for each component type as listed in Appendix 1. Thus a form will be
called frm..., a button btn..., a label lbl... and so on.
Ex 3.1 step 1 Using a ‘global’ variable
Our first version uses an integer declared in the implementation section of the unit to keep
track of the number of items (lines 26–27 below). As part of the form type declaration we
have a private data field called Count that has been commented out through curly brackets
(line 20). We’ll use this as an alternative in the next step.
The Button btnAddItem has an OnClick event handler (lines 14, 28–31), button
btnDisplay has an OnMouseDown (lines 15–16, 32–36) and an OnMouseUp event handler
(lines 17–18, 37–41) and BitBtn bmbReset has an OnClick event handler (lines 13, 42–45).
1 unit GlobalU;
2 interface
3 uses4 Windows, Messages, SysUtils, Variants, Classes, Graphics, Controls,5 Forms, Dialogs, StdCtrls, Buttons;
6 type7 TfrmCount = class(TForm)8 gpbItems: TGroupBox;9 lblTotal: TLabel;
10 bmbReset: TBitBtn;11 btnAddItem: TButton;12 btnDisplay: TButton;13 procedure bmbResetClick(Sender: TObject);14 procedure btnAddItemClick(Sender: TObject);15 procedure btnDisplayMouseDown(Sender: TObject;16 Button: TMouseButton; Shift: TShiftState; X, Y: Integer);17 procedure btnDisplayMouseUp(Sender: TObject;18 Button: TMouseButton; Shift: TShiftState; X, Y: Integer);19 private20 {Count: integer; // for step 2}21 end; // end TfrmCount = class(TForm)

In Delphi a unit level variable is effectively a class variable. If several objects are created from a1
class with a unit level variable, the same unit level variable is available to all the objects. Each
object shares the unit level variable: individual objects do not each have their own variable
corresponding to the unit level variable.
Programmer defined classes and objects (31 May 2006, all rights reserved) Chapter 3, Page 5
22 var23 frmCount: TfrmCount;
24 implementation
25 {$R *.dfm}
26 var27 Count: integer = 0;
28 procedure TfrmCount.btnAddItemClick(Sender: TObject);29 begin30 Inc (Count);31 end; // end procedure TfrmCount.btnAddItemClick
32 procedure TfrmCount.btnDisplayMouseDown(Sender: TObject;33 Button: TMouseButton; Shift: TShiftState; X, Y: Integer);34 begin35 lblTotal.Caption := IntToStr (Count);36 end; // end procedure TfrmCount.btnDisplayMouseDown
37 procedure TfrmCount.btnDisplayMouseUp(Sender: TObject;38 Button: TMouseButton; Shift: TShiftState; X, Y: Integer);39 begin40 lblTotal.Caption := '';41 end; // end procedure TfrmCount.btnDisplayMouseUp
42 procedure TfrmCount.bmbResetClick(Sender: TObject);43 begin44 Count := 0;45 end; // end procedure TfrmCount.bmbResetClick
46 end. // end unit GlobalU
This is a simple program that works. However it has a potential problem. Because three
different procedures, the event handlers btnItemsClick, btnDisplayMouseDown and
bmbResetClick all refer to the value of Count, Count must be a unit level variable (line
26–27). Giving variables unit level scope is generally not a good idea, and is usually best
avoided . So in the next step we’ll make this variable part of the user interface object.1
Before moving on to the next step, notice that we use the expression Inc (Count) and not
Count := Count + 1 in line 30. Either works, but Inc (Count) generates optimised code and so
is slightly faster and is particularly useful in loops.

Chapter 3, Page 6 Object orientation with Delphi (all rights reserved)
Ex 3.1 step 2 A combined user interface / application
object
To do away with the unit level variable in step 1, comment out the unit level declaration
(lines 26–27 above) and uncomment the form’s private data field (line 20). All references to
Count in the event handlers will now refer to a private data field of the form and not to a unit
level variable. Run the program and test it. To the user it works as before, but instead of the
unit level variable the program now uses a private data field of the object.
This change is an improvement, but we still have a problem. We have now modified the
RAD user interface class to include application data. So the user interface must know how to
increment the count (line 30), access it (line 35) and reset it (line 44): the user interface must
have knowledge of the details of how the application works. The principle of the separation
of concerns means that a user interface should not know how the application works, but only
know how to communicate with application objects in response to user input.
This change is a step in the right direction but mixing up the user interface and the
application will make reuse or future change difficult. (For example, if for some unexpected
reason Count in line 20 is changed to a double instead of an integer, lines 30 & 35 will both
cause compilation errors.) It would be better to encapsulate application data and the
operations carried out on that data separately from the user interface.
As a brief aside on programming style, we explicitly initialised the unit level variable
(step 1, line 27). Delphi initialises all object data when an object is created, and so we do not
need to initialise the private data field (line 20).
Example 3.2 An application object
If we review our experience with RAD objects (eg example 1.3 step 7) we see that three steps
are needed before we have an object we can use:
1. Define the class. We stipulate the required data and methods (the class’s ‘signature’) and
define the implementation of the methods. The class definition provides a set of
instructions for instantiating an object.
2. Declare a name to use as a reference to access the object. This sets aside memory on the
stack for a reference to the object.
3. Create the object. This allocates and initialises memory for the object on the heap, and
assigns the address of the object to the reference.
Adapting these steps to create our own classes and objects is the focus of this example.
Programmer defined classes and objects (31 May 2006, all rights reserved) Chapter 3, Page 7
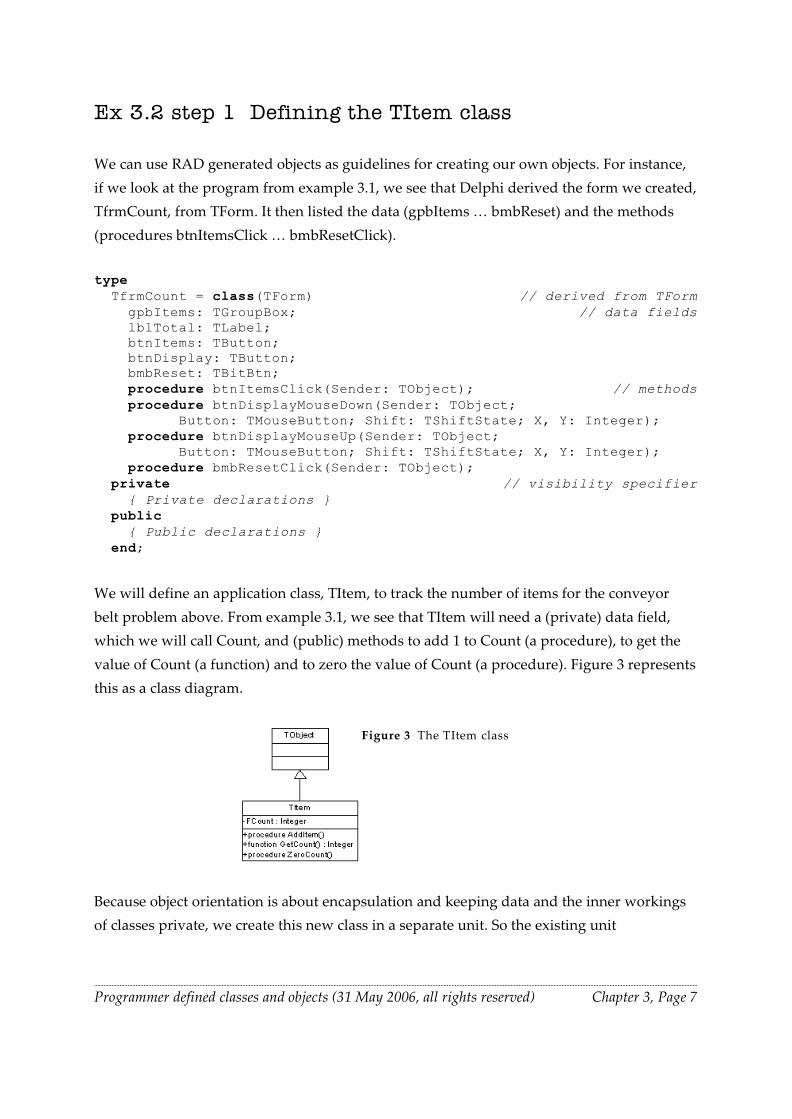
Figure 3 The TItem class
Ex 3.2 step 1 Defining the TItem class
We can use RAD generated objects as guidelines for creating our own objects. For instance,
if we look at the program from example 3.1, we see that Delphi derived the form we created,
TfrmCount, from TForm. It then listed the data (gpbItems … bmbReset) and the methods
(procedures btnItemsClick … bmbResetClick).
type TfrmCount = class(TForm) // derived from TForm gpbItems: TGroupBox; // data fields lblTotal: TLabel; btnItems: TButton; btnDisplay: TButton; bmbReset: TBitBtn; procedure btnItemsClick(Sender: TObject); // methods procedure btnDisplayMouseDown(Sender: TObject; Button: TMouseButton; Shift: TShiftState; X, Y: Integer); procedure btnDisplayMouseUp(Sender: TObject; Button: TMouseButton; Shift: TShiftState; X, Y: Integer); procedure bmbResetClick(Sender: TObject); private // visibility specifier { Private declarations } public { Public declarations } end;
We will define an application class, TItem, to track the number of items for the conveyor
belt problem above. From example 3.1, we see that TItem will need a (private) data field,
which we will call Count, and (public) methods to add 1 to Count (a procedure), to get the
value of Count (a function) and to zero the value of Count (a procedure). Figure 3 represents
this as a class diagram.
Because object orientation is about encapsulation and keeping data and the inner workings
of classes private, we create this new class in a separate unit. So the existing unit

The sequence for adding a unit varies slightly between different versions of Delphi. D8 ?? **2
Chapter 3, Page 8 Object orientation with Delphi (all rights reserved)
accompanying frmCount will contain the user interface and will communicate with the
separate unit containing the object that is keeping count of the items.
Open the project file from example 3.1. Save the unit file as OODriverU. Save the project
file as OODriverP.
We need a second unit (without a form) for the TItem class definition. Select File | New |
Unit from the menu . This unit has no accompanying form and Delphi provides only the2
unit name and the skeleton for the interface and implementation sections:
unit Unit2;
interface
implementation
end.
With RAD classes Delphi generates the class definition and the skeleton for each method.
When creating our own classes we can do this manually. We add TItem’s class declaration
to the interface section and its three methods (AddItem, GetCount and ZeroCount) to the
implementation section. We save it as ItemU .pas
1 unit ItemU ;
2 interface
3 type4 TItem = class(TObject) // derived from TObject5 private6 FCount: integer; // data is usually private7 public8 procedure AddItem; // Public access methods9 function GetCount: integer;
10 procedure ZeroCount;11 end; // end TItem = class(TObject)
12 implementation
13 { TItem }
14 procedure TItem.AddItem;15 begin16 Inc (FCount);17 end; // end procedure TItem.AddItem

Programmer defined classes and objects (31 May 2006, all rights reserved) Chapter 3, Page 9
18 function TItem.GetCount: integer;19 begin20 Result := FCount;21 end; // end function TItem.GetCount
22 procedure TItem.ZeroCount;23 begin24 FCount := 0;25 end; // end procedure TItem.ZeroCount
26 end. // end unit ItemU
The type declaration (lines 3–11) is much like Delphi’s automatic form declaration. Line 4
states that we are defining a new class, TItem, which is derived from TObject, Delphi’s base
class. TItem objects will have one data field, FCount of type integer (line 6), which we are
making private to this unit (line 5).
TItem has three methods, all of which are public (line 7) and so are available to other
units in this project. These public methods provide a means for other objects to interact with
the private data field and so they are called access methods. Line 8 states that TItem has a
procedure type method called AddItem that has no parameters. Line 9 declares a function
type method, GetCount, that has no incoming parameters and that supplies an integer
value. (An access method of this form is sometimes called a Getter method.) Line 10 declares
another procedure type method, ZeroCount, that has no incoming parameters.
The methods themselves are defined in the implementation section (lines 12–26). Because
procedure AddItem is one of TItem’s methods, and so is part of TItem, we use dot notation
to include the TItem relationship in the procedure header (line 14). Line 16 increases the
value of the (private) FCount variable declared in line 6 by one.
The ZeroCount method, lines 22–25, is similar. It has no incoming parameters and sets
the value of FCount to 0. Note that FCount is not declared as a local variable in either
function. It is declared as part of class TItem in line 6 and both methods manipulate this
value. However, because FCount is declared as private (lines 5–6), other units do not have
access to FCount.
The remaining method, function GetCount, returns the value of FCount through the
(automatic) Result variable (line 20). The only way an outsider can manipulate the value of
FCount is through the two public methods AddItems and ZeroCount. The only way an
outsider can access this value is through public method GetCount.
Notice that we changed the name Count to FCount. By a Delphi convention, a class’s data
fields are preceded by F… to provide a quick visual clue that they are local data fields, and
to distinguish them from properties, which do not have the preceding F. We’ll see more of
this in chapter 4 where we introduce properties and look at the relationship between a
property and a local data field.

Chapter 3, Page 10 Object orientation with Delphi (all rights reserved)
In summary, our data, FCount, is now private and encapsulated (lines 5&6). The only
way any other unit can access this data is through the public access methods AddItem,
GetCount and ZeroCount (lines 7–11), which define strictly what operations may be carried
out on the private data.
To reinforce that we now have two separate units in the project, view the uses clause in the
project file (menu sequence View | Units | OODriverP). We see that only one form is
created since unit ItemU .pas does not have an accompanying form.
program OODriverP;
uses Forms, OODriverU in 'OODriverU.pas' {frmCount}, ItemU in 'ItemU .pas';
{$R *.res}
begin Application.Initialize; Application.CreateForm(TfrmCount, frmCount); Application.Run;end.
Ex 3.2 step 2 Declaring a reference and creating an
object
As we mentioned in the introduction to example 3.2, the second step in using an object is to
create a name, or reference, for each object we need in the unit that will use these objects (ie
in unit OODriverU, not in unit ItemU ). The third step is to create the object so that we can
use it. We do both these steps here.
In OODriverU.pas, the unit associated with the form, we’ll instantiate an object of class
TItem and then manipulate this object from event handlers attached to the buttons. To do
this, first select the OODriverU tab in the edit window to display unit OODriverU.pas. We
need to:
– Add a reference to the other unit (lines 25–26 below) because this unit uses a class (TItem)
that is defined in unit ItemU . We can either type this reference in directly or have Delphi
enter it through the menu sequence File | Use Unit.
– Declare a reference to the object we are going to create (ItemCount, lines 27–28).
– Create the object in the OODriverU’s initialization section (lines 47–48). When we use
components, Delphi creates the objects automatically. However, if we define a class

Programmer defined classes and objects (31 May 2006, all rights reserved) Chapter 3, Page 11
ourselves, like TItem, we must ourselves create an object of this class before we can use it.
Here it is convenient to create this object (ItemCount) in the initialization section so that
it exists by the time the form appears. To do this we use the Create constructor method
that TItem inherits from TObject (line 48). (We’ll write our own constructor in chap 5.)
– Use the object in the OnClick event handlers through calls to its methods. Depending on
the operation we need we call either the AddItem method (line 31) or the ZeroCount
method (line 45). We use the GetCount method, which supplies an integer, to build the
label’s Caption (line 36).
23 implementation
24 {$R *.dfm}
25 uses26 ItemU ;
27 var28 ItemCount: TItem;
29 procedure TfrmCount.btnItemsClick(Sender: TObject);30 begin31 ItemCount.AddItem;32 end; // end procedure TfrmCount.btnItemsClick
33 procedure TfrmCount.btnDisplayMouseDown(Sender: TObject;34 Button: TMouseButton; Shift: TShiftState; X, Y: Integer);35 begin 36 lblTotal.Caption := IntToStr(ItemCount.GetCount);37 end; // end procedure TfrmCount.btnDisplayMouseDown
38 procedure TfrmCount.btnDisplayMouseUp(Sender: TObject;39 Button: TMouseButton; Shift: TShiftState; X, Y: Integer);40 begin41 lblTotal.Caption := '';42 end; // end procedure TfrmCount.btnDisplayMouseUp
43 procedure TfrmCount.bmbResetClick(Sender: TObject);44 begin45 ItemCount.ZeroCount;46 end; // end procedure TfrmCount.bmResetClick
47 initialization48 ItemCount := TItem.Create;
49 end. // end unit OODriverU
The constructor TItem.Create, called in line 48, sets aside the memory to hold the object,
initialises the object’s data fields, and returns the address of the object just created. So we
typically create the object and assign the return value to the name we have already declared

Chapter 3, Page 12 Object orientation with Delphi (all rights reserved)
Figure 4 TItem and TfrmCount
class diagram
(the reference) in a single program step. This creates both the object and the link between
the object name and the object itself:
ItemCount := TItem.Create;
Notice that we create (instantiate) an object from a class. So when creating an object we
call the class’s Create method (TItem.Create, line 48) and assign that to the object name
declared in the variable declaration (line 28). When using an object, once it has been created,
the method calls are to that object (ItemCount.AddItem in line 31, ItemCount.GetCount in
line 36 and ItemCount.ZeroCount in line 45, and not TItem.AddItem etc).
Save all the code from example 3.2 as we’ll elaborate further on it in exs 3.3 and 3.4. Run
and test this program.
If you want to trace what is happening in this program, return to the editor and place
breakpoints in the bodies of the OnClick event handlers (lines 31, 36 and 45 in
OODriverU.pas). (To place a breakpoint, place the cursor on the specific line in the editor
and then press <F5>.) Run the program again. Click on the different buttons, step through
the program line by line by using <F7> and notice how execution moves between units.
Resume normal operation through <F9>. (<F5> is a toggle command and will also remove a
breakpoint.)
Ex 3.2 step 3 UML Diagrams
The class diagram for this project has two classes (figure 4):
A sequence diagram involves simple interactions between the user and these two classes
(figure 5). Since these interactions are message flows, not data flows, we do not show the
return data.

Programmer defined classes and objects (31 May 2006, all rights reserved) Chapter 3, Page 13
Figure 5 Interaction between the user, frmCount and
ItemCount
Ex 3.2 step 4 Benefits of encapsulation
This example illustrates that an object can store and manipulate data. If the data in the object
is declared as private, as it is here, the only operations on the data that are possible are those made
available through the public methods. So in OODriverU we can no longer use a statement like
Inc(FCount) that we had in example 3.1 since it will give a fatal ‘undeclared identifier’ error
for FCount.
procedure TfrmCount.btnAddItemsClick(Sender: TObject);begin Inc(ItemCount.FCount); // Fatal, unknown identifier errorend; // end procedure TfrmCount.btnItemsClick
To achieve encapsulation, we declare the data in a class to be private. If we make the data
public, it can be accessed from outside the object and the statement above will work, which
completely negates the benefits of encapsulation.
TItem = class(TObject) public FCount: integer; // WRONG! public data, so lose encapsulation procedure AddItem; function GetCount: integer; procedure ZeroCount; end; // end TItem = class(TObject)

Chapter 3, Page 14 Object orientation with Delphi (all rights reserved)
Figure 6 The Code Explorer and Code Editor in Delphi 7
Instead of the statement Inc(ItemCount.FCount) we send the AddItem message to the
ItemCount object (line 31). Coding this separate class introduces a separation of concerns
between the user interface and the application logic. The user interface now simply specifies
what needs to be done, ‘add an item’, without being concerned about how to do it. The
ItemCount object simply knows that when it receives an AddItem message, it must
increment the value of FCount. It need know nothing about the event that gave rise to the
AddItems message.
Ex 3.2 step 5 The Code Explorer
The Code Explorer displays a tree diagram showing the classes and methods defined in
the unit displayed by the editor. It is docked to the left of the editor in versions up to Delphi
7. Use the menu sequence View | Code Explorer in Delphi 8. If we expand the tree by
clicking the plus signs at each node, the Code explorer gives a useful graphical view of the
TItem class we have defined, showing the private data field, FCount, and the public
methods, AddItem, GetCount and ZeroCount (figure 6). The Code Explorer provides a
quick way of navigating through a unit. By double-clicking on any of the final nodes in the
trees, one goes directly to the code definition of that node.

Programmer defined classes and objects (31 May 2006, all rights reserved) Chapter 3, Page 15
Figure 7 Enhancing the functionalityFigure 8 The objects on
the user interface
Example 3.2 Summary: There are three steps to the process of defining a class and creating an
object:
– First we define the class’s structure and the implementation of the methods. (As a guide,
we can imitate the way Delphi defines the form in a unit file.)
– Second, we allocate a name (which acts as a reference) for an object of the class by listing it
in the variable declaration of the unit that will use the object (and not in the unit defining
the class as the RAD code does).
– Third, we actively instruct Delphi to create the object and assign it to the name we
declared so that we can use it in our program.
After completing these steps we can go ahead and use the object through its method
calls. These use the standard dot notation with the object name followed by the method
name and any parameters that may be needed.
Example 3.3 Subclassing and inheritance
Assume that we now need to enhance the program of example 3.2 to accommodate boxes of
four items as well as just single items (figure 7).
Several options will work. We can have the btnAddBox’s OnClick event handler call
AddItem four times:
procedure TfrmCount.btnBoxClick(Sender: TObject);begin // a poor approach! ItemCount.AddItem; ItemCount.AddItem; ItemCount.AddItem; ItemCount.AddItem;end;

Chapter 3, Page 16 Object orientation with Delphi (all rights reserved)
This, or something similar like a For loop, is not a good idea since we lose the separations of
concerns – the user interface must know that a box contains four items.
Another possibility is to add an AddBox method to the TItem class. This is a much better
approach. A third alternative is to create a subclass of TItem containing an AddBox method.
Both these alternatives maintain the separation of concerns criterion, while the third method
also clarifies the distinction between an Item and a Box.
Ex 3.3 step 1 Subclassing TItem
We’ll develop the code from example 3.2 to create the subclass of TItem. The first step is to
define a subclass TItemBox. We can create this in either the existing ItemU unit or in a
separate, third unit. For simplicity, we’ll extend the existing ItemU unit.
1 unit ItemU;
2 interface
3 type4 TItem = class(TObject)5 private6 FCount: integer;7 public8 procedure AddItem;9 function GetCount: integer;
10 procedure ZeroCount;11 end; // end TItem = class(TObject)
12 TItemBox = class(TItem) // Derived from TItem, not TObject13 public14 procedure AddBox; // Public access method15 end; // end TItemBox = class(TItem)
16 implementation
17 { TItem }
18 procedure TItem.AddItem;19 begin20 Inc(FCount);21 end; // end procedure TItem.AddItem
22 function TItem.GetCount: integer;23 begin24 Result := FCount;25 end; // end function TItem.GetCount
26 procedure TItem.ZeroCount;27 begin28 FCount := 0;
Programmer defined classes and objects (31 May 2006, all rights reserved) Chapter 3, Page 17
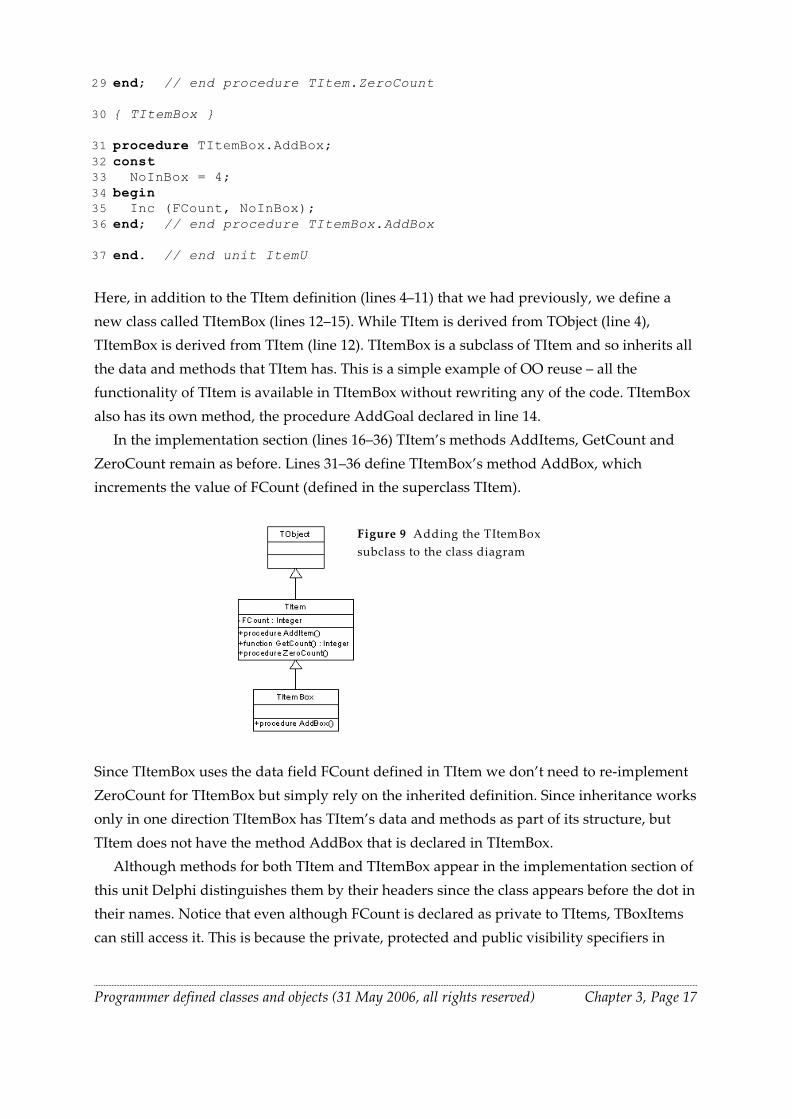
Figure 9 Adding the TItemBox
subclass to the class diagram
29 end; // end procedure TItem.ZeroCount
30 { TItemBox }
31 procedure TItemBox.AddBox;32 const33 NoInBox = 4;34 begin35 Inc (FCount, NoInBox);36 end; // end procedure TItemBox.AddBox
37 end. // end unit ItemU
Here, in addition to the TItem definition (lines 4–11) that we had previously, we define a
new class called TItemBox (lines 12–15). While TItem is derived from TObject (line 4),
TItemBox is derived from TItem (line 12). TItemBox is a subclass of TItem and so inherits all
the data and methods that TItem has. This is a simple example of OO reuse – all the
functionality of TItem is available in TItemBox without rewriting any of the code. TItemBox
also has its own method, the procedure AddGoal declared in line 14.
In the implementation section (lines 16–36) TItem’s methods AddItems, GetCount and
ZeroCount remain as before. Lines 31–36 define TItemBox’s method AddBox, which
increments the value of FCount (defined in the superclass TItem).
Since TItemBox uses the data field FCount defined in TItem we don’t need to re-implement
ZeroCount for TItemBox but simply rely on the inherited definition. Since inheritance works
only in one direction TItemBox has TItem’s data and methods as part of its structure, but
TItem does not have the method AddBox that is declared in TItemBox.
Although methods for both TItem and TItemBox appear in the implementation section of
this unit Delphi distinguishes them by their headers since the class appears before the dot in
their names. Notice that even although FCount is declared as private to TItems, TBoxItems
can still access it. This is because the private, protected and public visibility specifiers in
Chapter 3, Page 18 Object orientation with Delphi (all rights reserved)
Delphi apply to the unit rather than to the class. From Delphi 8, Delphi also has the strictly
private and strictly protected that apply to the class whether or not it is packaged in the same
unit as another class.
The class diagram now includes the new TItemBox subclass (figure 9).
Ex 3.3 step 2 Using the new (sub)class
We add btnBox to the form (figures 7 & 8). In unit OODriverU.pas we change the type of the
object ItemCount to TItemBox (line 30 below), create ItemCount from TItemBox instead of
TItem (line 52), and add an OnClick event handler for btnBox that calls the new AddBox
method (lines 47–50).
26 implementation
27 uses28 ItemU ;
29 var30 ItemCount: TItemBox; // Change to TItemBox
31 { Event handlers as before }
47 procedure TfrmCount.btnAddBoxClick(Sender: TObject);48 begin49 ItemCount.AddBox;50 end; // end procedure TfrmCount.btnAddBoxClick
51 initialization52 ItemCount := TItemBox.Create;
53 end. // end unit BoxCountU
Save all, and then run and test this program.
Example 3.3 Summary: In this example we derived TItemBox from TItem and added an
AddBox method to TItemBox. Since TItemBox is a subclass of TItem, it inherits the
definitions of TItem’s data fields and methods, and adds its own method definitions. (It
could also have defined further data fields.) By subclassing we do not interfere with the
existing class TItem. Because this separate application class maintains the separation of
concerns, the user interface does not need to know how many items there are in a box, but
merely calls the AddBox method. If, at some time in the future, the packaging changes and a
box can hold six items, the user interface is unaffected since we instead change the unit
defining TItemBox.

Programmer defined classes and objects (31 May 2006, all rights reserved) Chapter 3, Page 19
Figure 10 Using the Code Explorer to navigate through the code
Because of the inheritance, all of TItem’s functionality is available through TItemBox too.
Although we now declare ItemCount as a TItemBox and not a TItem, all the existing event
handlers remain the same. We create a new event handler to use the added facility and this
uses methods available only to a TItemBox and not to a TItem.
Navigating through the Code Explorer
While this example is still on the screen, let’s go back to the Code Explorer briefly (figure
10). Click on the ItemU tab in the edit window. Notice that the Code Explorer now shows
both classes, TItemBox and TItem, declared in this unit. As before, we can expand the tree
by clicking on the plus signs and navigate through the program code.
The Project Browser
Neither the Code Explorer (figure 10) nor the Object TreeView (figure 8) shows the class
inheritance hierarchy, so it is also worth taking a quick look at Delphi’s Project Browser,
available at View | Browser in versions of Delphi up to Delphi 7. (The project loaded must
have run in the current session before the Browser option becomes available.) The Project
Browser shows the classes we have created in this project along with their inheritance
structure (figure 11, left pane). We see TObject as the root class with TItem derived from

Chapter 3, Page 20 Object orientation with Delphi (all rights reserved)
Figure 11 Delphi’s Project Browser showing both Delphi’s standard
classes and the locally defined classes
TObject and TItemBox derived in turn from TItem. We also see that the form we have
created, TfrmCount, is derived from TForm, which in turn is derived from a series of other
objects all the way back to TObject. (We looked at Delphi’s VCL inheritance in chap 2.)
If we select TItemBox in the left pane, in the right pane we see that TItemBox has a single
public member, the method AddBox. It has inherited the private data field, FCount, and a
whole lot of public methods inherited from TItem and TObject including the constructor
Create near the bottom of the pane.
The Browser has many more capabilities. For more information press <F1> while the
Browser is the active window.
Example 3.4 Overloaded methods & protected visibility
Some OO programmers feel that one should not access a data field defined in a superclass
directly from a subclass. They would be unhappy with our definition of TBoxItem’s AddBox
method in example 3.3 step 1 line 35 since this accesses directly the superclass’s FCount data

Programmer defined classes and objects (31 May 2006, all rights reserved) Chapter 3, Page 21
field. Instead, to protect the encapsulation, they feel that a subclass should always use the
superclass’s access methods to access its data fields.
We could redefine AddBox in a messy and inelegant fashion to use AddItem:
32 procedure TItemBox.AddBox;33 var Count: integer;34 begin35 for Count := 1 to NoInBox do36 AddItem;37 end; // end procedure TItemBox.AddBox
It would be better, though to have a method in the superclass TItem that adds a specified
number of items to the FCount field. This leads to the concept of overloaded methods: add a
protected method AddItem with the number to add as a parameter (line 8 below). This is in
addition to the AddItem method we already had, though it had no parameters (line 10
below). So now we have two methods with the same name. How does Delphi distinguish
between them? If we call AddItem without any parameters, as in example 3.2 step 2 line 31,
Delphi will invoke the method with the required name and without any parameters (ie lines
20–23 below). If we call AddItem with a single integer parameter, as in line 41 below, Delphi
will invoke the method implementation with the same parameter signature (ie lines 24–27
below). To inform the compiler that we are overloading this method name, we must add the
overload keyword with each different declaration of AddItem (lines 8 & 10 below).
Overloaded method names must always have different parameter lists in terms of types
and/or numbers of parameters so that the compiler can distinguish between their calls.
We can avoid overloading if we use different names, eg AddItem and AddItems ().
However in cases where we want to perform the same operation but with different
parameter types, eg integers or doubles, it is particularly useful to be able to overload the
same name.
1 unit ItemU;
2 interface
3 type4 TItem = class(TObject)5 private6 FCount: integer;7 protected8 procedure AddItem (aNoToAdd: integer); overload;9 public
10 procedure AddItem; overload;11 function GetCount: integer;12 procedure ZeroCount;13 end; // end TItem = class(TObject)

Chapter 3, Page 22 Object orientation with Delphi (all rights reserved)
14 TItemBox = class(TItem)15 public16 procedure AddBox;17 end; // end TItemBox = class(TItem)
18 implementation
19 { TItem }
20 procedure TItem.AddItem;21 begin22 Inc(FCount);23 end; // end procedure TItem.AddItem
24 procedure TItem.AddItem(aNoToAdd: integer);25 begin26 Inc(FCount, aNoToAdd);27 end; // procedure TItem.AddItem(aNoToAdd: integer);
28 function TItem.GetCount: integer;29 begin30 Result := FCount;31 end; // end function TItem.GetCount
32 procedure TItem.ZeroCount;33 begin34 FCount := 0;35 end; // end procedure TItem.ZeroCount
36 { TItemBox }
37 procedure TItemBox.AddBox;38 const39 NoInBox = 4;40 begin41 AddItem(NoInBox);42 end; // end procedure TItemBox.AddBox
43 end. // unit ItemU
Because these changes are encapsulated within the TItem and TItemBox classes, the user
interface of example 3.3 needs no alteration to interact with this unit as you will see when
you run it.
Notice that AddItem without parameters is declared as public (line 10 above) and so can
be called directly by the user interface class (eg example 3.2 step 2 line 31). However
AddItem with the parameter is declared as protected and so cannot be called by the user
interface object. To see this, change example 3.3 step 2 line 49 to call AddItem:

Programmer defined classes and objects (31 May 2006, all rights reserved) Chapter 3, Page 23
Figure 12 A simplified version
of the class layout in memory
Figure 13 Reference to the
object
Figure 14 Creating the object
and the link to the class
47 procedure TfrmCount.btnBoxClick(Sender: TObject);48 begin49 ItemCount.AddItem(4); // out of scope50 end; // end procedure TfrmCount.btnBoxClick
This leads to a compilation error.
In Delphi the visibility specifiers private and protected apply to the unit. So in this case
we can replace protected by private and the program will still work. However, if these two
classes are defined in separate units the overloaded procedure AddItem (aNoToAdd) won’t
be accessible with private visibility and so must be protected. (We don’t make it public
because we want its visibility to be restricted to TItem and its descendants.)
Memory layout for classes and for objects
What does an object look like in memory? Figure 12 gives a simplified illustration of the
class layout of the TItem class in ItemU .pas. It gains to all the inherited methods through a
reference to the parent class and then uses additional memory for the methods it declares.
Object names are actually references to the block of memory that stores the unique data for
that object. Declaring the name sets aside memory on the stack to hold the reference to the
object, but not for the object itself (figure 13).

Chapter 3, Page 24 Object orientation with Delphi (all rights reserved)
Figure 15 Creating the object and linking it to the name
Figure 16 Subobject memory layout
When we invoke the object constructor, it sets aside the memory to hold the object itself,
initialises the values and provides the link to the class (figure 14).
The constructor (Create) returns the address of the object just created. So we typically
create the object and assign the return value to the name we have already declared (the
reference) in a single program step. This creates both the object and the link between the
object name and the object itself (figure 15):
ItemCount := TItem.Create;
Example 3.3 introduces inheritance. This means that we need to create an additional table
for the subclass methods and then link our object to that, as illustrated in figure 16. (Notice
that even though we don’t have a TItem object in example 3.3, we still have a TItem class
table.)
If we create several objects we need to repeat the object table but not the class table. So if we
have another object, MoreItems, of type TItemBox, we get figure 17.

Programmer defined classes and objects (31 May 2006, all rights reserved) Chapter 3, Page 25
Figure 17 Two TItemBox objects
Figure 18 A TItem and a TItemBox object
This other object MoreItems could instead be of type TItem (figure 18) in which case it has
access to the TItem methods but not the TItemBox methods:
In figure 18 both objects have the same data structure. This is because the subclass in
example 3.3 adds additional methods but no additional data fields to the superclass. We’ll
add additional data fields to a subclass later in this module.
In summary, as illustrated in figure 17, each object reference refers to the specific data
block for that object. So different objects of the same class each have their own data.
However, different objects of the same class each carry a reference to the same shared
method definitions. Each subclass defines its own methods and carries a pointer to its
superclass methods for the definition of the inherited methods, and so on up the hierarchy.
Even though they are highly simplified, these diagrams get quite complicated. They
would be difficult to use for normal programming. Fortunately, we don’t generally need to
think in these terms and can use the abstractions provided by the UML diagrams (eg figure
9)

Chapter 3, Page 26 Object orientation with Delphi (all rights reserved)
Chapter summary
– Keeping user interface and application objects separate: separation of concerns
– Mimicking RAD user interface objects in programmer defined application classes
– Steps in using a programmer defined object:
– define the class,
– allocate a name (reference),
– instantiate the object,
– assign it to the name.
– Inheritance: deriving a new class from an existing one
– Packaging a class in a unit
– The Code Explorer and Project Browser
– Layout of objects in memory
Main points:
1. Defining and using a class and a subclass
2. Reference semantics and object layout in memory
3. Separation of concerns: user interface and domain classes
Objects as independent entities: Programmer defined class
Objects as derived entities: Programmer defined inheritance
Objects as interacting entities: Access methods; Visibility; Overloading
Programmer defined classes and objects (31 May 2006, all rights reserved) Chapter 3, Page 27
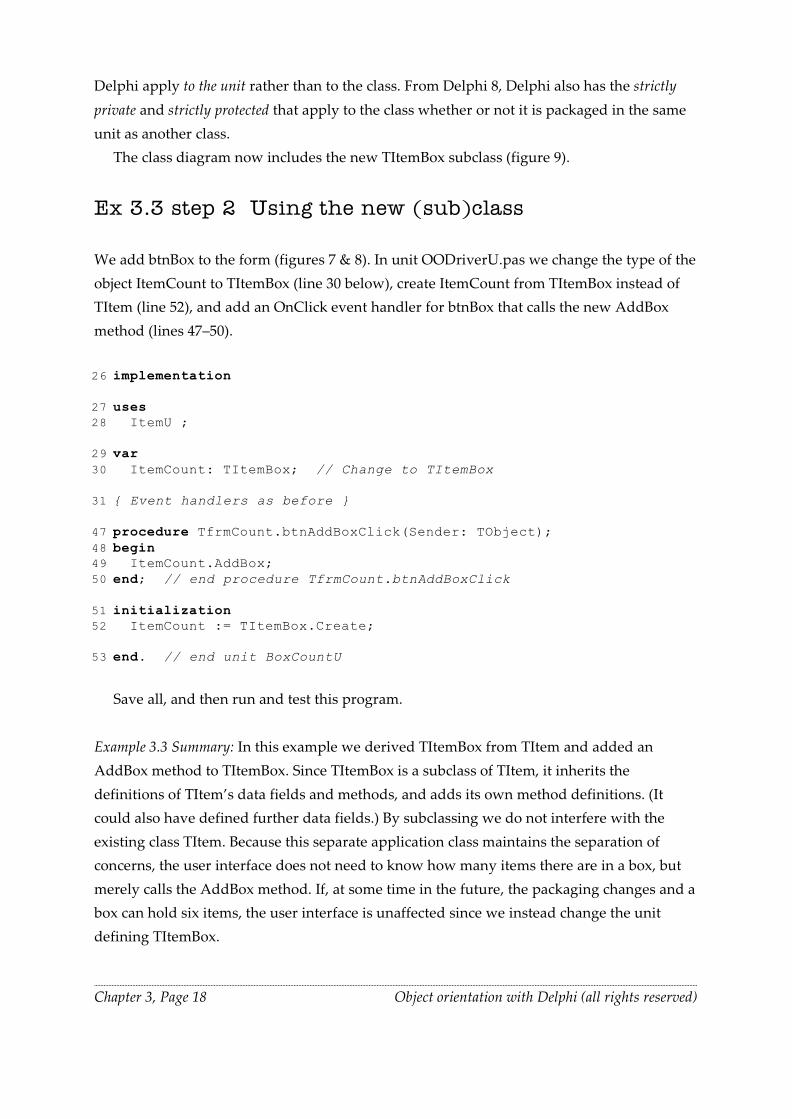
Figure 19 Extending the conveyor belt example
Problems
Problem 3.1 Study Chapter 3
Identify the appropriate example(s) or section(s) of the chapter to illustrate each comment
made in the summary above.
Problem 3.2 Double conveyor belts
Extend example 3.3 to work for a double conveyor belt system. One conveyor moves single
items and boxes of six items, while the other moves single items only. Clicking down the
Display button shows the totals for each conveyor, while releasing the button hides both
totals (figure 19).
In writing this program place the definitions of TItem and TItemBox in separate units.
Problem 3.3 Different box sizes
Consider another variation on the conveyor belt problem we have been looking at. In a
warehouse there is a temporary storage area with three reversible conveyor belts. One
carries individual items, the second carries small boxes of four items, and the third carries
large boxes with twelve items. The screen looks like this (figure 20):

Chapter 3, Page 28 Object orientation with Delphi (all rights reserved)
There are several ways of structuring the application classes. One could, for example, use
either a strongly hierarchical structure (figure 22) or a relatively flat structure (figure 23) .
Figure 20 Different box sizes
Figure 21 User interface
components for different box
sizes

Programmer defined classes and objects (31 May 2006, all rights reserved) Chapter 3, Page 29
1. Contrast these two approaches, describing the advantages and disadvantages of each.
2. Implement the deep hierarchy version.
3. Implement the shallow hierarchy version.
After having done these two implementations, you may find that you want to add to or
modify your comments in part 1 of this question.
Problem 3.4 Protected entry
Write a simple password-protected access system that initially has a single access gate. The
user interface for Gate 1 (figure 24) has:
– a text entry section, which show just asterisks when you type into it,
– a button to submit the password, and
– a response area.
If the password is correct, the response is ‘Proceed’ (figure 24). If the password is
incorrect the response is ‘Report to main desk’.
In accordance with the Separation of Concerns Principle, the user interface relies on a
separate, application class (TVerify) to determine whether the password is correct or not
(figure 26). The user interface sends a message to the application object giving a key (which
Figure 22 A deep, hierarchical
structure.
Figure 23 A shallower structure
Figure 24 First level password

Chapter 3, Page 30 Object orientation with Delphi (all rights reserved)
represents the correct password) and the word entered by the use. The password
verification object then returns True or False. Currently the verification algorithm is very
simple: the user must enter the reverse of what the key is. So if the key is Mary, the user
must enter yraM as the password. Figure 25 shows the components on the user interface
and figure 26 gives a class diagram. Write this program. The password key should be Mary,
with separate units for TfrmPassword (figure 24) and for TVerify.
b) This system must now be extended. The first access gate remains as before (figure 24). A
second gate with a second, separate user interface like the interface of the first gate is added.
This second access gate has a two stage password check. If the user enters the first password
successfully at the second gate (similarly to part a), the system then displays an additional
form requesting the user for a second, different password (figure 27). Only if this too is
correct is the user given permission to proceed. Should the first password be incorrect, or if
the first password is correct but the second is wrong, the user is told ‘Report to the main
desk’ as in part a. The class diagram is shown in figure 28. Write this program. The first
password key is Mary and the second key is George. The update program now has four
separate units, one each for the first gate (TfrmPassword, figure 24), for the second gate
(TfrmPassword1 derived from TfrmPassword), for the additional form TfrmPassword2
(figure 27) and for TVerify.
Figure 25 The user interface
components
Figure 26 Class diagram for
first level password control
Figure 27 The additional entry
screen (for the second password)

Programmer defined classes and objects (31 May 2006, all rights reserved) Chapter 3, Page 31
Change history
1. Problem 3.2 refers to example 3.3.
2. New figure inserted (figure 21). Subsequent figures’ numbering incremented
appropriately.
3. Page 9, final paragraph: ‘Notice that we changed the name FCount to FCount.’ Changed
to: ‘.....Count to FCount.’
Figure 28 Class diagram for second level of
password control