programmable heating controllerintroduction a a programmable heating controller is used to switch...
TRANSCRIPT

Instruction ManualModel No EP101
Programmable Heating Controller
2
Salus EP101 Manual 001:89 21/11/10 11:49 Page 1

Salus EP101 Manual 001:89 21/11/10 11:49 Page 2

PRODUCT COMPLIANCEThis product complies with the essential requirements of thefollowing EC Directives:
• Electro-Magnetic Compatibility directive 2004/108/EC• Low Voltage Directive 2006/95/EEC• EC Marking directive 93/68/EEC
SAFETY INFORMATIONThese instructions are applicable to the Salus Controls model statedon the front cover of this manual only, and must not be used withany other make or model.
These instructions are intended to apply in the United Kingdomonly, and should be followed along with any other statutoryobligations.
This accessory must be fitted by a Competent person, andinstallation must comply with the guidance provided in the currenteditions of BS7671 (IEE Wiring Regulations) and Part ‘P’ of theBuilding Regulations. Failure to comply with the requirements ofthese publications could lead to prosecution.
Always isolate the AC Mains supply before opening orremoving the unit from the wall or wall box.
When fitting batteries don’t mix old and new batteriestogether. Do not use rechargable batteries.
Please leave these instructions with the end user where they shouldbe kept in a safe place for future reference.
EP101 INSTRUCTION MANUAL 3
Salus EP101 Manual 001:89 21/11/10 11:49 Page 3

INTRODUCTIONA A programmable heating controller is used to switch the heating systemin your home on and off as needed. It works by controlling the heatingboiler according to a series of programmed settings that take effect atdifferent times of the day.
The EP101 from Salus Controls isa stylish and accurate 5/2 or 7 dayprogrammable heating controllerwith a large, easy to read LiquidCrystal Display (LCD). Thiscontroller has been specificallydesigned to be used for singlechannel Volt Free or 230V ACheating applications.
A simple jumper switch changesthe EP101 between 5/2 or 7 dayprogramming.
Features• Timed control of central heating• Large LCD with blue backlight• Stylish Casing• Volt Free Contacts• Built-in start up programme• 12 or 24 hour clock display• Advance 1 hour facility• Holiday Function• 5/2 or 7 day programming• Three On / Off periods• Memory backup
EP101 INSTRUCTION MANUAL4
Salus EP101 Manual 001:89 21/11/10 11:49 Page 4

INSTALLATION
Please read the important safety information at the start of this manualbefore you begin to install the device.
The ideal position to locate the EP101 programmable heating controller isabout 1.5m above floor level. It should be mounted in a location where thecontroller is easily accessible, reasonably lit and free from extremes oftemperature.
The electrical connections to the EP101 are made to the supplied industrystandard backplate. This simplifies installation, as no connections are madeto the controller itself. Connection details are shown below - no Earthconnection is required for the correct and safe operation of the EP101, buta parking terminal is provided to connect an Earth wire if one is present.
230V AC Switching
Terminal Description BackplateN Mains NeutralL Mains Live1 Hot Water Off2 No Connection3 Switched Live (output)4 230V link from Mains Live
(do not remove)Earth Parking (no electrical connection)
EP101 INSTRUCTION MANUAL 5
Salus EP101 Manual 001:89 21/11/10 11:49 Page 5

After installing the backplate in a suitable location, wiring connections can bemade as shown above. The following criteria apply to the installation:
• The incoming AC mains supply should be 230V AC and fused at 6 amps.• Optimum cable size for installation is 1.5 mm2; wiring colours should be
in accordance with the current requirements of the IEE Wiring Regulations.• Cable entry should be from the rear of the backplate.• All wiring connections should be securely made, and be firmly
gripped beneath the terminal square brass washer.
Do not restore the mains supply to the system until all associated items are fullyinstalled.
NOTE: All electrical installation work should be carried out by a suitably qualified Electrician or other competent person.
If you are not sure how to install this programmable thermostat consult eitherwith a qualified electrician, heating engineer or your boiler / heating systemsupplier for advice on how to continue.
Do not remove or refit the EP101 onto the backplate without the mainssupply to the system being isolated.
Volt Free Switching
Terminal Description BackplateN Mains NeutralL Mains Live1 Normally Closed (NC)2 No Connection3 Normally Open (NO)4 Volt Free Common
Earth Parking (no electrical connection)
EP101 INSTRUCTION MANUAL6
Salus EP101 Manual 001:89 21/11/10 11:49 Page 6

JUMPER SETTINGSChanges to the jumper settings should only be made by the Engineercarrying out the installation or other qualified person.
The installer should select the jumper positions required if changes need tobe made to the factory default settings. These jumpers are found on therear of the controller.
Jumper Function DefaultProgram Type Movable jumper for 5-2 or 7 5-2
individual days programming. programming
Internal Movable jumper for Internal backup Backup Battery enabling or disabling the battery disabled
internal backup battery.
The installer should enable the internal backup battery before fitting thecontroller to ensure user settings are retained – the battery will be keptcharged from the controller mains supply.
EP101 INSTRUCTION MANUAL 7
Salus EP101 Manual 001:89 21/11/10 11:49 Page 7

AFTER INSTALLATIONAfter completing installation and powering up the EP101 for the first timethe controller will behave in the following way:
All the indicators on the display and the backlight will be turned on for twoseconds. After two seconds, the EP101 will then operate in Normal mode(controller output OFF).
All the controller settings will be returned to default values. If the ResetButton is pressed, the EP101 will behave in the same way as describedabove, except that any previously saved user settings will be deleted andoverwritten with the default settings.
EP101 INSTRUCTION MANUAL8
Salus EP101 Manual 001:89 21/11/10 11:49 Page 8
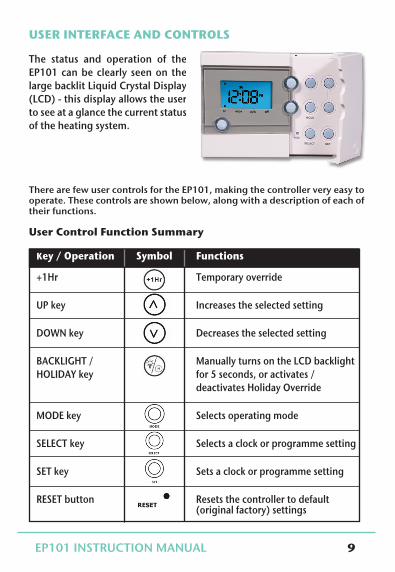
USER INTERFACE AND CONTROLS
The status and operation of theEP101 can be clearly seen on thelarge backlit Liquid Crystal Display(LCD) - this display allows the userto see at a glance the current statusof the heating system.
There are few user controls for the EP101, making the controller very easy tooperate. These controls are shown below, along with a description of each oftheir functions.
User Control Function Summary
Key / Operation Symbol Functions
+1Hr Temporary override
UP key Increases the selected setting
DOWN key Decreases the selected setting
BACKLIGHT / Manually turns on the LCD backlight HOLIDAY key for 5 seconds, or activates /
deactivates Holiday Override
MODE key Selects operating mode
SELECT key Selects a clock or programme setting
SET key Sets a clock or programme setting
RESET button Resets the controller to default (original factory) settings
EP101 INSTRUCTION MANUAL 9
Salus EP101 Manual 001:89 21/11/10 11:49 Page 9

OPERATIONThe EP101 is configured andadjusted by the use of an intuitiveuser interface with a minimalnumber of user controls.
The backlit LCD gives a highlyvisible, easily readable indication ofthe controller status.
Setting the Time
Press and hold SET and SELECT when the EP101 is in Normal mode for threeseconds to enter the Clock setting mode. Releasing both keys will display“12 hr” or “24 hr” and SET, as shown below:
Release the SET and SELECT keys andpress UP or DOWN to toggle between 12and 24 hour time format.
Pressing and releasing SELECT will then display the time and a SETindicator, with all other indicators cleared from the display. The hour partof the time will be flashing to indicate that it is the currently selected itemand is ready to be adjusted.
Press the UP or DOWN keys to increase ordecrease the hour setting – the selecteditem will stop flashing while a key ispressed, and will resume flashing whenyou release the key.
Press the SELECT key to select the ‘minutes’ section of the time. Set theminutes in the same way as the hour by using the UP and DOWN keys.
EP101 INSTRUCTION MANUAL10
Salus EP101 Manual 001:89 21/11/10 11:49 Page 10

Pressing and releasing SELECT again willthen display the year as displayed
Press the UP or DOWN keys to increase ordecrease the year – valid settings arebetween 05 and 99 (indicating a year rangeof 2005 to 2099).
Press the SELECT key to select the monthsection of the date – this is adjusted in thesame way by using the UP and DOWN keys– valid settings are between 01 and 12
Press the UP or DOWN keys to then increaseor decrease the day setting.
Pressing and releasing SELECT again willthen take you to the final part of the timeand date setting process: enabling daylightsaving.
Press the UP or DOWN keys to enable or disable the daylight saving setting
Pressing the SET key will confirm and save the settings, before returningthe EP101 to Normal mode. Not pressing any keys for more than 15 secondswill also update the clock settings and return the controller to Normalmode.
EP101 INSTRUCTION MANUAL 11
Salus EP101 Manual 001:89 21/11/10 11:49 Page 11

PROGRAMMING THE EP101
The EP101 offers great versatility with its programming options, allowingthe user to programme the unit to operate on a 5/2 or 7 day control cycle.The controller has a default set of programmes that have been designed tomeet the needs of most users. If these default programmes are not suitablefor your particular situation, reprogramming the EP101 with your ownsettings is a very straightforward operation.
Selection of the default programming mode (5/2 or 7 day) is made bychanging the jumper setting on the rear of the controller, as previouslydescribed within the Installation section of this manual.
5/2 Day Mode
5/2 day mode is the default programming mode for the EP101. With thismode selected three different sets of on/off times can be set for Weekdaysor Weekends.
To review or change a programme, press the SET key when the EP101 is inNormal mode. This will change the unit status to Programme Settingmode.
The display will show programme number 1 and SET PROG, with all otherindicators cleared. The weekdays will be flashing to indicate they are theselected item and are ready to be adjusted:
Press the UP or DOWN key to select theprogramme set for either Weekday orWeekend to be reviewed or adjusted.Pressing the SET key at any time when inprogramming mode will return theEP101 into Normal mode.
EP101 INSTRUCTION MANUAL12
Salus EP101 Manual 001:89 21/11/10 11:49 Page 12

Press the SELECT key to confirm the Weekday or Weekend selection. Oncethis is set, the ‘Hour’ will flash to indicate that it is the selected item and isthe next item to be adjusted:
Press the UP or DOWN key to adjustthe hour setting to the desired value,and confirm your selection bypressing the SELECT key.
Pressing the SELECT key allows you to step through each of the items to bereviewed or adjusted within the programmes in the following sequence:
Programme Status Function Sequence
1 ON Hour Minutes
1 OFF Hour Minutes
2 ON Hour Minutes
2 OFF Hour Minutes
3 ON Hour Minutes
3 ON Hour Minutes
…before then allowing you to cycle back to Programme 1. Pressing the SETkey at any time will confirm the setting and return to the programme setselection.
EP101 INSTRUCTION MANUAL 13
Salus EP101 Manual 001:89 21/11/10 11:49 Page 13

7 Day Mode
The EP101 also offers a 7 day programming mode, which allows you toprogramme three different sets of on/off times for each day of the week togive a total of 21 separate programme settings.
To review or change a programme, press the SET key when the EP101 is inNormal mode. This will change the unit status to Programme Settingmode.
The controller will display programme number 1 and SET PROG, with allother indicators cleared. The weekday will be flashing to indicate theselected item is ready to be adjusted.
Press the UP or DOWN key to changethe display to indicate the single dayyou want to programme:
Pressing the SET key at any time whenin programming mode will return theEP101 into Normal mode. Press theSELECT key to confirm the Dayselection. Once this is set, the ‘Hour’will flash to indicate that it is theselected item and is the next item tobe adjusted:
Press the UP or DOWN key to adjust the hour setting to the desired value,and confirm your selection by pressing the SELECT key.
EP101 INSTRUCTION MANUAL14
Salus EP101 Manual 001:89 21/11/10 11:49 Page 14

Pressing the SELECT key allows you to step through each of the items to bereviewed or adjusted within the programmes in the following sequence:
Programme Status Function Sequence
1 ON Hour Minutes
1 OFF Hour Minutes
2 ON Hour Minutes
2 OFF Hour Minutes
3 ON Hour Minutes
3 ON Hour Minutes
…before then allowing you to cycle back to programme 1. Pressing the SETkey at any time will confirm the setting and return to the programme setselection. Each programme for all the other days of the week is set in exactlythe same way – just repeat the steps shown above, after enteringprogramming mode and selecting the day you want to programme.
Regardless of which programming mode the EP101 is set for (5/2 or 7 day),not pressing any keys for 15 seconds will automatically save anyprogramming changes and exit to Normal mode. Programmes can bereviewed or changed even if temporary override mode is enabled.
Please be aware that each of the programme time settings must be insequence: for example, the OFF time cannot be earlier than the ON time,programme 3 cannot be set with a time earlier than Programme 2. If thissituation occurs, then the EP101 may operate in an unpredictable way.
EP101 INSTRUCTION MANUAL 15
Salus EP101 Manual 001:89 21/11/10 11:49 Page 15

OPERATING MODE SELECTION
The EP101 operating mode is selected by pressing the MODE key. There are four operating modes for the controller:
ON, ONCE, AUTO and OFF
The mode can be changed when the controller is in NORMAL mode bypressing the MODE key. Each key press will cycle the operation mode asfollows:
ON ONCE AUTO OFF ON
The mode indicator changes to indicate the selected operating mode:
The operating mode functions are:
Mode Possible selections Function
ON ON Continuously on
ONCE ON, ONCE On for one period per day (from Programme 1 ON to Programme 3 OFF)
AUTO ON, ONCE, AUTO Automatic programme control
OFF ON, ONCE, AUTO, OFF Continuously off
EP101 INSTRUCTION MANUAL16
Salus EP101 Manual 001:89 21/11/10 11:49 Page 16

Holiday Override ModeThe holiday override mode allows the user to override all thecurrent programme settings and turn off the heating for up to 31days. When the EP101 is in Normal mode, pressing theBACKLIGHT/HOLIDAY key for 3 seconds or longer allows you to turnon the holiday override mode. The controller display will have theday numeral flashing to indicate that it is ready to be adjusted, asshown in the image below:
Use the UP and DOWN keys toincrease or decrease the number ofdays to turn the system off. Themaximum number of allowableoverride days is 31 – increasing pastthis number will roll back thedisplay to 0 and disable the holidayoverride mode.
Pressing the SET key, or not pressing any keys for more than threeseconds will activate the holiday override mode and the heating willimmediately be turned off. The EP101 display will change to showthe number of days the system will be turned off for – the numberof days displayed will decrease at midnight each day.
Cancelling Holiday Override ModePressing the BACKLIGHT/HOLIDAY key for more than three secondswill turn off the holiday override mode and return the EP101 toNormal mode.
EP101 INSTRUCTION MANUAL 17
Salus EP101 Manual 001:89 21/11/10 11:49 Page 17
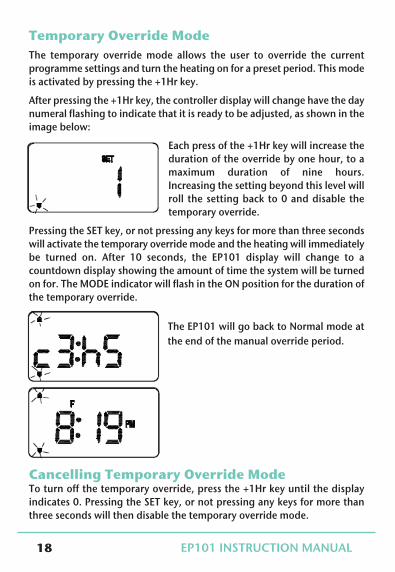
Temporary Override ModeThe temporary override mode allows the user to override the currentprogramme settings and turn the heating on for a preset period. This modeis activated by pressing the +1Hr key.After pressing the +1Hr key, the controller display will change have the daynumeral flashing to indicate that it is ready to be adjusted, as shown in theimage below:
Each press of the +1Hr key will increase theduration of the override by one hour, to amaximum duration of nine hours.Increasing the setting beyond this level willroll the setting back to 0 and disable thetemporary override.
Pressing the SET key, or not pressing any keys for more than three secondswill activate the temporary override mode and the heating will immediatelybe turned on. After 10 seconds, the EP101 display will change to acountdown display showing the amount of time the system will be turnedon for. The MODE indicator will flash in the ON position for the duration ofthe temporary override.
The EP101 will go back to Normal mode atthe end of the manual override period.
Cancelling Temporary Override ModeTo turn off the temporary override, press the +1Hr key until the displayindicates 0. Pressing the SET key, or not pressing any keys for more thanthree seconds will then disable the temporary override mode.
EP101 INSTRUCTION MANUAL18
Salus EP101 Manual 001:89 21/11/10 11:49 Page 18

OTHER FUNCTIONS AND CONTROLS
BacklightThe backlight of the EP101 is switched on automatically whenever any ofthe keys are pressed. The backlight will remain illuminated forapproximately 5 seconds after the last key press, except if you arechanging settings within the Clock, Programme or Temporary Overridemodes – in this case the backlight will remain illuminated throughout thesetting change process.
The backlight will not illuminate if there is no mains supply to thecontroller.
Daylight SavingWhen enabled, the clock will automatically change from Greenwich MeanTime (GMT) to British Summer Time (BST) on the last Sunday in March at2:00am. The clock will automatically change back to GMT on the lastSunday in October at 2:00am.
Reset ButtonThe Reset Button is provided as a way to restore the heating controller toits default factory settings. Pressing this button will delete anypreviously entered settings.
EP101 INSTRUCTION MANUAL 19
Salus EP101 Manual 001:89 21/11/10 11:49 Page 19

MAINTENANCEThe EP101 programmable heating controller requires no specialmaintenance. Periodically, the outer casing can be wiped clean using a drycloth (please DO NOT use solvents, polishes, detergents or abrasivecleaners, as these can damage the thermostat).
There are no user serviceable parts within the unit; any servicing or repairsshould only be carried out by Salus Controls or their appointed agents.
Should the EP101 programmable heating controller fail to functioncorrectly, check:
• Mains supply to the EP101 is switched on.• Heating system is switched on.• If the EP101 is still not functioning correctly, press the Reset Button.
WARRANTYSalus Controls warrants that this product will be free from anydefect in materials or workmanship, and shall perform inaccordance with its specification, for a period of two years from thedate of purchase. Salus Controls sole liability for breach of thiswarranty will be (at its option) to repair or replace the defectiveproduct.
EP101 INSTRUCTION MANUAL20
Salus EP101 Manual 001:89 21/11/10 11:49 Page 20

PRODUCT SPECIFICATIONModel: EP101Type: Programmable heating controller
designed for 230V AC and Volt Free heating applications.
ProgrammingProgramming Modes: User selectable for 5/2 or 7 day optionNumber of Programmes: Three (3) user programmes plus
factory default programme.Override Facility: User selectable programme
override facility.Holiday Facility: User selectable option to temporarily
override selected programme.
Default Programmes
Programme Output Weekday Weekend1 ON 6:00 AM 6:00 AM
OFF 8:00 AM 8:00 AM2 ON 10:00 AM 10:00 AM
OFF 12:00 PM 12:00 PM3 ON 6:00 PM 6:00 PM
OFF 10:00 PM 10:00 PM
SwitchingSwitching Voltage: 230V AC / 50HzSwitching Current: 16A resistive, 5A inductiveContact Type: Single Pole Double Throw (SPDT)
EnvironmentOperating Temperature: 0 ºC to + 50 ºCStorage Temperature: - 20 ºC to + 60 ºC
EP101 INSTRUCTION MANUAL 21
Salus EP101 Manual 001:89 21/11/10 11:49 Page 21

Salus Controls warrants that this product will be free from any defect inmaterials or workmanship, and shall perform in accordance with itsspecification, for a period of two years from the date of purchase. SalusControls sole liability for breach of this warranty will be (at its option) torepair or replace the defective product.
EP101 Warranty
Customer Name: ....................................................
Customer Address: ................................................
...............................................................................
Post Code: ..................... Tel No: ............................
Email: .....................................................................
Engineers Company: ..............................................
Tel No: ...................................................................
Email: ....................................................................
Intallation Date: .....................................................
Engineers Name: ....................................................
Engineers Signature: ..............................................
EP101 INSTRUCTION MANUAL22
Salus EP101 Manual 001:89 21/11/10 11:49 Page 22

Salus EP101 Manual 001:89 21/11/10 11:49 Page 23
Email: [email protected] Tel: 01226 323961Email: [email protected] Tel: 01226 323961
Sales:Technical:
Salus Controls plc, Salus House, Dodworth Business Park South,Whinby Road, Dodworth, Barnsley S75 3SP
salus-tech.
Salus EP101 Manual 001:89 21/11/10 11:49 Page 24