production of qcs only server and …document title: production of qcs only server and common server...
TRANSCRIPT

Document Title: PRODUCTION OF QCS ONLY SERVER AND COMMON SERVER ON WINDOWS 2008 USING EXPPLUS
Document # 6510030090
REV 02
Where Used: 09884613 Page 1 of 35
Senior Manager, Engineering: Harish Gopalan
Manager, Engineering:
DCC: RJ Garside
Originator: Halappa Begurappa Barun Paul
DATE: September 30, 2011 DATE: DATE: DATE: September 30, 2011 6510430198 Rev 00 Original Date Issued: December 13, 2010
Contents
1 About this Document ................................................................................................................. 3 1.1 Hardware ................................................................................................................................ 3
1.1.1 Dell PowerEdge R710 Views............................................................................................. 3 1.1.2 Dell PowerEdge T610 Views ............................................................................................. 4
2 Creating QCS-Only Server or Common Server on Dell PowerEdge R710 or T610 ................. 5 2.1 Configuring BIOS .................................................................................................................. 6
2.1.1 Configuring the BIOS settings ........................................................................................... 6 2.2 RAID Configuration............................................................................................................. 10
2.2.1 Starting the RAID Configuration Program ...................................................................... 10 2.2.2 Deleting RAID configuration........................................................................................... 10 2.2.3 RAID Configuration......................................................................................................... 11 2.2.4 Hot spare Configuration ................................................................................................... 12
2.3 Installing Operating System using Experion PKS R400 System Initialization Media ........ 13 2.3.1 Generating the Configuration Files for Target Machine .................................................. 13 2.3.2 Installing the Operating System on the Target Machine using Experion PKS R400
System Initialization Media.............................................................................................. 20 2.4 Creating Boot media............................................................................................................. 25 2.5 Display Properties configuration.......................................................................................... 25 2.6 Dell Open Manage ............................................................................................................... 29
2.6.1 Configuring Dell Open Manage6.2 .................................................................................. 29 2.7 Installing the RAE................................................................................................................ 33
3 Additional Information............................................................................................................. 33 3.1 BIOS Update utility.............................................................................................................. 33
3.1.1 Installing the appropriate BIOS on R400.x platform ....................................................... 34

Document Title: PRODUCTION OF QCS ONLY SERVER AND COMMON SERVER ON WINDOWS 2008 USING EXPPLUS
Document # 6510030090
REV 02
Where Used: 09884613 Page 2 of 35
Honeywell Proprietary and Confidential DO NOT COPY
Related documents
6510020334 - Real-Time Application Environment (RAE) R600 for Experion PKS R400.2 Release and Installation Notes
51154481 - Experion PKS System Initialization Media Software Change Notice
46027201 - Ghost Backup for Da Vinci and MXProLine Systems user guide
EP-DSX256 - Fault Tolerant Ethernet Installation and Service Guide
EPDCSX36 – Software Installation Users Guide
EPDCX506 – Supplementary Installation Tasks Guide
Revision history
Rev DCN# Date Author Description of Changes
00 - 13-Dec-2010 Halappa Begurappa
Barun Paul
Vidya Ramarao
New document released.
01 20895 4-Jan-2011 Vidya Ramarao Updated the procedure and review comments provided by the DE team.
02 20970 30-Sep-2011 Halappa Begurappa
Barun Paul
Updated the document with Init media R100.3 changes and BIOS update Utility.

Document Title: PRODUCTION OF QCS ONLY SERVER AND COMMON SERVER ON WINDOWS 2008 USING EXPPLUS
Document # 6510030090
REV 02
Where Used: 09884613 Page 3 of 35
Honeywell Proprietary and Confidential DO NOT COPY
1 About this Document
This document provides instructions on producing QCS -Only Server and Common Server on Windows server 2008 using the Experion PKS System Initialization media (EXPPlus media).
These instructions are applicable to Dell PowerEdge R710 and PowerEdge T610 Servers.
1.1 Hardware
For more information about Dell PowerEdge R710 hardware specifications, see section 1.1.1.
For more information about Dell PowerEdge T610 hardware specifications, see section 1.1.2.
1.1.1 Dell PowerEdge R710 Views
Figure 1-1 Dell PowerEdge R710 view and slot details
Table 1-1 R710 Back panel view connection description
Sl No. Connection Details Remarks
1 NIC: Four RJ-45 for integrated 10/100/1000 Mbps Ethernet
-
2 Serial connector: 9-pin, DTE, 16550 compatible -
3 USB: Two 4-pin, USB 2.0 compliant -
4 Video: 15-pin VGA -
5 Rear system ID button, Rear system status/ID blue/amber LED
-
6 Optional RJ-45 MEA connector -

Document Title: PRODUCTION OF QCS ONLY SERVER AND COMMON SERVER ON WINDOWS 2008 USING EXPPLUS
Document # 6510030090
REV 02
Where Used: 09884613 Page 4 of 35
Honeywell Proprietary and Confidential DO NOT COPY
Table 1-2 R710 Slot Details
Slot No. Slot Type Remarks
Slot 1 PCIe x8 Dual NIC (Optional)
Slot 2 PCIe x8 -
Slot 3 PCIe x4 -
Slot 4 PCIe x4 -
1.1.2 Dell PowerEdge T610 Views
Figure 1-2 T610 Back panel view and slot details

Document Title: PRODUCTION OF QCS ONLY SERVER AND COMMON SERVER ON WINDOWS 2008 USING EXPPLUS
Document # 6510030090
REV 02
Where Used: 09884613 Page 5 of 35
Honeywell Proprietary and Confidential DO NOT COPY
Table 1-3 T610 Back panel view connection description
Sl No. Connection Details Remarks
1 NIC: Two RJ-45 for integrated 10/100/1000 Mbps Ethernet
-
2 Serial connector: 9-pin, DTE, 16550 compatible -
3 USB: Six 4-pin, USB 2.0 compliant -
4 Video: 15-pin VGA -
5 Optional external VFlash card: One optional flash memory card slot with iDRAC6 Enterprise
-
6 Rear system ID button, Rear system status/ID blue/amber LED
-
7 Optional RJ-45 MEA connector -
Table 1-4 T610 Slot Details
Slot No. Slot Type Remarks
Slot 1 PCIe x4 Dual Port NIC (Option)
Slot 2 PCIe x8 -
Slot 3 PCIe x8 -
Slot 4 PCIe x4 -
Slot 5 PCIe x4 -
2 Creating QCS-Only Server or Common Server on Dell PowerEdge R710 or T610
To create a RAE R600 QCS-Only Server or a Common Server on the Dell PowerEdge R710 or T610 by using Experion PKS R400 System Initialization media, you must perform the following tasks.
Task See Section Completed?
Configuring the BIOS settings 2.1.1
RAID Configuration 2.2
Installing Operating System using Experion PKS R400 System Initialization Media 2.3
Creating Boot media 2.4
Display Properties configuration 2.5
Dell Open Manage 2.6
Installing the RAE 2.7

Document Title: PRODUCTION OF QCS ONLY SERVER AND COMMON SERVER ON WINDOWS 2008 USING EXPPLUS
Document # 6510030090
REV 02
Where Used: 09884613 Page 6 of 35
Honeywell Proprietary and Confidential DO NOT COPY
2.1 Configuring BIOS
2.1.1 Configuring the BIOS settings
ATTENTION: The Dell server comes with BIOS configuration settings based on the Honeywell CFI. However, it is recommended to verify, and reconfigure the same if needed.
CAUTION: The Dell server comes with Custom BIOS installed and it is recommended not to install any other version of the BIOS manually.
To configure the BIOS settings
1. Start the computer.
2. Press F2 to enter the System Setup.
If you are configuring the Dell PowerEdge R710, the Dell Inc. (www.dell.com)-PowerEdge R710 dialog box appears.
Figure 2-1 Dell PowerEdge R710 BIOS Version
If you are configuring the Dell PowerEdge T610, the Dell Inc. (www.dell.com)-PowerEdge T610 dialog box appears.
Figure 2-2 Dell PowerEdge T610 BIOS Version
Refer the subsequent steps to continue with the BIOS Settings.

Document Title: PRODUCTION OF QCS ONLY SERVER AND COMMON SERVER ON WINDOWS 2008 USING EXPPLUS
Document # 6510030090
REV 02
Where Used: 09884613 Page 7 of 35
Honeywell Proprietary and Confidential DO NOT COPY
Figure 2-3 BIOS Settings Details
2.1.1.1. Verifying the System Time and System Date
1. System Time
2. System Date
Figure 2-4 BIOS Settings - System Time and System Date
2.1.1.2. Boot Sequence Settings
1. Select the Boot Settings using UP/DOWN ARROW key.
2. Press [ENTER].
The Boot Configuration details are displayed.
Figure 2-5 BIOS Settings - Boot Sequence
3. Select Boot Sequence using UP/DOWN ARROW key.
4. Press [ENTER].
5. Under Boot Sequence,
a. Change the boot sequence order by using + / - key.
b. Press Space to enable the following drives.

Document Title: PRODUCTION OF QCS ONLY SERVER AND COMMON SERVER ON WINDOWS 2008 USING EXPPLUS
Document # 6510030090
REV 02
Where Used: 09884613 Page 8 of 35
Honeywell Proprietary and Confidential DO NOT COPY
SATA Optical Drive
Hard Drive C: (Integrate RAID PERC 6/i Integrate)
Figure 2-6 BIOS Settings - Boot Sequence Settings
NOTE: If NIC card is enabled with PXE, then an additional option is listed under Boot Sequence. For example: Embedded NIC1 MBA v5.0.5 Slot 0100.
6. Press [Esc] to exit Boot Sequence.
7. Press [Esc] again to return to System Setup window.
2.1.1.3. Integrated Devices settings
1. Select Integrated Devices using UP/DOWN ARROW key.
2. Press [ENTER] to view the list of integrated devices.
NOTE: Verify that the status of Embedded NIC1 and NIC2 option is Enabled.
3. Select Embedded NIC3 and NIC4 by using UP/DOWN ARROW key.
NOTE: This option is applicable only for Dell PowerEdge R710, NIC3 and NIC4 as these options are not available in Dell PowerEdge T610.
4. Under Embedded NIC 3 and NIC4, select Disabled (OS) by using SPACE key.

Document Title: PRODUCTION OF QCS ONLY SERVER AND COMMON SERVER ON WINDOWS 2008 USING EXPPLUS
Document # 6510030090
REV 02
Where Used: 09884613 Page 9 of 35
Honeywell Proprietary and Confidential DO NOT COPY
Figure 2-7 BIOS Settings - Integrated Devices Settings
5. Press [Esc] to exit.
2.1.1.4. System Security Settings
1. Select the System Security using UP/DOWN ARROW key.
2. Press [ENTER].
3. Select Setup Password.
4. Press [ENTER].
5. Under Setup Password, type the new password as hmxresult and confirm the same.
Figure 2-8 BIOS Settings – Password Settings
6. Select AC Power Recovery using UP/DOWN ARROW key.
7. Press [ENTER].
8. Under AC Power Recovery, select Last.
Figure 2-9 BIOS Settings – AC Power Recovery Settings

Document Title: PRODUCTION OF QCS ONLY SERVER AND COMMON SERVER ON WINDOWS 2008 USING EXPPLUS
Document # 6510030090
REV 02
Where Used: 09884613 Page 10 of 35
Honeywell Proprietary and Confidential DO NOT COPY
9. Press [Esc].
A message appears and prompting you to save changes and exit the BIOS.
10. Press [ENTER].
The system restarts automatically.
2.2 RAID Configuration
2.2.1 Starting the RAID Configuration Program
After the system restarts, start the RAID Configuration program.
To start the RAID Configuration program
1. After the system restarts, a message appears, prompting you to press <Ctrl+R> to run the Configuration utility.
RAID Configuration utility program starts.
2.2.2 Deleting RAID configuration
Delete the existing RAID Configuration
CAUTION: Deleting the RAID Volume deletes all the data from the Hard Disk.
To delete RAID Configuration
1. Start the RAID Configuration Utility program.
2. Under Virtual Disk Management (VD Mgmt), select Controller 0 by using the UP/DOWN ARROW key.
3. Press F2 to view the options available.
Figure 2-10 RAID Configuration – Delete RAID
4. Select Clear Config by using the UP/DOWN ARROW key.
A message prompting you to confirm to clear the configuration appears.
5. Answer YES to confirm.

Document Title: PRODUCTION OF QCS ONLY SERVER AND COMMON SERVER ON WINDOWS 2008 USING EXPPLUS
Document # 6510030090
REV 02
Where Used: 09884613 Page 11 of 35
Honeywell Proprietary and Confidential DO NOT COPY
2.2.3 RAID Configuration
To setup RAID configuration
1. Start the RAID Configuration Utility program.
2. Under Virtual Disk Management, select Controller 0 by using the UP/DOWN ARROW key.
3. Press F2 to view the options available.
Figure 2-11 RAID Configuration – Create New VD
4. Select Create New VD by using the UP/DOWN ARROW key.
5. Press [ENTER].
The Create New VD screen appears.
Figure 2-12 RAID Configuration – RAID Configuration Details
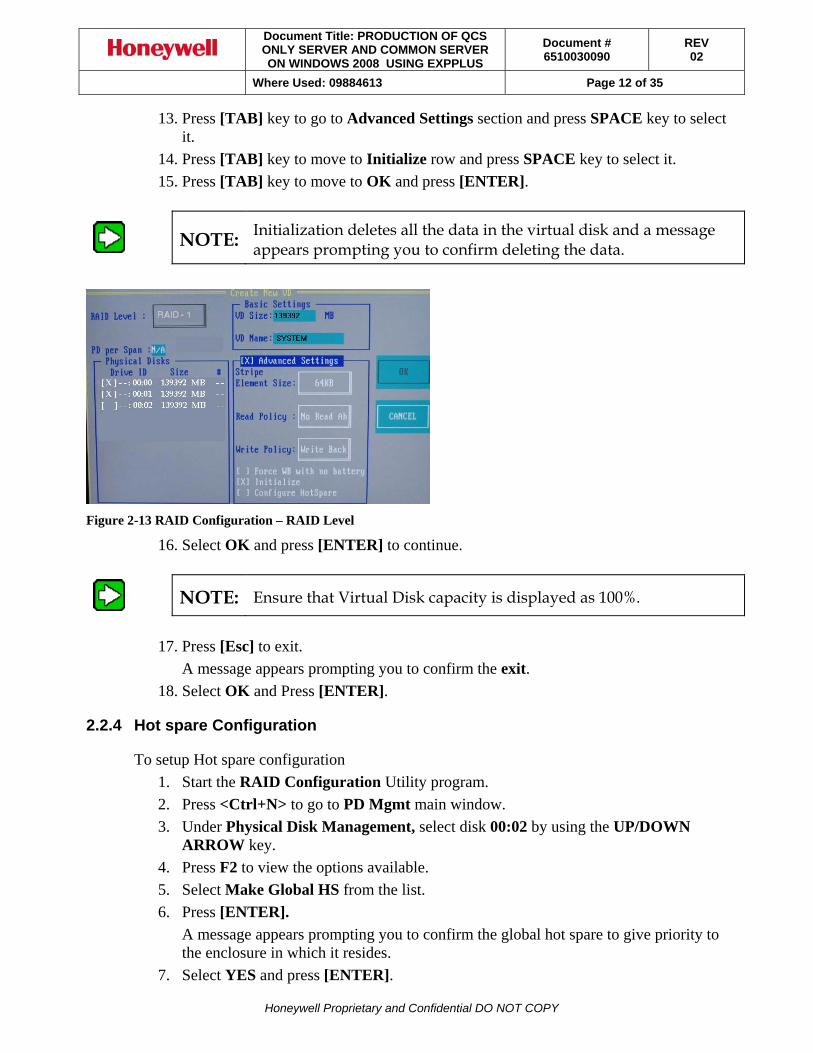
6. Press the [TAB] key to select the RAID Level row.
7. Press [ENTER] to view the list of RAID Level available.
8. Select RAID-1 from the list by using the UP/DOWN ARROW key, and then press [ENTER].
9. Press the [TAB] key to go to Physical Disks section.
10. Under Physical Disks, select drives 00:00 and 00:01 by using SPACE key.
11. Press [TAB] key to go to VD Name field under Basic Settings section.
12. Under Basic Settings, type VD name in the VD Name field. For example: SYSTEM.
Document Title: PRODUCTION OF QCS ONLY SERVER AND COMMON SERVER ON WINDOWS 2008 USING EXPPLUS
Document # 6510030090
REV 02
Where Used: 09884613 Page 12 of 35
Honeywell Proprietary and Confidential DO NOT COPY
13. Press [TAB] key to go to Advanced Settings section and press SPACE key to select it.
14. Press [TAB] key to move to Initialize row and press SPACE key to select it.
15. Press [TAB] key to move to OK and press [ENTER].
NOTE: Initialization deletes all the data in the virtual disk and a message appears prompting you to confirm deleting the data.
Figure 2-13 RAID Configuration – RAID Level
16. Select OK and press [ENTER] to continue.
NOTE: Ensure that Virtual Disk capacity is displayed as 100%.
17. Press [Esc] to exit.
A message appears prompting you to confirm the exit.
18. Select OK and Press [ENTER].
2.2.4 Hot spare Configuration
To setup Hot spare configuration
1. Start the RAID Configuration Utility program.
2. Press <Ctrl+N> to go to PD Mgmt main window.
3. Under Physical Disk Management, select disk 00:02 by using the UP/DOWN ARROW key.
4. Press F2 to view the options available.
5. Select Make Global HS from the list.
6. Press [ENTER].
A message appears prompting you to confirm the global hot spare to give priority to the enclosure in which it resides.
7. Select YES and press [ENTER].

Document Title: PRODUCTION OF QCS ONLY SERVER AND COMMON SERVER ON WINDOWS 2008 USING EXPPLUS
Document # 6510030090
REV 02
Where Used: 09884613 Page 13 of 35
Honeywell Proprietary and Confidential DO NOT COPY
Figure 2-14 Hot spare Configuration
8. Press [Esc] to exit.
A message prompting you to confirm the exit appears.
9. Select OK and press [ENTER] to confirm.
10. Press <Ctrl+Alt+Del> to restart the system.
2.3 Installing Operating System using Experion PKS R400 System Initialization Media
CAUTION:
Users must use Experion PKS System Initialization R100.x (or Later) media along with HPS Operating System Reinstallation media to install Windows Server 2008 operating system on the Honeywell qualified Dell PowerEdge R710 (MLK) and PowerEdge T610 (MLK) machines.
For detailed information on above media refer to the latest Experion PKS System Initialization Media Software Change Notice (SCN).
2.3.1 Generating the Configuration Files for Target Machine
2.3.1.1 Prerequisites
You need a standalone computer with CD/DVD ROM and Windows OS (Win2003, Win2008 or Win XP or Win 7) to generate the configuration files for the target machine.
The configuration files generated on the standalone computer must be saved in a pen drive or any removable disk as a backup. You need to use this configuration file along with Experion PKS R400 System Initialization media on the target machine.
2.3.1.2 Generating Configuration Files
Perform the following steps on the standalone computer to generate the configuration file for the target machine.

Document Title: PRODUCTION OF QCS ONLY SERVER AND COMMON SERVER ON WINDOWS 2008 USING EXPPLUS
Document # 6510030090
REV 02
Where Used: 09884613 Page 14 of 35
Honeywell Proprietary and Confidential DO NOT COPY
NOTE:
Acknowledge the user account control dialog box, if it appears. It is not necessary or mandatory for the user account control dialog box to appear during the installation process. This information is applicable for the remainder of this manual, unless explicitly stated otherwise.
1. Insert the Experion PKS R400 System Initialization media into the CD/DVD drive of
standalone computer (not the target computer).
The Honeywell- Experion PKS System Initialization dialog box appears.
Figure 2-15 Honeywell- Experion PKS System Initialization
2. Click Launch Setup.
3. Click Yes, if the User Account Control dialog box appears.
The Initializing Experion PKS System Installer message appears.

Document Title: PRODUCTION OF QCS ONLY SERVER AND COMMON SERVER ON WINDOWS 2008 USING EXPPLUS
Document # 6510030090
REV 02
Where Used: 09884613 Page 15 of 35
Honeywell Proprietary and Confidential DO NOT COPY
The Experion PKS System Initialization Wizard appears.
Figure 2-16 Configuration file Generation selection
4. Select Generate configuration files.
5. Click Next.
NOTE:
If the configuration files are already generated for the target machine, select Modify existing configuration files. Click Browse to browse to the configuration files and select the InitMediaOptions.xml file. Click Next. The subsequent dialog boxes are displayed according to the selections made as per the configuration files. You can modify the selections if required.
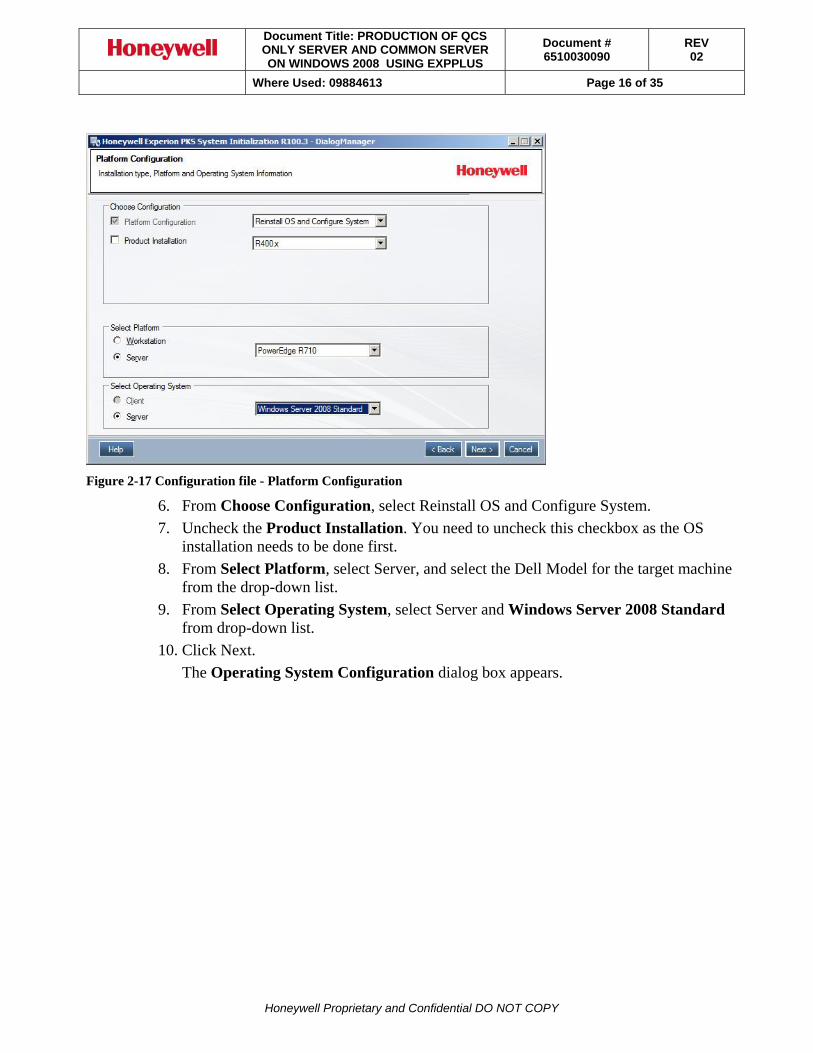
The Platform Configuration dialog box appears.
Document Title: PRODUCTION OF QCS ONLY SERVER AND COMMON SERVER ON WINDOWS 2008 USING EXPPLUS
Document # 6510030090
REV 02
Where Used: 09884613 Page 16 of 35
Honeywell Proprietary and Confidential DO NOT COPY
Figure 2-17 Configuration file - Platform Configuration
6. From Choose Configuration, select Reinstall OS and Configure System.
7. Uncheck the Product Installation. You need to uncheck this checkbox as the OS installation needs to be done first.
8. From Select Platform, select Server, and select the Dell Model for the target machine from the drop-down list.
9. From Select Operating System, select Server and Windows Server 2008 Standard from drop-down list.
10. Click Next.
The Operating System Configuration dialog box appears.

Document Title: PRODUCTION OF QCS ONLY SERVER AND COMMON SERVER ON WINDOWS 2008 USING EXPPLUS
Document # 6510030090
REV 02
Where Used: 09884613 Page 17 of 35
Honeywell Proprietary and Confidential DO NOT COPY
Figure 2-18 Configuration file – Operating System Configuration
11. For System Settings:
a. Select the Local Language from the drop-down list.
b. Select the Time Zone from the drop-down list appropriate to the geographical location where the system will be used.
c. Type the Computer Name
Following are the naming conventions that you need to follow, while creating a computer name.
The computer name must be 15 characters or less in length and should begin with an alphabetic character (“a to z” or “A to Z”) and cannot contain spaces or other non-standard characters.
The last letter for Redundant Servers must end in the letter A or B, with the same Base Name. For example, HSERVA and HSERVB.
All other nodes including non-redundant Servers Must Not end with the letters A or B.
d. Type the Company Name
e. Type the Customer Name
NOTE: For the Company Name and Customer Name do not use special characters.
f. Type the Workgroup Name

Document Title: PRODUCTION OF QCS ONLY SERVER AND COMMON SERVER ON WINDOWS 2008 USING EXPPLUS
Document # 6510030090
REV 02
Where Used: 09884613 Page 18 of 35
Honeywell Proprietary and Confidential DO NOT COPY
12. In the Account and Password, type the following details: a. User Account Name (QCSAdmin)
b. Password (Hmxresult1#) and confirm the password.
13. Uncheck the Microsoft Embedded COA (Certificate Of Authenticity) is not available on this platform check box. By doing this you need not enter the product key.
14. Click Next.
The Network and Input/Output Devices Configuration dialog box appears.
NOTE: For the systems with FTE connections, two integrated Broadcom NIC ports must be enabled in BIOS or You need to install the Intel Pro 1000 PT Dual Port Network adapter.
Figure 2-19 Configuration file – Network and I/O Devices Configuration
15. For configuring the systems with FTE, proceed with Step 17.
16. For configuring the system with Ethernet, select the Network Type as Ethernet, select the No. of Adapters as One from the drop-down list and Network Link Speed as 100 mbps Full Duplex.
17. In the Network Configuration
Select the Network Type as FTE for systems with FTE
Select No. of Adapters as Two for systems with FTE
The configuration of a network port can be changed by selecting and clicking TCP/IP Properties for NIC button.
18. The I/O details are selected by default.

Document Title: PRODUCTION OF QCS ONLY SERVER AND COMMON SERVER ON WINDOWS 2008 USING EXPPLUS
Document # 6510030090
REV 02
Where Used: 09884613 Page 19 of 35
Honeywell Proprietary and Confidential DO NOT COPY
19. In the FTE Configuration
Type the Multicast Address
Type the Device Index
Type the UDP Source Port
Type UDP Destination Port
Provide a Friendly Name
NOTE: For detailed information about FTE installation and configuration refer to Fault Tolerant Ethernet Installation and Service Guide - FE05-400 (Document ID: EP-DSX256).
20. Click Next.
21. Read through the Confirmation Configuration Summary details, and click Save Config files.
Figure 2-20 Configuration file – Network and I/O Devices Configuration
To save the configuration files, browse through one of the following options.
a. You can either use USB flash drive, or local hard disk to save the configuration files to be used on this computer for future use. OR
b. Save the generated configuration files in a separate folder at the root of the C drive, floppy drive, or USB drive.
22. Click OK.
The Experion PKS System Initialization dialog box appears indicating that Configuration files are saved successfully.

Document Title: PRODUCTION OF QCS ONLY SERVER AND COMMON SERVER ON WINDOWS 2008 USING EXPPLUS
Document # 6510030090
REV 02
Where Used: 09884613 Page 20 of 35
Honeywell Proprietary and Confidential DO NOT COPY
23. Click OK.
24. Click Finish.
25. Read the instructions on the Honeywell Experion PKS System Initialization R100.3 - DialogManager
Figure 2-21 Configuration file – EPKS System Init Media Booting Instructions
26. Click OK.
27. Close the Honeywell- Experion PKS System Initialization window.
2.3.2 Installing the Operating System on the Target Machine using Experion PKS R400 System Initialization Media
1. In the target machine, insert Experion PKS R400 System Initialization media, connect the USB flash drive that has the configuration file created for the target machine in section 2.3.1.2 and re-start the computer.

Document Title: PRODUCTION OF QCS ONLY SERVER AND COMMON SERVER ON WINDOWS 2008 USING EXPPLUS
Document # 6510030090
REV 02
Where Used: 09884613 Page 21 of 35
Honeywell Proprietary and Confidential DO NOT COPY
NOTE: Ensure that the USB drive containing the configuration files generated for the target machine is connected before you re-start the computer to avoid any removable disc detection.
2. Watch the monitor while it restarts and press any key when you see the message Press any key to boot from CD or DVD.
The Windows is loading files message appears.
The Experion PKS System Initialization Pre-Install Utility Window appears.
Figure 2-22 Browsing for Configuration Files
3. Click Browse. Browse to the path where the configuration file is present.
4. Select InitMediaOptions.xml files.
5. Click Open.
6. Click Next.
The Experion PKS System Initialization Pre-Install Utility dialog box appears.

Document Title: PRODUCTION OF QCS ONLY SERVER AND COMMON SERVER ON WINDOWS 2008 USING EXPPLUS
Document # 6510030090
REV 02
Where Used: 09884613 Page 22 of 35
Honeywell Proprietary and Confidential DO NOT COPY
Figure 2-23 System Hard Disk partition details
7. In the Configuration details, select the following:
Partitions count as Two from the drop-down list.
Type the size of Primary partition as 70.
8. Select DVD as the appropriate location for installation media.
9. Click Next.
Notice of Licensed Software dialog box appears.

Document Title: PRODUCTION OF QCS ONLY SERVER AND COMMON SERVER ON WINDOWS 2008 USING EXPPLUS
Document # 6510030090
REV 02
Where Used: 09884613 Page 23 of 35
Honeywell Proprietary and Confidential DO NOT COPY
Figure 2-24 Honeywell End User License Agreement
10. Read the license agreement and select I accept the terms in the license agreement.
11. Click Install.
A warning message appears indicating that the disk contents and partition will be deleted.
12. Click Yes to continue.
13. The Experion PKS System initialization preparing for Operating System installation dialog box appears.
A message appears prompting to insert the Windows 2008 Reinstallation DVD.

Document Title: PRODUCTION OF QCS ONLY SERVER AND COMMON SERVER ON WINDOWS 2008 USING EXPPLUS
Document # 6510030090
REV 02
Where Used: 09884613 Page 24 of 35
Honeywell Proprietary and Confidential DO NOT COPY
Figure 2-25 Windows 2008 Reinstallation DVD insertion
14. Remove the Experion PKS System Initialization media and insert the HPS operating system reinstallation media for Windows server 2008.
15. Click OK.
The Installing Windows…dialog box displays the status of the Operating System installation.
16. During the Operating System installation, your computer restarts several times.
17. After the Operating System installation is completed, a message appears prompting you to insert the Experion PKS System Initialization R100.3 DVD.
Figure 2-26 EPKS Init Media R100.3 DVD insertion
18. Remove the Windows 2008 Reinstallation DVD and insert the Experion PKS System Initialization R100.3 DVD. Click OK.
The Initializing Experion PKS System Installer... message appears.
19. After the initial personalized settings are completed, the Experion PKS-Status Display dialog box appears, displaying the status of the Operating System Configuration.
A message appears in the Experion PKS-Status Display dialog box confirming the Experion PKS System Initialization Installation is completed successfully.
20. Click OK to restart the system.
21. After the system restarts, login to the machine as QCSAdmin and verify the OS installation.

Document Title: PRODUCTION OF QCS ONLY SERVER AND COMMON SERVER ON WINDOWS 2008 USING EXPPLUS
Document # 6510030090
REV 02
Where Used: 09884613 Page 25 of 35
Honeywell Proprietary and Confidential DO NOT COPY
2.4 Creating Boot media
Windows PE Boot media is needed to run the Norton ghost application on this RAE node for creating its Ghost image (GHO file). You can use the same media to restore Ghost Images that are taken already.
NOTE: Use the computer which is installed with Windows Operating System and the CD/DVD Burning Software for creating the Boot Media.
NOTE: Refer the Ghost Backup for Da Vinci and MXProLine Systems user guide (46027201) for more details on using Norton Ghost on RAE node.
Use the burning software to burn a Boot Media CD from the Production DVD_124\OSDeployment\01000936_REVC_winpe.iso image.
2.5 Display Properties configuration
To configure the display properties
1. Right-click on the desktop, and then click Personalize from the shortcut menu.
The Personalization dialog box appears.
Document Title: PRODUCTION OF QCS ONLY SERVER AND COMMON SERVER ON WINDOWS 2008 USING EXPPLUS
Document # 6510030090
REV 02
Where Used: 09884613 Page 26 of 35
Honeywell Proprietary and Confidential DO NOT COPY
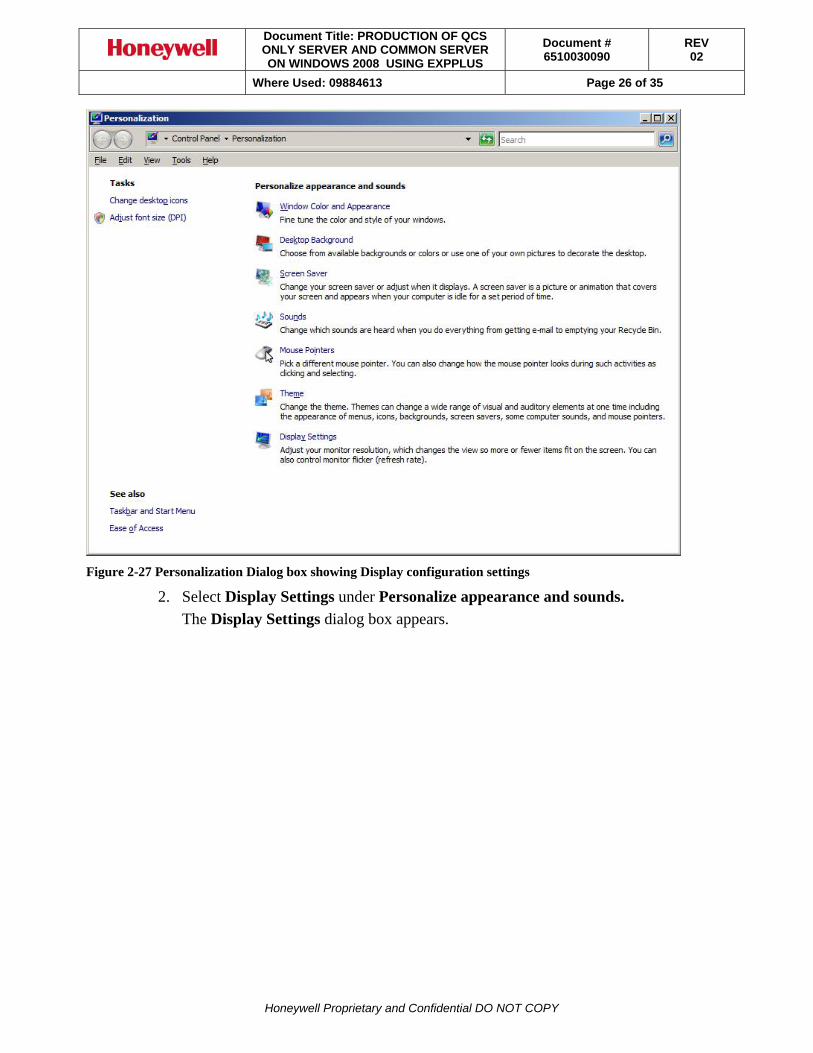
Figure 2-27 Personalization Dialog box showing Display configuration settings
2. Select Display Settings under Personalize appearance and sounds.
The Display Settings dialog box appears.

Document Title: PRODUCTION OF QCS ONLY SERVER AND COMMON SERVER ON WINDOWS 2008 USING EXPPLUS
Document # 6510030090
REV 02
Where Used: 09884613 Page 27 of 35
Honeywell Proprietary and Confidential DO NOT COPY
Figure 2-28 Display Settings Dialog box
3. Under Resolution, move the Slider to set a screen resolution of 1280x1024.
4. Under Colors, select Medium (16-bit).
5. Click Advanced settings.
The Generic PnP Monitor and Matrox G200eW (Nuvoton) dialog box appears.

Document Title: PRODUCTION OF QCS ONLY SERVER AND COMMON SERVER ON WINDOWS 2008 USING EXPPLUS
Document # 6510030090
REV 02
Where Used: 09884613 Page 28 of 35
Honeywell Proprietary and Confidential DO NOT COPY
Figure 2-29 Generic PnP Monitor and Matrox G200eW (Nuvoton)
6. Click the Monitor tab.
7. Under Monitor settings, set the Screen refresh rate based on type of monitor you are using, as follows:
For LCD Monitors – 60 Hertz.
For non-LCD Monitors – 75 Hertz
8. Click Apply.
The Display Settings message appears, prompting you to keep the display settings you have configured.
9. Click Yes.
10. Click OK to save the monitor settings and close the dialog box.
11. Click OK to close the Display Settings dialog box.
12. Close the Personalization dialog box.
Document Title: PRODUCTION OF QCS ONLY SERVER AND COMMON SERVER ON WINDOWS 2008 USING EXPPLUS
Document # 6510030090
REV 02
Where Used: 09884613 Page 29 of 35
Honeywell Proprietary and Confidential DO NOT COPY
2.6 Dell Open Manage
The Dell Open Manage6.2 is installed through Experion PKS R400 System Initialization media and the Server Administrator icon is created on the desktop.
2.6.1 Configuring Dell Open Manage6.2
To configure the Dell Open Manage6.2
1. Double-click the Server Administrator icon on the desktop.
NOTE: Use the Administrator password to log on to Dell Open Manage Server Administrator.
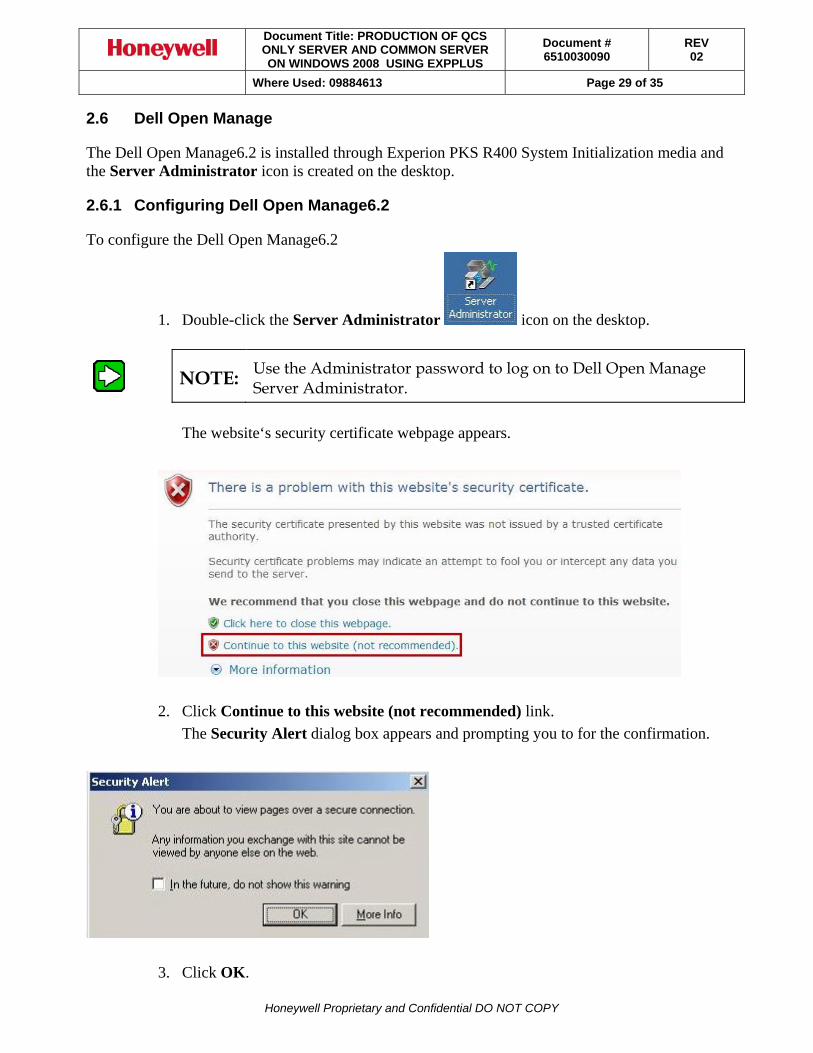
The website‘s security certificate webpage appears.
2. Click Continue to this website (not recommended) link.
The Security Alert dialog box appears and prompting you to for the confirmation.
3. Click OK.

Document Title: PRODUCTION OF QCS ONLY SERVER AND COMMON SERVER ON WINDOWS 2008 USING EXPPLUS
Document # 6510030090
REV 02
Where Used: 09884613 Page 30 of 35
Honeywell Proprietary and Confidential DO NOT COPY
NOTE: If the Dell Open Manage fails to open, perform the following steps to open the Dell Open Manage.
If the Server is not connected to the Internet, then Internet Connection Wizard dialog box appears prompting you to setup the internet connection.
Figure 2-30 Internet Connection Wizard
4. Click the View the ISP offer provided by my computer manufacturer.
5. Click OK.
6. Close the Internet Signup window.
The Security Alert dialog box appears.

Document Title: PRODUCTION OF QCS ONLY SERVER AND COMMON SERVER ON WINDOWS 2008 USING EXPPLUS
Document # 6510030090
REV 02
Where Used: 09884613 Page 31 of 35
Honeywell Proprietary and Confidential DO NOT COPY
Figure 2-31 Security Alert
7. Click Yes.
The Internet Explorer dialog box appears.
Figure 2-32 Internet Explorer
8. Click Add.
The Trusted sites dialog box appears.

Document Title: PRODUCTION OF QCS ONLY SERVER AND COMMON SERVER ON WINDOWS 2008 USING EXPPLUS
Document # 6510030090
REV 02
Where Used: 09884613 Page 32 of 35
Honeywell Proprietary and Confidential DO NOT COPY
Figure 2-33 Trusted Sites
9. Click Add to add the Server to trusted Web sites list.
The Server address is displayed under Web sites list.
10. Click Close.
The Microsoft Phishing Filter dialog box appears.
Figure 2-34 Microsoft Phishing Filter
11. Click the Turn off automatic Phishing Filter
12. Click OK.
The Dell Open Manage login webpage appears.
13. Logon with the Administrator User Name and Password.

Document Title: PRODUCTION OF QCS ONLY SERVER AND COMMON SERVER ON WINDOWS 2008 USING EXPPLUS
Document # 6510030090
REV 02
Where Used: 09884613 Page 33 of 35
Honeywell Proprietary and Confidential DO NOT COPY
14. Click OK.
Check that Open Manage has no errors and close application.
2.7 Installing the RAE
For installing RAE R600 on the Server, refer to Real-Time Application Environment (RAE) R600 for Experion PKS R400.2 Release and Installation Notes 6510020334.
3 Additional Information
This section provides additional information related to Operating System loading after major hardware recovery such as Mother Board failure.
3.1 BIOS Update utility
The BIOS Update utility selects Dell’s or Honeywell’s custom BIOS to support/protect operating system activation. Honeywell’s custom BIOS files are derived from generic Dell BIOS files and are mandatory to complete automatic activation of the operating system for platforms that are installed using Honeywell OEM embedded operating systems.
ATTENTION:
The BIOS Update utility updates the BIOS either to a new version or to any of the previous versions. This is a new feature introduced in Experion PKS System Initialization R100.3 onwards.
CAUTION: You are recommended to use the BIOS Update utility only in case of motherboard failure or motherboard replacement.
The following table lists the platform names and the model numbers with which the BIOS Update utility must be used.
Platform Part Number
T610 6543100028
6543100026
6543100027
T710 6543100029
In case of motherboard failure, below steps needs to be carried out in order to bring back the server to operation:
1. Replace the motherboard.
2. Complete the motherboard installation.
3. Switch on the platform.

Document Title: PRODUCTION OF QCS ONLY SERVER AND COMMON SERVER ON WINDOWS 2008 USING EXPPLUS
Document # 6510030090
REV 02
Where Used: 09884613 Page 34 of 35
Honeywell Proprietary and Confidential DO NOT COPY
4. Run the BIOS Update utility by referring Section 3.1.1 Installing the appropriate BIOS on R400.x platform.
3.1.1 Installing the appropriate BIOS on R400.x platform
CAUTION: Before starting the BIOS Update utility installation, save all data and close all windows. After the installation platform needs a restart.
Perform the following steps to run the BIOS Update utility on R400.x platforms.
1. Log on to the platform with administrator privileges.
2. Insert Experion PKS System Initialization R100.3 (or Later) media into DVD drive.
3. Browse to <root>\webpage\autorun.htm path.
4. Double-click autorun.htm
The Experion PKS System Initialization On-media documentation dialog box is displayed.
5. In the left pane, click BIOS
The BIOS Minimum Requirements screen is displayed in the right pane.
6. In the right pane, click platformname.exe from the BIOS upgrade application column.
For example, if you are upgrading BIOS version for the R710 platform, click R710.exe file.
7. Save the platformname.exe to your local folder.
8. Browse to the folder containing the installer and double-click WinZipSelfExtractor-<platform name.exe>
9. Click Allow and click Setup.
The BIOS Update dialog box is displayed that contains information about the installed BIOS version and the latest custom BIOS version.
ATTENTION:
The installed BIOS version and the package version displayed in the BIOS Update dialog box varies depending on the server or workstation on which you are performing the installation.
10. Click Yes to continue with the BIOS update installation.
11. Click OK to restart the platform after completing the installation.

Document Title: PRODUCTION OF QCS ONLY SERVER AND COMMON SERVER ON WINDOWS 2008 USING EXPPLUS
Document # 6510030090
REV 02
Where Used: 09884613 Page 35 of 35
Honeywell Proprietary and Confidential DO NOT COPY
CAUTION: Do not click Cancel on the WinZip Self Extractor-<platform name.exe> dialog box or close the WinZip Self Extractor-<platform name.exe> dialog box during installation.
The BIOS update occurs immediately after the platform is restarted.
Information about the BIOS modification is displayed on the screen.
Subsequently, the installed BIOS version is displayed in the Power On Self Test (POST) screen. You can also check the BIOS version by pressing F2 once the POST screen closes.