product support - download.xbox.comdownload.xbox.com/content/535607d1/0/gbm_man_eng... · xbox 360...
TRANSCRIPT

PRODUCT SUPPORTYou can contact Slitherine’s customer support directly on the site
www.slitherine.com
by posting a query on the game’s forum at
http://slitherine.com/forum/
by writing an e-mail at
or by phone calling this number:
0044 1372617003
For issues specifically regarding your Xbox 360 console, please refer to your Xbox 360 Instruction Manual or contact Xbox Customer Support.
1
] x
_ `
L
<
l C
>
A
B
X
Y
�Xbox Guide
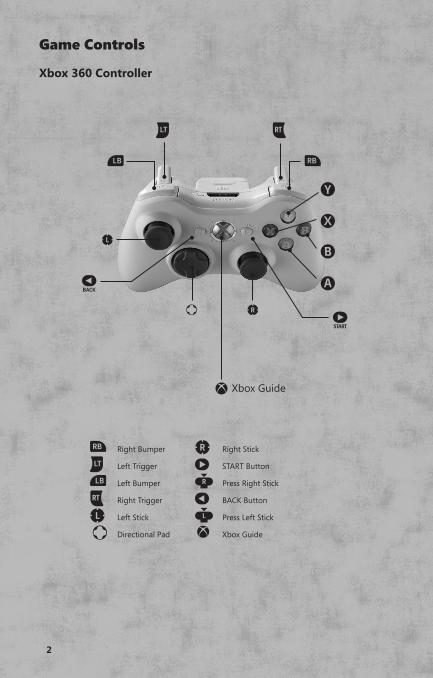
`� Right Bumper C� Right Stick
]� Left Trigger ;�� START Button
_� Left Bumper h��Press Right Stick
x� Right Trigger :�� BACK Button
L� Left Stick j��Press Left Stick
l�Directional Pad Xbox Guide
Game Controls
Xbox 360 Controller
2

Xbox LIVEXbox LIVE® is your connection to more games, more entertainment, more fun. Go to www.xbox.com/live to learn more.
ConnectingBefore you can use Xbox LIVE, connect your Xbox 360 console to a high-speed Internet connection and sign up to become an Xbox LIVE member. For more information about connecting, and to determine whether Xbox LIVE is available in your region, go to www.xbox.com/live/countries.
Family SettingsThese easy and flexible tools enable parents and caregivers to decide which games young game players can access based on the content rating. Parents can restrict access to mature-rated content. Approve who and how your family interacts with others online with the Xbox LIVE service, and set time limits on how long they can play. For more information, go to www.xbox.com/familysettings.
3

INTRODUCTION
Welcome to HISTORYTM Great Battles Medieval!
Great Battles Medieval is a unique blend of Real-Time Strategy and Role-playing that allows you to develop your army; gaining experience, abilities and equipment to customise your troops. Success can never be guaranteed but to give you the best chance we recommend careful preparation and equipping your squads to meet every eventuality. Tactical planning before the battles are fought is also essential; as even the best General cannot rectify every error once battle is joined.
GETTING STARTEDInsert the game into your Xbox 360’s disc tray and close the tray. The game may automatically start, or you may need to select Great Battles Medieval from the Xbox 360 Dashboard.
The game will load into the Title Screen. If you wish to save your progress, or play online multiplayer with an online enabled XBOX Live account, ensure you are logged into your account before progressing from the Title Screen into the Main Menu.
Progress into the Main Menu by pressing the START button in the Title Screen. The Main Menu has several different types of game modes and options.
To play a Single Player campaign, you will use Play Campaign, Resume Game, or Load Game. For Single Player Skirmish, you will use the Skirmish option. For online multiplayer via XBOX Live, select Multiplayer.
4
5
STARTING A CAMPAIGNStart a campaign by selecting the Play Campaign option from the Main Menu wheel. You can return to your most recent autosaved game by selecting Resume Game from the Main Menu wheel as well.
If you aren’t familiar with the controls or gameplay of Great Battles Medieval, it is recommended that you first play the Tutorial Campaign before delving into the more difficult English and French storylines.
Note: After each successful battle, the game will autosave if autosaving is enabled. Do not switch off the console when the autosave window appears on screen.
PLAYING THE GAMEIn Great Battles Medieval you play as a general in control of English or French forces during the hundred years war. The English campaign is designed for new players and the French campaign is much harder so best tried once you have some experience. As the English you will fight under the Black Prince, Henry V and other heroic characters from history, and as the French you fight for Joan of Arc and the King.
Great Battles Medieval is split in to 4 main areas, which we will explain in more detail later.
• Quest Map – where you choose which missions to undertake and travel around the game world.
• Army Camp – where you recruit, equip and train your troops.
• Deployment & Battle – where you create battle plans and engage the enemy.
• Battle Cards – where you select the Battle Cards to take to the next mission.
The game offers a unique RPG experience on a massive scale. Instead of playing with a few characters, the player has up to 20 squads under their command. Each squad can be equipped and trained by the player, selecting their armour, weapons, fighting styles and much more – there are an almost infinite number of combinations. As your men fight they gain experience and new skills. Pretty soon you have a unique army customized to your tactics, and different to any other army out there.
The tutorial campaign will explain the basics so all new generals should start here.
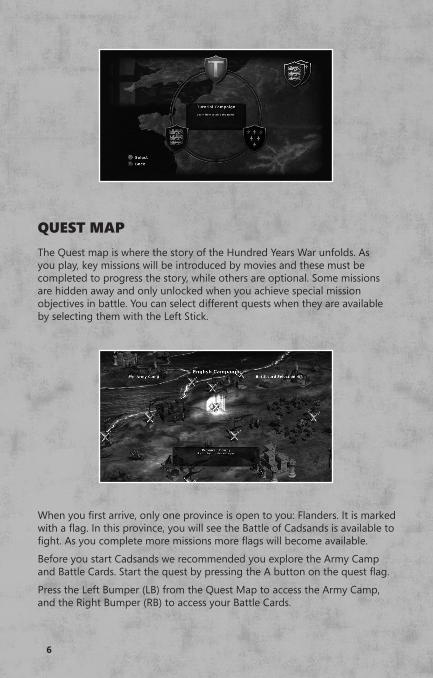
QUEST MAPThe Quest map is where the story of the Hundred Years War unfolds. As you play, key missions will be introduced by movies and these must be completed to progress the story, while others are optional. Some missions are hidden away and only unlocked when you achieve special mission objectives in battle. You can select different quests when they are available by selecting them with the Left Stick.
When you first arrive, only one province is open to you: Flanders. It is marked with a flag. In this province, you will see the Battle of Cadsands is available to fight. As you complete more missions more flags will become available.
Before you start Cadsands we recommended you explore the Army Camp and Battle Cards. Start the quest by pressing the A button on the quest flag.
Press the Left Bumper (LB) from the Quest Map to access the Army Camp, and the Right Bumper (RB) to access your Battle Cards.
6

7
ARMY CAMPThis is where you customize your army. In the middle of the screen is the selected squad. Icons arranged in a wheel around him represent your other squads. Use the Left Stick to move from one squad to the next, or you can quickly move from one squad to the next while in a submenu by using the Left Trigger (LT) and Right Trigger (RT).
By selecting the selected squad’s icon you enter the customization mode. In this mode there are many options open to you. You can choose a squad’s armour, weapon, shield, attack skills, general skills and defensive skills. You can also change the livery of a squad using the Directional Pad as indicated by the on screen buttons, which changes the shield designs. Each time you select an option you go deeper in to the customization menu. For example if you choose weapons you’ll be shown a list of weapons available. When you move to a weapon, its attributes can be seen in the information pane to the lower left. If it is too expensive the weapon icon will be greyed out.
Squads gain experience for killing opponents and when they gain enough experience points they go up a level and gain skill points. These skill points are used to further customise the squad. The skill points a squad has are shown on the squad’s icon, but at the start of the game you won’t see any numbers as your squads are all new recruits with no experience of battle.
You can recruit new squads and disband existing squads using the buttons shown on the left of the screen. Use the X button to move to the recruiting menu, and use the Y button to disband the current squad. You will be asked to confirm that you want to disband the squad. There are only 3 basic unit types in the game – infantry, cavalry and archers. How you equip them determines how they behave – give them a Pike and they becomes fearsome cavalry killers, but equip them with a sword and shield and they are best suited to fighting infantry. There are millions of possible combinations.
As you progress through the game new weapons, shields and armour will be unlocked and you’ll receive more money to purchase equipment and squads. You will spend a lot of time customising your army later but for now return to the Quest map and look at the Battle Cards.
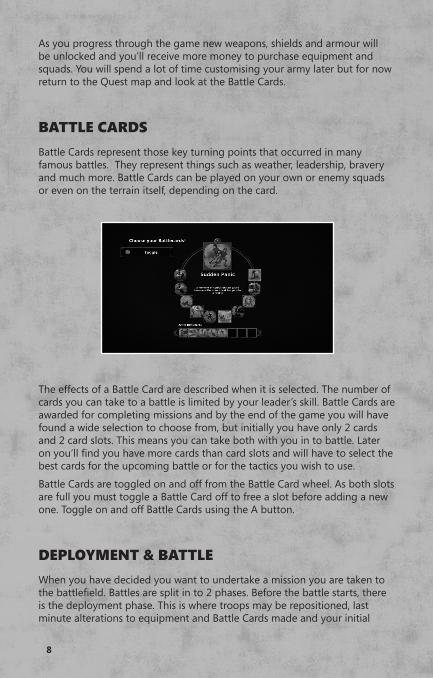
BATTLE CARDSBattle Cards represent those key turning points that occurred in many famous battles. They represent things such as weather, leadership, bravery and much more. Battle Cards can be played on your own or enemy squads or even on the terrain itself, depending on the card.
The effects of a Battle Card are described when it is selected. The number of cards you can take to a battle is limited by your leader’s skill. Battle Cards are awarded for completing missions and by the end of the game you will have found a wide selection to choose from, but initially you have only 2 cards and 2 card slots. This means you can take both with you in to battle. Later on you’ll find you have more cards than card slots and will have to select the best cards for the upcoming battle or for the tactics you wish to use.
Battle Cards are toggled on and off from the Battle Card wheel. As both slots are full you must toggle a Battle Card off to free a slot before adding a new one. Toggle on and off Battle Cards using the A button.
DEPLOYMENT & BATTLEWhen you have decided you want to undertake a mission you are taken to the battlefield. Battles are split in to 2 phases. Before the battle starts, there is the deployment phase. This is where troops may be repositioned, last minute alterations to equipment and Battle Cards made and your initial
8

9
disposition of forces set. The green tiles show the possible positions you can deploy your troops. The yellow squares show a route this squad has been ordered to take when the battle starts.
To move your troops around the Deployment Tiles, select a squad, and hold the A button while moving the squad with the Left Stick. This will drag the squad around the battlefield through the allowable green tiles until you release the A button.
Some battles limited the number of squads you can bring to them. You may have recruited more squads than there are available slots. In this case, you can select a squad that you do not want to be deployed in the battle and press the Y button to undeploy them. You can then use the Left and Right Triggers to select a squad from your army (shown in the lower left corner) and deploy that squad over the now empty Deployment Tile using the Y button. Squads that are not currently deployed in the battle are shown greyed out in the lower left corner.
Once you’re happy with this, you move on to the real-time battle. To begin the battle press the X button. From now on you are no longer able to change your equipment or Battle Card selections and the only way to reposition troops is to order them to move to the desired location and wait until they arrive.
Whenever you want to enter orders press the X button to toggle to Order Mode, which pauses the battle. This makes it easier for new players and those with slower reactions to play the game tactically. It is not about the speed of your reactions – it is about the speed of your mind!
You’ll notice that the battles are split in to a grid of tiles, which further simplifies the selection and ordering of units. It also allows players to set up more refined battle plans knowing how many tiles a unit can move or shoot, removing the guess work associated with other real-time strategy games.

At the deployment stage you’ll see the battlefield from behind your troops. At the top of the screen you can just see the enemy army. If playing as the English your men are red, and the French enemy are in blue livery. Across the bottom of the screen are your Battle Cards, and beneath this is an icon for each squad you have in the battle. These icons show the status of your men. If the squad becomes shaken or routed then blue and white symbols will appear on top of the icon. Once the missions objectives have been completed or failed, or all the squads on one side have routed, the battle is over.
Squads will attempt to follow the route they have been given but if an obstacle blocks them they will try to find an alternative route. If they encounter enemy troops, they will engage them. Any orders given before combat are forgotten in the heat of battle, and so any waypoints that were issued before a combat began are cleared.
Each time a man dies, a small skull floats up to give feedback about the progress of a combat. The skulls are colour coded for each side to provide an overview of who is winning or losing.
Morale is a key feature of the game and breaking the enemy army’s morale is a quicker route to victory than just killing them. Units are susceptible to their own and others’ successes and failures on the battlefield, while Battle Cards and special skills acquired through the game also play their part. A squad can be ordered, shaken or routed. Once routed, they will run away and, unless rallied, will leave the battle and play no further part. Every time a squad drops a morale level you’ll see an effect over the squad. You’ll also see effects played when a squad is attacked in the flank or rear or a when a Battle Card is played.
10

11
POST BATTLE SCREENWhen a mission is won (or lost!), you get a report of the battle. This shows you information about how many squads you lost, how many the enemy lost, how much money you earned, what rewards you won (or if you see a large ‘?’ symbol, what rewards you didn’t win!). If you lose a battle you won’t win any rewards. If you win a battle you may get some but not all the rewards, depending on whether you achieved all your objectives.
Losing a mission is not a disaster. You can just try again. There is no penalty for losing a mission other than you have to replay it.
If you win a mission it is a good idea to go straight to the Army Camp to spend your loot and select skills for any squads who have gained a level. Squads with skill points to spend will be marked with a bright halo.
SKIRMISH MODESkirmish mode is intended as a practice mode for multiplayer, or as a good way to experiment with squad and weapon combinations without sacrificing gameplay experience. First, select your game type:
• Sandbox has a variety of scenarios but never ends so you cannot win or lose it. The scenarios are not balanced and so you can end up with some very interesting and unusual match ups.
• 3 node tug-of-war. In this there are 3 battlefields to fight over. You start on the middle one and the winner pushes the loser back to their base camp. If you lose when fighting on your base camp you lose the campaign. On your base camp you will get artillery support!
• 5 node tug-of-war. This is the same as the 3 node tug-of-war, but with more battles to fight.

When a battle occurs in skirmish mode you must select which army you wish to use in the battle. At this point you cannot edit an army, only load up an existing army – this is intended to keep the game flowing fast and avoid delays, especially in multiplayer. You can either use one of the pre-set armies that we designed or an army you designed in the army editor. You can use a different army for each battle. Note that some battles limit the size of the army you can take while others allow any army.
ARMY EDITORYou access the army editor from the Main Menu, inside the Skirmish and Multiplayer menus but you cannot do it while you are playing a game. The army editor is almost exactly the same as your army camp. It allows you to recruit, equip and train your squads in new skills. The only real difference is that the amount of gold you have to spend and experience points available are set when you create the army – the army does not gain experience or get better. You have the choice of editing one of our pre-set armies or you can create an army from scratch.
In the army editor all pieces of equipment are unlocked so you can try out things you’d never be able to do in single player.
Once you have customised the army you can save it for use in Skirmish and Multiplayer games.
The Army Editor allows you to manually increase the experience of a given squad. The amount of levels that are totally available is given in the lower left corner of screen, and you may distribute these levels as you see fit for the proper balance of your army and vision.
You can also undo a small number of steps backwards if you make a mistake when editing your army.
12

13
MULTIPLAYEROnline multiplayer is accessible via the Multiplayer option in the Main Menu wheel. You must be signed into an online enabled XBOX Live profile in order to access the Multiplayer Menu.
Once in the menu, you can access the multiplayer army editor, and the Ranked and Standard Match types. With Ranked matches, you are paired with players who are of similar ability to you. With Standard matches, you are paired with all players (except those participating in Ranked matches). In addition, through the Standard Match option you can select to create a Private Match, which will not be visible to other players and allows you to invite a friend to play with you without being paired with a random player.
Creating an army through the Army Editor is the first step to battle. You can use the onscreen buttons to create a default army (that has been created for you) or to start from scratch with just a general. You can then edit the army as you see fit and save your changes. You are allowed nine total armies, three of each size: Small, Medium, and Large. Also, one of your armies is selected as your Default Army. This is the army that you use when you create a match, and when you join a match that has a different sized army than your Default Army, you will be prompted to change your Default Army to a size that matches the other player’s army size.
Once you’ve selected a match type, select Quick Match to quickly search for possible matches and join the first possible one. Select Custom Match to look through available matches and choose the one of your liking. Choose Create Match to create your own match type and wait for a player to join.
If no matches are available, the Quick Match option will prompt you to create a match and wait for a potential player.
Once you join in a match with another player and successfully connect, the game will bring you to the Quest Map display. The player who created the match can select the desired map (if applicable) and both players can adjust their Battle Cards by pressing the Right Bumper (RB).
Once you are ready, press the A button in the Quest Map. Once both players are ready, the battle will begin!
Multiplayer battles differ in that you have a limited amount of deployment time and order time throughout the match. The meter in the upper left corner of the screen displays your available time. When the meter turns red, be mindful that your time is about to run out and you will be forced to begin the battle.
The meter slowly recharges throughout the battle. Also, when both players are ordering troops, if one player presses X to begin the battle, that player is no longer penalized with lost order time while he waits for the other player to finishing Ordering.

In Standard Matches, if the Sandbox game type was selected, the game will go on perpetually with the number of battle wins for each player appearing in the upper left corner. We recommend Sandbox for ongoing, fun casual play. If you are playing Ranked Matches, then the Sandbox mode will exit after the first battle, having determined a winner for that game session.
LEADERBOARDSAn exciting feature in Great Battles Medieval is the Leaderboards. Access the leaderboards via the Leaderboards option from the Main Menu wheel. Leaderboards track statistics for both Single Player and the Multiplayer modes.
For Single Player, the leaderboards track the minimum amount of battle time used for each battle in the English and French campaigns. It does not count Order time, so you can achieve the smallest amount of battle time by stopping often to assess the situation and be the best tactician possible!
For Multiplayer, you can see the Most Kills leaderboard to see the number of kills by every player from the Multiplayer mode. Also, you can view the Trueskill™ rankings for each player from the Ranked Matches.
TIPS AND TACTICSThere are lots of things to take in to account in battle. Here are some hints and tips, but you will learn more as you go.
• Weapon & Unit Match Ups. The core concept of Great Battles Medieval is that all units have strengths and weaknesses. Spearmen are good against cavalry. Cavalry are good against infantry without spears, but best at the initial impact so suffer in drawn out fights. Archers are good at ranged combat but weak in melee. Artillery is lethal at range but cannot turn to face and have no melee ability at all. Large shields are great protection verses missile fire, but poor in melee. You can specialise your units with equipment and skills so there are units they are great against but you will also end up with a unit that is very vulnerable to some units. Alternatively you can create an all round unit with no strengths or weaknesses. The combinations are endless and so are the strategies. Try things out and see what works for you. Always take in to account what enemy squads are equipped with as there is a huge different between enemy infantry with Large shields and spears to those with small shields and axes – one will ruin your cavalry and archers, the others will be a tough match for your infantry.
14

15
• Battlefield Terrain. The terrain affects the combat abilities of your units. Forests reduce the effect of missile fire and give combat penalties to mounted and bonuses to lightly armoured infantry. Rocky ground is some protection from cavalry, but defensible terrain such as stakes is best. Try to get your units in terrain they like and your enemies in terrain they don’t like.
• Aggression. You units can be defensive, normal or aggressive. Passive units will only defend, they will not engage any enemy on nearby tiles. This is the default aggression for archers. Aggressive units will chase any enemy nearby, sometimes getting themselves in trouble when doing so – this is the only aggression setting for cavalry and not possible for units that are shaken or previously routed and rallied. Normal aggression is the default for infantry and in this mode they will engage adjacent opponents but not chase off after enemies without orders. Aggression is set using the icons on the right of the screen in battle. Be sure to choose the correct aggression settings as too much or too little autonomy for your units can win and lose the day!
• Fatigue & Walk or Run. Units get fatigued if they run or fight too much. You can toggle whether your units run or walk on the right of the screen in battle. The default is to run, but fatigued units cannot run. When fatigued units receive large combat penalties so it pays to rest your troops and rotate the units in the front line if possible. The fatigue is shown by a bar on the unit’s cards at the bottom of the screen.
• Morale. When a squad takes casualties its morale drops. Over time it’s morale will recover so rest shaken units and they may recover. If a unit routs it is beyond your control and will run from the field. Sometimes it may rally before it leaves the field and in this case you can control it again but bear in mind is probably quite fragile.
• Flank Attacks. Once a unit is engaged in combat it faces that direction. Even if attacked from behind a unit can turn quickly to respond. However if a unit is attacked from 2 directions at once this counts as a flank attack. Flank attacks are shown by a blue effect over the unit in battle. A large morale penalty is caused when a flank attack occurs and it is a good way to break enemy units.
• Trample. Cavalry units, especially lance armed cavalry, have a chance to trample enemy infantry on contact. This trample attack is applied before combat and gives cavalry a chance to sweep the enemy infantry away. Infantry armed with spears are very resistant to trample attacks, and skills such as Stand Firm further reduce their chance to be trampled.

CREDITSSlitherine SoftwareProgramming: Philip Veale - Art: Richard Evans - Design: Iain McNeilBusiness Management: JD McNeil - Marketing Director: Marco MinoliWeb Manager: Andrea Nicola - QA: Robbie Shaw, Christian BassaniWar Drum StudiosCEO, System Architect: Thomas Williamson - Technical Director: MichaelOwen - Business Development: Flashman Studios - Lead Artist: Anna VittoneProgrammers: John Haynes, Joshua Johnson, Sakib Saikia, Dustin Holtz,Djilani Kebaili, Peter Lee - 3D Artists: Morgan Pasteur, Allyce RusnakSound Engineering: J Peter Williamson - External Art: Immersion GamesSpecial Thanks: Acronym Games, Ike Herman, Jeremy Stieglitz, Matt Williams,Abner Williamson, Ross Friedberg, Victor Waters, Zack FowlerLordz Games StudioCEO: Tim van der Moer - Scenario Design: Lukas Nijsten - Movie Editing:Christian Sturm - Sound & Music: Morgan Casey for the Lordz Games StudioLocalisation - Synthesis InternationalLocalisation Manager: Luca Artoni - Translation Manager: Irene PanzeriAudio Manager: Edoardo Fusco - Voice Talent Director: Ambra RavagliaAudio Engineer: Manuel AulettaVoice TalentChristopher Jones - Antonio Paiola - Antoine Tomé - Malcolm AndreassonÁngel Amorós
Published by Slitherine Ltd ©2010. All Rights Reserved. Developed by Slitherine Ltd. All rights reserved. HISTORY™ Great Battles Medieval. Slitherine Ltd 2010. External Developement by War Drum Studios. All rights reserved. THE HISTORY CHANNEL, HISTORY and the “H” logos are trademarks of A&E Television Networks. All rights reserved. Documentary footage © 1999-2010 A&E Television Networks. All rights reserved.
16
