printing the enrollment verification form...
TRANSCRIPT
Enrollment Form Report Page 1
Printing the Enrollment Verification Form Report
Version 1.4 Updated March 16, 2012
Schools should use the Zangle Enrollment Form Report to print a pre-filled SDUSD Enrollment Form with student information that has been entered in Zangle. Schools are to use this report to verify enrollment information from Parent/Guardians each school year rather than having a parent fill out a blank form for their children every year.
Important: To print the Enrollment Form Report for your returning and incoming students for the next school year for verification purposes, log into next year’s track in Zangle.
Follow the steps below to run the Enrollment Form Report
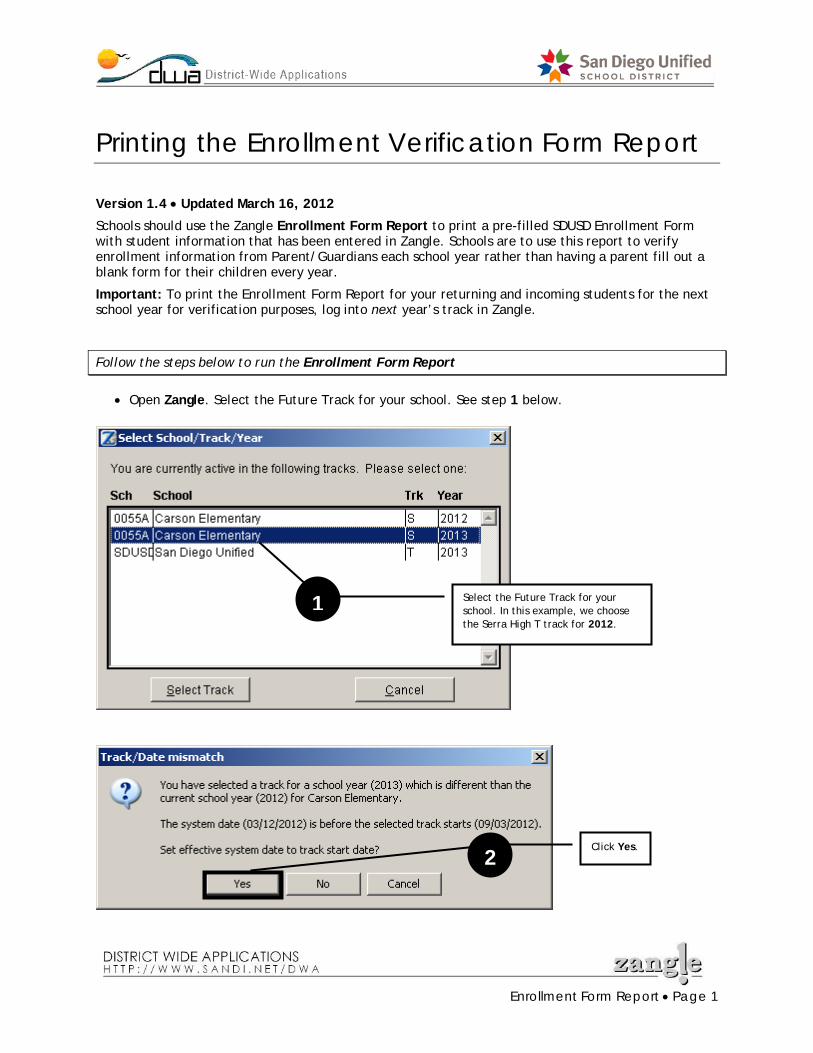
Open Zangle. Select the Future Track for your school. See step 1 below.
Select the Future Track for your school. In this example, we choose the Serra High T track for 2012.
1
Click Yes. 2

Enrollment Form Report Page 2
Click Enrollment.
Click Reports.
3
4
Double-click Enrollment Form (or click once and then click the Select button.) 5

Enrollment Form Report Page 3
Click Parent Copy (for Enrollment Verification) or Office Copy.
The Parent Copy instructs Parent/Guardian/Contacts to make necessary changes and has a signature line on the second page where the Parent/Guardian/Contact must sign the form and check a box indicating if changes were made or not.
The Office Copy indicates no signature is required and can be used if additional copies of the form are needed for school records.
6
The track will default to the track you are currently logged in to. Change if need be.
You may need to make changes to your printer settings if you wish to print the Enrollment Form back-to-back and if your printer has this feature. See page 11 for directions.
Select what language you would like the Enrollment Form to be printed in: English or Spanish. Note: To print in the Primary Contact’s Primary Language, use the Select tab to select the appropriate Group. See the next page for details on how to select the correct district Group.
7

Enrollment Form Report Page 4
Double-click Enrollment.
Click the Select tab. 8
9
Select Future Students. 10
Click Done. 11

Enrollment Form Report Page 5
Double-click Group. 12
Select the appropriate group.
There are two district-made groups for you to use:
*CLangNOTSp contains all Primary Contacts who have any Primary Language other than Spanish.
*CLangSp contains all Primary Contacts who have Spanish as their Primary Language in Zangle.
In this example, we are printing the Enrollment Verification Form in English for all Primary Contacts in Zangle at Serra High who have any language other than Spanish as their Primary Language. We will select the *CLangNOTSp group.
Note: When printing the Enrollment Verification Form in Spanish, select the *CLangSp group.
Click Select.
13
14

Enrollment Form Report Page 6
When you are ready to view the report, click Preview. The report will open to a cover page.
By default the report will sort students in alphabetical order.
See page 19 for detailed instructions on sorting this report differently.
15
The *CLangNotSp Group has been selected. Proceed to Step 15 on the next page.

Enrollment Form Report Page 7
Click either X in the upper right corner to close the cover sheet and reveal the report. (You can also use the Close Preview icon located in the Print Preview bar in the upper left corner of the screen if you prefer.)
16

Enrollment Form Report Page 8
Click the single red arrow to see the next page of the report.
There are two pages per student.
17 The Parent Copy includes the Enrollment Verification Form header, instructing the Parent/Guardian to make all necessary changes in blue or black pen and to sign and date the back of the form.

Enrollment Form Report Page 9
This is the second page of the report. If your printer supports duplex printing, this will be the back side of the report.
Note: The Office Copy not only has a different header but does not require a parent signature.
To print the report, click Continue.
If you do not want to print the report, click Cancel. 19
Close the report when finished previewing.
18
IMPORTANT! A parent must check one of the following boxes:
Yes, changes were made
No changes were made If no corrections were made to the form, the Parent/Guardian must check the No changes were made box and sign and date the form. If corrections were made by the Parent/Guardian, they must check the Yes, changes were made box and sign and date the form.

Enrollment Form Report Page 10
How the Enrollment Form Report should be used
Schools are to use the Enrollment Form report in order to verify enrollment information with parents of returning students each school year. Additional recommendations and guidelines for using this report can be found below:
1. Schools should send the Parent Copy (Enrollment Verification Form) home with students. a. It is recommended that schools should also include the job aid entitled, “Completing
your Child’s Enrollment Form” from the district Registration web site under the Enrollment Forms link (http://www.sandi.net/Page/2557).
b. It is recommended that schools include a cover sheet with any additional instructions for parents.
2. Corrections must be made by the Parent/Guardian in blue or black ink only. The Parent/Guardian/Contact must sign the back of the form even if no changes were made. If the Parent/Guardian/Contact neglected to sign the form, the school should make every effort to obtain a signature. Student or parent information should only be updated in Zangle if a signature was provided.
3. The signed Enrollment Verification Form returned by a Parent/Guardian/Contact should be filed by the school in the secure area where other enrollment forms are kept. If many corrections were made to the enrollment form for a student, schools may wish to print a new, updated version of the Office Copy for filing purposes, but this is not required.
4. If the school receives a corrected, signed Enrollment Verification Form and the Home Address has changed, proof of residence is required. Please refer to Admin Circular No. 10 from September 5, 2007 (http://www.sandi.net/staff/circulars/0708/ac010.pdf) for more information. Please also be sure to update the Address Verified Date in Zangle.
5. If the school receives a corrected, signed Enrollment Verification Form, and the Ethnicity/Race has changed, make the necessary update in Zangle. If you have questions, contact the SDUSD Enrollment Options Department at (619) 725-5672 or [email protected].
6. Some situations require the home address to be kept completely confidential. In these situations, enter the school’s address in the Home Address field in Zangle. If the Parent/Guardian/Contact has a P.O. Box that can be used, enter the P.O. Box address in the Mailing Address field in Zangle. The Principal should be provided with a document that indicates the true, confidential address for the Parent/Guardian/Contact and student. The confidential address should be kept in a safe and secure location. An appropriate note must be entered in the Legal Buildings field in Zangle to indicate that the address is confidential.

Enrollment Form Report Page 11
For Windows 7 Users: Setting your printer to print the Enrollment Form report back-to-back on one sheet before you launch Zangle
To print the Zangle Enrollment Form report back-to-back on one sheet of paper for a two-page report card for Windows 7 users, you need to change the Printing Preferences for your printer before you launch Zangle. Follow the instructions below to change the Printing Preferences.
From the Start menu, click Devices and Printers.
1

Enrollment Form Report Page 12
Right click the name of the printer you will be using to print the back-to-back report cards.
Select Printing Preferences. Note: The next Steps will vary depending on the type of printer you are using. Most printers have a Finishing tab or Layout tab. Follow Steps 4 through 6 on the next page for your particular printer.
2
3

Enrollment Form Report Page 13
OR
You should now be able to print the Enrollment Forms back-to-back. Follow the steps beginning on page 1. IMPORTANT! Don’t forget to reset your settings after you finish printing the Enrollment Forms! If you don’t reset your settings, everything you print from your computer will be two-sided!
Change the Printing Shortcuts to Two–sided (Duplex) Printing.
Click OK. 6
Click OK.
On the Setup tab, under the Duplex drop-down menu, choose Open to Left.
6
5
Click the Printing Shortcuts tab. 4
5
Click the Setup tab. 4
7

Enrollment Form Report Page 14
For Windows 2003 and Windows XP Users: Printing the Enrollment Form report back to back on one sheet
To print the Enrollment Form report back to back on one page, follow the directions below. This option also works for many other Zangle reports.
Follow the steps below to run the Enrollment Form Report back to back
From the File menu in the upper left corner of the window, choose Print Setup.
The Page Setup dialog box opens.
1

Enrollment Form Report Page 15
Click Printer.
Another Page Setup dialog box opens. 2
Choose the printer with 2-sided printing capabilities.
If it’s already selected, proceed to Step 4.
3
Click Properties.
4

Enrollment Form Report Page 16
DIFFERENT PRINTERS AND DIFFERENT PROPERTIES
Because our schools have different types and brands of printers, we have shown screenshots of the most commonly used printers in SDUSD schools and how to set the Properties for each of the examples.
Match the Properties screen you are viewing on your computer screen with one of the four displayed in this handout below and then execute Step 5:
Properties A
Select Flip on Long Edge to print the report back to back on one sheet of paper.
Continue with Step 6 on page 18.
5

Enrollment Form Report Page 17
Properties B
Properties C
Choose Open to Left.
Continue with Step 6 on page 18.
Choose 2-sided Printing.
Continue with Step 6 on page 18.
5
5

Enrollment Form Report Page 18
Properties D
Click OK multiple times to return to the main Enrollment Form Report window.
After you have set your printer Properties and selected the criteria for your report, Preview the report.
7
Check the Print on both sides box.
Continue with Step 6, below.
5
6

Enrollment Form Report Page 19
Sorting the report different ways
Click the Sort tab and follow the steps below to sort the Enrollment Form Report in different ways.
Select the field you wish to add.
In this example Home Address will be added as a sort option.
2
For additional sort criteria, click the Add button.
The Add Sort Field dialog box opens.
1

Enrollment Form Report Page 20
Click Preview to preview the sort order of the report before printing.
Click Done.
Repeat steps 1-3 to add additional fields for sorting.
To change the sort order of the report, click and drag the gray box next to the field you wish to sort by to the top of the list.
3
Notice that Home Address is now above Name in the sort list. The report will sort students by the ordering shown here.
4
5

Enrollment Form Report Page 21
Printing the report for selected students
If you would like to print the report for one or more specific students but not the entire school, use the Select tab to indicate which students to print the report for.
Follow the steps below to run the Enrollment Form Report for selected students.
Click the Select tab. 1
Use the Find Students dialog box to search for specific students.
To see a list of all students, simply click Find without entering any information in the fields.
We are looking for one specific student, so we will narrow our search by entering a few letters of his name here.
Click the desired category.
You can filter the report by any category listed here. In this example, a single student will be selected, so we will click Student to select one or more students.
2
Click Edit.
A new window will appear. 3
4

Enrollment Form Report Page 22
Move the desired student (or students) from the left column to the right column by either double-clicking the name or clicking the name and then clicking the right arrow.
In this example, a single student, Samantha Gomez, will be selected for the report.
When you have selected all of the desired students, click Done.
5
6

Enrollment Form Report Page 23
Click Preview to view the report before printing.
Now that the student Samantha Gomez has been selected, the student’s SDUSD ID number will be displayed. If several students have been selected, only the first three student ID numbers will appear.
7