primarius essentials - goecca.com · ecca. this will open the primarius help manual this will be...
TRANSCRIPT
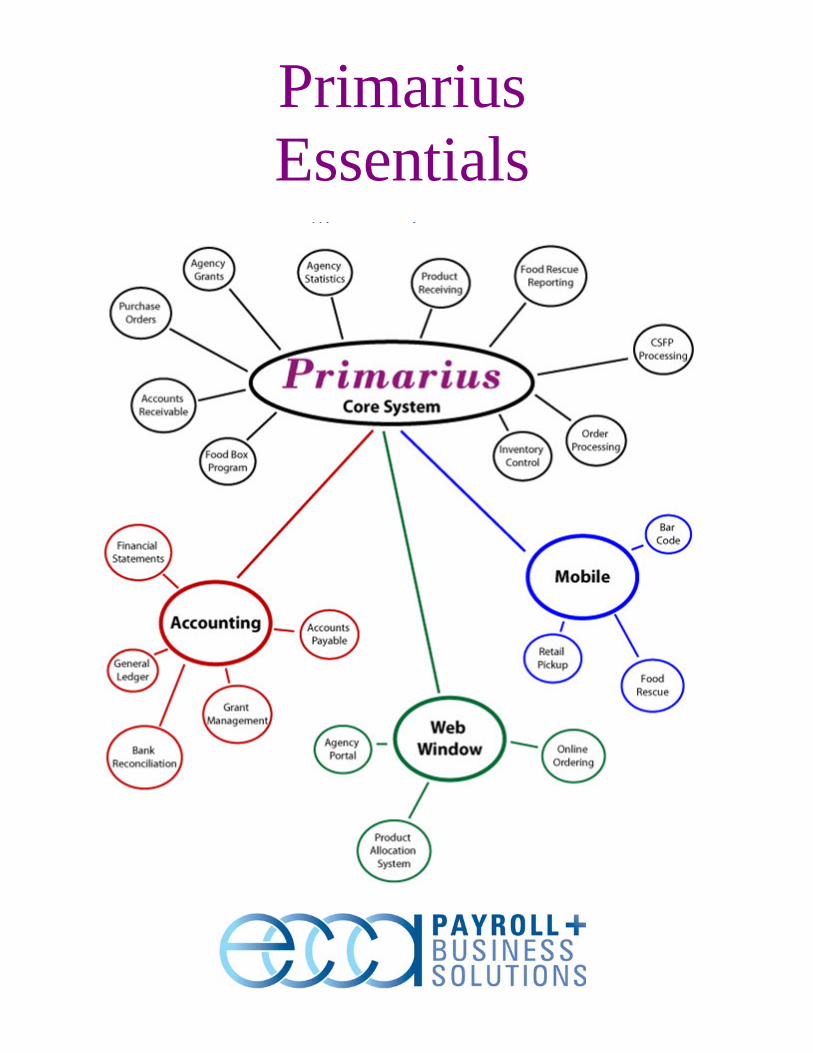
Primarius Essentials
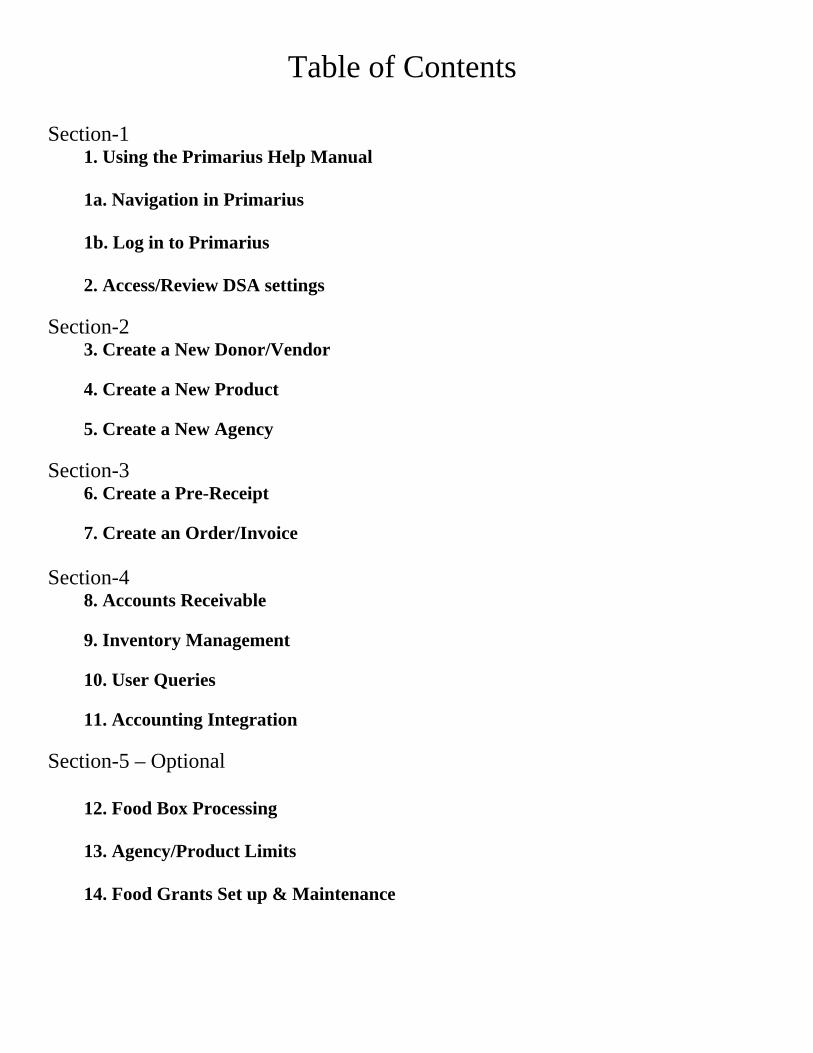
Table of Contents
Section-1 1. Using the Primarius Help Manual 1a. Navigation in Primarius 1b. Log in to Primarius 2. Access/Review DSA settings
Section-2 3. Create a New Donor/Vendor 4. Create a New Product 5. Create a New Agency
Section-3 6. Create a Pre-Receipt 7. Create an Order/Invoice
Section-4 8. Accounts Receivable
9. Inventory Management
10. User Queries
11. Accounting Integration
Section-5 – Optional
12. Food Box Processing 13. Agency/Product Limits 14. Food Grants Set up & Maintenance

Standard Tasks Section 1- Start up
1. Using the Primarius Help Manual Click on this icon If you do not have this icon contact whoever set up the system for Primarius or ECCA.
This will open the Primarius Help Manual
This will be the source of much of the detail information for the fields in Primarius. It is Web based and is going to be kept current. Use the Contents to find the topic you are looking for or in the top Center enter the text you want to search for. For the Training go to the topic and click on it to read and to open sub-topics read those also.
1a. Navigation in Primarius View the Video Tutorials in the Contents of the Primarius Help Manual

1b. Log in to Primarius
Enter your User Name – this will need to be set up in the DSA. If that has not been done for Start ups Use DEMO1 This is not case sensitive. Enter your Password – this will need to be set up in the DSA. If that has not been done for Start ups Use DEMO1. This is case sensitive. Warehouse – choose from the dropdown (button on right) the Warehouse you are working from. Database – choose from the dropdown (button on right) the Database you will be working from. In most setups you will only have one choice. Note: Updates and Important Info will appear in the Lower section of the Login screen. Use the Scroll Bar to see all of the Information.

2. Access/Review DSA settings The DSA (Data Service Administrator) is where the settings and customized dropdown choices are set or set up. The info on the settings and set up will be found in the Primarius Help Manual. From the Main Primarius screen click on Launch Programs then DSA.
That will bring up the DSA Log in. Enter your User Name and Password – only users assigned to the Administrator Menu group will have access to the DSA.
If your data was converted some DSA settings and drop downs will be created from that data. When starting from scratch ECCA will have populated some settings and drop downs used by most Food Banks.
The DSA Set up sections In the Help are.
Users – Set up user logins & Menu groups-logins assigned to a user will only have access to the screens in that group. Food Bank Setup - The settings here will customize how Primarius will process for the Food Bank. Primarius Setups – The settings here will customize what the Food Bank sees-Dropdowns with names familiar to the food Bank.
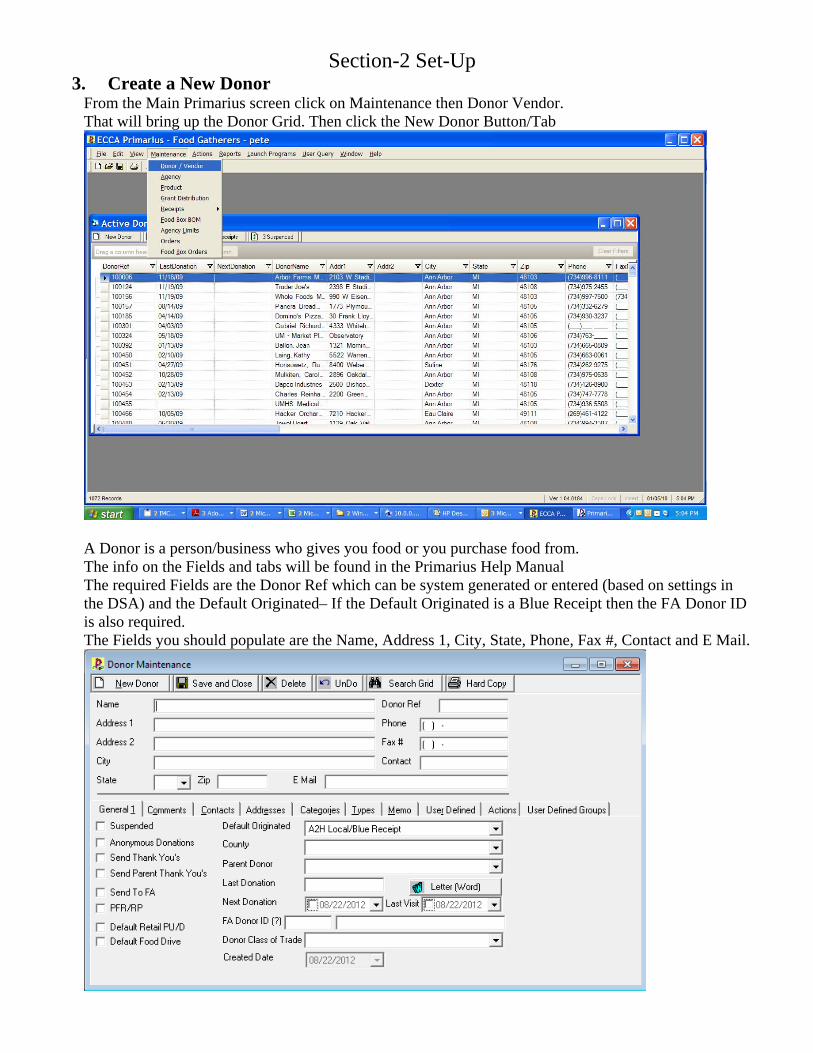
Section-2 Set-Up 3. Create a New Donor
From the Main Primarius screen click on Maintenance then Donor Vendor. That will bring up the Donor Grid. Then click the New Donor Button/Tab
A Donor is a person/business who gives you food or you purchase food from. The info on the Fields and tabs will be found in the Primarius Help Manual The required Fields are the Donor Ref which can be system generated or entered (based on settings in the DSA) and the Default Originated– If the Default Originated is a Blue Receipt then the FA Donor ID is also required. The Fields you should populate are the Name, Address 1, City, State, Phone, Fax #, Contact and E Mail.

4. Create a New Product
From the Main Primarius screen click on Maintenance then Product. That will bring up the Products Grid. Click the New Product Button/Tab
The info on the Fields and tabs will be found in the Primarius Help Manual The required Fields are the Product Ref which can be system generated or entered (based on settings in the DSA), Name, Unit of Measure, Unit Weight, Packing, FA Type (31 Food Groups), Category, Storage (Dry, Frozen, Refrigerated), FA Product Cat and * TI & HI (*Required only for Bar Code)
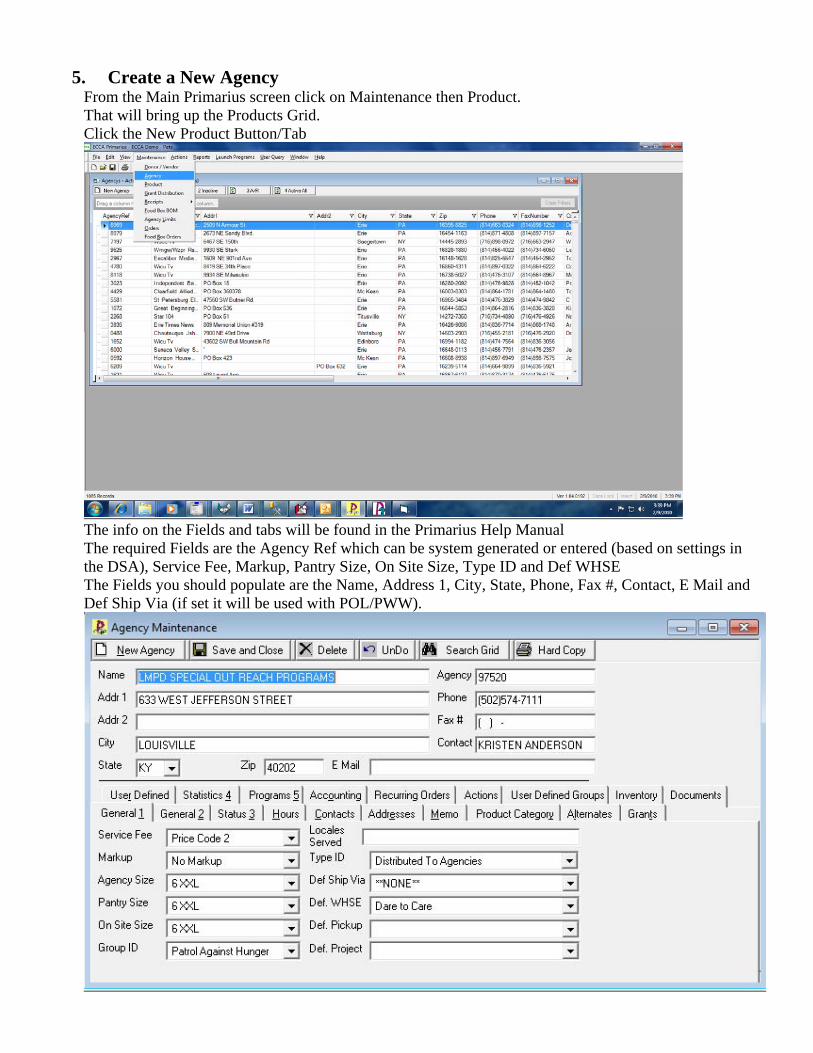
5. Create a New Agency
From the Main Primarius screen click on Maintenance then Product. That will bring up the Products Grid. Click the New Product Button/Tab
The info on the Fields and tabs will be found in the Primarius Help Manual The required Fields are the Agency Ref which can be system generated or entered (based on settings in the DSA), Service Fee, Markup, Pantry Size, On Site Size, Type ID and Def WHSE The Fields you should populate are the Name, Address 1, City, State, Phone, Fax #, Contact, E Mail and Def Ship Via (if set it will be used with POL/PWW).

For General 2 The required Fields is the County ID field. Online Password is Required for ECCA-POL. The other fields are optional based on the food bank’s wants and needs. Activity can be used for NAR groupings.
At least one Product Category needs to be listed so the agency can place an order. Typing All will add all of the available Categories at one time.
In contacts for PWW the Online Name and Password are Required.

Section-3 Transactions Will be covered in more detail in the Data entry Session.
6. Create a Pre-Receipt
All inventories are controlled at the receipt level. Nothing will show in inventory until it has become a receipt. There are three Receipt Types – PO used when ordering products that can then be broken in to smaller Pre-Receipts and or when the order(s) need Approval Pre-Receipt is the recommended way (required for the Bar Code process) to generate a Receipt. From the Main Primarius screen click on Maintenance then Receipts. That will bring up the Receipts choices. Then choose Pre-Receipt. That will bring up the Pre-Receipts Grid. Then click New Pre-receipt Button/Tab.
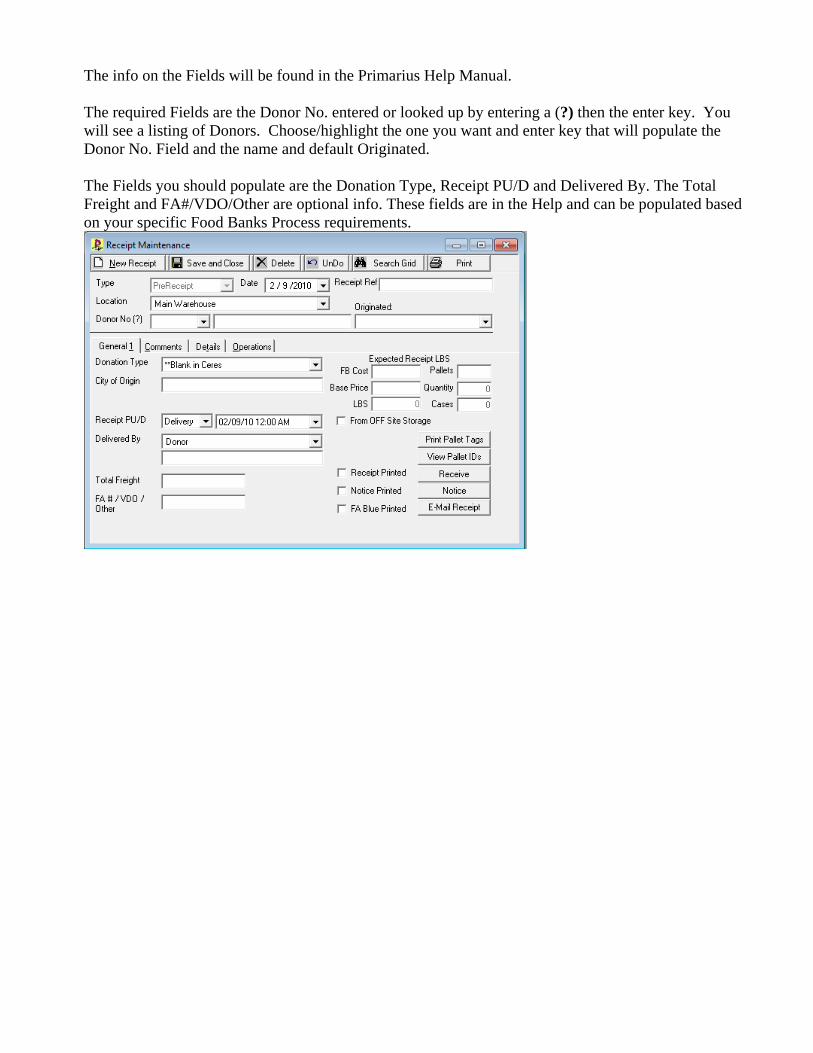
The info on the Fields will be found in the Primarius Help Manual. The required Fields are the Donor No. entered or looked up by entering a (?) then the enter key. You will see a listing of Donors. Choose/highlight the one you want and enter key that will populate the Donor No. Field and the name and default Originated. The Fields you should populate are the Donation Type, Receipt PU/D and Delivered By. The Total Freight and FA#/VDO/Other are optional info. These fields are in the Help and can be populated based on your specific Food Banks Process requirements.

Then click on the Details Tab to get to the Details Maint. Screen Enter the Product Number using the drop down or use the look up (?) That will populate the Product Name, Category and U/M. Enter Quantity Received (This is based on the U/M). Food Bank Cost/Donor Value and Base Price may or may not be populated based on Product Master & DSA settings. Entering a different Value will override the default settings if they are not grayed out. If the Product is a Mixed Prod. then the Rcvd Weight needs to be Entered otherwise it will be system populated and be Grayed out. The remaining fields are optional based on your food bank’s needs. Field info is in the Primarius Help Manual. No. of pallets should be populated if you want to print a Pallet Tag – it is required for Bar Code Primarius to print Pallet Tags = Pallet ID’s Repeat (New Detail) until all products are entered.
Save and close and Click the General 1 Tab to return to the Receipt Maintenance screen. For Non Bar Code Food banks click Receive after making sure all entries are accurate. Print and File the Receipt according to your Food Bank’s Processes. For Bar Code Food Banks click Print Pallet Tags then follow the process in the Primarius Help – implementing Bar Coding – Primarius Bar Code Manual – Receiving Product.
The How to – Enter a Pre- Receipt is in the Primarius Help.

Create a PO Enter the same as above for a Pre-Receipt
Enter Order Qty leave Received Blank when creating a PO

When ready to create a Pre-Receipt fill in the Qty to Receive then click the Create Pre-Receipt Button.
For Non Bar Code Food banks click Receive after making sure all entries are accurate.
Print and File the Receipt according to your Food Banks Processes. For Bar Code Food Banks click Print Pallet Tags then follow the process in the Primarius Help -implementing Bar Coding – Primarius Bar Code Manual – Receiving Product.
7. Create an Order Orders can be created by clicking on new order and Thru the Allocations or POL Features.
The order entry process and Field info is available in the Primarius Help under Orders. The required Fields are the Agency, Warehouse, and Ship Via. At Agency (?) enter number, Lookup the agency with the (?) or use the Drop down for the Number. Warehouse will populate based on login choice but can be edited. Ship Via make a choice from the drop down. Optional fields - Pickup WHSE will default from the Agency Master or choose the drop down choice. Pick Up By can be entered, choose from drop down (contacts) or both. Click the Product Tab for entry of Products

Enter the product Number, use drop down, or use the Look up (?). Enter the Quantity based on the Unit of Measure for that item. Depending on Food Bank Policy or Procedure (the Unit Price and or the Service Fee/LB) those values can be edited (if Black) (can not if Gray). Click on New Detail or tab key or enter key then repeat above until all products are entered. Then save and close.
If you are using Grants and auto apply is not set in the DSA then click Apply Grants Based on DSA settings Review, Release and Pick may or may not be grayed out. Review - for POL/PWW Online orders. Can also be done in groups from the Review Grid. Release – for Bar Code - Can also be done in groups from the Release Grid. Pick – for Bar Code - Can also be done in groups from the Pick Grid. Click Invoice to print the invoice of the order. Confirm the Invoice/Order after it has been printed or by clicking Confirm. Based on settings in the DSA a confirmed order may or may not be edited. See Orders>Adjustments and or Credit Memos for help on Editing an invoice
Section-4 Other Processes 8. Accounts Receivable
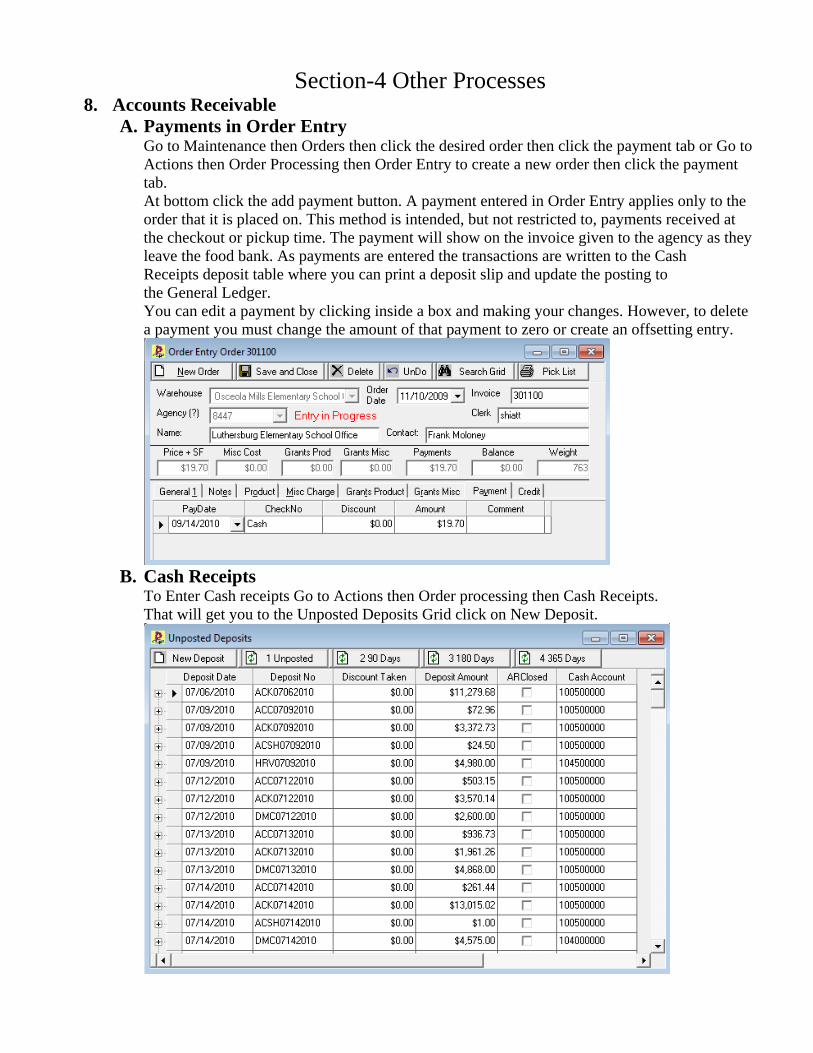
A. Payments in Order Entry Go to Maintenance then Orders then click the desired order then click the payment tab or Go to Actions then Order Processing then Order Entry to create a new order then click the payment tab. At bottom click the add payment button. A payment entered in Order Entry applies only to the order that it is placed on. This method is intended, but not restricted to, payments received at the checkout or pickup time. The payment will show on the invoice given to the agency as they leave the food bank. As payments are entered the transactions are written to the Cash Receipts deposit table where you can print a deposit slip and update the posting to the General Ledger. You can edit a payment by clicking inside a box and making your changes. However, to delete a payment you must change the amount of that payment to zero or create an offsetting entry.
B. Cash Receipts
To Enter Cash receipts Go to Actions then Order processing then Cash Receipts. That will get you to the Unposted Deposits Grid click on New Deposit.

If you have more than one bank account set up you will need to choose which one the deposit will be made to. Enter a Deposit Reference. I recommend that it be a unique Ref. ie. - 09-03-10-D1. Choose the deposit date - it will default to today’s date. Then Enter the Agency number or use the (?) look up or enter the letter (I) and an invoice number to get the agency for that invoice. Enter the Check number or if Applying Credits - Apply CR, then a Check Amount if Applying Credits Leave as 0. See Primarius Help for further details.
C. Miscellaneous Cash
This is for Monies that are not intended to pay agencies balances. I recommend that a new deposit is started for Misc. Cash however it is not required. The steps are similar to entering a Payment except that the agency field is left blank. See the Primarius help for additional details
D. Credits in Order Entry Go to the invoice that you want to apply a dollar adjustment and click the Credit Tab. Get additional info from the Primarius Help.
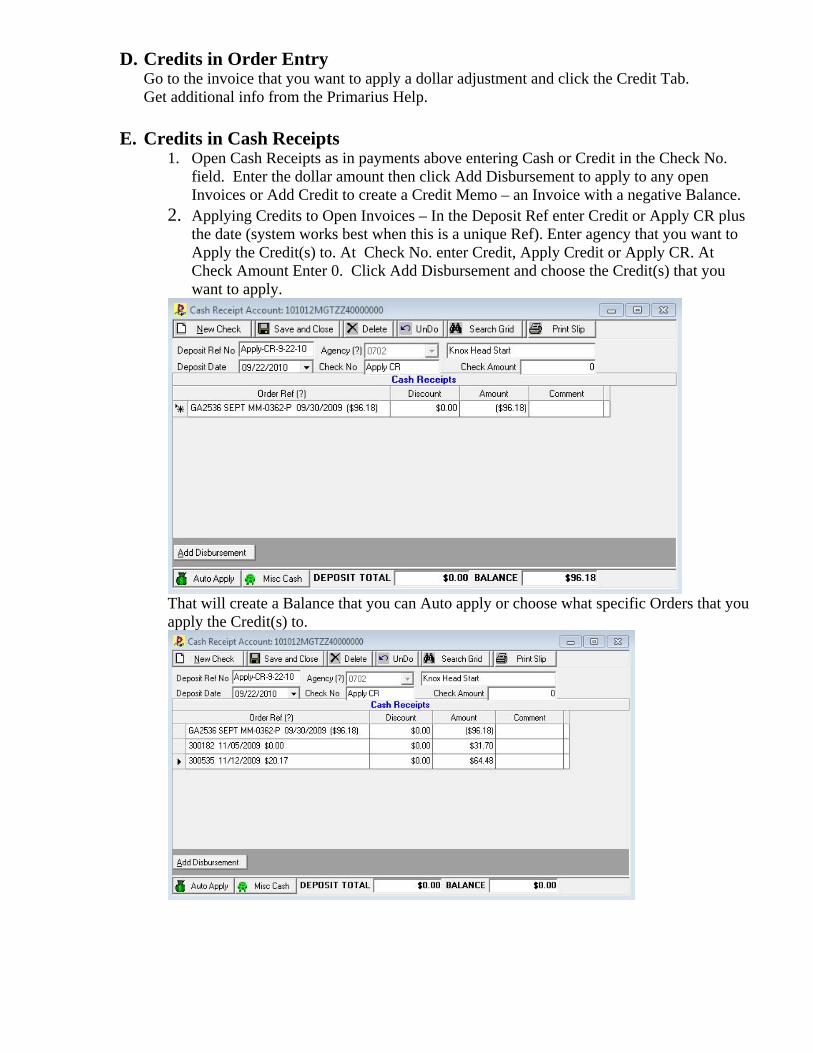
E. Credits in Cash Receipts 1. Open Cash Receipts as in payments above entering Cash or Credit in the Check No.
field. Enter the dollar amount then click Add Disbursement to apply to any open Invoices or Add Credit to create a Credit Memo – an Invoice with a negative Balance.
2. Applying Credits to Open Invoices – In the Deposit Ref enter Credit or Apply CR plus the date (system works best when this is a unique Ref). Enter agency that you want to Apply the Credit(s) to. At Check No. enter Credit, Apply Credit or Apply CR. At Check Amount Enter 0. Click Add Disbursement and choose the Credit(s) that you want to apply.
That will create a Balance that you can Auto apply or choose what specific Orders that you apply the Credit(s) to.
F. Posting Deposits A payment or discount is considered un-posted if a deposit slip has not been printed and it has not been updated to GL. The update will flag the transaction as posted, post it to GL, (if you have the ECCA General Ledger system) and clear it from the AR to GL posting file. Find the Deposit you want to post then open it and click the Plus sign to open the unposted checks. Double click on any Row then click print slip (you can choose not to print at print screen) then click Yes to post to GL. Even if you do not use the ECCA GL , click Yes so that the entries will receive the posted status. See Help for additional Info.
G. Discounts You can discount charges on an agency’s order. Discounts can apply to service fees, agency costs, misc. charges, or a combination of the above. Discounts are automatically calculated when certain parameters are setup in the DSA. If parameters are not set, then you must calculate the discount manually and enter it into the payment record. See Help for additional Info
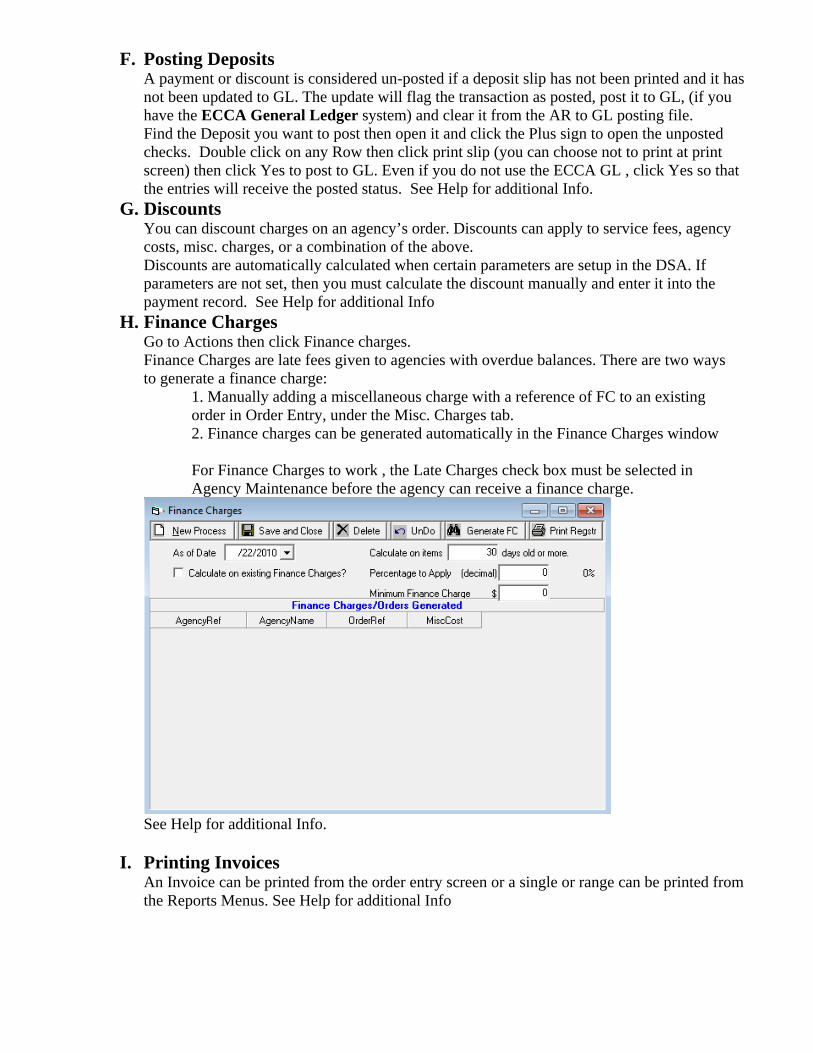
H. Finance Charges Go to Actions then click Finance charges. Finance Charges are late fees given to agencies with overdue balances. There are two ways to generate a finance charge:
1. Manually adding a miscellaneous charge with a reference of FC to an existing order in Order Entry, under the Misc. Charges tab. 2. Finance charges can be generated automatically in the Finance Charges window For Finance Charges to work , the Late Charges check box must be selected in Agency Maintenance before the agency can receive a finance charge.
See Help for additional Info.
I. Printing Invoices An Invoice can be printed from the order entry screen or a single or range can be printed from the Reports Menus. See Help for additional Info
9. Inventory Management Inventory Management
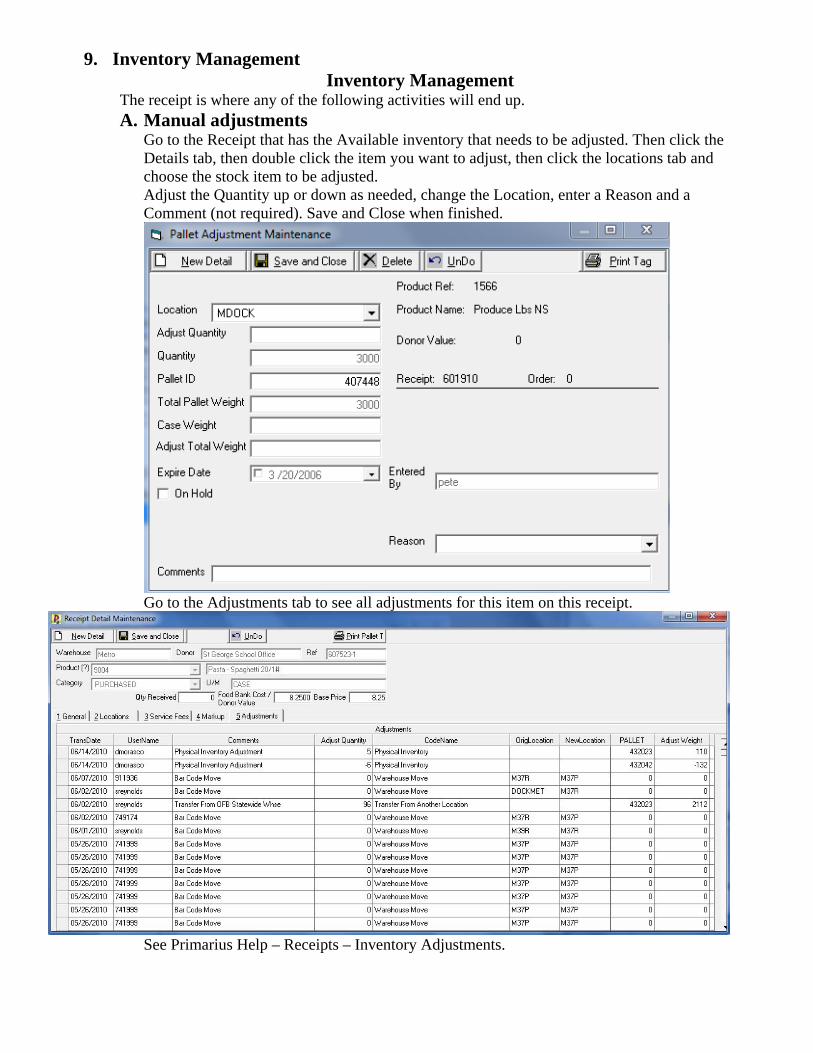
The receipt is where any of the following activities will end up. A. Manual adjustments
Go to the Receipt that has the Available inventory that needs to be adjusted. Then click the Details tab, then double click the item you want to adjust, then click the locations tab and choose the stock item to be adjusted. Adjust the Quantity up or down as needed, change the Location, enter a Reason and a Comment (not required). Save and Close when finished.
Go to the Adjustments tab to see all adjustments for this item on this receipt.
See Primarius Help – Receipts – Inventory Adjustments.

B. Replenish Pick Location Go to Actions then Order Processing then Pick Location Replenish. This is used with the Bar Code and the Use Pick Location (Strawberry) versions to generate a report indicating what product picking location(s) will need to be replenished based on the orders that are to be picked. See detail info in HELP.
C. Physical Inventory
Go to Actions then inventory then Physical Inventory Once a Physical Inventory has been started, all transactions affecting the inventory balance must be stopped. This includes receipts, converting pre-receipts to receipts, order processing, and other inventory adjustments.
Choose the warehouse doing the Count. 1. Clear the whole file - will clear the file or indicate that one is in process. 2. Using the Select By choices and Select How will determine what items will be added for
the count. Make the choices then click the Add Items To File button.
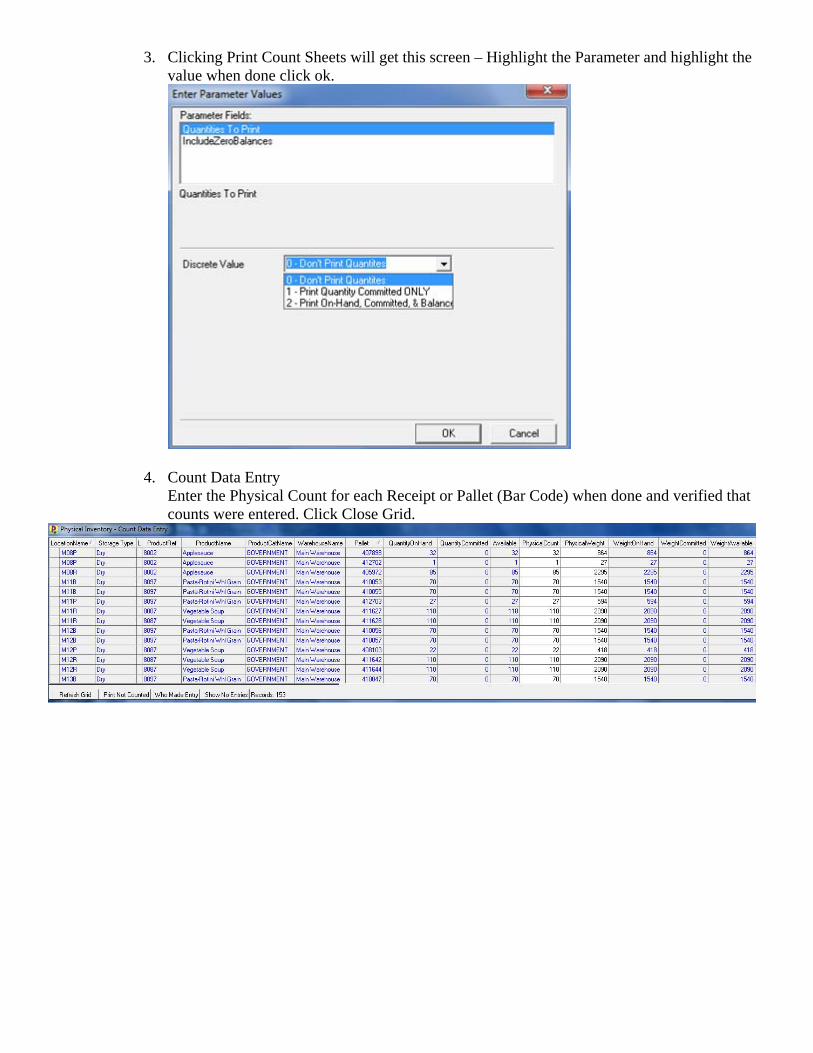
3. Clicking Print Count Sheets will get this screen – Highlight the Parameter and highlight the value when done click ok.
4. Count Data Entry Enter the Physical Count for each Receipt or Pallet (Bar Code) when done and verified that counts were entered. Click Close Grid.

5. Print the variance Register-Only Print items with Variance
Review the variance and recount as necessary.
6. Update Inventory - This uses the counts entered in Count Data Entry and creates an
adjustment and changes the sum-on-hand for all of those in which the physical count varies from the available quantity. Only run Update Inventory after reviewing the counts on the Variance Register. You will be asked what date to use to post these transactions. It will default to today’s date. The Expected date would be the date the inventory was counted ie. the inventory is Counted at the end of the Fiscal year (9/30) but the review and recounts were not approved until (10/1) The date to use in this case is 09/30/2010

D. Warehouse Transfer Go to Actions then Inventory then Warehouse Transfers. The grid will be showing past Transfers. Click on New Transfer
Choose your From and TO Warehouses and TO Location from the drop downs. The TO Location is usually a receiving/staging location. Then choose the line of product that you want to transfer. It will show the whole quantity of that line but you can change it to any lesser amount. Repeat until all is transferred. The inventory will be active in the TO Warehouse as soon as it is appears in the Products Transferred grid. The Blue Arrow will Transfer ALL items in the From Whse to the TO Whse.
For Bar Code users the process is basically the same except that the items in the Products Transferred Grid are on Hold in the TO Whse. and are released from being on hold by clicking the Blue Transfer button.
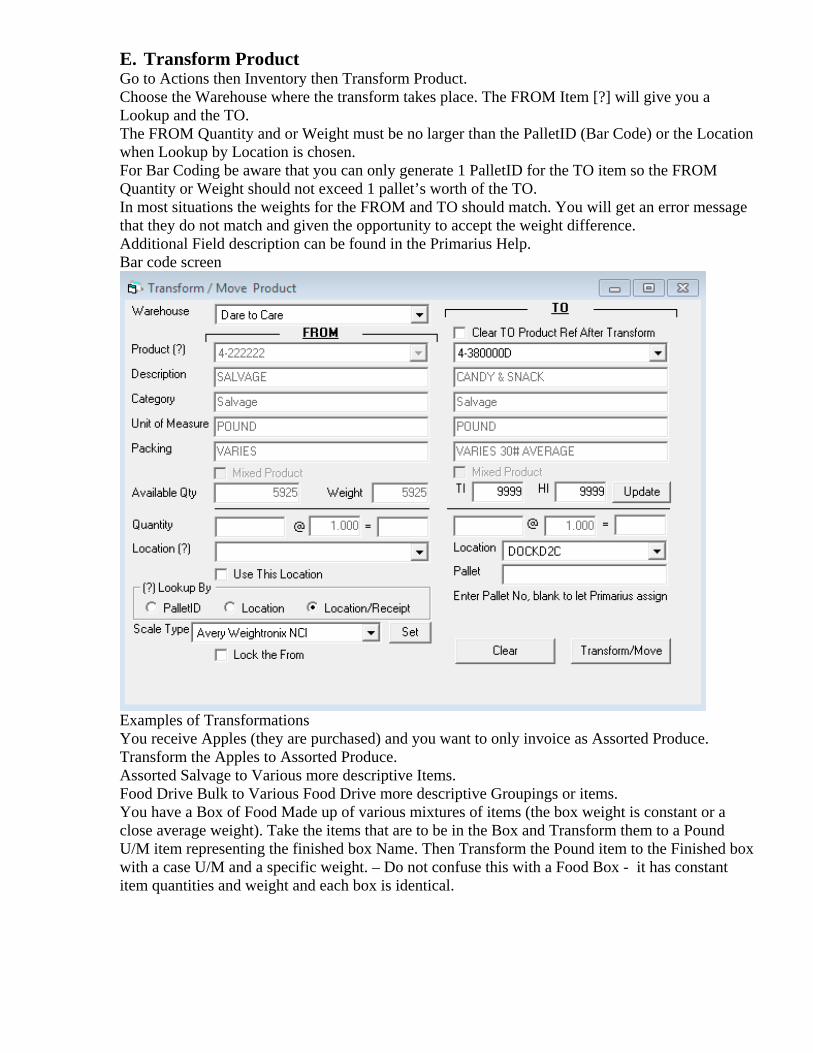
E. Transform Product Go to Actions then Inventory then Transform Product. Choose the Warehouse where the transform takes place. The FROM Item [?] will give you a Lookup and the TO. The FROM Quantity and or Weight must be no larger than the PalletID (Bar Code) or the Location when Lookup by Location is chosen. For Bar Coding be aware that you can only generate 1 PalletID for the TO item so the FROM Quantity or Weight should not exceed 1 pallet’s worth of the TO. In most situations the weights for the FROM and TO should match. You will get an error message that they do not match and given the opportunity to accept the weight difference. Additional Field description can be found in the Primarius Help. Bar code screen
Examples of Transformations You receive Apples (they are purchased) and you want to only invoice as Assorted Produce. Transform the Apples to Assorted Produce. Assorted Salvage to Various more descriptive Items. Food Drive Bulk to Various Food Drive more descriptive Groupings or items. You have a Box of Food Made up of various mixtures of items (the box weight is constant or a close average weight). Take the items that are to be in the Box and Transform them to a Pound U/M item representing the finished box Name. Then Transform the Pound item to the Finished box with a case U/M and a specific weight. – Do not confuse this with a Food Box - it has constant item quantities and weight and each box is identical.
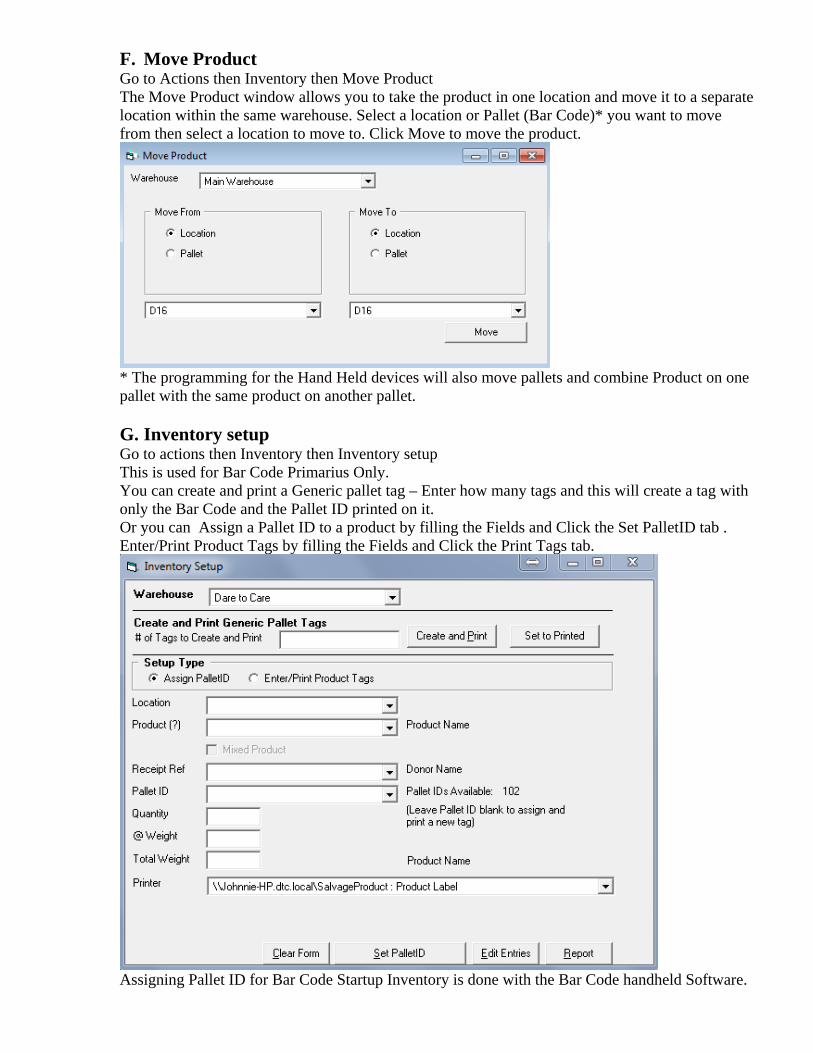
F. Move Product Go to Actions then Inventory then Move Product The Move Product window allows you to take the product in one location and move it to a separate location within the same warehouse. Select a location or Pallet (Bar Code)* you want to move from then select a location to move to. Click Move to move the product.
* The programming for the Hand Held devices will also move pallets and combine Product on one pallet with the same product on another pallet. G. Inventory setup Go to actions then Inventory then Inventory setup This is used for Bar Code Primarius Only. You can create and print a Generic pallet tag – Enter how many tags and this will create a tag with only the Bar Code and the Pallet ID printed on it. Or you can Assign a Pallet ID to a product by filling the Fields and Click the Set PalletID tab . Enter/Print Product Tags by filling the Fields and Click the Print Tags tab.
Assigning Pallet ID for Bar Code Startup Inventory is done with the Bar Code handheld Software.

10. User Queries The Primarius query tool gives you the ability to create custom queries to find the specific information you are looking for. There are two types of user queries: Basic and Advanced.
The Basic query allows you to edit the Maintenance grid so only certain columns are displayed with only a certain range of data. To edit the Grid do a Right Click and choose Edit Columns.

When Checking the Column Box only those columns will be on the Grid. Selecting a From and To data range will only show that data.
The Filter Function of the Grid will allow data selection similar to the Advanced Query Process. From the Grid click the Filter and choose Custom. The Operator will have the same Functions as the Advanced Conditions.
An Advanced query can get more complex in what information you can find. See User Query in Primarius Help for additional info.

To create a New Query chose a New Query Name, Template and check the box as Private. Only you can delete a Private Query. After you create an Advanced/New query, you can then run it from the Query menu, located below the group you created it for. For example, all of your Agency queries can be found on the Query menu. Click Agency then click your Query Name.
A New Query can be made then filtered to achieve what can be done by setting Conditions.
11. Accounting Integration Work in Progress See Primarius Help – Accounting Integration

12. Food Box Food Box Creation A food box is made up of the same items with the same Qty for each item ie. each Box for a given Item Ref will be Identical. When creating the Food Box set it up like any other item except the Product Category will be Food Box and the weight will be entered later. Use 1 lb to start or an estimated item weight. Create new items that are units of full cases. The using the Food Box BOM (Bill of Materials) to indicate what and how many eaches/units will be in the “Box”.

The BOM for a food box requires at least one Description Line and one Product Line. You can copy an existing BOM to a new Food Box when needed. See Food Box in Primarius Help for additional info.
When the Food Box BOM is completed go to the Food Box Orders. Note this is the only screen that you will see Starting, Shipped and Remaining Quantities. The items that make up the ‘Box” will show the inventory activity.

When creating a Food Box Order you will fill in the fields below and process thru the 6 steps in order to complete the set up so the Food Box Ref can be used for generating orders. Refer to the Primarius Help for additional details. Note in the Analyze step you will get the weight to enter in the Product Master for the Food Box.
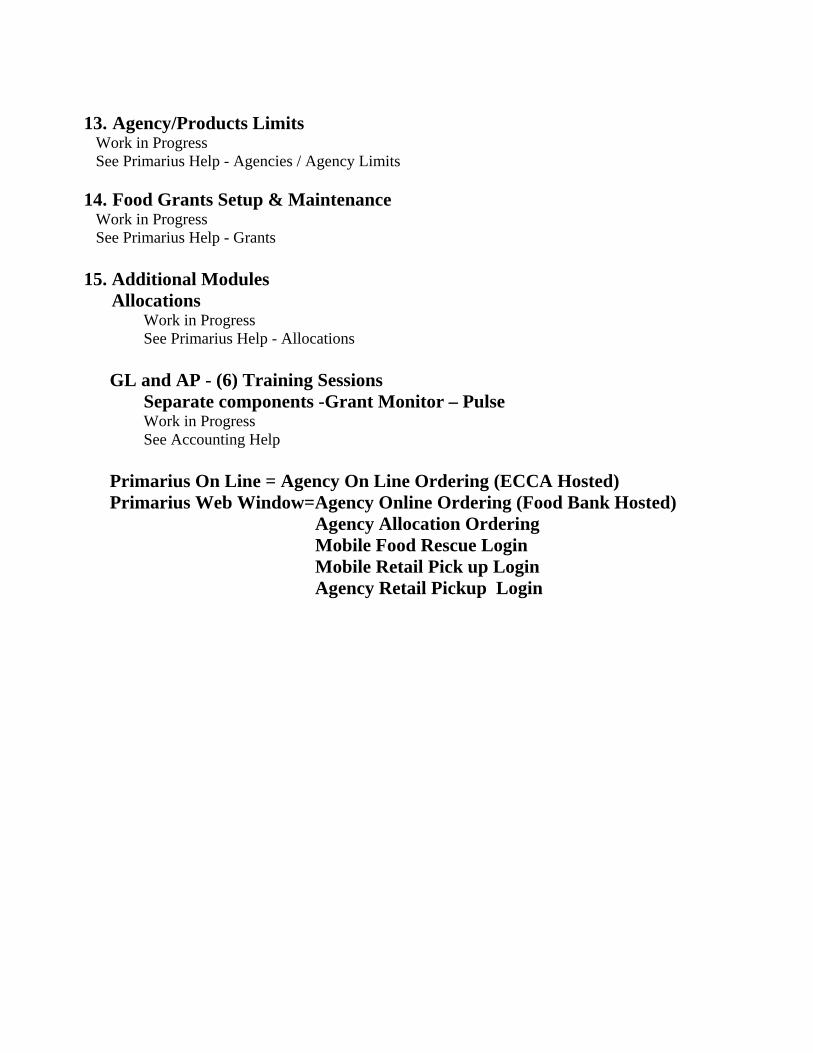
13. Agency/Products Limits Work in Progress See Primarius Help - Agencies / Agency Limits
14. Food Grants Setup & Maintenance
Work in Progress See Primarius Help - Grants
15. Additional Modules Allocations
Work in Progress See Primarius Help - Allocations
GL and AP - (6) Training Sessions
Separate components -Grant Monitor – Pulse Work in Progress See Accounting Help
Primarius On Line = Agency On Line Ordering (ECCA Hosted) Primarius Web Window=Agency Online Ordering (Food Bank Hosted) Agency Allocation Ordering Mobile Food Rescue Login Mobile Retail Pick up Login
Agency Retail Pickup Login