presented by dimas & deby - dimz-it.com linux security.pdf · in firewalld, rules can be...
TRANSCRIPT

Presented by Dimas & Deby
1

CentOS (Community Enterprise Operating System) is aLinux distribution that attempts to provide a free, enterprise-class, community-supported computing platform which aimsto be functionally compatible with its upstream source, RedHat Enterprise Linux (RHEL).[
2

• Lakukan instalasi paket Linux sesuai kebutuhan(dalam presentasi ini kami menginstall Linux minimal)
• Pastikan saat proses instalasi Fitur Disk Encryption diaktifkan.
• Disc Encryption pada Centos menggunakan Aplikasiyang bernama “LUKS” (Linux Unified Key Setup)
LUKS is a disk encryption specification created by Clemens Fruhwirth in 2004 and originally intended for Linux.
3

� Pastikan saat login tidak menggunakan user Administrator/Root (Least Privilege)
� Setelah login menggunakan user biasa, tambahkanuser tersebut ke dalam Fitur Sudoers sesuai kebutuhan
4

� The only folks allowed near the server should be directly responsible for it.
� Don't allow the system to boot from removable media as the default option
� Require a bios password to change boot options. OS security doesn't matter much if your attacker brings their own OS to the party.
� Setup complex password for Root & Other User Account.
5
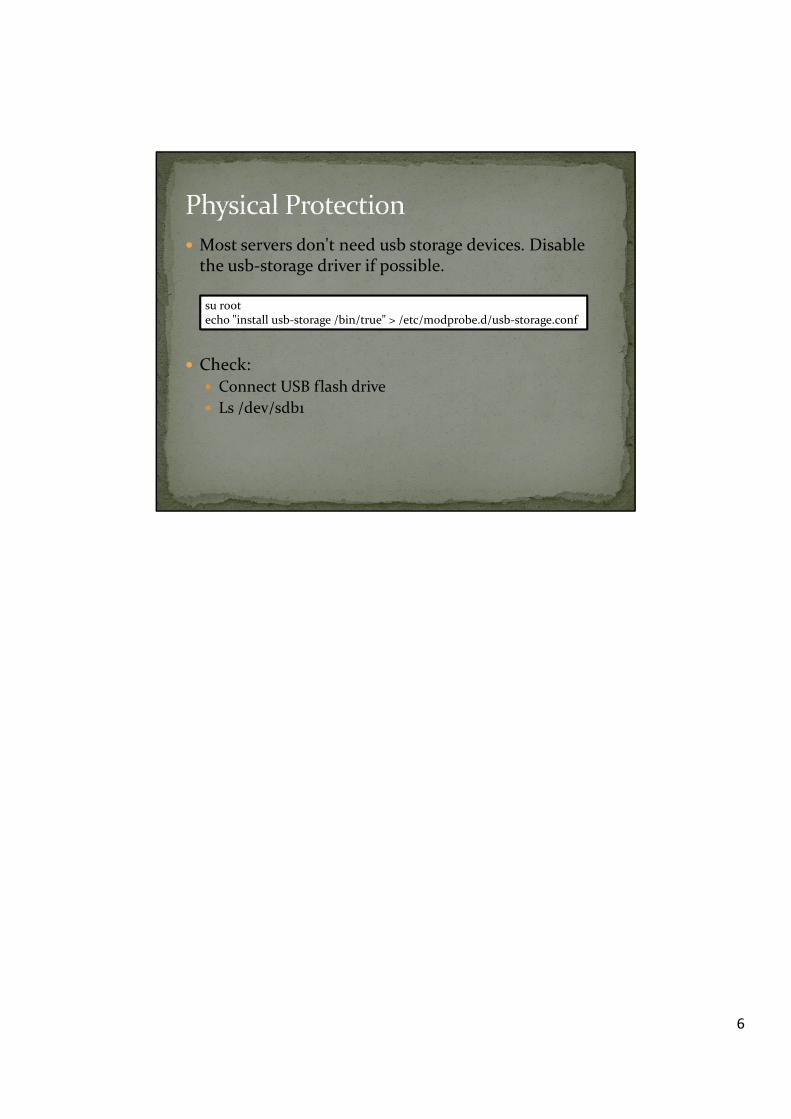
� Most servers don't need usb storage devices. Disable the usb-storage driver if possible.
� Check:� Connect USB flash drive
� Ls /dev/sdb1
su rootecho "install usb-storage /bin/true" > /etc/modprobe.d/usb-storage.conf
6

Once a server is up and running, root shouldn't be logging in directly except in emergency situations. These usually require hands at the console, so that's the only place root should be allowed to log in.
1. To do this, we need to modify /etc/securetty. echo “" > /etc/securettychmod 700 /root
2. Prevents root access via the OpenSSH suite of tools.- Edit the /etc/ssh/sshd_config file and set the
permitRootLogin parameter to no
7

� Set number of days for password Expiration.
� [root@dlp ~]# vi /etc/login.defs� # line 25: set 60 for Password Expiration� PASS_MAX_DAYS 60
� Passwords may only be changed once a day.
� [root@dlp ~]# vi /etc/login.defs� # line 26: set 1 for Minimum number of days available� PASS_MIN_DAYS 1
8

� Limit using a password that was used in past.
� [root@dlp ~]# vi /etc/pam.d/system-auth� # near line 15: prohibit to use the same password for 5 generation in
past� password sufficient pam_unix.so sha512 shadow nullok
try_first_pass use_authtok remember=5
� Set minimum password length.
� # set 8 for minimum password length� [root@dlp ~]# authconfig --passminlen=8 --update� # the parameter is set in a config below� [root@dlp ~]# grep "^minlen" /etc/security/pwquality.conf
minlen = 8
9

� Set minimum number of required classes of characters for the new password. (kinds ⇒ UpperCase / LowerCase / Digits / Others)
� # set 2 for minimum number of required classes of characters� [root@dlp ~]# authconfig --passminclass=2 --update� # the parameter is set in a config below� [root@dlp ~]# grep "^minclass" /etc/security/pwquality.conf
minclass = 2
� Set maximum number of allowed consecutive same characters in the new password.
� # set 2 for maximum number of allowed consecutive same characters� [root@dlp ~]# authconfig --passmaxrepeat=2 --update� # the parameter is set in a config below� [root@dlp ~]# grep "^maxrepeat" /etc/security/pwquality.conf
maxrepeat = 2
10

� Set hash/crypt algorithm for new passwords. (default is md5)
� # show current algorithm
� [root@dlp ~]# authconfig --test | grep hashing
� password hashing algorithm is md5
� # change algorithm to sha512
� [root@dlp ~]# authconfig --passalgo=sha512 --update
� [root@dlp ~]# authconfig --test | grep hashing
� password hashing algorithm is sha512
11
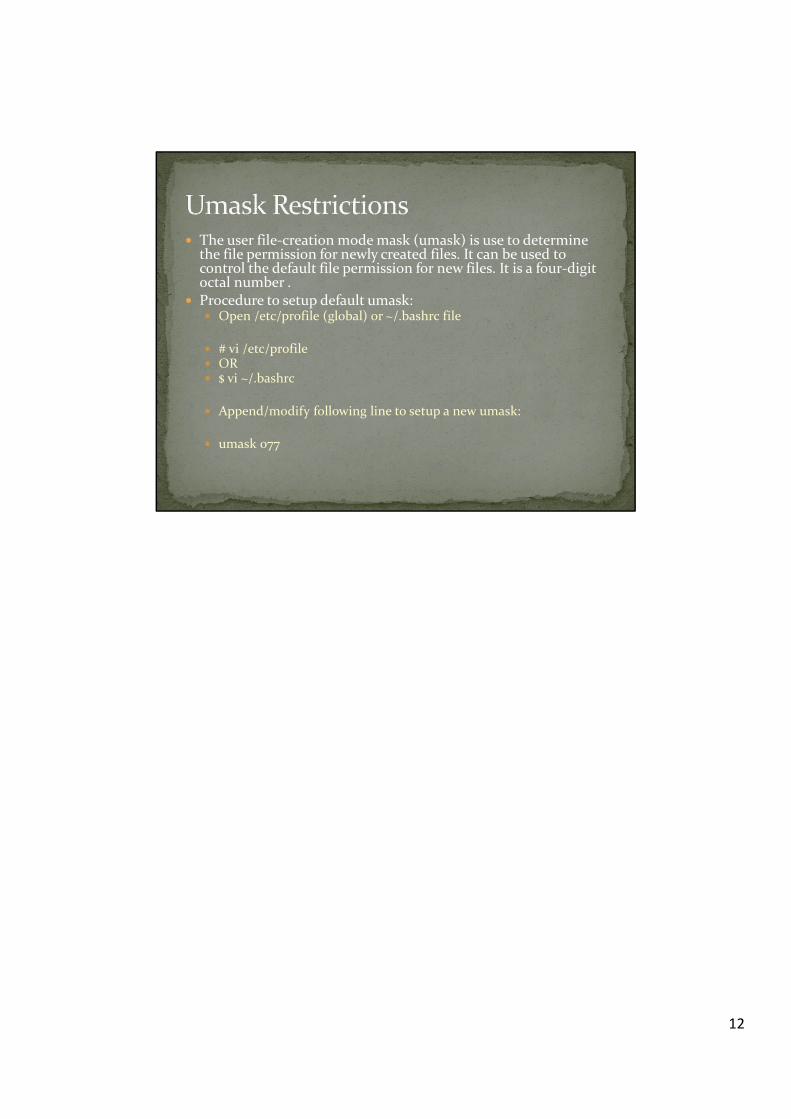
� The user file-creation mode mask (umask) is use to determine the file permission for newly created files. It can be used to control the default file permission for new files. It is a four-digit octal number .
� Procedure to setup default umask:� Open /etc/profile (global) or ~/.bashrc file
� # vi /etc/profile� OR� $ vi ~/.bashrc
� Append/modify following line to setup a new umask:
� umask 077
12

� And now we need to update /etc/pam.d/system-auth. Add:� auth required pam_tally2.so deny=3 onerr=fail
unlock_time=60
� The file /var/log/tallylog is a binary log containing failed login records for pam.
� You can see the failed attempts by running the pam_tally2 command without any options, and unlock user accounts early by using pam_tally2 --reset -u username
13

� The TCP Wrappers package (tcp_wrappers) is installed by default and provides host-based access control to network services.
� When a connection attempt is made to a TCP-wrapped service, the service first references the host's access files (/etc/hosts.allowand /etc/hosts.deny) to determine whether or not the client is allowed to connect.
� In most cases, it then uses the syslog daemon (syslogd) to write the name of the requesting client and the requested service to /var/log/secure or /var/log/messages.
� This example blocks everything but ssh.
� echo "ALL:ALL" >> /etc/hosts.deny� echo "sshd:ALL" >> /etc/hosts.allow
14

� Firewalld is a complete firewall solution available by default on CentOS 7 servers.
� The firewalld daemon manages groups of rules using entities called "zones". Zones are basically sets of rules dictating what traffic should be allowed depending on the level of trust you have in the networks your computer is connected to. Network interfaces are assigned a zone to dictate the behavior that the firewall should allow.
� In firewalld, rules can be designated as either permanent or immediate. If a rule is added or modified, by default, the behavior of the currently running firewall is modified. At the next boot, the old rules will be reverted.
� Before we can begin to create our firewall rules, we need to actually turn the daemon on. The systemd unit file is called firewalld.service. We can start the daemon for this session by typing:� sudo systemctl start firewalld.service� We can verify that the service is running and reachable by typing:� firewall-cmd --state
15

� Linux malware includes viruses, trojans, worms and other types of malware that affect the Linux operating system. Linux, Unix and other Unix-like computer operating systems are generally regarded as very well-protected against, but not immune to, computer viruses.
� Like Unix systems, Linux implements a multi-user environment where users are granted specific privileges and there is some form of access control implemented. To gain control over a Linux system or to cause any serious consequences to the system itself, the malware would have to gain root access to the system.
16

� The following is a partial list of known Linux malware:� Botnets
� Mayhem - 32/64-bit Linux/FreeBSD multifunctional botnet� Linux/Remaiten - A threat targeting the Internet of Things.
� Rootkits� Snakso-A - 64-bit Linux webserver rootkit
� Trojans� Effusion - 32/64-bit injector for Apache/Nginx webservers, (7
Jan 2014)� Hand of Thief - Banking trojan, 2013
17

� Viruses� 42
� Arches
� Worms� Adm - Net-Worm.Linux.Adm
� Adore
18

� Linux Malware Detect (LMD):� # wget http://www.rfxn.com/downloads/maldetect-current.tar.gz� # tar -xvf maldetect-current.tar.gz� # ls -l | grep maldetect� # ./install.sh
� Edit the /usr/local/maldetect/conf.maldet:� email_alert=1� email_addr=gacanepa@localhost� email_subj="Malware alerts for $HOSTNAME - $(date +%Y-%m-
%d)"� quar_hits=1� quar_clean=1� quar_susp=1� clam_av=1
19

� ClamAV:� Create the repo file /etc/yum.repos.d/dag.repo:
� [dag]
� name=Dag RPM Repository for Red Hat Enterprise Linux
� baseurl=http://apt.sw.be/redhat/el$releasever/en/$basearch/dag/
� gpgcheck=1
� gpgkey=http://dag.wieers.com/packages/RPM-GPG-KEY.dag.txt
� enabled=1
� # yum update && yum install clamd
20

� Now it’s time to test our recent LMD / ClamAV installation. Instead of using real malware, we will use the EICAR test files, which are available for download from the EICAR web site.� # cd /var/www/html� # wget http://www.eicar.org/download/eicar.com � # wget http://www.eicar.org/download/eicar.com.txt � # wget http://www.eicar.org/download/eicar_com.zip � # wget http://www.eicar.org/download/eicarcom2.zip
� Scan with LMD:� # maldet --scan-all /var/www/� LMD also accepts wildcards, so if you want to scan only a certain type of file, (i.e. zip files, for example),
you can do so:� # maldet --scan-all /var/www/*.zip
� When the scanning is complete, you can either check the email that was sent by LMD or view the report with:� # maldet --report 021015-1051.3559� Where 021015-1051.3559 is the SCANID (the SCANID will be slightly different in your case).
� If you check the quarantine folder:� # ls -l /usr/local/maldetect/quarantine/*
21

Q & A
END
22