preparing a computer for work with a cryptographic usb ... your... · preparing a computer for work...
TRANSCRIPT

Preparing a computer for work with a cryptographic USB (Aladdin eToken Pro) token

Preparing a computer for work with a cryptographic
USB (Aladdin eToken Pro) token
1
This manual describes the steps that are necessary to prepare a computer for work
with an elektroninis.lt e-signature in a cryptographic USB (Aladdin eToken PRO)
token. Installation only with administrator rights. You must have administrator rights
on the PC on which you want to install the software!
Contents
1. Download the drivers ........................................................................................................................................ 1 2. Install the SafeNet program ............................................................................................................................. 1 3. Install the root certificates ............................................................................................................................... 6 4. Prepare the Mozilla FireFox browser ....................................................................................................... 12
1. Download the drivers
In order to use the electronic signature, Java software is required to be installed on
your computer. If it is not installed on your computer, please download it from the
website www.java.com and install it.
Go to the website http://www.elektroninis.lt/en/prepare-pc/nid-1004 and download the
following drivers for your USB (Aladdin eToken PRO) to your computer:
Root certificates; The SafeNet program;
2. Install the SafeNet program
Before starting the installation, close all other applications that are running, for example, Internet
Explorer and Mozilla FireFox web browsers.
Locate the downloaded file SafeNetAuthenticationClient-x32-x64_8.00-SP2.exe.
Start the installation by double clicking on the file.
Figure 2.1

Preparing a computer for work with a cryptographic
USB (Aladdin eToken Pro) token
2
The SafeNet Authentication Client 8.0 SP2 Setup window opens. Click the button Next (Figure 2.2).
Figure 2.2
In the next window, click the button Next.
Figure 2.3

Preparing a computer for work with a cryptographic
USB (Aladdin eToken Pro) token
3
A new window will open, where you should click on the box to the left of the line “I accept the license agreement” and click the button Next (Figure 2.4).
Figure 2.4
Select the option Standard and click the button Next (Figure 2.5).
Figure 2.5

Preparing a computer for work with a cryptographic
USB (Aladdin eToken Pro) token
4
Continue and click the button Next (Figure 2.6).
Figure 2.6
Confirm that you agree to install the SafeNet program (Figure 2.7).
Figure 2.7

Preparing a computer for work with a cryptographic
USB (Aladdin eToken Pro) token
5
In the following window, you will see the installation progress bar. Wait until the installation is complete (Figure 2.8).
Figure 2.8
The last SafeNet Authentication Client 8.0 SP2 Setup window opens, where you have to click the button Finish.
Figure 2.9
The installation of the SafeNet program is now complete.

Preparing a computer for work with a cryptographic
USB (Aladdin eToken Pro) token
6
3. Install the root certificates
Extract the archive file root_certificates.zip containing the root certificates which
you downloaded in the first step. The Sertifikatai (or Certificates) folder contains
the following root certificates which need to be installed: IssuingCA_2.cer,
IssuingCA_A.cer, PolicyCA(2).cer, PolicyCA.cer and RootCA.cer.
Figure 3.1
The root certificates are installed as follows: double-click the mouse on one of the root certificate
files and the Certificate window will open. Click the button Install Certificate… (Figure 3.2).
Figure 3.2

Preparing a computer for work with a cryptographic
USB (Aladdin eToken Pro) token
7
The Certificate Import Wizard window will open. Click the button Next.
Figure 3.3
Click the button Browse... (Figure 3.4).
Figure 3.4

Preparing a computer for work with a cryptographic
USB (Aladdin eToken Pro) token
8
The Select Certificate Store window will open where you have to select Trusted Root
Certification Authorities and click the button OK.
Figure 3.5
Return to the Certificate Import Wizard window and click the button Next.
Figure 3.6

Preparing a computer for work with a cryptographic
USB (Aladdin eToken Pro) token
9
The last Certificate Import Wizard window opens. Click the button Finish (Figure 3.7).
Figure 3.7
Preparing a computer for work with a cryptographic
USB (Aladdin eToken Pro) token
10
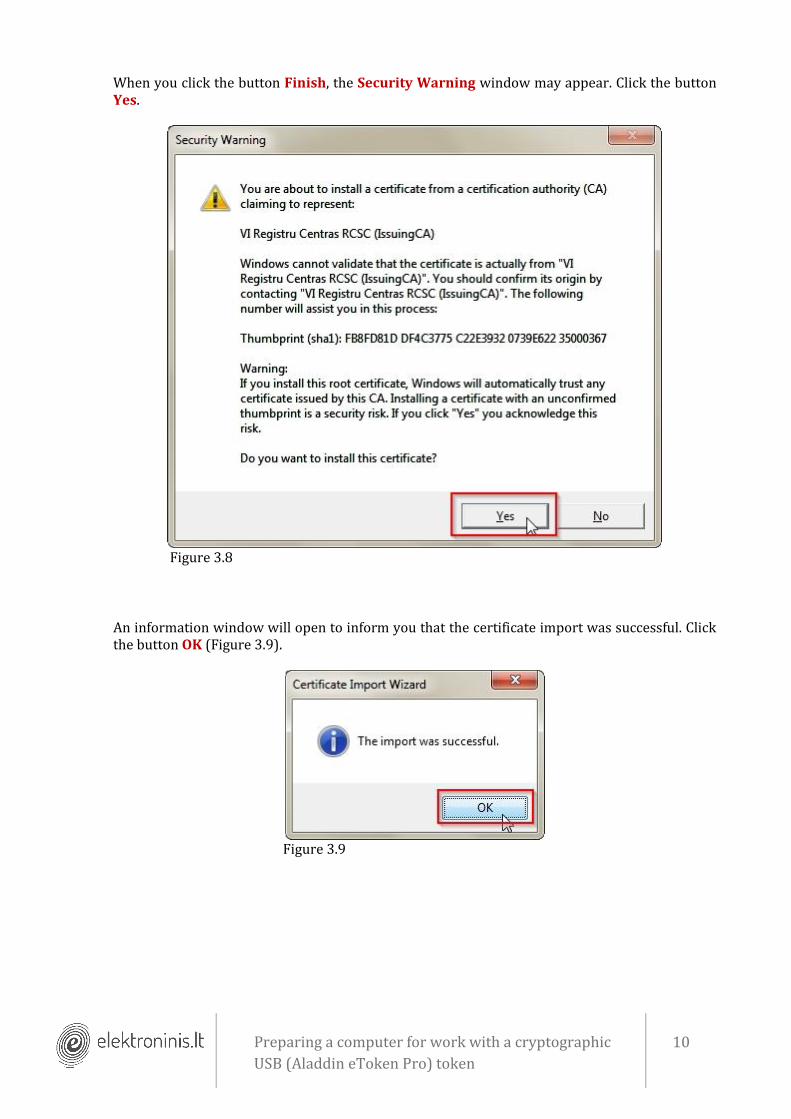
When you click the button Finish, the Security Warning window may appear. Click the button Yes.
Figure 3.8
An information window will open to inform you that the certificate import was successful. Click the button OK (Figure 3.9).
Figure 3.9

Preparing a computer for work with a cryptographic
USB (Aladdin eToken Pro) token
11
Return to the Certificate window and click the button OK.
Figure 3.10
Repeat the same root certificate installation procedure for all root certificates.
After completing the installation of all root certificates, close all windows that were open during the installation process. The installation of the root certificates is now complete.

Preparing a computer for work with a cryptographic
USB (Aladdin eToken Pro) token
12
4. Prepare the Mozilla FireFox browser
If you are using the Mozilla Firefox browser, you will need to additionally install the SafeNet security module and the root certificates into this browser.
1. Install the SafeNet security module
Open the Mozilla Firefox web browser and, in the upper part of the menu bar, click Priemonės
(or Tools) and select Nuostatos (or Options).
In the opened window, click Kitkas (or Advanced) and select the tab Liudijimai (or Certificates)
and Saugumo priemonės (or Security Devices) (Figure 4.1).
Figure 4.1

Preparing a computer for work with a cryptographic
USB (Aladdin eToken Pro) token
13
The Saugumo priemonių tvarkytuvė (or Device Manager) window will open (Figure 4.2). If
you do not see the eToken security module in the left pane Saugumo moduliai ir priemonės (or
Security Modules and Devices) of the opened window, click the button Įkelti (or Load).
Figure 4.2
The PKCS Nr. 11 modulio įkėlimas (or Load PKCS#11 Device) window will open. In the
Modulio vardas (or Module Name) field, select Naujas PKCS Nr. 11 modulis (or New PKCS#11
Module) and enter “eToken” (Figure 4.3) in the Modulio vardas (or Module Name) field. Click
the button Parinkti failą... (or Browse…).
Figure 4.3

Preparing a computer for work with a cryptographic
USB (Aladdin eToken Pro) token
14
In the opened PKCS Nr. 11 įkėlimas (or Load PKCS#11 Device) window, select My Computer-
>WIN7 (C:)->Windows->System32 (Figure 4.4). Find the eTPKCS11.dll file and click Open.
Figure 4.4
Click Gerai (or OK) to confirm the action.
Figure 4.5

Preparing a computer for work with a cryptographic
USB (Aladdin eToken Pro) token
15
When you return to the Saugumo priemonių tvarkytuvė (or Device Manager) window, you
should see a new section – eToken – in the left pane Saugumo moduliai ir priemonės (or
Security Modules and Devices). Close the window by clicking the button Gerai (or OK) (Figure
4.6).
Figure 4.6
The installation of the SafeNet security module in the Mozilla FireFox browser is now complete.
Preparing a computer for work with a cryptographic
USB (Aladdin eToken Pro) token
16
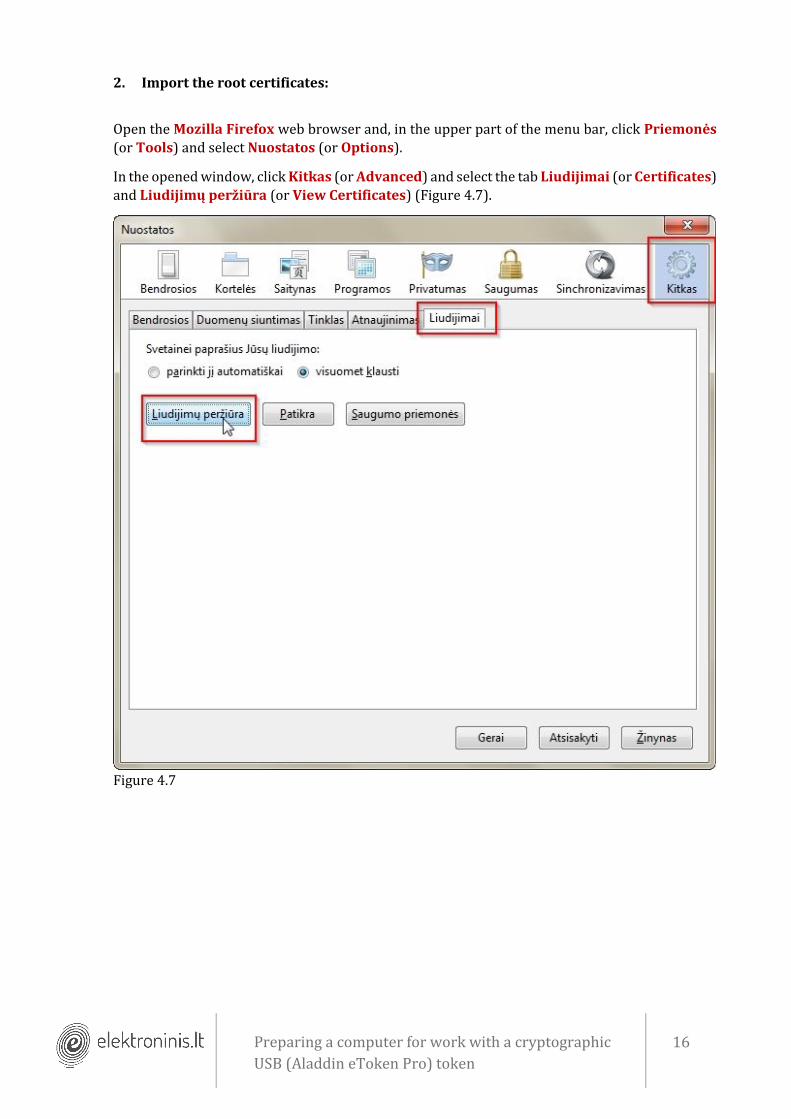
2. Import the root certificates:
Open the Mozilla Firefox web browser and, in the upper part of the menu bar, click Priemonės
(or Tools) and select Nuostatos (or Options).
In the opened window, click Kitkas (or Advanced) and select the tab Liudijimai (or Certificates)
and Liudijimų peržiūra (or View Certificates) (Figure 4.7).
Figure 4.7

Preparing a computer for work with a cryptographic
USB (Aladdin eToken Pro) token
17
The Liudijimų tvarkytuvė (or Certificate Manager) window will open. Select the Liudijimų
įstaigų (LĮ) (or Authorities) tab (Figure 4.8) and click the button Importuoti… (or Import…).
Figure 4.8

Preparing a computer for work with a cryptographic
USB (Aladdin eToken Pro) token
18
The following window will open: Pasirinkite failą, kuriame yra importuojamas LĮ liudijimas
(or Select File containing CA certificate(s) to import).
In the first step, you downloaded elektroninis.lt root certificates and later unzipped the file. Locate the extracted file folder Sertifikatai (or Certificates) on your computer. In the Pasirinkite failą, kuriame yra importuojamas LĮ liudijimas (or Select File containing CA certificate(s) to import) window, specify the path to the directory Sertifikatai (or Certificates), where you should see the following root certificates: IssuingCA_2.cer, IssuingCA_A.cer, PolicyCA(2).cer, PolicyCA.cer and RootCA.cer. Select the first certificate and click the button Open (Figure 4.9).
Figure 4.9

Preparing a computer for work with a cryptographic
USB (Aladdin eToken Pro) token
19
The Liudijimo atsiuntimas (or Downloading Certificate) window will open, where you need to select all three options available and click the button Gerai (or OK) (Figure 4.10).
Figure 4.10
Return to the Liudijimų tvarkytuvė (or Certificate Manager) window, click the button
Importuoti… (or Import…) and import the other four certificates one by one in the same way as
the first one.
Figure 4.11

Preparing a computer for work with a cryptographic
USB (Aladdin eToken Pro) token
20
After you import all the certificates, you should see them in the VĮ Registrų Centras section, as
shown in Figure 4.11. After completing the installation on all windows, click the button Gerai (or OK). Close the Mozilla FireFox browser.
Your computer workstation is now prepared for work with the Aladdin eToken PRO cryptographic USB token. Restart the computer.
We recommend that you change your password. Please click here for instructions on how to change your password.