prepare the unknown - wizkids | dedicated to...
TRANSCRIPT

Crewmen hurry about the darkened bridge as the red alert klaxon sounds in the background. On the main viewer, the Klingon D7 Battlecruiser can be seen lazily turning about for what it no doubt thinks is a final pass…
Captain James T. Kirk pulls himself back into the captain’s chair. Leaning forward he stretches out his right hand, waiting for the perfect moment: “Mr. Sulu… FIRE!”
Star Trek: Fleet Captains puts you in the command chair of the famous starships from the Star Trek Universe. It’s part miniatures game, part space exploration, and part starship combat, but it’s all Trek!
You and your opponent will assemble your fleet and set out to explore and control an unknown region of space. You will explore strange new worlds, seek out new life and new civilizations. Starfleet Command and the Klingon High Council have sent you to complete a series of important missions. If you can complete enough missions and survive enough encounters, victory will be yours!
Whether you are a fan of the movies, the Star Trek: Voyager series, the Star Trek: the Next Generation series, the Star Trek: Deep Space Nine series, or the classic original, all the adventure and excitement of Star Trek awaits you!
1
2
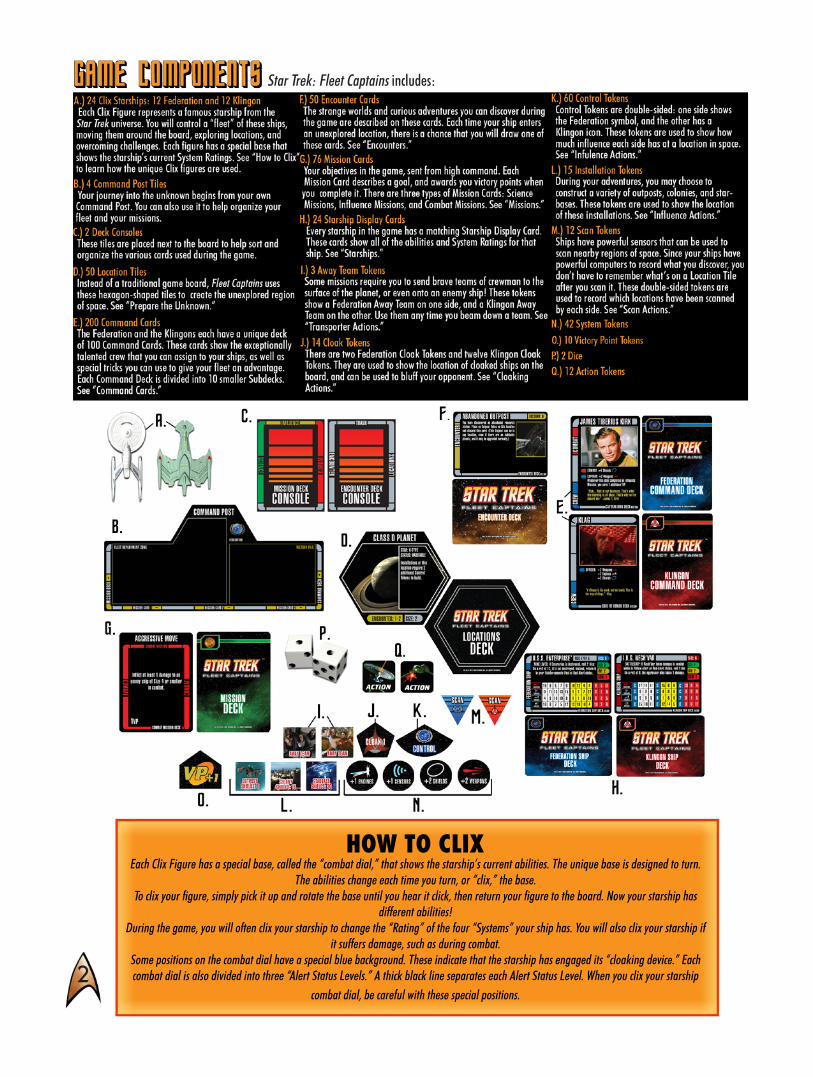
Star Trek: Fleet Captains includes:
HOW TO CLIXEach Clix Figure has a special base, called the “combat dial,” that shows the starship’s current abilities. The unique base is designed to turn.
The abilities change each time you turn, or “clix,” the base.To clix your figure, simply pick it up and rotate the base until you hear it click, then return your figure to the board. Now your starship has
different abilities!During the game, you will often clix your starship to change the “Rating” of the four “Systems” your ship has. You will also clix your starship if
it suffers damage, such as during combat.Some positions on the combat dial have a special blue background. These indicate that the starship has engaged its “cloaking device.” Each combat dial is also divided into three “Alert Status Levels.” A thick black line separates each Alert Status Level. When you clix your starship
combat dial, be careful with these special positions.

3
Your goal in Fleet Captains is to earn victory points (sometimes called “VP”). You can earn victory points in a variety of ways, such as completing missions, surviving encounters, or building starbases. Before the game begins, you and your opponent must decide what the Victory Point Goal will be. The first player to collect enough victory points to meet this goal wins the game!
The Victory Point Goal can be any number between 6 and 38. The more points you need to win, the longer the game will be. We recommend playing with a Victory Point Goal of 10. This goal makes a game that takes about an hour to an hour-and-a-half to play.
The Victory Point Goal also determines the maximum Fleet Size you can have on the board at any point in time (see “Muster Your Fleet”). Longer games also give you access to larger and more complex fleets of starships. This can also affect the number of Actions you can spend each turn (see “Actions”).
Once the Victory Point Goal has been chosen, you and your opponent need to determine how large the game board will be. The smallest board you can use is three tiles by four tiles. In theory, there is no maximum size, but there are only 50 Location Tiles in the game. Larger boards are good for longer games. Smaller boards are good for games with a lot of action and combat. In general, games with a higher Victory Point Goal should be played on a larger board.
We recommend using the “standard” five by five layout described below. It makes for a good mix of exploration and combat, and is perfect for playing a standard 10 Point game.
Before you can begin exploring, you will need to set up the game. Use the illustrations below to guide you.
PREPARE THE UNKNOWN:Take all 50 Location Tiles, turn them face down, and shuffle them together. For the standard five by five game, you start by placing one tile in the middle of the table (labeled “1” in the diagram). Add two more tiles on each side of the center tile to create a line running from you to your opponent (labeled “2” in the diagram). Each player has a Command Post Tile, which is placed at the end of this line. Now fill in the empty spots between you and your opponent using two lines of six tiles each (labeled “3” in the diagram). Finally, create lines of five tiles each on the outside of those two lines (labeled “4” in the diagram).

4
Place the two Deck Consoles to one side of the game board. One console shows spaces for the three types of Mission Cards. Sort the Mission Cards into three decks (Science, Influence, and Combat—they all have the same back, but are identified on the front) and shuffle each deck separately. Set each deck next to the matching space on the Deck Console. The other console shows spaces for the Encounter Cards and the Location Tiles. Stack the leftover Location Tiles next to the matching space. Then shuffle the Encounter Cards and set them next to the Console.
Note: The last space on the Deck Console has a “Trash” label. This space is used to place any cards that are “trashed” during the game.
Note: After your first few games, once you’ve gotten the hang of Fleet Captains, you can create many different board configurations—anything you and your opponent can come up with! You could create narrow starting areas with a lager middle section. Or create tight choke points and peninsulas. Whatever you and your opponent agree is a fair and interesting arrangement.
Muster Your Fleet:After the board has been created, it’s time to prepare your fleet. Fleet Captains can be played by two players or two teams of two players (See Team Rules at the end for how to modify play). One player/team assumes command of the Federation, while the other(s) represents the Klingon Empire. You must decide who plays which side.
The ships assigned to you are determined by the luck of the draw. You won’t begin the game with every ship available. All players are restricted to a pre-determined Fleet Size. Your Fleet Size at the beginning of the game is equal to the Victory Point Goal you chose. In the standard game, for example, the Victory Point Goal and the Fleet Size are both 10.
Each ship has a matching Starship Display Card. In the top right corner of each card is a number for the Size value of that ship. The total Size of all ships in your fleet cannot be more than your Fleet Size.
Take all 12 Starship Display Cards for your side and shuffle them face down. Now you’re ready to “draft” your starting fleet:
Step 1: Turn over the top Starship Display Card.Step 2: Total the Size values of all your face up ships.Step 3: Draw, Discard, Stand, or Redraft:Draw: If the total Size value is less than your Fleet Size, place the card face up next toyour Command Post and draw another ship (return to Step 1).Discard: If the total Size value is more than your maximum Fleet Size, discard the card and draw another ship (return to Step 1).Stand: If the total Size value is exactly equal to your Fleet Size, place the card face up next to your Command Post and stop drawing.Redraft (Mulligan): If you run out of Starship Display Cards before your total Size value matches the Fleet Size, you have a choice: You can either keep the ships you have (even though your opponent will have an advantage). Or you can mulligan: discard all your Starship Display Cards, reshuffle them, and start over from Step 1.

5
Example: John is commanding the Federation fleet. He starts drafting ships. The first ship he turns over is the U.S.S. Venture, with a Size of 5. He places it next to his Command Post. The next card is the U.S.S. Equinox (Size 1). He places it next to the Venture. The third card is the U.S.S. Enterprise (Size 6). This would make his total Size value 12, which is higher than the maximum Fleet Size of 10. Sadly, he must discard the Enterprise. The next card he turns over is the U.S.S. Sutherland (Size 4). Now his total Size value is exactly equal to the Fleet Size (5 + 1 + 4 = 10) so he places the Sutherland with the other two ships and stops drawing.
Once you’re done drafting ships, take the rest of your Starship Display Cards (including any you discarded in Step 3) and place them to the side. This is your Reinforcement Pool, and you may be able to bring some of these ships into the game later.
Find the Clix Starships that match your Starship Display Cards and place them on the Starship Deployment Zone of your Command Post.
Take Command:Once you have a fleet of ships, its time to build your own personal Command Deck. Take the Command Cards for your side. Each card has a note in the bottom right corner that identifies which Subdeck the card belongs to. Sort your Command Cards into those ten Subdecks.
Your Subdecks each have a unique theme. The “Main Engineering” Federation Subdeck has engineer cards and auxiliary power cards, while the Klingon’s “Way of the Warrior” Subdeck has a lot of combat cards and crew that improve your fighting ability.
Take a look at the ships in your fleet to see what kind of Mission Cards you will draw (see “Receiving Orders”). This will help you decide which Subdecks to include in your Command Deck.
Choose four of your Subdecks (a total of 40 cards) to create your Command Deck. Shuffle these cards together and place them face down to the right of your Command Post. Finally, draw the first four cards from your Command Deck to form your starting hand.

6
Receiving Orders:You also have your own deck of Mission Cards that represent the orders received from your commanders. The type of cards included in your Mission Deck is based on the ships in your starting fleet. Each Starship Display Card has three numbers along the right side of the card. These numbers tell you how many Mission Cards of each type to add to your Mission Deck. Larger ships will tell you to draw more cards than smaller ships. The type of cards will give you missions that your fleet is well-suited to complete.
Draw the Mission Cards listed on your starting ships from the three stacks next to the Deck Console but do not look at these cards. Make a pile of face-down Mission Cards until you have drawn all the cards you need. Then shuffle them together and place them next to your Command Post.
Each ship will tell you to draw a number of Mission Cards equal to the Size value of that ship. So, in a standard 10 point game, you will draw a total of 10 Mission Cards (assuming you did not start with a smaller fleet).
Draw the first three Mission Cards from your deck and place them below your Command Post. If any of them are “Secret Missions,” place them face down. Otherwise, place them face up (see “Missions”).
There is a space on your Command Post to keep your Victory Pile. This is where you will collect victory points during the game. See “Your Victory Pile.”
Now you’re ready to play!
Example: The Klingon player has a starting fleet that will create a mission deck with seven Combat Missions, three Influence Missions, and one Science Mission. He decides to focus on Command Cards that will help him in combat. So he chooses “Way of the Warrior,” “The Science of War,” “Battleships,” and “Code of Honor.”
Example: If the U.S.S. Enterprise NCC 1701-E is one of your starting ships, you will draw 3 Science Missions, 2 Influence Missions, and 1 Combat Mission.

7
You are not required to do all of these things—this is just the maximum you can do each turn. You also don’t have to do them in any particular order (though if you stop moving a ship or Task Force, you cannot move it any further that turn). It is perfectly legal to move one ship, take an action with a different ship, make a Power Adjustment with the first ship, then move a third ship, etc. Just make sure you remember which ships have moved and how many actions you’ve taken.
SYSTEM TESTSMany actions and encounters in the game will require you to make a System Test. Each test will tell you which of the ship’s Systems are used. Every test will have a Test Level that you must meet or beat in order to succeed. To make a System Test, roll one die and add it to the current System Rating for the matching System. If the total of the die roll and the System Rating is higher than or equal to the Test Level, you succeed.
Example: The U.S.S. Yosemite has just encountered a mysterious and dangerous Partic le Fountain. The Encounter Card requires a Level 12 Sensors Test to avoid taking damage. The U.S.S. Yosemite currently has Sensors 7. So, the Federation player will need to roll a “5” or higher on the die roll to succeed at the Sensors Test.
Often, you will be able to improve your chances of success by making a Power Adjustment (see “Power Adjustments”). This can change your System Rating.
Example: If the U.S.S. Yosemite makes a Power Adjustment, it could increase its Sensors Rating all the way up to 13. Since Sensors 13 is higher than the Test Level, the attempt is automatically successful.
Choose a player to go first using whatever method suits your fancy—such as rolling a die or playing rock-paper-scissors. The winner gets to go first, and play alternates between the players until one of you reaches the Victory Point Goal.
During your turn, you get to do all of the following in any order you choose:
• Move each ship in your fleet.• Make one Power Adjustment with each ship in your fleet.• Take 3 Actions.• Play Command Cards.• Cycle a Mission Card (discard an uncompleted mission card for a new one).• Discard 1 Command Card.

8
Compare your final value to the Test Level for the System Test. If your total is equal to or higher than the Test Level, you succeed! If not, you fail the test.
Note: If your modified System Rating is higher than the Test Level you automatically succeed! No die roll is needed.
Note: System tests you undertake to perform a mission count as one of your actions for the turn.
Note: If your System is Disabled (System Rating “D”), you automatically fail the System Test. You cannot play any Command Cards to improve a Disabled System.
Cooperative System TestsSome System Tests cannot be passed by a lone ship. Particularly difficult tasks may require two or more ships to work together by attempting a Cooperative System Test.
To make a Cooperative System Test, all ships involved must be at the same location, and each ship must spend an Action. These ships add their System Ratings for the appropriate System together before rolling the die. You still only get to roll one die for the test, but your base number is much higher.
Example: The Klingon Empire has ordered its fleet to complete a Geological Study of an uninhabitable planet. This requires a level 20 Sensors Test. The I.K.S. Klothos and the I.K.S. Maht-H’a have been dispatched to conduct the survey. Both ships are set to their maximum Sensors Rating. Klothos has Sensors 7 and Maht-H’a has Sensors 10. They add their Sensors Ratings together for a total of 17. The Klingon player will need to roll a “3” or higher on the die to succeed at the test.
Step 1. Find the System Rating for the System you will use on the ship’s combat dial.Step 2. You may play one Command Card from your hand that modifies the System you are using.Step 3. Your opponent may play one Command Card from his hand to modify the System you are using. If you chose not to play a card in step 2, you may play a card now to respond to a card played by your opponent. (i.e. if you pass, and your opponent passes, you do not get to play a card.)Step 4. Add or subtract any modifiers for Crew Cards or System Tokens attached to the ship, and for any Command Cards you or your opponent played.Step 5. Roll one die. Add the result rolled to your modified System Rating.
STEP 1 STEP 2 STEP 3
STEP 4
STEP 5
When you need to make a System Test, in response to a chance encounter in a region of space you just explored for example, follow these simple steps:

9
Example: The U.S.S. Yeager is attempting to use the Sensor Overload Command Card against the I.K.S. Bortas. This card requires an Opposed Sensors Test. The Yeager currently has Sensors 6. The Bortas has Sensors 7 and it has a Crew Card assigned to it that adds +3 Sensors. To improve his odds, the Federation Player plays an “Emergency Power” Command Card (+2 to any System). The Federation player rolls one die and gets a “4,” so his total on the test is 12. The Klingon player rolls a “1” for a total of 11. The Yeager has the higher total, so the Bortas suffers the effect of the Sensor Overload.
Note that combat is considered a special type of Opposed System Test - see “Combat” for more details.
MOVEMENTEach ship in your fleet can move once each turn. The distance a ship can move is determined by its current Engines Rating.
Any ship with an Engines Rating of 1 or higher can move from its present location to any adjacent location (unless a location or encounter effect prevents it from moving). Ships with disable Engines cannot move.
Locations are adjacent only if they share a common edge. Your Command Post is larger than other tiles. It is adjacent to three locations.
When a ship moves, it has a number of movement points equal to its current Engines Rating. It only costs 1 movement point to enter a location and stop moving. If you want to move farther, you will need to spend more points. Every Location Tile has a Size value in the lower right corner. This is the number of movement points you must spend to cross that location. A ship can cross multiple locations if it has enough movement points to pay the cost for crossing all of the locations.
Important: You cannot interrupt a ship’s movement to take any other kind of action. Once you stop moving a ship, it cannot move any further this turn.
Ships can cooperate to make an Opposed System Test (spending 1 action for each ship). Two small ships, for example, might combine their Weapons Ratings to attack a larger enemy. The matching Ratings are combined, and only one die is rolled for the cooperating ships, but otherwise the test is resolved normally.
Opposed System TestsSometimes a ship will be required to make a System Test against another ship. For example, during combat the attacking ship will make a Weapons Test against the defender’s Shields Test (see “Combat”). During an Opposed System Test, both players will roll one die and add it to the matching System Rating. Each player can also play one Command Card to modify the test. The results of both tests are compared. If the active player has a higher total, he succeeds at the test. If the target’s total is higher, or if the results are equal, the test fails.
10
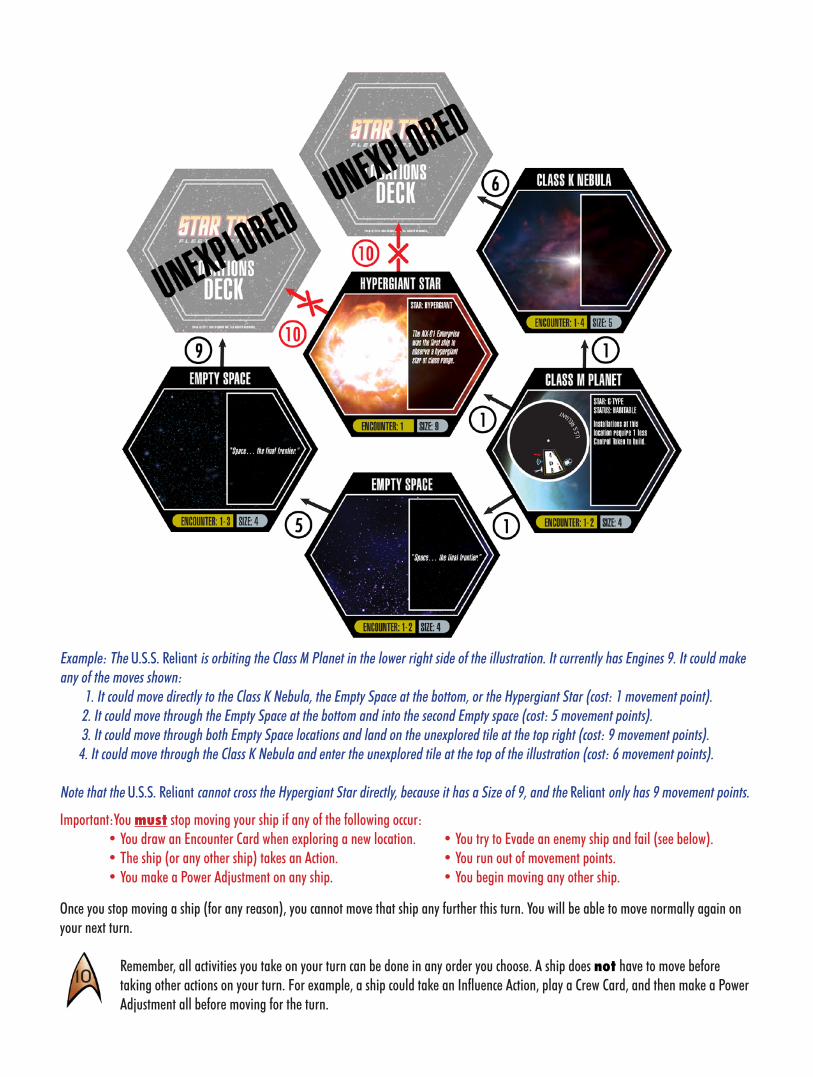
Example: The U.S.S. Reliant is orbiting the Class M Planet in the lower right side of the illustration. It currently has Engines 9. It could make any of the moves shown: 1. It could move directly to the Class K Nebula, the Empty Space at the bottom, or the Hypergiant Star (cost: 1 movement point). 2. It could move through the Empty Space at the bottom and into the second Empty space (cost: 5 movement points). 3. It could move through both Empty Space locations and land on the unexplored tile at the top right (cost: 9 movement points). 4. It could move through the Class K Nebula and enter the unexplored tile at the top of the illustration (cost: 6 movement points).
Note that the U.S.S. Reliant cannot cross the Hypergiant Star directly, because it has a Size of 9, and the Reliant only has 9 movement points.
Important:You must stop moving your ship if any of the following occur: •YoudrawanEncounterCardwhenexploringanewlocation. •YoutrytoEvadeanenemyshipandfail(seebelow). •Theship(oranyothership)takesanAction. •Yourunoutofmovementpoints. •YoumakeaPowerAdjustmentonanyship. •Youbeginmovinganyothership. Once you stop moving a ship (for any reason), you cannot move that ship any further this turn. You will be able to move normally again on your next turn.
Remember, all activities you take on your turn can be done in any order you choose. A ship does not have to move before taking other actions on your turn. For example, a ship could take an Influence Action, play a Crew Card, and then make a Power Adjustment all before moving for the turn.

11
Command Posts:Your Command Post is a special location that only your ships can enter. It costs zero movement points to enter your Command Post, so you can move there even if you have no Engine power left (but not if your Engines are Disabled). Ships that enter Command Posts must end their movement for the turn and any missions that are unique to the ship (such as a Warp Experiment) will have to start over.
Exploration:If a ship moves onto an unexplored Location Tile, you must explore it (unless that ship is cloaked). This does not cost an action. There are three steps to exploring a new location:
Step 1: ExploreTurn over the Location Tile. Turn the tile so that the text on the tile is facing you. This shows that you are the player who explored that tile (this is important for some missions). Many Location Tiles have some kind of effect. These effects take place immediately unless they say otherwise. If there was a Scan Token on the Location Tile, discard it.
Step 2: EncounterEach Location Tile has a range of numbers in the lower left corner. When you explore that location, you must roll one die. If the result matches a number in that range, you must draw and resolve an Encounter Card before doing anything else. Drawing an Encounter Card stops the ship’s movement, even if it has movement points left to spend.
Step 3: Stop or ContinueIf you do not draw an Encounter Card, and your ship has enough movement points to cross the location you just explored, you may continue moving. Otherwise, the ship’s movement for the turn ends.
Example: The I.K.S. Kronos One has just entered a new region of unexplored space. The Klingon player turns over the Location Tile: it’s a Class J Nebula. Kronos One, and any other ships in this location, will gain +4 Shields while in this location. The Federation Scan Token that was on the Location Tile is discarded. Now the Klingon player rolls one die and gets a “3.” Since the Class J Nebula only shows “1-2” for the encounter roll, he does not draw an Encounter Card. If the I.K.S. Kronos One has Engines 7 or higher, it could continue moving since the Class J Nebula has a Size of 6.

12
Enemy Action:The movement rules above assume that there are no enemy ships in any of the locations you are moving through (or from). If you want to leave a location that the enemy occupies, you must attempt a Breakaway Roll or Evasion Roll.
Breakaway:If your uncloaked ship begins the turn in a location occupied by any uncloaked enemy ships, you must make a Breakaway Roll before you can move that ship. Roll one die and add the Size value for your ship to the result. Your opponent also rolls one die and adds the Size values of all uncloaked ships he controls in that location. If your total is equal to or higher than your opponent’s total, your ship may move normally. If not, you still get to move, but your opponent may make a free attack against your ship (it does not cost him an action, and occurs even if you decide not to move after all). Only one of the enemy ships can make this free attack (see “Combat Actions”).
Example: The I.K.S. Rotarran (Size 2) and I.K.S. Somraw (Size 1) are patrolling a location that is also occupied by the U.S.S. Venture (Size 5). The U.S.S. Venture decides that its time to leave the area and attempts a Breakaway roll. The Federation player rolls one die and gets a “2,” adding it to the Size of the U.S.S. Venture for a total of 7. The Klingon player adds the Sizes of his two ships together and rolls one die. He gets a “5” for a total of 8. Since the Klingons have the higher total, one of them may make a free attack on the U.S.S. Venture as it leaves the location.
Evasion:If your uncloaked ship attempts to move through a location occupied by one or more uncloaked enemy ships you must make an Evasion Roll. The Evasion Roll is made the same way as a Breakaway Roll (described above) with one difference: if the moving ship fails, it simply stops moving in that location. A failed Evasion Roll does not grant your opponent a free attack on your ship.
Note: If your ship is cloaked, you do not need to make any Breakaway or Evasion rolls. See “Cloaking Actions.”
Task Forces:Ships may travel together as a Task Force. If more than one of your ships begins the turn at the same location you can move them together. Declare which ships compose the Task Force before moving. The combined Task Force only receives movement points equal to the lowest Engines Rating of any ship in the Task Force. The Task Force must make the entire move together. It cannot split up during the move.
Example: The U.S.S. Excelsior (Engines 8) and the U.S.S. Reliant (Engines 6) are together in the same location. The Federation player decides to move them as a Task Force. The two ships move together using only the slower ship’s movement points. In this case, the slower U.S.S. Reliant limits the Task Force to only 6 movement points.

13
If a Task Force explores a new location, you may choose which ships are involved in any Encounter Card you draw, unless the Encounter Card says that all ships are affected. However, if you draw an Encounter Card, all ships in the Task Force must stop moving, even if they are not involved in the encounter.
Note: If the Encounter Card has a benefit, it is not duplicated and can be assigned to only one ship. However, if the Encounter Card has a negative effect, it is duplicated and affects all ships in the Task Force.
Task Force Evasion:If your Task Force attempts to move through an enemy occupied location, add the Size values of all ships in the Task Force together before you make the Evasion Roll. The roll is otherwise resolved normally.
POWER ADJUSTMENTSEach ship in your fleet can make one Power Adjustment each turn. This allows you to adjust your System Ratings to get the best benefit values for any actions you wish to take. Some ships have an abundant power supply when undamaged, allowing them to fully power multiple Systems at the same time. Smaller ships, or those that have been damaged, often do not. You will have to choose the best way to distribute the power you have available by choosing the best combat dial settings for each of your ships.
To make a Power Adjustment, simply clix the combat dial of your ship to the left or right until you reach the power configuration you want. You can choose any setting you want as long as you do not turn the combat dial past any solid black lines or change the background color. (Cloaked ships are the one exception to this, they may become un-cloaked, thus changing the background color.)
You can make a Power Adjustment at any time during your turn, even if it interrupts another action or encounter. But, each ship can only make one Power Adjustment each turn, and any Power Adjustment ends the ship’s movement for the turn if the ship is currently moving.
Example: The U.S.S. Equinox currently has set its Engines to maximum, which leaves its Sensors Disabled. Exploring a new region of space has led to an encounter that requires a Sensors Test. Since the U.S.S. Equinox has not made a Power Adjustment yet this turn, it can interrupt the Encounter and change its combat dial to get a higher Sensors Rating. If the U.S.S. Equinox had already made its only Power Adjustment for the turn, it would be unable to activate its Sensors and it would automatically fail the test!
ACTIONSEach turn you can take up to three Actions with your ships. Actions are your main way of interacting with the game. Normally, each ship can only take one action per turn (some Command Cards may allow a ship to take an extra action). There are seven types of Actions you can choose from:
•CloakingActions—engaging Cloaking Devices to make your ships undetectable.•CombatActions—attacking opposing starships.•InfluenceActions—taking control of locations and building installations.•ReinforcementActions—replacing lost ships in your fleet.•RepairActions—removing damage from a ship at an installation.•ScanActions—examining unexplored Location Tiles.•TransporterActions—moving crew or cargo between ships and planets.•SystemTests—when voluntary, such as when completing a mission (see ”Missions”).
Task Force Breakaway: If you attempt to leave an enemy occupied location with a Task Force, add the Size values of all ships in the Task Force together before you make the Breakaway Roll. If your attempt fails, your opponent still gets to make a free attack with one of his ships, and chooses which one of your ships will be the target of the attack.

14
In general, any time you cause a ship to do anything other than move, make a Power Adjustment, or react to an Encounter Card you just drew, you must spend an Action. If an Encounter Card or another ship forces you to make a System Test, this does not cost you an Action.
Example: The U.S.S. Enterprise is attempting to complete a Nebula Research Mission. It must spend an Action to attempt the required Sensors Test.
You may spend a maximum of three Actions each turn. Each ship you control can spend only one of these Actions per turn (unless a Command Card says otherwise).
Important: The three Action limit assumes that you are playing a standard 10 point game. If you are playing a larger game, you will have more Actions to spend each turn. If you are playing a 13 to 15 point game, you may spend four Actions each turn. If you are playing a game with 16 or more points, you may spend five Actions per turn.
Action TokensEach player has three Action Tokens. When a ship takes an action, place one of your tokens on the Ship Display Card. This serves as a handy reminder of which ships have taken actions, and how many actions you have spent so far this turn.
Cloaking Actions:Some ships are equipped with powerful cloaking devices that render them invisible. Only ships with a functioning cloaking device can take a Cloaking Action. A cloaking device is only functioning if there is a blue-background setting on the ship’s combat dial in its current Alert Status.
Example: The U.S.S. Defiant can use its cloaking device when it is in Undamaged or Yellow-Alert Status.
A Cloaking Action can be used to cloak the ship, or to deploy a Sensor Echo if the ship is already cloaked.
Cloaked ships are invisible, but this limits the ship’s other Systems. Usually, the ship must Disable its Weapons, Shields, and Sensors. But, it is much harder for the enemy to find and attack a cloaked ship. While a ship is cloaked:
•It may not take any actions other than Cloaking Actions unless a card or ability allows it to.•It may not be the target of an attack from any ship.•It does not need to make any Breakaway Rolls or Evasion Rolls.• It may not be the target of any Systems Test from any other ship except a Scan Action attempting to reveal a Cloak Token.•It does not explore new locations when it moves.
When you take a Cloak Action with an uncloaked ship, you must rotate the combat dial until the blue-colored setting for the current Alert Status is visible. Remove the starship figure from the board and replace it with one of your Cloak Tokens, face down. Find the matching Cloak Token and place it face up on the Ship Display Card for the cloaked ship.

Example: The I.K.S. Korinar, currently in Red-Alert Status, decides to hide from the Federation fleet. It spends an action to engage its cloaking device. The Klingon player clix the Korinar’s combat dial until he finds the blue-background setting. This indicates that the cloak has been engaged. The Korinar Clix Figure is removed from the board and replaced with a face down Cloak Token. The matching Cloak Token is placed on the Korinar’s Starship Display Card.
15
De-Cloaking:A cloaked ship can de-cloak during its turn simply by making a normal Power Adjustment. Turn the combat dial to any other setting in the current Alert Status and return the ship to the board in the location of its Cloak Token. Remove the Cloak Token from the board.
Note: You can Power Adjust out of cloaking, but not into cloaking.
Example: Having reached safety, the I.K.S. Korinar needs to de-cloak before it can be repaired. The Klingon player clix its combat dial to any other setting in the ship’s Red-Alert Status. He then replaces the Cloak Token on the board with the Korinar Clix Figure.
Some game effects (such as an opponent’s Scan Action) can also force a cloaked ship to de-cloak. If this occurs, you may choose any setting in the ship’s current Alert Status.
Moving While Cloaked:A cloaked ship moves in the same way as a visible ship, using the Engines Power Level visible on its combat dial.
Example: The cloaked but badly damaged I.K.S. Korinar has an Engines Rating of 5, so it can spend 5 movement points each turn.
Remember, even though echoes can move as fast as their fastest cloaked ship, each actual cloaked ship may still only move it’s own top speed. If a player is attempting to hide a slow ship he shouldn’t move an echo faster than that ship could go.

16
The only exception is that cloaked ships cannot explore new locations. Instead, the cloaked ship may move into the unexplored location, leaving the Location Tile face down. The cloaked ship must stop moving as soon as it enters an unexplored location. The ship can continue moving on your next turn.
If the ship becomes un-cloaked while it is in an unexplored location, it must immediately explore that location as normal.
Sensor Echoes:A cloaked ship can take a Cloaking Action to create a Sensor Echo. You can use Sensor Echoes to bluff your opponent and hide the true location of your cloaked ship.
Add a second Cloak Token to the same location as your cloaked ship. This token must not match the Cloak Token of any other ship already in play.
Example: To confuse the Federation ships, the I.K.S. Korinar spends an Action to place a second Cloak Token in the same location. This new Cloak Token is a Sensor Echo.
When you place the Sensor Echo Token, you should pick up all Cloak Tokens in that location and secretly mix them so your opponent doesn’t know which token is which. Return them to the location after mixing them. You may look at your own Cloak Tokens at any time, and you can mix Cloak Tokens in the same location at any time as well.
You can only add one Sensor Echo Token for each cloaked ship you control.
A Sensor Echo can move on the board just like a ship. The Sensor Echo Token can move with the Engines Power Level of any of your currently cloaked ships. It may move independently of any of your actual ships. You may never move any Sensor Echo faster than the fastest cloaked ship you control. This movement cannot be modified by any cards or abilities (since it isn’t really there).
Sensor Echoes can never take any Actions, and cannot use any special abilities.
Example: The Klingon player moves the Cloak Token that represents the I.K.S. Korinar and the Cloak Token representing the Sensor Echo to two different locations. He can spend 5 movement points for each of the Cloak Tokens.
Sensor Echoes can be a useful tool, but be careful not to overreach your own ability to keep track of them. Moving a Sensor Echo faster than one of your cloaked ships could give your opponents clues about which token is the real ship, and which is not.
Sensor Echoes remain on the board if the ship that created them de-cloaks, even if there are now more echoes than cloaked ships, or no cloaked ships at all. If you have no cloaked ships, your Sensor Echoes can only move to one adjacent location each turn (as if they had only one movement point). Remember that only cloaked ships can create new Sensor Echoes.

Encounters and Missions While Cloaked:Encounters or missions can affect cloaked ships or Sensor Echoes you control. If you must make a permanent adjustment to a cloaked ship (such as taking damage), or if you earn victory points (by completing a mission, for example), and it is not clear to your opponent which token is the real ship, you must show him that the Cloak Token affected by the encounter or mission is a particular ship (or show that it is a Sensor Echo that can ignore the event).
If an encounter or mission forces you to reveal a ship’s location, you may immediately move any Sensor Echo Token to the ship’s location. If you must reveal a Sensor Echo Token for anything other than an opponent’s Sensor Test, you may immediately move it to the same location as any other Cloak Token you control.
Example: On a later turn, the I.K.S. Korinar reaches a location where the Klingon player can complete a mission. He announces that the mission is complete, and shows the Cloak Token for the Korinar to his opponent. The Cloak Token is then returned to the board, face down. Also, he takes the Sensor Echo Cloak Token and moves it to the same location as the Korinar’s Cloak Token, mixing them together so the Federation player does not know which token is which.
COMBAT ACTIONS:If you want to attack an enemy ship, you must take a Combat Action. Ship-to-ship combat is a special Opposed System Test. When you attack an enemy, your ship (or ships, see below) is called the aggressor. The ship you are attacking is called the target.
The aggressor makes a Weapons Test against a Shield Test made by the target. Like other System Tests, both players may play one (and only one) Command Card and roll one die each. The results of the two tests are compared:
•Iftheresultoftheaggressor’sWeaponsTestislessthanorequaltotheresultofthetarget’sShieldsTest,theattack fails and there is no effect. •Iftheresultoftheaggressor’sWeaponsTestexceedstheresultofthetarget’sShieldsTest,theattacksucceedsandthe target takes one damage. •Iftheaggressor’sWeaponsTestdoubles the target’s Shields Test, the target takes two damage. •Iftheaggressor’sWeaponsTesttriples the target’s Shields Test, the target takes three damage.
Each point of damage reduces the target’s Alert Status one level to the right on its combat dial. Undamaged goes to Yellow-Alert, and Yellow-Alert goes to Red-Alert. If a ship at Red-Alert Status takes damage, it is destroyed. This means that if a ship takes three points of damage in a single hit, it will almost always be destroyed (unless a Command Card prevents some of the damage).
Example: The Klingon Battleship I.K.S. Negh’Var has ambushed the science vessel U.S.S. Yosemite. The Negh’Var currently has Weapons 11, and the Yosemite only has Shields 3. It doesn’t look good for the Feds!The Klingon player rolls one die and gets a “4,” making his total Weapons Test value 15. The Federation player only rolls a “1” on his die, making the Shields Test total 4.Since 15 ÷ 4 is more than 3, the Yosemite takes three points of damage: it explodes in a huge ball of flame and debris! The bridge crew of the Negh’Var celebrate the destruction of the (nearly) helpless enemy.
Combined Attacks:Multiple ships can combine in a Cooperative Combat Action against a single enemy ship (the aggressor chooses which ship to attack if there are multiple enemies in the same location). This is done like any other Cooperative System Test. Each attacking ship must spend one Action to participate in the attack, and adds its Weapons Rating to the Weapons Test. Each player can still only play one card, and only adds one die roll to the total. If a ship is destroyed please see the section on Starship Destruction and the Reinforcement Actions.
17

INFLUENCE ACTIONS:Influence Actions are used to expand your control in a location of space. The amount of influence you have in a location is represented by the number of Control Tokens you have there. A Ship can spend Influence Actions to change the number of Control Tokens in its location. Or, a Ship can spend an Influence Action to build or expand an installation.
Important: You cannot take any Influence Actions in a location that is occupied by an uncloaked enemy ship unless a Command Card allows you to.
There are two types of Influence Actions:
1. Exert Influence:When your ship takes this Action, you may either place one of your Control Tokens on the ship’s location (if there are no enemy Control Tokens present) or remove one of your opponent’s Control Tokens from this location (if there are enemy tokens there). You can exert influence on a location even if there are no habitable planets there.
Note: There can only ever be Control Tokens from one side or the other in each location. You cannot add your tokens to a location that has enemy tokens on it. You must remove your opponent’s Control Tokens first.
2. Build or Expand an Installation:If the ship is in a location with a habitable planet or an existing Installation Token, and you have enough Control Tokens in that location, you can build or expand an installation there. Installations are represented by small square tokens.
The Control Tokens required for each level of installation are shown here:
Installation Type Influence Installation Required Shields Special Ability
OUTPOST
COLONY
STARBASE
x1
x2
x3
NONE
OUTPOST
COLONY
0
15
30
REPAIR
REPAIR
IMPROVED REPAIR, +1VP
There can only be one installation in each location.
All new installations begin as Outposts. An Outpost can be expanded to a Colony, which can then be expanded into a Starbase. You cannot skip over a level of Installation, even if you have enough Control Tokens. For example, you cannot expand an Outpost directly to a Starbase. You must upgrade to a Colony first.
Control Tokens are not spent when an installation is built: do not remove them from the location. A Command Card may allow you to upgrade an installation that you could not normally upgrade, but you must still have the required Control Tokens in that location to do so.
18

19
Example: The U.S.S. Venture is in a location with a Colony Token. There are 3 Federation Control Tokens here also. The U.S.S. Venture can spend an Action to upgrade the Colony to a Starbase.
Note: Some planets affect the number of Control Tokens required to build or expand installations in that location. Sometimes the planet will reduce the requirement, and sometimes it will increase it. It is possible that a planet will allow you to place a new Outpost without having any Control Tokens there.
Installations are valuable because they allow you to repair damaged ships (see “Repair Actions”). In addition, if you upgrade a Colony to a Starbase you immediately receive a +1 VP Token (add it to your Victory Pile). You keep this point even if the Starbase is later destroyed.
Installations and Planets are controlled by the side that has Control Tokens in that location. Keep in mind: though Control Tokens cannot be stolen (they must be cleared by taking Influence Actions before you can place your own), installations can be stolen. If your opponent is able to remove all of your Control Tokens from the installation’s location and place at least one of his own, he takes control of the installation.
You cannot “self-destruct” an installation to prevent it from falling into enemy hands. However, either player may attack an installation to destroy it. Each installation has a Shields value, just like a starship. If you attack an installation (yours or your opponents), you must make a successful Weapons Test with a Level equal to the installation’s Shields value. If the test succeeds, the installation is totally destroyed (remove it from the board). If you fail, nothing happens.
Example: The I.K.S. Bortas has arrived in a location occupied by a Federation Colony that it wishes to destroy. It attempts a Level 15 Weapons Test. Because the I.K.S. Bortas currently has Weapons 12, the Klingon player only needs to roll a “3” or higher to destroy the Colony.
REINFORCEMENT ACTIONS:You can only take a Reinforcement Action if the combined Size values of all your starships are less than your current Fleet Size. Usually, this will occur when you lose ships in battle or during exploration.
Remember that the first time you lose a ship, your Fleet Size increases by one (see “Starship Destruction”). Also some cards (ex. Reinforcements for the Klingons and Code 47 for the Federation) increase your fleet size by one.
At the beginning of the game, all ships that did not begin in your fleet create your Reinforcement Pool. These are the ships that you can bring into play through the Reinforcement Action.
When you take a Reinforcement Action, search through your Reinforcement Pool and choose any single ship to add to your fleet. The Size of the ship cannot cause your fleet to exceed your Fleet Size limit.
You can take multiple Reinforcement Actions during the game to bring more than one ship into play, as long as you have room in your fleet. You can even call for reinforcements over multiple turns.

20
Example: After a violent clash with the Klingons, the Federation fleet has been reduced from it’s original size. It now only has 6 Size value worth of ships. The Federation Fleet Size is now 11 (since the Fleet Size increases by 1 when the first ship is lost). The Federation player could spend one Action to bring the U.S.S. Prometheus into play, using all 5 of his available Fleet Size. Or, he could spend two actions to bring the U.S.S. Excelsior and the U.S.S. Reliant into the game. But, he could not add the U.S.S. Enterprise-E (Size 6) to his fleet because he doesn’t have enough Fleet Size left.
Repair Actions:If your ship has been damaged, either because its Alert Status has been reduced or because a card has permanently damaged a system, you can repair it at any friendly installation or your Command Post.
You can only take a Repair Action if there are no uncloaked enemy ships in the same location.
When you take a Repair Action at any friendly installation or Command Post, you may either turn the ship’s combat dial up to the next better Alert Status or repair a System that has been permanently damaged by an event.
Example: The I.K.S. Somraw has been lightly damaged (Yellow-Alert Status) and has been the victim of a Stellar Pulse encounter that has permanently Disabled its Weapons. Since the ship is in the same location as a Klingon Outpost, the Somraw can spend an action to either upgrade its status to Undamaged, or remove the Disabled Weapons Token and return its Weapons to normal effectiveness.
If your ship is at a friendly Starbase or Command Post, you may spend its movement for the turn to receive the benefit of a Repair Action (to increase its Alert Status once or fix a damaged System). This special repair does not cost an Action, and can be used whether or not that ship takes a normal Repair Action that turn. So, you could sacrifice movement and spend an action to fully repair a ship from Red-Alert to Undamaged. Note that this special repair does not count as a Repair Action, so Command Cards that can be played during a Repair Action do not apply.
SCAN ACTIONS:Only ships with Sensors 1 or higher can take a Scan Action. There are two types of Scan Actions:
Scan Location:A ship can use a Scan Action to examine one unexplored Location Tile. You can only scan a tile that is adjacent to the ship taking the Scan Action. Secretly look at the Location Tile (without revealing it to your opponent) and return it to the board, face down. Place one of your Scan Tokens on the tile to show that you are a player who scanned it. You may freely look at any Location Tile marked with your Scan Token. If the location is later explored (by either player), discard the Scan Token.
Example: If the Somraw was in a location with a Klingon Starbase, it could sacrifice it’s movement for the turn and spend one Action to both upgrade its Alert Status and remove the Disabled Weapons Token.

21
Note: Since your Command Post is adjacent to three Location Tiles, a ship in your Command Post can scan any of them.
Search for Cloaked Ships:The second type of Scan Action is used to reveal enemy Cloak Tokens. You can only attempt to reveal a Cloak Token if it is in the same location as one of your ships. Your ship must first succeed at a Level 15 Sensor Test. If you succeed, turn the Cloak Token over: •IftheCloakTokenisaSensorEcho,itisremovedfromtheboard. •IftheCloakTokenmatchesacloakedenemyshipthatshipimmediatelyde-cloaks.TheScanningShipmaynowtakeasecond Action this turn (this action still counts against your three Action limit for the turn).
See “Cloaking Actions” for more information about cloaked ships.
TRANSPORTER ACTIONS:A ship must have active Sensors in order to take a Transporter Action. Transporters have a number of uses. They can transfer cargo or crew between ships or even place Away Teams on habitable planets.
Moving Cargo or Crew Between Friendly Ships:If you want to move Crew Cards or cargo between friendly ships, all you have to do is spend a Transporter Action when they are in the same location. You may freely transfer any number of Crew Cards and/or cargo between these two ships—but only between these two ships. All ships have unlimited cargo space in this game.
Moving Cargo or Crew to an Enemy Ship:Your opponent’s ships are not as helpful. You can attempt to beam a single Crew Card or cargo onto or off of an enemy ship, but you must first succeed at a Sensor Test. The Level of the test is equal to the Shields Rating of the enemy ship. If you succeed at the test, you may choose one of the following effects: •ForceyouropponenttodiscardoneCrewCardassignedtothatship(hischoice).Youropponentmayinsteadchoosetodiscard any one Crew Card from his hand. •TakeoneCrewCardofyourchoicefromtheenemyshipandplaceitonyourownshipasaprisoner(treatitlikecargo). •Takeonepieceofcargo(oraprisoner)ofyourchoicefromtheenemyshipandputitonyourship. •Takeonepieceofcargoofyourchoicefromyourshipandputitontheenemyship(thisis,afterall,theonlywaytogetridof Tribbles…).
If you rescue a prisoner from an enemy ship, you may immediately assign that Crew Card to the ship that performed the Transporter Action, or discard it.
Example: The U.S.S. Enterprise-A has moved into the same location as the I.K.S. Gr’oth. The Federation player decides it would be a great time to get rid of some troublesome tribbles. He makes a Transporter Action. The U.S.S. Enterprise-A has Sensors 2, and the I.K.S. Gr’oth has Shields 6. If the Federation player can roll a “4” or higher on the die, he can force the Klingon player to take the tribbles card and assign it to the Gr’oth as cargo.
Away Teams:You can beam down an Away Team to a habitable planet in the same location as your ship. You can also retrieve an Away Team (yours or your opponents) from a planet at your location. This Action is automatic: no roll is required (even if there are enemy ships in the area).
Some Mission Cards instruct you to place and retrieve Away Teams. This will require two Transporter Actions: one to place the Away Team and a second to recover it. You do not have to perform both actions with the same ship to complete the mission.
22
PLAYING COMMAND CARDSDuring your turn you may play any number of Command Cards. Every time you are involved in a System Test, you may play one card. Many cards can be played to allow you to take a special Action that is different from those listed above. You may also play Crew Cards, assigning them to your ships. Always draw a replacement card after you play a Command Card from your hand (see “Command Cards”).
You cannot normally interrupt another action by playing a Command Card. For example, you may not assign a Crew Card to a ship that is moving until the movement is complete.
DISCARDING COMMAND CARDSYou may discard one Command Card from your hand each turn, if you choose. This does not cost an Action, and you are not required to discard if you do not want to. Remember to draw a replacement card.
CYCLE A MISSIONSometimes you will find yourself in a situation where a mission will be too difficult or time consuming to complete. Each turn you may get rid of one such Mission Card. This is called “cycling.” This does not cost an Action, and you are not required to cycle a Mission Card each turn.
Discard the cycled Mission Card and draw a replacement from your Mission Deck. If there are no cards left in your Mission Deck, draw the top card from any of the three Mission Decks next to the Deck Console. You choose which deck to draw from each time you draw a new Mission Card after your Mission Deck is empty.
LOCATION TILESThese hexagonal tiles form the playing surface for the game. Before the game, they are laid out in a grid, face down. Each tile represents an unexplored area of outer space, called a location.
Some locations are merely areas of empty space. Some are benign star systems or nebulae. Some locations are hazardous, granting bonuses or penalties to System Tests, or even having strange effects on ships or crew.
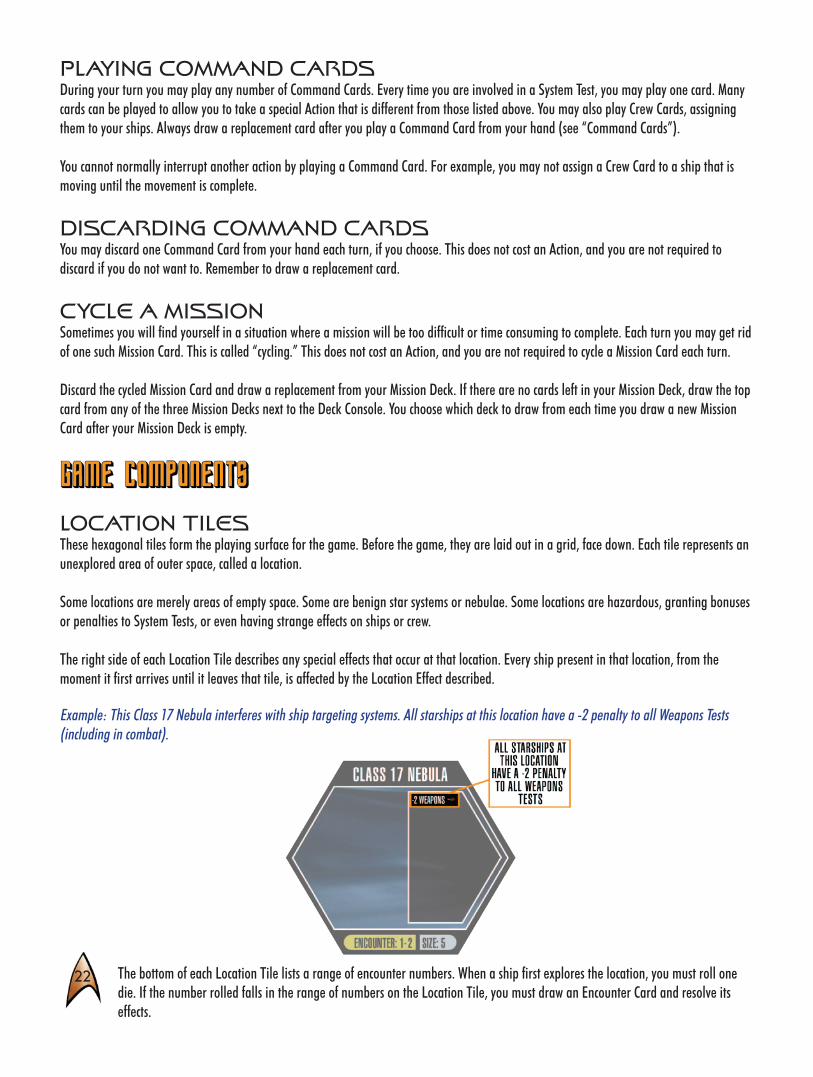
The right side of each Location Tile describes any special effects that occur at that location. Every ship present in that location, from the moment it first arrives until it leaves that tile, is affected by the Location Effect described.
Example: This Class 17 Nebula interferes with ship targeting systems. All starships at this location have a -2 penalty to all Weapons Tests (including in combat).
The bottom of each Location Tile lists a range of encounter numbers. When a ship first explores the location, you must roll one die. If the number rolled falls in the range of numbers on the Location Tile, you must draw an Encounter Card and resolve its effects.

23
Example: When a starship explores this Class K Planet, roll one die. If the result is “1,” “2,” or “3,” an Encounter Card is immediately drawn.
The bottom right corner of the Location Tile shows the Size value for the location. The Size value is the number of movement points a ship must spend to cross the location (see “Movement”).
STARSHIPSThere are 12 starships on each side, but you won’t use all of them in every game.
Each ship has a patented Clix combat dial attached to its base. The Clix dial shows the ship’s current System Ratings, and the background color displays the ship’s current Alert Status, which will change when the ship takes damage.
All ships start the game in any of the available Undamaged (white background) settings. During the game, you can adjust your ship’s System Ratings by turning the base to any other setting within the ship’s current Alert Status.
Each starship also has a matching Starship Display Card. This card has useful information about your ship, including its Size, the Mission Cards you draw at the start of the game, and any special ability that ship may have. The bottom of the card has a chart showing you every possible System Rating you can choose at each Alert Status.
SYSTEMS AND SYSTEM RATINGS
Every ship has four Systems: Weapons , Sensors , Engines , and Shields . The combat dial shows the current Rating for each of the four systems. The Rating represents how much of the total energy produced by the ship is being used by that System. This energy is divided between systems in different ways at each combat dial setting. Choosing the right settings is one of the crucial elements of your strategy during the game.
Turning the dial to a different setting will change the Rating for each System. Turning the dial to a different setting within the same Alert Status does not change the total power spent, but merely redistributes it from one System to another. For example, one setting may have a higher Sensors Rating, but a lower Weapons Rating. See “Power Adjustment” for more information about changing System Ratings.
Example: Last turn, the U.S.S. Voyager prepared to enter an unexplored area by making a power adjustment and setting their Engines to 9 and Sensors to 10. If a dangerous foe is encountered, the Ratings can be adjusted by clicking the combat dial until higher Weapons and Shields values are found.
The number on the combat dial for each System is used when the ship attempts a System Test (see “System Tests”).
If the dial shows a “D” for a System, instead of a number, this means that System is Disabled. A Disabled System cannot be used at all, and any cards or abilities that modify a Disabled System have no effect. If some modifier reduces the Rating of a System below zero, that also means the System is Disabled.
A System that shows a Power Level of “0” is active and can be used. This System is said to be active but “unpowered.” If the number on the combat dial is “1” or higher, the System is active and powered. Cards and abilities may boost an unpowered system, but not a Disabled one.

24
Example: At this setting, Voyager’s Weapons System has been Disabled and cannot be used.
Note: Each Starship Display Card has a full readout of all settings on the combat dial for easy reference, so you can choose your System Ratings without your opponent knowing what you’re planning.
Alert StatusThere are three different color-coded Alert Status levels: Undamaged (white), Yellow-Alert (yellow), and Red-Alert (red). The background that shows on a ship’s combat dial tells you which Alert Status this ship is in. When a ship is damaged, it will change Alert Status.
Example: The Klingon Bird-of-Prey Ch’Tang has taken damage and is currently at Yellow-Alert Status.
Since all ships have three Alert Status levels, each ship can take three points of damage before being destroyed. Because larger ships have much more power than small ones, it is harder to damage (or destroy) them, even though they only have the same three Alert Status levels.
A thick black line is always marked on the Combat Dial between each Alert Status level so you must be careful not to cross one of these lines when you make a Power Adjustment.
All ships always begin the game in Undamaged Status (with the white background). You can choose any power setting in the Undamaged part of the combat dial. During the game, when you make a Power Adjustment, you can change to any other setting within the ship’s current Alert Status.
Cloaking DevicesSome ships have a powerful cloaking device. These ships will have a setting on the combat dial with a blue background. This special setting can only be used when the ship engages its cloaking device. See “Cloaking Actions.”
COMMAND CARDSYou will have your own deck of Command Cards. All Command Cards fall into one or more of three categories: Ops Cards (short for “Operations”), Combat Cards, and Crew Cards. Every card will fit at least one category. Some cards fit two or even all three catergories. The left edge of the Command Card shows you the categories for that card. Combat Cards have a red bar, Ops Cards have a green bar, and Crew Cards have a blue bar.
At the bottom of the card is a list of the effects the card has when played. These effects are color-coded to match the three types of Command Cards. If a Command Card falls into more than one category, it will have a different effect listed for each category. However, when you play the card you can only choose one of the effects listed.
Example: Data is a versatile card that can be used as a Combat Card, an Ops card, or a Crew Card. If you use this card during combat, any damage your ship takes is reduced by one. If you use it during a Sensor Test, you receive a +5 bonus to your Sensors. If played as a Crew Card, Data gives your ship a permanent +3 Sensors, and you can trash Data to prevent all damage to his ship.
Note: The type of effect you choose also determines the type of card for all other purposes. For example, if you play the “Data” card and use the Combat effect, your opponent cannot play a card that cancels an Ops card, even though the “Data” card could be played to give an Ops effect.

25
Most Ops Cards and Combat cards only apply to a single action, encounter, or die roll, and are discarded once that event is complete. Some of these cards remain in play. When an Ops Card or Combat card remains in play, place it next to the Starship Display Card for the ship that was affected.
Crew Cards always remain in play, and are placed next to the Starship Display Card for the ship you assign that crew member to.
Note: Any Command Card that does not specifically state that it refers to your opponents ship always refers to your ships only.
When you play a Command Card, after the card effects are resolved, place it in your discard pile and immediately draw a replacement card from your Command Deck. If you play a card during combat, for example, after the combat is over your Command Card goes to the discard pile, and you draw a replacement. If the card has a permanent effect, it remains in play, but a replacement card is drawn immediately.
If your Command Deck runs out of cards, gather your discard pile, turn it over, shuffle it, and create a new Command Deck. Do not include any trashed cards when you reshuffle your Command Deck.
Ops Cards:Ops Cards are the broadest category of Command Cards. They cover everything that is not a Crew Card or related to combat. Many Ops Cards modify an Action you are taking, or give you a bonus on a System Test.
The text on the Ops Card always begins with an explanation of when the card can be played. Some cards also require that you (or your ship) meet certain requirements before you can play them. The format for Ops effects is:
WHEN CARD CAN BE PLAYED (Requirements): Effect.
If you do not meet the requirements, or if the card does not apply to the action you are taking, then you cannot use that Command Card. If the effect lists “Interrupt,” you can play this card during any action (except combat) or encounter, if any requirements are met.
Example: The “First Contact” Command Card has this Ops effect: “Exploration (Habitable Planet): Roll one die: on a roll of 2-6, place a Control Token here. On a roll of 1, place one of your opponent’s Control Tokens.” You can only play “First Contact” when you explore a location that has a habitable planet.
Example: The “Modified Torpedo” Command Card has the Ops effect “Interrupt (Weapons 1): +4 Sensors.” You can play this card any time you need to make a Sensors Test, if your Weapons Rating is 1 or higher.
Important: Ops Cards can never be played during combat!
Note: Most Ops cards can be played during your turn, or during your opponents turn, as long as you meet the requirements for playing the card.

26
“As an Action” Cards:Some Ops Cards say “As an Action.” In order to play one of these cards, you must spend one of your three Actions for the turn. You must also declare which ship is performing the Action (since each ship can only take one Action each turn). These Ops cards grant you the ability to take an Action that is different from the normal Actions available during your turn.
Combat Cards:Combat cards are similar to Ops Cards. The main difference is that Combat Cards can be played during combat (Ops Cards cannot). You may also use a Combat Card outside of combat if you are attempting a Weapons Test or Shields Test.
Example: The “Battle Stations” Command Card gives you a bonus of +2 Weapons and +2 Shields. You can play this card during combat, whether you are the aggressor or the target. You could also play “Battle Stations” during an encounter that requires a Weapons Test, or any other situation that uses Weapons or Shields.
Unless the Combat Card says otherwise, the effect always ends at the end of the current combat.
“End This Combat” CardsSome Combat Cards tell you to “End this combat.” If one of these cards is played, the combat ends immediately. Do not roll the dice for the Weapons Test or Shields Test. Neither vessel is harmed.
“Remove a Ship” CardsSome Combat Cards force your opponent to remove one of his ships from the combat. The removed ship does not move from the location of the combat, but it does not add its Weapons Rating to the Weapons Test when resolving the attack. You opponent chooses which of his ships to remove from the combat.
Crew Cards:Crew Cards represent exceptional crewmen and officers that you might have onboard a starship. When you play a Crew Card from your hand, you must assign it to a ship in play. The Crew Card grants a permanent bonus to that ship, as long as it remains assigned to it.
There are four types of Crew Cards: Captains, Officers, Engineers, and Specialists. Each ship can only have one card of each type assigned to it at a time. If you want to attach a second Crew Card of the same type, you must discard the old Crew Card to make space.
Example: Kurn has been assigned to the I.K.S. Negh’Var. He is a Captain. Vagh is an Officer, so he could also be assigned to the Negh’Var. Both Crew Cards would stay in play and grant their bonuses to the ship. However, if the Klingon player later assigned Nu’Daq to the Negh’Var (another Captain), he would first have to discard Captain Kurn.

27
Many Crew Cards also have Ops or Combat effects on them. You may play these cards from you hand as a normal Ops or Combat Card. But if you do, the card will be discarded after it is resolved, so you won’t be able to assign it to a ship. When a Crew Card is assigned to a ship, however, you may choose to discard it to use any Ops or Combat effect on that card instead of the usual Crew Card effect. This would represent a crewman making a special sacrifice or pushing himself to the limit to serve his ship. You must still meet any requirements or restrictions for playing the Combat or Ops Card. Also, only the ship that the Crew Card was assigned to can benefit from the Combat or Ops effect of the card.
Example: Mr. Spock has been assigned to the U.S.S. Enterprise. As an Officer Crew Card, he grants the Enterprise +3 Sensors (along with other benefits). Mr. Spock also has an Ops effect (+5 Sensors). The Federation player could discard Mr. Spock to receive the +5 Sensors Ops effect instead of the normal +3 bonus, but only if the Enterprise is making the test. Mr. Spock could not be discarded to give a +5 Sensors bonus to the U.S.S. Yeager.
Note: Discarding a Crew Card to use the Ops or Combat effect does not count as playing a Command Card. So, you may use this benefit in addition to playing your single Combat or Ops Card during a test.
“Trash” a Card:A few cards and game events will tell you to “trash” a Command Card. Trashing a card is different from discarding it. A trashed card is placed next to the trash space on the Deck Console. These cards are out of the game entirely and cannot be used again. Cards in your discard pile might be used again if the deck is exhausted and reshuffled, or if some game effect allows you to draw a card from your discard pile. But cards that have been trashed never reenter the game.
MISSIONSMission Cards represent orders sent to you by your commanders. They provide you with goals you can accomplish, and are the primary way you will earn victory points. There are three types of Mission Cards: Science Missions, Influence Missions, and Combat Missions.
Before the game begins, you create a Mission Deck using cards determined by the ships you drafted. This way you will have Mission Cards that are suitable for the type of ships you have in your fleet (see “Receive Orders”).
You will always have three Mission Cards in front of you. Normally, these cards are kept face up, so your opponent will have some idea of what you are trying to accomplish. Any Mission Card that says “Secret Mission,” however, is kept face down instead. Your opponent will not know what kind of secret missions you are working towards.
Each Mission Card describes what steps you must take to complete the mission. If you fulfill all of the requirements, place the Mission Card in your Victory Pile. It is worth victory points equal to the value shown on the card.
Most Mission Cards instruct you to perform a specific action. If you perform that task, you have completed the mission. The Mission Card must be on the table when you perform the required action. If you draw a Mission Card that matches an action you already completed,you do not get credit for that mission. You’ll have to do it all over again.
28
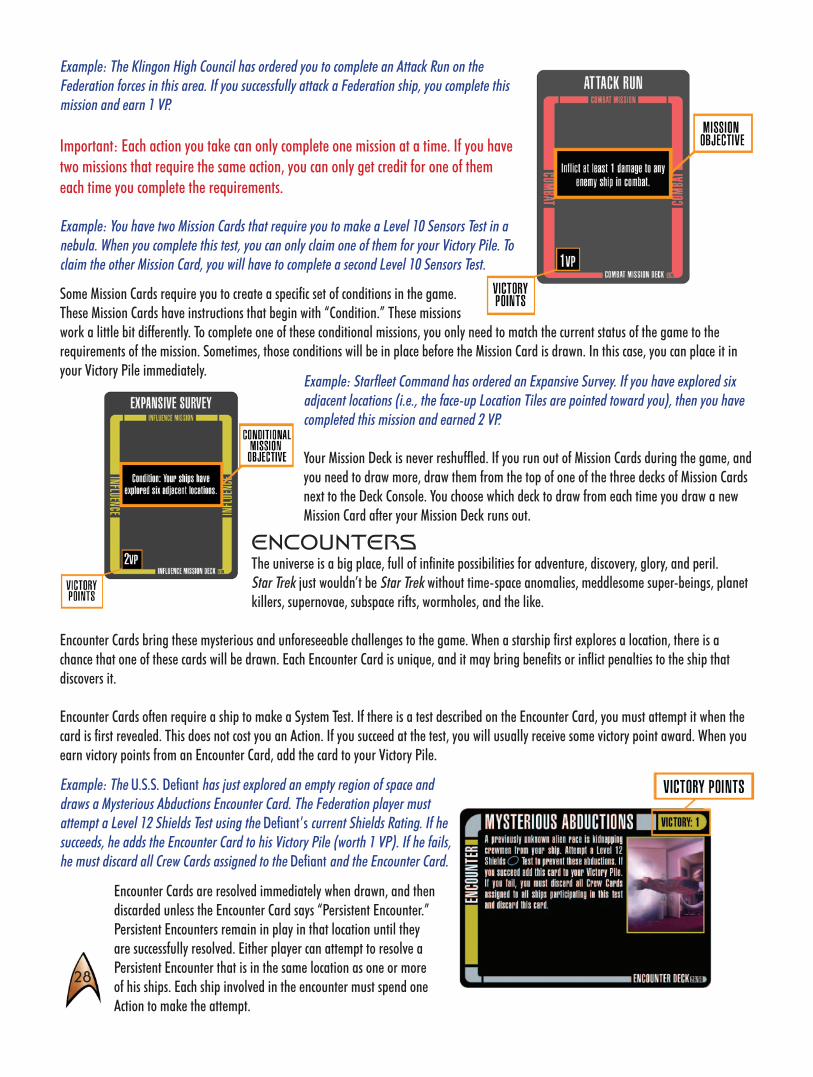
Example: The Klingon High Council has ordered you to complete an Attack Run on the Federation forces in this area. If you successfully attack a Federation ship, you complete this mission and earn 1 VP.
Important: Each action you take can only complete one mission at a time. If you have two missions that require the same action, you can only get credit for one of them each time you complete the requirements.
Example: You have two Mission Cards that require you to make a Level 10 Sensors Test in a nebula. When you complete this test, you can only claim one of them for your Victory Pile. To claim the other Mission Card, you will have to complete a second Level 10 Sensors Test.
Some Mission Cards require you to create a specific set of conditions in the game. These Mission Cards have instructions that begin with “Condition.” These missionswork a little bit differently. To complete one of these conditional missions, you only need to match the current status of the game to the requirements of the mission. Sometimes, those conditions will be in place before the Mission Card is drawn. In this case, you can place it in your Victory Pile immediately.
Example: Starfleet Command has ordered an Expansive Survey. If you have explored six adjacent locations (i.e., the face-up Location Tiles are pointed toward you), then you have completed this mission and earned 2 VP.
Your Mission Deck is never reshuffled. If you run out of Mission Cards during the game, and you need to draw more, draw them from the top of one of the three decks of Mission Cards next to the Deck Console. You choose which deck to draw from each time you draw a new Mission Card after your Mission Deck runs out.
ENCOUNTERS The universe is a big place, full of infinite possibilities for adventure, discovery, glory, and peril. Star Trek just wouldn’t be Star Trek without time-space anomalies, meddlesome super-beings, planet killers, supernovae, subspace rifts, wormholes, and the like.
Encounter Cards bring these mysterious and unforeseeable challenges to the game. When a starship first explores a location, there is a chance that one of these cards will be drawn. Each Encounter Card is unique, and it may bring benefits or inflict penalties to the ship that discovers it.
Encounter Cards often require a ship to make a System Test. If there is a test described on the Encounter Card, you must attempt it when the card is first revealed. This does not cost you an Action. If you succeed at the test, you will usually receive some victory point award. When you earn victory points from an Encounter Card, add the card to your Victory Pile.
Example: The U.S.S. Defiant has just explored an empty region of space and draws a Mysterious Abductions Encounter Card. The Federation player must attempt a Level 12 Shields Test using the Defiant’s current Shields Rating. If he succeeds, he adds the Encounter Card to his Victory Pile (worth 1 VP). If he fails, he must discard all Crew Cards assigned to the Defiant and the Encounter Card.
Encounter Cards are resolved immediately when drawn, and then discarded unless the Encounter Card says “Persistent Encounter.” Persistent Encounters remain in play in that location until they are successfully resolved. Either player can attempt to resolve a Persistent Encounter that is in the same location as one or more of his ships. Each ship involved in the encounter must spend one Action to make the attempt.
29
Once you begin to resolve an encounter, you cannot interrupt it by taking a different Action. You can play one (and only one) Command Card to modify the encounter. Also, you may make a Power Adjustment for the ship involved in the encounter (if that ship has not already made a Power Adjustment this turn).
STARSHIP DESTRUCTIONWhen a starship is destroyed, it is removed from the game. Do not return it to your Reinforcement Pool.
All cargo and Crew Cards assigned to the ship are discarded into the appropriate discard piles (these crew and cargo are worth no victory points). If a ship is destroyed in combat, the aggressor receives a +1 VP Token for destroying the enemy ship (add it to your Victory Pile).
When you lose your first ship, your Fleet Size goes up by 1. You can then use the Reinforcement Action to bring new ships into play.
Your goal is to earn enough victory points to reach (or exceed) the Victory Point Goal set at the beginning of the game. In the standard game, this goal is 10 points.
The first player to reach this goal wins the game, with one exception: if you were the first player to take a turn in the game, and you are the first player to reach the Victory Point Goal, your opponent gets to take one final turn to try to catch up. If your opponent can match or beat your score, they win instead!
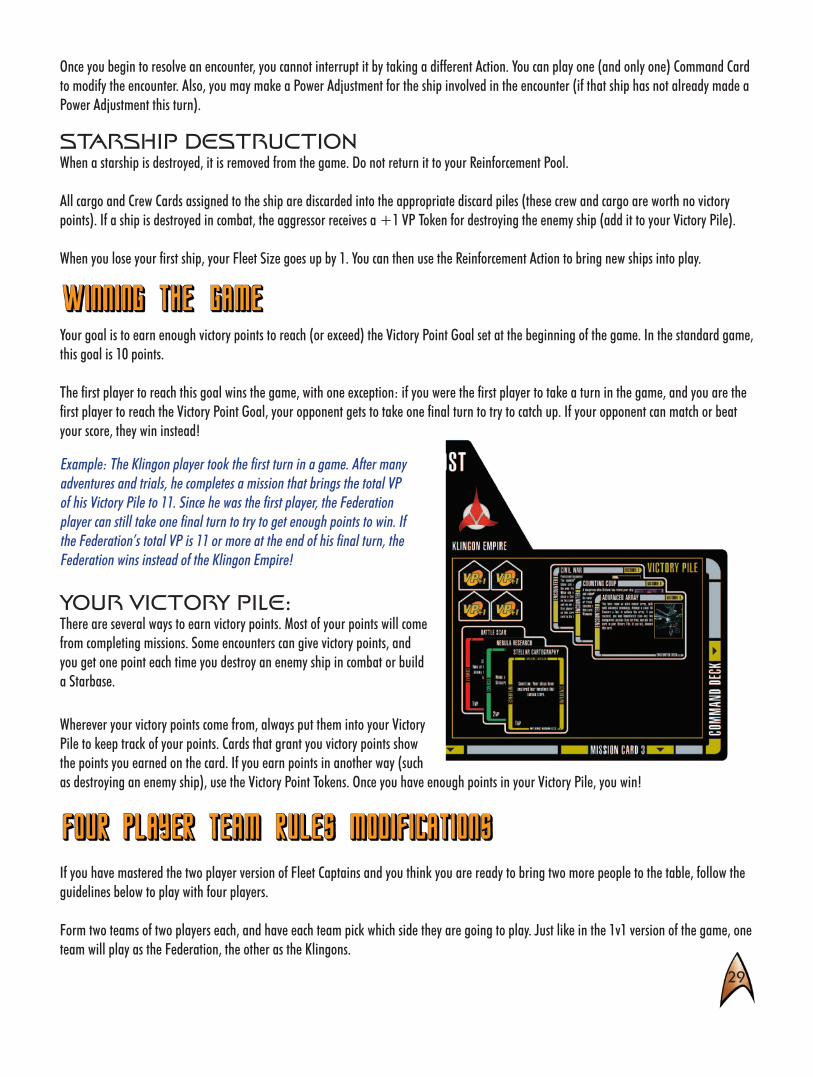
Example: The Klingon player took the first turn in a game. After many adventures and trials, he completes a mission that brings the total VP of his Victory Pile to 11. Since he was the first player, the Federation player can still take one final turn to try to get enough points to win. If the Federation’s total VP is 11 or more at the end of his final turn, the Federation wins instead of the Klingon Empire!
YOUR VICTORY PILE:There are several ways to earn victory points. Most of your points will come from completing missions. Some encounters can give victory points, and you get one point each time you destroy an enemy ship in combat or build a Starbase.
Wherever your victory points come from, always put them into your Victory Pile to keep track of your points. Cards that grant you victory points show the points you earned on the card. If you earn points in another way (such as destroying an enemy ship), use the Victory Point Tokens. Once you have enough points in your Victory Pile, you win!
If you have mastered the two player version of Fleet Captains and you think you are ready to bring two more people to the table, follow the guidelines below to play with four players.
Form two teams of two players each, and have each team pick which side they are going to play. Just like in the 1v1 version of the game, one team will play as the Federation, the other as the Klingons.

30
Laying Out the BoardTo accommodate the larger game, we recommend using a larger board. For your first game, try this setup, which uses 45 location tiles:
Of course you are free to lay out the board however you like, as long as all players agree to the configuration before the game begins!
Mustering Your FleetWe recommend each team mustering a fleet of size 16 (again, you are free to agree on a larger or smaller size!) for a 4-player game. After fleets are determined, each team divides the ships amongst both players as evenly as possible, such that the difference in size between players is no more than 2 points. Once ships have been assigned, ownership may not be transferred between players.
Forming Command DecksEach player will form their own 40 card Command Deck, just as they would in the 2-player game. It is recommended that teams work together so that each player will have the best Command Deck for the ships in the fleet under their control.
Acquiring MissionsForm a common Mission deck for each team using the same rules for the 2-player game. Each player draws three missions from their common pile to display in front of their console (keeping secret missions hidden face-down, of course).
GAMEPLAY
Taking Turns and Assigning ActionsTeams alternate taking turns, with both players taking their actions simultaneously. Each player gets 2 Actions to spend per turn (so each team can use up to 4 total actions per turn). Players can only deploy actions to ships they control, not to an allied vessel. Players can decide what order to resolve their actions in (e.g. player one can take an action, player two can take two actions, and then player one can take a second action), and can resolve actions simultaneously when needed (such as during combat, if each player wants to assign an action to a ship to make an attack). Since players take their turns as a team, they are free to discuss strategy for assigning actions.

31
MissionsPlayers complete missions as usual, with a few exceptions under team play. If a mission needs to be accomplished over multiple actions (such as the deployment and retrieval of an Away Team), or can use multiple ships (such as discovering or controlling a certain number of Locations), than either team member is eligible to trigger the completion of that Mission.
If the Mission requires tracking the actions of a single ship over multiple turns (such as scanning a certain number of Locations with a ship), or tracks the actions of a ship in a single turn (such as destroying an opposing ship), only the player who controls that Mission card can complete it.
Swapping Mission CardsPlayers may exchange face-up mission cards, one for one, by spending one action. They do not need to have ships in the same location to do so.
Playing Command CardsCommand cards are played as usual, with a few exceptions. For opposed System Tests and combats where there is more than one player’s ship present (and thus more than one hand of Command Cards from which a Command Card might be played), the team must indicate which player is the “lead” player. The lead player must have a ship involved in the action. During the resolution of the action, the lead player is the only player who may play a Command Card to affect the action.
Note: Some Command Cards may be confusing or ambiguous when played under team rules. As a rule, apply the effects of a Command Card at the player level, not the team level.
Swapping Command Cards and Crew via a Transport ActionDuring the course of the game, players may discuss the contents of their hands with their teammate. If both players have a ship in the same Location, they may freely swap Command Cards between players, one for one, for the cost of one Transporter Action (they can swap any number of Command Cards between players for the cost of one action, as long as both players are giving the same number of cards as they are receiving). Additionally, assigned Crew Cards can be transferred between teammates this way for two of the ships in the Location that the Transporter Action takes place; Crew do not have to be transferred one for one.
CloakingPlayers on the same team my freely and secretly share information regarding face-down Cloak tokens that they control.
Task ForcesPlayers on the same team my form a Task Force as normal with a teammate’s ship, as long as that teammate agrees to participate in the Task Force. The Task Force functions normally as described in the Task Force section of the normal rules.
Reinforcements: When playing with 4 players, your team fleet size increases by 1 the first and second time your team loses a ship. This increase in fleet size is shared by both players on the team and can create a scenario in which one player controls a fleet that is more than 2-sizes greater than the other, which is allowed. Reinforcement ships must come in to play through the command post of the player that is taking the Reinforcement Action.
Installations: Players share the benefits (repair and improved repair actions) and may freely upgrade any installations built by their team.
WinningEach player tracks their Victory Points in their respective Victory Piles, but teams share a common Victory Point total. We recommend playing with a goal of 16 Victory Points for a team.
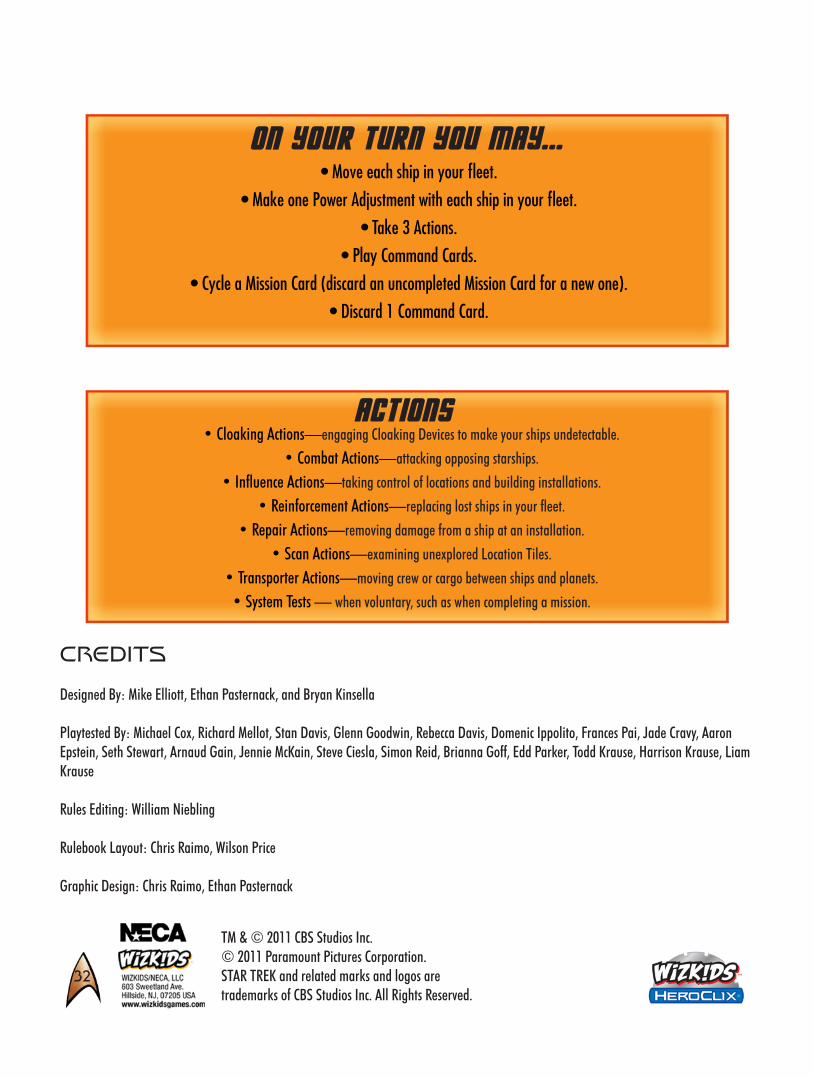
32
CREDITS
Designed By: Mike Elliott, Ethan Pasternack, and Bryan Kinsella
Playtested By: Michael Cox, Richard Mellot, Stan Davis, Glenn Goodwin, Rebecca Davis, Domenic Ippolito, Frances Pai, Jade Cravy, Aaron Epstein, Seth Stewart, Arnaud Gain, Jennie McKain, Steve Ciesla, Simon Reid, Brianna Goff, Edd Parker, Todd Krause, Harrison Krause, Liam Krause
Rules Editing: William Niebling
Rulebook Layout: Chris Raimo, Wilson Price
Graphic Design: Chris Raimo, Ethan Pasternack
TM & © 2011 CBS Studios Inc. © 2011 Paramount Pictures Corporation.STAR TREK and related marks and logos are trademarks of CBS Studios Inc. All Rights Reserved.
ON YOUR TURN YOU MAY...• Move each ship in your fleet.
• Make one Power Adjustment with each ship in your fleet.
• Take 3 Actions.
• Play Command Cards.
• Cycle a Mission Card (discard an uncompleted Mission Card for a new one).
• Discard 1 Command Card.
•CloakingActions—engaging Cloaking Devices to make your ships undetectable.
•CombatActions—attacking opposing starships.
•InfluenceActions—taking control of locations and building installations.
•ReinforcementActions—replacing lost ships in your fleet.
•RepairActions—removing damage from a ship at an installation.
•ScanActions—examining unexplored Location Tiles.
•TransporterActions—moving crew or cargo between ships and planets.
•SystemTests—when voluntary, such as when completing a mission.
ACTIONS