premium and atrium using unity pro - fipway network...
TRANSCRIPT

Premium and Atrium using Unity Pro
35006183 10/2013
3500
6183
.10
www.schneider-electric.com
Premium and Atrium using Unity ProFipway NetworkUser Manual
10/2013

The information provided in this documentation contains general descriptions and/or technical characteristics of the performance of the products contained herein. This documentation is not intended as a substitute for and is not to be used for determining suitability or reliability of these products for specific user applications. It is the duty of any such user or integrator to perform the appropriate and complete risk analysis, evaluation and testing of the products with respect to the relevant specific application or use thereof. Neither Schneider Electric nor any of its affiliates or subsidiaries shall be responsible or liable for misuse of the information contained herein. If you have any suggestions for improvements or amendments or have found errors in this publication, please notify us.
No part of this document may be reproduced in any form or by any means, electronic or mechanical, including photocopying, without express written permission of Schneider Electric.
All pertinent state, regional, and local safety regulations must be observed when installing and using this product. For reasons of safety and to help ensure compliance with documented system data, only the manufacturer should perform repairs to components.
When devices are used for applications with technical safety requirements, the relevant instructions must be followed.
Failure to use Schneider Electric software or approved software with our hardware products may result in injury, harm, or improper operating results.
Failure to observe this information can result in injury or equipment damage.
© 2013 Schneider Electric. All rights reserved.
2 35006183 10/2013

Table of Contents
Safety Information . . . . . . . . . . . . . . . . . . . . . . . . . . . . . 7About the Book. . . . . . . . . . . . . . . . . . . . . . . . . . . . . . . . 9
Part I Introduction to Fipway communication . . . . . . . . 11Chapter 1 Introduction to Fipway communication . . . . . . . . . . . . 13
Introduction to communication. . . . . . . . . . . . . . . . . . . . . . . . . . . . . . . 13Part II Hardware implementation for Fipway
communication . . . . . . . . . . . . . . . . . . . . . . . . . . . . 15Chapter 2 Introduction to hardware implementation . . . . . . . . . . 17
Devices used for communication functions . . . . . . . . . . . . . . . . . . . . . 18Fipway Architecture . . . . . . . . . . . . . . . . . . . . . . . . . . . . . . . . . . . . . . . 19Operating standards . . . . . . . . . . . . . . . . . . . . . . . . . . . . . . . . . . . . . . 20
Chapter 3 Implementation of TSX SCY 21601 module . . . . . . . . . 213.1 At a Glance . . . . . . . . . . . . . . . . . . . . . . . . . . . . . . . . . . . . . . . . . . . . . 22
Introduction . . . . . . . . . . . . . . . . . . . . . . . . . . . . . . . . . . . . . . . . . . . . . 223.2 Description. . . . . . . . . . . . . . . . . . . . . . . . . . . . . . . . . . . . . . . . . . . . . . 23
Description. . . . . . . . . . . . . . . . . . . . . . . . . . . . . . . . . . . . . . . . . . . . . . 233.3 Built-in Channel Specifications . . . . . . . . . . . . . . . . . . . . . . . . . . . . . . 25
Characteristics of the built-in channel . . . . . . . . . . . . . . . . . . . . . . . . . 253.4 TSX SCY 21601 Module’s Host Channel Compatibility . . . . . . . . . . . 26
TSX SCY 21601 Host Channel Compatibility . . . . . . . . . . . . . . . . . . . 263.5 Installation . . . . . . . . . . . . . . . . . . . . . . . . . . . . . . . . . . . . . . . . . . . . . . 27
Installation . . . . . . . . . . . . . . . . . . . . . . . . . . . . . . . . . . . . . . . . . . . . . . 273.6 Operation. . . . . . . . . . . . . . . . . . . . . . . . . . . . . . . . . . . . . . . . . . . . . . . 29
Operation. . . . . . . . . . . . . . . . . . . . . . . . . . . . . . . . . . . . . . . . . . . . . . . 293.7 Module Visual Diagnostics . . . . . . . . . . . . . . . . . . . . . . . . . . . . . . . . . 30
Visual diagnostics of the module . . . . . . . . . . . . . . . . . . . . . . . . . . . . . 303.8 Built-in Channel Connection . . . . . . . . . . . . . . . . . . . . . . . . . . . . . . . . 32
At a Glance . . . . . . . . . . . . . . . . . . . . . . . . . . . . . . . . . . . . . . . . . . . . . 33Power consumption of the TSX SCY 21601 module. . . . . . . . . . . . . . 34
Chapter 4 Implementation of PCMCIA Cards . . . . . . . . . . . . . . . . 354.1 At a Glance . . . . . . . . . . . . . . . . . . . . . . . . . . . . . . . . . . . . . . . . . . . . . 36
Introduction . . . . . . . . . . . . . . . . . . . . . . . . . . . . . . . . . . . . . . . . . . . . . 364.2 Description. . . . . . . . . . . . . . . . . . . . . . . . . . . . . . . . . . . . . . . . . . . . . . 38
Description. . . . . . . . . . . . . . . . . . . . . . . . . . . . . . . . . . . . . . . . . . . . . . 38
35006183 10/2013 3

4.3 Connecting the PCMCIA Card Reception Channel . . . . . . . . . . . . . . . 40Precautions to be Taken when Connecting PCMCIA Card . . . . . . . . . 41PCMCIA card product reference and installation . . . . . . . . . . . . . . . . . 42Connection of the PCMCIA card . . . . . . . . . . . . . . . . . . . . . . . . . . . . . 43Mounting of Cards and Cables. . . . . . . . . . . . . . . . . . . . . . . . . . . . . . . 44Visualization of operating status of TSX FPP 20 PCMCIA card . . . . . 47Visual diagnostics for TSX FPP 20 PCMCIA card . . . . . . . . . . . . . . . . 48
4.4 Connection of the TSX FPP 20 card . . . . . . . . . . . . . . . . . . . . . . . . . . 49Connecting the TSX FPP 20 card . . . . . . . . . . . . . . . . . . . . . . . . . . . . 49
4.5 Summary of Connection Devices. . . . . . . . . . . . . . . . . . . . . . . . . . . . . 50Summary of Connection Equipment . . . . . . . . . . . . . . . . . . . . . . . . . . 50
4.6 Precautions when Connecting PCMCIA Cards . . . . . . . . . . . . . . . . . . 51Precautions for Connecting PCMCIA Cards . . . . . . . . . . . . . . . . . . . . 51
4.7 Consumption of PCMCIA Cards . . . . . . . . . . . . . . . . . . . . . . . . . . . . . 52Power consumption of PCMCIA card. . . . . . . . . . . . . . . . . . . . . . . . . . 52
Part III Software implementation for Fipway communication . . . . . . . . . . . . . . . . . . . . . . . . . . . 53
Chapter 5 Installation methodology. . . . . . . . . . . . . . . . . . . . . . . . 55Introduction . . . . . . . . . . . . . . . . . . . . . . . . . . . . . . . . . . . . . . . . . . . . . 55
Chapter 6 Communication via Fipway network: General . . . . . . 576.1 Introduction to Fipway communication. . . . . . . . . . . . . . . . . . . . . . . . . 58
Brief description of the Fipway network . . . . . . . . . . . . . . . . . . . . . . . . 59Communication function. . . . . . . . . . . . . . . . . . . . . . . . . . . . . . . . . . . . 60Use of common words . . . . . . . . . . . . . . . . . . . . . . . . . . . . . . . . . . . . . 62Use of shared tables . . . . . . . . . . . . . . . . . . . . . . . . . . . . . . . . . . . . . . 64
6.2 Characteristics . . . . . . . . . . . . . . . . . . . . . . . . . . . . . . . . . . . . . . . . . . . 65Hardware compatibilities . . . . . . . . . . . . . . . . . . . . . . . . . . . . . . . . . . . 66Software compatibility . . . . . . . . . . . . . . . . . . . . . . . . . . . . . . . . . . . . . 67Performance. . . . . . . . . . . . . . . . . . . . . . . . . . . . . . . . . . . . . . . . . . . . . 68Operating mode . . . . . . . . . . . . . . . . . . . . . . . . . . . . . . . . . . . . . . . . . . 69
Chapter 7 Configuring Fipway communication . . . . . . . . . . . . . . 71Configuration Methodology for a Fipway Network . . . . . . . . . . . . . . . . 72Fipway configuration screen . . . . . . . . . . . . . . . . . . . . . . . . . . . . . . . . 79Fipway parameters relating to telegrams and the physical layer . . . . . 81Fipway parameters relating to common data . . . . . . . . . . . . . . . . . . . . 82Example of a shared table configuration . . . . . . . . . . . . . . . . . . . . . . . 84
4 35006183 10/2013

Chapter 8 Debugging Fipway communication . . . . . . . . . . . . . . . 87Fipway debug screen . . . . . . . . . . . . . . . . . . . . . . . . . . . . . . . . . . . . . 88Fipway debugging parameters . . . . . . . . . . . . . . . . . . . . . . . . . . . . . . 90Requests Available for Testing a Communication Channel . . . . . . . . 92How to Test a Channel with the Identification and Mirror Requests . . 93How to Test a Channel Using Requests . . . . . . . . . . . . . . . . . . . . . . . 95How to access the module diagnostics and channel diagnostics functions of a Fipway device . . . . . . . . . . . . . . . . . . . . . . . . . . . . . . . . 96
Chapter 9 Fipway communication language objects . . . . . . . . . . 999.1 Fipway communication language objects and IODDTs. . . . . . . . . . . . 100
Introduction to Fipway communication language objects . . . . . . . . . . 101Implicit Exchange Language Objects Associated with the Application-Specific Function . . . . . . . . . . . . . . . . . . . . . . . . . . . . . . . . . . . . . . . . . 102Explicit Exchange Language Objects Associated with the Application-Specific Function . . . . . . . . . . . . . . . . . . . . . . . . . . . . . . . . . . . . . . . . . 103Management of Exchanges and Reports with Explicit Objects . . . . . . 105
9.2 Language Objects and Generic IODDT Applicable to Communication Protocols . . . . . . . . . . . . . . . . . . . . . . . . . . . . . . . . . . . . . . . . . . . . . . . 109Details of IODDT Implicit Exchange Objects of Type T_COM_STS_GEN . . . . . . . . . . . . . . . . . . . . . . . . . . . . . . . . . . . . . . . 110Details of IODDT Explicit Exchange Objects of Type T_COM_STS_GEN . . . . . . . . . . . . . . . . . . . . . . . . . . . . . . . . . . . . . . . 111
9.3 Language objects and IODDTs associated with Fipway communication 113Details of the implicit exchange objects of the T_COM_FPW IODDT. 114Details of the Explicit Exchange Objects of the T_COM_FPW IODDT 117Language Objects Associated with Configuration . . . . . . . . . . . . . . . . 120Details of the Explicit Exchange Objects for a Fipway Function . . . . . 121
9.4 The IODDT Type T_GEN_MOD Applicable to All Modules. . . . . . . . . 122Details of the Language Objects of the T_GEN_MOD-Type IODDT. . 122
Index . . . . . . . . . . . . . . . . . . . . . . . . . . . . . . . . . . . . . . . . . 125
35006183 10/2013 5

6 35006183 10/2013

Safety Information
Important Information
NOTICE
Read these instructions carefully, and look at the equipment to become familiar with the device before trying to install, operate, or maintain it. The following special messages may appear throughout this documentation or on the equipment to warn of potential hazards or to call attention to information that clarifies or simplifies a procedure.
35006183 10/2013 7

PLEASE NOTE
Electrical equipment should be installed, operated, serviced, and maintained only by qualified personnel. No responsibility is assumed by Schneider Electric for any consequences arising out of the use of this material.
A qualified person is one who has skills and knowledge related to the construction and operation of electrical equipment and its installation, and has received safety training to recognize and avoid the hazards involved.
8 35006183 10/2013

About the Book
At a Glance
Document Scope
This manual describes the implementation of hardware and software for Fipway communication with Premium and Atrium PLCs.
Validity Note
This documentation is valid from Unity Pro V8.0.
Product Related Information
WARNINGUNINTENDED EQUIPMENT OPERATION
The application of this product requires expertise in the design and programming of control systems. Only persons with such expertise should be allowed to program, install, alter, and apply this product.
Follow all local and national safety codes and standards.
Failure to follow these instructions can result in death, serious injury, or equipment damage.
35006183 10/2013 9

10 35006183 10/2013

Premium and Atrium using Unity Pro
Introduction to Fipway
35006183 10/2013
Introduction to Fipway communication
Part IIntroduction to Fipway communication
35006183 10/2013 11

Introduction to Fipway
12 35006183 10/2013

Premium and Atrium using Unity Pro
Introduction
35006183 10/2013
Introduction to Fipway communication
Chapter 1Introduction to Fipway communication
Introduction to communication
At a Glance
The communication function allows data to be exchanged between all devices connected on a bus or a network.
This function applies:
to specific communication modules mounted in-rack,
to processors via PCMCIA cards.
Type of communication
The communication function covered in this manual is the Fipway function
Software implementation
The section on software implementation in this manual is identical to that for Premium and Atrium PLCs.
35006183 10/2013 13

Introduction
14 35006183 10/2013

Premium and Atrium using Unity Pro
Fipway hardware implementation
35006183 10/2013
Hardware implementation for Fipway communication
Part IIHardware implementation for Fipway communication
Subject of this Part
This part presents the installation of hardware for Fipway communication.
What Is in This Part?
This part contains the following chapters:
Chapter Chapter Name Page
2 Introduction to hardware implementation 17
3 Implementation of TSX SCY 21601 module 21
4 Implementation of PCMCIA Cards 35
35006183 10/2013 15

Fipway hardware implementation
16 35006183 10/2013

Premium and Atrium using Unity Pro
Fipway hardware implementation
35006183 10/2013
Introduction to hardware implementation
Chapter 2Introduction to hardware implementation
Aim of this Chapter
This chapters covers general points relating to different devices used for Fipway communication.
What Is in This Chapter?
This chapter contains the following topics:
Topic Page
Devices used for communication functions 18
Fipway Architecture 19
Operating standards 20
35006183 10/2013 17

Fipway hardware implementation
Devices used for communication functions
At a Glance
The architecture below shows the Fipway network and its various component devices:
Description
The following table lists the devices on the network:
Number Product reference Description
1 TSX FP CA/CR••• Main cable
2 TSX FP ACC4 Branching device
3 TSX FPP 20 PCMCIA card
4 TSX FP CG 010/030 Branch connector cable
5 TSX FP ACC7 Line terminator
6 TSX SCY 21601 Module
18 35006183 10/2013

Fipway hardware implementation
Fipway Architecture
Description
Example of a Fipway architecture:
A large number of Schneider products which operate on the Fipway network can be connected to the OZD FIP G3 transceiver:
Premium TSX P57 •54 and TSX PCI57 354 PLCs (programmed using Unity Pro V2.0), equipped with a TSX FPP OZD 200 or TSX FPP 200 card.
PC with a slot for a type III PCMCIA card: communication is performed by the TSX FPP 20 card. PC with an ISA bus: communication is performed by the TSX FPC 10 ISA card, and a special
driver, supplied with the TSX FPP OZD 200 or TSX FPP 200 card, must be installed in addition to the standard driver.
For a PC used on FIPWAY, install the driver using the TLXLFFPCOZD diskette supplied with the PCMCIA TSXFPP200 card with the kit product references TSX FPP OZD 200 or TSX FPP 200. The address of the PC station cannot be 0 or 1.
NOTE: TSX FP ACC6 and TSX FP ACC8M repeaters are not compatible with architectures using OZD FIP G3 transceivers.
NOTE: The TSX DM OZD 01 manual gives all the characteristics of HIRSCHMANN OZD FIP G3 transceivers.
35006183 10/2013 19

Fipway hardware implementation
Operating standards
General
TSX SCY 21601 and PCMCIA module communication cards comply with the following international norms and standards:
US Standards: UL508, IEC 1131-2 CANADA Standards: CSA C22.2/1 42 Compliance with regulations: FCC-B EC labeling PCMCIA mechanical standard type III E PCMCIA 2.01
The link built into the TSX SCY 21601 module complies with communication standards:
Uni-Telway Modbus X-Way
The TSX FPP 20 Fipway PCMCIA card complies with the following communication standards:
FIP protocol (link, network management) PCMCIA X-Way
20 35006183 10/2013

Premium and Atrium using Unity Pro
TSX SCY 21601
35006183 10/2013
Implementation of TSX SCY 21601 module
Chapter 3Implementation of TSX SCY 21601 module
Aim of this Chapter
This Chapter deals with implementation of the hardware for the TSX SCY 21601 module.
What Is in This Chapter?
This chapter contains the following sections:
Section Topic Page
3.1 At a Glance 22
3.2 Description 23
3.3 Built-in Channel Specifications 25
3.4 TSX SCY 21601 Module’s Host Channel Compatibility 26
3.5 Installation 27
3.6 Operation 29
3.7 Module Visual Diagnostics 30
3.8 Built-in Channel Connection 32
35006183 10/2013 21

TSX SCY 21601
At a Glance
Section 3.1At a Glance
Introduction
General
The TSX SCY 21601 module can take PCMCIA communication cards.
It has two communication channels:
A multi-protocol built-in channel (channel 0), RS485 isolated asynchronous serial link, supporting Uni-Telway, Jbus/Modbus or Character Mode protocols.
A PCMCIA host channel (channel 1) which supports the following protocols: Fipway cell network corresponding to the TSX FPP 20 card. Uni-Telway, Jbus/Modbus and Character Mode on an RS 232-D, Current Loop, or RS 485
link, corresponding to cards TSX SCP 111, 112 and 114.
NOTE: the built-in channel of the TSX SCY 21601 module is only compatible with a twin-wire RS 485 link.
22 35006183 10/2013

TSX SCY 21601
Description
Section 3.2Description
Description
General
The TSX SCY 21601 module is a standard format module which can be inserted into one of the slots on a Premium/Atrium PLC station rack.
NOTE: Remoting of the X-Bus is not authorized for this module.
Illustration:
35006183 10/2013 23

TSX SCY 21601
This module is made up of the following elements:
Insertable cards
Different communication cards which can be fitted to the TSX SCY 21601 module’s host channel:
Number Description
1 Three indicator LEDs on the front of the module: RUN and ERR show the module’s status. CH0 displays the status of the built-in serial link channel (channel 0)
communication.
2 Built-in channel has a 25 pin SUB-D female connector, half duplex mode (channel 0) RS 485 base link: Uni-Telway Modbus Character Mode
3 PCMCIA type III (channel 1) host channel.
Type Description Illustration
TSX FPP 20 Fipway network cards
TSX SCP 111 Multiprotocol card (Uni-Telway, Modbus/Jbus, Character Mode), RS 232 D, 9 non-isolated signals.
TSX SCP 112 Multiprotocol card (Uni-Telway, Modbus/Jbus, Character Mode), current loop (BC 20 mA).
TSX SCP 114 Multiprotocol card (Uni-Telway, Modbus/Jbus, Character Mode), RS 485, RS 422 compatible isolated.
24 35006183 10/2013

TSX SCY 21601
Built-in Channel Specifications
Section 3.3Built-in Channel Specifications
Characteristics of the built-in channel
General
The TSX SCY 21601 module’s built-in channel includes:
An RS 485 Physical Interface. A twisted double pair link. Uni-Telway, Modbus and Character Mode protocols.
Specifications
Specifications of the built-in link for the following 3 protocols:
Uni-Telway Modbus Character Mode
Type Master/slave Master/slave Half duplex
Data transfer rate 9600 bits/sec. Parameters can be set from 1200 to 19200 bits/sec.
9600 bits/sec. Parameters can be set from 1200 to 19200 bits/sec.
9600 bits/sec. Parameters can be set from 1200 to 19200 bits/sec.
Number of devices 28 28 -
Number of slave addresses
98 98 -
Length of bus without branching
1000 m 1300 m 1000 m
Message Size 240 bytes 256 bytes 4 Kb
Utilities UNI-TE Master/slave Master/slave Messaging Requests
Word/bit Reading Word/bit Writing Diagnostics
Character string send/receive
35006183 10/2013 25

TSX SCY 21601
TSX SCY 21601 Module’s Host Channel Compatibility
Section 3.4TSX SCY 21601 Module’s Host Channel Compatibility
TSX SCY 21601 Host Channel Compatibility
General
The cards supported by the host channel are:
The TSX FPP 20 card is compatible with the following Fipway devices: Model 40 PLCs (TSX 47-455, TSX 67-455, etc.) in versions later than 5.0. TSX 17 PLCs PC compatible PLCs connected with TSX FPC10 and TSX FPC 20 cards.
PCMCIA cards: TSX SCP 111, 112, 114 which communicate with Premium/Atrium, 1000 Series and Modicon PLCs and other Uni-Telway, Modbus and Character Mode compatible products. PCMCIA cards are also Jbus/Modbus compatible with 1000 Series PLCs
NOTE: The TSX FPP 10 card is not supported by the host channel.
26 35006183 10/2013

TSX SCY 21601
Installation
Section 3.5Installation
Installation
General
The TSX SCY 21601 module is installed in a Premium/Atrium PLC station rack.
It forms part of an X-Way network architecture based on Series 7, Micro, Premium and Atrium PLCs.
This communication module accords the PLC station the following:
An insulated RS 485 multiprotocol communication channel. A standard PCMCIA communication card slot.
The TSX SCY 21601 module can be fixed in any available slot in a Premium/Atrium PLC station rack.
Maximum number
A TSX SCY 21601 module can support a maximum of 2 application-specific communication channels, a built-in RS 485 channel and a channel from the PCMCIA card which can be integrated into the module.
Since the maximum number of channels managed by a PLC station depends on the type of processor installed, the number of TSX SCY 21601 modules in a station will therefore depend on:
The type of processor installed. The number of application-specific channels already used, other than communication channels.
The user will therefore have to count the total number of channels in use on the PLC station and determine the number of TSX SCY 21601 modules which can be used.
NOTE: Application-specific channel recognition is defined in the Premium (see Premium and Atrium using Unity Pro, Processors, racks and power supply modules, Implementation manual) / Atrium (see Premium and Atrium using Unity Pro, Processors, racks and power supply modules, Implementation manual) PLC installation Manual.
35006183 10/2013 27

TSX SCY 21601
Connection/Disconnection
The TSX SCY 21601 module can be wired or unwired when switched on. This device does not have a backup memory function. When the module is disconnected from the rack, its internal memory is erased. The module goes through an initialization phase once it is reconnected.
A TSX SCY 21601 module which has a PCMCIA card installed may be disconnected when the power is on.
NOTE: In contrast, PCMCIA cards cannot be removed when switched on.
28 35006183 10/2013

TSX SCY 21601
Operation
Section 3.6Operation
Operation
General
The TSX SCY 21601 module manages two independent communication channels which each have their own functions:
Channel 0 deals with Uni-Telway, Modbus and Character Mode protocols on an isolated physical link, and with standardized RS 485 half duplex with a speed limited to 19200 bits per second.
Channel 1 receives one of the following PCMCIA communication cards: Cell network: TSX FPP 20 Fipway card. Field Bus: TSX SCP 111 (RS232), TSX SCP 112 (current loop), TSX SCP 114 (RS 422/RS
485) Uni-Telway, Jbus/Modbus and Character mode cards.
The choice of PCMCIA card and protocol is made when the TSX SCY 21601 module’s communication channels are configured using Unity Proware.
35006183 10/2013 29

TSX SCY 21601
Module Visual Diagnostics
Section 3.7Module Visual Diagnostics
Visual diagnostics of the module
General
Three LEDs are built into the front panel of TSX SCY 21601 modules. These LEDs allow you to visualize information on the operating state of the module and on the communication status of the built-in serial link channel.
The host channel’s communication status is determined by the ERR and COM LEDs in the PCMCIA cards on the serial or Fipway link Visual diagnostics for PCMCIA cards (see page 48)
30 35006183 10/2013

TSX SCY 21601
Meaning of LEDs:
RUN ERR CH0 Comments
(1) (1) Module powered-down or module failure
No communication on the built-in channel.
(2)Communication on built-in channel.
(1) Serious fault on built-in channel.
Fault on built-in channel.Configuration fault.No device OK on channel.
Device fault on built-in channel.
Self-tests running
Key:
Off Flashing
On(1) Indifferent state.(2) Displays line activity.
35006183 10/2013 31

TSX SCY 21601
Built-in Channel Connection
Section 3.8Built-in Channel Connection
Aim of this Section
This section describes the different ways to connect the built-in channel of TSX SCY 11601/21601modules.
What Is in This Section?
This section contains the following topics:
Topic Page
At a Glance 33
Power consumption of the TSX SCY 21601 module 34
32 35006183 10/2013

TSX SCY 21601
At a Glance
General Points
The TSX SCY 21601 module has a variety of devices (see Premium and Atrium using Unity Pro, Asynchronous Serial Link, User Manual) for connecting the channel built into the buses.
35006183 10/2013 33

TSX SCY 21601
Power consumption of the TSX SCY 21601 module
Values
This table shows the power consumption of a TSX SCY 21601 communication module without a PCMCIA card or a connection to the built-in channel:
Voltage Typical Current Maximum Current Power dissipation
5 Volts 350 mA 420 mA 2.1 W max.
34 35006183 10/2013

Premium and Atrium using Unity Pro
35006183 10/2013
Implementation of PCMCIA Cards
Chapter 4Implementation of PCMCIA Cards
Aim of this Chapter
This chapter provides an overview of the hardware implementation for PCMCIA communication cards on Premium/Atrium PLCs.
What Is in This Chapter?
This chapter contains the following sections:
Section Topic Page
4.1 At a Glance 36
4.2 Description 38
4.3 Connecting the PCMCIA Card Reception Channel 40
4.4 Connection of the TSX FPP 20 card 49
4.5 Summary of Connection Devices 50
4.6 Precautions when Connecting PCMCIA Cards 51
4.7 Consumption of PCMCIA Cards 52
35006183 10/2013 35

At a Glance
Section 4.1At a Glance
Introduction
General
Premium/Atrium PLC stations connect to communication networks, buses and links through PCMCIA communication cards.
The card to be connected is a metal device whose dimensions comply with PCMCIA extended type III.
PCMCIA cards are installed in the host slot of the processor and/or TSX SCY 21601 module in PLCs from the Premium family.
PCMCIA cards can also be used in devices which can host type III cards, such as FT 2100 terminals or PC-compatible third-party devices, for example.
NOTE: It is prohibited to connect PCMCIA cards when the power is switched on.
36 35006183 10/2013

PCMCIA cards are installed, operated and maintained using Unity Pro programming and operation software for all PLCs in the Premium family.
TSX FFP 20 card
Fipway network PCMCIA card:
Functions Illustration
The TSX FPP 20 PCMCIA card supports the FIP physical layer. It is used to connect a Premium/Atrium station to a Fipway network, as well as to connect to devices of manufacturers who wish to connect their products to the Fipway network.The card is fitted with four rotary switches (marked "1" in the illustration) which make it possible to encode the network number and station.
35006183 10/2013 37

Description
Section 4.2Description
Description
General
PCMCIA type III (extended) communication cards are built into a metal case with the following dimensions: length: 85.5 mm width: 51 mm height: 10 mm
The front of the card is designed to display communication status and provides the physical connection to the network.
38 35006183 10/2013

Mechanical Configuration
The mechanical configuration of the card must be adapted by mounting a removable cover, depending on the type of installation desired:
NOTE: The covers with wings, mounted on PCMCIA cards, prevent any accidental removal when switched on and guarantee that the card remains in good working order.
The two covers 1 and 3 are provided with the PCMCIA card. Cover 2 is provided with the Atrium processor.
Connection to the network is achieved by connecting the link cable to the front of the card. A guidance system is used to prevent anything being mounted incorrectly.
The product reference label informs the user of the type of physical layer supported by the card.
Type of Installation Configuration Illustration
Installation on a Premium type processor or on a TSX SCY 21601 communication module
Removable cover with wings. Screws are provided to fix it to the host module (marked 3 on illustration).
Installation on an Atrium type processor
Removable cover with wings. Screws are provided to fix it to the Atrium processor (marked 2 on illustration).
Installation onto a PC compatible device
Removable cover (marked 1 on illustration)
35006183 10/2013 39

Connecting the PCMCIA Card Reception Channel
Section 4.3Connecting the PCMCIA Card Reception Channel
Aim of this Section
This section describes the installation of PCMCIA cards in the reception channel of the TSX SCY 21601 module.
What Is in This Section?
This section contains the following topics:
Topic Page
Precautions to be Taken when Connecting PCMCIA Card 41
PCMCIA card product reference and installation 42
Connection of the PCMCIA card 43
Mounting of Cards and Cables 44
Visualization of operating status of TSX FPP 20 PCMCIA card 47
Visual diagnostics for TSX FPP 20 PCMCIA card 48
40 35006183 10/2013

Precautions to be Taken when Connecting PCMCIA Card
General
When removing or inserting the card, the unit is not guaranteed to be operational. There is no procedure for a warm start between the PCMCIA card and the TSX SCY 21601 host device.
In the event that the operating environment does not allow the application to be stopped by switching off the PLC processor, you are recommended to remove the TSX SCY 21601 module with the PCMCIA card.
The PCMCIA card must be equipped with a PLC version cover and be screwed into the TSX SCY 21601 host module before the unit is switched on (mechanical configuration (see page 39)).
CAUTIONUNEXPECTED EQUIPMENT OPERATION
Power off the device before handling the PCMCIA card.
Failure to follow these instructions can result in injury or equipment damage.
35006183 10/2013 41

PCMCIA card product reference and installation
Installation
The PCMCIA card can be installed in the host channels of processors and the TSX SCY 21601 module.
Application-specific channels and network connections
Table showing the number of application-specific channels or network connections used by PCMCIA card:
Number of "application-specific" channels supported by the type of processor:
Premium (see Premium and Atrium using Unity Pro, Processors, racks and power supply modules, Implementation manual)
Atrium (see Premium and Atrium using Unity Pro, Processors, racks and power supply modules, Implementation manual)
Product references Number of application-specific channels Number of Network Connections
Card in the processor Card in the TSX SCY 21601 module
TSX FPP 20 - - 1
42 35006183 10/2013

Connection of the PCMCIA card
General
Connecting PCMCIA cards requires specific cables and connection devices, depending on the type of models.
Fipway network card
The TSX FPP 20 Fipway card is connected via the host channel using a TSX FPCG 10 or TSX FPCG 30 cable.
35006183 10/2013 43

Mounting of Cards and Cables
PCMCIA Card Details
Illustration:
PCMCIA cards are made up of the following elements:
Number Designation Comments
1 Equipped card Receives electronic components.
2 Body made of zamac -
3 PCMCIA connector Connector with 20 connection points.
4 Upper cover Houses the product reference label which shows the type of PCMCIA card
5 Removable cover Ensures the card is displayed in its slot. The names of the two LEDs are printed on the front of the removable cover. This cover is also used to fix the PCMCIA card on the processor or on the TSX SCY 21601 module.
6 Linking cable with ferule The ferule placed on the end of the PCMCIA card cable side prevents the cable being pinched by the removable cover. This ferule also eliminates the risk of causing a bending radius which can damage the quality of the link.
44 35006183 10/2013

Assembly for TSX P57 1•4 to TSX P57 5•4 Processors
To assemble the transmission card for the processor or the TSX SCY 21601, first remove the cover which is screwed on the device and then follow the instructions below:
Assembly for TSX P57 5•4 Processors
To assemble the card in TSX P57 5•4 type processors, follow the instructions below:
Step Action Illustration
1 Connect the cable
2 Place the appropriate cover on the device, taking care to insert the ferrule in the slot provided in order to fix the cable to the card.
3 Screw on the cover.
4 Insert the card in the slot provided in the host device.
5 Screw in the card to stop it being moved when switched on, and to ensure it functions effectively.
Step Action Illustration
1 Connect the cable.
2 Place the appropriate cover on the device, taking care to insert the ferrule in the slot provided in order to fix the cable to the card.
3 Screw on the cover.
35006183 10/2013 45

4 Remove the plastic cover from the caddy.
5 Guide the card into the caddy from an oblique angle using the 2 locating devices.
6 Slide the card into the caddy until it stops. The card is now firmly attached to the caddy.
7 Insert the assembly (caddy and card) in the slot provided in the host device.
8 Screw in the card to stop it being moved when switched on, and to ensure it functions effectively.
Step Action Illustration
46 35006183 10/2013

Visualization of operating status of TSX FPP 20 PCMCIA card
General
Two diagnostics LEDs are located on the front of the card. They inform the user on how exchanges between the device supporting the PCMCIA card and the related device are functioning.
Illustration
Number Description Illustration
1 Error "ERR" LED (normally off) displays errors.This is red.
2 The "COM" communication LED displays the line activity.This LED is yellow.
35006183 10/2013 47

Visual diagnostics for TSX FPP 20 PCMCIA card
General
Depending on their state, LEDs of the PCMCIA card indicate the operating mode for communication, as well as the card diagnostics.
TSX FPP 20 card
State of LEDs:
NOTE: The "ERR" LED, when flashing, indicates that an external fault has occurred. These faults are:
Line fault Station already present on the network Incorrect station-network address coding (rotary switch coding)
ERR COM Meaning Corrective actions
Device switched off No dialog Check supply, Card inoperational
Operating normally -
(1) Serious fault Change the card
Functional fault Check the configuration and the connection to the communication bus
Functional fault Check the configuration
Key:
Off
On
Flashing
(1) Indifferent state
48 35006183 10/2013

Connection of the TSX FPP 20 card
Section 4.4Connection of the TSX FPP 20 card
Connecting the TSX FPP 20 card
General
The TSX FPP 20 PCMCIA card is connected to the Fipway network using a connector such as TSX FP ACC4 or TSX FP ACC 12.
To connect the PCMCIA card to the ACC4/ACC12 connector the user has the choice of:
Either a 1 m cable, product reference TSX FP CG 010. Or a 3 m cable, product reference TSX FP CG 030.
The elements required for connecting a Premium/Atrium PLC to the Fipway network are:
NOTE: Important: TSX FP CG 010/030 cables connect and disconnect from the PCMCIA card only when power is switched off.
35006183 10/2013 49

Summary of Connection Devices
Section 4.5Summary of Connection Devices
Summary of Connection Equipment
TSX FPP 20 card
Type of cable Product reference Designation
Fipway/Fipio cable TSX FP CG 010 Connection cable, L=1 m.
Fipway/Fipio cable TSX FP CG 030 Connection cable, L=3 m.
Connection device TSX FP ACC4 Fipway/Fipio connection device.
Connection device TSX FP ACC12 Fipway/Fipio connection device.
50 35006183 10/2013

Precautions when Connecting PCMCIA Cards
Section 4.6Precautions when Connecting PCMCIA Cards
Precautions for Connecting PCMCIA Cards
Important
Cards must be connected or disconnected in the host device (processor or TSX SCY 21601) when the device is switched off.
The ferrule, placed in direct contact with the PCMCIA card device, is used to handle electrical interference carried by the link cable braids.
35006183 10/2013 51

Consumption of PCMCIA Cards
Section 4.7Consumption of PCMCIA Cards
Power consumption of PCMCIA card
TSX FPP 20
Power consumption table:
Voltage Typical Current Maximum Current Power dissipation
5 volts 280 mA 330 mA 1.65 W max.
52 35006183 10/2013

Premium and Atrium using Unity Pro
Fipway software implementation
35006183 10/2013
Software implementation for Fipway communication
Part IIISoftware implementation for Fipway communication
Subject of this Part
This part introduces software implementation for Fipway communication with Unity Proware.
What Is in This Part?
This part contains the following chapters:
Chapter Chapter Name Page
5 Installation methodology 55
6 Communication via Fipway network: General 57
7 Configuring Fipway communication 71
8 Debugging Fipway communication 87
9 Fipway communication language objects 99
35006183 10/2013 53

Fipway software implementation
54 35006183 10/2013

Premium and Atrium using Unity Pro
Methodology
35006183 10/2013
Installation methodology
Chapter 5Installation methodology
Introduction
Introduction
Hardware installation for the application-specific modules is carried out using the different Unity Pro editors:
in offline mode, and in online mode.
If you do not have a processor for connection purposes, Unity Pro enables you to carry out a first-level test using a simulator. In this case installation (see page 56) is different.
The recommended installation sequence is defined below, but certain phases can be modified (for example, beginning with the configuration phase).
Installation using processor
The following table introduces the different installation phases when using a processor.
Phase Description Mode
Logical network Creation and configuration of the logical Fipway network. Offline
Declaration of variables Declaration of the IODDT-type variables for application-specific modules and the project variables.
Offline (1)
Programming Project programming. Offline (1)
Configuration Declaration of modules and the Fipway card. Offline
Module channel configuration.
Association of the logical Fipway network with the Fipway card.
Entry of the configuration parameters.
Association Association of the IODDTs with the configured modules (variables editor).
Offline (1)
Generation Project generation (analyzing and editing links). Offline
Transfer Transfer of the project to the PLC. Online
Adjustment/Debugging Project debugging from debug screens, animation tables. Online
Modification of the program and adjustment parameters.
Documentation Building the documentation file and printing the different data relating to the project.
Connected (1)
35006183 10/2013 55

Methodology
Installation using simulator
Note: The simulator is only used for the discrete or analog modules.
The following table introduces the different installation phases when using the simulator.
Operation/Diagnostics Displaying the different data needed for running the project. Online
Project / module diagnostics.
Legend
(1) These different phases can also be carried out in the other mode.
Phase Description Mode
Phase Description Mode
Declaration of variables Declaration of the IODDT-type variables for application-specific modules and the project variables.
Offline (1)
Programming Project programming. Offline (1)
Configuration Declaration of the modules. Offline
Module channel configuration.
Entry of the configuration parameters.
Association Association of the IODDTs with the configured modules (variables editor).
Offline (1)
Generation Project generation (analyzing and editing links). Offline
Transfer Transfer project to simulator. Online
Simulation Program simulation without Inputs/Outputs. Online
Adjustment/Debugging Project debugging from debug screens, animation tables. Online
Modification of the program and adjustment parameters.
Legend
(1) These different phases can also be carried out in the other mode.
56 35006183 10/2013

Premium and Atrium using Unity Pro
Fipway Communication: General
35006183 10/2013
Communication via Fipway network: General
Chapter 6Communication via Fipway network: General
Subject of Chapter
This Chapter introduces communication via the Fipway network and its services.
What Is in This Chapter?
This chapter contains the following sections:
Section Topic Page
6.1 Introduction to Fipway communication 58
6.2 Characteristics 65
35006183 10/2013 57

Fipway Communication: General
Introduction to Fipway communication
Section 6.1Introduction to Fipway communication
Aim of this Section
This Section gives a summary description of the Fipway network and its associated services.
What Is in This Section?
This section contains the following topics:
Topic Page
Brief description of the Fipway network 59
Communication function 60
Use of common words 62
Use of shared tables 64
58 35006183 10/2013

Fipway Communication: General
Brief description of the Fipway network
Introduction
The Fipway network complies fully with the FIP standard.
A Fipway communication channel includes three basic functions:
the inter-station message handling function for routing messages, the send/receive telegram function, the common word (%NW) or shared table production/consumption function.
35006183 10/2013 59

Fipway Communication: General
Communication function
At a Glance
Fipway communication provides the following services:
the message handling service, the common words service, the shared table service.
Messaging
The PCMCIA card messaging service enables:
exchange of messages between two network stations, message broadcasting to all network stations, sending/receiving telegrams between stations whose address is between 0 and 15, sending the devices the messages to be routed to another network (routing function).
The exchange of messages between the PLC and the PCMCIA card is synchronous.
Common words
The common words service is constituted of a set of dedicated %NW words. Depending on its software configuration, each network station whose address is between 0 and 31 can access the database in read or write mode.
Updates are performed implicitly at the start of the cycle for read operations and at the end of the cycle for write operations. The application program consists simply of writing or reading these words.
Word addressing is as follows:
%NWn.s.d
The following table describes addressing parameters for common words:
NOTE: The network number is used to select the network on which common words are exchanged in a multi-network configuration.
Parameter Description
n Network number
s Station number
d Word number
60 35006183 10/2013

Fipway Communication: General
Shared table
This service is used to exchange a table of internal words (%MW) divided into as many areas as there are stations whose address is between 0 and 31 in the Fipway network.
The principle depends upon distribution by each PLC of a word memory area to the other network stations.
Updates are performed implicitly and independently of the application program’s execution cycle. The program consists simply of writing or reading the words.
NOTE: When configuring and assigning fields, be careful to avoid creating memory conflicts between stations.
35006183 10/2013 61

Fipway Communication: General
Use of common words
At a Glance
The following examples deal with the use of the common words service in mono- and multi-network architectures.
This service corresponds to the exchange of 4 words (%NW) per station. There can be 32 stations on the Fipway network
NOTE: That’s right, these info can be found in the rest of the Fipway documentation, but it should be better to add these infos at the beginning of the Fipway configuration in the appropriated chapters, as required
Mono-network architecture
The example is as follows:
Three PLCs connected on a Fipway network (number 0) exchange data among themselves via the common words service.
This service corresponds to the exchange of 4 words (%NW) per PLC.
62 35006183 10/2013

Fipway Communication: General
Multi-network architecture
The example is as follows:
In a multi-network (see Unity Pro, Operating Modes) architecture, common words can be accessed through the network address of each module.
Reading and writing common words
The application program manages the contents of the different common words:
reading common words originating from remote stations, writing common words from the local station.
The write or read syntax for a common word is identical to that of internal words:
%MW10:=%NW2.1.0: reading a common word, %NW2.2.3:= 357: writing a common word,
35006183 10/2013 63

Fipway Communication: General
Use of shared tables
At a Glance
Three TSX 37 or TSX 57-type PLCs connected on a Fipway network must exchange data among themselves (production parameters, action reports, etc.) via the shared table service.
This service corresponds to the exchange of 32 words (%MW) per station. There can be 32 stations on the Fipway network.
Example
The following illustration provides an example:
Station 1 exchanges a table starting from %MW200 of 10 words in length to %MW300 of station 2 and %MW400 of station 3.
Station 2 exchanges a table starting from %MW310 of 20 words in length to %MW210 of station 1 and %MW410 of station 3.
Station 3 exchanges a table starting from %MW430 of 5 words in length to %MW230 of station 1 and %MW330 of station 2.
64 35006183 10/2013

Fipway Communication: General
Characteristics
Section 6.2Characteristics
Aim of this Section
This Section introduces the characteristics and constraints of using Fipway communication.
What Is in This Section?
This section contains the following topics:
Topic Page
Hardware compatibilities 66
Software compatibility 67
Performance 68
Operating mode 69
35006183 10/2013 65

Fipway Communication: General
Hardware compatibilities
General
The binary digit rate for the network is 1 Mbits/s.
The length of a segment depends on its type of branches. Its maximum length is 1000 meters without relay.
When relays are used (optical or electrical), the maximum length between the two stations the furthest distance away depends upon the number of relays crossed.
The maximum length in kilometers is calculated using the following formula:
L = 22 - (0.5 * R) where R is the number of relays crossed by the FIP data between the two stations.
The Fipway network is connected to Hirschmann optical transmitters with the PCMCIA TSX FPPOZD 200 card.
Availability
This type of communication is available for:
Premium PLCs via: the TSX FPP 20 PCMCIA card,
Set the network address between 0 to 127Set the station address between 0 to 63
the TSX FPPOZD 200 PCMCIA card,Set the network address between 0 to 127Set the station address between 0 to 32
Capacity
One Fipway network segment enables connection of 36 devices. Devices for a Fipway network can be:
stations with the constraint of a maximum of 32 stations per segment, stations with the constraint of a maximum of 32 relays per segment,
On all of the segments, a maximum of a 64 stations can be connected to the network.
66 35006183 10/2013

Fipway Communication: General
Software compatibility
Message handling
The maximum frame size depends on the type of transaction:
For a message, the maximum frame is 128 bytes. For a telegram, the maximum frame is 16 bytes.
Equally, the PCMCIA cards can process: 8 communication functions simultaneously (8 in receive and 8 in send mode).
for messages, 8 communication functions simultaneously (8 in send and 8 in receive mode). for telegrams, one single communication function (one in send and one in receive mode).
Common words
The common words service is supported by the stations at addresses between 0 and 31.
This database is made up of a maximum of 128 words for all the stations.
Each station can produce a maximum of between 0 and 4 common words and consume the other common words on the network.
Shared table
The shared table service is supported by the stations at addresses between 0 and 31.
This database is made up of a maximum of 128 words for all the stations.
Each station can produce a maximum of between 1 and 32 words (defined in configuration mode) and consume the other words on the network.
35006183 10/2013 67

Fipway Communication: General
Performance
Transaction time
The following table gives the transaction time between two stations:
The telegram exchange time between two stations is 21 ms.
Receiving station
Cyclic Periodic 50 ms
Sending station Cyclic 50 ms -
Periodic 50 ms 120 ms 160 ms
68 35006183 10/2013

Fipway Communication: General
Operating mode
At a Glance
The following diagram describes the operating mode of the TSX FPP 20 card.
General Diagram
The operating mode is as follows:
Operation
After power-up, the module performs self-tests. During this phase, the LED indicators blink. If no configuration exists, the card operates in messaging service mode and can be configured
with Unity Pro. If there is a Unity Pro application in the PLC, the application configuration is transmitted to the
module and the module starts up. If a power outage occurs, the PLC processor carries out a warm restart. The module then
relaunches its self-test procedures.
35006183 10/2013 69

Fipway Communication: General
70 35006183 10/2013

Premium and Atrium using Unity Pro
Configuration
35006183 10/2013
Configuring Fipway communication
Chapter 7Configuring Fipway communication
Subject of this Chapter
This Chapter describes the Configuration process during set-up of Fipway communication.
What Is in This Chapter?
This chapter contains the following topics:
Topic Page
Configuration Methodology for a Fipway Network 72
Fipway configuration screen 79
Fipway parameters relating to telegrams and the physical layer 81
Fipway parameters relating to common data 82
Example of a shared table configuration 84
35006183 10/2013 71

Configuration
Configuration Methodology for a Fipway Network
At a Glance
Creation and configuration of a Fipway network involves 4 major stages:
creation of a logical Fipway network, configuration of a logical Fipway network, declaration of the Fipway PCMCIA card, association of the card with the logical network.
These four methods are presented at a later point in this documentation.
NOTE: the advantage of this method is that from stage two onwards, you can devise your communication application (you are not obliged to have the hardware to begin work) and use the simulator to test its operation.
NOTE: the two first stages can be executed from the project browser, and the two following stages from the hardware configuration editor.
How to create a logical Fipway network
The following table introduces the procedure to follow for creating a logical Fipway network:
Step Action
1 Right-click the Network subdirectory of the Communication directory of the Project browser and select the New network option.Result:
72 35006183 10/2013

Configuration
2 Choose Fipway in the list of available networks and choose a meaningful name for your selection.Result:
Note: when you click the Comments directory, you can also enter a comment if you wish.
3 Click OK ; a new logical network is created.Result: we have just created the Fipway network that appears in the project browser.
Note: as you can see, as small icon shows that the logical network is not associated with PLC hardware.
Step Action
35006183 10/2013 73

Configuration
How to access logical Fipway network configuration
The following table introduces the procedure to follow for accessing the logical Fipway network configuration:
Step Action
1 Open the project browser to view your project’s logical networks.Result:
2 Right-click on the logical Fipway network to be configured.Result: the contextual menu appears.
3 Select Open in the contextual menu.Result: the Fipway configuration screen appears.
74 35006183 10/2013

Configuration
How to declare the Fipway PCMCIA card
The following table introduces the procedure to be followed to physically declare the Fipway PCMCIA card in the processor:
Step Action
1 Open the hardware configuration editor.
2 Double-click on the PCMCIA communication card slot (lower slot).Result: The card type selection window appears
3 Develop the Communication line by clicking the + sign.Result:
4 Select the Fipway TSX FPP 20 or TSX FPPOZD 200 card, and then confirm using OK.Result: the hardware configuration editor is displayed.
35006183 10/2013 75

Configuration
5 Double-click on the processor’s PCMCIA communication card.Result:
6 Select the channel and choose the Fipway function.Result:
Step Action
76 35006183 10/2013

Configuration
How to associate the logical network
The following table introduces the procedure to be followed to associate the logical Fipway network with the PCMCIA card that you have just declared:
Step Action
1 Open the hardware configuration editor.
2 Click twice on the PCMCIA card slot.Result:
3 In the Network link field, select the network to be associated with the card.Result:
35006183 10/2013 77

Configuration
4 Confirm your choice and close the window.Result: the Fipway workshop logical network is associated with the TSX FPP 20 card. The icon associated with this logical network changes and indicates the link with a PLC.
Also, the module address is updated in the configuration window of the Fipway workshop logical network if the window is open.
Step Action
78 35006183 10/2013

Configuration
Fipway configuration screen
Introduction
This screen is used to declare the communication channel and configure the parameters required for a Fipway link.
Illustration
The following diagram shows a configuration screen.
35006183 10/2013 79

Configuration
Description
The following table introduces the different elements in the configuration screen and their functions.
Address Element Function
1 Tabs The tab in the foreground shows the current mode ( Configuration in this example). Each mode can be selected using the corresponding tab. The modes available are: Configuration , Debug accessible only in online mode, Diagnostic (Fault) only accessible in online mode.
2 Module zone Shows the shortened version of the module title.
3 Channel zone Is used: By clicking on the reference number, to display the tabs: Description which gives the characteristics of the device. I/O Objects (see Unity Pro, Operating Modes) which is
used to presymbolize the input/output objects. Fault which shows the device faults (in online mode).
To select the channel, To display the Symbol, name of the channel defined by the
user (using the variable editor).
4 General parameters zone
Used to choose the general parameters associated with the channel: Function: for a TSX FPP 20/TSX FPPOZD 200 card, the
Fipway function is the only function available. By default, No function is configured.
Task: indicates the MAST task in which the channel’s implicit exchange objects will be exchanged. This parameter is fixed.
5 configuration zone
Used to configure the channel configuration parameters. Certain filter types can be fixed and are grayed out.It is divided into two types of information: telegram management parameters (not available for Fipway
cards placed on channel 1 of the TSX SCY 21601 module),
physical layer parameters.
80 35006183 10/2013

Configuration
Fipway parameters relating to telegrams and the physical layer
Introduction
Once the communication channel has been configured, you must enter the parameters dedicated to telegrams and the physical layer.
These are divided between two windows: the Telegram window, the Physical Layer window.
Telegram Window
The window is displayed as below:
It allows you to enter:
the Telegram Management: if the box is checked, the card can be used for telegram management (default setting).
the Event processing: this option can be accessed only if telegram management is enabled. This option enables telegrams to be managed by event tasks. If the box is checked, you must enter the task number where the telegrams will be processed.Possible values for Premium PLCs are between 1 and 63.
NOTE: Neither of these two options are available for a TSX FPP 20 card placed on channel 1 of the TSC SCY 21601 module.
Physical layer window
The window is displayed as below:
It is used to select the physical layer used for communication.
NOTE: Only the FIP-specific physical layer is available.
35006183 10/2013 81

Configuration
Fipway parameters relating to common data
Introduction
The Fipway parameters window relating to common data is accessed from the project browser (see page 74). The window is displayed as below:
It allows you to:
enable or disable management of common data exchanges, select the type of common data to exchange, enter the parameters required for this type of exchange.
None
Select this box if you do not want any common data to be managed in the project.
Common words
Select this box if you would like common data to be managed by common words (%NW).
When this field is selected, you must fill in the local Network number to which the database is linked.
NOTE: The local network number corresponds to the code number on the PCMCIA card.
82 35006183 10/2013

Configuration
Shared table
Select this box if you would like common data to be managed by shared table.
When this field is selected, you must fill in the following parameters:
Address at start of table: this parameter shows the beginning of the internal word table reserved in the PLC.The 128 words that follow the beginning of the table will be reserved for the shared table function and are shared by all the stations.
Address zone produced: this parameter shows the address of the beginning of the area for internal words produced by the station.The address that is entered must take the internal word areas for the other stations into account. Overlapping of word areas between two stations must be avoided.
Length of zone produced: this parameter shows the length (in words) of the internal word table produced by the PLC (from 1 to 32 words).
35006183 10/2013 83

Configuration
Example of a shared table configuration
Introduction
The example shows how the stations are configured to use the shared table service.
These configurations are based on the example given for the use of shared tables.
Configuration of station 1
The example shows the configuration for station 1.
Configuration of station 2
The example shows the configuration for station 2.
The area produced by the station begins with the address %MW310.
The area corresponding to %MW300 to %MW309 is reserved for the words produced by station 1.
84 35006183 10/2013

Configuration
Configuration of station 3
The example shows the configuration for station 3.
The area produced by the station begins with the address %MW430.
The area corresponding to %MW400 to %MW409 is reserved for the words produced by station 1.
The area corresponding to %MW410 to %MW429 is reserved for the words produced by station 2.
35006183 10/2013 85

Configuration
86 35006183 10/2013

Premium and Atrium using Unity Pro
Debugging
35006183 10/2013
Debugging Fipway communication
Chapter 8Debugging Fipway communication
Subject of this Chapter
This Chapter describes the Debugging process during set-up of Fipway communication.
What Is in This Chapter?
This chapter contains the following topics:
Topic Page
Fipway debug screen 88
Fipway debugging parameters 90
Requests Available for Testing a Communication Channel 92
How to Test a Channel with the Identification and Mirror Requests 93
How to Test a Channel Using Requests 95
How to access the module diagnostics and channel diagnostics functions of a Fipway device 96
35006183 10/2013 87

Debugging
Fipway debug screen
Introduction
This screen, split into two zones, allows you to debug a Fipway link.
Illustration
The figure below shows an example of a debug screen dedicated to Fipway communication.
88 35006183 10/2013

Debugging
Description
The table below shows the various elements of the debug screen and their functions.
NOTE: LEDs and commands not available appear grayed out.
Address Element Function
1 Tabs The tab in the foreground shows the current mode (Debug in this example). Each mode can be selected using the corresponding tab. The modes available are: Debug accessible only in online mode, Diagnostic (Fault), only accessible in online mode, Configuration.
2 Module zone Shows the shortened version of the module title.
3 Channel zone Is used: By clicking on the reference number, to display the tabs: Description which gives the characteristics of the device. I/O Objects (see Unity Pro, Operating Modes) which is
used to presymbolize the input/output objects. Fault which shows the device faults (in online mode).
To select the channel, To display the Symbol, name of the channel defined by the
user (using the variable editor).
4 General parameters zone
Specifies the parameters of the communication channel: Function: specifies the communication function configured.
This heading is frozen. Task: specifies the MAST task configured. This heading is
frozen. Network link: specifies the Fipway logical network
(see page 77) associated with the card. This heading is frozen.
5 Display and command zone
is used to access the debugging parameters of a Fipway link.It is split into three windows: channel information, information on message errors, the possibility of testing the communication channel.
35006183 10/2013 89

Debugging
Fipway debugging parameters
At a Glance
The specific part is split into three windows:
The Channel information window, The Message errors window, The Channel test window.
Channel information
The window is displayed as shown below:
It contains information concerning the communication channel:
Network address: this field indicates the network address encoded on the PCMCIA card. Station address: this field indicates the station address encoded on the PCMCIA card. Common data: this field specifies the type of common data selected in configuration mode. B.A.: this field indicates if the local PCMCIA card is the bus arbiter of the Fipway network. In this
case, the box is blacked out. Router: this field indicates if the local PCMCIA card is configured as a Bridge (router). In this
case, the box is blacked out.
Message errors
The window is displayed as shown below:
This window displays the error counters of the PCMCIA card:
Messages sent and not acknowledged, Messages refused.
The Reset counters button resets these counters to zero.
90 35006183 10/2013

Debugging
Channel test
The window is displayed as shown below:
This window is used to test a communication channel by sending a request to one of the stations present on the network.
35006183 10/2013 91

Debugging
Requests Available for Testing a Communication Channel
At a Glance
This page describes the various options for testing a communication channel from the debug screen.
Test conditions
Sending a request to a station that is not connected results in an error message.
Requests available
The Channel test window offers the following requests: Identification: causes the Identification request to be sent to the designated slave, Counters: causes the Read error counters request to be sent to the designated station. The
message received is composed firstly of the number of messages sent but not acknowledged followed by the number of refused messages.
Reset Counters: causes the error counters of the designated station to be reset to zero, Enter Request: is used to send a UNI-TE request, other than those provided by the command
buttons, to the designated station. If this function is chosen, a screen appears allowing you to select the parameters specific to the request (the request code must be encoded in hexadecimal),
Mirror: is used to send a Mirror request to the designated station. If this function is chosen, a screen appears allowing you to select the length of the string of characters to be sent (maximum of 80 characters). The PLC then sends this string of characters (ABCD, etc.) to the destination device. The destination device automatically returns the character string received to the sender.
92 35006183 10/2013

Debugging
How to Test a Channel with the Identification and Mirror Requests
At a Glance
This page describes the procedure for testing a communication channel using the Identification and Mirror requests.
How to identify a station
The following procedure is used to identify a designated station.
How to send the Mirror request
The following procedure is used to send the Mirror request and therefore to test the correct routing of information between two devices.
Step Actions
1 Select the address of the station to be queried using the Station field.
2 Press the Identification button.Result: the response appears in the Receive Response window.
Step Action
1 Select the address of the station to be queried using the Station field.
2 Press the Mirror button.Result: the following window appears.
3 Enter the length of the data to be sent (maximum 80 characters).
35006183 10/2013 93

Debugging
4 Press the Send button.Result: the response appears in the Receive Response window.
The response contains: the character string ABCDEFGH corresponding to a length of data sent of 8.
Step Action
94 35006183 10/2013

Debugging
How to Test a Channel Using Requests
At a Glance
This page describes the procedure for testing a communication channel from the debug screen using various requests.
How to send a request
The following procedure is used to send a request, other than those provided by the command buttons, to a designated station.
Step Action
1 Select the address of the station to be queried using the Station field.
2 Press the Enter Request button.Result: the following window appears.
The data sent in this example are encoded on 3 bytes.
3 Enter the function code (encoded in hexadecimal on one byte) corresponding to the request that you wish to send.
4 Enter the data to be sent by encoding each data item in hexadecimal. The data are entered one after another without any space between them.
5 Press the Send button.Result: the response appears in the Receive Response window.
The response in this example contains the data on 3 bytes (12 34 DB).
35006183 10/2013 95

Debugging
How to access the module diagnostics and channel diagnostics functions of a Fipway device
Introduction
The module or channel diagnostics functions display current faults (when they exist) classed according to their category:
internal faults (software internal fault, communication fault with the processor, configuration/parameterization error),
external faults (faulty slave device, difference between physical configuration and Unity Pro configuration),
other faults (module missing or off).
A faulty module or channel is indicated by certain LEDs turning red such as:
in the rack configuration screen, by the presence of a red square in the position of the faulty counting module,
in all the module level screens (Description and Fault tabs), in the module zone with the I/O LED.
in all the channel level screens (Description, Debug and Fault tabs), in the module zone with the I/O LED, in the channel field with the channel fault LED.
in the faulty screen accessible with the Fault tab where the fault diagnostics are described.
The fault is also signaled:
on the module, through the centralized display, by the dedicated language objects: CH_ERROR (%Ir.m.c.ERR) and module error
MOD_ERROR (%Ir.m.MOD.ERR), %MWr.m.MOD.2, etc., and the status words (see page 122).
96 35006183 10/2013

Debugging
Procedure for accessing diagnostics
The table below shows the procedure for accessing the Fault screen of the module and the Fipway channel.
Step Action
1 Open the Fipway module to be diagnosed.
2 Access the diagnostics screen by clicking on the Fault tab.Result: The list of module faults appears.
35006183 10/2013 97

Debugging
98 35006183 10/2013

Premium and Atrium using Unity Pro
Communication language objects
35006183 10/2013
Fipway communication language objects
Chapter 9Fipway communication language objects
Subject of this Chapter
This chapter describes the language objects associated with Fipway communication as well as the various ways in which they may be used.
What Is in This Chapter?
This chapter contains the following sections:
Section Topic Page
9.1 Fipway communication language objects and IODDTs 100
9.2 Language Objects and Generic IODDT Applicable to Communication Protocols 109
9.3 Language objects and IODDTs associated with Fipway communication 113
9.4 The IODDT Type T_GEN_MOD Applicable to All Modules 122
35006183 10/2013 99

Communication language objects
Fipway communication language objects and IODDTs
Section 9.1Fipway communication language objects and IODDTs
Subject of this Section
This section provides general information on Fipway communication language objects and IODDTs.
What Is in This Section?
This section contains the following topics:
Topic Page
Introduction to Fipway communication language objects 101
Implicit Exchange Language Objects Associated with the Application-Specific Function 102
Explicit Exchange Language Objects Associated with the Application-Specific Function 103
Management of Exchanges and Reports with Explicit Objects 105
100 35006183 10/2013

Communication language objects
Introduction to Fipway communication language objects
General
The IODDTs are predefined by the manufacturer; they contain input/output language objects for an application-specific channel. Fipway communication has two associated IODDTs:
T_COM_STS_GEN which applies to all communication protocols except Fipio and Ethernet, T_COM_FPW specific to Fipway communication.
NOTE: IODDT variables can be created in two different ways:
Using the I/O objects (see Unity Pro, Operating Modes) tab, Data Editor (see Unity Pro, Operating Modes).
Language objects types
Each IODDT contains a group of language objects used to control and verify IODDTs and their operations.
There are two types of language objects:
implicit exchange objects, which are automatically exchanged on each new cycle of the task associated with the module,
explicit exchange objects, which are exchanged at the request of the application, via explicit exchange instructions.
Implicit exchanges concern module states and communication signals.
Explicit exchanges are used to set parameters for the module and perform diagnostics.
35006183 10/2013 101

Communication language objects
Implicit Exchange Language Objects Associated with the Application-Specific Function
At a Glance
An integrated application-specific interface or the addition of a module automatically enhances the language objects application used to program this interface or module.
These objects correspond to the input/output images and software data of the module or integrated application-specific interface.
Reminders
The module inputs (%I and %IW) are updated in the PLC memory at the start of the task, the PLC being in RUN or STOP mode.
The outputs (%Q and %QW) are updated at the end of the task, only when the PLC is in RUN mode.
NOTE: When the task occurs in STOP mode, either of the following are possible, depending on the configuration selected:
outputs are set to fallback position (fallback mode) outputs are maintained at their last value (maintain mode)
Figure
The following diagram shows the operating cycle of a PLC task (cyclical execution).
102 35006183 10/2013

Communication language objects
Explicit Exchange Language Objects Associated with the Application-Specific Function
Introduction
Explicit exchanges are performed at the user program’s request using these instructions: READ_STS (see Unity Pro, I/O Management, Block Library) (read status words) WRITE_CMD (see Unity Pro, I/O Management, Block Library) (write command words) WRITE_PARAM (see Unity Pro, I/O Management, Block Library) (write adjustment parameters) READ_PARAM (see Unity Pro, I/O Management, Block Library) (read adjustment parameters) SAVE_PARAM (see Unity Pro, I/O Management, Block Library) (save adjustment parameters) RESTORE_PARAM (see Unity Pro, I/O Management, Block Library) (restore adjustment
parameters)
These exchanges apply to a set of %MW objects of the same type (status, commands or parameters) that belong to a channel.
These objects can: provide information about the module (for example, type of error detected in a channel) have command control of the module (for example, switch command) define the module’s operating modes (save and restore adjustment parameters in the process
of application)
NOTE: To avoid several simultaneous explicit exchanges for the same channel, it is necessary to test the value of the word EXCH_STS (%MWr.m.c.0) of the IODDT associated to the channel before calling any EF addressing this channel.
NOTE: Explicit Exchanges are not supported when Modicon M340 Analog and Digital I/O modules are configured behind a M340 Ethernet Remote I/O adapter module in a Quantum EIO Ethernet Configuration. As a consequence, it is not possible to setup a module’s parameters from the PLC application during operation.
35006183 10/2013 103

Communication language objects
General Principle for Using Explicit Instructions
The diagram below shows the different types of explicit exchanges that can be made between the application and module.
Managing Exchanges
During an explicit exchange, check performance to see that the data is only taken into account when the exchange has been correctly executed.
To do this, two types of information is available: information concerning the exchange in progress (see page 107) the exchange report (see page 108)
The following diagram describes the management principle for an exchange.
NOTE: In order to avoid several simultaneous explicit exchanges for the same channel, it is necessary to test the value of the word EXCH_STS (%MWr.m.c.0) of the IODDT associated to the channel before calling any EF addressing this channel.
104 35006183 10/2013

Communication language objects
Management of Exchanges and Reports with Explicit Objects
At a Glance
When data is exchanged between the PLC memory and the module, the module may require several task cycles to acknowledge this information. All IODDTs use two words to manage exchanges: EXCH_STS (%MWr.m.c.0): exchange in progress EXCH_RPT (%MWr.m.c.1): report
NOTE:
Depending on the localization of the module, the management of the explicit exchanges (%MW0.0.MOD.0.0 for example) will not be detected by the application: For in-rack modules, explicit exchanges are done immediately on the local PLC Bus and are
finished before the end of the execution task. So, the READ_STS, for example, is always finished when the %MW0.0.mod.0.0 bit is checked by the application.
For remote bus (Fipio for example), explicit exchanges are not synchronous with the execution task, so the detection is possible by the application.
Illustration
The illustration below shows the different significant bits for managing exchanges:
35006183 10/2013 105

Communication language objects
Description of Significant Bits
Each bit of the words EXCH_STS (%MWr.m.c.0) and EXCH_RPT (%MWr.m.c.1) is associated with a type of parameter: Rank 0 bits are associated with the status parameters: The STS_IN_PROGR bit (%MWr.m.c.0.0) indicates whether a read request for the status
words is in progress. The STS_ERR bit (%MWr.m.c.1.0) specifies whether a read request for the status words is
accepted by the module channel.
Rank 1 bits are associated with the command parameters: The CMD_IN_PROGR bit (%MWr.m.c.0.1) indicates whether command parameters are
being sent to the module channel. The CMD_ERR bit (%MWr.m.c.1.1) specifies whether the command parameters are
accepted by the module channel.
Rank 2 bits are associated with the adjustment parameters: The ADJ_IN_PROGR bit (%MWr.m.c.0.2) indicates whether the adjustment parameters are
being exchanged with the module channel (via WRITE_PARAM, READ_PARAM, SAVE_PARAM, RESTORE_PARAM).
The ADJ_ERR bit (%MWr.m.c.1.2) specifies whether the adjustment parameters are accepted by the module. If the exchange is correctly executed, the bit is set to 0.
Rank 15 bits indicate a reconfiguration on channel c of the module from the console (modification of the configuration parameters + cold start-up of the channel).
The r, m and c bits indicates the following elements: the r bit represents the rack number. The m bit represents the position of the module in the rack. The c bit represents the channel number in the module.
NOTE: r represents the rack number, m the position of the module in the rack, while c represents the channel number in the module.
NOTE: Exchange and report words also exist at module level EXCH_STS (%MWr.m.MOD) and EXCH_RPT (%MWr.m.MOD.1) as per IODDT type T_GEN_MOD.
Example
Phase 1: Sending data by using the WRITE_PARAM instruction
106 35006183 10/2013
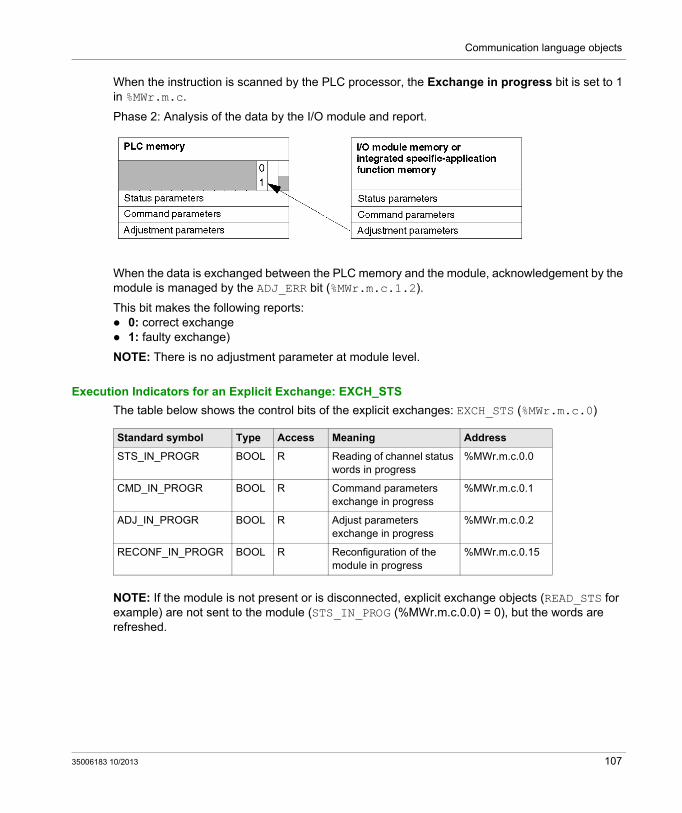
Communication language objects
When the instruction is scanned by the PLC processor, the Exchange in progress bit is set to 1 in %MWr.m.c.
Phase 2: Analysis of the data by the I/O module and report.
When the data is exchanged between the PLC memory and the module, acknowledgement by the module is managed by the ADJ_ERR bit (%MWr.m.c.1.2).
This bit makes the following reports: 0: correct exchange 1: faulty exchange)
NOTE: There is no adjustment parameter at module level.
Execution Indicators for an Explicit Exchange: EXCH_STS
The table below shows the control bits of the explicit exchanges: EXCH_STS (%MWr.m.c.0)
NOTE: If the module is not present or is disconnected, explicit exchange objects (READ_STS for example) are not sent to the module (STS_IN_PROG (%MWr.m.c.0.0) = 0), but the words are refreshed.
Standard symbol Type Access Meaning Address
STS_IN_PROGR BOOL R Reading of channel status words in progress
%MWr.m.c.0.0
CMD_IN_PROGR BOOL R Command parameters exchange in progress
%MWr.m.c.0.1
ADJ_IN_PROGR BOOL R Adjust parameters exchange in progress
%MWr.m.c.0.2
RECONF_IN_PROGR BOOL R Reconfiguration of the module in progress
%MWr.m.c.0.15
35006183 10/2013 107

Communication language objects
Explicit Exchange Report: EXCH_RPT
The table below shows the report bits: EXCH_RPT (%MWr.m.c.1)
Counting Module Use
The following table describes the steps realised between a Couting Module and the system after a power-on.
If, in the begining of your application, you use a WRITE_PARAM command, you must wait until the bit %MWr.m.c.0.2 switches to 0.
Standard symbol Type Access Meaning Address
STS_ERR BOOL R Error reading channel status words (1 = failure)
%MWr.m.c.1.0
CMD_ERR BOOL R Error during a command parameter exchange (1 = failure)
%MWr.m.c.1.1
ADJ_ERR BOOL R Error during an adjust parameter exchange (1 = failure)
%MWr.m.c.1.2
RECONF_ERR BOOL R Error during reconfiguration of the channel (1 = failure)
%MWr.m.c.1.15
Step Action
1 Power on.
2 The system sends the configuration parameters.
3 The system sends the adjust parameters by WRITE_PARAM method.Note: When the operation is finished, the bit %MWr.m.c.0.2 switches to 0.
108 35006183 10/2013

Communication language objects
Language Objects and Generic IODDT Applicable to Communication Protocols
Section 9.2Language Objects and Generic IODDT Applicable to Communication Protocols
About this Section
This section presents the language objects and generic IODDT applicable to all communication protocols except Fipio and Ethernet.
What Is in This Section?
This section contains the following topics:
Topic Page
Details of IODDT Implicit Exchange Objects of Type T_COM_STS_GEN 110
Details of IODDT Explicit Exchange Objects of Type T_COM_STS_GEN 111
35006183 10/2013 109

Communication language objects
Details of IODDT Implicit Exchange Objects of Type T_COM_STS_GEN
Introduction
The following table presents the IODDT implicit exchange objects of type T_COM_STS_GEN applicable to all communication protocols except Fipio and Ethernet.
Error Bit
The table below presents the meaning of the detected error bit CH_ERROR (%Ir.m.c.ERR).
Standard Symbol Type Access Meaning Address
CH_ERROR EBOOL R Communication channel error bit. %Ir.m.c.ERR
110 35006183 10/2013

Communication language objects
Details of IODDT Explicit Exchange Objects of Type T_COM_STS_GEN
Introduction
This section presents the T_COM_STS_GEN type IODDT explicit exchange objects applicable to all communication protocols except Fipio and Ethernet. It includes the word type objects whose bits have a specific meaning. These objects are presented in detail below.
Sample Variable Declaration: IODDT_VAR1 of type T_COM_STS_GEN
Observations
In general, the meaning of the bits is given for bit status 1. In specific cases an explanation is given for each status of the bit.
Not all bits are used.
Execution Flags of an Explicit Exchange: EXCH_STS
The table below shows the meaning of channel exchange control bits from channel EXCH_STS (%MWr.m.c.0).
Explicit Exchange Report: EXCH_RPT
The table below presents the meaning of the exchange report bits EXCH_RPT (%MWr.m.c.1).
Standard Symbol Type Access Meaning Address
STS_IN_PROGR BOOL R Reading of channel status words in progress. %MWr.m.c.0.0
CMD_IN_PROGR BOOL R Current parameter exchange in progress. %MWr.m.c.0.1
ADJ_IN_PROGR BOOL R Adjustment parameter exchange in progress. %MWr.m.c.0.2
Standard Symbol Type Access Meaning Address
STS_ERR BOOL R Reading error for channel status words. %MWr.m.c.1.0
CMD_ERR BOOL R Error during command parameter exchange. %MWr.m.c.1.1
ADJ_ERR BOOL R Error during adjustment parameter exchange. %MWr.m.c.1.2
35006183 10/2013 111

Communication language objects
Standard Channel Faults, CH_FLT
The table below shows the meaning of the bits of the status word CH_FLT (%MWr.m.c.2). Reading is performed by a READ_STS (IODDT_VAR1).
Standard Symbol Type Access Meaning Address
NO_DEVICE BOOL R No device is working on the channel. %MWr.m.c.2.0
1_DEVICE_FLT BOOL R A device on the channel is inoperative. %MWr.m.c.2.1
BLK BOOL R Terminal block not connected. %MWr.m.c.2.2
TO_ERR BOOL R Time out exceeded anomaly. %MWr.m.c.2.3
INTERNAL_FLT BOOL R Internal detected error or channel self-testing. %MWr.m.c.2.4
CONF_FLT BOOL R Different hardware and software configurations. %MWr.m.c.2.5
COM_FLT BOOL R Interruption of the communication with the PLC. %MWr.m.c.2.6
APPLI_FLT BOOL R Application detected error (adjustment or configuration).
%MWr.m.c.2.7
112 35006183 10/2013

Communication language objects
Language objects and IODDTs associated with Fipway communication
Section 9.3Language objects and IODDTs associated with Fipway communication
Subject of this Section
This section introduces language objects and IODDTs that are associated with Fipway communication.
What Is in This Section?
This section contains the following topics:
Topic Page
Details of the implicit exchange objects of the T_COM_FPW IODDT 114
Details of the Explicit Exchange Objects of the T_COM_FPW IODDT 117
Language Objects Associated with Configuration 120
Details of the Explicit Exchange Objects for a Fipway Function 121
35006183 10/2013 113

Communication language objects
Details of the implicit exchange objects of the T_COM_FPW IODDT
At a Glance
The following tables introduce the implicit exchange objects of the T_COM_FPW IODDT which apply to Fipway communication.
Error bit
The following table explains the meaning of the error bit CH_ERROR (%Ir.m.c.ERR).
Status bit
The following table explains the meaning of the status bit NET_STS (%IWr.m.c.0.0).
Output signals object
The following table explains the meaning of the status bit STOP_EXCH (%QWr.m.c.0.0).
Update flags
The following table explains the meanings of the word bits which serve as update flags of common data for stations 0 to 15.
Standard symbol Type Access Meaning Address
CH_ERROR EBOOL R Communication channel error bit. %Ir.m.c.ERR
Standard symbol Type Access Meaning Address
NET_STS BOOL R Presence bit for at least one of the stations. %IWr.m.c.0.0
Standard symbol Type Access Meaning Address
STOP_EXCH BOOL R Rising edge at 1: stop of all current exchanges. %QWr.m.c.0.0
Standard symbol Type Access Meaning Address
REFRESH_ID_0 BOOL R The common words or words in the shared table for station 0 are updated.
%IWr.m.c.1.0
REFRESH_ID_1 BOOL R The common words or words in the shared table for station 1 are updated.
%IWr.m.c.1.1
REFRESH_ID_2 BOOL R The common words or words in the shared table for station 2 are updated.
%IWr.m.c.1.2
REFRESH_ID_3 BOOL R The common words or words in the shared table for station 3 are updated.
%IWr.m.c.1.3
REFRESH_ID_4 BOOL R The common words or words in the shared table for station 4 are updated.
%IWr.m.c.1.4
REFRESH_ID_5 BOOL R The common words or words in the shared table for station 5 are updated.
%IWr.m.c.1.5
114 35006183 10/2013

Communication language objects
Update flags
The following table introduces word bit meanings, update flags of common data for stations 16 to 31.
REFRESH_ID_6 BOOL R The common words or words in the shared table for station 6 are updated.
%IWr.m.c.1.6
REFRESH_ID_7 BOOL R The common words or words in the shared table for station 7 are updated.
%IWr.m.c.1.7
REFRESH_ID_8 BOOL R The common words or words in the shared table for station 8 are updated.
%IWr.m.c.1.8
REFRESH_ID_9 BOOL R The common words or words in the shared table for station 9 are updated.
%IWr.m.c.1.9
REFRESH_ID_10 BOOL R The common words or words in the shared table for station 10 are updated.
%IWr.m.c.1.10
REFRESH_ID_11 BOOL R The common words or words in the shared table for station 11 are updated.
%IWr.m.c.1.11
REFRESH_ID_12 BOOL R The common words or words in the shared table for station 12 are updated.
%IWr.m.c.1.12
REFRESH_ID_13 BOOL R The common words or words in the shared table for station 13 are updated.
%IWr.m.c.1.13
REFRESH_ID_14 BOOL R The common words or words in the shared table for station 14 are updated.
%IWr.m.c.1.14
REFRESH_ID_15 BOOL R The common words or words in the shared table for station 15 are updated.
%IWr.m.c.1.15
Standard symbol Type Access Meaning Address
Standard symbol Type Access Meaning Address
REFRESH_ID_16 BOOL R The common words or words in the shared table for station 16 are updated.
%IWr.m.c.2.0
REFRESH_ID_17 BOOL R The common words or words in the shared table for station 17 are updated.
%IWr.m.c.2.1
REFRESH_ID_i BOOL R The common words or words in the shared table for station i are updated.
%IWr.m.c.2.n
REFRESH_ID_31 BOOL R The common words or words in the shared table for station 31 are updated.
%IWr.m.c.2.15
35006183 10/2013 115

Communication language objects
Update flags
The following table for stations 32 to 47 is not significant for common words or words in the shared table.
Update flags
The following table for stations 48 to 63 is not significant for common words or words in the shared table.
Standard symbol Type Access Meaning Address
REFRESH_ID_32 BOOL R The common words or words in the shared table for station 32 are updated.
%IWr.m.c.3.0
REFRESH_ID_33 BOOL R The common words or words in the shared table for station 33 are updated.
%IWr.m.c.3.1
REFRESH_ID_i BOOL R The common words or words in the shared table for station i are updated.
%IWr.m.c.3.n
REFRESH_ID_47 BOOL R The common words or words in the shared table for station 47 are updated.
%IWr.m.c.3.15
Standard symbol Type Access Meaning Address
REFRESH_ID_48 BOOL R The common words or words in the shared table for station 48 are updated.
%IWr.m.c.4.0
REFRESH_ID_49 BOOL R The common words or words in the shared table for station 49 are updated.
%IWr.m.c.4.1
REFRESH_ID_i BOOL R The common words or words in the shared table for station i are updated.
%IWr.m.c.4.n
REFRESH_ID_63 BOOL R The common words or words in the shared table for station 63 are updated.
%IWr.m.c.4.15
116 35006183 10/2013

Communication language objects
Details of the Explicit Exchange Objects of the T_COM_FPW IODDT
At a Glance
The following tables introduce the explicit exchange objects of the T_COM_FPW IODDT which apply to Fipway communication. It covers word-type objects, whose bits have a particular meaning. These objects are introduced in detail below.
Example of a declaration for a variable: IODDT_VAR1 of the type T_COM_FPW
Notes
The meaning of bits is usually given for status 1 of this bit. In specific cases, each bit status is explained.
All bits are not used.
Explicit Exchange Execution Flags: EXCH_STS
The following table explains the meanings of the channel exchange control bits EXCH_STS (%MWr.m.c.0).
Explicit Exchange Report: EXCH_RPT
The following table introduces the meanings of report bitsEXCH_RPT (%MWr.m.c.1).
Standard Channel Faults, CH_FLT
The following table introduces the meanings of the status words bits CH_FLT (%MWr.m.c.2); reading is carried out by a READ_STS (IODDT_VAR1).
Standard symbol Type Access Meaning Address
STS_IN_PROGR BOOL R Reading of the status words of the channel in progress.
%MWr.m.c.0.0
CMD_IN_PROGR BOOL R Command parameters exchange in progress. %MWr.m.c.0.1
ADJ_IN_PROGR BOOL R Adjust parameters exchange in progress. %MWr.m.c.0.2
Standard symbol Type Access Meaning Address
STS_ERR BOOL R Channel status words read fault. %MWr.m.c.1.0
CMD_ERR BOOL R Fault during exchange of command parameters. %MWr.m.c.1.1
ADJ_ERR BOOL R Fault during exchange of adjustment parameters. %MWr.m.c.1.2
Standard symbol Type Access Meaning Address
NO_DEVICE BOOL R No device is functioning on the channel. %MWr.m.c.2.0
1_DEVICE_FLT BOOL R A device on the channel is faulty. %MWr.m.c.2.1
BLK BOOL R Terminal block fault (not connected). %MWr.m.c.2.2
35006183 10/2013 117

Communication language objects
Station status
The following table explains the meanings of the status word bits for stations 0 to 15; reading is carried out by a READ_STS (IODDT_VAR1).
Station status
The following table explains the meanings of the status word bits for stations 16 to 31; reading is carried out by a READ_STS (IODDT_VAR1).
Station status
The following table explains the meanings of the status word bits for stations 32 to 47; reading is carried out by a READ_STS (IODDT_VAR1).
TO_ERR BOOL R Time Out error (faulty wiring). %MWr.m.c.2.3
INTERNAL_FLT BOOL R Internal error or channel self-test. %MWr.m.c.2.4
CONF_FLT BOOL R Different hardware and software configurations. %MWr.m.c.2.5
COM_FLT BOOL R Problem communicating with the PLC. %MWr.m.c.2.6
APPLI_FLT BOOL R Application fault (double address station, adjustment or configuration fault).
%MWr.m.c.2.7
Standard symbol Type Access Meaning Address
Standard symbol Type Access Meaning Address
STA_STS_0 BOOL R Presence of station 0. %MWr.m.c.8.0
STA_STS_1 BOOL R Presence of station 1. %MWr.m.c.8.1
STA_STS_n BOOL R Presence of station n. %MWr.m.c.8.n
STA_STS_15 BOOL R Presence of station 15. %MWr.m.c.8.15
Standard symbol Type Access Meaning Address
STA_STS_16 BOOL R Presence of station 16. %MWr.m.c.9.0
STA_STS_17 BOOL R Presence of station 17. %MWr.m.c.9.1
STA_STS_n BOOL R Presence of station n. %MWr.m.c.9.i
STA_STS_31 BOOL R Presence of station 31. %MWr.m.c.9.15
Standard symbol Type Access Meaning Address
STA_STS_32 BOOL R Presence of station 32. %MWr.m.c.10.0
STA_STS_33 BOOL R Presence of station 33. %MWr.m.c.10.1
STA_STS_n BOOL R Presence of station n. %MWr.m.c.10.i
STA_STS_47 BOOL R Presence of station 47. %MWr.m.c.10.15
118 35006183 10/2013

Communication language objects
Station status
The following table explains the meanings of the status word bits for stations 48 to 63; reading is carried out by a READ_STS (IODDT_VAR1).
Standard symbol Type Access Meaning Address
STA_STS_48 BOOL R Presence of station 48. %MWr.m.c.11.0
STA_STS_49 BOOL R Presence of station 49. %MWr.m.c.11.1
STA_STS_n BOOL R Presence of station n. %MWr.m.c.11.i
STA_STS_63 BOOL R Presence of station 63. %MWr.m.c.11.15
35006183 10/2013 119

Communication language objects
Language Objects Associated with Configuration
At a Glance
This page describes all the configuration language objects for Fipway communication. These objects are not integrated into the IODDTs; they can be displayed by the application program.
Internal Constants
The following table describes the internal constants:
Object Type Access Meaning
%KWr.m.c.0 INT R Byte 0 = 4 for Fipway communication
%KWr.m.c.1 INT R Byte 0 : station address = 0: FIP physical layer, = 1: WOLRD FIP physical layer.
Byte 1 : event number configured, (= -1 if "event processing" is not checked in the configuration screen)
%KWr.m.c.2 INT R Byte 0: common data = 16#00: none, = 16#01: common words = 16#02: shared table
Byte 1: telegrams (only valid for FPP20 in channel 1 of processor) = 16#00: not supported, = 16#01: supported.
%KWr.m.c.3 INT R Address of the beginning of the shared table.
%KWr.m.c.4 INT R Byte 0: number of common words or size of the shared table production area.Byte 1: Address (in bytes) of the beginning of the shared table production area.
120 35006183 10/2013

Communication language objects
Details of the Explicit Exchange Objects for a Fipway Function
At a Glance
The following tables introduce the language objects for Fipway communication. These objects are not integrated into the IODDTs.
List of Explicit Exchange Objects
The table below shows explicit exchange objects.
Number Type Access Meaning
%MWr.m.c.3 INT R Byte 0: bit 0 = 0: if bridge, not router.
Byte 1: = 16#00: bus master function not supported,
= 16#03: bus master function active,
= 16#20: bus master function on standby.
%MWr.m.c.4 INT R Messages not acknowledged.
%MWr.m.c.5 INT R Messages refused.
%MWr.m.c.6 INT R Byte 0: station number.Byte 1: network number.
%MWr.m.c.7 INT R Byte 0: 16#00: service inactive,
16#01: common words read/write,
16#02: common words read,
16#03: participation in the exchange of a shared table (operation without error),
16#04: overlapping of a shared table exchange area,
16#05: exchange error for a shared table.
Byte 1: size.
35006183 10/2013 121

Communication language objects
The IODDT Type T_GEN_MOD Applicable to All Modules
Section 9.4The IODDT Type T_GEN_MOD Applicable to All Modules
Details of the Language Objects of the T_GEN_MOD-Type IODDT
At a Glance
All the modules of Premium PLCs have an associated IODDT of type T_GEN_MOD.
Observations
In general, the meaning of the bits is given for bit status 1. In specific cases an explanation is given for each status of the bit.
Not all bits are used.
List of Objects
The table below presents the objects of the IODDT:
Standard symbol Type Access Meaning Address
MOD_ERROR BOOL R Module error bit %Ir.m.MOD.ERR
EXCH_STS INT R Module exchange control word. %MWr.m.MOD.0
STS_IN_PROGR BOOL R Reading of status words of the module in progress.
%MWr.m.MOD.0.0
EXCH_RPT INT R Exchange report word. %MWr.m.MOD.1
STS_ERR BOOL R Fault when reading module status words. %MWr.m.MOD.1.0
MOD_FLT INT R Internal error word of the module. %MWr.m.MOD.2
MOD_FAIL BOOL R Internal error, module failure. %MWr.m.MOD.2.0
CH_FLT BOOL R Faulty channel(s). %MWr.m.MOD.2.1
BLK BOOL R Terminal block fault. %MWr.m.MOD.2.2
CONF_FLT BOOL R Hardware or software configuration fault. %MWr.m.MOD.2.5
NO_MOD BOOL R Module missing or inoperative. %MWr.m.MOD.2.6
EXT_MOD_FLT BOOL R Internal error word of the module (Fipio extension only).
%MWr.m.MOD.2.7
MOD_FAIL_EXT BOOL R Internal fault, module unserviceable (Fipio extension only).
%MWr.m.MOD.2.8
CH_FLT_EXT BOOL R Faulty channel(s) (Fipio extension only). %MWr.m.MOD.2.9
BLK_EXT BOOL R Terminal block fault (Fipio extension only). %MWr.m.MOD.2.10
122 35006183 10/2013

Communication language objects
CONF_FLT_EXT BOOL R Hardware or software configuration fault (Fipio extension only).
%MWr.m.MOD.2.13
NO_MOD_EXT BOOL R Module missing or inoperative (Fipio extension only).
%MWr.m.MOD.2.14
Standard symbol Type Access Meaning Address
35006183 10/2013 123

Communication language objects
124 35006183 10/2013

Premium and Atrium using Unity Pro
Index
35006183 10/2013
Index
Cchannel data structure for all modules
IODDT, 109T_GEN_MOD, 100, 122
channel data structure for Fipway communi-cation
T_COM_FPW, 113common words, 62compliance, 20connecting
TSXFPP20, 35TSXSCY21601, 32
consumptionTSX FPP 20, 52TSXSCY21601, 34
Ddiagnosing
TSX FPP 20, 48TSX SCY 21601, 30
diagnostics, 87
FFipway, 57
Iinstalling
TSXFPP20, 44
Mmessaging, 60
Pparameter settings, 100performances, 68
35006183 10/2013
Sshared tables, 64
TT_COM_FPW, 113T_GEN_MOD, 122topologies, 17TSXFPACC12, 50TSXFPACC4, 50TSXFPCG010, 50TSXFPCG030, 50TSXFPP20, 50TSXSCY21601, 21
Wwiring precautions, 51
125

35006183 10/2013 126