powerterm series terminal emulator - frontpage...
TRANSCRIPT

PowerTerm® Series Terminal Emulator
User's Guide

PowerTerm Series User’s Guide
ii
Important Notice
This guide is subject to the following conditions and restrictions:
•••• This User’s Guide provides documentation for the PowerTerm Interconnect series of products. Your specific PowerTerm product might include only a portion of the features documented in this Guide.
• The proprietary information belonging to Ericom® Software Ltd. is supplied solely for the purpose of assisting explicitly and properly authorized users of PowerTerm®.
• No part of its contents may be used for any other purpose, disclosed to any person or firm, or reproduced by any means, electronic and mechanical, without the express prior written permission of Ericom® Software Ltd.
• The text and graphics are for the purpose of illustration and reference only. The specifications on which they are based are subject to change without notice.
• The software described in this document is furnished under a license agreement. The software may be used or copied only in accordance with the terms of that agreement.
• Information in this document is subject to change without notice. Corporate and individual names and data used in examples herein are fictitious unless otherwise noted.
Copyright 2002 Ericom® Software Ltd.
Ericom® and PowerTerm® are registered trademarks of Ericom® Software Ltd., which may be registered in certain jurisdictions.
Other company and brand, product and service names are trademarks or registered trademarks of their respective holders.
Table of Contents iii
About This Guide
This guide assumes that you are familiar with the operation of the terminal you intend to emulate.
! The PowerTerm User's Guide is comprised of the following chapters:
Chapter 1, Introduction to PowerTerm, presents PowerTerm and describes its main features. It also provides a quick guide to working with PowerTerm. Chapter 2, The PowerTerm Window, provides an overview of the PowerTerm window and its components. Chapter 3, Using PowerTerm, provides step-by-step instructions for using PowerTerm. Chapter 4, Scripts, describes the Power Script Language (PSL). A detailed description of each PSL command is provided in the PowerTerm online help. Chapter 5, Menu Reference, describes each of the PowerTerm menu options.

PowerTerm Series User’s Guide
iv
Table of Contents
Chapter 1: Introduction to PowerTerm ................................................. 1
Chapter 2: The PowerTerm Window ....................................................13 The PowerTerm Window ............................................................................................... 14 Menu Bar ...................................................................................................................... 17 Menu Conventions ........................................................................................................ 18 Working with Menus and Commands ............................................................................ 18 Toolbar ......................................................................................................................... 21 Hot Keys .......................................................................................................................23 Manipulating Desktop Components ............................................................................... 24 Selecting Text ............................................................................................................... 26
Chapter 3: Using PowerTerm...............................................................28 PowerTerm Workflow.................................................................................................... 29 Step 1: Starting PowerTerm .......................................................................................... 30 Step 2: Setting Up your Working Environment ............................................................... 35 Step 3: Defining Settings for Terminal Emulation (Terminal Settings) ............................ 49 Step 4: Defining Modem and Communication Settings .................................................. 79 Step 5: Saving the Terminal Setup File.......................................................................... 91 Step 6: Connecting to a Host......................................................................................... 95 Step 7: Working with the Host ....................................................................................... 98 Step 8: Ending a PowerTerm Session ......................................................................... 109 Step 9: Exiting PowerTerm .......................................................................................... 111
Chapter 4: Scripts...............................................................................112 Script Overview ........................................................................................................... 113 Power Script Language (PSL) ..................................................................................... 114 PowerTerm Sample Scripts ......................................................................................... 115 PSL Syntax ................................................................................................................. 115 PSL Data Types .......................................................................................................... 118 Variable Assignment ................................................................................................... 120 Activating Script Files from the Host............................................................................ 122 DDE Commands ......................................................................................................... 123 PSL Commands .......................................................................................................... 127 Creating a Script ......................................................................................................... 233 Editing a Script ............................................................................................................ 235 Recording a Script....................................................................................................... 236 Running PowerTerm Scripts........................................................................................ 236 Running a Specific Script ............................................................................................ 240 Running Individual Script Commands .......................................................................... 243 Activating a Recorded Script ....................................................................................... 243 Saving a Recorded Script ............................................................................................ 243

Table of Contents v
Chapter 5: Menu Reference................................................................245 File Menu ....................................................................................................................246 Edit Menu ....................................................................................................................251 Terminal Menu ............................................................................................................254 Communication Menu ..................................................................................................257 Options Menu ..............................................................................................................261 Script Menu .................................................................................................................264 Help Menu ...................................................................................................................266

Chapter 1, Introduction to PowerTerm 1
ntroduction to PowerTerm
IChapter 1: Introduction to PowerTerm This chapter presents PowerTerm and describes its main features. A quick guide to PowerTerm is also provided in this chapter. It describes the basic steps for users who are familiar with accessing remote terminals.
!!!!""""This chapter describes the following topics: What is PowerTerm?, page 2. PowerTerm Features, page 3. System Requirements, page 4. PowerTerm Setup, page 5. A Quick Guide Through PowerTerm, page 6.
PowerTerm Series User’s Guide
2
What is PowerTerm? PowerTerm is a fully functional terminal emulator for Microsoft Windows. It emulates various terminal types, including UNIX, VMS and IBM. PowerTerm enables you to connect to a single or multiple host via both network and remote connections. PowerTerm provides two main features to enable the PC to act and feel like a real host terminal: Terminal display emulation: PowerTerm emulates the exact display of the chosen terminal. It presents host applications exactly as they would appear on an actual terminal.Once the PC connects to a host computer, all host operations can be performed as if the PC is an actual host terminal. Terminal keyboard emulation: PowerTerm enables you to emulate the selected terminal's keyboard by mapping the PC keys to match the host keys. Keyboard mapping definitions are stored in a .PTK file. PowerTerm includes a special programming language, Power Script Language (PSL), which enables you to create scripts for automating tasks. For example, you can create a PSL script which logs you in automatically. Scripts can be used to start PowerTerm, or can be utilized anytime during a PowerTerm session. PSL is intended for users with programming skills. PowerTerm enables you to use the standard Microsoft DDE mechanism to communicate with other Windows applications as a DDE client or DDE server application. PowerTerm also provides various options to customize and optimize the working environment: Power Pad: a programmable floating keypad. Soft buttons: programmable buttons located at the bottom of the PowerTerm window. PSL commands can be assigned to the Power Pad and the Soft buttons to enable additional functions with a click of the mouse.

Chapter 1, Introduction to PowerTerm 3
ntroduction to PowerTerm
IPowerTerm Features • Compact, light and high performance program. • 32-bit support for Windows 95/98/2000/NT/XP, Linux, Solaris or
Mac OS X. • File transfer for Xmodem, Ymodem, Zmodem, Kermit, Ascii,
Binary and IND$FILE. • Supports TCP/IP WinSock, DECnet (CTERM) and LAT. • Supports RS-232 (both direct and via modem), PPP/SLIP, SNA
and APPC connections. • Supports Ethernet and Token ring networks. • PowerTerm Script scripting language (PSL) with over 80 existing
commands. • Script recorder for automation of tasks. • String functions, including substring, index and concatenation. • Enables you to save parameters for all sessions. • High level API enables access from other environments, such as
C++, Visual Basic and PowerBuilder. It also supports EHLLAPI. • DDE communication for client or server. • Language support for all Western European languages. • Modem dialing. • Multi-session capabilities. • User programmable buttons • Floating Power Pad with programmable buttons. • Control of color selection and screen attributes. • Printing support including Auto Print mode and Slave Printing,
Advanced Printing capabilities: including TN5250 host print transform, specifying the orientation of the printed output for non-graphic printing, setting values for CPI/LPI/FONT parameters, printer rows and columns.
• Supports Kermit Get command.

PowerTerm Series User’s Guide
4
System Requirements
! To run PowerTerm you need:
• 386 data processor or higher. • MS-Windows version 95 or higher, Linux, Solaris or Mac OS X. • Connection to a host computer. • 4.3 MB free space on your hard disk.
Chapter 1, Introduction to PowerTerm 5
ntroduction to PowerTerm
IPowerTerm Setup To enable PC—host interaction, you need to define two sets of parameters: terminal parameters and communication parameters. These are both saved in a terminal setup file. A terminal setup file has a .PTS extension. The PowerTerm default setup file is called PTDEF.PTS. The communication setup file has a .PTC extension. The keyboard definitions file has a .PTK extension. PowerTerm provides the option to work with a single host or multiple hosts. You can create different setup files for working with each host to enable each user a customized working environment.
Working with a Single Host If you only need to connect to a single host, you should use the default terminal setup and communication file called PTDEF.PTS. When you select Power Term, it automatically uses the parameters in the setup file to start the system.
Working with Different Terminal Emulations If you are working with different terminals with different emulations, you may need to use a different setup file for each emulation. To create a setup file, you first need to define the terminal setup and communication parameters, and then save these parameters to a terminal setup file. These files will have a .PTS extension. For more information, see the section Running a Script upon Startup in Chapter 4: Scripts.

PowerTerm Series User’s Guide
6
A Quick Guide Through PowerTerm The following workflow provides a quick guide for using PowerTerm.
Step 3
Step 2
Step 1
Step 5
Step 4
Set the Equalizer CurveStart PowerTerm
Select a TerminalEmulation
Connect to a Host
Exit PowerTerm
Work with a Host
Each of the steps is explained on the pages that follow. For a more detailed description of these steps, see PowerTerm Workflow in
Chapter 3: Using PowerTerm.

Chapter 1, Introduction to PowerTerm 7
ntroduction to PowerTerm
IStep 1: Start PowerTerm
Start PowerTerm by clicking on the PowerTerm icon in the Ericom PowerTerm group. The PowerTerm window is displayed:
When PowerTerm is used for the first time, the PowerTerm window is automatically displayed together with the Connect dialog box. After the connection parameters have been defined, the Connect dialog box is no longer automatically displayed when you open PowerTerm. See Step 4: Defining Modem and Communication Settings, in Chapter 3: Using PowerTerm.
PowerTerm opens with the default terminal setup file PTDEF.PTS. You can also open PowerTerm using a customized setup (.PTS) file (see Starting PowerTerm with a Customized Setup File on page 31), or script (.PSL) file (see Running a Script upon Startup, in Chapter 4: Scripts).
The most important feature of the PowerTerm window is its work area, which emulates a host terminal screen by displaying data entered on your terminal and data received from the host.
Control Menu Box
Status Indicator
Caps Hold
Toolbar
History ScrollBar Work
Area
Title Bar
Emulation Type
Cursor Position Counter
Macro/Message Display Area
Menu Bar
Soft Buttons Area

PowerTerm Series User’s Guide
8
Step 2: Select a Terminal Emulation
You can either (A) select a terminal for the current session or (B) open a previously defined terminal setup (.PTS) file. A- For The Current Session
1. Select the Setup option from the Terminal menu. The Terminal Setup window is displayed:
2. Select the Emulation tab. 3. To select a terminal emulation for a current session, click
one of the Terminal Types. The emulation type that you select changes the number of setup tabs and,
for IBM emulations, the PowerTerm window display.
To define terminal settings for the current session, click the relevant tab in the Terminal Setup window and then define setup parameters (for example, Display, Keyboard or Printer). After you have defined the settings that you require, click OK.
Chapter 1, Introduction to PowerTerm 9
ntroduction to PowerTerm
ITo save these terminal settings in the default setup file (PTDEF.PTS), from the File menu, select Save Terminal Setup to save the current settings file. Or, Select Save Terminal Setup As, specify a setup file name and click OK. The file is saved with a .PTS extension.
You can start PowerTerm by creating a shortcut (Windows 95/98/NT/2000/XP).
B- Open A Previously Defined Terminal Setup (.PTS) File • To open a terminal setup file with previously defined settings,
select Open from the File menu. Select a setup file and click OK. Or, Select a setup file in the Connect window (see Step 3).
PowerTerm Series User’s Guide
10
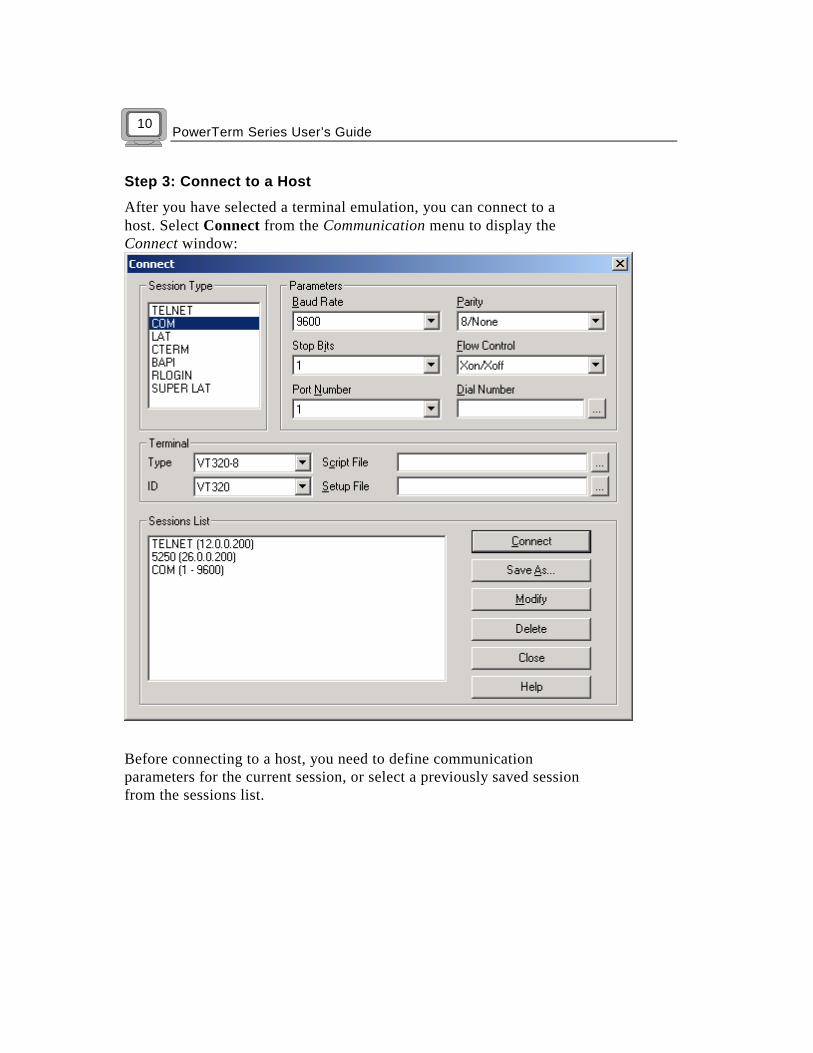
Step 3: Connect to a Host
After you have selected a terminal emulation, you can connect to a host. Select Connect from the Communication menu to display the Connect window:
Before connecting to a host, you need to define communication parameters for the current session, or select a previously saved session from the sessions list.

Chapter 1, Introduction to PowerTerm 11
ntroduction to PowerTerm
I• To define communication parameters for a current session, select a session type and the session parameters. PowerTerm also provides an option to run a script (.PSL) file before you connect to a host, or select a terminal setup (.PTS) file to define terminal settings. You can save session parameters by clicking the Save As button in the Connect window. Specify a session name and click OK. Saved sessions are displayed in the Sessions List.
• To select a session with previously defined connection parameters, click on a session in the Sessions List.
Click the Connect button to connect to a host computer.
Step 4: Work with a Host
PowerTerm provides the following options for working with a host: • Transferring files: PowerTerm enables you to transfer files to and
from a host. For non-IBM terminal emulations, PowerTerm transfers files in Kermit, Xmodem, Ymodem, Zmodem, ASCII or Binary mode. For IBM terminal emulations, PowerTerm enables you to select CMS, TSO or CICS as a Mainframe working environment.
• Printing files: PowerTerm enables you to define print parameters, and print the terminal screen or data transferred from the host application.
Step 5: Exit PowerTerm
PowerTerm provides options when exiting PowerTerm: end a session automatically or be prompted with a confirmation message prior to closing a session.
To exit PowerTerm, select Exit from the File menu.
Refer to page 77 for more information on PowerTerm preferences when exiting PowerTerm.

PowerTerm Series User’s Guide
12
If you have changed terminal settings, PowerTerm displays a warning message asking if you want to update the terminal settings file (.PTS). The message will point to the name of the setup file currently loaded (PTDEF.PTS, if you used the default). Click OK to update the file, or No to cancel the latest changes and restore the default setup (PTDEF.PTS) file.

Chapter 2, The PowerTerm Window
he PowerTerm
Window
T
13
Chapter 2: The PowerTerm Window This chapter provides an overview of the PowerTerm window and its components. The PowerTerm window contains menu and toolbar options which provide access to most PowerTerm functions. The remainder of PowerTerm functions can be accessed by clicking the right mouse button on the relevant PowerTerm object. The most important feature of the PowerTerm window is its work area, which emulates a host terminal screen by displaying data entered on your terminal, and data received from the host. This chapter also includes a section describing how to select text in PowerTerm.
!!!!""""This chapter describes the following topics:
The PowerTerm Window, page 14. Menu Bar, page 17. Toolbar, page 21. Hot Keys, page 23. Manipulating Desktop Components, page 24. Selecting Text, page 26.

PowerTerm Series User’s Guide
14
The PowerTerm Window
!!!!####The PowerTerm window consists of the following components:
Control Menu Box: Provides standard Windows commands and enables you to redisplay the Menu bar. Title Bar: Displays the application name. During a communication session, the session ID type and/or the host name is displayed next to the application name. For example, (A) PowerTerm. Menu Bar: Contains dropdown menus which enable the user to perform most PowerTerm operations. See page 17 for further information. Toolbar: Contains tools which can be used as shortcuts to access frequently used menu commands. See page 21 for further information.
Maximize
Button
Minimize
Button
Close Button
Cursor Position Counter
Control Menu Box
Toolbar
History Scroll Bar
Status Indicator
Hold
Emulation Type
Macro/Message
Display Area
Window
Corner Caps
Work Area

Chapter 2, The PowerTerm Window
he PowerTerm
Window
T
15
Work Area: Displays the data entered on the PC terminal or received from the host. During an emulation session, this work area emulates a terminal display.
For IBM terminal types, the work area is displayed in black.
History Scroll Bar: Enables you to scroll up and down through the PowerTerm window to view previously displayed data. This is available for non-IBM emulations only. The History Scroll Bar is displayed by default. If the History Scroll Bar is not displayed, select Setup from the Terminal menu to display it. Click the Display tab and select the History Scroll Bar checkbox. Emulator Type: Displays the current terminal emulation type selected from the Emulation tab in the Terminal Setup dialog box. Cursor Position Counter: Displays the current line and column position of the text cursor in the work area. Caps: Indicates whether the keyboard is in caps lock mode. Hold: Indicates whether the screen is in hold or frozen mode. Status Indicator - On Line, Off Line, Printer, Auto Prt: When communication is established, the status indicator reads On Line. When data is transmitted with a printing request to the slave printer, the indicator reads Printer. The color of the indicator is the same as when PowerTerm is in On Line mode. For example, if the system was On Line when the printing request arrived, the printer will appear in red. When the terminal is in Automatic Printing mode, the data is sent to the screen and printer, and the indicator reads Auto Prt. Soft Buttons Area: Contains a series of buttons that you can program to execute specific script commands. See the section Programming Soft Buttons on page 45 for further information. Macro/Message Display Area: Displays system messages, or a script sequence as you type it in the work area. Minimize button: Closes the window, but not PowerTerm. Click the PowerTerm button appearing in the Taskbar to reopen the PowerTerm window. You can use this button to make room on your Windows desktop.

PowerTerm Series User’s Guide
16
Maximize button: Enlarges a window so that it fills the entire screen. After you maximize a window, the maximize button is replaced with the restore button . This button is used to restore the window to its previous size. Window Border and Corners: Changes the size of the window. As you change the window size, the characters that appear in the work area are scaled up or down so that all the information always remains in view.
Chapter 2, The PowerTerm Window
he PowerTerm
Window
T
17
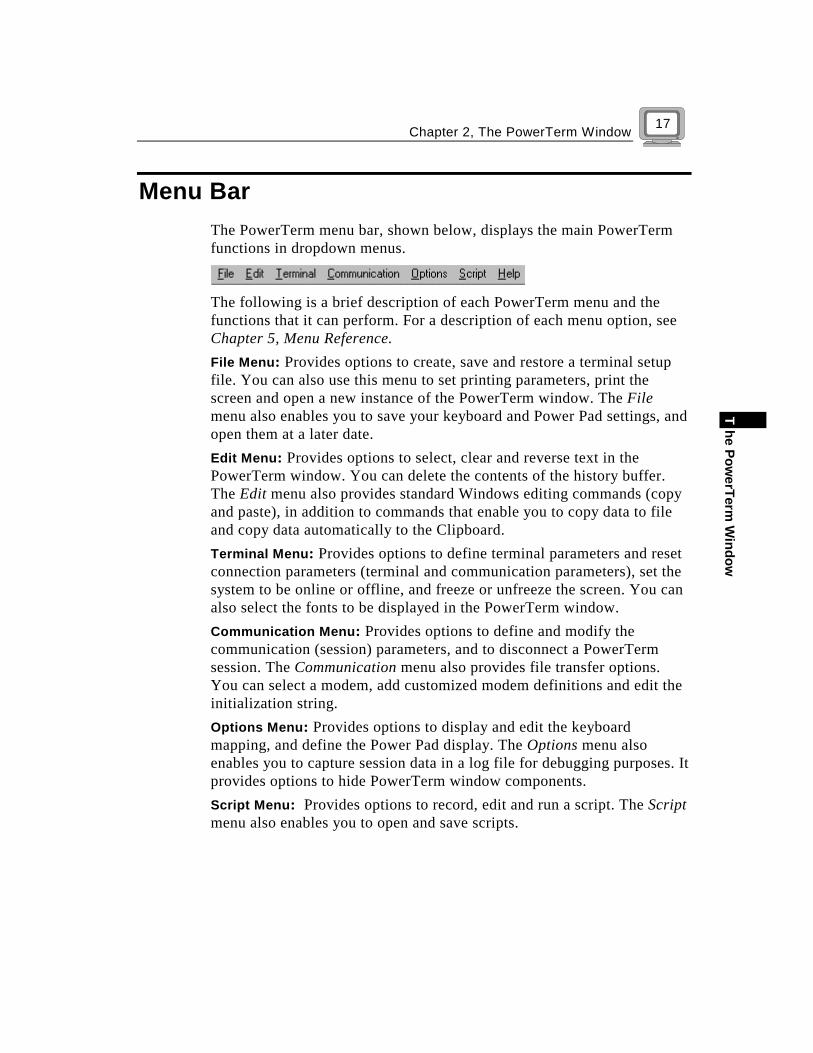
Menu Bar The PowerTerm menu bar, shown below, displays the main PowerTerm functions in dropdown menus.
The following is a brief description of each PowerTerm menu and the functions that it can perform. For a description of each menu option, see Chapter 5, Menu Reference. File Menu: Provides options to create, save and restore a terminal setup file. You can also use this menu to set printing parameters, print the screen and open a new instance of the PowerTerm window. The File menu also enables you to save your keyboard and Power Pad settings, and open them at a later date. Edit Menu: Provides options to select, clear and reverse text in the PowerTerm window. You can delete the contents of the history buffer. The Edit menu also provides standard Windows editing commands (copy and paste), in addition to commands that enable you to copy data to file and copy data automatically to the Clipboard. Terminal Menu: Provides options to define terminal parameters and reset connection parameters (terminal and communication parameters), set the system to be online or offline, and freeze or unfreeze the screen. You can also select the fonts to be displayed in the PowerTerm window. Communication Menu: Provides options to define and modify the communication (session) parameters, and to disconnect a PowerTerm session. The Communication menu also provides file transfer options. You can select a modem, add customized modem definitions and edit the initialization string. Options Menu: Provides options to display and edit the keyboard mapping, and define the Power Pad display. The Options menu also enables you to capture session data in a log file for debugging purposes. It provides options to hide PowerTerm window components. Script Menu: Provides options to record, edit and run a script. The Script menu also enables you to open and save scripts.

PowerTerm Series User’s Guide
18
Help Menu: Provides options for accessing the PowerTerm online helps and product information.
Menu Conventions The following Windows conventions are used in PowerTerm menus: Grayed text: Indicates that the menu option is inactive or unavailable.
An Ellipsis (…): Indicates that more information is required to complete the command.
Working with Menus and Commands You can select menus and commands by: • Using a mouse. • Using the keyboard. • Typing a letter.
! To select a menu item using the mouse: 1. Point to the name of the menu on the menu bar. 2. Click the mouse button. The menu drops down. 3. Slide the mouse over the command that you want to select and click.
After clicking the name of a menu or the menu bar, you can drag the mouse to the right, left or up and down to move to other options.

Chapter 2, The PowerTerm Window
he PowerTerm
Window
T
19
! To select a menu item using the keyboard: 1. Press the <Alt> key to access the menu bar. The far left menu is
highlighted. 2. Use the direction (arrow) keys to move the highlighting bar to select a
menu. 3. Press the down arrow to open the menu. 4. Use the up and down arrows to highlight the command that you want
and press the <Enter> key.

PowerTerm Series User’s Guide
20
To select a menu or menu item by typing a letter: Menus, menu items and commands have an underline character. You can select a menu by holding down the <Alt> key, and then typing the underlined letter. For example, you can open the File menu by holding down the <Alt> key and typing the letter <F>. Once a menu is open, you can select an item by just typing its underline character.
Chapter 2, The PowerTerm Window
he PowerTerm
Window
T
21
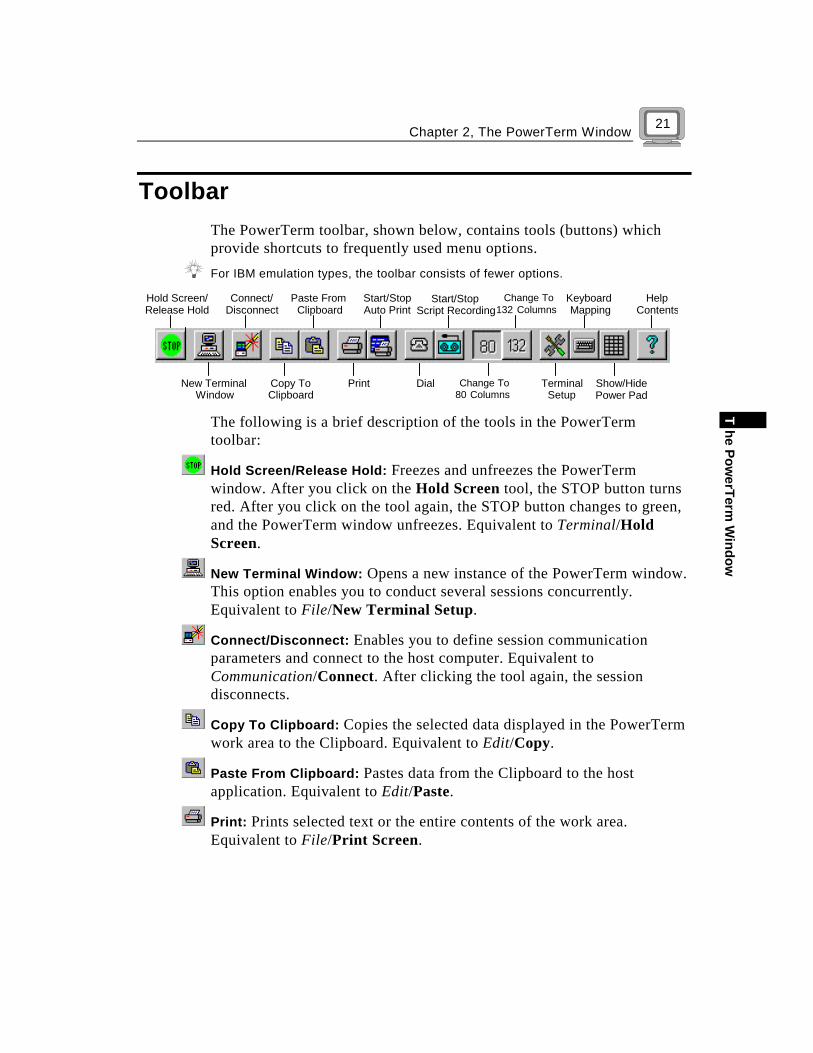
Toolbar The PowerTerm toolbar, shown below, contains tools (buttons) which provide shortcuts to frequently used menu options.
For IBM emulation types, the toolbar consists of fewer options.
Hold Screen / Release Hold
New Terminal Window
Copy To Clipboard
Paste From Clipboard
Connect / Disconnect
Start/StopAuto Print
Dial
Start/Stop Script Recording
Change To 80 Columns
Change To132 Columns
Terminal Setup
Keybo ard Mapping
Show / Hide Power Pad
Help Contents
The following is a brief description of the tools in the PowerTerm toolbar:
Hold Screen/Release Hold: Freezes and unfreezes the PowerTerm window. After you click on the Hold Screen tool, the STOP button turns red. After you click on the tool again, the STOP button changes to green, and the PowerTerm window unfreezes. Equivalent to Terminal/Hold Screen.
New Terminal Window: Opens a new instance of the PowerTerm window. This option enables you to conduct several sessions concurrently. Equivalent to File/New Terminal Setup.
Connect/Disconnect: Enables you to define session communication parameters and connect to the host computer. Equivalent to Communication/Connect. After clicking the tool again, the session disconnects.
Copy To Clipboard: Copies the selected data displayed in the PowerTerm work area to the Clipboard. Equivalent to Edit/Copy.
Paste From Clipboard: Pastes data from the Clipboard to the host application. Equivalent to Edit/Paste.
Print: Prints selected text or the entire contents of the work area. Equivalent to File/Print Screen.
PowerTerm Series User’s Guide
22
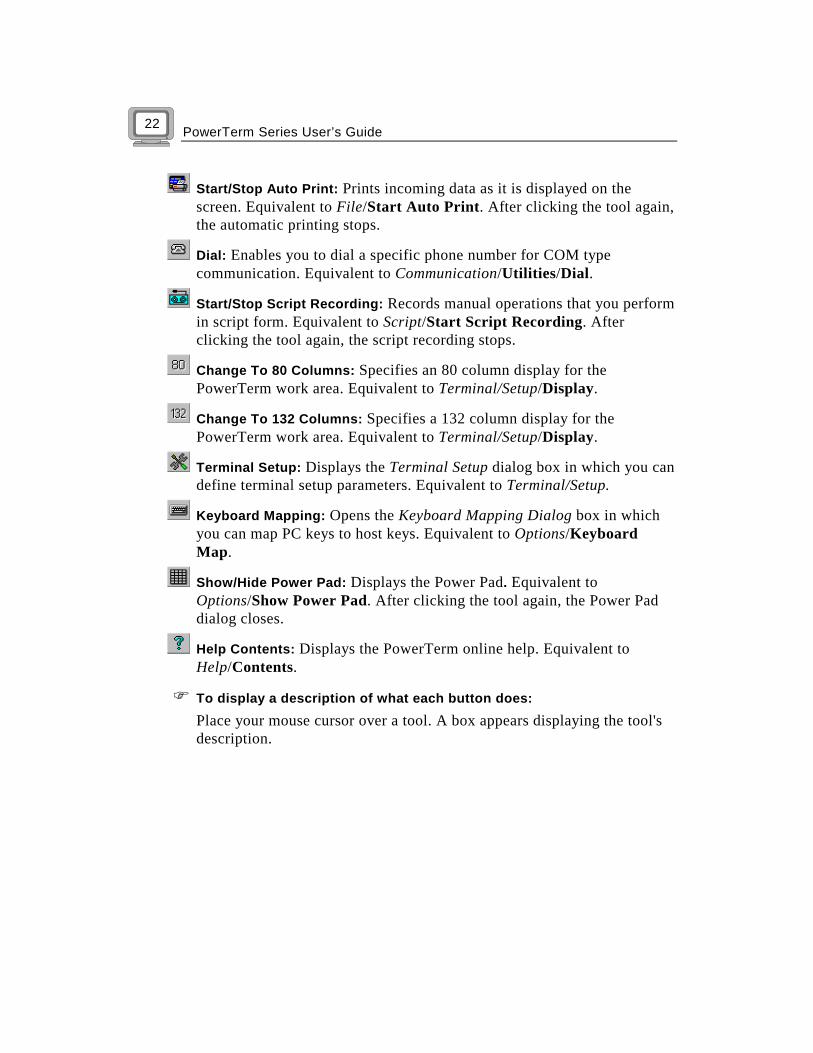
Start/Stop Auto Print: Prints incoming data as it is displayed on the screen. Equivalent to File/Start Auto Print. After clicking the tool again, the automatic printing stops.
Dial: Enables you to dial a specific phone number for COM type communication. Equivalent to Communication/Utilities/Dial.
Start/Stop Script Recording: Records manual operations that you perform in script form. Equivalent to Script/Start Script Recording. After clicking the tool again, the script recording stops.
Change To 80 Columns: Specifies an 80 column display for the PowerTerm work area. Equivalent to Terminal/Setup/Display.
Change To 132 Columns: Specifies a 132 column display for the PowerTerm work area. Equivalent to Terminal/Setup/Display.
Terminal Setup: Displays the Terminal Setup dialog box in which you can define terminal setup parameters. Equivalent to Terminal/Setup.
Keyboard Mapping: Opens the Keyboard Mapping Dialog box in which you can map PC keys to host keys. Equivalent to Options/Keyboard Map.
Show/Hide Power Pad: Displays the Power Pad. Equivalent to Options/Show Power Pad. After clicking the tool again, the Power Pad dialog closes.
Help Contents: Displays the PowerTerm online help. Equivalent to Help/Contents.
! To display a description of what each button does: Place your mouse cursor over a tool. A box appears displaying the tool's description.

Chapter 2, The PowerTerm Window
he PowerTerm
Window
T
23
Hot Keys Hot keys are keyboard keys that you can press instead of choosing menu commands. These hot keys refer to your standard PC keyboard keys, before they are mapped to terminal keys. Once hot keys are mapped, they lose their original function and reflect the newly mapped terminal key. For example, if you map <Alt F4> to the <Backspace> key on the terminal keyboard, it performs the function of a <Backspace> key. The following table lists the default PowerTerm hot keys:
Alt F4 Exit.
Alt F6 Open new terminal window.
Alt F9 Activate script.
Ctrl + Alt F9 Start/stop recording script.
Alt F10 Select screen.
Alt F11 Clear screen.
Alt F12 Reverse screen.
Scroll Lock Hold screen.
Pause Change the cursor shape.
Ctrl Up Arrow Scroll up one line.
Ctrl Down Arrow Scroll down one line.
Ctrl Home Scroll to beginning of the history buffer.
Ctrl End Scroll to end of the history buffer.
Ctrl Page Up Scroll up one page.
Ctrl Page Down Scroll down one page.
Shift + Ctrl + X Switches focus to session X, where X is the session letter (A…Z) displayed in the PowerTerm window Title bar.
Ctrl + Spacebar Switch between sessions to access the next active session.

PowerTerm Series User’s Guide
24
Manipulating Desktop Components PowerTerm enables you to customize the PowerTerm window by hiding or displaying desktop components and changing the display colors for different text attributes.
! To show/hide the Menu bar: On the Options menu, click Hide Menu. This removes the menu bar altogether. To restore the Menu bar, click the control menu box, then click Restore Menu.
! To show/hide the Soft buttons: On the Options menu, click Hide Buttons. The menu option becomes Show Buttons. You can click it to redisplay the Soft buttons bar.
! To show/hide the Status bar: On the Options menu, click Hide Status Bar. The menu option becomes Show Status Bar. You can click it to redisplay the Status bar.
! To show/hide the Toolbar: On the Options menu, click Hide Tool Bar. The menu option becomes Show Tool Bar. You can click it to redisplay the Toolbar.
! To show/hide the Power Pad: On the Options menu, click Show Power Pad to display the Power Pad. The menu option becomes Hide Power Pad. You can click it to hide the Power Pad.
! To show/hide the History Scroll bar: This option is only available for non-IBM emulations.
1. On the Terminal menu, click Setup. The Terminal Setup dialog box is displayed.
2. Click the Display tab.

Chapter 2, The PowerTerm Window
he PowerTerm
Window
T
25
3. Click the History Scroll Bar checkbox to select it. Click again to deselect it.
4. Click OK to close the Terminal Setup dialog box. The PowerTerm window is redisplayed with the history scroll bar displayed or removed, as selected.
! To change the display color of the PowerTerm window: 1. From the Terminal menu, select Setup. The Terminal Setup dialog
box is displayed. 2. Click the Colors tab. 3. Click the attribute for which you want to define foreground and
background colors. Notice that the attributes change according to the emulation type you selected previously.
4. In the Text area, click the color that you want to apply to the text (foreground) of the display.
5. In the Background area, click the color that will apply to the background of the text. In non-IBM emulations, the Select Attribute of the entire screen is generally Normal. The color for the Normal attribute determines the color of the entire work area. The box above the Select Attribute parameter shows the result of your selections.
6. Click OK to close the Terminal Setup dialog box and display the PowerTerm window in the selected colors.
! To disable/enable underline: If data is transmitted with the Underline attribute, you can disable the underline by clearing this parameter. 1. From the Terminal menu, select Setup. The Terminal Setup dialog
box is displayed. 2. Click the Colors tab. You can check the parameter to enable underlined characters.
! To disable/enable blink: If data is transmitted with the Blink attribute, you can disable blinking by clearing this parameter. 1. From the Terminal menu, select Setup. The Terminal Setup dialog
box is displayed. 2. Click the Colors tab.

PowerTerm Series User’s Guide
26
You can check the parameter to enable blinking. ! To disable/enable host colors:
1. From the Terminal menu, select Setup. The Terminal Setup dialog box is displayed.
2. Click the Colors tab. Check this parameter to disable the host color definitions and to work with your own (PC) color scheme.
Selecting Text The following are descriptions of specific text selection techniques that you may find useful in different emulations.
! To select a word: In the work area, you can select text using the mouse. Clicking a word selects the word. <Ctrl> + clicking a word selects the word and any punctuation marks or other symbols, up to the first space that follows them.
If the Automatic Copy option in the Edit menu is active (default), selecting text also copies the selection to the Clipboard.
! To select a block: A block is any section of the work area. In VT, point to one corner of the block, hold down the <Ctrl> key and drag the mouse to the opposite corner of the block. In 3270 and 5250, point to a line and drag the mouse to the last line you want to include in the selection.
! To select full lines: Point to a line, hold down the <Shift> key and drag the mouse to the last line you want to include in the selection.
! To select a string:
VT emulation: Point to the first character that you want to include in the selection. Drag the mouse to the last character that you want to include in the selection and release the mouse button. 5250 and 3270 emulations: Hold down the <Ctrl> key and drag.

Chapter 2, The PowerTerm Window
he PowerTerm
Window
T
27
! To select the entire screen:
From the Edit menu, select the Select Screen option.
! To select a menu entry: Double-clicking a word and pressing <Enter> (VT emulations only) sends the word to the host followed by an <Enter> signal. Use this feature to select a menu entry. For example, if the emulation screen displays the menu of an application residing on the host, click a menu entry to activate the program that the menu entry represents.
! To activate light pen support: In 3270 emulations, any double click on the screen is equivalent to touching the screen with a light pen.
PowerTerm Series User’s Guide 28
Chapter 3: Using PowerTerm This chapter provides step by step instructions for using PowerTerm. It outlines the PowerTerm workflow and provides a detailed explanation of each step.
! This chapter consists of the following topics: PowerTerm Workflow, page 29. Step 1: Starting PowerTerm, page 30. Step 2: Setting up your Working Environment, page 35. Step 3: Defining Settings For Terminal Emulation, page 49. Step 4: Defining Modem and Communication Settings, page 79. Step 5: Saving the Terminal Setup File, page 91. Step 6: Connecting to a Host, page 95. Step 7: Working with the Host, page 98. Step 8: Ending a PowerTerm Session, page 109. Step 9: Exiting PowerTerm, page 111.

Chapter 3, Using PowerTerm
sing PowerTerm
U
29
PowerTerm Workflow The diagram below illustrates the PowerTerm workflow. If you are familiar with accessing remote terminals, you may want to follow the procedure outlined in A Quick Guide through PowerTerm in Chapter 1: Introduction to PowerTerm. The following workflow provides a more detailed description of each step involved in using PowerTerm. The remainder of this chapter is divided into the steps listed below:
Step 5
Step 6
Step 3
Step 4
Set the Equalizer CurveStep 1
Set the Equalizer CurveStep 2
Step 7
Starting PowerTerm
Setting up yourworking environment
Defining settings forterminal emulation
Defining modem andcommunication settings
Saving the terminal setup file
Connecting to a host
Working with the host
Step 8
Exiting PowerTerm
Ending aPowerTerm session
Step 9
PowerTerm Series User’s Guide 30
Step 1: Starting PowerTerm
! To start PowerTerm in Windows 95/98/2000/NT/XP:
1. Click the Start button. 2. Point to Programs and select the Ericom Software. 3. Point to PowerTerm and select PowerTerm. The PowerTerm
window is displayed.
When PowerTerm is used for the first time, the PowerTerm window is automatically displayed together with the Connect dialog box. After the connection parameters have been defined, the Connect dialog box is no longer automatically displayed when you open PowerTerm.
Chapter 3, Using PowerTerm
sing PowerTerm
U
31
Starting PowerTerm using a Setup File PowerTerm can be started using a default or customized setup file. A default setup file is used to connect to a single host, and a customized setup file for different terminal emulations. A setup file contains both communication session parameters and terminal setup parameters.
The setup file is in text format and can be edited using a text editor.
Starting PowerTerm with the Default Setup File
The PowerTerm default setup file is called PTDEF.PTS. When you open PowerTerm, it automatically uses this file to start the system. Auto Connect
The Auto Connect option enables you to automatically connect to a specific terminal using the parameters in the default setup (PTDEF.PTS) file. To access the Auto Connect option, select the Setup option from the Terminal menu. The Terminal Setup dialog box is displayed. Click the Preferences tab and select the Auto Connect option. For more information about this option, see the topic Preferences Properties Page on page 76.
Starting PowerTerm with a Customized Setup File
PowerTerm enables you to run a customized setup file from startup by using a command or creating a Windows shortcut. This accesses PowerTerm and the specific setup file. You can use this option to start PowerTerm with predefined communication and terminal setup parameters for a specific host.
Before you create a shortcut to a setup file, you first need to create and save the setup file in PowerTerm. For details about how to create and save a setup file, see Steps 3 to 5 in this chapter.
You can also select and open a terminal setup file during a PowerTerm session. For more information, see Step 6: Connecting to a Host.

PowerTerm Series User’s Guide 32
! To start PowerTerm using a customized setup file:
Applicable for Windows 95/98/NT/2000/XP.
1. Locate the PowerTerm shortcut (either on your desktop or in the Start Menu folder).
2. Right-click Properties. The PowerTerm Properties dialog appears:
Type the name
of the required
setup file here

Chapter 3, Using PowerTerm
sing PowerTerm
U
33
3. In the Target area, position your cursor after the “, type a space and then type the name of the required setup (.PTS) file. PowerTerm recognizes Windows file naming conventions, including spaces in a file name. If you have a setup file with a space in the name, for example Setup 1.PTS, PowerTerm ignores the space and looks directly for the .PTS extension.
In the event that the setup file is in a directory other than that of PowerTerm, type the entire path of the setup file.
4. Click OK. Next time PowerTerm window will be displayed using the parameters defined in the specified setup file.
Using a Setup File during a PowerTerm Session
You can also open a terminal setup file (.PTS) during a PowerTerm session to run a session using predefined terminal setup and communication parameters. PowerTerm provides two options to open a setup file: • By selecting the Open Terminal Setup option from the File
menu. The Open File dialog box is displayed in which you can select a setup file. For more information, see Step 5: Saving the Terminal Setup File, page 91.
• By selecting the Connect option from the Communication menu. The Connect dialog box is displayed in which you can specify the name of the Setup File to be run before communication is established. For more information, see Step 4: Defining Modem and Communication Settings, page 79.

PowerTerm Series User’s Guide 34
Starting PowerTerm using a Script
You can also launch PowerTerm and run a script immediately upon launching. Scripts are created with Power Script Language (PSL) and enable you to automate tasks. For example, you can use a script to automatically connect to a specific host. For more information, see the section Running a Script upon Startup, in Chapter 4: Scripts, page 237.
Chapter 3, Using PowerTerm
sing PowerTerm
U
35
Step 2: Setting Up your Working Environment This section provides a description of the basic operations that may be performed to set up and optimize the PowerTerm working environment for your usage. You can also customize the PowerTerm window to show or hide window components and change the display of the window. These options are all described in the section Manipulating Desktop Components in Chapter 2: The PowerTerm Window. PowerTerm enables you to emulate a host keyboard by assigning (mapping) PC keys to host keys. It furthermore provides two features, the Power Pad and Soft buttons, which enable you to automate commands. PowerTerm also enables you to save your keyboard and/or Power Pad settings in separate files and open them at a later date.
! To set up the PowerTerm work environment:
Mapping the PC Keyboard, page 36. Saving and Opening Keyboard Mapping Settings, page 39. Programming the Power Pad, page 41. Saving and Opening your Power Pad Settings, page 43. Programming Soft Buttons, page 45. Selecting Fonts, page 47.
PowerTerm Series User’s Guide 36
Mapping the PC Keyboard
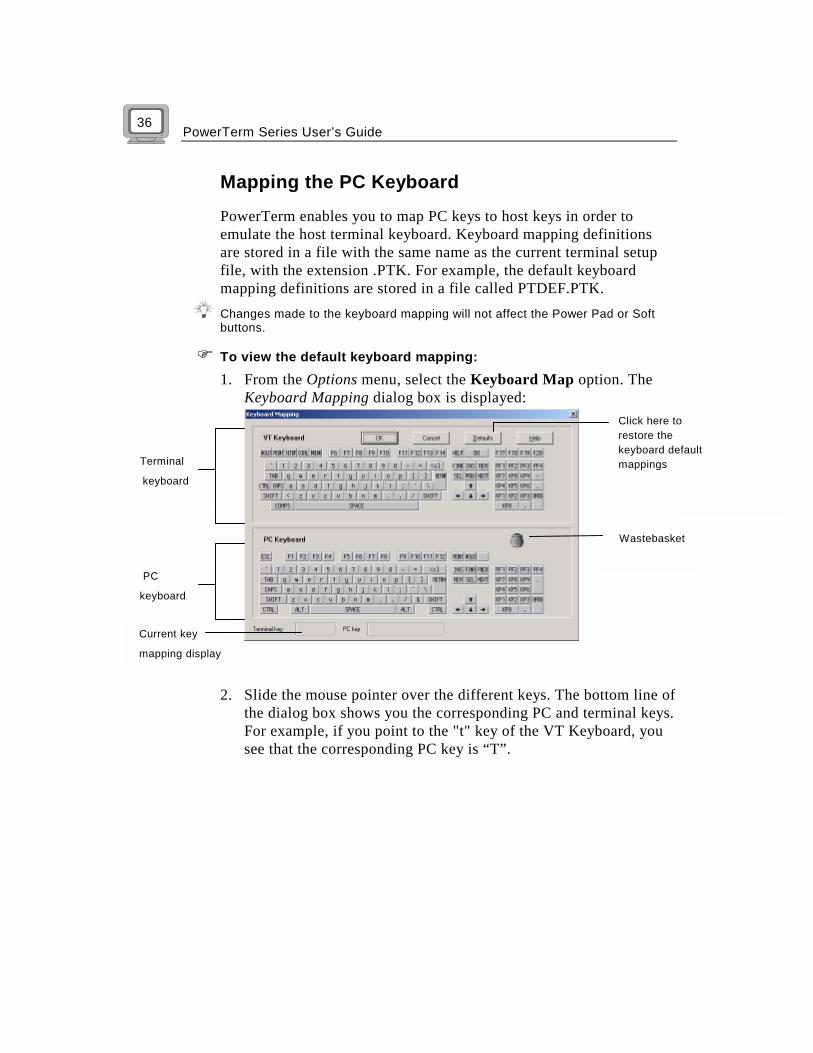
PowerTerm enables you to map PC keys to host keys in order to emulate the host terminal keyboard. Keyboard mapping definitions are stored in a file with the same name as the current terminal setup file, with the extension .PTK. For example, the default keyboard mapping definitions are stored in a file called PTDEF.PTK.
Changes made to the keyboard mapping will not affect the Power Pad or Soft buttons.
! To view the default keyboard mapping:
1. From the Options menu, select the Keyboard Map option. The Keyboard Mapping dialog box is displayed:
2. Slide the mouse pointer over the different keys. The bottom line of
the dialog box shows you the corresponding PC and terminal keys. For example, if you point to the "t" key of the VT Keyboard, you see that the corresponding PC key is “T”.
Terminal
keyboard
PC
keyboard
Click here to restore the keyboard default mappings
Wastebasket
Current key
mapping display
Chapter 3, Using PowerTerm
sing PowerTerm
U
37
! To map a PC key to a host key: In the Keyboard Mapping dialog box, drag a key from the upper terminal keyboard to a PC key on the lower keyboard.
Click the <Shift> or <Control> keys on the terminal keyboard to display additional key functions. For example, if you click the <Shift> key, the alphabet keys on the terminal keyboard are displayed in upper case. You can then map (drag) these keys to your PC keyboard keys.
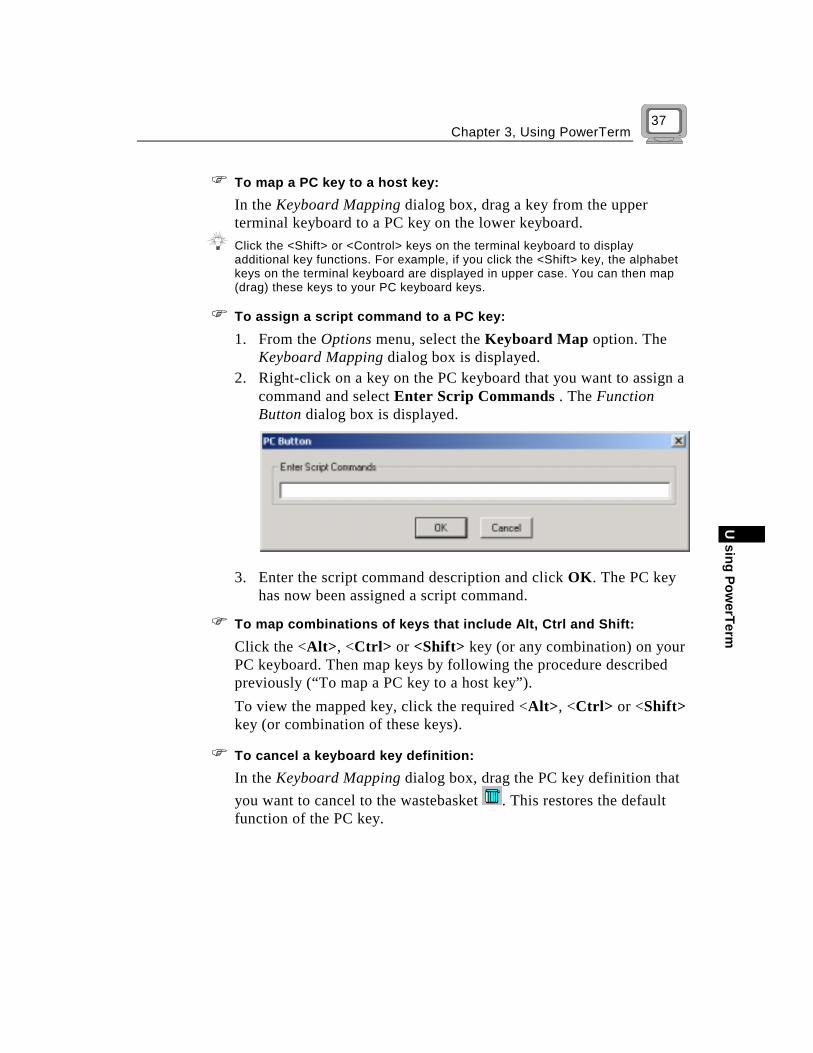
! To assign a script command to a PC key:
1. From the Options menu, select the Keyboard Map option. The Keyboard Mapping dialog box is displayed.
2. Right-click on a key on the PC keyboard that you want to assign a command and select Enter Scrip Commands . The Function Button dialog box is displayed.
3. Enter the script command description and click OK. The PC key has now been assigned a script command.
! To map combinations of keys that include Alt, Ctrl and Shift:
Click the <Alt>, <Ctrl> or <Shift> key (or any combination) on your PC keyboard. Then map keys by following the procedure described previously (“To map a PC key to a host key”). To view the mapped key, click the required <Alt>, <Ctrl> or <Shift> key (or combination of these keys).
! To cancel a keyboard key definition: In the Keyboard Mapping dialog box, drag the PC key definition that you want to cancel to the wastebasket . This restores the default function of the PC key.

PowerTerm Series User’s Guide 38
! To replace a PC key with another PC key: PowerTerm enables you to move the functionality of a mapped PC key to another PC key. For example, you can drag the F6 key on the PC keyboard to the spacebar on the PC keyboard to give F6 functionality to the spacebar. In the Keyboard Mapping dialog box, drag the required PC key onto the PC key that it will replace. This cancels the function of the original PC key. To cancel the replacement, drag the replaced key back to its original position.
! To copy a PC key to another PC key: PowerTerm enables you to copy the function of one PC key to another PC key. In the Keyboard Mapping dialog box, hold the <Ctrl> key while you drag the PC key whose function you want to copy to the required PC key. Both keys now have the same functionality.
! To restore the default keyboard mapping of all mapped keys:
In the Keyboard Mapping dialog box, click the Defaults button.

Chapter 3, Using PowerTerm
sing PowerTerm
U
39
Saving and Opening Keyboard Mapping Settings
PowerTerm enables you to save keyboard mapping settings in separate files and open them at a later date.
! To save keyboard mapping settings:
1. From the File menu, select Save Keyboard File. The Save Keyboard File dialog box is displayed:
2. Select the directory in which you want to save the file. 3. Enter a file name. The file extension .kbd is automatically added
to the file name. 4. Click Save. The keyboard mapping file is saved with the specific
file name.

PowerTerm Series User’s Guide 40
! To open predefined keyboard mapping settings:
1. From the File menu, select Open Keyboard File. The Open Keyboard File dialog box is displayed:
2. Select the directory in which the keyboard file is saved. 3. Select the required keyboard file from the files list. The file name
is highlighted. 4. Click Open. Parameters defined in the selected keyboard file are
now applied to the current session.

Chapter 3, Using PowerTerm
sing PowerTerm
U
41
Programming the Power Pad
The Power Pad is a floating keypad that contains buttons, which can be programmed to execute customized PSL scripts. You can also change their names and adjust the number of buttons displayed in the Power Pad.
The Power Pad enables you to customize PowerTerm, in addition to keyboard mapping and the Soft buttons. Changes made to the Power Pad will not affect keyboard mapping or Soft buttons.
Power Pad buttons are named by default F1, F2, F3, and so on, with a few default function names, such as Clear, Enter and Insert. Left-clicking on the F1 button is equivalent to sending F1 to the host.
! To program the Power Pad:
1. From the Options menu, select Show Power Pad or click . The Power Pad is displayed:
2. Right-click on the Power Pad button that you want to program.
The Power Pad Button dialog box is displayed:
3. Enter the Power Pad button description (the new name that will
appear on the Power Pad button) and click OK.

PowerTerm Series User’s Guide 42
The Power Pad Button dialog box is displayed containing a field to enter a script command or script commands separated by semicolons.
4. Enter the script command to be run by this Power Pad button. For
example, send <f13>, and click OK. The Power Pad button is now displayed with its new name.
Clicking on the Power Pad button will execute the newly defined script commands, for example, sending <F13> to the host. For more information, see the section Creating a Script in Chapter 4: Scripts.
! To adjust the number of buttons in the Power Pad:
You can display a maximum of 10 rows and 10 columns in the Power Pad. The default number of buttons is 9 rows and 4 columns.
1. From the Options menu, select Power Pad Setup. The Power Pad Setup dialog box is displayed:
2. Click on the dropdown box to select the number of rows or
columns that you want the Power Pad to contain.

Chapter 3, Using PowerTerm
sing PowerTerm
U
43
3. Click OK. The Power Pad is displayed with the number of rows and columns specified:
Saving and Opening Power Pad Settings
PowerTerm enables you to save your Power Pad settings in separate files and open them at a later date.
! To save your Power Pad settings:
1. From the File menu, select Save Power Pad File. The Save Power Pad File dialog box is displayed:

PowerTerm Series User’s Guide 44
2. Select the directory in which you want to save the file. 3. Enter a file name. The file extension .pad is automatically added
to the file name. 4. Click Save. The Power Pad file will be saved with the specific file
name.
! To open predefined Power Pad settings:
1. From the File menu, select Open Power Pad File. The Open Power Pad File dialog box is displayed:
2. Select the directory in which the Power Pad file is saved. 3. Select the required Power Pad file from the files list. 4. Click Open. Parameters defined in the selected Power Pad file are
now applied to the current session.
Chapter 3, Using PowerTerm
sing PowerTerm
U
45
Programming Soft Buttons
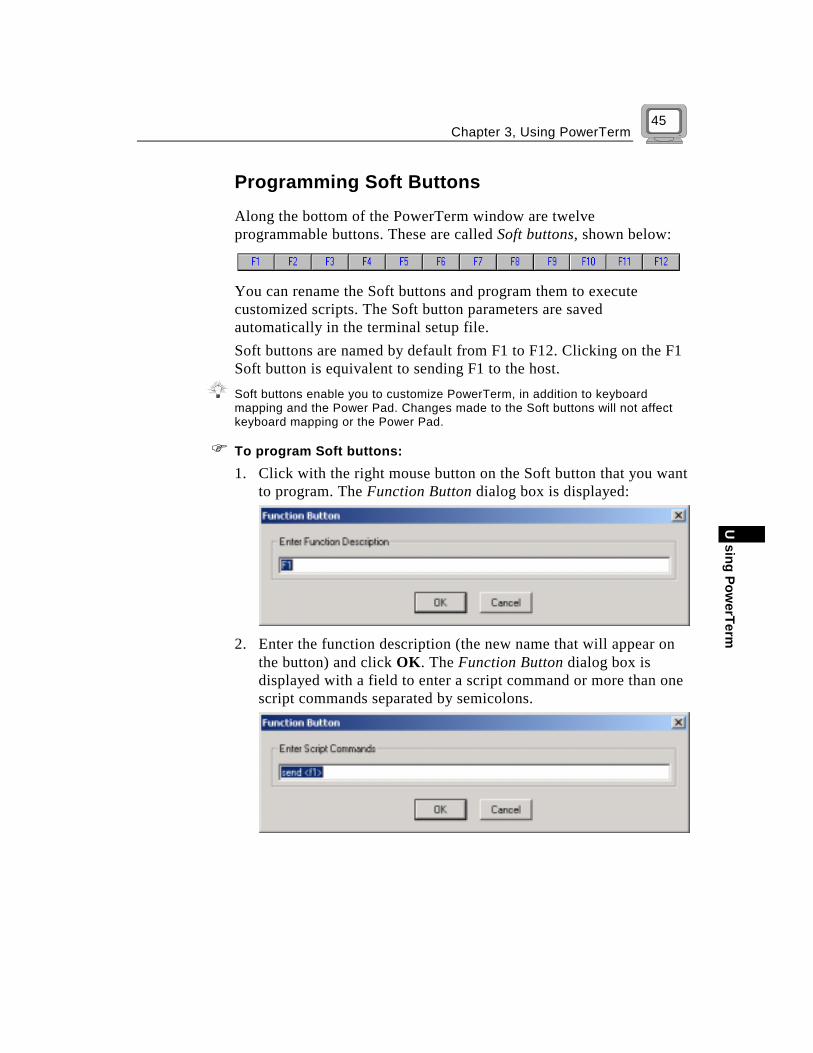
Along the bottom of the PowerTerm window are twelve programmable buttons. These are called Soft buttons, shown below:
You can rename the Soft buttons and program them to execute customized scripts. The Soft button parameters are saved automatically in the terminal setup file. Soft buttons are named by default from F1 to F12. Clicking on the F1 Soft button is equivalent to sending F1 to the host.
Soft buttons enable you to customize PowerTerm, in addition to keyboard mapping and the Power Pad. Changes made to the Soft buttons will not affect keyboard mapping or the Power Pad.
! To program Soft buttons: 1. Click with the right mouse button on the Soft button that you want
to program. The Function Button dialog box is displayed:
2. Enter the function description (the new name that will appear on
the button) and click OK. The Function Button dialog box is displayed with a field to enter a script command or more than one script commands separated by semicolons.

PowerTerm Series User’s Guide 46
3. Enter the script command to be run by this button. For example, exec notepad Click OK. The Soft button is now displayed with its new name.
Clicking on the Soft button will execute the newly defined script command. In the example, clicking the programmed Soft button will open Notepad. For more information, see the section Creating a Script in Chapter 4: Scripts.

Chapter 3, Using PowerTerm
sing PowerTerm
U
47
Selecting Fonts
PowerTerm enables you to select the system fonts you want to be displayed in the PowerTerm window or use the default PowerTerm fonts. The default PowerTerm fonts are scaleable, so that if the window is made smaller, the font size is reduced in relation to the size of the window. System fonts remain the same size, no matter what the size of the window. When you select your own system fonts you can only select fixed size fonts, meaning fonts that are not scaleable. System fonts enable you to select a different language.
! To select PowerTerm fonts: From the Terminal menu, select the PowerTerm Fonts option. The PowerTerm window will now display PowerTerm fonts.
! To select system fonts: 1. From the Terminal menu, select the System Fonts option. The
Font dialog box is displayed:

PowerTerm Series User’s Guide 48
2. Define the system font parameters by selecting the font, style and
size required. 3. Click OK. The PowerTerm window will now display the system
font selected.
Chapter 3, Using PowerTerm
sing PowerTerm
U
49
Step 3: Defining Settings for Terminal Emulation (Terminal Settings) PowerTerm enables you to define the terminal settings for connecting to a host. Once you have defined terminal settings, you can save them as a setup file. A setup file can be activated at startup or opened manually during a PowerTerm session. This file is saved with a .PTS extension. The current communication parameters are saved in the communication setup file with the extension .PTC. The default setup file is PTDEF.PTC. For more information, see Step 4: Defining Communication Settings, page 79. The terminal settings provided by PowerTerm are listed below. A description of each option and the functions it performs can be found on pages that follow. Emulation, page 50, displays supported terminal emulations and enables you to select a terminal type. General, page 52, defines parameters for the terminal emulation type. Display, page 55, defines display settings for the PowerTerm window. Keyboard, page 59, defines keyboard setup parameters. Printer, page 63, defines printer parameters. Tabs, page 72, defines tab stops in the work area. Colors, page 73, defines color settings for the PowerTerm window. Preferences, page 76, defines parameters that determine PowerTerm behavior and automate processes. The options listed above can be accessed by selecting the Setup option from the Terminal menu. Each option is displayed in the format of a properties page in the Terminal Setup dialog box.
The parameters that you define will only remain active for the current session, unless you save them in a setup file. For more information, see Step 5: Saving the Terminal Setup File, page 91.

PowerTerm Series User’s Guide 50
Emulation Properties Page
The Emulation properties page displays the emulation terminal types available with this version of PowerTerm for selection. The emulation type that you select changes the tabs displayed in the Terminal Setup dialog box. Some emulation types change the look of the PowerTerm desktop. For example, for 3270 and 5250 terminal types the toolbar contains fewer options.
! To define settings for terminal emulation: 1. From the Terminal menu, select the Setup option. The Terminal
Setup dialog box is displayed. 2. Select the Emulation tab. The Emulation properties page is
displayed:
3. Select the terminal type that you require from the list of supported
emulations. If you select an IBM terminal type, the PowerTerm window changes to black
and the toolbar consists of fewer options.

Chapter 3, Using PowerTerm
sing PowerTerm
U
51
Once you have selected the emulation type, you need to define settings for each tab in the Terminal Setup dialog box. The remaining tabs on the Terminal Setup dialog box are described in this chapter.
The parameters that you define will only remain active for the current session, unless you save them in a setup file. For more information, see Step 5: Saving the Terminal Setup File, page 91.
PowerTerm Series User’s Guide 52
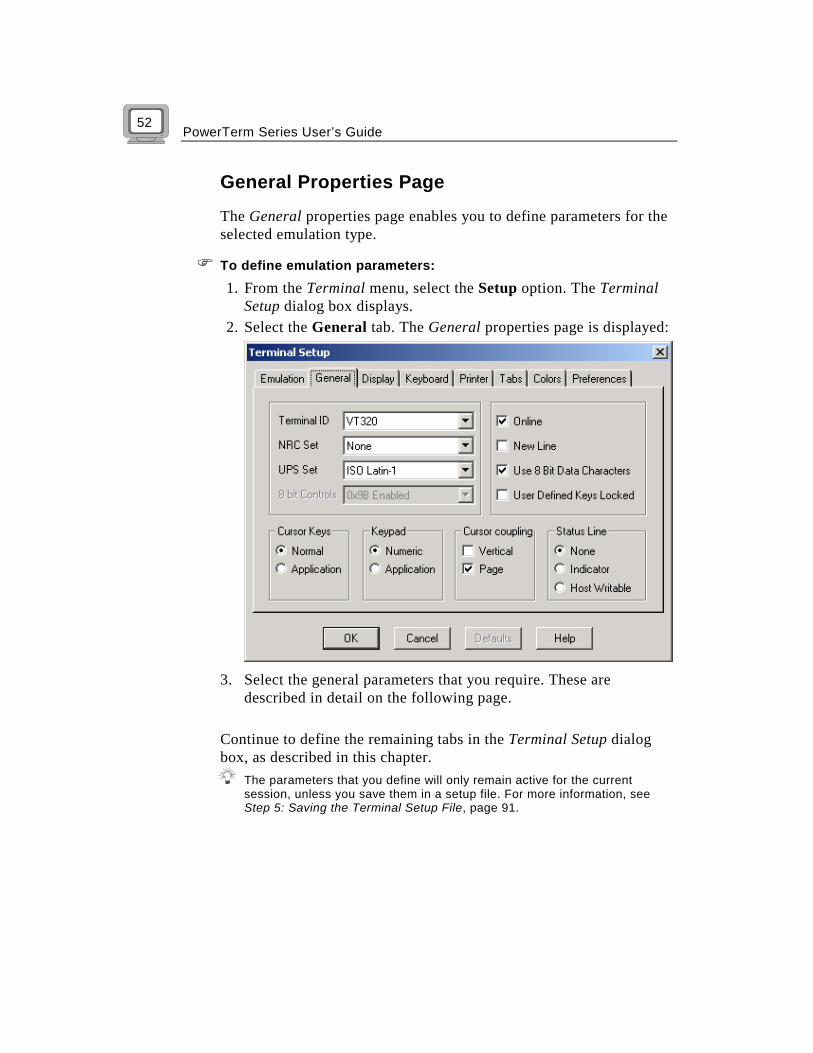
General Properties Page
The General properties page enables you to define parameters for the selected emulation type.
! To define emulation parameters:
1. From the Terminal menu, select the Setup option. The Terminal Setup dialog box displays.
2. Select the General tab. The General properties page is displayed:
3. Select the general parameters that you require. These are
described in detail on the following page. Continue to define the remaining tabs in the Terminal Setup dialog box, as described in this chapter.
The parameters that you define will only remain active for the current session, unless you save them in a setup file. For more information, see Step 5: Saving the Terminal Setup File, page 91.
Chapter 3, Using PowerTerm
sing PowerTerm
U
53
The parameters displayed in the General properties page are: The selected emulation will determine the parameters displayed.
Terminal ID: Determines the ID returned by the emulation program to the host. Make sure you select an ID that the host application recognizes. NRC Set: Determines the communication and keyboard character set for 7-bit data only. You can either select None or one of the languages available. UPS Set: Determines the communication and keyboard character set for 8-bit data only. Select one of the available languages. Online: This parameter is equivalent to selecting the On Line/Off Line button on the PowerTerm desktop. New Line: This parameter determines whether the <Enter> key generates only a carriage return or a carriage return/line feed combination. Use 8-Bit Data Characters: If the communicated data is in 8-bit character format, check this parameter. For 7-bit characters, clear this parameter. If this parameter is cleared, the 8th bit is truncated. If you receive 7-bit data, you can convert it to 8-bit data for printing on the slave printer. User Defined Keys Locked: This parameter determines whether applications on the host system can override your user-defined keys (UDKs) when you have defined a function key that conflicts with how the host wants to use this key. Locked prevents UDKs from being overridden. Unlocked allows them to be overridden. UDKs let you use a single key for multiple keystrokes. To program the 15 UDKs, 256 bytes are available. The key definitions are loaded sequentially (from F6 to F20), so that if you reach the 256-byte limit, more definitions cannot be loaded. Cursor Keys: This parameter determines whether the four arrow keys generate ANSI-standard control sequences for moving the cursor, or generate customized application program functions.
The selected host application will usually determine the default option.
Keypad: Determines the effects of the numeric keypad at the right of your keyboard.
PowerTerm Series User’s Guide 54
Numeric
Keypad keys insert numbers (For example, pressing the 7 on the numeric keypad is the same as typing a 7 on the keyboard).
Application Keypad keys generate control sequences which can be used by some applications.
The selected host application will usually determine the default option.
Cursor coupling: This parameter causes the cursor to remain visible during page scrolling.
The selected host application will usually determine the default option.
Status Line: The None option displays an emulation screen without a status line. Select Indicator to display the status line. Select Host Writable to display the status line sent by the host.
The selected host application will usually determine the default option.
Setup for 3270 and 5250 This section describes the parameters that are unique to the 3270 and 5250 emulation types. Their General properties page includes: General
ID Determines the ID returned by the emulation program to the host. Make sure you select an ID that the host application recognizes.
Unscaled Screen When this parameter is not checked, the characters appearing in the work area are scaled when you change the size of the desktop. Check this parameter if you want to disable this feature.
Show Response Time
Check this parameter if you want to display the number of seconds that elapsed between the time data was sent to the host and the host response time.
Cursor Ruler Use these parameters to display full-screen, vertical or horizontal lines as a cursor ruler.

Chapter 3, Using PowerTerm
sing PowerTerm
U
55
Cursor Use these parameters to control the cursor display. Experiment with each parameter to view the cursor display options available. Appearance Power GUI: Displays data in a window with 3D look and feel. Show Frame: Places a frame around the text area of the emulation. HLLAPI Names You can specify the short and long HLLAPI names. Code Page
You can specify the keyboard mode in which the correct key strokes (for a specific country or language's keyboard) are sent to the host. Alternate Size If you check the Enable parameter, you override the terminal alternate size. Type the required number of rows and columns.
PowerTerm Series User’s Guide 56
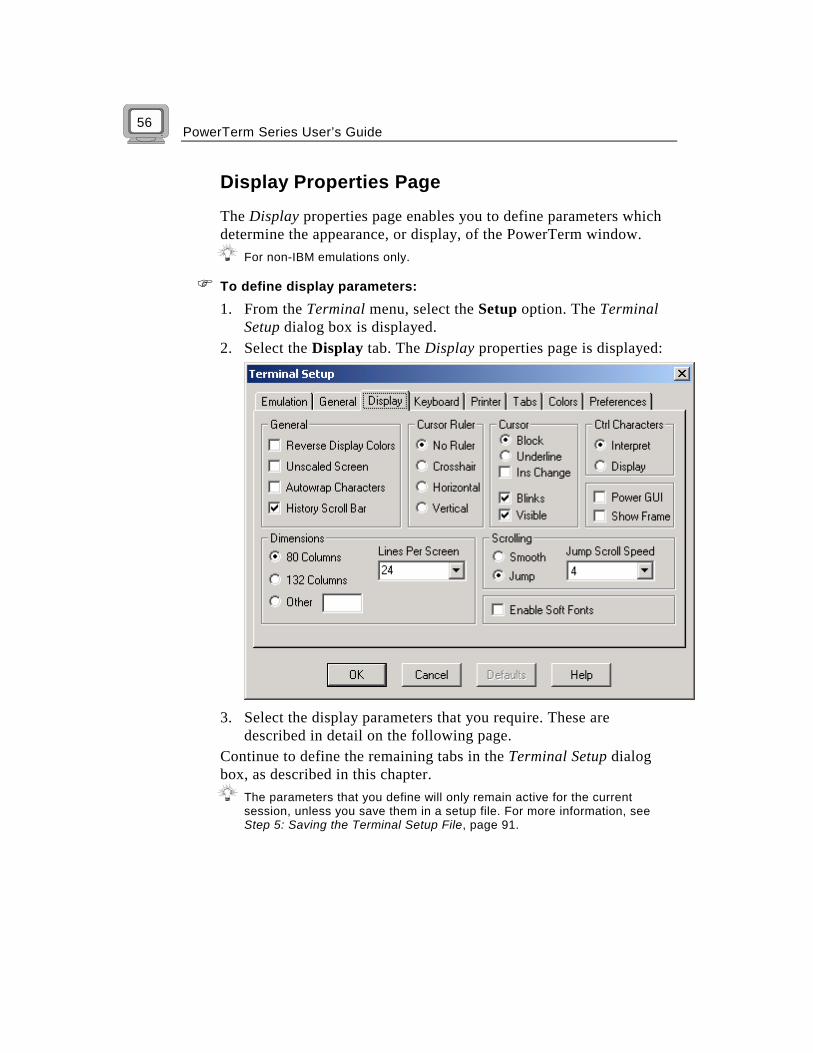
Display Properties Page
The Display properties page enables you to define parameters which determine the appearance, or display, of the PowerTerm window.
For non-IBM emulations only.
! To define display parameters:
1. From the Terminal menu, select the Setup option. The Terminal Setup dialog box is displayed.
2. Select the Display tab. The Display properties page is displayed:
3. Select the display parameters that you require. These are
described in detail on the following page. Continue to define the remaining tabs in the Terminal Setup dialog box, as described in this chapter.
The parameters that you define will only remain active for the current session, unless you save them in a setup file. For more information, see Step 5: Saving the Terminal Setup File, page 91.

Chapter 3, Using PowerTerm
sing PowerTerm
U
57
The parameters displayed in the Display properties page are: General
Reverse Display Colors
Reverses the text and background colors in the work area.
Unscaled Screen When this parameter is not checked, the characters appearing in the work area are scaled when you change the size of the desktop. Check this parameter if you want to disable this feature.
Autowrap Characters
Word wrapping occurs at the end of a line and the cursor moves to the next line.
History Scroll Bar For non-IBM emulations, the vertical history scroll bar is displayed along the right edge of the PowerTerm screen. This enables you to scroll through the data displayed previously on the screen. If the host transmits during scrolling, the display automatically scrolls back to its current position.
Cursor Ruler Use these parameters to display full-screen, vertical or horizontal lines as a cursor ruler. Cursor Use these parameters to control the cursor display. Experiment with each parameter to view the cursor display options available. Ctrl Characters The Interpret option displays normal text as affected by control characters. Click the Display option to actually display the control characters. Power GUI: Displays data in a window with 3D look and feel. Show Frame: Places a frame around the text area of the emulation.

PowerTerm Series User’s Guide 58
Dimensions Determines the number of characters (Columns) per displayed line, and the number of lines to be displayed in the work area. Characters are scaled according to the selected values. For example, if you select 132 Columns, PowerTerm displays 132 (small) characters across a single screen line.
Instead of choosing one of the standard options (80 and 132), you can type a different value in the Other box.
Scrolling Determines the pace at which data is displayed in the work area as it arrives. If you select Jump, you should determine the Jump Scroll Speed which is measured in number of line units. The higher the value, the faster the scrolling. Select Unlimited in the Jump Scroll Speed area to display data without delaying communication, or Page to scroll data by full screens. The Smooth option is equivalent to a Jump Scroll Speed of 1. Enable Soft Fonts: Enables you to work with VT soft fonts that are only available when working with a VT emulation. When VT soft fonts are enabled, fonts will be loaded from the host application.

Chapter 3, Using PowerTerm
sing PowerTerm
U
59
Keyboard Properties Page
The Keyboard properties page enables you to define keyboard parameters for your PC.
! To define keyboard parameters:
1. From the Terminal menu, select the Setup option. The Terminal Setup dialog box is displayed.
2. Select the Keyboard tab. The Keyboard properties page is displayed:
3. Select the keyboard parameters that you require. These are
described in detail on the following pages. Continue to define the remaining tabs in the Terminal Setup dialog box, as described in this chapter.
The parameters that you define will only remain active for the current session, unless you save them in a setup file. For more information, see Step 5: Saving the Terminal Setup File, page 91.
PowerTerm Series User’s Guide 60
The parameters displayed in the Keyboard properties page are: Backspace Key Sends: Determines what the <Backspace> key sends (a delete or an actual backspace). The following options are available:
Auto Repeat The repetitious display of the character whose key is being continuously pressed down.
Key Click If you check this box, a click sound is issued when you press a key on the keyboard.
Local Echo Determines whether keyboard input is displayed (echoed) on your screen. If Local Echo is selected, keyboard input is displayed even if the host system does not echo your input. If Local Echo is deselected, keyboard input is sent to the host system without being displayed on the screen (unless the host system echoes the characters).
Use Emulator Alt Keys
Check this parameter to make an <Alt> key perform the operation assigned to it by the emulated environment.
Margin Bell Determines whether the terminal sounds a bell tone when the cursor reaches the right margin.
Warning Bell Determines whether the terminal sounds a bell tone for operating errors, mail messages etc.
Use VT Keyboard Mode
Transforms your keyboard to Digital VT keyboard mode. In this mode, the PC keyboard operates as close to a VT keyboard as possible, and takes full advantage of LK450 Digital keyboards.
Use Shift Lock Simulates Shift Lock. When this parameter is checked, the entire keyboard moves to Shift Lock status. For example, if you type “a”, the keyboard issues “A”.

Chapter 3, Using PowerTerm
sing PowerTerm
U
61
Answerback Message: Enables you to specify an answerback message and how you want it displayed. Click the Clear button to delete the message. Click the Conceal button to hide the message (the message is not deleted). Click Clear to cancel the conceal command. Auto Answerback: Determines whether the terminal automatically sends the message to the host system after you make the connection. This is useful if your answerback message is a command to the host system. For example, when you initially connect to an OpenVMS system, you may want to start the MAIL utility by sending an answerback message of MAIL^M. You can also send an answerback message by pressing <Ctrl>+<F5> when the VT keyboard mode is ON.
Setup for 3270 and 5250 This section describes the parameters that are unique to the 3270 and 5250 emulation types. Their Keyboard properties page includes: Backspace Deletes
Check this parameter if you want to be able to delete characters by pressing the Backspace key.
Auto Repeat The repetitious display of the character whose key is being continuously pressed down.
Key Click If you check this box, a click sound is issued when you press a key on the keyboard.
Typeahead Check this parameter if you want to be able to type data ahead (before the host responds).
Use Emulator ALT Keys
Disables standard Windows Alt sequences, such as Alt+F4. If you check this parameter, an ALT sequence will perform the operation assigned to it by the emulated environment.
Use Shift Lock Check this parameter to simulate Shift Lock. When this parameter is checked, the entire keyboard moves to Shift Lock status. For example, if you type “a”, the keyboard issues “A”.

PowerTerm Series User’s Guide 62
Numpad Decimal Sends Comma
Determines whether the Numeric Pad sends a comma instead of a decimal.
Lock Numeric Field
Determines whether the keyboard is locked when you try to enter non-numeric data.
Non SNA System Wait
Determines whether the System Wait in the IBM 3270 emulation will act as a System Wait in a non SNA terminal.

Chapter 3, Using PowerTerm
sing PowerTerm
U
63
Printer Properties Page
The Printer properties page enables you to define printer parameters for your PC.
! To define printer parameters:
1. From the Terminal menu, select the Setup option. The Terminal Setup dialog box is displayed.
2. Select the Printer tab. The Printer properties page is displayed:
3. Select the printer parameters that you require. These are described
in detail on the following pages. Continue to define the remaining tabs in the Terminal Setup dialog box, as described in this chapter.
The parameters that you define will only remain active for the current session, unless you save them in a setup file. For more information, see Step 5: Saving the Terminal Setup File, page 91.

PowerTerm Series User’s Guide 64
Print Device This option allows you to select a printing output channel. The possibilities are: Option Sends the Output None No destination was assigned. Print Manager Sends to the standard Windows Print
Manager, in text mode. Device Sends to the device you designate in the
Device Name text box. For example, this can be a device such as prn, lpt1, com1. In the Device Name text box, you can also specify communication parameters. For example: COM1:9600,8.
File Sends to the file you type in the File Name text box. See the Device parameter below.
If you chose Print Manager or None as the option for Print Device, the Device File Name field will be disabled.
Device
Device File Name: If a file of the same name exists, you can choose to add the new data to it, or to create a new file. You can do this using the File Creation parameters. To add the data, click the Append option; to create a new file, click the Overwrite option. Use Form Feed: Adds a form feed (page eject) after each printing job, if you are printing to file. Print Line Graphics As Text: Converts line graphics to text. This speeds up printing on a slow dot-matrix printer. CR -> CRLF: Clicking this option in slave printing mode will add a line feed after each single carriage return (one that has no line feed following it).
Chapter 3, Using PowerTerm
sing PowerTerm
U
65
Print Screen Data Conversion: Converts data to IBM or Digital character sets. If you do not want to convert data, use the None option, or select Graphics from the dropdown list to print in Graphics mode.
Selecting the Graphics option will always send a print screen via the Print Manager in Graphics mode, regardless of the print device.
Slave Printer Data Conversion: Converts data to IBM or Digital character sets for slave printing. If you do not want to convert data, use the None option. Select the Graphics option from the dropdown list in order to print to a postscript printer. Slave Printer Job Delimiter: When printing in slave mode, the job delimiter character that you select here will divide the data into print jobs instead of escape sequences arriving from the host application. Delay for Print Closing (Seconds) The command to close the printer queue is delayed by the number of seconds that you determine. This command only takes effect if no open command is issued in the meantime. Important for printing to cut sheet printers (e.g. inkjets/lasers) and network printers.
Advanced Printing
The Advanced Printer Setup window enables you to define printer parameters.
Non 5250 printing
! To set values for non-host print transform in non-graphic mode:
1. From the Printer properties page, click the Advanced Printing button. The Advanced Printer Setup dialog box is displayed:

PowerTerm Series User’s Guide 66
2. From the Printer/Type Model drop down list, select the desired
printer. If your manufacturer Printer Type and Model are not listed, then choose one
that is compatible.
3. You can use the initial printer values that appear in the Font, CPI, LPI, Printer Columns and Printer Rows combo boxes or override them by clearing the Ignore check box and selecting the desired value from the adjacent combo box.
Some printers do not support all of the possible values listed in the combo boxes.
4. Click OK when you have selected the required printer parameters.

Chapter 3, Using PowerTerm
sing PowerTerm
U
67
In Text mode:
Printer Type/Model : Specifies the destination printer. Ignore disables the combo box (LPI, CPI, Fonts, Printer Columns and Printer Rows) adjacent to it. LPI: Lines Per Inch. CPI: Characters Per Inch. Font: Specifies the name of desired font and its initial size to be applied to the output. This field’s accompanying check box is explained below:
Emulation Type Check Box Status Applied to Output
Selected Printer default font and size Non 5250 Ignore
Cleared User input
Selected Host font and size 5250 Use Host Value
Cleared User input
To select a font for your printer: ! Select the desired font from the Font dropdown list. Printer Columns: Determines the number of printer columns in the output. When the Ignore check box is selected, the number of columns on your emulation screen is applied to the output. Printer Rows: Determines the number of printer rows in the output. When the Ignore check box is selected, the default values for the specific emulation is applied to the output.
Text mode is designated in the Printer Property Page by setting the two data conversion combo boxes (Print Screen and Slave Printer) to None. In Graphics mode: The only relevant fields are Printer Columns and Printer Rows.
Non Graphic printing
Orientation: Specifies the orientation of the printed output. The default depends on your printer’s settings.
If you are in graphics mode, then select the desired orientation in the Print Setup dialog box.

PowerTerm Series User’s Guide 68
TN5250 Printing Session
! To set values for non-host print transform in non-graphic mode:
1. From the Printer properties page, click the Advanced Printing button. The Advanced Printer Setup dialog box is displayed:
2. From the Printer/Type Model drop down list, select the desired printer.
If your manufacturer Printer Type and Model are not listed, then choose one that is compatible.
Chapter 3, Using PowerTerm
sing PowerTerm
U
69
3. You can use the host values for the Font, CPI, LPI, Printer Columns and Printer Rows or override them by clearing the Use Host Value check box and selecting the desired value from the adjacent combo box.
Some printers do not support all of the possible values listed in the combo boxes.
4. Click OK when you have selected the required printer parameters. Printer Type/Model : Specifies the destination printer. Ignore disables the combo box (LPI, CPI, Fonts, Printer Columns and Printer Rows) adjacent to it. LPI: Lines Per Inch. CPI: Characters Per Inch. Font: Specifies the name of desired font and its initial size to be applied to the output. This field’s accompanying check box is explained below:
Emulation Type Check Box Status Applied to Output
Selected Printer default font and size Non 5250 Ignore
Cleared User input
Selected Host font and size 5250 Use Host Value
Cleared User input
To select a font for your printer: ! Select the desired font from the Font dropdown list. Printer Columns: Determines the number of printer columns in the output. When the Ignore check box is selected, the number of columns on your emulation screen is applied to the output. Printer Rows: Determines the number of printer rows in the output. When the Ignore check box is selected, the default values for the specific emulation is applied to the output. Orientation: Specifies the orientation of the printed output. The default depends on your printer’s settings.
PowerTerm Series User’s Guide 70
! To enable host print transform:
For IBM 5250 printer only.
1. Select the Enable Host Print Transform check box. 2. Select the manufacturer printer type and model from the Printer
Type/Model dropdown list. 3. Select the paper size from the Drawer 1 dropdown list. 4. Select the paper size from the Drawer 2 dropdown list. 5. Select the paper size from the Envelope Hopper dropdown list. 6. Specify whether the printer has Code Page 899 installed in the
Supports ASCII Code-Page 899 field. Additional steps for Other Printers: 8. Specify the Customizing Object. 9. Specify the Customizing Object’s Library.
Enable Host Printer Transform: Enables host to send to the emulation the printer specific format commands. If disabled, the host sends general format commands in which the emulation in turn, translates to printer specific commands.
You should use Host Printer Transform with non-graphic mode. Printer Type/Model : Specifies the destination printer.
Drawer 1: Specifies the size for the paper in Paper Source 1. The default depends on what you chose for the Printer Type/Model. Drawer 2: Specifies the size for the paper in Paper Source 2. The default depends on what you chose for the Printer Type/Model. Envelope Hopper: Specifies the size of the envelope. The default depends on what you chose for the Printer Type/Model. Supports ASCII Code-Page 899: Specifies whether the printer has Code Page 899 installed. Default: disabled.
Most printers do not have Code Page 899 installed.
Customizing Object: Specifies the object name which you had previously defined on the AS/400. Library: Specifies the customizing object’s library on the AS/400.

Chapter 3, Using PowerTerm
sing PowerTerm
U
71
The above fields are applicable when you have first defined a customizing object for your printer on the AS/400. Choose Other Printer from the Printer Type/Model dropdown list and the Customizing Object and Library fields become enabled.

PowerTerm Series User’s Guide 72
Tabs Properties Page
The Tabs properties page enables you to determine tabs in the work area. Tabbed data received from the host will be laid out in the work area according to ruler settings defined with this option.
This option is only displayed for VT terminal types.
! To define tab parameters:
1. From the Terminal menu, select the Setup option. The Terminal Setup dialog box is displayed.
2. Select the Tabs tab. The Tabs properties page is displayed:
3. Continue to define the remaining tabs in the Terminal Setup
dialog box, as described in this chapter. The parameters that you define will only remain active for the current
session, unless you save them in a setup file. For more information, see Step 5: Saving the Terminal Setup File, page 91.

Chapter 3, Using PowerTerm
sing PowerTerm
U
73
Tab parameters and their functions are: Tab Stops Set Every: PowerTerm enables you to set tab stops in the work area. Type a number and click the Set Every button. PowerTerm will set a tab stop in increments of that number. Alternatively, you can set tab stops manually by clicking anywhere you want within the ruler (Tab Stops) area. Clear All: Clears all tab stops.

PowerTerm Series User’s Guide 74
Colors Properties Page
The Colors properties page enables you to define the color of data displayed in the work area. Color definitions are stored in the terminal parameters (.PTS) file.
! To define color parameters for data displayed in the work area:
1. From the Terminal menu, select the Setup option. The Terminal Setup dialog box is displayed.
2. Select the Colors tab. The Colors properties page is displayed:
3. Select the parameters that you require. These are described in
detail on the pages that follow. 4. Continue to define the remaining tabs in the Terminal Setup
dialog box, as described in this chapter. The parameters that you define will only remain active for the current
session, unless you save them in a setup file. For more information, see Step 5: Saving the Terminal Setup File, page 91.
Preview Box: The box above the Select Attribute area shows the result of your selections. Experiment with various attributes until you see the result that you want, and then click OK.
Preview Box

Chapter 3, Using PowerTerm
sing PowerTerm
U
75
Enable Underline: Check this parameter to enable underlined characters. If data is transmitted with the Underline attribute, you can disable the underline by clearing this parameter. Enable Blink: Check the parameter to enable blinking. If data is transmitted with the Blink attribute, you can disable blinking by clearing this parameter. Disable Host Colors: Check this parameter if you want to disable the host color definitions and to work with your own (PC) color scheme. Show BMP: Specifies a Bitmap Screen as the Background in PowerTerm. The desired bitmap should be named pt_bg.bmp and should be copied to the PowerTerm folder. Select Attribute: Click the attribute for which you want to define foreground and background colors. Notice that the attributes change according to the emulation type you selected in the Emulation properties page for non-IBM emulations. Generally, the attribute of the entire screen is Normal. The color for the Normal attribute determines the color of the entire work area. Text: Click the color that will apply to the text (foreground) of the display. Background: Click the color that will apply to the background of the text.

PowerTerm Series User’s Guide 76
Preferences Properties Page
The Preferences properties page enables you to determine PowerTerm behavior and automate processes. They remain active until you change them. For example, if you select to connect automatically at PowerTerm startup, you will always be connected when you open PowerTerm, until you change this setting in the Preferences properties page.
! To define PowerTerm preferences:
1. From the Terminal menu, select the Setup option. The Terminal Setup dialog box is displayed.
2. Select the Preferences tab. The Preferences properties page is displayed:
3. Define the required preference parameters. These are described in
detail on the following pages. 4. Click OK to set the selected parameters and close the Terminal
Setup dialog box.

Chapter 3, Using PowerTerm
sing PowerTerm
U
77
The parameters that you define will only remain active for the current session, unless you save them in a setup file. For more information, see Step 5: Saving the Terminal Setup File, page 91.
On Terminal Setup File Open These parameters tell PowerTerm what to do when you start the PowerTerm program. The following options are available: Auto Connect Connection is established immediately
with the parameters saved in the default setup file (PTDEF.PTS).
Show Connect Dialog Box
Connection is not established immediately. The Connect dialog box opens, enabling you to select the connection parameters that you require.
Do not Connect The PowerTerm window opens. You decide what to do.
Window Title
This parameter enables you to give the currently active window a name of your choice.
History Buffer
This parameter specifies the size of the buffer in which data is stored, by selecting an option from the dropdown list.
On PowerTerm Exit
The following options are available:

PowerTerm Series User’s Guide 78
Save Terminal Setup The new terminal parameters (if you changed them) are saved to the current terminal setup file. Select either Save Terminal Setup or Confirm Save or none.
Confirm Save Terminal parameters are not saved automatically. PowerTerm displays a dialog box where you can decide whether or not to save. Select either Save Terminal Setup or Confirm Save or none.
Save Window Size & Position
Saves the size and position of the emulation window. The next time you open PowerTerm, the same window appears.
Confirm Disconnect Session
If you close PowerTerm during a session, you will be requested to confirm disconnect.
Inactivity Timeout: Specifies the time limit for keyboard inactivity, after which time PowerTerm shuts down.
On Session Exit These parameters determine what to do when you exit a session. Auto Reconnect: Re-establishes communication. Auto Exit PowerTerm: Closes PowerTerm altogether.

Chapter 3, Using PowerTerm
sing PowerTerm
U
79
Step 4: Defining Modem and Communication Settings Modem settings enable you to add customized modem definitions and edit initialization strings by selecting a modem from a list of existing modems. Communication setting enables you to define the session type, session parameters and select the script file and setup file. Communication and terminal settings are both saved to a setup (.PTS) file. This file can be used on PowerTerm startup (see Step 1: Starting PowerTerm, page 30), or opened during a PowerTerm session (see Step 5: Saving the Terminal Setup File, page 91).
All sessions in the sessions list are saved in the PTCOMM.INI file.
! To define modem settings:
1. From the Communication menu, select Modem Setup. The Modem Setup dialog box is displayed:
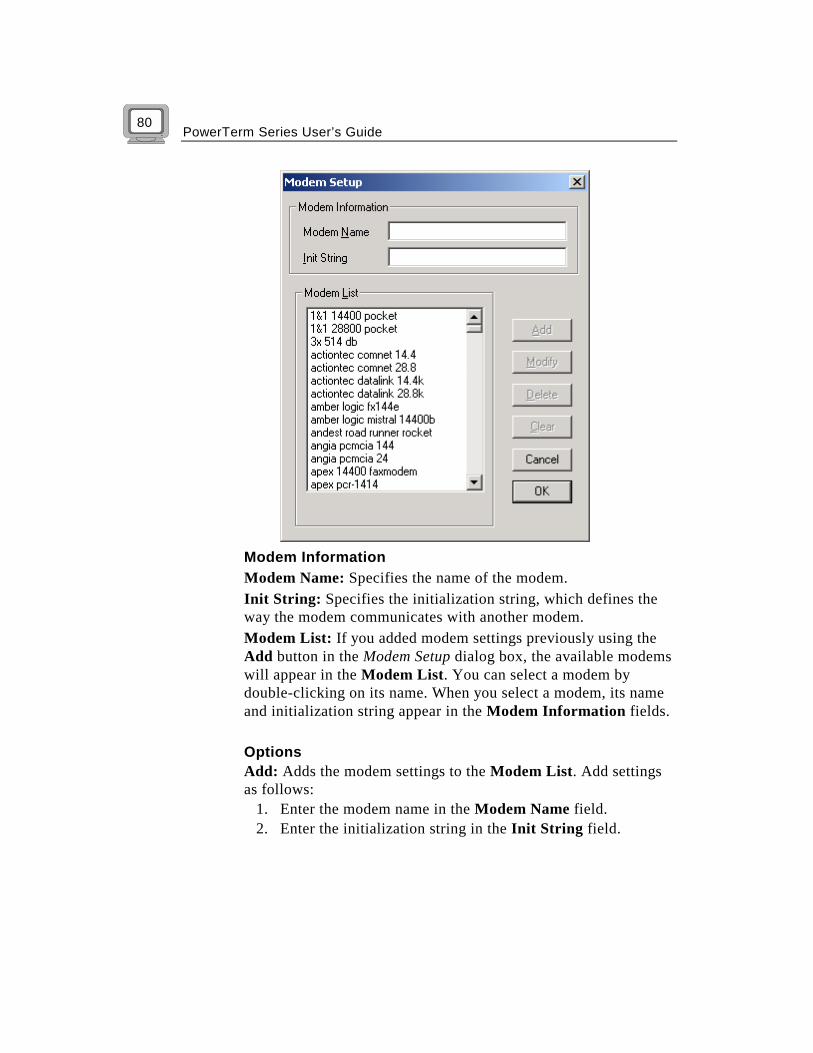
PowerTerm Series User’s Guide 80
Modem Information Modem Name: Specifies the name of the modem. Init String: Specifies the initialization string, which defines the way the modem communicates with another modem. Modem List: If you added modem settings previously using the Add button in the Modem Setup dialog box, the available modems will appear in the Modem List. You can select a modem by double-clicking on its name. When you select a modem, its name and initialization string appear in the Modem Information fields. Options Add: Adds the modem settings to the Modem List. Add settings as follows:
1. Enter the modem name in the Modem Name field. 2. Enter the initialization string in the Init String field.

Chapter 3, Using PowerTerm
sing PowerTerm
U
81
3. Click Add. The new modem settings appear in the Modem List.
Modify: Updates the data entered in the Modem Information fields for the selected modem in the Modem List. Modem settings are modified as follows: 1. Select the modem you want to modify from the Modem List. 2. Clear the Modem Information fields, as described above. 3. Enter the new parameters in the Modem Name and Init
String fields. 4. Click the Modify button. The Modem Information fields of
the selected modem are updated. Delete: Deletes settings for a modem. You can delete a modem as follows: 1. Select the modem to delete from the Modem List. The
parameters of the selected modem appear in the Modem Information fields.
2. Click the Delete button. A confirmation message is displayed. 3. Click OK to delete the selected modem from the Modem List. Clear: Clears the Modem Information fields for the selected modem. You can clear the Modem Information fields as follows: 1. Select the modem from the Modem List. The parameters of
the selected modem appear in the Modem Information fields. 2. Click the Clear button. The Modem Information fields are
cleared, and you can redefine this information for the defined modem.
Click OK once you have selected the required modem settings. You can now define your communication settings.
! To define communication settings:
1. From the Communication menu, select Connect. The Connect dialog box is displayed:

PowerTerm Series User’s Guide 82
Available session types differ according to the selected terminal emulation.
2. Select a terminal type from the dropdown list.
3. Click a session type. For each session type, PowerTerm displays a set of session parameters on the right side of the dialog box (some types have identical parameters). For example, under a VT session, you will see TELNET.
4. Click OK once you have selected the required communication parameters. You can now connect to a host. For more information see Step 6: Connecting to a Host, page 95.
Click here to browse for a script (.PSL) file
Click here to browse for a setup (.PTS) file
Define session parameters
Click here to select a session

Chapter 3, Using PowerTerm
sing PowerTerm
U
83
Session Type Session Type Description TELNET Uses the Telnet protocol over TCP/IP for
network communication. For this session type, you must specify the host computer name or the IP address in the Parameter’s Host Name text box. You can also specify the TELNET port number (default 23). The WINSOCK.DLL file must be on the search path.
COM Uses serial communication with the PC's COM ports. For this type, you must define the baud rate, port number, parity, stop bits and flow control. Optionally, you can specify a phone (dial) number.
BAPI For TCP/IP connections with parameters similar to those of TELNET. Before you use this option, make sure you installed the BAPI support software on your PC.
CTERM Uses the DIGITAL CTERM protocol for network communication with a remote or local VAX/OpenVMS host via DIGITAL PATHWORKS 32. For this session type, you must specify the host computer name in the Parameter’s Node Name.
LAT Uses DIGITAL LAT protocol for network communication with a VAX/OpenVMS host via DIGITAL PATHWORKS 32. For this type, you must specify a service name and optionally a password if required.
TN3270 TELNET for 3270. Check the Use TN3270E Protocol box if you want to work with TELNET SNA extensions. You can also specify the LU name of the host (LU name or LU pool).
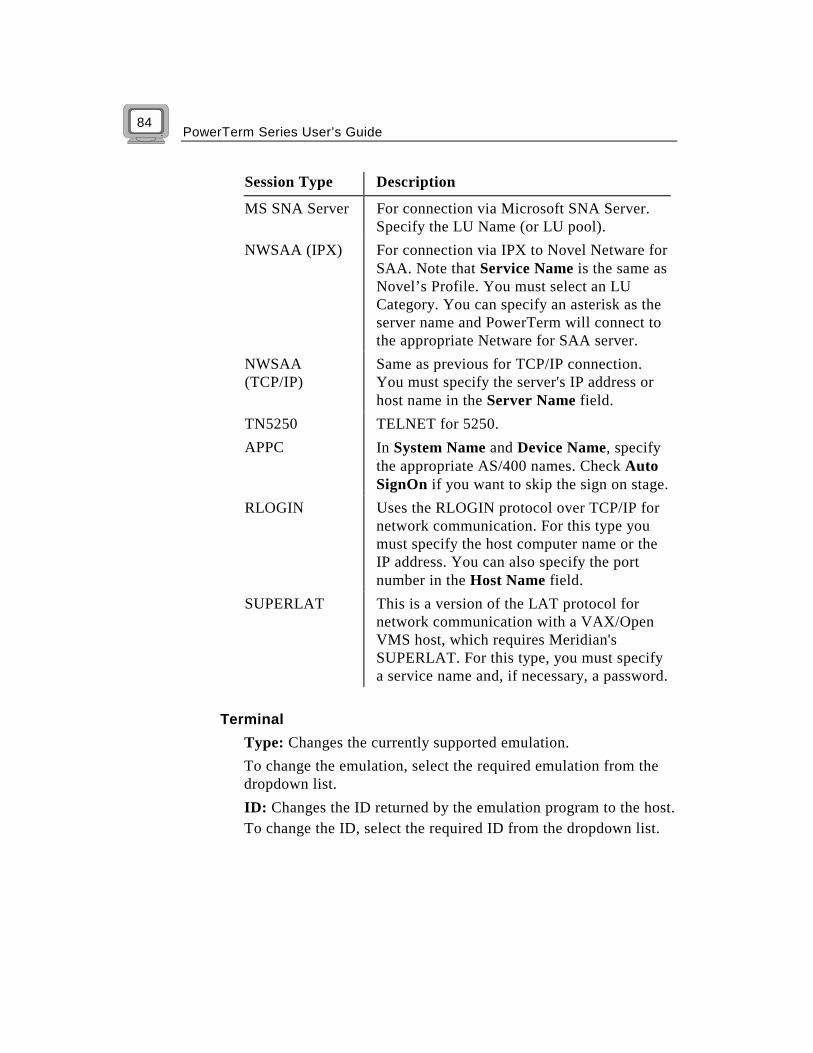
PowerTerm Series User’s Guide 84
Session Type Description
MS SNA Server For connection via Microsoft SNA Server. Specify the LU Name (or LU pool).
NWSAA (IPX) For connection via IPX to Novel Netware for SAA. Note that Service Name is the same as Novel’s Profile. You must select an LU Category. You can specify an asterisk as the server name and PowerTerm will connect to the appropriate Netware for SAA server.
NWSAA (TCP/IP)
Same as previous for TCP/IP connection. You must specify the server's IP address or host name in the Server Name field.
TN5250 TELNET for 5250. APPC In System Name and Device Name, specify
the appropriate AS/400 names. Check Auto SignOn if you want to skip the sign on stage.
RLOGIN Uses the RLOGIN protocol over TCP/IP for network communication. For this type you must specify the host computer name or the IP address. You can also specify the port number in the Host Name field.
SUPERLAT This is a version of the LAT protocol for network communication with a VAX/Open VMS host, which requires Meridian's SUPERLAT. For this type, you must specify a service name and, if necessary, a password.
Terminal Type: Changes the currently supported emulation.
To change the emulation, select the required emulation from the dropdown list. ID: Changes the ID returned by the emulation program to the host. To change the ID, select the required ID from the dropdown list.

Chapter 3, Using PowerTerm
sing PowerTerm
U
85
If the terminal type 5250 Display is selected, the Device Name field is enabled. Device Name: When using multiple sessions, each new session can be automatically given a new name, followed by the session number. For example, if the device name was Test, then the first session would be Test1, and the next Test2 and so on. To enter the device name, simply enter "devicename+" in the Device Name field and save the setup file. Dial Number: Specifies the number to be dialed by the modem before communication is established. To specify the dial number, either type it in the text box or click the browse button. The Quick Dial Setup dialog box, shown below, displays the modem list of available dial numbers.
Selecting a Quick Dial Number 1. Select the desired name from the Dial List.

PowerTerm Series User’s Guide 86
2. Click OK.
Adding a Quick Dial Number 1. Type the Name you want to appear in the Dial List. 2. Enter the Dial Number. 3. Click OK. Script File: Specifies the name of a script to be run before communication is established. To specify the file name, either type it in the text box or click the browse button. The Browse Login Script dialog box, shown below, displays the script files located in the PowerTerm directory.
Select a file and click Open.
By default, scripts are listed with a .PSL extension. You can, however, specify any name for your script. If your script file carries a different extension, you can list them by typing the extension (proceeded by an asterisk and a dot) in the File name text box, and then press the <Enter> key.
Setup File: Specifies the name of the setup file to be opened before communication is established.

Chapter 3, Using PowerTerm
sing PowerTerm
U
87
To specify the setup file name, either type it in the text box or click the browse button. The Browse Terminal Setup dialog box, shown below, displays the setup files located in the PowerTerm directory:
Select a file and click Open.
By default, scripts are listed with a .PTS extension. You can, however, specify any name for your script.
Sessions List If you saved session settings using the Save As button in the Connect dialog box, you will see the session names in this list. You can select a session by double-clicking its name. This establishes communication with the host. Note that as you select a session, its parameters appear in the dialog box. Connect: Connects to the host according to the displayed session parameters. Save As: Saves the current session settings.

PowerTerm Series User’s Guide 88
You can save a session as follows: 1. Define session parameters. 2. Click the Save As button. The Save Session dialog box is
displayed:
PowerTerm offers a default session name. You can overwrite this name
and specify your own session name. 3. Click OK. The session is displayed in the Sessions List. After saving a set of communication parameters from the Sessions List area, you can use it to start a communication session. Modify: Updates the selected session in the Sessions List area, with the data entered in the upper section of the dialog box. A session is modified as follows: 1. Select the session you want to modify from the Sessions List. 2. Enter the new parameters in the upper section of the Connect
dialog box. 3. Click the Modify button. Saves the new parameters for the
selected session. Delete: Deletes a session setting. You can delete a session as follows: 1. Select the session to delete from the Sessions List. 2. Click the Delete button. 3. A confirm message is displayed. Click OK to delete the
session setting.

Chapter 3, Using PowerTerm
sing PowerTerm
U
89
! To assign a device name to an AS/400 session:
1. From the Terminal menu, select Setup. The Terminal Setup window is displayed.
2. From the Emulation tab, select 5250 Display. 3. Click OK. 4. From the Communication menu, select Connect. The Connect
dialog box is displayed:
5. In the Host Name field enter the name of the AS/400 host. 6. In the Device Name field enter the device name for the emulation
session (up to a maximum of 10 characters). When using multiple sessions enter "devicename+" and each
session will be automatically assigned a new name. For example, if the device name entered was John+, then the first session will be John1, the second John2 and so on.
7. Click Connect.

PowerTerm Series User’s Guide 90
The AS/400 session begins and is assigned the device name specified above.

Chapter 3, Using PowerTerm
sing PowerTerm
U
91
Step 5: Saving the Terminal Setup File Once both terminal and communication settings have been defined, you can save them to a setup (.PTS) file. This file can be used to start PowerTerm, or opened manually during a PowerTerm session in order to define terminal and communication settings. PowerTerm asks you if you want to save setting changes to the currently loaded setup file. If you do not want to overwrite the parameters in the current setup file, save the settings under a different file name. You can also create an icon for your current PowerTerm settings, which can be accessed from the Windows Start menu, or by double-clicking on the icon on your desktop. Your session starts automatically with the desired parameters.
You can also save settings when you exit PowerTerm. For more information, see Step 9: Exiting PowerTerm, page 111.
! To save terminal settings to the current setup file:
From the File menu, select Save Terminal Setup. The current terminal settings are saved to the currently loaded terminal settings (.PTS) file.
This option overwrites parameters previously defined in the setup file.
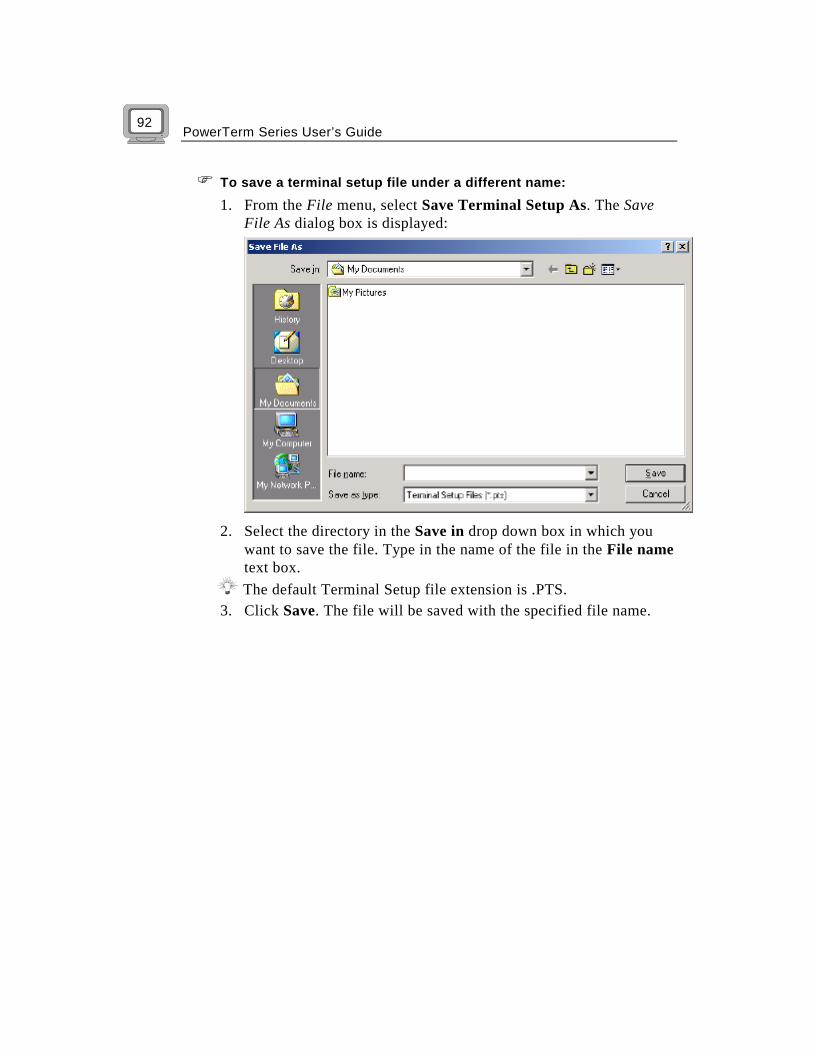
PowerTerm Series User’s Guide 92
! To save a terminal setup file under a different name:
1. From the File menu, select Save Terminal Setup As. The Save File As dialog box is displayed:
2. Select the directory in the Save in drop down box in which you
want to save the file. Type in the name of the file in the File name text box.
The default Terminal Setup file extension is .PTS. 3. Click Save. The file will be saved with the specified file name.

Chapter 3, Using PowerTerm
sing PowerTerm
U
93
! To save PowerTerm settings as an icon:
1. From the File menu, select Save As Icon. The Save As Icon dialog box is displayed:
2. Enter the Icon Information that you want to use for your icon.
The name of the setup file should be changed to avoid confusion. If you use the default name, PTDEF.PTS, these settings will become the default settings when PowerTerm is launched, if no other settings file has been specified.

PowerTerm Series User’s Guide 94
Opening a Setup File
Once you have created a setup file, you can open it in PowerTerm in order to connect to a host using the predefined terminal and communication parameters.
! To open a setup file:
1. From the File menu, select Open Terminal Setup. The Open File dialog box is displayed:
2. Select the directory in the Look in drop down list in which the
setup file is located. 3. Select the required setup file from the files list. 4. Click Open. Parameters defined in the selected setup file are now
available.

Chapter 3, Using PowerTerm
sing PowerTerm
U
95
Step 6: Connecting to a Host This step describes how to connect to a host once you have defined terminal and communication parameters, as described in Steps 4-5 of this chapter.
This option is not relevant if you started PowerTerm automatically with a terminal setup (.PTS) file (see Step 1: Starting PowerTerm, page 30) or with a script (.PSL) file (see Running a Script upon Startup, on page 237).
! To establish a connection:
1. From the Communication menu, select Connect. The Connect dialog box is displayed:
Click here to connect to a host
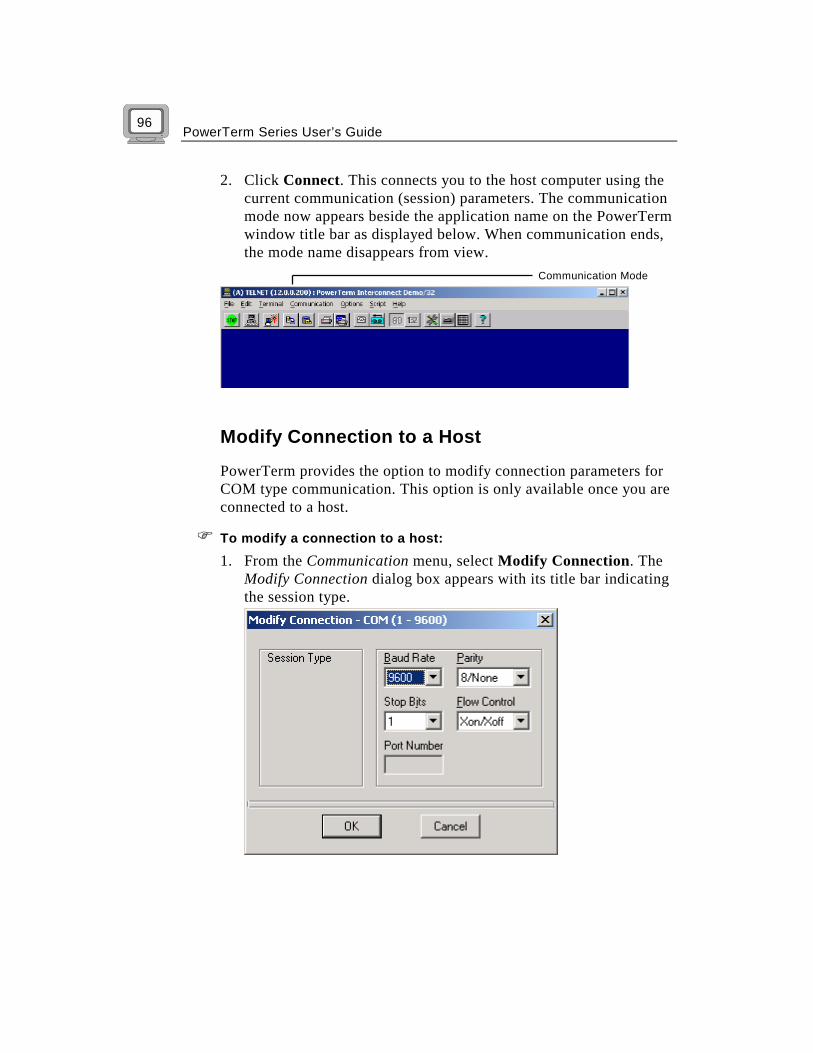
PowerTerm Series User’s Guide 96
2. Click Connect. This connects you to the host computer using the current communication (session) parameters. The communication mode now appears beside the application name on the PowerTerm window title bar as displayed below. When communication ends, the mode name disappears from view.
Modify Connection to a Host
PowerTerm provides the option to modify connection parameters for COM type communication. This option is only available once you are connected to a host.
! To modify a connection to a host:
1. From the Communication menu, select Modify Connection. The Modify Connection dialog box appears with its title bar indicating the session type.
Communication Mode

Chapter 3, Using PowerTerm
sing PowerTerm
U
97
2. Change the session parameters (but not the Session Type), and the
Script File as required. For more information see Step 4: Defining Modem and Communication Settings, page 79.
Automatically Connecting to the Host Using a PSL Script
When you are working with more than one host, PowerTerm enables you to connect to a host using a customized PSL script. For each host, you need to define a different script with the name of each host. This option provides you with a Windows shortcut to a host. For details of how to start PowerTerm using a customized setup file, see the section Running a Script upon Startup on page 237.
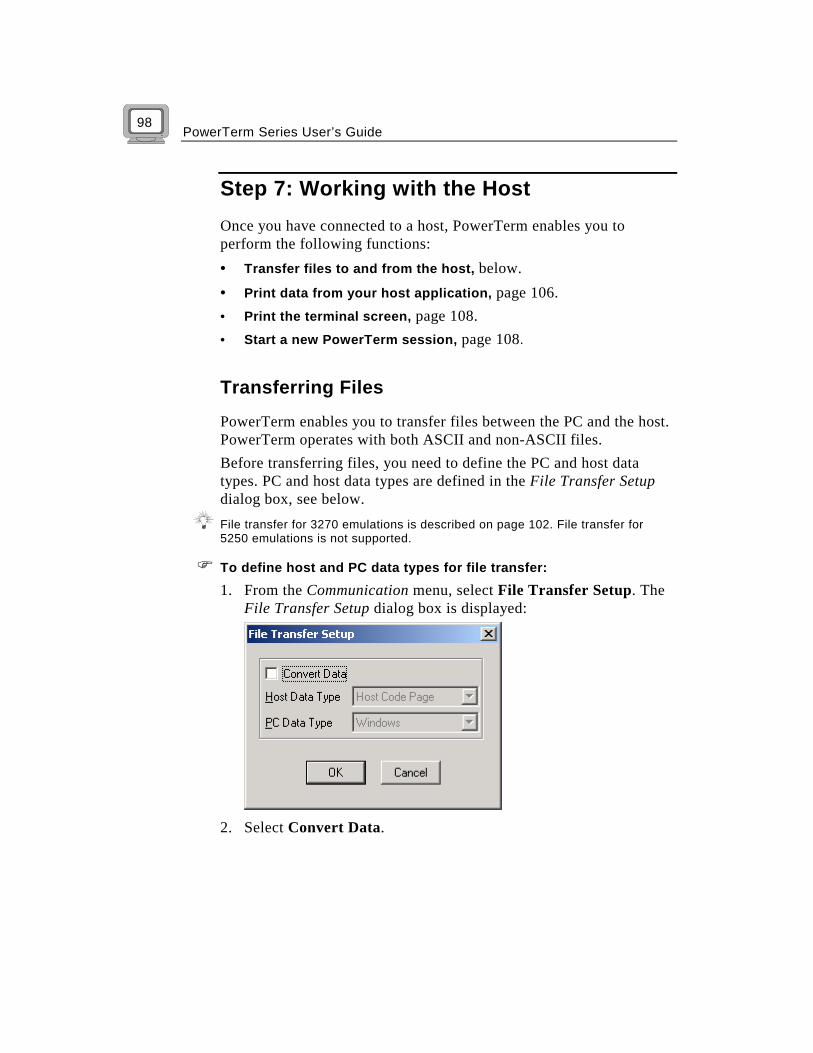
PowerTerm Series User’s Guide 98
Step 7: Working with the Host Once you have connected to a host, PowerTerm enables you to perform the following functions: • Transfer files to and from the host, below. • Print data from your host application, page 106. • Print the terminal screen, page 108. • Start a new PowerTerm session, page 108.
Transferring Files
PowerTerm enables you to transfer files between the PC and the host. PowerTerm operates with both ASCII and non-ASCII files. Before transferring files, you need to define the PC and host data types. PC and host data types are defined in the File Transfer Setup dialog box, see below.
File transfer for 3270 emulations is described on page 102. File transfer for 5250 emulations is not supported.
! To define host and PC data types for file transfer:
1. From the Communication menu, select File Transfer Setup. The File Transfer Setup dialog box is displayed:
2. Select Convert Data.
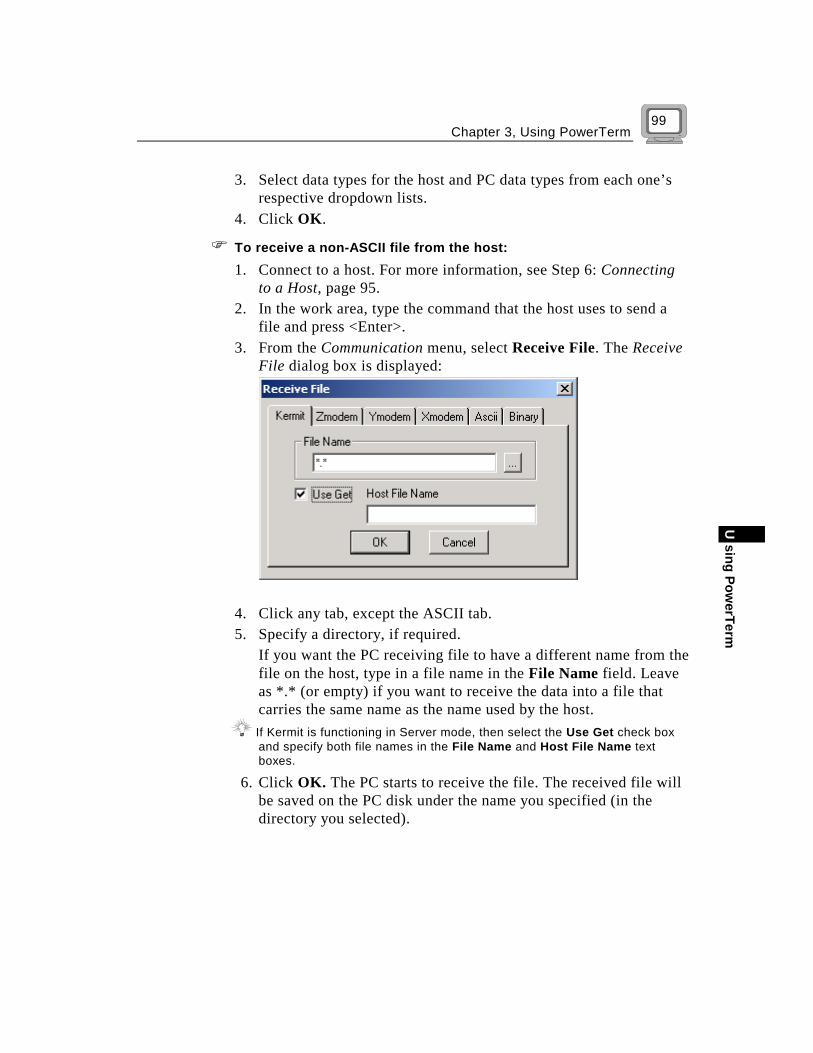
Chapter 3, Using PowerTerm
sing PowerTerm
U
99
3. Select data types for the host and PC data types from each one’s respective dropdown lists.
4. Click OK.
! To receive a non-ASCII file from the host: 1. Connect to a host. For more information, see Step 6: Connecting
to a Host, page 95. 2. In the work area, type the command that the host uses to send a
file and press <Enter>. 3. From the Communication menu, select Receive File. The Receive
File dialog box is displayed:
4. Click any tab, except the ASCII tab. 5. Specify a directory, if required.
If you want the PC receiving file to have a different name from the file on the host, type in a file name in the File Name field. Leave as *.* (or empty) if you want to receive the data into a file that carries the same name as the name used by the host.
If Kermit is functioning in Server mode, then select the Use Get check box and specify both file names in the File Name and Host File Name text boxes.
6. Click OK. The PC starts to receive the file. The received file will be saved on the PC disk under the name you specified (in the directory you selected).

PowerTerm Series User’s Guide 100
! To receive an ASCII file from the host: 1. Connect to a host. For more information, see Step 6: Connecting
to a Host, page 95. 2. In the work area, type in the command that displays the file (For
example: for UNIX, cat <filename>; for VAX, type <filename>). Do not press <Enter>.
3. From the Communication menu, select Receive File. The Receive File dialog box is displayed. 4. Click the ASCII tab.
5. In the File Name field, enter the name of the PC file that will
store the data, and click OK. 6. Press Enter to activate the command. 7. At the end of the capture process, select the Stop Receiving
ASCII File command from the Communication menu.
! To send a non-ASCII file from the PC to the host: 1. Connect to a host. For more information, see Step 6: Connecting
to a Host, page 95. 2. In the work area, type the host’s file reception command and press
<Enter>.
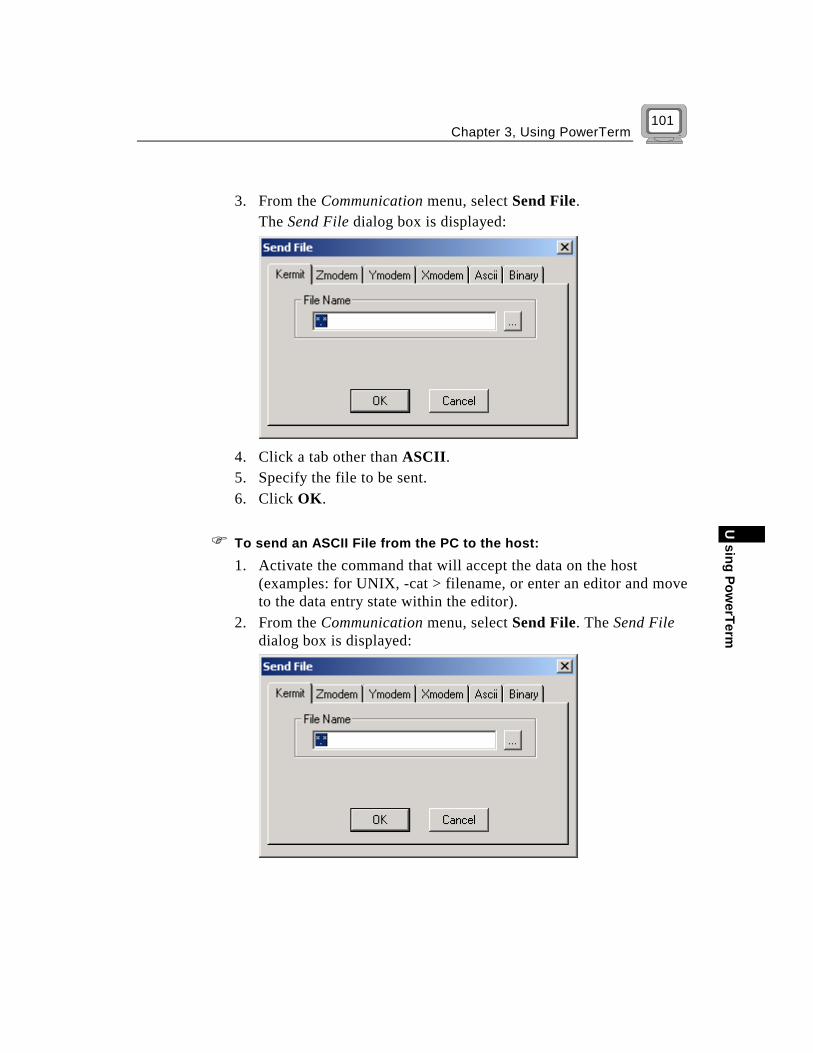
Chapter 3, Using PowerTerm
sing PowerTerm
U
101
3. From the Communication menu, select Send File. The Send File dialog box is displayed:
4. Click a tab other than ASCII. 5. Specify the file to be sent. 6. Click OK.
! To send an ASCII File from the PC to the host: 1. Activate the command that will accept the data on the host
(examples: for UNIX, -cat > filename, or enter an editor and move to the data entry state within the editor).
2. From the Communication menu, select Send File. The Send File dialog box is displayed:
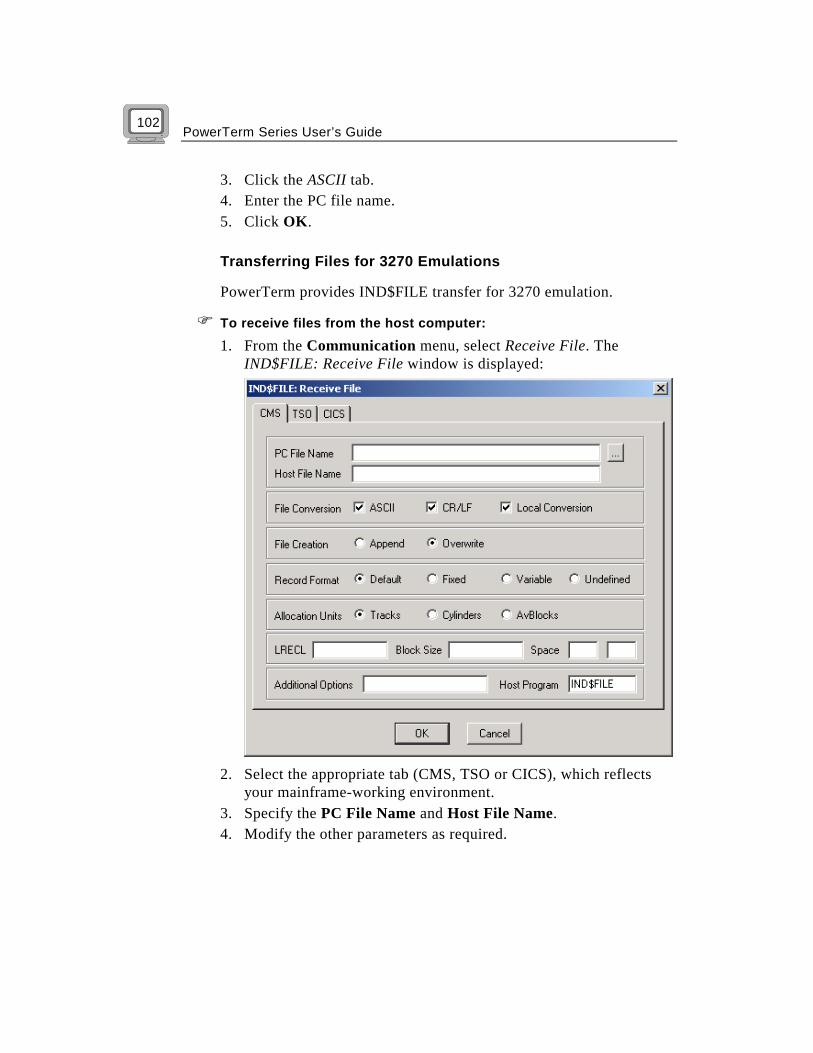
PowerTerm Series User’s Guide 102
3. Click the ASCII tab. 4. Enter the PC file name. 5. Click OK.
Transferring Files for 3270 Emulations
PowerTerm provides IND$FILE transfer for 3270 emulation.
! To receive files from the host computer:
1. From the Communication menu, select Receive File. The IND$FILE: Receive File window is displayed:
2. Select the appropriate tab (CMS, TSO or CICS), which reflects
your mainframe-working environment. 3. Specify the PC File Name and Host File Name. 4. Modify the other parameters as required.

Chapter 3, Using PowerTerm
sing PowerTerm
U
103
5. Click OK to start receiving the file. A File Transfer Status window with file transfer details is displayed. PC File Name: The name of the file that resides on the PC. Host File Name: The name of the file that resides on the mainframe.
The following parameters should be modified, if necessary:
File Conversion
ASCII: Specifies converting the file to ASCII format. CR/LF: Specifies deleting a carriage return character and a linefeed character from the end of each line of the file you are sending, or adding them to the end of each line of the file you are receiving from the host. For ASCII files (but not for binary files) CR/LF processing is typically appropriate. Local Conversion: Specifies converting the file according to the format specifications that appear in the above Host and PC boxes.
File Creation
Append: Specifies appending the transferred file onto the existing file of same name. Overwrite: Specifies that the transferred file overwrite the existing file of same name.
Record Format
Default: Specifies the Default Record Format for the file residing on the mainframe. Fixed: Specifies the Fixed Record Format for the file residing on the mainframe. Variable: Specifies Variable Record Format for the file residing on the mainframe. Undefined: Specifies Undefined Record Format for the file residing on the mainframe.

PowerTerm Series User’s Guide 104
Allocation Units
The primary and secondary Space (see below) allocations are measured in either track, cylinder or average block units. Each type is represented by one of the following fields: Tracks: Specifies Tracks as the allocation unit of disk space. Cylinders: Specifies Cylinders as the allocation of disk space. AvBlocks: Specifies the size (in blocks) for an average block.
Relevant only where you are using blocks as your allocation unit.
LRECL (Logical Record Length): Specifies the record size (in bytes) for the file being created on the host. For ASCII files, set this value to accommodate the longest line in your file. Range of values: 0 and 32768. Default: lines of up to 80 characters. Block Size: Specifies the block size (in bytes) for the file being created on the host. For files with fixed-length records, this value must be a multiple of the LRECL (Logical Record Length). Space: Specifies the size (in allocation units) of the primary (left box) and secondary (right box) allocation for the host file being created. In the event that the primary allocation is insufficient, then a secondary allocation is used. Additional Options: Specifies any parameters specific to the IND$FILE program on your host system. The contents of this text box are attached to the end of the transfer command. Host Program: Specifies the name of the host program to be utilized by PowerTerm to initiate a file transfer. The default and only valid choice: IND$FILE.

Chapter 3, Using PowerTerm
sing PowerTerm
U
105
! To send files to the host computer:
1. From the Communication menu, select Send File. The IND$FILE: Send File window is displayed:
2. Select the appropriate tab (CMS, TSO or CICS) which reflects
your mainframe working environment. 3. Specify the PC File Name and Host File Name. 4. Modify the other parameters as required. 5. Click OK to start sending the file. A File Transfer Status window
with file transfer details is displayed.
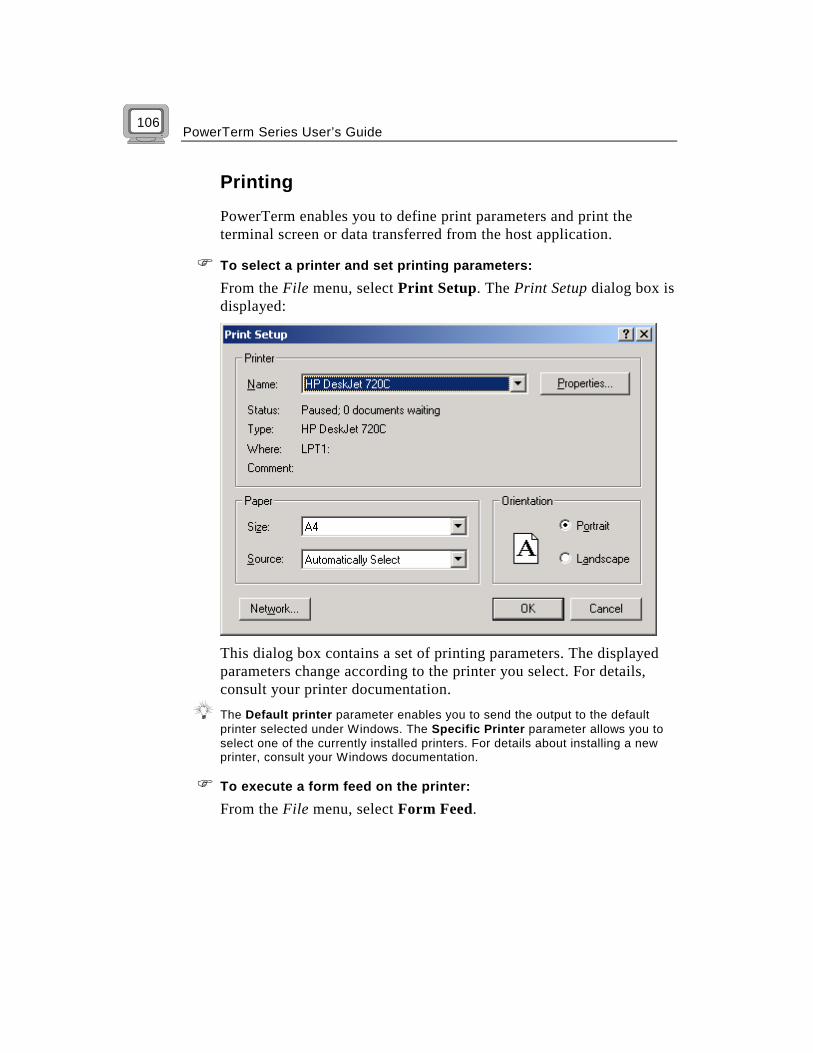
PowerTerm Series User’s Guide 106
Printing
PowerTerm enables you to define print parameters and print the terminal screen or data transferred from the host application.
! To select a printer and set printing parameters:
From the File menu, select Print Setup. The Print Setup dialog box is displayed:
This dialog box contains a set of printing parameters. The displayed parameters change according to the printer you select. For details, consult your printer documentation.
The Default printer parameter enables you to send the output to the default printer selected under Windows. The Specific Printer parameter allows you to select one of the currently installed printers. For details about installing a new printer, consult your Windows documentation.
! To execute a form feed on the printer:
From the File menu, select Form Feed.
Chapter 3, Using PowerTerm
sing PowerTerm
U
107
! To execute a line feed on the printer:
From the File menu, select Line Feed.
! To print accumulated data displayed in the work area:
1. From the File menu, select Start Auto Print. The Start Auto Print command starts accumulating incoming data (while it is displayed on the screen). After you select this command, the menu option changes to Stop Printing.
2. On the File menu, click Stop Printing. The Stop Printing command prints all the data accumulated in the printing buffer of the slave printer, or in the autoprint buffer. If data was buffered with a printing request and communication failed before the data was sent to the slave printer, select this command to print the accumulated information.
! To print a session using device naming: 1. Open a session. 2. From the Terminal menu, select Setup. The Terminal Setup
window is displayed. 3. From the Emulation tab, select 5250 Printer. 4. Select the Printer tab, and from the Print Device dropdown list
select File. 5. In the File Name field enter Lpt1 and click OK. 6. From the Communication menu, select Connect. The Connect
dialog box is displayed. 7. In the Host Name field, enter the name of the AS/400 host. In the
Device Name field, enter the name of the device for the printer session.
8. Click Connect. The Printer Session window is displayed. Leave it open. The AS/400 automatically creates a queue with the specified device name.
9. Open another session, this one a 5250-display session, and send your print jobs to the queue created by the AS/400.

PowerTerm Series User’s Guide 108
Print the Terminal Screen
From the File menu, select Print Screen to print selected text, or the entire contents of the work area.
Starting a New PowerTerm Session
PowerTerm enables you to run two or more sessions concurrently by opening a new instance of the PowerTerm window. Each session is identified by a letter (A to Z), which appears in the session window title bar. A session is assigned the first available letter. The first session is (A), the second (B), and so on. For example, if A, B and D are opened, the next session is assigned C.
! To open a new instance of the PowerTerm window:
From the File menu, select New Terminal Window. A new instance of the PowerTerm window is displayed. You can switch to a specific session by pressing <Shift> + <Ctrl> + <X>, where X is the session letter. For example, if you want to work in session C, you would press <Shift> + <Ctrl> + <C>. You can switch between sessions by pressing <Ctrl> + <Spacebar>.
Chapter 3, Using PowerTerm
sing PowerTerm
U
109
Step 8: Ending a PowerTerm Session You need to end the session(s) before exiting the PowerTerm application. PowerTerm provides four options to end a session: • Automatic Closing, below. • Optional Closing, page 110. • User-Initiated Closing, page 110. • User-Initiated Fast Exit, page 110. For details on how to exit PowerTerm, see Step 9: Exiting PowerTerm, page 111.
Automatic Closing
PowerTerm enables you to close PowerTerm automatically when you close a session.
! To define parameters for closing a PowerTerm session automatically:
1. From the Terminal menu, select Setup. The Terminal Setup dialog box is displayed.
2. Select the Preferences tab. 3. Click the Auto Exit PowerTerm box to select it. 4. Click OK. If you have modified terminal parameters during a session, a message displays asking if you want to save the setup (.PTS) file before closing.
To automatically reconnect a PowerTerm session when you exit the current session, select the Auto ReConnect option in the Terminate Setup dialog box.

PowerTerm Series User’s Guide 110
Optional Closing
For non-IBM emulations only, if you have not selected the Auto Exit PowerTerm option in the Terminal Setup dialog box (as described on the previous page), and the communication session has been terminated, PowerTerm displays the following message: “Session closed (<exit code>). Hit Enter to restart session.”
<exit code> may have one of the following values: • (zero). Communication ended successfully. • A number other than 0. Communication aborted. The exit
code points to the error that caused the problem. Press Enter to re-establish communication based on the current terminal and communication parameters.
User-Initiated Closing
You can close a session at any time by selecting Disconnect from the Communication menu.
User-Initiated Fast Exit
If you request a fast exit while communication is in progress (for example, by pressing <Alt> + <F4>), PowerTerm reacts according to the parameters that you selected in the Preferences tab of the Terminal Setup dialog box. If you have selected the Auto Exit PowerTerm parameter, PowerTerm closes the session and exits. If this parameter is not selected, a message is displayed enabling you to decide what to do next. To access the Preferences tab, select Setup from the Terminal menu.

Chapter 3, Using PowerTerm
sing PowerTerm
U
111
Step 9: Exiting PowerTerm
! To exit PowerTerm:
From the File menu, select Exit (Alt+F4). If you have changed the terminal settings, PowerTerm displays a warning
message asking if you want to update the terminal settings file (.PTS). The message will point to the name of the setup file currently loaded (PTDEF.PTS, if you used the default). Click OK to update the file, or No to cancel the latest changes and restore the default setup (PTDEF.PTS) file.

PowerTerm Series User’s Guide 112
Chapter 4: Scripts PowerTerm enables you to create scripts for automating tasks. Power Script Language (PSL) is PowerTerm's own programming language. This chapter provides an overview of script commands and programming conventions used in PSL. This chapter also describes how to create, edit, run, save and activate scripts in PowerTerm. Each PSL command is described in PowerTerm's online help, which can be accessed by selecting Contents from the Help menu.
!!!!""""This chapter describes the following topics: Script Overview, page 113. Power Script Language (PSL), page 114. Using PowerTerm Scripts, page 232.

Chapter 4, Scripts
criptsS
113
Script Overview You can use scripts to automate PowerTerm tasks. Scripts are written in Power Script Language (PSL) and are saved with a .PSL extension. For example, you can create a script to login to PowerTerm, execute a file, display a message and so on. Scripts can be run upon startup or during a PowerTerm session.
PSL Types
! PowerTerm commands can be grouped into six categories: Simulation transmission to host commands: Enables you to communicate with the host. For example, the <send> command sends data to the host. Standard programming commands: Enables you to use standard programming commands. For example, the <exec> command opens a program. File handling commands: Enables you to work with files. For example, the <read> command reads from a file. DDE commands: Enables you to use standard Microsoft Windows DDE mechanisms to communicate with other Windows applications. PowerTerm-specific commands: Enables you to activate specific PowerTerm features. For example, the <map> command enables you to map a PC key to a host key. Desktop interface commands: Enables you to manipulate components in the PowerTerm window. For example, the <menu hide> command hides the PowerTerm menu.
PowerTerm Series User’s Guide 114
Power Script Language (PSL) Power Script Language (PSL) is a special feature of PowerTerm which provides commands for creating scripts. These scripts can be used to automate tasks. For example, you can create a script to login to PowerTerm automatically. PSL is intended for users with programming skills.
! The following topics are described in this section: PowerTerm Sample Scripts, page 115, describes the standard scripts used in PowerTerm. PSL Syntax, page 115, describes the syntax used to create PowerTerm script. PSL Data Types, page 118, describes common formats for data strings. Variable Assignment, page 120, describes the syntax used to assign variables. Activating Script Files from the Host, page 122, describes commands to activate a script file or script commands via special escape sequences. DDE Commands, page 123, describes the function of DDE commands for both client and server application. PSL Commands, page 127, describes the syntax and provides examples for each PSL command.
Chapter 4, Scripts
criptsS
115
PowerTerm Sample Scripts PowerTerm provides several sample scripts designed for frequent tasks. The following table lists the sample scripts and their parameters: Script Parameters Parameter Values COMM.PSL Port number 1 – 32. Baud rate All. Protocol type none, xonxoff, hardware. TELNET.PSL Host name Specify the name of the host. LAT.PSL Service name Specify the name of the service. CTERM.PSL Node name Specify the name of the CTERM
node. All parameters must be typed in lowercase letters.
Additional sample scripts are also included as part of PowerTerm.
PSL Syntax A command consists of one or more fields separated by spaces or tabs. The first field is the name of a command, which may be either a built-in command or a procedure consisting of a sequence of PSL commands. Newline characters are used as command separators, and semicolons may be used to separate commands on the same line. Each PSL command returns either a string result, or an empty string. PSL has four additional syntactic constructs: • Braces {} • Brackets [] • Dollar sign ? • Backslash \
PSL commands must be entered in lower case.

PowerTerm Series User’s Guide 116
Braces Braces are used to group complex arguments. They act as nestable quote characters. If the first character of an argument is an open brace, then the argument is not terminated by white space. Instead, it is terminated by the matching close brace. The argument passed to the command consists of everything between the braces, with the enclosing braces stripped off. For example: host = {vms unix {aix hp sun} aos} The variable host will receive one argument: "vms unix {aix hp sun} aos". This particular command will set the variable host to the specified string. If an argument is enclosed in braces, then none of the other substitutions described below is made on the argument. One of the most common uses of braces is to specify a PSL sub-program as an argument to a PSL command.
Brackets Brackets are used to invoke command substitution. If an open bracket appears in an argument, then everything from the open bracket up to the matching close bracket is treated as a command and executed recursively by PSL. The result of the command is then substituted into the argument in place of the bracketed string. For example, the format command: msg = [format {Data is %s bytes long} 99] does print-like formatting (from the C language) and returns the string "Data is 99 bytes long", which is then assigned to the variable message.

Chapter 4, Scripts
criptsS
117
Dollar Sign The dollar sign is used for variable substitution. If the dollar sign appears in an argument, then the following characters are treated as a variable name, and the contents of the variable are substituted into the argument in place of the dollar sign and name. For example: num = 99 msg = [format {Data is %s bytes long} $num] The result is the same as the single command in the previous example. The following are examples of common functions for the dollar sign in Power Script Language: • $P1 represents the variable of the parameter if P1 is the
parameter. • $PC counts the number of parameters in the command line.
Backslash The backslash character may be used to insert special characters into arguments, such as braces or nonprinting characters. Such special characters include the following: [ ] { } $ t b r m
\xFF will send the hex code FF (where F can be any hex character: 0-9, A-F). For example: send \x1B\[m This command will send the three characters: escape, [ and m.
PowerTerm Series User’s Guide 118
PSL Data Types PSL uses only one type of data: strings. All commands, arguments to commands, results returned by commands and variable values are ASCII strings. Although everything in PSL is a string, many commands expect their string arguments to have particular formats. There are three particularly common formats for strings: • Lists • Expressions • Commands A list is just a string containing one or more fields separated by white space, similar to a command. Braces may be used to enclose complex list elements. These complex list elements are often lists in their own right. For example: {vms unix {aix hp sun} aos} This is a list with four elements, the third of which is a list with three elements. PSL provides commands for a number of list-manipulation operations, such as creating lists, extracting elements and computing list lengths. The second common form for a string is a numeric expression. PSL expressions have the same operators and rules of precedence as expressions in the C language. The expr PSL command evaluates a string as an expression and returns the result (as a string, of course). For example: expr {($x < $y) || ($z != 0)} Returns "1'' if the numeric value of variable x is less than that of variable y, or if variable z is not zero; otherwise it returns "0''. Several other commands, such as if and for, expect one or more of their arguments to be expressions.
Chapter 4, Scripts
criptsS
119
The third common interpretation of strings is as commands (or sequences of commands). Arguments of this form are used in PSL commands that implement control structures. For example: if {$x < $y} { swap = $x x = $y y = $swap } The if command receives two arguments here, each of which is delimited by braces. if is a built-in command that evaluates its first argument as an expression; if the result is non-zero, it executes its second argument as a PSL command. This particular command swaps the values of the variables x and y if x is less than y. PSL also allows users to define command procedures written in the PSL language. The proc built-in command is used to create a PSL procedure (PSLproc). For example: proc factorial x { if {$x == 1} {return 1} return [expr {$x * [factorial [expr $x - 1]]}] } This PSL command defines a recursive factorial procedure. The proc command takes three arguments: a name for the new PSLproc, a list of variable names (in this case the list has only a single element, x), and a PSL command that comprises the body of the PSLproc. After this proc command has been executed, factorial may be invoked just like any other PSL command. For example: factorial 4 returns the string "24''.
PowerTerm Series User’s Guide 120
In addition to the commands already mentioned, PSL provides commands for manipulating strings (comparison, matching and printf/scanf-like C language operations), commands for manipulating files and file names. The built-in PSL commands provide a simple but complete programming language.
Variable Assignment
Syntax varName = value
varName[index] = value
Variable assignment is as follows: the variable varName is on the left side of the expression and the value you want to assign to the variable is on the right. For example: B = 200
Two types of variables: Scalar and Array
A variable containing a single value is a scalar variable and the majority of the time fits ones needs. Other times, it's convenient to assign more than one related value to a single variable. Then you can create an array variable that can contain a series of values. Array variables and scalar variables are declared in the same way, except that the declaration of an array variable uses brackets [ ] following the variable name.

Chapter 4, Scripts
criptsS
121
A variable’s scope is determined by where it is declared. When you declare a variable within a procedure, only code within that procedure can access or modify the value of that variable. It has local scope and is called a local variable. In contrast a global variable declared outside a procedure is recognizable to all the procedures in your script. An exception to the rule governing local variables is when the global command has been invoked to declare varName to be global.
PowerTerm Series User’s Guide 122
Activating Script Files from the Host A host application may activate a script file or script commands via special escape sequences.
Escape Sequences for VT
Activating a script file called Script-Name: ESCP$sScript-NameESC \ An example activating the message.psl script: ESCP$smessage.pslESC\
ESC is the ASCII 27 code.
Activating script commands called Script-Commands: ESCP$tScript-CommandsESC \ An example activating the "message testing ; send end" commands: ESCP$tmessage testing ; send endESC\
Escape Sequences for DG
Activating a script file called Script-Name: ESCWsScript-Name000
ESC is the ASCII 30 code, 000 is the ASCII 0 code.
Activating script commands called Script-Commands: ESCWtScript-Commands000

Chapter 4, Scripts
criptsS
123
DDE Commands PowerTerm enables you to use the standard Microsoft DDE mechanism to communicate with other Windows applications. PowerTerm can be a DDE client application or a DDE server application. The DDE server application waits for requests from DDE clients, and allows them to supply it with information or receive information. For example: A spreadsheet DDE server will let clients get data from cells and put data into cells of a file. As a DDE server, PowerTerm uses the server name PTW with topic PSL. Any application can request it to execute commands and return the related return data. A client application can access PowerTerm with the dde execute command or the dde request command and an item that is any valid PSL command separated with ";". The single DDE server PSL command is: dde return value After a dde request command is executed, the PowerTerm DDE server sends the value from the last DDE return command executed in this request. If no DDE return command was executed, it returns an empty answer. Examples for PowerTerm as a DDE server might be: • Sending information to the host. • Reading information from the emulation screen. As a DDE client, PowerTerm performs one of several DDE operations, depending on the option. The legal options are: dde initiate applicationName topicName

PowerTerm Series User’s Guide 124
Connects to the applicationName DDE server with topicName. Returns a conversation ID for use with successive DDE commands. dde execute convId command Executes a server command. Returns an empty string. dde request convId item Returns an item from the server. dde poke convId item value Changes an item of the server to the new value. Returns an empty string. dde terminate convId Terminates a DDE conversation with the server. dde returns Returns a value according to the option.

Chapter 4, Scripts
criptsS
125
Examples 1 Assigns three numbers on the emulation screen to array "cel"
for {i = 1} {$i < 4} {incr i} {
row = [expr $i + 3]
cel($i) = [screen-rect $row 10 $row 15]}
Initiates a DDE conversation with MicroSoft Excel file TEST.XLS. conv = [dde initiate EXCEL TEST.XLS]
Pokes the three numbers to three cels in TEST.XLS. for {i = 1} {$i < 4} {incr i} {dde poke $conv R1C$i $cel($i)}
Requests the sum of those numbers from a result cel in TEST.XLS. sum = [dde request $conv "R2C1"]
Terminates the DDE conversation. dde terminate $conv
Sends the result to the host application. send $sum
2 Initiates a DDE conversation with another PowerTerm which is connected to another computer. Reads information from the screen (of the other host) and sends it to its own host. conv = [dde initiate PTW PSL-B] data = [dde request $conv { dde return [screen 10 1 15 80]}] dde execute $conv{send joe}

PowerTerm Series User’s Guide 126
For an explanation of each DDE command, see PowerTerm's online help. To access the online help for DDE commands, select Contents from the Help menu and click the Index tab. Type dde and click Display.

Chapter 4, Scripts
criptsS
127
PSL Commands
append
Description Append to a variable. Syntax append varName value [value value ...] Notes Appends all of the value arguments to the current value of variable varName. If varName does not exist, it is given a value equal to the concatenation of all the value arguments. This command provides an efficient way to build up long variables incrementally. Example The following line appends variables y and z to variable x:
append x $y $z It is much more efficient than
x = $x$y$z if $x is long.

PowerTerm Series User’s Guide 128
array Description Manipulate array variables. Syntax array option arrayName [arg arg ...] Notes This command performs one of several operations on the variable given by arrayName. ArrayName must be the name of an existing array variable. The option argument determines what action is carried out by the command. A description of each valid option (which may be abbreviated) follows:
array anymore arrayName searchId Returns 1 if there are any more elements left to be processed in an array search, 0 if all elements have already been returned. SearchId indicates which search on arrayName to check, and must have been the return value from a previous invocation of array startsearch. This option is particularly useful if an array has an element with an empty name, because the return value from array nextelement does not indicate whether the search has been completed.
array donesearch arrayName searchId This command terminates an array search and destroys all the states associated with that search. SearchId indicates which search on arrayName to destroy, and must have been the return value from a previous invocation of array startsearch. Returns an empty string.
array names arrayName Returns a list containing the names of all of the elements in the array. If there are no elements in the array, then an empty string is returned.

Chapter 4, Scripts
criptsS
129
array nextelement arrayName searchId Returns the name of the next element in arrayName, or an empty string if all elements of arrayName have already been returned in this search. The searchId argument identifies the search, and must have been the return value of an array startsearch command. Warning: If elements are added to or deleted from the array, then all searches are automatically terminated just as if array donesearch had been invoked; this will cause array nextelement operations to fail for those searches.
array size arrayName Returns a decimal string giving the number of elements in the array.
array startsearch arrayName This command initializes an element-by-element search through the array given by arrayName, such that invocations of the array nextelement command will return the names of the individual elements in the array. When the search has been completed, the array donesearch command should be invoked. The return value is a search identifier that must be used in array nextelement and array donesearch commands; it allows multiple searches to be underway simultaneously for the same array.
PowerTerm Series User’s Guide 130
break Description Abort looping command. Syntax break Notes This command may be invoked only inside the body of a looping command such as for, foreach, or while. Example break terminates the while loop when variable x equals 5:
x = 0
while {$x < 10} {
incr x
if {$x == 5}
break
.
.
.
}

Chapter 4, Scripts
criptsS
131
cd Description Change working directory. Syntax cd dirName Notes Changes the current working directory to dirName. Returns Returns an empty string. Example Changes working directory to pterm:
cd pterm
PowerTerm Series User’s Guide 132
close Description Close an open file. Syntax close fileId Notes Closes the file given by fileId. fileId must be the return value from a previous invocation of the open command; after this command, it should not be used anymore. Returns The normal result of this command is an empty string, but errors are returned if there are problems in closing the file.
Example Opens file "sales.dat", reads 10 bytes, closes it, and displays the data in a message box:
fileId = [open sales.dat]
data = [read $fileId 10]
close $fileId
message $data

Chapter 4, Scripts
criptsS
133
concat Description Join lists together. Syntax concat arg [arg ...] Notes This command treats each argument as a list and concatenates them into a single list. It also eliminates leading and trailing spaces in the arguments and adds a single separator space between arguments. It permits any number of arguments. Returns Returns a single list with all elements. Example Returns {a b c d e f {g h}}:
concat a b {c d e} {f {g h}}
PowerTerm Series User’s Guide 134
continue Description Skip to the next iteration of a loop. Syntax continue Notes This command may be invoked only inside the body of a looping command such as for, foreach, or while. It signals the innermost containing loop command to skip the remainder of the loop's body but to continue with the next iteration of the loop. Example Skips over the while loop commands when variable x is less than 5.
x = 0
while {$x < 10} {
incr x
if {$x < 5}
continue
.
.
.
}

Chapter 4, Scripts
criptsS
135
cursor Description Move the cursor to a new position. Syntax cursor row col Notes The cursor command changes the cursor position but does not send any indication to the host. Returns Returns an empty string. Example
cursor 4 34

PowerTerm Series User’s Guide 136
display
Description Display a string on the current cursor position. Syntax display string Notes The display command displays the string on the screen, but does not send it to the host. Returns Returns an empty string. Example display "Hit ENTER to continue"
Chapter 4, Scripts
criptsS
137
eof
Description Check for end-of-file condition on an open file. Syntax eof fileId Notes Returns 1 if an end-of-file condition has occurred on fileId, 0 otherwise. fileId must have been the return value from a previous call to open. Example Opens file "input.dat" for reading and file "output.dat" for writing. While not end-of-input file, reads a line and writes it to the output file. Closes both files.
inFile = [open input.dat]
outFile = [open output.dat w]
gets $inFile data
while {! [eof $inFile]} {
puts $outFile $data
gets $inFile data
}
close $inFile
close $outFile

PowerTerm Series User’s Guide 138
eval
Description Evaluate a PSL script. Syntax eval arg [arg ...] Notes eval takes one or more arguments, which together comprise a PSL script containing one or more commands. eval concatenates all its arguments in the same fashion as the concat command and passes the concatenated string to the PSL recursively. Returns Returns the result of the evaluation (or any error generated by it).
Example Assigns command variable with the expr command, executes the command, and displays its output:
command = "expr 3 * 8"
result = [eval $command]
message $result

Chapter 4, Scripts
criptsS
139
exec
Description Invoke a program. Syntax exec Program Notes This command executes a program. The Program variable may contain parameters. Example Activates the Notepad program with parameter pt.psl: exec "notepad pt.psl"

PowerTerm Series User’s Guide 140
expr
Description Evaluate an expression. Syntax expr arg [arg arg ...] Notes Concatenates args (adding separator spaces between them), evaluates the result as a PSL expression, and returns the value. The operators permitted in PSL expressions are a subset of the operators permitted in the C language expressions, and they have the same meaning and precedence as the corresponding C language operators. Expressions almost always yield numeric results (integer or floating-point values). PSL expressions support non-numeric operands and string comparisons. For example, the command "expr 8.2 + 6" evaluates to 14.2. Operands A PSL expression consists of a combination of operands, operators, and parentheses. White space may be used between the operands and operators and parentheses; it is ignored by the expression processor. Where possible, operands are interpreted as integer values. Integer values may be specified in decimal (the normal case), in octal (if the first character of the operand is 0, or in hexadecimal (if the first two characters of the operand are 0x). If an operand does not have one of the integer formats, then it is treated as a floating-point number if that is possible. Floating-point numbers may be specified in any of the ways accepted by an ANSI-compliant C language compiler (except that the f, F, l, and L suffixes will not be permitted in most installations). For example, all of the following are valid floating-point numbers: 2.1, 3., 6e4, 7.91e+16.
Chapter 4, Scripts
criptsS
141
If no numeric interpretation is possible, then an operand is left as a string (and only a limited set of operators may be applied to it). Operands may be specified in any of the following ways: • As a numeric value, either integer or floating-point. • As a PSL variable, using standard $ notation. The variable's
value will be used as the operand. • As a string enclosed in double-quotes.
The expression parser will perform backslash, variable, and command substitutions on the information between the quotes, and use the resulting value as the operand. As a string enclosed in braces. The characters between the open brace and matching close brace will be used as the operand without any substitutions. As a PSL command enclosed in brackets. The command will be executed and its result will be used as the operand. As a mathematical function whose arguments have any of the above forms for operands, such as sin($x). See below for a list of defined functions. Where substitutions occur above (for example, inside quoted strings), they are performed by the expression processor. However, an additional layer of substitution may already have been performed by the command parser before the expression processor was called. As discussed below, it is usually best to enclose expressions in braces to prevent the command parser from performing substitutions on the contents. For some examples of simple expressions, suppose the variable x has the value 3 and the variable y has the value 6. Then the command on the left side of each of the lines below will produce the value on the right side of the line:
expr 3.1 + $x 6.1
expr 2 + "$x.$y" 5.6
PowerTerm Series User’s Guide 142
expr 4 * [llength "6 2"] 8
expr {word one} < "word $x" 0
Operators The valid operators are listed below, grouped in decreasing order of precedence: "-" "~" "!" Unary minus, bit-wise NOT, logical NOT. None of these operands may be applied to string operands, and bit-wise NOT may be applied only to integers. "*" "/" "%" Multiply, divide, remainder. None of these operands may be applied to string operands, and remainder may be applied only to integers. The remainder will always have the same sign as the divisor and an absolute value smaller than the divisor. "+" "-" Add and subtract. Valid for any numeric operands. "<<" ">>" Left and right shift. Valid for integer operands only. "<" ">" "<=" ">=" Boolean less, greater, less than or equal, and greater than or equal. Each operator produces 1 if the condition is true, 0 otherwise. These operators may be applied to strings as well as numeric operands, in which case string comparison is used. "==" "!=" Boolean equal and not equal. Each operator produces a zero/one result. Valid for all operand types. "&" Bit-wise AND. Valid for integer operands only. "^" Bit-wise exclusive OR. Valid for integer operands only. "|" Bit-wise OR. Valid for integer operands only.
Chapter 4, Scripts
criptsS
143
"&&" Logical AND. Produces a 1 result if both operands are non-zero, 0 otherwise. Valid for numeric operands only (integers or floating-point). "||" Logical OR. Produces a 0 result if both operands are zero, 1 otherwise. Valid for numeric operands only (integers or floating-point). "x ? y : z" If-then-else, as in the C language. If x evaluates to non-zero, then the result is the value of y. Otherwise, the result is the value of z. The x operand must have a numeric value. See the C language manual for more details on the results produced by each operator. All of the binary operators group left-to-right within the same precedence level. For example, the command
expr 4 * 2 < 7
returns 0. The &&, ||, and ?: operators have "lazy evaluation", just as in C, which means that operands are not evaluated if they are not needed to determine the outcome. For example, in the command
expr {$z ? [x] : [y]}
only one of [x] or [y] will actually be evaluated, depending on the value of $z. Note, however, that this is only true if the entire expression is enclosed in braces; otherwise, PSL will evaluate both [x] and [y] before invoking the expr command. Mathematical functions PSL supports the following mathematical functions in expressions:

PowerTerm Series User’s Guide 144
acos cos hypot sinh
asin cosh log sqrt
atan exp log10 tan
atan2 floor pow tanh
ceil fmod sin
Each of these functions invokes the C language math library function of the same name. Conversion Functions PSL also implements functions for conversion between integers and floating-point numbers. A description of these functions follows. abs(arg) Returns the absolute value of arg. Arg may be either integer or floating-point, and the result is returned in the same form. double(arg) If arg is a floating value, returns arg; otherwise, converts arg to floating and returns the converted value. int(arg) If arg is an integer value, returns arg; otherwise, converts arg to integer by truncation and returns the converted value. round(arg) If arg is an integer value, returns arg; otherwise, converts arg to integer by rounding and returns the converted value. Types, Conversion and Precision Conversion among internal representations for integer, floating-point, and string operands is done automatically as needed. For arithmetic computations, integers are used until some floating-point number is introduced, after which floating-point is used. For example:
expr 5 / 4

Chapter 4, Scripts
criptsS
145
returns 1, while
expr 5 / 4.0
expr 5 / ( [string length "abcd"] + 0.0 )
both return 1.25. Floating-point values are always returned with a "." or an "e" so that they will not look like integer values. For example:
expr 20.0/5.0
returns "4.0", not "4". String Operations String values may be used as operands of the comparison operators, although the expression evaluator tries to do comparisons as integer or floating-point when it can. If one of the operands of a comparison is a string and the other has a numeric value, the numeric operand is converted back to a string. For example, the commands
expr "0x03" > "2"
expr "0y" < "0x12" both return 1. The first comparison is done using integer comparison, and the second is done using string comparison after the second operand is converted back to the string "18".

PowerTerm Series User’s Guide 146
file Description Manipulate file names and attributes. Syntax file option name [arg arg ...] Notes This command provides several operations on a file's name or attributes. Name is the name of a file. Option indicates what to do with the file name. Any unique abbreviation for option is acceptable. A description of the valid options follows. file atime name Returns a decimal string giving the time at which file name was last accessed. The time is measured in the standard POSIX fashion as seconds from a fixed starting time (often January 1, 1970). If the file does not exist or its access time cannot be queried, then an error is generated. file dirname name Returns all of the characters in name up to but not including the last slash character. If there are no slashes in name, then returns ".". If the last slash in name is its first character, then returns "\". file exists name Returns 1 if file name exists, 0 otherwise. file extension name Returns all of the characters in name after and including the last dot in name. If there is no dot in name, then returns the empty string. file isdirectory name Returns 1 if file name is a directory, 0 otherwise. file isfile name Returns 1 if file name is a regular file, 0 otherwise.
Chapter 4, Scripts
criptsS
147
file mtime name Returns a decimal string giving the time at which file name was last modified. The time is measured in the standard POSIX fashion as seconds from a fixed starting time (often January 1, 1970). If the file does not exist or its modified time cannot be queried, then an error is generated. file rootname name Returns all of the characters in name up to but not including the last "." character in the name. If name does not contain a dot, then returns name. file size name Returns a decimal string giving the size of file name in bytes. If the file does not exist or its size cannot be queried, then an error is generated. file stat name varName Invokes the stat system call on name, and uses the variable given by varName to hold information returned from the system call. VarName is treated as an array variable, and the following elements of that variable are set: atime, ctime, dev, mode, mtime, size, type. Each element except type is a decimal string with the value of the corresponding field from the stat return structure. See the manual entry for stat for details on the meanings of the values. The type element gives the type of the file in the same form returned by the command file type. This command returns an empty string. file tail name Returns all of the characters in name after the last backslash. If name contains no backslashes, then returns name. file type name Returns a string giving the type of file name, which will be one of file or directory.

PowerTerm Series User’s Guide 148
flush
Description Flush buffered output for a file. Syntax flush file Notes Flushes any output that has been buffered for file. file must have been the return value from a previous call to open. It must refer to a file that was opened for writing. Returns Returns an empty string. Example Opens file "sales.dat" for writing. Writes 10 lines, flushes data to file, and then closes the file.
fileId = [open sales.dat w]
for {i = 0} {$i < 10} {incr i} {puts $fileId "Line no $i"}
flush $fileId
close $fileId

Chapter 4, Scripts
criptsS
149
for Description "For'' loop. Syntax for start test next body Notes for is a looping command, similar in structure to the C language for statement. The start, next, and body arguments must be PSL command strings, and test is an expression string. The for command first invokes PSL to execute start. Then it repeatedly evaluates test as an expression; if the result is non-zero it invokes PSL on body, then invokes PSL on next, then repeats the loop. The command terminates when test evaluates to 0. If a continue command is invoked within body, then any remaining commands in the current execution of body are skipped, processing continues by invoking PSL on next, then evaluating test, and so on. If a break command is invoked within body or next, then the for command will return immediately. The operation of break and continue are similar to the corresponding statements in the C language. Returns Returns an empty string. Example Executes the message command 10 times:
for {i = 1} {$i <= 10} {incr i} {message "i = $i"}
PowerTerm Series User’s Guide 150
foreach Description Iterate over all elements in a list. Syntax foreach varname list body Notes In this command, varname is the name of a variable, list is a list of values to assign to varname, and body is a PSL script. For each element of list (in order from left to right), foreach assigns the contents of the field to varname as if the index command had been used to extract the field, then calls PSL to execute body. The break and continue statements may be invoked inside body, with the same effect as in the for command. Returns Returns an empty string. Example For each item in the list, a message is displayed:
foreach var {Item1 Item2 Item3} {message "Item : $var"}

Chapter 4, Scripts
criptsS
151
format Description Format a string in the style of sprintf. Syntax format formatString [arg arg ...] Notes This command generates a formatted string in the same way as the ANSI C sprintf procedure. FormatString indicates how to format the result, using % conversion specifiers as in sprintf, and the additional arguments, if any, provide values to be substituted into the result. Returns and Formatting The return value is the formatted string. The command operates by scanning formatString from left to right. Each character from the format string is appended to the result string unless it is a percent sign. If the character is "%", then it is not copied to the result string. Instead, the characters following the % character are treated as a conversion specifier. The conversion specifier controls the conversion of the next successive arg to articular format, and the result is appended to the result string in place of the conversion specifier. If there are multiple conversion specifiers in the format string, then each one controls the conversion of one additional arg. The format command must be given enough args to meet the needs of all of the conversion specifiers in formatString. Each conversion specifier may contain up to six different parts: A set of flags, a minimum field width, a precision, a length modifier, and a conversion character. Any of these fields may be omitted except for the conversion character.
PowerTerm Series User’s Guide 152
The fields that are present must appear in the order given above. The paragraphs below discuss each of these fields in turn. If the % is followed by a decimal number and a $, as in "%2$d", then the value to convert is not taken from the next sequential argument. Instead, it is taken from the argument indicated by the number, where 1 corresponds to the first arg. If the conversion specifier requires multiple arguments because of * characters in the specifier, then successive arguments are used, starting with the argument given by the number. If there are any positional specifiers in formatString, then all of the specifiers must be positional. The second portion of a conversion specifier may contain any of the following flag characters, in any order: \- Specifies that the converted argument should be left-justified in its field (numbers are normally right-justified with leading spaces if needed). + Specifies that a number should always be printed with a sign, even if positive. space Specifies that a space should be added to the beginning of the number if the first character is not a sign. 0 Specifies that the number should be padded on the left with zeros instead of spaces. # Requests an alternate output form. For o and O conversions, it guarantees that the first digit is always 0. For x or X conversions, 0x or 0X (respectively) will be added to the beginning of the result unless it is zero. For all floating-point conversions (e, E, f, g, and G), it guarantees that the result always has a decimal point. For g and G conversions, it specifies that trailing zeros should not be removed.
Chapter 4, Scripts
criptsS
153
The third portion of a conversion specifier is a number giving a minimum field width for this conversion. It is typically used to make columns line up in tabular printouts. If the converted argument contains fewer characters than the minimum field width then it will be padded so that it is as wide as the minimum field width. Padding normally occurs by adding extra spaces on the left of the converted argument, but the 0 and \- flags may be used to specify padding with zeros on the left or with spaces on the right, respectively. If the minimum field width is specified as * rather than a number, then the next argument to the format command determines the minimum field width; it must be a numeric string. The fourth portion of a conversion specifier is a precision, which consists of a period followed by a number. The number is used in different ways for different conversions. For e, E, and f conversions, it specifies the number of digits to appear to the right of the decimal point. For g and G conversions, it specifies the total number of digits to appear, including those on both sides of the decimal point (however, trailing zeros after the decimal point will still be omitted unless the # flag has been specified). For integer conversions, it specifies a minimum number of digits to print (leading zeros will be added if necessary). For s conversions, it specifies the maximum number of characters to be printed; if the string is longer than this, then the trailing characters will be dropped. If the precision is specified with * rather than a number then the next argument to the format command determines the precision, it must be a numeric string. The fourth part of a conversion specifier is a length modifier, which must be h or l. If it is h it, specifies that the numeric value should be truncated to a 16-bit value before converting. This option is rarely useful. The l modifier is ignored. The last thing in a conversion specifier is an alphabetic character that determines what kind of conversion to perform.

PowerTerm Series User’s Guide 154
The following conversion characters are currently supported: d Convert integer to signed decimal string. u Convert integer to unsigned decimal string. i Convert integer to signed decimal string; the integer may be in decimal, in octal (with a leading 0), or in hexadecimal (with a leading 0x). o Convert integer to unsigned octal string. x or X Convert integer to unsigned hexadecimal string, using digits "0123456789abcdef" for x and "0123456789ABCDEF" for X. c Convert integer to the 8-bit character it represents. s No conversion; just insert string. f Convert floating-point number to signed decimal string of the form xx.yyy, where the number of y's is determined by the precision (default: 6). If the precision is 0, then no decimal point is output. e or E Convert floating-point number to scientific notation in the form x.yyye+-zz, where the number of y's is determined by the precision (default: 6). If the precision is 0, then no decimal point is output. If the E form is used, then E is printed instead of e. g or G If the exponent is less than \-4 or greater than or equal to the precision, then convert floating-point number as for %e or %E. Otherwise, convert as for %f. Trailing zeros and a trailing decimal point are omitted.

Chapter 4, Scripts
criptsS
155
% No conversion: just insert %. For the numerical conversions, the argument being converted must be an integer or floating-point string; format converts the argument to binary and then converts it back to a string according to the conversion specifier.

PowerTerm Series User’s Guide 156
gets Description Get file. Syntax gets fileId varName Notes This command reads the next line from the file given by file and discards the terminating newline character. If varName is specified, then the line is placed in the variable by that name and the return value is a count of the number of characters read (not including the newline). If the end of the file is reached before reading any characters, then (-1) is returned and varName is set to an empty string. If varName is not specified, then the return value will be the line (minus the newline character) or an empty string if the end of the file is reached before reading any characters. An empty string will also be returned if a line contains no characters except the newline, so eof may have to be used to determine what really happened. If the last character in the file is not a newline character, then gets behaves as if there were an additional newline character at the end of the file. File must be the return value from a previous call to open. It must refer to a file that was opened for reading. Returns Returns the line length (if varName specified) or the line itself. Example Gets first line from "sales.dat" file:
fileId = [open sales.dat]

Chapter 4, Scripts
criptsS
157
gets $fileId data
close $fileId
PowerTerm Series User’s Guide 158
glob Description Return names of files that match patterns. Syntax glob swiches [pattern pattern ...] Notes This command performs file name "globbing" in a fashion similar to the CSH shell. It returns a list of the files whose names match any of the pattern arguments. If the initial arguments to glob start with “-“ then they are treated as switches. The following switches are currently supported: -nocomplain Allows an empty list to be returned without error; without this switch, an error is returned if the result list would be empty. -- Marks the end of switches. The argument following this one will be treated as a pattern even if it starts with a "-". The pattern arguments may contain any of the following special characters: ? Matches any single character. * Matches any sequence of zero or more characters. [chars] Matches any single character in chars. If chars contains a sequence of the form a-b, then any character between a and b (inclusive) will match. x Matches the character x. {a,b,...} Matches any of the strings a, b, etc.

Chapter 4, Scripts
criptsS
159
As with csh, a "." at the beginning of a file's name or just after a "\" must be matched explicitly or with a {} construct. In addition, all "\" characters must be matched explicitly. Returns Returns the files list. Example Displays all files with ".dat" extension:
message [glob *.dat]

PowerTerm Series User’s Guide 160
global Description Access global variables. Syntax global varname [varname ...] Notes This command is ignored unless a PSL procedure is being interpreted. If so, then it declares the given varnames to be global variables rather than local ones. For the duration of the current procedure (and only while executing in the current procedure), any reference to any of the varnames will refer to the global variable by the same name.
Returns Returns an empty string. Example
global varname1 varname2

Chapter 4, Scripts
criptsS
161
if Description Execute scripts conditionally. Syntax if expr1 [then] body1 [elseif expr2 [then] body2] [elseif ...] [[else] bodyN] Notes The if command evaluates expr1 as an expression (in the same way that the expr command evaluates its argument). The value of the expression must be a boolean (a numeric value, where 0 is false and anything else is true, or a string value such as true or yes for true and false or no for false). If it is true, then body1 is executed by passing it to the PSL. Otherwise, expr2 is evaluated as an expression and if it is true, then body2 is executed, and so on. If none of the expressions evaluates to true, then bodyN is executed. The then and else arguments are optional, to make the command easier to read. There may be any number of elseif clauses, including zero. BodyN may also be omitted as long as else is omitted too. Returns The return value from the command is the result of the body script that was executed, or an empty string, if none of the expressions was non-zero and there was no bodyN. Example Displays "yes" if variable host equals "vax", or "no" if it is not:
if {$host == "vax"} {message "yes"} else {message "no"}

PowerTerm Series User’s Guide 162
incr Description Increment the value of a variable. Syntax incr varName increment Notes Increments the value stored in the variable whose name is varName. The value of the variable must be an integer. If increment is supplied, then its value (which must be an integer) is added to the value of variable varName; otherwise, 1 is added to varName. The new value is stored as a decimal string in variable varName and also returned as result.
Returns Returns the new varName value. Example Uses the incr command to increase for loop counter:
for {i = 0} {$i < 10} {incr i} {commands...}
Chapter 4, Scripts
criptsS
163
info Description Return information about the state of the PSL interpreter. Syntax info option [arg arg ...] Notes This command provides information about various internals of the PSL interpreter. The legal options (which may be abbreviated) are: info args procname Returns a list containing the names of the arguments to procedure procname, in order. Procname must be the name of a PSL command procedure. info body procname Returns the body of procedure procname. Procname must be the name of a PSL command procedure. info cmdcount Returns a count of the total number of commands that have been invoked in this interpreter. info commands [pattern} If pattern is not specified, returns a list of names of all the PSL commands, including both the built-in commands and the command procedures defined using the proc command. If pattern is specified, only those names matching pattern are returned. Matching is determined using the same rules as for string match. info complete command

PowerTerm Series User’s Guide 164
Returns 1 if command is a complete PSL command in the sense of having no unclosed quotes, braces, brackets or array element names, If the command does not appear to be complete, then 0 is returned. This command is typically used in line-oriented input environments to allow users to type in commands that span multiple lines; if the command is not complete, the script can delay evaluating it until additional lines have been typed to complete the command. info default procname arg varname Procname must be the name of a PSL command procedure and arg must be the name of an argument to that procedure. If arg does not have a default value, then the command returns 0. Otherwise, it returns 1 and places the default value of arg into variable varname. info exists varName Returns 1 if the variable named varName exists in the current context (either as a global or local variable), returns 0 otherwise. info globals [pattern] If pattern is not specified, returns a list of all the names of currently defined global variables. If pattern is specified, only those names matching pattern are returned. Matching is determined using the same rules as for string match. info level [number] If number is not specified, this command returns a number giving the stack level of the invoking procedure, or 0 if the command is invoked at top-level. If number is specified, then the result is a list consisting of the name and arguments for the procedure call at level number on the stack. If number is positive, then it selects a particular stack level (1 refers to the top-most active procedure, 2 to the procedure it called, and so on); otherwise, it gives a level relative to the current level (0 refers to the current procedure, -1 to its caller, and so on). See the uplevel command for more information on what stack levels mean. info library Returns the name of the library directory in which standard PSL scripts are stored. The default value for the library is "lib", but it may be overridden by setting the PSL_LIBRARY environment variable.

Chapter 4, Scripts
criptsS
165
info locals [pattern] If pattern is not specified, returns a list of all the names of currently defined local variables, including arguments to the current procedure, if any. Variables defined with the global and upvar commands will not be returned. If pattern is specified, only those names matching pattern are returned. Matching is determined using the same rules as for string match. info procs [pattern] If pattern is not specified, returns a list of all the names of PSL command procedures. If pattern is specified, only those names matching pattern are returned. Matching is determined using the same rules as for string match. info script If a PSL script file is currently being evaluated, then this command returns the name of the innermost file being processed. Otherwise, the command returns an empty string. info vars [pattern] If pattern is not specified, returns a list of all the names of currently visible variables, including both locals and currently visible globals. If pattern is specified, only those names matching pattern are returned. Matching is determined using the same rules as for string match.
Returns Returns the appropriate info value. Example Displays "Yes" if variable varName exists, otherwise "No":
if {[info exists varName] == "vax"} {message "yes"} else {message "no"}

PowerTerm Series User’s Guide 166
join Description Create a string by joining together list elements. Syntax join list [joinString] Notes The list argument must be a valid PSL list. This command returns the string formed by joining all of the elements of list together with joinString separating each adjacent pair of elements. The joinString arrgument defaults to a space character.
Returns Returns the list items separated by joinString. Example Displays "1#2#3#4#5#6#7":
message [join {1 2 3 4 5 6 7} #]
Chapter 4, Scripts
criptsS
167
key Description Map a key to do a certain action. Syntax key [alt+][ctrl+][shift+]pckey option [args...] Notes A PC key or a terminal key may be a combination of control keys plus another key. Performs one of several key operations, depending on option. The legal options are:
key [alt+][ctrl+][shift+]pckey run scriptName Maps a PC key to run a PSL script.
key [alt+][ctrl+][shift+]pckey do commands Maps a PC key to execute PSL commands.
key [alt+][ctrl+][shift+]pckey send [alt+][ctrl+][shift+]vtkey Maps a PC key to send a VT key.
Note The VT key above is a Virtual Terminal key, not DIGITAL's VT emulator key. The available PC keys are: • A–Z, 0–9 • Special symbol keys: ( ` - = \ [ ] ; ' , . / ) • Space, Tab, Capslock, Esc, Backspace, Return • Right, Left, Up, Down arrows • Insert, Delete, Home, End, Pgup, Pgdn • F1–F12 • Print, Scroll, Pause • Numlock, divide, multiply, subtract, add, decimal, enter

PowerTerm Series User’s Guide 168
• Numpad0–numpad9 The available VT keys are: • Esc, Tab, Backspace, Return, F1–F20, Help, Do • udk6-udk20 • Pf1-Pf4, comma, minus, enter • Numpad0–numpad9 • Insert, Remove, Find, Select, Next, Prev • delete, home, end, pgup, pgdn • right, left, up, down arrows • Divide, multiply, subtract, add, decimal, enter • C1–C4, eop, eol
Note Because of support for several terminals, not all keys support all
terminal keyboards, yet it is quite easy to find the name of a requested key in any terminal keyboard. Returns Returns an empty string. Examples The following line maps ctrl+alt+f5 to activate Notepad.exe:
key ctrl+alt+f5 do {exec notepad.exe} The following line maps Shift+Alt+A to run script Menu.psl:
key shift+alt+a run menu.psl The following line maps the Scroll Lock key to send do:
key scroll send do The following line maps Alt+F6 to send Ctrl+g:
key alt+f6 send ctrl+g
Chapter 4, Scripts
criptsS
169
lappend Description Append list elements onto a variable. Syntax lappend varName value [value value ...] Notes This command treats the variable given by varName as a list and appends each of the value arguments to that list as a separate element, with spaces between elements. If varName does not exist, it is created as a list with elements given by the value arguments. lappend is similar to append except that the values are appended as list elements rather than raw text. This command provides a relatively efficient way to build up large lists. For example, "lappend a $b" is much more efficient than "a = [concat $a [list $b]]" when $a is long.
Returns Returns the concatenated list. Example Displays "a b {1 2 3} d {1 2 3} 4 5":
a = {a b {1 2 3} d}
message [lappend a {1 2 3} 4 5]
PowerTerm Series User’s Guide 170
lindex
Description Retrieve an element from a list. Syntax lindex list index Notes This command treats list as a PSL list and returns the lindex'th element from it (0 refers to the first element of the list). In extracting the element, lindex observes the same rules concerning braces and quotes and backslashes as the PSL command interpreter; however, variable substitution and command substitution do not occur. Returns Returns the specified item. If lindex is negative or greater than or equal to the number of elements in value, then an empty string is returned.
Example Displays the second item from a list in variable List:
message [lindex $List 2]
Chapter 4, Scripts
criptsS
171
linsert Description Insert elements into a list. Syntax linsert list index element [element element ...] Notes This command produces a new list from list by inserting all of the element arguments just before the index element of list. Each element argument will become a separate element of the new list. If index is less than or equal to zero, then the new elements are inserted at the beginning of the list. If index is greater than or equal to the number of elements in the list, then the new elements are appended to the list.
Returns Returns the new list with old and new items.
Example Inserts items "vax {hp digital ibm} dg" after item 3 in List:
message [linsert $List 3 vax {hp digital ibm} dg]
PowerTerm Series User’s Guide 172
list Description Create a list. Syntax list arg [arg arg ...] Notes This command returns a list comprised of all the args. Braces and backslashes are added as necessary, so that the index command may be used on the result to re-extract the original arguments, and also so that eval may be used to execute the resulting list, with arg comprising the command's name and the other args comprising its arguments. list produces slightly different results than concat: concat removes one level of grouping before forming the list, while list works directly from the original arguments. Returns Returns the new list. Examples
list a b {c d e} {f {g h}} will return "a b {c d e} {f {g h}}"
concat a b {c d e} {f {g h}} will return "a b c d e f {g h}"

Chapter 4, Scripts
criptsS
173
llength Description Count the number of elements in a list. Syntax llength list Notes Treats list as a list and returns a decimal string giving the number of elements in it.
Example
llength {1 2 {ab cd fff} {18 19}} will return 4.

PowerTerm Series User’s Guide 174
lrange Description Return one or more adjacent elements from a list. Syntax lrange list first last Notes list must be a valid PSL list. This command will return a new list consisting of elements first through last, inclusive. Last may be end (or any abbreviation of it) to refer to the last element of the list. If first is less than zero, it is treated as if it were zero. If last is greater than or equal to the number of elements in the list, then it is treated as if it were end. If first is greater than last, then an empty string is returned. "lrange list first first" does not always produce the same result as "lindex list first" (although it often does for simple fields that are not enclosed in braces). It does, however, produce exactly the same results as "list [lindex list first]".
Returns Returns the items in the range. Example
lrange "1 2 3 {3 4 5} a { b c} d" 2 5 will return "3 {3 4 5} a { b c}".

Chapter 4, Scripts
criptsS
175
lreplace Description Replace elements in a list with new elements. Syntax lreplace list first last [element element ...] Notes lreplace returns a new list formed by replacing one or more elements of list with the element arguments. First gives the index in list of the first element to be replaced. If first is less than zero, then it refers to the first element of list — the element indicated by first must exist in the list. Last gives the index in list of the last element to be replaced; it must be greater than or equal to first. Last may be end (or any abbreviation of it) to indicate that all elements between first and the end of the list should be replaced. The element arguments specify zero or more new arguments to be added to the list in place of those that were deleted. Each element argument will become a separate element of the list. If no element arguments are specified, then the elements between first and last are simply deleted.
Returns Returns the new list. Example
lreplace "1 2 3 {3 4 5} a { b c} d" 2 5 one two will return "1 2 one two d".
PowerTerm Series User’s Guide 176
lsearch Description See if a list contains a particular element. Syntax lsearch [mode] list pattern Notes This command searches the elements of list to see if one of them matches pattern. If so, the command returns the index of the first matching element. If not, the command returns (-1). The mode argument indicates how the elements of the list are to be matched against pattern and it must have one of the following values: -exact The list element must contain exactly the same string as pattern. -glob Pattern is a glob-style pattern, which is matched against each list element using the same rules as the string match command. -regexp Pattern is treated as a regular expression and matched against each list element using the same rules as the regexp command. If mode is omitted, then it defaults to -glob.
Returns Returns the index of the first matched item or -1. Example
lsearch "vax unix ibm" *n* will find the item "unix" and return 1.

Chapter 4, Scripts
criptsS
177
lsort Description Sort the elements of a list. Syntax lsort [switches] list Notes This command sorts the elements of list, returning a new list in sorted order. By default, ASCII sorting is used, with the result returned in increasing order. However, any of the following switches may be specified before list to control the sorting process (unique abbreviations are accepted): -ascii Uses string comparison with ASCII collation order. This is the default. -integer Converts list elements to integers and uses integer comparison. -real Converts list elements to floating-point values and uses floating comparison. -command command Uses command as a comparison command. To compare two elements, evaluate a PSL script consisting of command with the two elements appended as additional arguments. The script should return an integer less than, equal to, or greater than zero if the first element is to be considered less than, equal to, or greater than the second, respectively. -increasing Sorts the list in increasing order ("smallest" items first). This is the default. -decreasing Sorts the list in decreasing order ("largest" items first).

PowerTerm Series User’s Guide 178
Returns
Returns the sorted list. Example Returns "ibm unix vax":
lsort "vax unix ibm"

Chapter 4, Scripts
criptsS
179
menu Description Change menu type. Syntax menu option Notes Changes PowerTerm main menu type. menu hide Removes the main menu. menu minimize Minimizes the main menu (with one click on the menu, you can restore it). menu restore Restores the menu to its normal state. Example Hides the menu:
menu hide

PowerTerm Series User’s Guide 180
message Description Display a message. Syntax message string [title text] [option] Notes Diplays the message string on the screen. The "title text" option replaces the default "PowerTerm" title with text. The option can be one of the following and will change the type of the message box:
info, error, question
Example Displays the message "Hello" with title "Welcome" and message type info:
message Hello title Welcome info
Chapter 4, Scripts
criptsS
181
open Description Open a file. Syntax open fileName [access] [permissions] Notes This command opens a file and returns an identifier that may be used in future invocations of commands like read, gets, puts, and close. fileName gives the name of the file to open. The access argument indicates the way in which the file is to be accessed. It may take two forms: either a string or a list of POSIX access flags. It defaults to “r”. In the first form, access may have any of the following values: r Opens the file for reading only; the file must already exist. r+ Opens the file for both reading and writing; the file must already exist. w Opens the file for writing only. Truncate it if it exists. If it does not exist, creates a new file. w+ Opens the file for reading and writing. Truncates it if it exists. If it does not exist, creates a new file. a Opens the file for writing only. The file must already exist, and the file is positioned so that new data is appended to the file. a+ Opens the file for reading and writing. If the file does not exist, creates a new empty file. Sets the initial access position to the end of the file.
PowerTerm Series User’s Guide 182
In the second form, access consists of a list of any of the following flags, all of which have the standard POSIX meanings. One of the flags must be either RDONLY, WRONLY, or RDWR. RDONLY Opens the file for reading only. WRONLY Opens the file for writing only. RDWR Opens the file for both reading and writing. APPEND Sets the file pointer to the end of the file prior to each write. CREAT Creates the file if it does not already exist (without this flag, it is an error for the file not to exist). EXCL If CREAT is specified also, an error is returned if the file already exists. NOCTTY If the file is a terminal device, this flag prevents the file from becoming the controlling terminal of the process. NONBLOCK Prevents the process from blocking while opening the file. For details refer to your system documentation on the open system call’s O_NONBLOCK flag. TRUNC If the file exists, it is truncated to zero length. If a new file is created as part of opening it, permissions (an integer) is used to set the permissions for the new file in conjunction with the process's file mode creation mask. Permissions defaults to 0666. If a file is opened for both reading and writing, then seek must be invoked between a read and a write, or vice versa (this restriction does not apply to command pipelines opened with open). Returns

Chapter 4, Scripts
criptsS
183
Returns the file ID. Example Opens file "output.dat" for writing, writes data and closes:
File = [open output.dat w]
pets $File "message test"
close $File

PowerTerm Series User’s Guide 184
open-setup-file Description Open setup file. Syntax open-setup-file file-name Notes Opens a saved setup file, replacing the PowerTerm parameters. (Similar to the Open command on the File menu). Returns Returns an empty string.
Example Opens setup file "prog.pts":
open-setup-file prog.pts
Chapter 4, Scripts
criptsS
185
proc Description Create a PSL procedure. Syntax proc name args body Notes The proc command creates a new PSL procedure named name, replacing any existing command or procedure there may have been by that name. Whenever the new command is invoked, the contents of body will be executed by the PSL interpreter. Args specifies the formal arguments to the procedure. It consists of a list, possibly empty, each of those elements specifies one argument. Each argument specifier is also a list with either one or two fields. If there is only a single field in the specifier, then it is the name of the argument; if there are two fields, then the first is the argument name and the second is its default value. When name is invoked, a local variable will be created for each of the formal arguments to the procedure. Its value will be the value of corresponding argument in the invoking command or the argument's default value. Arguments with default values need not be specified in a procedure invocation. However, there must be enough actual arguments for all the formal arguments that do not have defaults, and there must not be any extra actual arguments. There is one special case to permit procedures with variable numbers of arguments: If the last formal argument has the name args, then a call to the procedure may contain more actual arguments than the procedure has formals. In this case, all of the actual arguments starting at the one that would be assigned to args are combined into a list (as if the list command had been used). This combined value is assigned to the local variable args.

PowerTerm Series User’s Guide 186
When body is being executed, variable names normally refer to local variables, which are created automatically when referenced and deleted when the procedure returns. One local variable is automatically created for each of the procedure's arguments. Global variables can only be accessed by invoking the global command or the upvar command. When a procedure is invoked, the procedure's return value is the value specified in a return command. If the procedure does not execute an explicit return, then its return value is the value of the last command executed in the procedure's body. If an error occurs while executing the procedure body, then the procedure-as-a-whole will return that same error. Returns Returns an empty string. Example Defines a recursive factorial procedure:
proc factorial x {
if {$x == 1} {return 1}
return [expr {$x * [factorial [expr $x - 1]]}]
}
message [facorial 4] will display 24.
Chapter 4, Scripts
criptsS
187
puts Description Write to a file. Syntax puts [-nonewline] fileId string Notes Writes the characters given by string to the file given by fileId. FileId must have been the return value from a previous call to open. It must refer to a file that was opened for writing. puts normally outputs a newline character after string, but this feature may be suppressed by specifying the -nonewline switch. Output to files is buffered internally by PSL. The flush command may be used to force buffered characters to be output.
Returns Returns an empty string. Example Opens file "data" for writing, writes data, and closes:
outFile = [open data w]
puts $outFile Information
close $outFile
PowerTerm Series User’s Guide 188
pwd Description Return the current working directory. Syntax pwd Returns Returns the path name of the current working directory.
Example Displays the current working directory:
message [pwd]

Chapter 4, Scripts
criptsS
189
read Description Read from a file. Syntax read [-nonewline] fileId or read fileId numBytes Notes In the first form, all of the remaining bytes are read from the file given by fileId. They are returned as the result of the command. If the -nonewline switch is specified, then the last character of the file is discarded if it is a newline. In the second form, the extra argument specifies how many bytes to read: exactly this many bytes will be read and returned, unless there are fewer than numBytes bytes left in the file. In this case, all the remaining bytes are returned. FileId must the return value from a previous call to open, it must refer to a file that was opened for reading.
Returns Returns the data read from the file. Example Opens file "data" for reading, reads 10 bytes, and closes:
inFile = [open data]
data = [read $inFile 20]
close $inFile
PowerTerm Series User’s Guide 190
regexp
Description Match a regular expression against a string. Syntax regexp [switches] exp string [matchVar] [subMatchVar subMatchVar ...] Notes Determines whether the regular expression exp matches part or all of string and returns 1 if it does, 0 if it does not. If additional arguments are specified after string, then they are treated as the names of variables in which to return information about which part(s) of string matched exp. MatchVar will be set to the range of string that matched all of exp. The first subMatchVar will contain the characters in string that matched the leftmost parenthesized subexpression within exp. The next subMatchVar will contain the characters that matched the next parenthesized subexpression to the right in exp, and so on. If the initial arguments to regexp start with "-", then they are treated as switches. The following switches are supported: -nocase Causes uppercase characters in string to be treated as lower case during the matching process. -indices Changes what is stored in the subMatchVars. Instead of storing the matching characters from string, each variable will contain a list of two decimal strings giving the indices in string of the first and last characters in the matching range of characters. -- Marks the end of switches. The argument following this one will be treated as exp even if it starts with a "-".

Chapter 4, Scripts
criptsS
191
If there are more subMatchVar's than parenthesized subexpressions within exp, or if a particular subexpression in exp does not match the string (for example, because it was in a portion of the expression that was not matched), then the corresponding subMatchVar will be set to "-1 -1" if -indices has been specified or to an empty string otherwise. Regular Expressions A regular expression is zero or more branches, separated by "|". It matches anything that matches one of the branches. A branch is zero or more pieces, concatenated. It matches a match for the first, followed by a match for the second, and so on. A piece is an atom possibly followed by "*", "+", or "?". An atom followed by "*" matches a sequence of 0 or more matches of the atom. An atom followed by "+" matches a sequence of 1 or more matches of the atom. An atom followed by "?" matches a match of the atom, or the null string. An atom is a regular expression in parentheses (matching a match for the regular expression), a range (see below), "." (matching any single character), "^" (matching the null string at the beginning of the input string), "$" (matching the null string at the end of the input string), a "\" followed by a single character (matching that character), or a single character with no other significance (matching that character). A range is a sequence of characters enclosed in "[]". It normally matches any single character from the sequence. If the sequence begins with "^", it matches any single character not from the rest of the sequence. If two characters in the sequence are separated by "-", this is shorthand for the full list of ASCII characters between them (for example, "[0–9]" matches any decimal digit). To include a literal "]" in the sequence, make it the first character (following a possible "^"). To include a literal "-", make it the first or last character. Choosing Among Alternative Matches In general there may be more than one way to match a regular expression to an input string. For example, consider the following command:
regexp (a*)b* aabaaabb x y

PowerTerm Series User’s Guide 192
Considering only the rules given so far, x and y could end up with the values aabb and aa, aaab and aaa, ab and a, or any of several other combinations. To resolve this potential ambiguity, regexp chooses among alternatives using the rule "first then longest". In other words, it considers the possible matches in order, working from left to right across the input string and the pattern, and it attempts to match longer pieces of the input string before shorter ones. More specifically, the following rules apply in decreasing order of priority: Rule 1: If a regular expression could match two different parts of an input string, then it will match the one that begins earliest. Rule 2: If a regular expression contains "|" operators, then the leftmost matching subexpression is chosen. Rule 3: In "*", "+", and "?" constructs, longer matches are chosen in preference to shorter ones. Rule 4: In sequences of expression components, the components are considered from left to right. In the example from above, (a*)b* matches aab: the (a*) portion of the pattern is matched first and it consumes the leading aa, then the b* portion of the pattern consumes the next b. Returns Returns 1 if it matches, 0 if it does not. Example Consider the following example: regexp (ab|a)(b*)c abc x y z After this command, x will be abc, y will be ab, and z will be an empty string.

Chapter 4, Scripts
criptsS
193
Rule 4 specifies that (ab|a) gets first shot at the input string, and Rule 2 specifies that the ab subexpression is checked before the a subexpression. Thus the b has already been claimed before the (b*) component is checked, and (b*) must match an empty string.

PowerTerm Series User’s Guide 194
regsub Description Perform substitutions based on regular expression pattern matching. Syntax regsub [switches] exp string subSpec varName Notes This command matches the regular expression exp against string, and it copies string to the variable whose name is given by varName. The command returns 1 if there is a match and 0 if there is not. If there is a match, then while copying string to varName, the portion of string that matched exp is replaced with subSpec. If subSpec contains a "&" or "0", then it is replaced in the substitution with the portion of string that matched exp. If subSpec contains a "n", where n is a digit between 1 and 9, then it is replaced in the substitution with the portion of string that matched the n-th parenthesized subexpression of exp. Additional backslashes may be used in subSpec to prevent special interpretation of "&" or "0" or "n" or backslash. The use of backslashes in subSpec tends to interact badly with the PSL parser's use of backslashes, so it is generally safest to enclose subSpec in braces if it includes backslashes. If the initial arguments to regexp start with "-", then they are treated as switches. The following switches are supported: -all All ranges in string that match exp are found and substitution is performed for each of these ranges. Without this switch, only the first matching range is found and substituted. If -all is specified, then "&" and "n" sequences are handled for each substitution, using the information from the corresponding match. -nocase
Chapter 4, Scripts
criptsS
195
Uppercase characters in string will be converted to lowercase before matching against exp; however, substitutions specified by subSpec use the original unconverted form of string. -- Marks the end of switches. The argument following this one will be treated as exp even if it starts with a "-". Returns Returns 1 if it matches, 0 if it does not. Example Returns 1 and variable new will contain "*abc*abc*def". The "abc" portion of "abcdef" was substituted by "*abc*abc*" and the "def" portion was left a the end.
regsub (ab|a)(b*)c abcdef *&*&* new

PowerTerm Series User’s Guide 196
rename
Description Rename or delete a command. Syntax rename oldName newName Notes Renames the command that used to be called oldName so that it is now called newName. If newName is an empty string, then oldName is deleted. Returns Returns an empty string as result.
Example Renames the for command to loop and then uses it: rename for loop
loop {i = 0} {$i < 10} {incr i} {commands...}
Chapter 4, Scripts
criptsS
197
return Description Return from a procedure. Syntax return [-code code] [-errorcode code] [string] Notes Returns immediately from the current procedure (or top-level command or run command), with string as the return value. If string is not specified, then an empty string will be returned as result. Exceptional Returns In the usual case where the -code option is not specified, the procedure will return normally. However, the -code option may be used to generate an exceptional return from the procedure. Code may have any of the following values: ok Normal return: same as if the option is omitted. error Error return: same as if the error command were used to terminate the procedure, except for handling of errorInfo and errorCode variables (see below). return The current procedure will return with a completion code of PSL_RETURN, so that the procedure that invoked it will return also. break The current procedure will return with a completion code of PSL_BREAK, which will terminate the innermost nested loop in the code that invoked the current procedure. continue The current procedure will return with a completion code of PSL_CONTINUE, which will terminate the current iteration of the innermost nested loop in the code that invoked the current procedure.

PowerTerm Series User’s Guide 198
value Value must be an integer; it will be returned as the completion code for the current procedure. The -code option is rarely used. It is provided so that procedures that implement new control structures can reflect exceptional conditions back to their callers. An additional option, -errorcode, may be used to provide additional information during error returns. This option is ignored unless code is error. If the -errorcode option is specified, then code provides a value for the errorcode variable. If the option is not specified then errorcode will default to NONE.
Returns Returns the string specified or an empty string.
Example Defines a division procedure with two parameters. If the second parameter is zero, returns with continue error code; otherwise, returns division of the two. In the rest of the code, in a loop: inputs two numbers and activates the divide procedure. If second parameter is zero divide will act as a continue command and return to start of the while loop; otherwise, division result will be displayed and the loop will be terminated.
proc divide {x y} {
if {$y == 0} {return -code continue 0} else {
return [expr $x / $y]}
}
while {1} {
# commands to input data for variables x & y ...
result = [divide $x $y]

Chapter 4, Scripts
criptsS
199
message "$x / $y = $result"
break
}

PowerTerm Series User’s Guide 200
run Description Evaluate a file as a PSL script. Syntax run fileName [parameters...] Notes Read file fileName and pass the contents to the PSL interpreter as a script to evaluate in the normal fashion. The return value from run is the return value of the last command executed from the file. If an error occurs in evaluating the contents of the file, then the run command will return that error. If a return command is invoked from within the file, then the remainder of the file will be skipped and the run command will return normally with the result from the return command.
If parameters are included, variables named $p1 to $pN will exist, according to number of parameters.
Returns Returns the value from the last command in the script.
Example
run test.psl

Chapter 4, Scripts
criptsS
201
scan Description Parse string using conversion specifiers in the style of sscanf. Syntax scan string format varName [varName ...] Notes This command parses fields from an input string in the same fashion as the ANSI C sscanf procedure and returns a count of the number of fields successfully parsed. String gives the input to be parsed and format indicates how to parse it, using % conversion specifiers as in sscanf. Each varName gives the name of a variable; when a field is scanned from string, the result is converted back into a string and assigned to the corresponding variable. Details on Scanning scan operates by scanning string and formatString together. If the next character in formatString is a blank or tab, then it is ignored. Otherwise, if it is not a % character, then it must match the next non-white-space character of string. When a % is encountered in formatString, it indicates the start of a conversion specifier. A conversion specifier contains three fields after the %: a *, which indicates that the converted value is to be discarded instead of assigned to a variable; a number indicating a maximum field width; and a conversion character. All of these fields are optional except for the conversion character. When scan finds a conversion specifier in formatString, it first skips any white-space characters in string. Then it converts the next input characters according to the conversion specifier and stores the result in the variable given by the next argument to scan. The following conversion characters are supported: d

PowerTerm Series User’s Guide 202
The input field must be a decimal integer. It is read in and the value is stored in the variable as a decimal string. o The input field must be an octal integer. It is read in and the value is stored in the variable as a decimal string. x The input field must be a hexadecimal integer. It is read in and the value is stored in the variable as a decimal string. c A single character is read in and its binary value is stored in the variable as a decimal string. Initial white space is not skipped in this case, so the input field may be a white-space character. This conversion is different from the ANSI standard in that the input field always consists of a single character and no field width may be specified. s The input field consists of all the characters up to the next white-space character; the characters are copied to the variable. e or f or g The input field must be a floating-point number consisting of an optional sign, a string of decimal digits possibly containing a decimal point, and an optional exponent consisting of an e or E followed by an optional sign and a string of decimal digits. It is read in and stored in the variable as a floating-point string. [chars] The input field consists of any number of characters in chars. The matching string is stored in the variable. If the first character between the brackets is a "]", then it is treated as part of chars rather than the closing bracket for the set. [^chars] The input field consists of any number of characters not in chars. The matching string is stored in the variable. If the character immediately following the "^" is a "]", then it is treated as part of the set rather than the closing bracket for the set.

Chapter 4, Scripts
criptsS
203
The number of characters read from the input for a conversion is the largest number that makes sense for that particular conversion (for example, as many decimal digits as possible for %d, as many octal digits as possible for %o, and so on). The input field for a given conversion terminates either when a white-space character is encountered or when the maximum field width has been reached, whichever comes first. If a "*" is present in the conversion specifier, then no variable is assigned and the next scan argument is not consumed. Returns Returns the number of scanned parameters and fills the variables with their values.
Example Scans the following string and sets the variables:
var1 = 123 var2 = 65 ("A" ASCII) var3 = unix.
scan "123 A unix" "%d %c %s" var1 var2 var3
PowerTerm Series User’s Guide 204
screen Description Copy data from the screen. Syntax screen startRow startCol [endRow] endCol Notes screen copies complete lines from the starting position (startRow, startCol) to and including the end position (endRow, endCol). If endRow is not specified, endRow equals startRow. Returns Returns the data copied from the screen. Example Consider the following screen:
Line 1 : "line 1: 1234567890"
Line 2 : "line 2: 1234567890"
Line 3 : "line 3: 1234567890"
Line 4 : "line 4: 1234567890"
data = [screen 2 15 4 10] Sets variable data to screen data from (2, 15) to (4, 10) :
"7890\nline 2: 1234567890\nline 3: 12" where "\n" is a line separator.

Chapter 4, Scripts
criptsS
205
screen-rect
Description Copy data from the screen. Syntax screen-rect startRow startCol [endRow] endCol Notes screen-rect copies rectangular data from the starting position (startRow, startCol) to and including the end position (endRow, endCol). If endRow is not specified, endRow equals startRow. Returns Returns the data copied from the screen. Example Consider the following screen: Line 1 : "line 1: 1234567890" Line 2 : "line 2: 1234567890" Line 3 : "line 3: 1234567890" Line 4 : "line 4: 1234567890" data = [screen-rect 2 2 4 15] Sets variable data to screen data from (2, 2) to (4, 15) :
"ine 1: 1234567\nine 2: 1234567\nine 3: 1234567\n" where "\n" is a line separator.
PowerTerm Series User’s Guide 206
seek Description Change the access position for an open file. Syntax seek fileId offset [origin] Notes Changes the current access position for fileId. FileId must have been the return value from a previous call to open. The offset and origin arguments specify the position at which the next read or write will occur for fileId. Offset must be an integer (which may be negative) and origin must be one of the following: start The new access position will be offset bytes from the start of the file. current The new access position will be offset bytes from the current access position; a negative offset moves the access position backwards in the file. end The new access position will be offset bytes from the end of the file. A negative offset places the access position before the end-of-file, and a positive offset places the access position after the end-of-file. The origin argument defaults to start. Returns Returns an empty string. Example Opens file "file1" for reading. Moves to position 55 in the file. Reads 10 bytes to variable data and closes file:
fileId = [open file1]

Chapter 4, Scripts
criptsS
207
seek $fileId 55 start
data = [read $fileId 10]
close $fileId

PowerTerm Series User’s Guide 208
send Description Send data to the host. Syntax send data Notes Sends data as though it was typed from the keyboard. Returns Returns an empty string. Example The host receives the following data and shows the current directory:
send "dir^M"
Note "^M" sends ctrl-m. The "^" sign followed by a letter represents the
control code of that letter.

Chapter 4, Scripts
criptsS
209
session Description Modify the communication session status. Syntax session option Notes Performs one of several session operations, depending on option. The legal options are: session open Opens a session according to communication parameters previously defined with the set command. session modify Modifies the current session according to communication parameters previously defined with the set command. session close Closes the current session. Returns Returns an empty string. Examples
1 Opens a COM session with the following parameters:
set comm-type com
set port-number 2
set baud-rate 19200
set protocol-type xonxoff
session open 2 Modifies the COM session to 9600 baud-rate:

PowerTerm Series User’s Guide 210
set baud-rate 9600
session modify 3 Opens the setup file "abc.pts" for working with specific
PowerTerm parameters for the "abc" host (similar to the Open command on the File menu). Then opens a Telnet session to host "abc" (similar to the Connect command on the Communication menu).
open-setup-file abc.pts
set comm-type telnet
set host-name abc
session open 4 Opens a lat session to host "abc" through DIGITAL
PATHWORKS 32:
set comm-type lat
set service-name abc
session open 5 Opens a lat session to host "abc" through Novell's NetWare for
LAT:
set comm-type lat
set server-name NovellServerName
set service-name abc
session open 6 Closes the current session.
session close
Note

Chapter 4, Scripts
criptsS
211
In order to automatically connect to a host, make the appropriate script. Click Properties on the File menu in the Program Manager and add the name of the script (with parameters) to the Command Line. Every time the icon is clicked, PowerTerm will run the script and open the session. Consider the following script, named "telnet.psl", to connect to a host with telnet protocol:
set comm-type telnet
set host-name $p1
session open Click Properties on the File menu, and enter: C:\PTW\PTW.EXE telnet.psl HostName
Every time you click the icon, "telnet.psl" will execute and connect to HostName. In this manner you can create several icons for automatic connection to all your organization computers.
PowerTerm Series User’s Guide 212
set Description Set a new value to a PowerTerm parameter. Syntax set parameter value [value2] Notes Sets a new value to one of the PowerTerm parameters. set baud-rate value Sets the serial communication baud rate to one of the following values: 300, 600, 1200, 1800, 2400, 3600, 4800, 7200, 9600, 14400, 19200, 38400, 57600, 115200. set protocol-type value Sets the serial communication protocol type to one of the following values: none, xonxoff, hardware. set parity bits type Sets the serial communication parity bits and type to one of the following values: bits: 7, 8. type: none, even, odd, mark, space. set stop-bits value Sets the serial communication stop bits to one of the following values: 1, 2. set comm-type value Sets the communication type to one of the following values: com: Serial communication. int14: Communication with BIOS interrupt 14. lat: Network communication with DIGITAL LAT. cterm: Serial communication with DIGITAL CTERM. telnet: Network communication with TCP/IP Telnet.

Chapter 4, Scripts
criptsS
213
nwlat: Network communication NetWare for LAT. set port-number value Sets the serial communication port number to one of the following values: 1, 2, 3, 4. set host-name string Sets the telnet and cterm communication host name. set service-name string Sets the lat communication service name (may also specify a host name). set user-name string Sets the NetWare for LAT user name. set server-name string Sets the NetWare for LAT user name. set session-name string Sets the communication session name on the emulation's title bar. Returns Returns an empty string.
PowerTerm Series User’s Guide 214
split Description Split a string into a proper PSL list. Syntax split string [splitChars] Notes Returns a list created by splitting string at each character that is in the splitChars argument. Each element of the result list will consist of the characters from string that occur between instances of the characters in splitChars. Empty list elements will be generated if string contains adjacent characters in splitChars, or if the first or last character of string is in splitChars. If splitChars is an empty string, then each character of string becomes a separate element of the result list. SplitChars defaults to the standard white-space characters. Returns Returns the split string. Examples
split "comp.unix.misc" "." returns "comp unix misc"
split "Hello world" "" returns "H e l l o { } w o r l d"
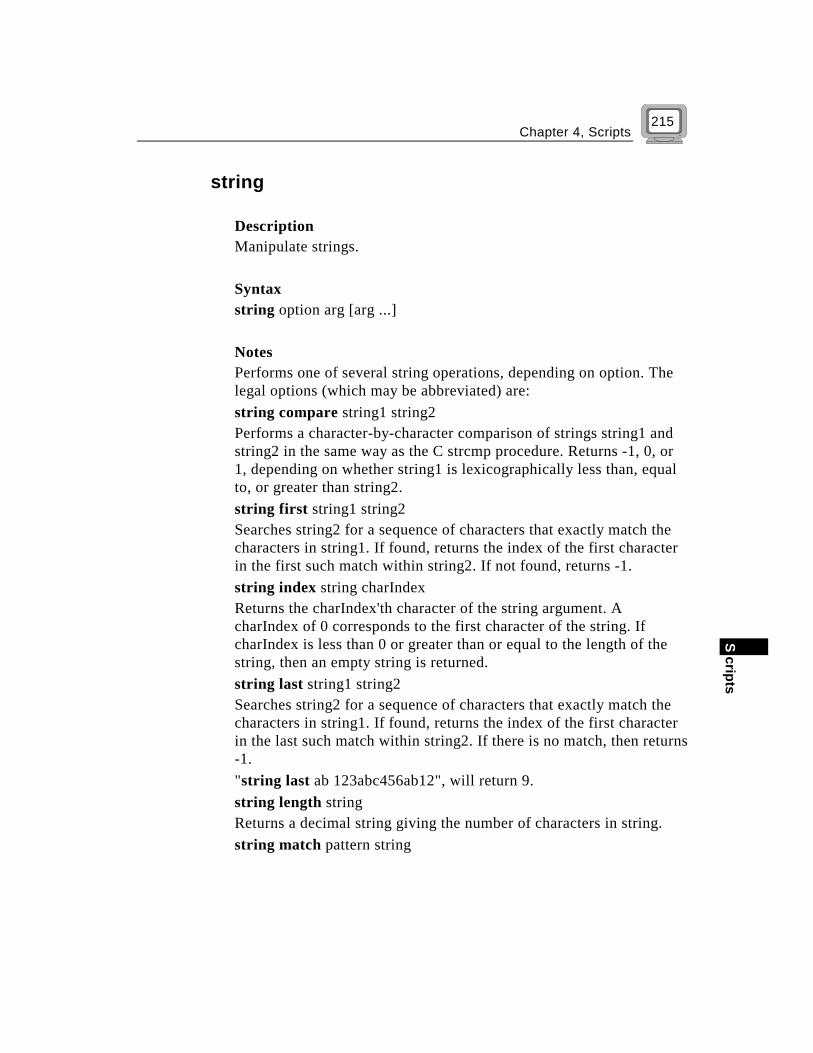
Chapter 4, Scripts
criptsS
215
string Description Manipulate strings. Syntax string option arg [arg ...] Notes Performs one of several string operations, depending on option. The legal options (which may be abbreviated) are: string compare string1 string2 Performs a character-by-character comparison of strings string1 and string2 in the same way as the C strcmp procedure. Returns -1, 0, or 1, depending on whether string1 is lexicographically less than, equal to, or greater than string2. string first string1 string2 Searches string2 for a sequence of characters that exactly match the characters in string1. If found, returns the index of the first character in the first such match within string2. If not found, returns -1. string index string charIndex Returns the charIndex'th character of the string argument. A charIndex of 0 corresponds to the first character of the string. If charIndex is less than 0 or greater than or equal to the length of the string, then an empty string is returned. string last string1 string2 Searches string2 for a sequence of characters that exactly match the characters in string1. If found, returns the index of the first character in the last such match within string2. If there is no match, then returns -1. "string last ab 123abc456ab12", will return 9. string length string Returns a decimal string giving the number of characters in string. string match pattern string

PowerTerm Series User’s Guide 216
If pattern matches string, returns 1, if it does not, returns 0. For the two strings to match, their contents must be identical except that the following special sequences may appear in pattern: * Matches any sequence of characters in string, including a null string. ? Matches any single character in string. [chars] Matches any character in the set given by chars. If a sequence of the form x-y appears in chars, then any character between x and y, inclusive, will match. \x Matches the single character x. This provides a way of avoiding the special interpretation of the characters *?[]\e in pattern. string range string first last Returns a range of consecutive characters from string, starting with the character whose index is first and ending with the character whose index is last. An index of 0 refers to the first character of the string. Last may be end to refer to the last character of the string. If first is less than zero, then it is treated as if it were zero, and if last is greater than or equal to the length of the string, then it is treated as if it were end. If first is greater than last, then an empty string is returned. string tolower string Returns a value equal to string except that all uppercase letters have been converted to lower case. string toupper string Returns a value equal to string except that all lowercase letters have been converted to upper case. string trim string [chars] Returns a value equal to string except that any leading or trailing characters from the set given by chars are removed. If chars is not specified, then white space is removed (spaces, tabs, newlines, and carriage returns). string trimleft string [chars]
Chapter 4, Scripts
criptsS
217
Returns a value equal to string except that any leading characters from the set given by chars are removed. If chars is not specified, then white space is removed (spaces, tabs, newlines, and carriage returns). string trimright string [chars] Returns a value equal to string except that any trailing characters from the set given by chars are removed. If chars is not specified, then white space is removed (spaces, tabs, newlines, and carriage returns). Returns Returns the converted string. Example Returns "UNIX".
string toupper Unix

PowerTerm Series User’s Guide 218
switch Description Evaluate one of several scripts, depending on a given value. Syntax switch [options] string [pattern body [pattern body ...]] or switch [options] string {pattern body [pattern body...]} Notes The switch command matches its string argument against each of the pattern arguments in order. As soon as it finds a pattern that matches string, it evaluates the following body argument by passing it recursively to the PSL interpreter and returns the result of that evaluation. If the last pattern argument is default, then it matches anything. If no pattern argument matches string and no default is given, then the switch command returns an empty string. If the initial arguments to switch start with "-", then they are treated as options. The following options are currently supported: -exact Use exact matching when comparing string to a pattern. This is the default. -glob When matching string to the patterns, use glob-style matching (i.e. the same as implemented by the string match command). -regexp When matching string to the patterns, use regular expression matching (i.e. the same as implemented by the regexp command). -- Marks the end of options. The argument following this one will be treated as string even if it starts with a "-". Two syntaxes are provided for the pattern and body arguments.

Chapter 4, Scripts
criptsS
219
The first uses a separate argument for each of the patterns and commands. This form is convenient if substitutions are desired on some of the patterns or commands. The second form places all of the patterns and commands together into a single argument. The argument must have proper list structure, with the elements of the list being the patterns and commands. The second form makes it easy to construct multiline switch commands, because the braces around the whole list make it unnecessary to include a backslash at the end of each line. Since the pattern arguments are in braces in the second form, no command or variable substitutions are performed on them. This makes the behavior of the second form different than the first form in some cases. If a body is specified as "-'', it means that the body for the next pattern should also be used as the body for this pattern (if the next pattern also has a body of "-", then the body after that is used, and so on). This feature makes it possible to share a single body among several patterns. Returns Returns the output of the last command of the executed body. Example
switch abc a-b {format 1} abc {format 2} default {format 3}
will return "2".
switch -regexp aaab {
^a.*b$ -
b {format 1}
a* {format 2}
default {format 3}
}

PowerTerm Series User’s Guide 220
will return "1".
switch xyz {
a -
b {format 1}
a* {format 2}
default {format 3}
}
will return "3".

Chapter 4, Scripts
criptsS
221
tell Description Return current access position for an open file. Syntax tell fileId Notes Returns a decimal string giving the current access position in fileId. FileId must have been the return value from a previous call to open.
Returns Returns the file position. Example Opens a file and Reads twice 10 bytes. tell will return "20":
fileId = [open data"]
read $fileId 10
read $fileId 10
position = [tell $fileId]
close $fileId

PowerTerm Series User’s Guide 222
time Description Time the execution of a script. Syntax time scriptCommand count Notes Calls the PSL interpreter count times to evaluate scriptCommand (or once if count is not specified). It then returns a string of the form "503 microseconds per iteration", which indicates the average amount of time required per iteration, in microseconds. Time is measured in elapsed time, not CPU time.
Returns Returns the elapsed time of a PSL command. Example Displays the average elapsed time of "run test.psl" command:
message [time "run test.ppl" 100]
Chapter 4, Scripts
criptsS
223
unset Description Delete variables. Syntax unset name [name ...] Notes This command removes one or more variables. Each name is a variable name, specified in any of the ways acceptable to variable assignment. If a name refers to an element of an array, then that element is removed without affecting the rest of the array. If a name consists of an array name with no parenthesized index, then the entire array is deleted. An error occurs if any of the variables does not exist, and any variables after the nonexistent one are not deleted. Returns Returns an empty string. Example Sets and then deletes variable a:
a = abc
unset a
PowerTerm Series User’s Guide 224
uplevel
Description Execute a script in a different stack frame. Syntax uplevel [level] arg [arg ...] Notes All of the arg arguments are concatenated as if they had been passed to concat. The result is then evaluated in the variable context indicated by level. uplevel returns the result of that evaluation. If level is an integer, then it gives a distance to move (up the procedure calling stack) before executing the command. If level consists of "#" followed by a number, then the number gives an absolute level number. If level is omitted, then it defaults to 1. Level cannot be defaulted if the first command argument starts with a digit or "#". Returns Returns the result of the evaluation. Example Suppose that procedure ‘a’ was invoked from top-level, and that it called ‘b’, and that ‘b’ called ‘c’. Suppose that ‘c’ invokes the uplevel command. If level is 1 or #2 or omitted, then the command will be executed in the variable context of ‘b’. If level is 2 or #1, then the command will be executed in the variable context of ‘a’. If level is 3 or #0, then the command will be executed at top-level (only global variables will be visible). The uplevel command causes the invoking procedure to disappear from the procedure calling stack while the command is being executed. In the above example, suppose ‘c’ invokes the command
Chapter 4, Scripts
criptsS
225
uplevel 1 {x = 43; d} where ‘d’ is another PSL procedure. The "x = 43" command will modify the variable x in b's context, and ‘d’ will execute at level 3, as if called from ‘b’. If it in turn executes the command uplevel {x = 42} then the "x = 42" command will modify the same variable x in b's context: the procedure ‘c’ does not appear to be on the call stack when ‘d’ is executing. The command "info level" may be used to obtain the level of the current procedure. uplevel makes it possible to implement new control constructs as PSL procedures (for example, uplevel could be used to implement the while construct as a PSL procedure).

PowerTerm Series User’s Guide 226
upvar Description Create link to variable in a different stack frame. Syntax upvar [level] otherVar myVar [otherVar myVar ...] Notes This command arranges for one or more local variables in the current procedure to refer to variables in an enclosing procedure call or to global variables. Level may have any of the forms permitted for the uplevel command, and may be omitted if the first letter of the first otherVar is not "#" or a digit (it defaults to 1). For each otherVar argument, upvar makes the variable by that name in the procedure frame given by level (or at global level, if level is #0 accessible in the current procedure) by the name given in the corresponding myVar argument. The variable named by otherVar need not exist at the time of the call. It will be created the first time myVar is referenced, just like an ordinary variable. upvar may only be invoked from within procedures. MyVar may not refer to an element of an array, but otherVar may refer to an array element. The upvar command simplifies the implementation of call-by-name procedure calling and also makes it easier to build new control constructs as PSL procedures. Returns Returns an empty string. Example Consider the following procedure:
Chapter 4, Scripts
criptsS
227
proc add2 name {
upvar $name x
x = [expr $x+2]
}
Add2 is invoked with an argument giving the name of a variable, and it adds two to the value of that variable. Although add2 could have been implemented using uplevel instead of upvar, upvar makes it simpler for add2 to access the variable in the caller's procedure frame. If an upvar variable is unset (e.g. x in add2 above), the unset operation affects the variable it is linked to, not the upvar variable. There is no way to unset an upvar variable except by exiting the procedure in which it is defined. However, it is possible to retarget an upvar variable by executing another upvar command.

PowerTerm Series User’s Guide 228
wait Description Wait for specific strings received from the host. Syntax wait number for text [at row column] wait number seconds The following notes and examples, relate to the above mentioned syntaxes. Notes This command instructs PowerTerm to wait a specified period of time for a certain string to arrive from the host application. This text is case sensitive. Number refers to the number of seconds. If the string does not arrive from the host application within the specified time, PowerTerm returns the appropriate value. Examples The following script commands instruct PowerTerm to wait for two strings, "username" and "password", during the login process. If the string is not received within 10 seconds, the message “username not found” or “password not found” displays and the script terminates.
Found = [wait 10 for username]
if {$found == 0} {message “Username not found”;return}
send “john^M”
Found = [wait 10 for password]
if {$found == 0} {message “Password not found”;return}
send “john pass^M”
wait 10 seconds
Chapter 4, Scripts
criptsS
229
Note The "^M" string is control-m on the keyboard. wait system This command is for 5250 emulations only. It instructs PowerTerm to wait for the AS/400 to notify it when it is finished processing a screen. At the time of processing the screen data the emulator displays X SYSTEM in the status bar and the user cannot enter any commands. When the AS/400 finishes processing, the X SYSTEM disappears and the script continues with the next command. If the wait system script command is executed when the X SYSTEM is not displayed, wait system will immediately continue with the next script command. wait record This command is for 3270 emulations only. It instructs PowerTerm to wait for the next screen record from the mainframe. When the mainframe finishes processing the screen record, the script continues with the next command. If the wait record script command is executed when the mainframe is not processing a screen record, wait record will immediately continue with the next script command. Note The following note relates to wait system and wait record. Between different screens in the AS/400 environment, there will only be one X SYSTEM. However, in the mainframe environment, there may be several records per screen. For examples of the use of wait system and wait record commands, select the Script/Start Script Recording menu command. Enter several screens into the application and select the Script/Stop Script Recording menu command. You can then save the script and view it.

PowerTerm Series User’s Guide 230
while Description Execute script repeatedly as long as a condition is met. Syntax while test body Notes The while command evaluates test as an expression (in the same way that the expr command evaluates its argument). The value of the expression must be a proper boolean value. If it is a true value, then body is executed by passing it to the PSL. After body has been executed, then test is evaluated again, and the process repeats until eventually test evaluates to a false boolean value. continue commands may be executed inside body to terminate the current iteration of the loop, and break commands may be executed inside body to cause immediate termination of the while command. Returns Returns an empty string. Example Displays "yes" while variable host is equal to "vax":
while {$host == vax} {
message yes
commands...
}
Chapter 4, Scripts
criptsS
231
window Description Change the emulation window status. Syntax window option [args...] Notes Performs one of several window operations, depending on option. The legal options are: window [maximize | minimize | restore | hide | show] Changes the emulation window accordingly. window size height width Changes the height and width (in pixels) of the window. window position y x Changes the x and y coordinates (in pixels) of the window. Returns Returns an empty string. Example Restores the window (may be in maximize) and sets its position and size:
window restore
window position 50 50
window size 400 600
PowerTerm Series User’s Guide 232
Using PowerTerm Scripts
! PowerTerm provides the following script options: Creating a Script, on page 233, describes how to create a PowerTerm script. Editing a Script, on page 235, describes how to edit an existing script. Recording a Script, page 236, describes how to record a script in PowerTerm. Running PowerTerm Scripts, page 236, describes the various ways that a script can be launched. Running a Specific Script, page 240, describes how to run a recorded script in PowerTerm to automate tasks. Running a Script upon Startup, page 237, describes how to activate a script upon starting PowerTerm. Running Individual Script Commands, page 243, describes how to run a specific script command. Activating a Recorded Script, page 243, describes how to activate a script recorded in memory. Saving a Recorded Script, page 243, describes how to save a script from memory to a specific file.

Chapter 4, Scripts
criptsS
233
Creating a Script PowerTerm enables you to create a script to run upon startup or at any time during a PowerTerm session.
! To create a script file:
1. From the Script menu, select Edit Script. The Edit Script dialog box is displayed:
2. Specify the PowerTerm folder in the Look in box in which to
store the new script.
3. Type a name for the new script file in the File name box. You can type any name and extension that comply with DOS file-naming conventions.
It is recommended that you use a .PSL extension, because PowerTerm automatically recognizes that the .PSL extension indicates a script file.
4. Click Open. If the file exists, it opens ready for editing. If it does not exist, a message box displays, asking whether to create a new file.

PowerTerm Series User’s Guide 234
5. Click Yes. Notepad opens to enable you to enter the new script:
6. Type the script command(s) that you require. 7. From the File menu in Notepad, select Save to save your new
script file. 8. Exit from Notepad.
Scripts can be written in any standard text editor.

Chapter 4, Scripts
criptsS
235
Editing a Script PowerTerm enables you to edit an existing script (.PSL) file.
! To edit a script file:
1. From the Script menu, select Edit Script. The Edit Script dialog box is displayed:
2. Select the required script file by double-clicking the file in the
files list. This opens Notepad and displays the selected script. 3. Edit the script as required. 4. From the File menu in Notepad, select Save to save your new
script file. 5. Exit from Notepad.
Scripts can be written in any standard text editor.

PowerTerm Series User’s Guide 236
Recording a Script PowerTerm enables you to create a script by recording all the actions that you perform in the PowerTerm window. Actions can include selecting a menu option, typing an entry on the screen, making selections in a dialog box and so on.
! To record a script:
1. From the Script menu, select Start Script Recording or click on the audiotape icon. The Start Script Recording option changes to Stop Script Recording while the audiotape icon appears pressed down.
2. Perform the manual operations that you want to record. For example, select a menu option, enter parameters in a dialog box, or type a password.
If you do not want to record certain operations, click Pause Script Recording on the Script menu which changes to Continue Script Recording . This will pause the script recording process. You can then perform operations that will not be included in the recording.
3. To resume script recording, click Continue Script Recording from the Script menu.
4. When you have performed all the operations to be stored in the script, select Stop Script Recording from the Script menu.
You can also save the script file that you created, so that you can run it at any time to repeat the operations. For more information see page 243, Saving a Recorded Script.
Running PowerTerm Scripts PowerTerm enables you to run scripts, upon startup or during a PowerTerm session, to automate specific tasks.

Chapter 4, Scripts
criptsS
237
Upon Startup PowerTerm enables you to run a script from startup by creating a Windows shortcut to PowerTerm and a specific script file. This option can be used to connect to a host using a specific script.
! To start PowerTerm using a script in Windows 95/98/2000/NT/XP
The following procedure describes one way to create a shortcut. Consult your Windows documentation for a description of other available options.
1. Locate the file ptw32.exe on your computer. 2. Right-click and select Create Shortcut option. The Shortcut
to ptw32.exe appears in the current folder.
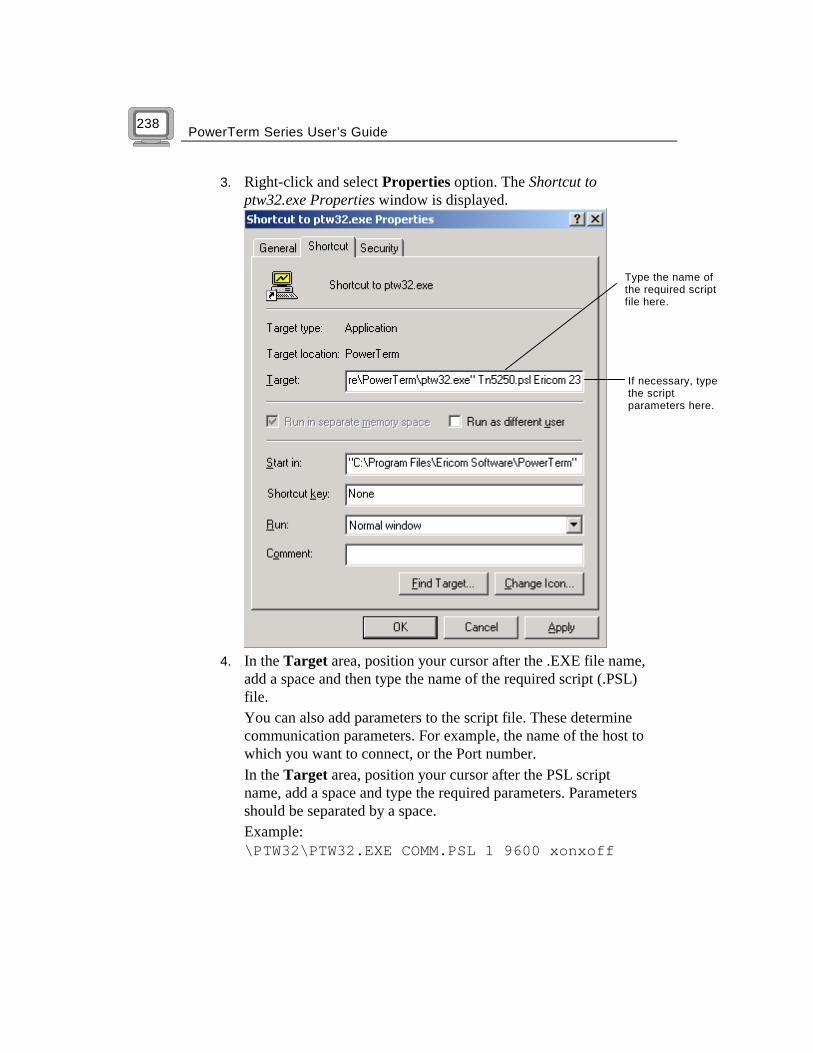
PowerTerm Series User’s Guide 238
3. Right-click and select Properties option. The Shortcut to ptw32.exe Properties window is displayed.
4. In the Target area, position your cursor after the .EXE file name,
add a space and then type the name of the required script (.PSL) file. You can also add parameters to the script file. These determine communication parameters. For example, the name of the host to which you want to connect, or the Port number. In the Target area, position your cursor after the PSL script name, add a space and type the required parameters. Parameters should be separated by a space. Example: \PTW32\PTW32.EXE COMM.PSL 1 9600 xonxoff
Type the name of the required script file here.
If necessary, type the script parameters here.

Chapter 4, Scripts
criptsS
239
PowerTerm recognizes Windows file naming conventions, including spaces in a file name. If you have a setup file with a space in the name, PowerTerm ignores the space and looks directly for the .PSL extension.
5. Click OK. When you start PowerTerm, the script file is automatically executed and you are connected to the host that you specified in your setup file.
Repeat the process described above for each host.
During a PowerTerm Session
Using Soft Buttons
Soft buttons are named by default from F1 to F12. If you have assigned a script to F1, clicking on the F1 button is equivalent to sending the script to the host. For more information, see the section, Programming Soft Buttons, page 45.
Using the Power Pad
Power Pad buttons are named by default F1, F2, F3, and so on, with a few default function names, such as Clear, Enter and Insert. If you have assigned a script to the F1 button, clicking on the F1 button is equivalent to sending the script to the host. For more information, see the section Programming the Power Pad, page 41.
Using the Run Script Command
The Run Script command is a menu option which enables you to run a script created to automate tasks. For more information, see Running a Specific Script, page 240.
Upon Connecting to a Host
PowerTerm enables you to specify the name of a script to be run after communication is established. The name of the script file needs to be specified in the Script File text box in the Connect dialog. For more information, see the section Step 6: Connecting to a Host, page 95.
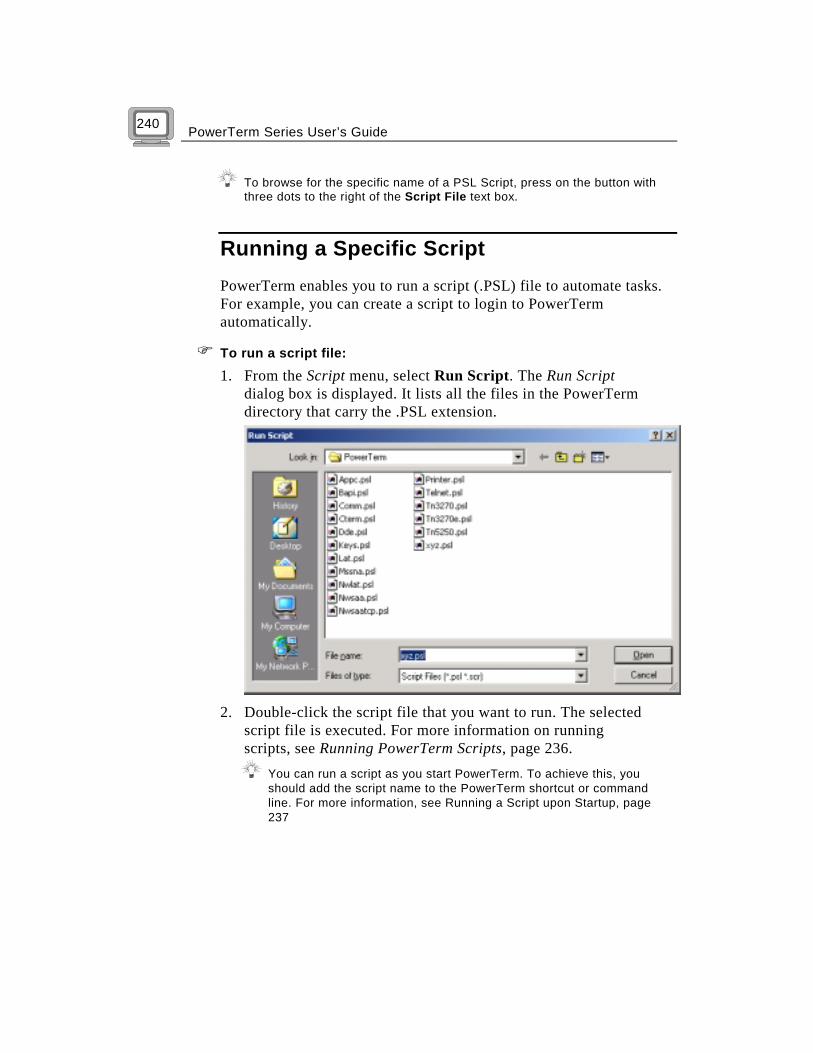
PowerTerm Series User’s Guide 240
To browse for the specific name of a PSL Script, press on the button with three dots to the right of the Script File text box.
Running a Specific Script PowerTerm enables you to run a script (.PSL) file to automate tasks. For example, you can create a script to login to PowerTerm automatically.
! To run a script file:
1. From the Script menu, select Run Script. The Run Script dialog box is displayed. It lists all the files in the PowerTerm directory that carry the .PSL extension.
2. Double-click the script file that you want to run. The selected
script file is executed. For more information on running scripts, see Running PowerTerm Scripts, page 236.
You can run a script as you start PowerTerm. To achieve this, you should add the script name to the PowerTerm shortcut or command line. For more information, see Running a Script upon Startup, page 237
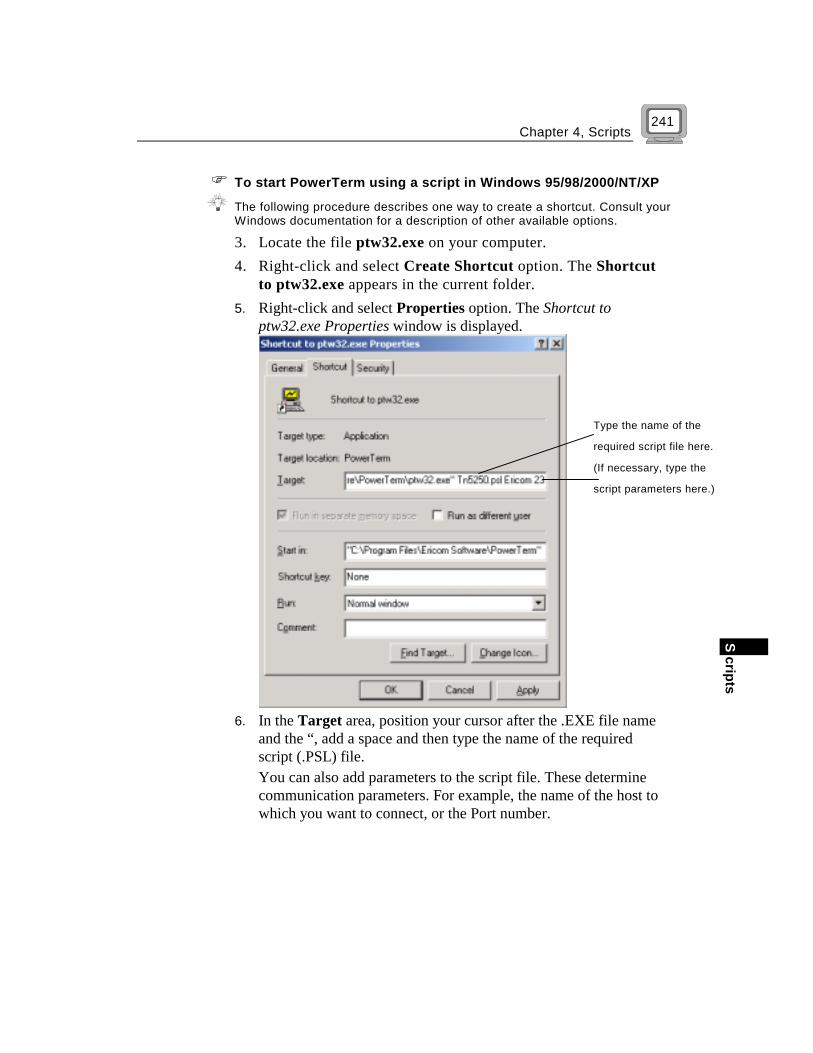
Chapter 4, Scripts
criptsS
241
! To start PowerTerm using a script in Windows 95/98/2000/NT/XP
The following procedure describes one way to create a shortcut. Consult your Windows documentation for a description of other available options.
3. Locate the file ptw32.exe on your computer. 4. Right-click and select Create Shortcut option. The Shortcut
to ptw32.exe appears in the current folder. 5. Right-click and select Properties option. The Shortcut to
ptw32.exe Properties window is displayed.
6. In the Target area, position your cursor after the .EXE file name
and the “, add a space and then type the name of the required script (.PSL) file. You can also add parameters to the script file. These determine communication parameters. For example, the name of the host to which you want to connect, or the Port number.
Type the name of the
required script file here.
(If necessary, type the
script parameters here.)
PowerTerm Series User’s Guide 242
In the Target area, position your cursor after the PSL script name, add a space and type the required parameters. Parameters should be separated by a space. Example: \PTW32\PTW32.EXE COMM.PSL 1 9600 xonxoff
PowerTerm recognizes Windows file naming conventions, including spaces in a file name. If you have a setup file with a space in the name, PowerTerm ignores the space and looks directly for the .PSL extension.
6. Click OK. When you start PowerTerm, the script file is automatically executed and you are connected to the host that you specified in your setup file.
7. Repeat the process described above for each host.
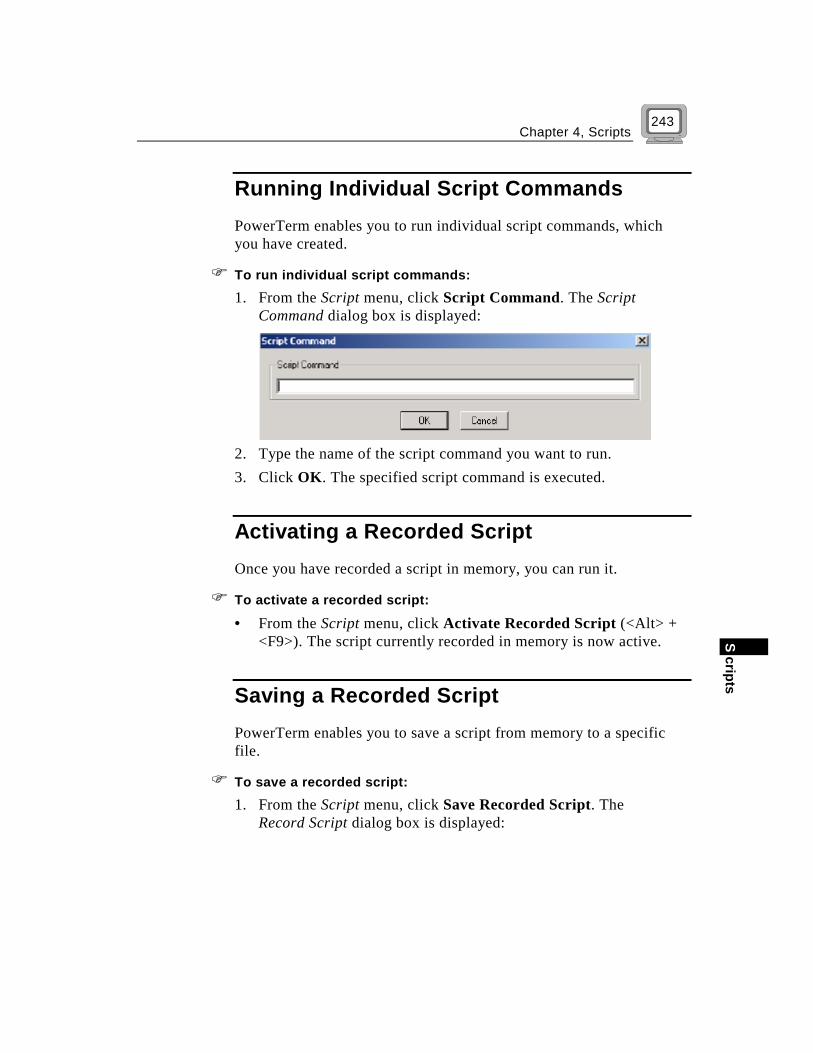
Chapter 4, Scripts
criptsS
243
Running Individual Script Commands PowerTerm enables you to run individual script commands, which you have created.
! To run individual script commands:
1. From the Script menu, click Script Command. The Script Command dialog box is displayed:
2. Type the name of the script command you want to run. 3. Click OK. The specified script command is executed.
Activating a Recorded Script Once you have recorded a script in memory, you can run it.
! To activate a recorded script:
• From the Script menu, click Activate Recorded Script (<Alt> + <F9>). The script currently recorded in memory is now active.
Saving a Recorded Script PowerTerm enables you to save a script from memory to a specific file.
! To save a recorded script:
1. From the Script menu, click Save Recorded Script. The Record Script dialog box is displayed:

PowerTerm Series User’s Guide 244
2. Select the directory in which you want to save the file. 3. Enter a file name. The file extension .PSL is automatically
added to the file name. 4. Click Save. The file is saved with the specific file name.

Chapter 5, Menu Reference
enu Reference
M
245
Chapter 5: Menu Reference This chapter describes each of the PowerTerm menu bar options as shown below:
Use this chapter for reference only. See Chapter 3: Using PowerTerm for a detailed explanation of each step involved in using PowerTerm.
!!!!""""This chapter describes the following menus: File Menu, page 246. Edit Menu, page 251. Terminal Menu, page 254. Communication Menu, page 257. Options Menu, page 261. Script Menu, page 264. Help Menu, page 266.

PowerTerm Series User’s Guide
246
File Menu The File menu provides options to create, save and restore a terminal setup file. You can also create an icon for your current PowerTerm settings, open keyboard and/or Power Pad settings and save them. You can also use this menu to set printing parameters, print, and to open a new instance of the PowerTerm window.
New Terminal Setup Restores the default parameters including the terminal display colors.

Chapter 5, Menu Reference
enu Reference
M
247
If you have changed terminal parameters since the last save, PowerTerm displays a warning message asking whether or not to save the latest changes. The message points to the terminal settings file currently loaded (PTDEF.PTS is the default). Click No to cancel the latest changes and restore the default file.
Open Terminal Setup Displays the Open File dialog box which enables you to select and open an existing setup (.PTS) file. For more information, see Chapter 3: Using PowerTerm, Step 5: Saving the Terminal Setup File, page 91.
Save Terminal Setup Saves the currently open setup file. Both terminal setup and communication parameters are saved to the current setup (.PTS) file. For more information, see Chapter 3: Using PowerTerm, Step 5: Saving the Terminal Setup File, page 91.
Save Terminal Setup As Opens the Save File As dialog box which enables you to save the current setup file under a different name.
Save As Icon Opens the Save As Icon dialog box which enables you to create an icon for the current PowerTerm settings (.PTS file). This means that PowerTerm can be accessed from the Windows Start menu, or by double-clicking the icon on your desktop. This enables you to start a session automatically with the desired parameters.
PowerTerm Series User’s Guide
248
To avoid confusion, the name of the setup file should be changed. If you use the default name, PTDEF.PTS, these settings will become the default settings when PowerTerm is launched and no settings file has been specified.
Open Keyboard File Opens the Open Keyboard File dialog box which enables you to open keyboard mapping settings that have previously been saved in a separate file.
Save Keyboard File Opens the Save Keyboard File dialog box which enables you to save keyboard mapping settings in a separate file and open them at a later date.
Open Power Pad File Opens the Open Power Pad File dialog box which enables you to open Power Pad settings that have previously been saved in a separate file.
Save Power Pad File Opens the Save Power Pad File dialog box which enables you to save Power Pad settings in a separate file and open them at a later date.
Print Screen Prints the contents of the work area, or the selected text.

Chapter 5, Menu Reference
enu Reference
M
249
Print Setup Displays the Print Setup dialog box, which contains printing parameters. Displayed parameters change according to the printer you selected.
The Default Printer parameter enables you to send the output to the default printer selected under Windows. The Specific Printer parameter allows you to select one of the currently installed printers. For details about installing a new printer, consult your Windows documentation.
Start /Stop Auto Print Prints all the data displayed in the work area. This option changes to Stop Printing once the Start Auto Print function is activated. Select Stop Printing to stop printing the data displayed in the work area.
Close Print Queue Manually closes the Windows print queue.
Form Feed Executes a form feed on the printer.
Line Feed Executes a line feed on the printer.
PowerTerm Series User’s Guide
250
New Terminal Window Opens a new instance of the PowerTerm window. This enables you to run several sessions concurrently and simulate more than one terminal type. You can access a session by switching windows. After opening a new terminal window, you should define terminal and communication parameters before connecting to a host.
Exit Enables you to exit PowerTerm. If you have changed the terminal settings, PowerTerm displays a warning message asking you if you want to update the terminal settings (.PTS) file. For more information, see Chapter 3: Using PowerTerm, Step 9: Exiting PowerTerm, page 111.
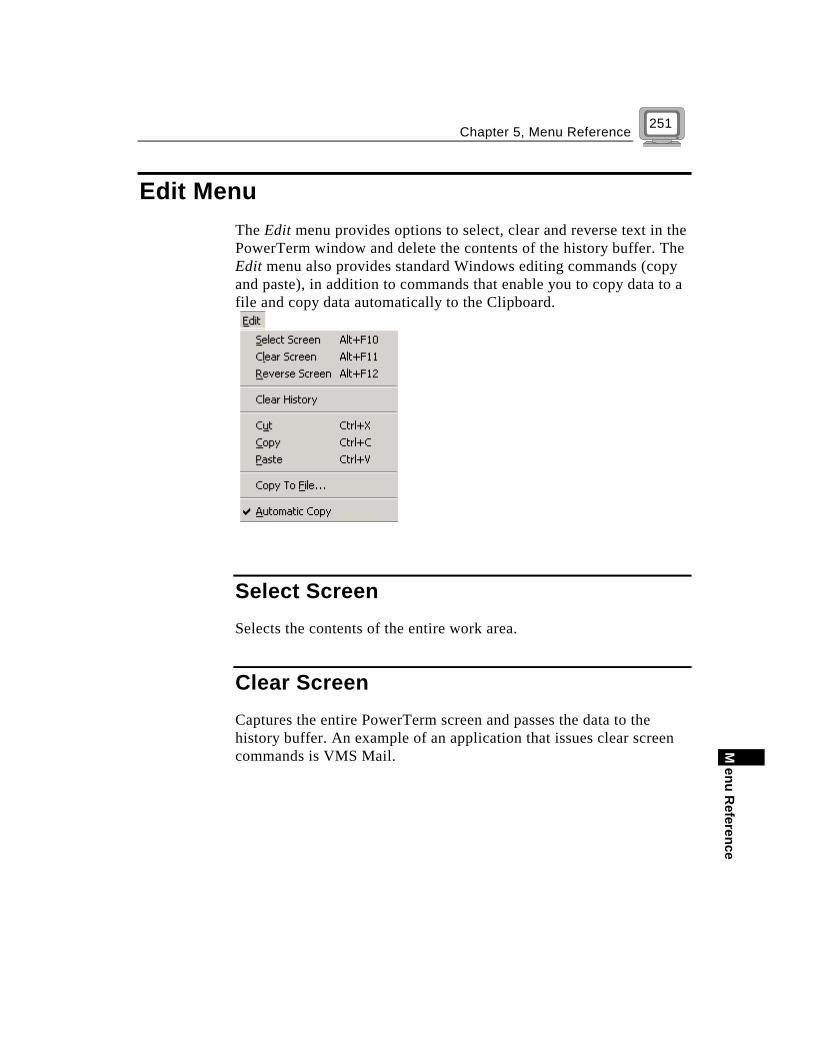
Chapter 5, Menu Reference
enu Reference
M
251
Edit Menu The Edit menu provides options to select, clear and reverse text in the PowerTerm window and delete the contents of the history buffer. The Edit menu also provides standard Windows editing commands (copy and paste), in addition to commands that enable you to copy data to a file and copy data automatically to the Clipboard.
Select Screen Selects the contents of the entire work area.
Clear Screen Captures the entire PowerTerm screen and passes the data to the history buffer. An example of an application that issues clear screen commands is VMS Mail.

PowerTerm Series User’s Guide
252
Reverse Screen Changes the paragraph alignment. You can type from left to right or right to left, depending on the language you are using.
Clear History Deletes the entire contents of the history or scrollback buffer. This command is only available when the history buffer is in use.
Copy If the Automatic Copy option in the Edit menu is not active, use the Edit/Copy command to copy the marked text to the clipboard.
Paste Pastes the clipboard contents into the work area. Right-click (or select Edit/Paste) to send the host, data stored in the Clipboard. This operation is equivalent to actually typing the contents of the Clipboard on the host screen.
Copy to File Copies selected information to a file. If no text is selected, the entire screen is written to the file.

Chapter 5, Menu Reference
enu Reference
M
253
Automatic Copy Automatically copies selected information to the clipboard. When this option is active, all selected text is copied automatically to the Clipboard and there is no need to select the Copy option.

PowerTerm Series User’s Guide
254
Terminal Menu The Terminal menu provides options to define and reset connection parameters, set the system to be online or offline and freeze or unfreeze the screen. The Terminal menu also enables you to select the system fonts you want to be displayed in the PowerTerm window, or use the default PowerTerm fonts.
Setup Opens the Terminal Setup dialog box in which you can define settings for terminal emulation. This dialog box contains different tab pages which enable you to define all aspects of your terminal setup. For more information, see Chapter 3: Using PowerTerm, Step 3: Defining Settings for Terminal Emulation (Terminal Settings), page 49.
PowerTerm Fonts Displays the default PowerTerm fonts defined in the PowerTerm window.
Chapter 5, Menu Reference
enu Reference
M
255
The default PowerTerm fonts are scaleable, so that if the window shrinks, the fonts will shrink in relation to the size of the window.
System Fonts Displays the system fonts you want to be displayed in the PowerTerm window. System fonts remain the same size, no matter what the size of the window. When you select your own system fonts, you can only select fixed size fonts, meaning fonts that are non-scalable. System fonts enable you to select a different language.
Reset Resets the VT terminal defaults. This command does not apply to PowerTerm’s exclusive terminal parameters (such as color).
Online Sets the system to be online or offline.
Hold Screen Stops communication and freezes the screen. To unfreeze the screen, reselect the command.
English Selects English as the language for the PowerTerm interface.

PowerTerm Series User’s Guide
256
German Selects German as the language for the PowerTerm interface.
French Selects French as the language for the PowerTerm interface.
Italian Selects Italian as the language for the PowerTerm interface.
Spanish Selects Spanish as the language for the PowerTerm interface.
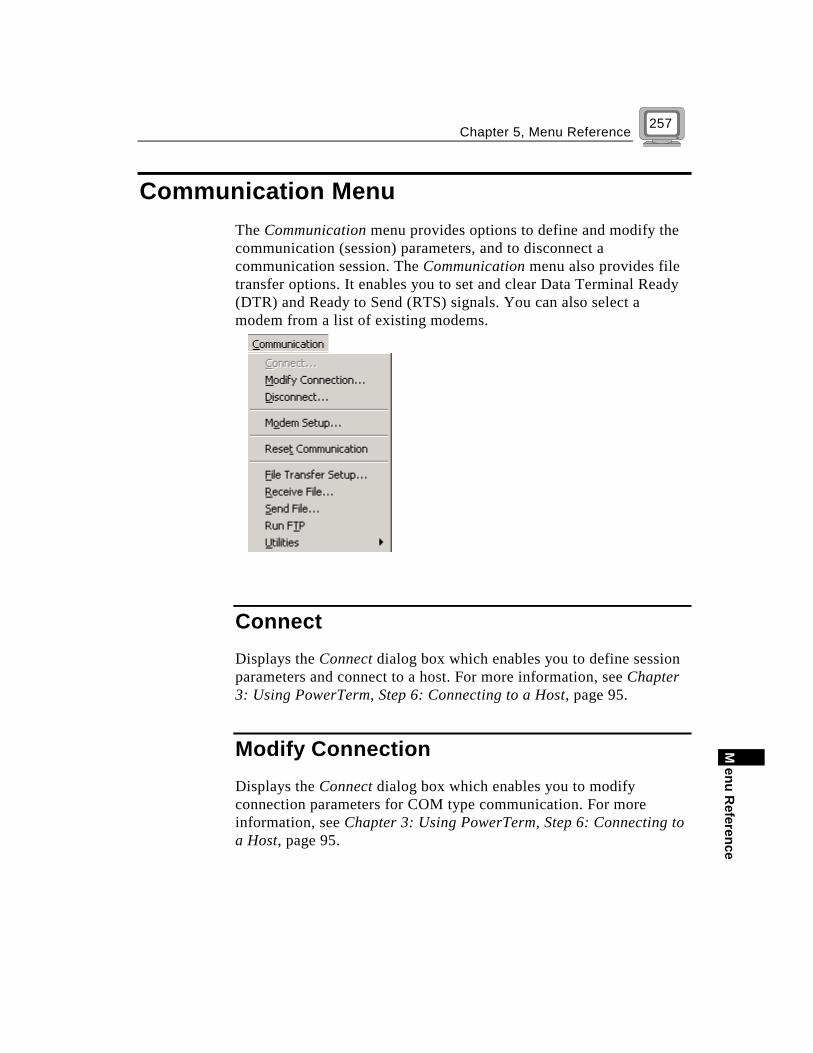
Chapter 5, Menu Reference
enu Reference
M
257
Communication Menu The Communication menu provides options to define and modify the communication (session) parameters, and to disconnect a communication session. The Communication menu also provides file transfer options. It enables you to set and clear Data Terminal Ready (DTR) and Ready to Send (RTS) signals. You can also select a modem from a list of existing modems.
Connect Displays the Connect dialog box which enables you to define session parameters and connect to a host. For more information, see Chapter 3: Using PowerTerm, Step 6: Connecting to a Host, page 95.
Modify Connection Displays the Connect dialog box which enables you to modify connection parameters for COM type communication. For more information, see Chapter 3: Using PowerTerm, Step 6: Connecting to a Host, page 95.

PowerTerm Series User’s Guide
258
Disconnect Disconnects the communication session.
Modem Setup Opens the Modem Setup dialog box which enables you to select a modem from a list of existing modems and initialization strings. It also enables you to add customized modem definitions and edit the initialization string provided.
Reset Communication Resets the communication port for COM type communication.
File Transfer Setup Displays the File Transfer Setup dialog box, which enables you to define host and PC data types for file transfer.
Receive File Receives a file from the host via Kermit, Zmodem, Ymodem, Xmodem, Ascii or Binary.
Send File Sends a file to the host via Kermit, Zmodem, Ymodem, Xmodem, Ascii or Binary.
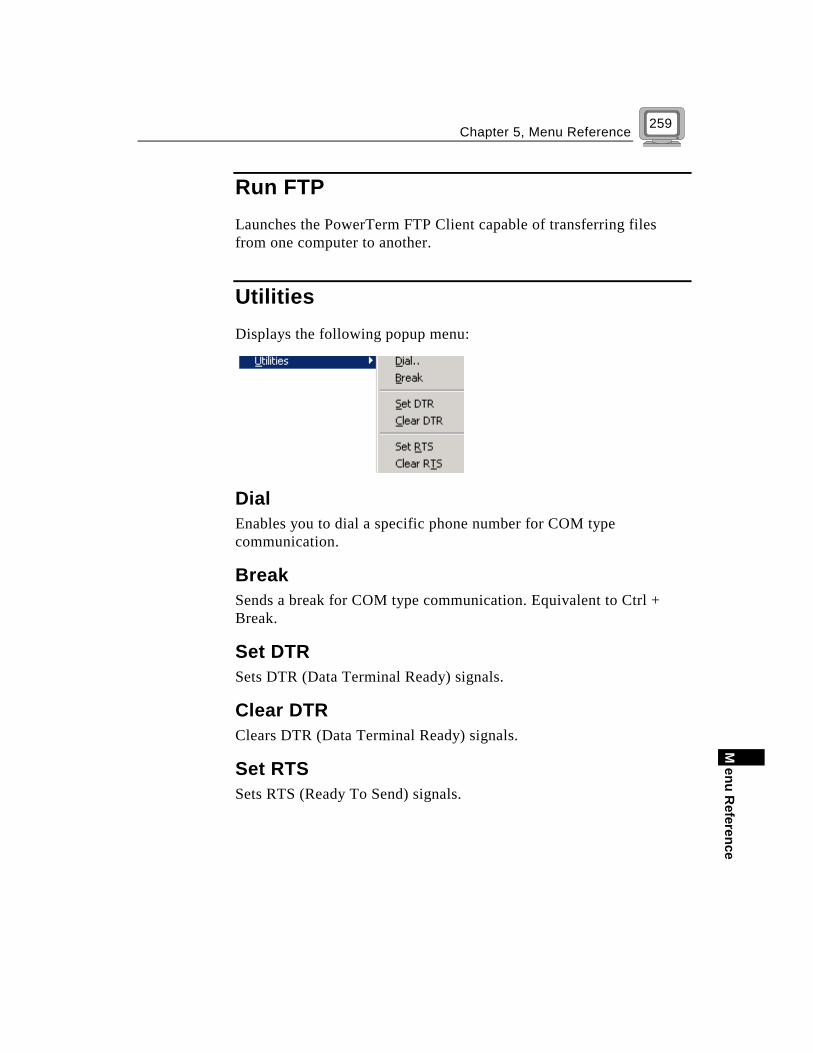
Chapter 5, Menu Reference
enu Reference
M
259
Run FTP Launches the PowerTerm FTP Client capable of transferring files from one computer to another.
Utilities Displays the following popup menu:
Dial Enables you to dial a specific phone number for COM type communication.
Break Sends a break for COM type communication. Equivalent to Ctrl + Break.
Set DTR Sets DTR (Data Terminal Ready) signals.
Clear DTR Clears DTR (Data Terminal Ready) signals.
Set RTS Sets RTS (Ready To Send) signals.

PowerTerm Series User’s Guide
260
Clear RTS Clears RTS (Ready To Send) signals.
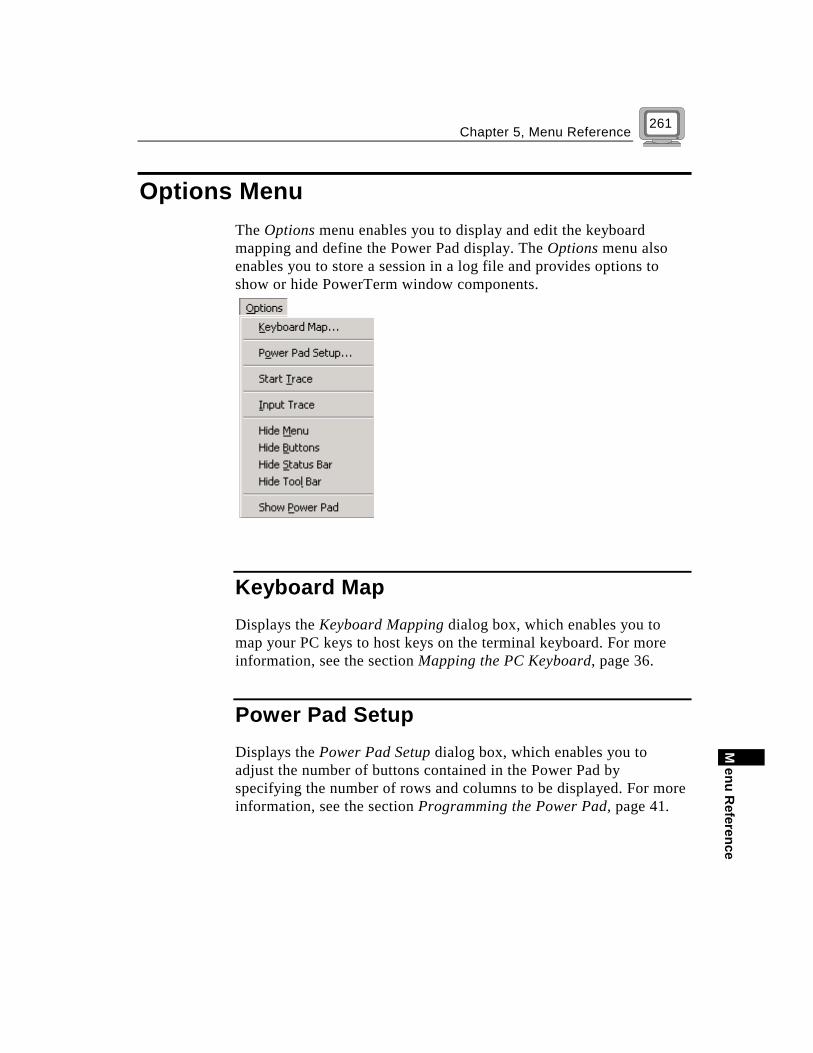
Chapter 5, Menu Reference
enu Reference
M
261
Options Menu The Options menu enables you to display and edit the keyboard mapping and define the Power Pad display. The Options menu also enables you to store a session in a log file and provides options to show or hide PowerTerm window components.
Keyboard Map Displays the Keyboard Mapping dialog box, which enables you to map your PC keys to host keys on the terminal keyboard. For more information, see the section Mapping the PC Keyboard, page 36.
Power Pad Setup Displays the Power Pad Setup dialog box, which enables you to adjust the number of buttons contained in the Power Pad by specifying the number of rows and columns to be displayed. For more information, see the section Programming the Power Pad, page 41.
PowerTerm Series User’s Guide
262
Start/Stop Trace Stores the session in a log file. Raw data is stored in the Capture.log file, while formatted data with readable escape sequences is stored in the Trace.log file. This option changes to Stop Trace once the Start Trace option has been activated.
Input Trace Enables you to view the contents of the Capture.log file on the PowerTerm desktop work area.
Hide Menu Hides the Menu bar. To restore the Menu bar, select Restore Menu from the Control Menu box.
Hide Buttons Hides the Soft buttons. This option changes to Show Buttons when the Soft buttons are hidden.
Hide Status Bar Hides the Status bar. This option changes to Show Status Bar when the Status bar is hidden.
Hide Tool Bar Hides the Toolbar. This option changes to Show Tool Bar when the Toolbar is hidden.

Chapter 5, Menu Reference
enu Reference
M
263
Show Power Pad Displays the floating Power Pad. This option changes to Hide Power Pad when the Power Pad is floating.

PowerTerm Series User’s Guide
264
Script Menu The Script menu provides options to record, edit and run a script.
Run Script Displays the Run Script dialog box, which enables you to select and run a script. For more information, see Chapter 4: Scripts, Running PowerTerm Scripts, page 236.
Edit Script Displays the Edit Script dialog box, which enables you to select the script that you want to edit. The selected script is opened for editing in Notepad. For more information see Chapter 4: Scripts, Creating a Script and Editing a Script, page 233-235.
Chapter 5, Menu Reference
enu Reference
M
265
Script Command Displays the Script Command dialog box, which enables you to run individual script commands.
Start/Stop Script Recording Writes a script automatically. After requesting Start Script Recording, the manual operations you perform in the emulation screen are recorded into a script file, until you choose the Stop Script Recording command. For more information, see Chapter 4: Scripts, Recording a Script, page 236.
Pause Script Recording Pauses script recording. This enables you to exclude certain operations from recording. For more information, see Chapter 4: Scripts, Recording a Script, page 236.
Activate Recorded Script Activates the script currently recorded in memory. The script is saved in memory while PowerTerm is active, until it is saved to a specific file.
Save Recorded Script Enables you to save a script from memory to a specific file. The script is saved in memory while PowerTerm is active, until it is saved to a specific file.

PowerTerm Series User’s Guide
266
Help Menu The Help menu provides options for accessing the PowerTerm online help, Getting Started online help and product information.
Contents Accesses the first page of the PowerTerm online help.
Getting Started Accesses the first page of the PowerTerm Getting Started online help.
About PowerTerm Displays product and contact information, in addition to memory and system resources.