powerpoint 2008 created by the office of media and educational technologies on: 07/2010 “this...
TRANSCRIPT

PowerPoint 2008
Created by The Office of Media and Educational Technologies on: 07/2010
“This presentation contains copyright material used under the educational fair use exemption to U.S. Copyright law. Further use is prohibited.”
1

ObjectivesMaryland Technology Standards for School Administrators
Standard 1: Leadership and Vision
Standard 2: Teaching and Learning
Maryland Teacher Technology Standards
Standard 5: Integrating technology into curriculum and instruction
Maryland Technology Standards
Standard 3: Technology for Learning and Collaboration
2
AgendaAgenda
ToolbarsElements GalleryToolbox/PalettesInserting online clipartInserting pictures Inserting tablesInserting documentsInserting hyperlinks Inserting videoInserting musicExporting PowerPoint slides
3

Select View>Toolbars -
and choose the toolbars to add
Toolbars4
Standard
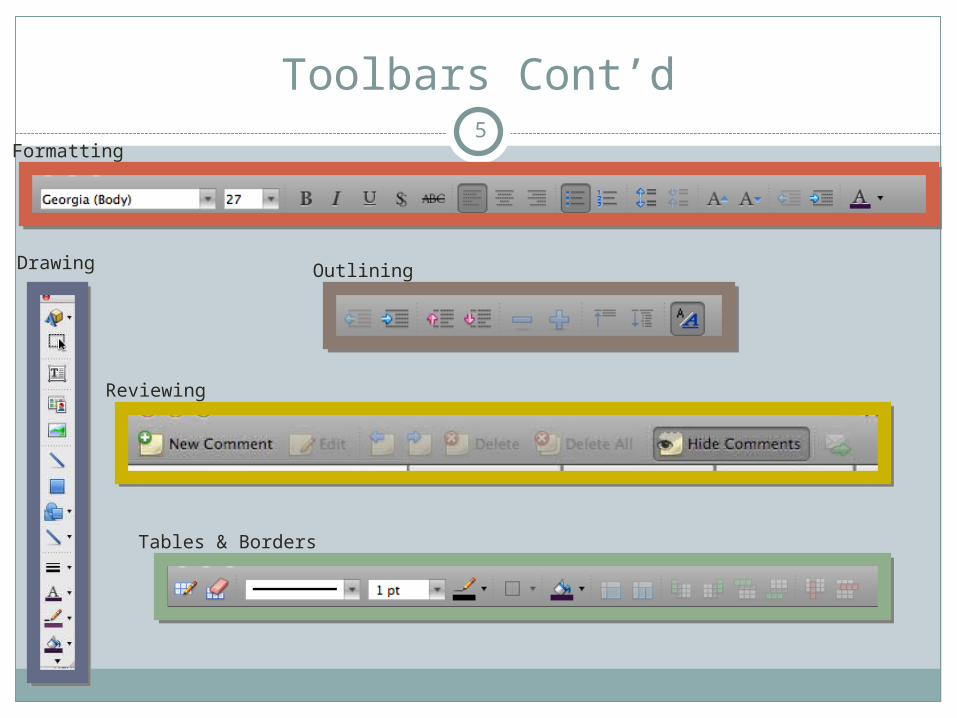
Toolbars Cont’d5
Drawing
Tables & Borders
Reviewing
Outlining
Formatting

New in 2008: The Elements Gallery offers tabs to enhance
your presentation
Elements Gallery6

Toolbox/Palettes
• Select the Toolbox on the Standard Toolbar
• The Formatting Palette appears with several menus: Object Palette, Custom Animation, Scrapbook, Reference Tools, Compatibility Report
7

Toolbox/Palettes Cont’d8

Inserting Online Clip Art
Clip art can be added to any page, regardless of the layout.Go to Insert>Clip Art (the clip art library opens) Select Online and the Internet Browser opens Microsoft Office Clip Art PageBrowse Clip Art and Media Categories
9
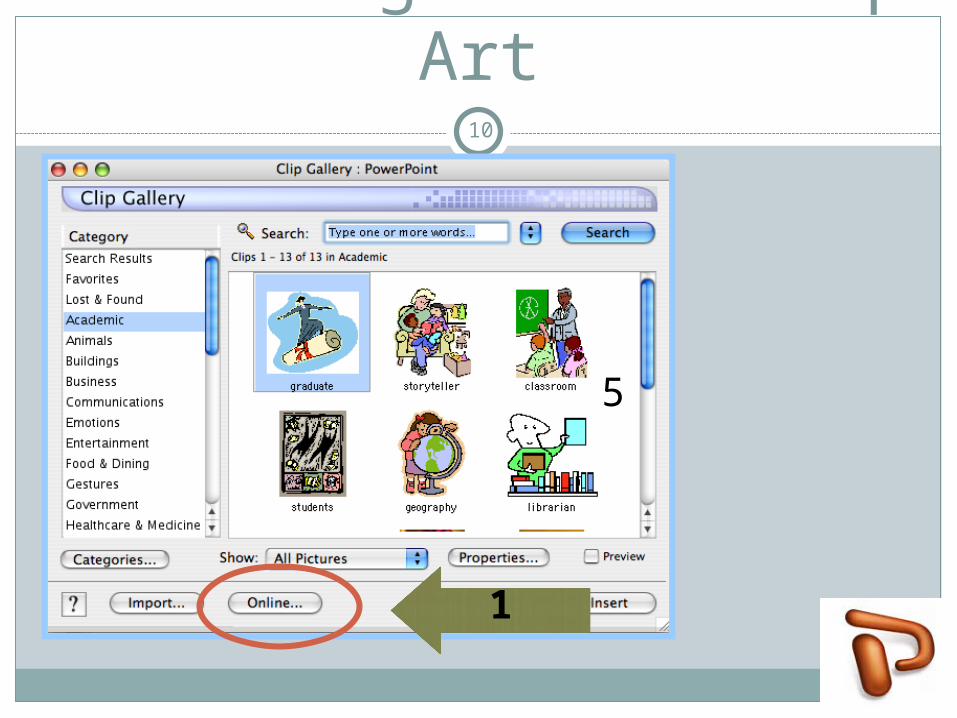
Inserting Online Clip Art
1
5
10

Inserting Online Clip Art
2
2
11

Inserting Online Clip Art
Choosea
category
3
12

Inserting Online Clip Art
1check imagesand
Select Download4
13

Inserting Online Clip Art
The picture will appear as a .JPG
14

Inserting Online Clip Art
5
15

Inserting Pictures
Choose location of the picture on computer
Pictures other than clip art can also be added to any side layout
Select Insert
16

Inserting Pictures
Picture can come from a variety of sources including:Digital camera,
import images into iPhoto libraryFrom any picture
location.Select Pictures folder for locationSelect Insert
17

Inserting Table (Option 1)
Tables visually organize the information on the slide Select Table Styles from the Elements Gallery
18

Inserting Table (Option 2)
Insert>Table> Choose the number of
rows and columns>Select OK
The New Table
Hurray!
19

Inserting a Document
Insert>Object>Choose type of file and if it is a new file or a previously created one>then select OKCreate New – type the information on the document and then close the document. It will automatically be updated into the slide.
20

Inserting Document
11 Create from fileoption
22
33
21

Inserting Document ViewHere is what the document
looks like. This one has been given a yellow background and a line outline to make it stand out. To edit, select the object,
select fill and select background color.
22

Inserting a Hyperlink
During a presentation it may be necessary to insert a link to a webpage or a document. Hyperlinks can have different styles:
A hyperlink can be placed on the page with a display words.The hyperlink can be embedded in a word or an object, highlight the word or object
Either style: Insert>Hyperlink>type in the web address in the top area or select the document to link to>select OK
23

Inserting a Hyperlink 24

Inserting a Hyperlink 25

Making and Object a Hyperlink
To embed the hyperlink in an object or word, select the object or word Insert>Hyperlink>type web address or document to link to. The display will state, <<Selection in Document>>
26

Inserting Video
Video segments can also add a great visual connect to learners. Videos can come from any .mov file Examples include: DEStreaming, iPhoto slideshow that are .mov files or other movie files. PowerPoint also has a gallery with animated clip art.
27

Inserting Video from Existing File
Insert>MoviesNavigate to find movie and select
28

Inserting Animated Clip Art
Go to Insert>Clip ArtSelect Show: All Motion ClipsSelect a CategorySelect ClipSelect Insert
29
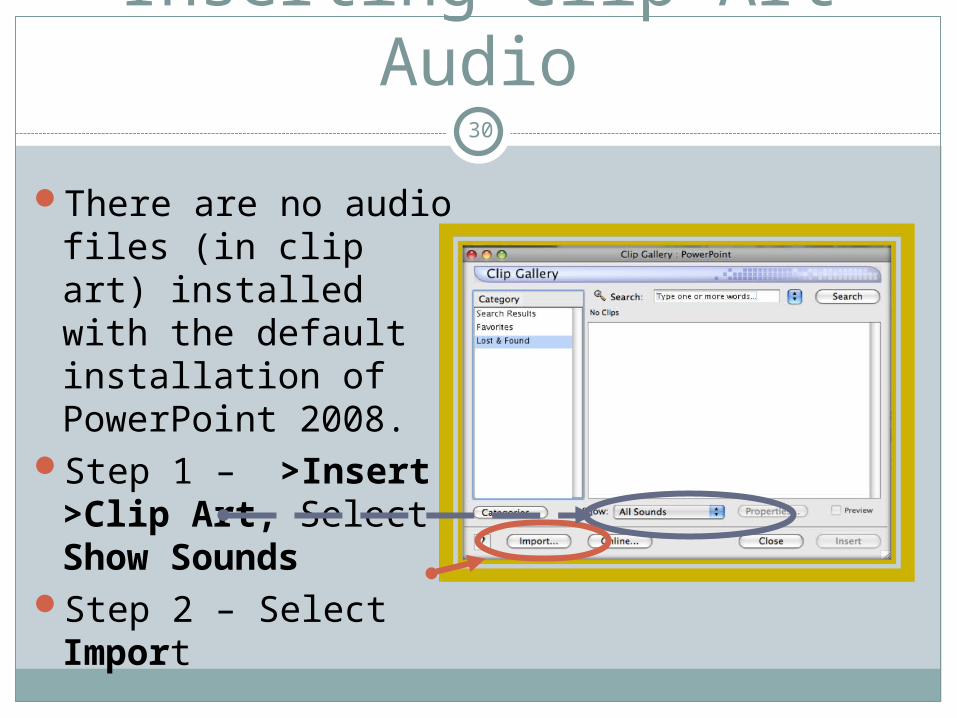
Inserting Clip Art Audio
There are no audio files (in clip art) installed with the default installation of PowerPoint 2008.
Step 1 – >Insert >Clip Art, Select Show Sounds
Step 2 – Select Import
30

Inserting Sound
Sound adds another element to a presentation and connects to auditory learners in the classroom. A variety of sounds can be added to slides, including sound bites, music from a CD, or a recorded voice. Downloading sounds from the clip art gallery online converts sounds to a .wav file and places them to your default download location.The .wav file will need to be imported to the clip art gallery
31

Inserting Sound from Clip Art Gallery
Go to Insert>Clip ArtChoose Show All SoundsThere are no sounds in gallerySelect Online
32
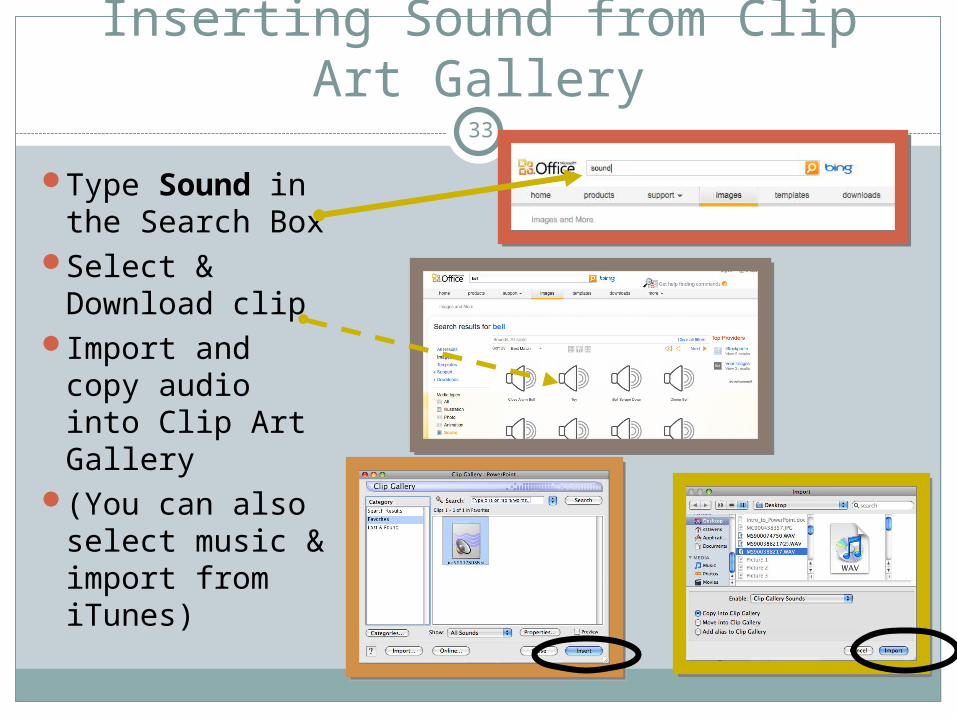
Inserting Sound from Clip Art Gallery
Type Sound in the Search Box
Select & Download clip
Import and copy audio into Clip Art Gallery
(You can also select music & import from iTunes)
33

Inserting Sound from Clip Art Gallery
Your audio clip will now be in your Clip Art Gallery.
Go to Insert>Clip Art
Select audio clipSelect Insert
34

Inserting Sound from File
Select Insert>Sound and Music>Sound From File
Locate the folder that contains the sound and select Insert
Speaker icon will appear on slide
35

Sound File Notes
To preview the sound in Normal view, double click on the sound iconAutomatic and Continuous Play Options:
To loop the sound so it plays throughout the slide show, go to Slideshow>Custom Animations> Options and select Play using animation order and loop until stopped.Go to Order and Timings and select automatically “0” seconds after previous
36

Inserting Recorded Sound
Go to Insert>Sound and Music>Record SoundSelect Record and speak into the internal microphoneSelect stop when finishedPlay to preview sound. If satisfied, name the sound and select SaveGo to Animations to set any custom animations for the sound.
37
Exporting Slides to Picture Files
PowerPoint slides can be exported as images and then downloaded into iMovie, iPhoto, or imported into other documents to enhance projects. All slides will be located in a folder and can be used in a different programs.
38

Exporting Slides to Picture Files
File>Save As Pictures>Format Choose JPEG format>SaveA dialogue box explains the location the folder is saved to.
39

Questions? 40
For more information for see your OIT rep or visit the DR

unused41

New Features in PowerPoint 2008
New Toolbar Themes Layouts Transitions Table Styles Charts WordArt SmartArt Graphics (11 pages)
42

Inserting Online Clip Art
1
43

Inserting Online Clip Art
1Decide on image,
Check itClick download5
5 will download to desktop
44