powered by ecoglo - thomas & betts · cleaning test astm d 4828-94 (1999). test for coated...
TRANSCRIPT
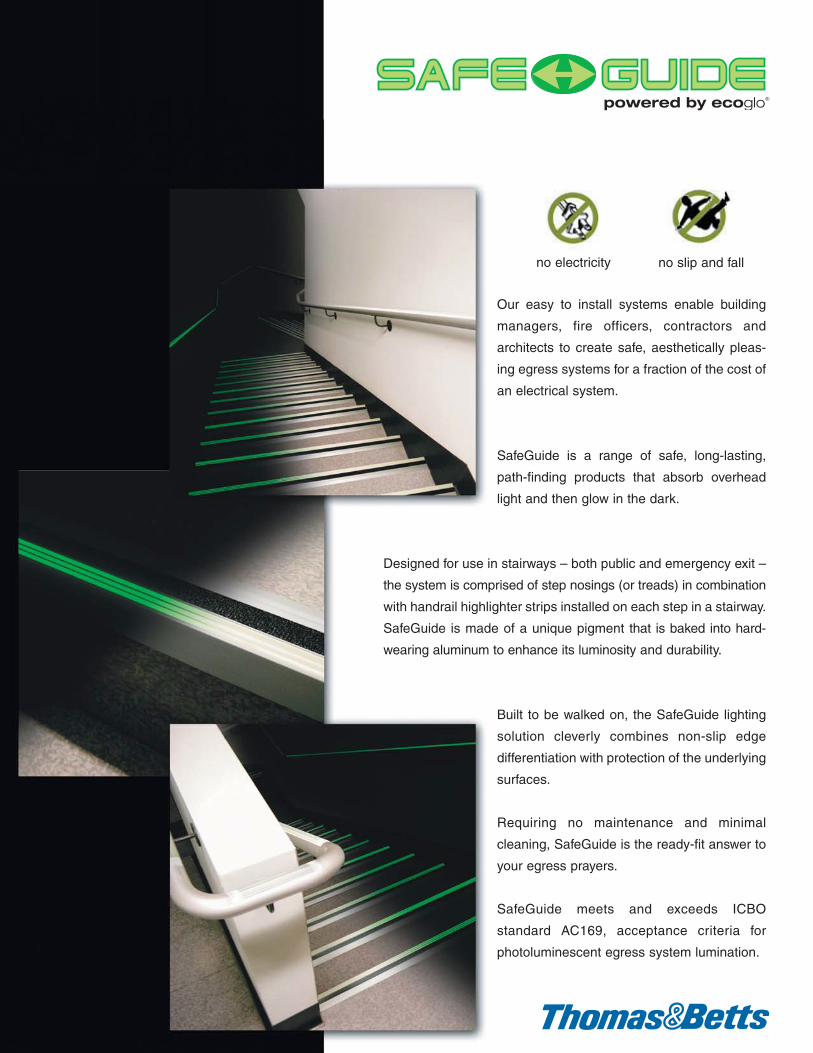
no slip and fall
Our easy to install systems enable building
managers, fire officers, contractors and
architects to create safe, aesthetically pleas-
ing egress systems for a fraction of the cost of
an electrical system.
SafeGuide is a range of safe, long-lasting,
path-finding products that absorb overhead
light and then glow in the dark.
Designed for use in stairways – both public and emergency exit –
the system is comprised of step nosings (or treads) in combination
with handrail highlighter strips installed on each step in a stairway.
SafeGuide is made of a unique pigment that is baked into hard-
wearing aluminum to enhance its luminosity and durability.
Built to be walked on, the SafeGuide lighting
solution cleverly combines non-slip edge
differentiation with protection of the underlying
surfaces.
Requiring no maintenance and minimal
cleaning, SafeGuide is the ready-fit answer to
your egress prayers.
SafeGuide meets and exceeds ICBO
standard AC169, acceptance criteria for
photoluminescent egress system lumination.
no electricity
powered by ecoglo®
Notice: The installation instructions provided with this product must be closely adhered to.Any deviations from these instructions could void any guarantees or performance claims made,either written or verbal.
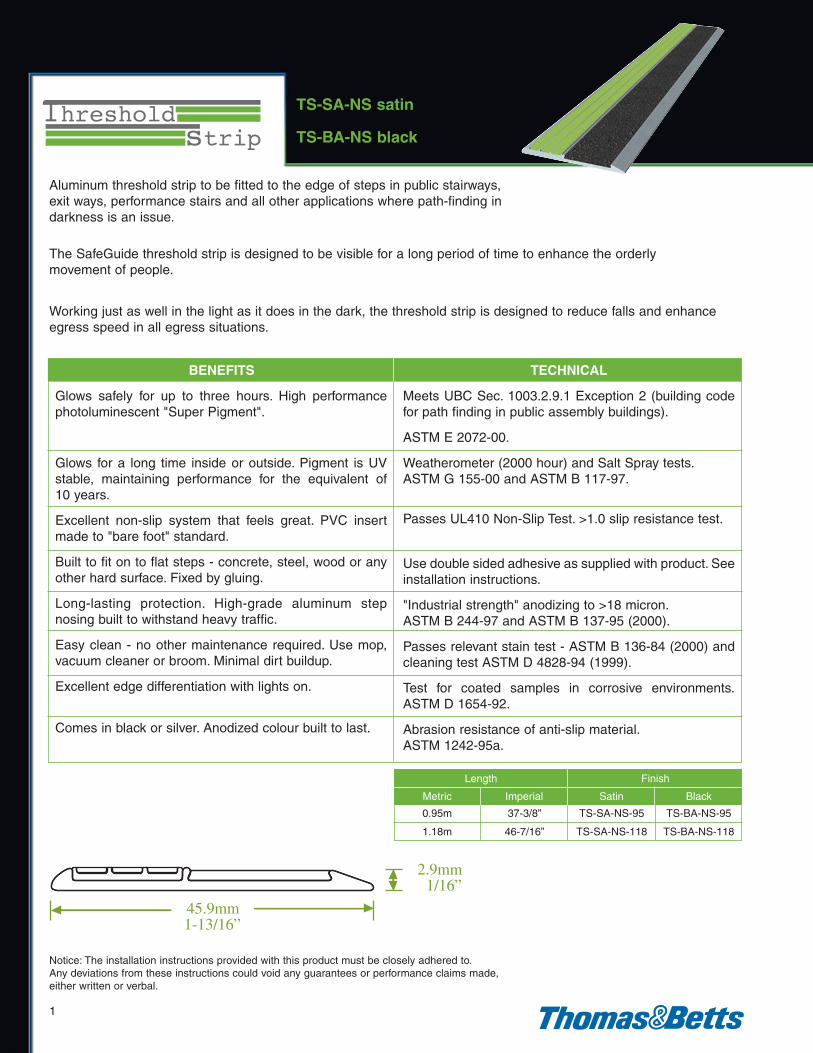
Aluminum threshold strip to be fitted to the edge of steps in public stairways, exit ways, performance stairs and all other applications where path-finding in darkness is an issue.
The SafeGuide threshold strip is designed to be visible for a long period of time to enhance the orderly movement of people.
Working just as well in the light as it does in the dark, the threshold strip is designed to reduce falls and enhanceegress speed in all egress situations.
BENEFITS
Glows safely for up to three hours. High performancephotoluminescent "Super Pigment".
Glows for a long time inside or outside. Pigment is UVstable, maintaining performance for the equivalent of 10 years.
Excellent non-slip system that feels great. PVC insertmade to "bare foot" standard.
Built to fit on to flat steps - concrete, steel, wood or anyother hard surface. Fixed by gluing.
Long-lasting protection. High-grade aluminum step nosing built to withstand heavy traffic.
Easy clean - no other maintenance required. Use mop,vacuum cleaner or broom. Minimal dirt buildup.
Excellent edge differentiation with lights on.
Comes in black or silver. Anodized colour built to last.
TECHNICAL
Meets UBC Sec. 1003.2.9.1 Exception 2 (building codefor path finding in public assembly buildings).
ASTM E 2072-00.
Weatherometer (2000 hour) and Salt Spray tests.ASTM G 155-00 and ASTM B 117-97.
Passes UL410 Non-Slip Test. >1.0 slip resistance test.
Use double sided adhesive as supplied with product. Seeinstallation instructions.
"Industrial strength" anodizing to >18 micron.ASTM B 244-97 and ASTM B 137-95 (2000).
Passes relevant stain test - ASTM B 136-84 (2000) andcleaning test ASTM D 4828-94 (1999).
Test for coated samples in corrosive environments.ASTM D 1654-92.
Abrasion resistance of anti-slip material.ASTM 1242-95a.
45.9mm1-13/16”
2.9mm1/16”
1
TS-SA-NS satin
TS-BA-NS black
FinishLength
Metric
0.95m
1.18m
37-3/8”
46-7/16”
TS-SA-NS-95
TS-SA-NS-118
TS-BA-NS-95
TS-BA-NS-118
Imperial Satin Black
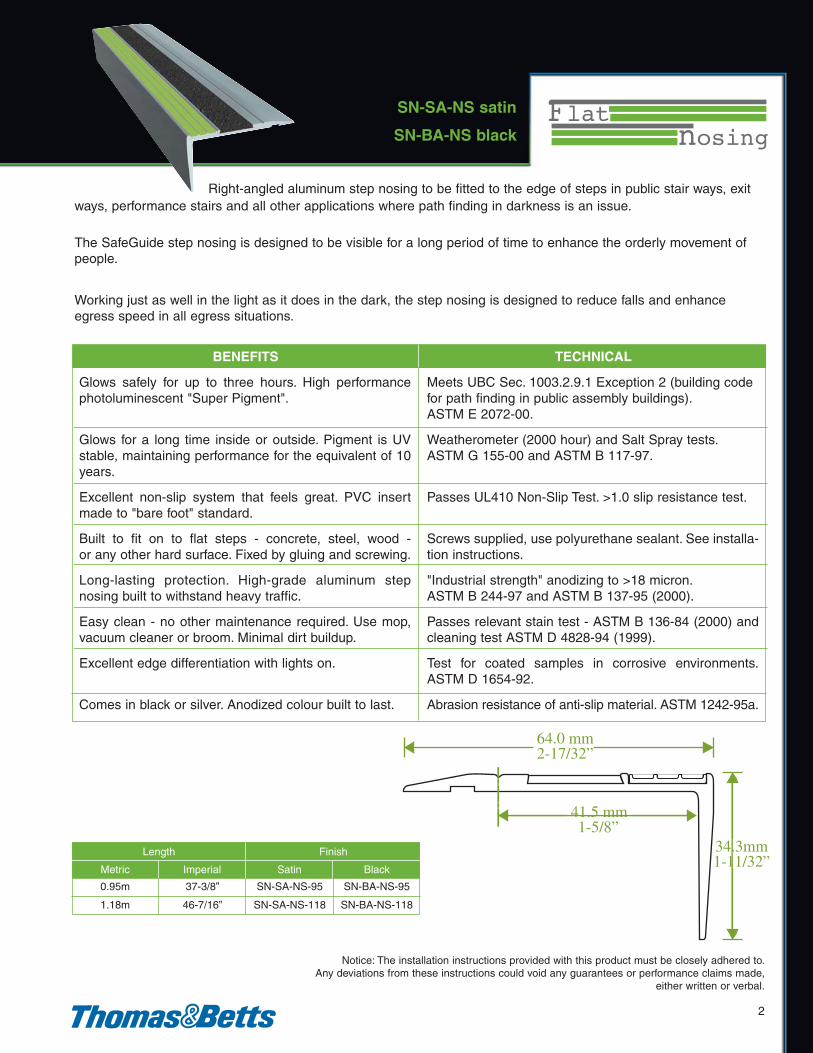
Right-angled aluminum step nosing to be fitted to the edge of steps in public stair ways, exit ways, performance stairs and all other applications where path finding in darkness is an issue.
The SafeGuide step nosing is designed to be visible for a long period of time to enhance the orderly movement ofpeople.
Working just as well in the light as it does in the dark, the step nosing is designed to reduce falls and enhanceegress speed in all egress situations.
BENEFITS
Glows safely for up to three hours. High performancephotoluminescent "Super Pigment".
Glows for a long time inside or outside. Pigment is UVstable, maintaining performance for the equivalent of 10years.
Excellent non-slip system that feels great. PVC insertmade to "bare foot" standard.
Built to fit on to flat steps - concrete, steel, wood - or any other hard surface. Fixed by gluing and screwing.
Long-lasting protection. High-grade aluminum step nosing built to withstand heavy traffic.
Easy clean - no other maintenance required. Use mop,vacuum cleaner or broom. Minimal dirt buildup.
Excellent edge differentiation with lights on.
Comes in black or silver. Anodized colour built to last.
TECHNICAL
Meets UBC Sec. 1003.2.9.1 Exception 2 (building codefor path finding in public assembly buildings).ASTM E 2072-00.
Weatherometer (2000 hour) and Salt Spray tests.ASTM G 155-00 and ASTM B 117-97.
Passes UL410 Non-Slip Test. >1.0 slip resistance test.
Screws supplied, use polyurethane sealant. See installa-tion instructions.
"Industrial strength" anodizing to >18 micron.ASTM B 244-97 and ASTM B 137-95 (2000).
Passes relevant stain test - ASTM B 136-84 (2000) andcleaning test ASTM D 4828-94 (1999).
Test for coated samples in corrosive environments.ASTM D 1654-92.
Abrasion resistance of anti-slip material. ASTM 1242-95a.
34.3mm1-11/32”
64.0 mm2-17/32”
41.5 mm1-5/8”
2
SN-SA-NS satin
SN-BA-NS black
FinishLength
Metric
0.95m
1.18m
37-3/8”
46-7/16”
SN-SA-NS-95
SN-SA-NS-118
SN-BA-NS-95
SN-BA-NS-118
Imperial Satin Black
Notice: The installation instructions provided with this product must be closely adhered to.Any deviations from these instructions could void any guarantees or performance claims made,
either written or verbal.
Notice: The installation instructions provided with this product must be closely adhered to.Any deviations from these instructions could void any guarantees or performance claims made,either written or verbal.
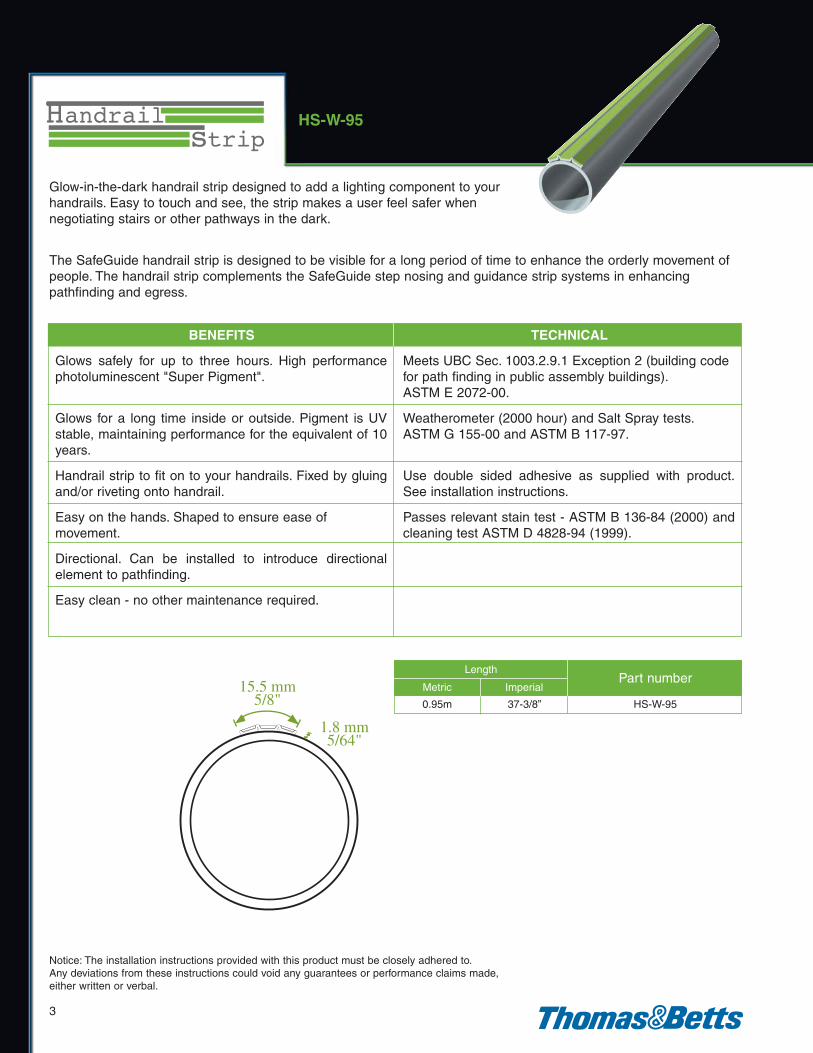
Glow-in-the-dark handrail strip designed to add a lighting component to your handrails. Easy to touch and see, the strip makes a user feel safer when negotiating stairs or other pathways in the dark.
The SafeGuide handrail strip is designed to be visible for a long period of time to enhance the orderly movement ofpeople. The handrail strip complements the SafeGuide step nosing and guidance strip systems in enhancingpathfinding and egress.
BENEFITS
Glows safely for up to three hours. High performancephotoluminescent "Super Pigment".
Glows for a long time inside or outside. Pigment is UVstable, maintaining performance for the equivalent of 10years.
Handrail strip to fit on to your handrails. Fixed by gluingand/or riveting onto handrail.
Easy on the hands. Shaped to ensure ease ofmovement.
Directional. Can be installed to introduce directional element to pathfinding.
Easy clean - no other maintenance required.
TECHNICAL
Meets UBC Sec. 1003.2.9.1 Exception 2 (building codefor path finding in public assembly buildings).ASTM E 2072-00.
Weatherometer (2000 hour) and Salt Spray tests.ASTM G 155-00 and ASTM B 117-97.
Use double sided adhesive as supplied with product.See installation instructions.
Passes relevant stain test - ASTM B 136-84 (2000) andcleaning test ASTM D 4828-94 (1999).
1.8 mm5/64"
15.5 mm5/8"
3
HS-W-95
Part numberLength
Metric
0.95m 37-3/8” HS-W-95
Imperial
Notice: The installation instructions provided with this product must be closely adhered to.Any deviations from these instructions could void any guarantees
or performance claims made, either written or verbal.
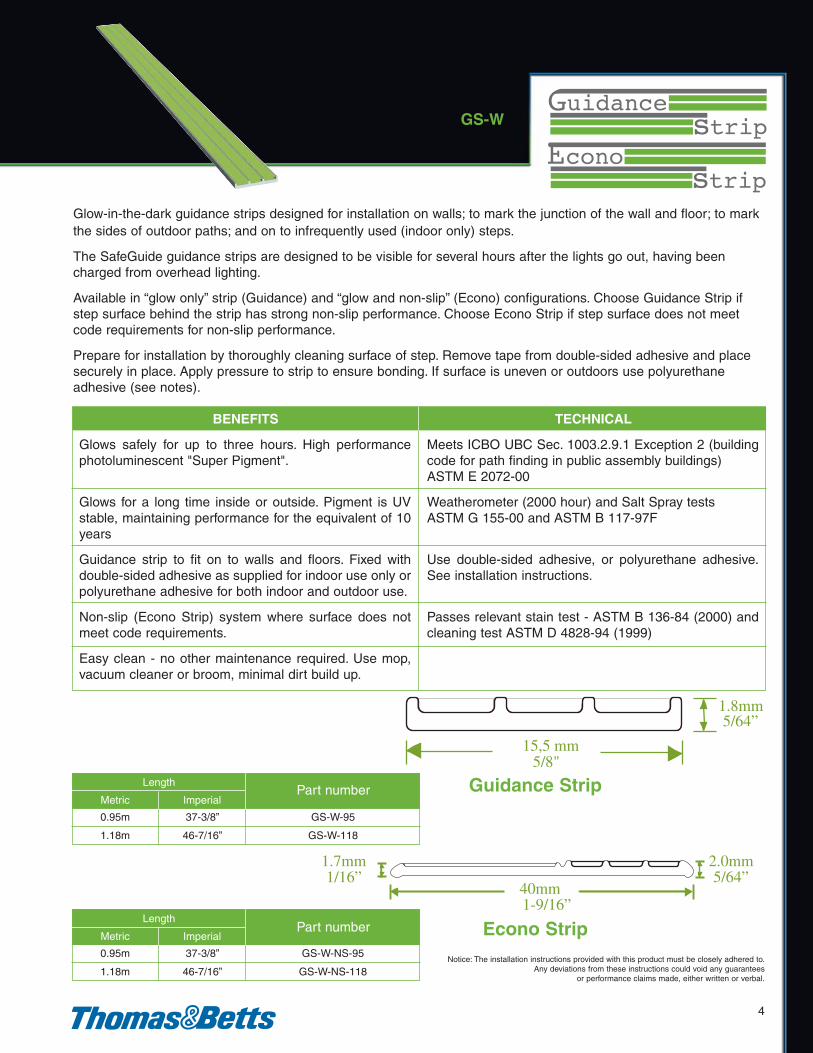
Glow-in-the-dark guidance strips designed for installation on walls; to mark the junction of the wall and floor; to markthe sides of outdoor paths; and on to infrequently used (indoor only) steps.
The SafeGuide guidance strips are designed to be visible for several hours after the lights go out, having beencharged from overhead lighting.
Available in “glow only” strip (Guidance) and “glow and non-slip” (Econo) configurations. Choose Guidance Strip ifstep surface behind the strip has strong non-slip performance. Choose Econo Strip if step surface does not meetcode requirements for non-slip performance.
Prepare for installation by thoroughly cleaning surface of step. Remove tape from double-sided adhesive and placesecurely in place. Apply pressure to strip to ensure bonding. If surface is uneven or outdoors use polyurethaneadhesive (see notes).
BENEFITS
Glows safely for up to three hours. High performancephotoluminescent "Super Pigment".
Glows for a long time inside or outside. Pigment is UVstable, maintaining performance for the equivalent of 10years
Guidance strip to fit on to walls and floors. Fixed withdouble-sided adhesive as supplied for indoor use only orpolyurethane adhesive for both indoor and outdoor use.
Non-slip (Econo Strip) system where surface does notmeet code requirements.
Easy clean - no other maintenance required. Use mop,vacuum cleaner or broom, minimal dirt build up.
TECHNICAL
Meets ICBO UBC Sec. 1003.2.9.1 Exception 2 (buildingcode for path finding in public assembly buildings)ASTM E 2072-00
Weatherometer (2000 hour) and Salt Spray testsASTM G 155-00 and ASTM B 117-97F
Use double-sided adhesive, or polyurethane adhesive.See installation instructions.
Passes relevant stain test - ASTM B 136-84 (2000) andcleaning test ASTM D 4828-94 (1999)
1.8mm5/64”
15,5 mm5/8"
40mm1-9/16”
2.0mm5/64”
1.7mm1/16”
Guidance Strip
Econo Strip
4
GS-W
Part numberLength
Metric
0.95m
1.18m
37-3/8”
46-7/16”
GS-W-95
GS-W-118
Imperial
Part numberLength
Metric
0.95m
1.18m
37-3/8”
46-7/16”
GS-W-NS-95
GS-W-NS-118
Imperial
Notice: The installation instructions provided with this product must be closely adhered to.Any deviations from these instructions could void any guarantees or performance claims made,either written or verbal.
Right-angled aluminum step nosing to be fitted to the edge of carpeted steps in public stair ways, exit ways, performance stairs and anywhere that path finding in darkness is an issue.
Carpet should be removed from step edge, which is a simple process. This means the nosing is independent of thecarpet and the carpet can be changed without removing the nosing.
The SafeGuide step nosing is designed to be visible for a long period of time to enhance the orderly movement of people.
Working just as well in the light as it does in the dark, the step nosing is designed to reduce falls and enhanceegress speed in all egress situations.
BENEFITS
Glows safely for up to three hours. High performancephotoluminescent "Super Pigment".
Glows for a long time inside or outside. Pigment is UV sta-ble, maintaining performance for the equivalent of 10 years.
Excellent non-slip system that feels great. PVC insertmade to "bare foot" standard.
Built to fit onto carpeted steps – carpet can be changedwithout removing the step nosing. Fixed by gluing andscrewing onto surface below carpet with lip overlappingcarpet edge.
Long-lasting protection for your steps and customers.High-grade aluminum step nosing built to withstandheavy traffic
Easy clean - no other maintenance required. Use mop,vacuum cleaner or broom, minimal dirt buildup.
Excellent edge differentiation with lights on.
Comes in black or silver. Anodized colour built to last.
TECHNICAL
Meets UBC Sec. 1003.2.9.1 Exception 2 (building codefor path finding in public assembly buildings).ASTM E 2072-00.
Weatherometer (2000 hour) and Salt Spray tests.ASTM G 155-00 and ASTM B 117-97.
Passes UL410 Non-Slip Test. >1.0 slip resistance.
Screws supplied. Use polyurethane sealant.See installation instructions.
"Industrial strength" anodizing to >18 micron.ASTM B 244-97 and ASTM B 137-95 (2000).
Passes relevant stain test - ASTM B 136-84 (2000) andcleaning test ASTM D 4828-94 (1999).
Test for coated samples in corrosive environments.ASTM D 1654-92.
Abrasion resistance of anti-slip material. ASTM 1242-95a.
33.3mm1-5/16”
57.0mm2-7/32”
41.5mm1-5/8”
14.5mm9/16”
9.6mm3/8”
5
CN-BA-NS black
CN-SA-NS satin
FinishLength
Metric
0.95m
1.18m
37-3/8”
46-7/16”
CN-SA-NS-95
CN-SA-NS-118
CN-BA-NS-95
CN-BA-NS-118
Imperial Satin Black

INSTALLATION INSTRUCTIONSSafeGuide Step Nosings – Flat Step Nosings
SafeGuide stair treads can be fitted to almost any substrate quickly and easily with proprietary fixings supplied with theproduct. When fitting product to solid substrates (concrete, timber, steel plates, etc.) it is stressed that a polyurethaneadhesive (see notes) be used in conjunction with all mechanical fixings. This method will prevent ‘chatter’ and restrictall movement that may loosen mechanical fixings over time.
All nosings come with three countersunk holes for mechanical fixing.
Fitting To Concrete Substrate
1. For a row of steps, place a nosing in the exact required position on the top step and one in the exact required position on the bottom step. Run a string line from the left edge of the top nosing to the left edge of the bottom nosing. This can then be used to ensure the nosings are installed perfectly in a straight line.
2. Place nosings in position on the individual steps with the left edge of each nosing lining up with the string line.
3. Through the pre-drilled holes of the nosings, mark a spot to show the position to drill into the substrate.
4. Remove the nosing and using a 6mm (approx 1/4”) concrete drill bit drill the hole that will house the plastic plugs as supplied with the screw fixings.
5. Clean away all debris and place plastic plugs into the holes. Ensure they are fully inserted into the drilled holes.
6. Lay the nosing upside down and clean off any possible residue from the underside to ensure a good bond with the adhesive.
7. Using a cartridge glue gun, apply a 3mm (1/8”) bead of the recommended polyurethane adhesive in a weaving pattern along the full length of the underside of the nosing. Keep the adhesive away from the outside edges of the nosing and the pre-drilled holes.
8. Turn the nosing back to right side up and place onto the step. Ensure the pre-drilled holes in the nosing are in line with the holes in the substrate.
9. Insert the screws and tighten down firmly using a battery operated drill with an R2 square drive bit. This will spread the bead of adhesive between the nosing and the substrate and create a strong even bond.
10.If any adhesive squeezes out around the edges of the nosing, wait until it cures before removing by trimming off with a box-cutter type cutting blade.
Fitting to Wooden Substrate
All the above procedures can be followed except:
The plastic plugs that are required to house the screw fixings in the concrete substrate will not be required.
The supplied screw fixers are self tapping type and ideal for wooden steps. Care should be taken to check thethickness of the wooden step is sufficient to house the screw.
6
Notice: The installation instructions provided with this product must be closely adhered to.Any deviations from these instructions could void any guarantees or performance claims made,
either written or verbal.
Notice: The installation instructions provided with this product must be closely adhered to.Any deviations from these instructions could void any guarantees or performance claims made,either written or verbal.
INSTALLATION INSTRUCTIONSThreshold strip, Econo Strip and Guidance Strip
These strips can be fitted to almost any substrate quickly and easily with double-sided adhesives supplied with theproduct (for indoor use only) or polyurethane adhesive (for both indoor and outdoor use).
Fitting To Indoor Substrates Only
1. Clean the surface of the substrate using any industrial strength cleaner. Ensure the substrate is thoroughly drybefore continuing installation. Use of the supplied adhesive without thorough cleaning will void themanufacturers warranty.
2. In the case of a row of steps, place a strip in the exact required position on the top step and one in the exact required position on the bottom step. Then run a string line from the left edge of the top nosing to the left edge of the bottom nosing. This can then be used to ensure the nosings are installed perfectly in a straight line.
3. Place strips in position on the individual steps with the left edge of each nosing lining up with the string line.
4. Remove the paper backing of the double-sided adhesive and place onto the step.
5. Firmly apply pressure to the full surface of the strip to ensure the best adhesion.
Fitting To Indoor And Outdoor Substrates Using The Recommended Polyurethane Adhesive
1. Clean the surface of the substrate using any industrial strength cleaner. Ensure substrate is thoroughly drybefore continuing installation. Use of the adhesive without thorough cleaning will void the manufacturer’swarranty.
2. In the case of a row of steps, place a strip in the exact required position on the top step and one in the exact required position on the bottom step. Then run a string line from the left edge of the top nosing to the left edge of the bottom nosing. This can then be used to ensure the nosings are installed perfectly in a straight line.
3. Place strips upside down on the individual steps with the left edge of each nosing lining up with the string line.Clean off any possible residue from the underside to ensure a good bond with the adhesive.
4. Using a cartridge glue gun, apply a 3mm (1/8”) bead of the recommended polyurethane adhesive in a weavingpattern along the full length of the underside of the nosing. Keep the adhesive away from the outside edges ofthe strips.
5. Turn the strip back to right side up and place onto the step.
6. Firmly apply pressure to the full surface of the strip to ensure the best adhesion.
7. If any adhesive squeezes out around the edges of the strip, wait until it cures before removing by trimming offwith a box-cutter type cutting blade.
7

INSTALLATION INSTRUCTIONSSafeGuide stair treads can be fitted to almost any carpet substrate quickly and easily with proprietaryfixings supplied with the product. When fitting product to solid substrates (concrete, timber, steel plates,etc.) it is stressed that a polyurethane adhesive be used in conjunction with all mechanical fixings.
This method will prevent ‘chatter’ and restrict all movement that may over time loosen mechanical fixings.All nosings come with three countersunk holes for mechanical fixing.
Fitting Nosings to Concrete Substrate with Existing Carpet1. In the case of a row of steps, place a nosing in the exact required position on the top step and one in the exact required
position on the bottom step. Then run a string line from the left edge of the top nosing to the left edge of the bottom nosing. This can then be used to ensure the nosings are installed perfectly in a straight line.
2. Now prepare to cut a strip of carpet away from the top of the step. This needs to be accurate so as the nosing will completelycover the area removed. Note the carpet on the front of the step will remain in place for the installation of the nosing.
3. Starting from the top step, push the riser section of the nosing hard against the front edge of the carpeted step. Then release the nosing back and away from the front of the step to approximately 9.5mm or 3/8inch. This is the position that will outline the required area of carpet to be cut away.
4. Take a sharp “Box-cutter type” cutting blade and cut the carpet parallel to both the left and right edges and along the full length of the nosing on the top of the step. Once the initial lines have been cut, remove the nosing and cut along the leading edge of the step (i.e. where the top front of the step meets the top flat of the step). Cut the carpet so as to join the already cut left and right edges.
5. Remove the cut strip of carpet and place the nosing into position for fixing. Holding firmly against the front edge of the step, mark a spot through the pre-drilled holes in the nosing to locate the place to drill the fixing holes into the substrate.
6. Remove the nosing and, using a 6mm (approx. 1/4”) concrete drill bit, drill the hole that will house the plastic plugs as supplied with the screw fixings.
7. Clean away all debris and place plastic plugs into the holes. Ensure they are fully inserted into the drilled holes8. Lay the nosing upside down and clean off any possible residue from the underside to ensure a good bond with the adhesive.9. Using a cartridge glue gun apply a 3mm (1/8”) bead of the recommended polyurethane adhesive in a weaving pattern
along the full length of the underside of the nosing. Keep the adhesive clear from the outside edges of the nosing and the pre-drilled holes.
10. Turn the nosing back to right side up and place onto the step. Ensure the pre-drilled holes in the nosing are in line with the holes in the substrate.
11. Insert the screws and tighten down firmly using a battery operated drill with an R2 square drive bit. This will spread the bead of adhesive between the nosing and the substrate and create a strong even bond.
Fitting Nosings to Concrete Substrate with New CarpetIt is recommended that an introduction (via the project manager) be made with the carpet supplier/installer to inform thatSafeGuide stair nosing have been specified and will be used on the same project. This will enable the carpet installer to cut thecarpet, in preparation for the nosing, when the full carpet is being laid.To ensure correct measurements are followed, a product drawing or a sample nosing should be supplied for the installer.
Fitting to Carpeted Wooden SubstrateAll the above procedure can be used except:The plastic plugs that are required to house the screw fixings in the concrete substrate will not be required.The supplied screw fixers are self tapping type and ideal for wooden steps. Care should be taken to check the thickness of thewooden step is sufficient to house the screw.
8
Notice: The installation instructions provided with this product must be closely adhered to.Any deviations from these instructions could void any guarantees or performance claims made,
either written or verbal.

INSTALLATION INSTRUCTIONSAccessories
Anchors and Screws
Plastic Anchor Stainless Steel Self
Tapping Screw
Polyurethane Sealant – “Bostik 1100 Fast Set”
• A one-component, fast curing, polyurethane elastomeric/adhesive sealant – gun grade.
• Tack-free time – 90 minutes.
• Curing time @ 77°F – 1.5 to 3 days which varies with temperature.
• Excess sealant that has squeezed out from under the nosing is best left to cure and then removed by way of cutting excess away with a “box-cutter” type cutting blade.
• For supply of product, full specifications and technical data contact Bostik Customer Services on 1 800 726 7845 or http://www.bostik.com
9
Notice: The installation instructions provided with this product must be closely adhered to.Any deviations from these instructions could void any guarantees or performance claims made,either written or verbal.
powered by ecoglo®

FACILITY NAME: ____________________FACILITY LOCATION: ____________________OPERATIONS MANAGER: __________________1SafeGuide photo-luminescent stair nosing
1. Introduction SafeGuide stair nosing is illuminated by natural or artificial light sources. The performance of the photo-luminescent insert depends upon the amount of light and the time of exposure to that light.
Based on the type of lights in the facility (ref ACTIVATION SOURCE TYPE) and the brightness of those lights (ref MINIMUM ILLUMINANCE AT TARGET) SafeGuide will supply the time (ref ACTIVATION DURATION) that the lights must be left on to charge the photo-luminescent insert prior to a performance.
2. Operating Specifications
ACTIVATION SOURCE TYPE:
MINIMUM ILLUMINANCE AT TARGET:
ACTIVATION DURATION:
TARGET LUMINANCE OUTPUT: 17.6 mcd/m2
TARGET OUTPUT DURATION: 140 minutes
3. Operating Definitions
ACTIVATION SOURCE: Light source used to charge photoluminescent material.
ACTIVATION SOURCE TYPE: Type of light to act as activation source, eg fluorescent light, incandescent light, natural light.
TARGET: Product containing photoluminescent material which is to be illuminated by the activation source.
MINIMUM ILLUMINANCE AT TARGET: Minimum illuminance, measured in lux, on the photoluminescent material.
ACTIVATION DURATION: Length of time that the activation light source must illuminate the target with the minimum illuminance level.
TARGET LUMINANCE OUTPUT: 17.6 mcd/m2 as defined by ASTM E 2073-00.
TARGET OUTPUT DURATION: The maximum time that safe lighting is required.
4. Maintenance
1. Heavy objects should not come into contact with the nosings at any time. Damage occurring in this manner will not be repaired or replaced under the warranty issued by the manufacturer.
2. A chemical cleaning agent for the anti-slip insert is available should discolouration occur.
3. Damage to the underlying concrete could occur if the nosing is removed. Care must be taken in separating the fixative from the concrete.Note that the nosing is installed as a permanent fixture.
4. If spare parts are requested as part of the order, the anti-slip strip will be delivered as a separate unit.
Cutting of the aluminum nosing should be done with a hacksaw or titanium tipped circular saw. The photo-luminescent insert should suffer no damage from the blade. Note that cutting the anti-slip insert can result in significant damage to the cutting blade.
The anti-slip should be cut through the smooth underside of the strip with a sharp cutter blade prior to insertion into the nosing. When cut to size, remove the paper backing and firmly press the strip into place. Apply further pressure to ensure adequate bonding.
5. Cleaning
1. Cleaning to remove built up dirt and objects from the photo-luminescent insert will ensure the photo-luminescence continues performing to specification.
2. Mopping, high-pressure water (but not water blasting or steam cleaning) or wiping with a cloth will keep the photo-luminescent insert clean.Observation will determine if cleaning is required however a regular clean every 4 to 6 weeks or after particularly heavy use will ensure correct performance.
3. Do not use highly alkaline material (ph >8) to clean the product as this will result in the in deterioration of the anodized surface and delamination of the photo-luminescent insert. Similar difficulties will be experienced with acid material (ph <5).
10
1
Notice: The installation instructions provided with this product must be closely adhered to.Any deviations from these instructions could void any guarantees or performance claims made,either written or verbal.
SafeGuide consists of a suite of innovative products that are made up of crystals in a pigment that emits a steady green luminescent glow.
The process of photo-luminescence allows certain substances to emit light after they have absorbed various kinds of energy. The processinvolves:
1. The absorption of energy - normally light. This causes the electrons of the atoms of the absorbing material to become excited and jumpfrom the inner orbits of the atoms to the outer orbits
2. When the electrons fall back to their original state, photons of light are emitted.
VISIBILITY
When primed with the appropriate levels of light, SafeGuide systems are visible from a minimum of at least 30 feet after 140 minutes of black-out. The crystals continue to glow until exhausting the energy they have absorbed, but they can be charged repeatedly by re-exposure to light – maintaining their performance for the life of building.
The pigment is non-radioactive, non-toxic, and responds to both solar and artificial light sources. A hard, long-lasting finish protects the surfaceof the handrail highlighter strips, nosings and stair treads.
3. Product Description: Basic Use: SafeGuide products are self-illuminating stair nosings, path delineation, and safety systems that illumi-nate by means of photoluminous pigment. When primed with appropriate levels of light, SafeGuide systems will be visible at 30 feet after140 minutes of darkness.
Meets stringent fire and safety regulations, can be used indoors and outdoors, and is UV stable. Resistant to cleaning chemicals, highpressure water cleaning and a wide range of climatic conditions. Easily fixed to most surfaces. Engineered to last the lifetime of the build-ing with little maintenance.
Products: SafeGuide Stair Nosing: Extruded, anodized aluminum. A minimum of 5/8"of the leading edge of the tread of the nosing isutilized for the insertion of the encapsulated photoluminous system. SafeGuide Photoluminescent Route Identification Strips –Guidance, Econo-, Threshold- and Handrail Strips: Fully encapsulated photoluminescent system, no less than 15mm (5/8") of glowstrip wide, contained within an extruded aluminum strip.
Materials common to most profiles include: Lightweight aluminum photoluminous pigment, non-slip surface (for stair nosing, Thresholdand Econo Strip products).
Colours: Anodized aluminum is available in silver or black
4. Technical Data: Photoluminescence satisfies the requirements of the International Building Code Section 1003.2.11 "Means of EgressIllumination" as documented in ICBO ES AC169 Acceptance Criteria for Photoluminous Egress Illumination, the required level of lumi-nance is achieved at 140 minutes. ICBO ES ER5785 Evaluation Report on SafeGuide conformance to AC169. ASTM E 2072 and 2073Standards for Photoluminescent Marking Systems. Non-slip surfacing UL Standard 410 "Slip Resistance"
5. Installation: Stair Nosing Preparation - Concrete: Test prior to installation for the reaction of fixative with concrete surface. Preparation -Steel: Test prior to installation for reaction between i) fixative and steel finish, and ii) steel and any mechanical fixer used. See manufac-turers instructions for installation. Stair nosing and Tread preparation: Test prior to installation for the reaction of fixative or double-sidedadhesive with surface. Clean thoroughly, use solvent to remove grease and dirt. Handrail Strip Preparation: Test prior to installation forthe reaction of the double-sided adhesive tape with surface.
6. Availability and Cost: Available from manufacturer's authorized representatives.
7. Warranty: SafeGuide products, when installed, used and maintained properly, are guaranteed to be free of defects in performance andworkmanship for three years and should perform satisfactorily through the life of the building.
8. Maintenance: Nosings: Heavy objects should not come into contact with the nosings at any time. Damage occurring in this manner willnot be repaired or replaced under the warranty issued by SafeGuide. Installation is permanent therefore damage to the underlying sur-face could occur if the nosing is removed. The systems should be cleaned on a monthly basis or as deemed necessary by periodic inspec-tion. Encapsulated Photoluminescent System: The operation of the system should be checked visually on an annual basis.
© 2004. Thomas & Betts Limited.Printed in Canada. 06/04/5000
TB/SafeGuide-E