powercenter data federation guide - gerardnico · v preface the powercenter data federation guide...
TRANSCRIPT
Informatica PowerCenter®
(Version 8.6.1)
Data Federation Guide
Informatica PowerCenter Data Federation Guide
Version 8.6.1 December 2008
Copyright (c) 1998–2008 Informatica Corporation. All rights reserved.
This software and documentation contain proprietary information of Informatica Corporation and are provided under a license agreement containing restrictions on use and disclosure and are also protected by copyright law. Reverse engineering of the software is prohibited. No part of this document may be reproduced or transmitted in any form, by any means (electronic, photocopying, recording or otherwise) without prior consent of Informatica Corporation. This Software may be protected by U.S. and/or international Patents and other Patents Pending.
Use, duplication, or disclosure of the Software by the U.S. Government is subject to the restrictions set forth in the applicable software license agreement and as provided in DFARS 227.7202-1(a) and 227.7702-3(a) (1995), DFARS 252.227-7013(c)(1)(ii) (OCT 1988), FAR 12.212(a) (1995), FAR 52.227-19, or FAR 52.227-14 (ALT III), as applicable.
The information in this product or documentation is subject to change without notice. If you find any problems in this product or documentation, please report them to us in writing.
Informatica, PowerCenter, PowerCenterRT, PowerCenter Connect, PowerCenter Data Analyzer, PowerExchange, PowerMart, Metadata Manager, Informatica Data Quality, Informatica Data Explorer, Informatica B2B Data Exchange and Informatica On Demand are trademarks or registered trademarks of Informatica Corporation in the United States and in jurisdictions throughout the world. All other company and product names may be trade names or trademarks of their respective owners.
Portions of this software and/or documentation are subject to copyright held by third parties, including without limitation: Copyright DataDirect Technologies. All rights reserved. Copyright © 2007 Adobe Systems Incorporated. All rights reserved. Copyright © Sun Microsystems. All rights reserved. Copyright © RSA Security Inc. All Rights Reserved. Copyright © Ordinal Technology Corp. All rights reserved. Copyright © Platon Data Technology GmbH. All rights reserved. Copyright © Melissa Data Corporation. All rights reserved. Copyright © Aandacht c.v. All rights reserved. Copyright 1996-2007 ComponentSource®. All rights reserved. Copyright Genivia, Inc. All rights reserved. Copyright 2007 Isomorphic Software. All rights reserved. Copyright © Meta Integration Technology, Inc. All rights reserved. Copyright © Microsoft. All rights reserved. Copyright © Oracle. All rights reserved. Copyright © AKS-Labs. All rights reserved. Copyright © Quovadx, Inc. All rights reserved. Copyright © SAP. All rights reserved. Copyright 2003, 2007 Instantiations, Inc. All rights reserved. Copyright © Intalio. All rights reserved.
This product includes software developed by the Apache Software Foundation (http://www.apache.org/), software copyright 2004-2005 Open Symphony (all rights reserved) and other software which is licensed under the Apache License, Version 2.0 (the “License”). You may obtain a copy of the License at http://www.apache.org/licenses/LICENSE-2.0. Unless required by applicable law or agreed to in writing, software distributed under the License is distributed on an “AS IS” BASIS, WITHOUT WARRANTIES OR CONDITIONS OF ANY KIND, either express or implied. See the License for the specific language governing permissions and limitations under the License.
This product includes software which was developed by Mozilla (http://www.mozilla.org/), software copyright The JBoss Group, LLC, all rights reserved; software copyright, Red Hat Middleware, LLC, all rights reserved; software copyright © 1999-2006 by Bruno Lowagie and Paulo Soares and other software which is licensed under the GNU Lesser General Public License Agreement, which may be found at http://www.gnu.org/licenses/lgpl.html. The materials are provided free of charge by Informatica, “as-is”, without warranty of any kind, either express or implied, including but not limited to the implied warranties of merchantability and fitness for a particular purpose.
The product includes ACE(TM) and TAO(TM) software copyrighted by Douglas C. Schmidt and his research group at Washington University, University of California, Irvine, and Vanderbilt University, Copyright (c) 1993-2006, all rights reserved.
This product includes software copyright (c) 2003-2007, Terence Parr. All rights reserved. Your right to use such materials is set forth in the license which may be found at http://www.antlr.org/license.html. The materials are provided free of charge by Informatica, “as-is”, without warranty of any kind, either express or implied, including but not limited to the implied warranties of merchantability and fitness for a particular purpose.
This product includes software developed by the OpenSSL Project for use in the OpenSSL Toolkit (copyright The OpenSSL Project. All Rights Reserved) and redistribution of this software is subject to terms available at http://www.openssl.org.
This product includes Curl software which is Copyright 1996-2007, Daniel Stenberg, <[email protected]>. All Rights Reserved. Permissions and limitations regarding this software are subject to terms available at http://curl.haxx.se/docs/copyright.html. Permission to use, copy, modify, and distribute this software for any purpose with or without fee is hereby granted, provided that the above copyright notice and this permission notice appear in all copies.
The product includes software copyright 2001-2005 (C) MetaStuff, Ltd. All Rights Reserved. Permissions and limitations regarding this software are subject to terms available at http://www.dom4j.org/license.html.
The product includes software copyright (c) 2004-2007, The Dojo Foundation. All Rights Reserved. Permissions and limitations regarding this software are subject to terms available at http://svn.dojotoolkit.org/dojo/trunk/LICENSE.
This product includes ICU software which is copyright (c) 1995-2003 International Business Machines Corporation and others. All rights reserved. Permissions and limitations regarding this software are subject to terms available at http://www-306.ibm.com/software/globalization/icu/license.jsp
This product includes software copyright (C) 1996-2006 Per Bothner. All rights reserved. Your right to use such materials is set forth in the license which may be found at http://www.gnu.org/software/kawa/Software-License.html.
This product includes OSSP UUID software which is Copyright (c) 2002 Ralf S. Engelschall, Copyright (c) 2002 The OSSP Project Copyright (c) 2002 Cable & Wireless Deutschland. Permissions and limitations regarding this software are subject to terms available at http://www.opensource.org/licenses/mit-license.php.
This product includes software developed by Boost (http://www.boost.org/) or under the Boost software license. Permissions and limitations regarding this software are subject to terms available at http://www.boost.org/LICENSE_1_0.txt.
This product includes software copyright © 1997-2007 University of Cambridge. Permissions and limitations regarding this software are subject to terms available at http://www.pcre.org/license.txt.
This product includes software copyright (c) 2007 The Eclipse Foundation. All Rights Reserved. Permissions and limitations regarding this software are subject to terms available at http://www.eclipse.org/org/documents/epl-v10.php.
The product includes the zlib library copyright (c) 1995-2005 Jean-loup Gailly and Mark Adler.
This product includes software licensed under the terms at http://www.tcl.tk/software/tcltk/license.html.
This product includes software licensed under the terms at http://www.bosrup.com/web/overlib/?License.
This product includes software licensed under the terms at http://www.stlport.org/doc/license.html.
This product includes software licensed under the Academic Free License (http://www.opensource.org/licenses/afl-3.0.php). This product includes software copyright © 2003-2006 Joe WaInes, 2006-2007 XStream Committers. All rights reserved. Permissions and limitations regarding this software are subject to terms available at http://xstream.codehaus.org/license.html. This product includes software developed by the Indiana University Extreme! Lab. For further information please visit http://www.extreme.indiana.edu/.
This Software is protected by U.S. Patent Numbers 6,208,990; 6,044,374; 6,014,670; 6,032,158; 5,794,246; 6,339,775; 6,850,947; 6,895,471; 7,254,590 and other U.S. Patents Pending.
DISCLAIMER: Informatica Corporation provides this documentation “as is” without warranty of any kind, either express or implied, including, but not limited to, the implied warranties of non-infringement, merchantability, or use for a particular purpose. Informatica Corporation does not warrant that this software or documentation is error free. The information provided in this software or documentation may include technical inaccuracies or typographical errors. The information in this software and documentation is subject to change at any time without notice.
Part Number: PC-DFG-86100-0001
Table of Contents
Preface . . . . . . . . . . . . . . . . . . . . . . . . . . . . . . . . . . . . . . . . . . . . . . . . . . . . . . . . . . . . . . v
Informatica Resources . . . . . . . . . . . . . . . . . . . . . . . . . . . . . . . . . . . . . . . . . . . . . . . . . . . . . . v
Informatica Customer Portal . . . . . . . . . . . . . . . . . . . . . . . . . . . . . . . . . . . . . . . . . . . . . . v
Informatica Documentation . . . . . . . . . . . . . . . . . . . . . . . . . . . . . . . . . . . . . . . . . . . . . . v
Informatica Web Site . . . . . . . . . . . . . . . . . . . . . . . . . . . . . . . . . . . . . . . . . . . . . . . . . . . v
Informatica How-To Library . . . . . . . . . . . . . . . . . . . . . . . . . . . . . . . . . . . . . . . . . . . . . . v
Informatica Knowledge Base . . . . . . . . . . . . . . . . . . . . . . . . . . . . . . . . . . . . . . . . . . . . . . vi
Informatica Global Customer Support . . . . . . . . . . . . . . . . . . . . . . . . . . . . . . . . . . . . . . . vi
Chapter 1: Installing the Data Federation Option . . . . . . . . . . . . . . . . . . . . . . . . . . . . . 1
Understanding the Data Federation Option . . . . . . . . . . . . . . . . . . . . . . . . . . . . . . . . . . . . . . 1
Composite Data Services . . . . . . . . . . . . . . . . . . . . . . . . . . . . . . . . . . . . . . . . . . . . . . . . 2
Using the PowerCenter Data Federation Option . . . . . . . . . . . . . . . . . . . . . . . . . . . . . . . . 2
Installation and Configuration . . . . . . . . . . . . . . . . . . . . . . . . . . . . . . . . . . . . . . . . . . . . . . . 3
Data Federation Option License Information . . . . . . . . . . . . . . . . . . . . . . . . . . . . . . . . . . 3
Minimum System Requirements . . . . . . . . . . . . . . . . . . . . . . . . . . . . . . . . . . . . . . . . . . . 3
Before You Begin . . . . . . . . . . . . . . . . . . . . . . . . . . . . . . . . . . . . . . . . . . . . . . . . . . . . . . 3
Steps to Install the Data Federation Option . . . . . . . . . . . . . . . . . . . . . . . . . . . . . . . . . . . 3
Validating the Data Federation Option License . . . . . . . . . . . . . . . . . . . . . . . . . . . . . . . . 3
Importing SQLNormalizer.car . . . . . . . . . . . . . . . . . . . . . . . . . . . . . . . . . . . . . . . . . . . . . 4
Installing the Composite ODBC Driver . . . . . . . . . . . . . . . . . . . . . . . . . . . . . . . . . . . . . . 4
Configuring a Composite ODBC Data Source . . . . . . . . . . . . . . . . . . . . . . . . . . . . . . . . . 4
Using Composite with Data Analyzer . . . . . . . . . . . . . . . . . . . . . . . . . . . . . . . . . . . . . . . 5
Chapter 2: Reading from Composite Virtual Databases . . . . . . . . . . . . . . . . . . . . . . . . 7
Overview . . . . . . . . . . . . . . . . . . . . . . . . . . . . . . . . . . . . . . . . . . . . . . . . . . . . . . . . . . . . . . . 7
Creating Mappings from Composite Views . . . . . . . . . . . . . . . . . . . . . . . . . . . . . . . . . . . . . . 8
Publishing Views in Composite . . . . . . . . . . . . . . . . . . . . . . . . . . . . . . . . . . . . . . . . . . . . 8
Importing Views into the Designer . . . . . . . . . . . . . . . . . . . . . . . . . . . . . . . . . . . . . . . . . 8
Creating Source Definitions . . . . . . . . . . . . . . . . . . . . . . . . . . . . . . . . . . . . . . . . . . . . . . . . . 9
Publishing Data Services in Composite . . . . . . . . . . . . . . . . . . . . . . . . . . . . . . . . . . . . . . 9
Manually Creating a Source Definition . . . . . . . . . . . . . . . . . . . . . . . . . . . . . . . . . . . . . 10
Importing a Source Definition . . . . . . . . . . . . . . . . . . . . . . . . . . . . . . . . . . . . . . . . . . . 10
Chapter 3: Extending Composite Data Sources . . . . . . . . . . . . . . . . . . . . . . . . . . . . . 11
Extending Composite Data Sources . . . . . . . . . . . . . . . . . . . . . . . . . . . . . . . . . . . . . . . . . . . 11
Publishing Data Services in Composite . . . . . . . . . . . . . . . . . . . . . . . . . . . . . . . . . . . . . 11
Extending Composite Sources Using ODBC . . . . . . . . . . . . . . . . . . . . . . . . . . . . . . . . . 11
Extending Composite Sources Using Web Services . . . . . . . . . . . . . . . . . . . . . . . . . . . . . 12
Chapter 4: Profiling and Viewing Virtual Database Data . . . . . . . . . . . . . . . . . . . . . . 13
Profiling Data in a Virtual Database . . . . . . . . . . . . . . . . . . . . . . . . . . . . . . . . . . . . . . . . . . 13
i i i

Viewing Virtual Database Data in Data Analyzer . . . . . . . . . . . . . . . . . . . . . . . . . . . . . . . . . 13
Step 1. Combine Data into a Virtual Database . . . . . . . . . . . . . . . . . . . . . . . . . . . . . . . . 14
Step 2. Configure Data Sources and Data Connectors . . . . . . . . . . . . . . . . . . . . . . . . . . . 14
Step 3. Create Fact Tables, Dimension Tables, and Schemas . . . . . . . . . . . . . . . . . . . . . . 14
Step 4. Create Reports . . . . . . . . . . . . . . . . . . . . . . . . . . . . . . . . . . . . . . . . . . . . . . . . . 14
Index . . . . . . . . . . . . . . . . . . . . . . . . . . . . . . . . . . . . . . . . . . . . . . . . . . . . . . . . . . . . . . . 15
iv Table of Contents

Preface
The PowerCenter Data Federation Guide provides information to install the Data Federation Option and use the Data Federation Option to extract and load federated data. It is written for database administrators and developers responsible for configuring mappings and sessions for extracting and loading federated data. It is also written for Data Analyzer administrators and developers who want to use Data Analyzer to view virtual database reports.
This book assumes you have knowledge of relational database concepts and database engines, PowerCenter, and Composite Information Server.
Informatica Resources
Informatica Customer PortalAs an Informatica customer, you can access the Informatica Customer Portal site at http://my.informatica.com. The site contains product information, user group information, newsletters, access to the Informatica customer support case management system (ATLAS), the Informatica How-To Library, the Informatica Knowledge Base, Informatica Documentation Center, and access to the Informatica user community.
Informatica DocumentationThe Informatica Documentation team takes every effort to create accurate, usable documentation. If you have questions, comments, or ideas about this documentation, contact the Informatica Documentation team through email at [email protected]. We will use your feedback to improve our documentation. Let us know if we can contact you regarding your comments.
Informatica Web SiteYou can access the Informatica corporate web site at http://www.informatica.com. The site contains information about Informatica, its background, upcoming events, and sales offices. You will also find product and partner information. The services area of the site includes important information about technical support, training and education, and implementation services.
Informatica How-To LibraryAs an Informatica customer, you can access the Informatica How-To Library at http://my.informatica.com. The How-To Library is a collection of resources to help you learn more about Informatica products and
v

features. It includes articles and interactive demonstrations that provide solutions to common problems, compare features and behaviors, and guide you through performing specific real-world tasks.
Informatica Knowledge BaseAs an Informatica customer, you can access the Informatica Knowledge Base at http://my.informatica.com. Use the Knowledge Base to search for documented solutions to known technical issues about Informatica products. You can also find answers to frequently asked questions, technical white papers, and technical tips.
Informatica Global Customer SupportThere are many ways to access Informatica Global Customer Support. You can contact a Customer Support Center through telephone, email, or the WebSupport Service.
Use the following email addresses to contact Informatica Global Customer Support:
♦ [email protected] for technical inquiries
♦ [email protected] for general customer service requests
WebSupport requires a user name and password. You can request a user name and password at http://my.informatica.com.
Use the following telephone numbers to contact Informatica Global Customer Support:
North America / South America Europe / Middle East / Africa Asia / Australia
Informatica Corporation Headquarters100 Cardinal WayRedwood City, California 94063United States
Toll Free +1 877 463 2435
Standard RateBrazil: +55 11 3523 7761 Mexico: +52 55 1168 9763 United States: +1 650 385 5800
Informatica Software Ltd.6 Waltham ParkWaltham Road, White WalthamMaidenhead, BerkshireSL6 3TNUnited Kingdom
Toll Free 00 800 4632 4357
Standard RateBelgium: +32 15 281 702France: +33 1 41 38 92 26Germany: +49 1805 702 702Netherlands: +31 306 022 797Spain and Portugal: +34 93 480 3760United Kingdom: +44 1628 511 445
Informatica Business Solutions Pvt. Ltd.Diamond DistrictTower B, 3rd Floor150 Airport RoadBangalore 560 008India
Toll Free Australia: 1 800 151 830Singapore: 001 800 4632 4357
Standard RateIndia: +91 80 4112 5738
vi Preface
C H A P T E R 1
Installing the Data Federation Option
This chapter includes the following topics:
♦ Understanding the Data Federation Option, 1
♦ Installation and Configuration, 3
Understanding the Data Federation Option
The PowerCenter Data Federation option provides Enterprise Information Integration (EII) capabilities. It integrates PowerCenter and Composite Information Server to give you access to multiple, disparate data sources. It allows you to combine these data sources into a virtual database layer for use by applications and front-end reporting tools. Access to a variety of data sources in a virtual database with the Data Federation option can help you address the following business needs:
♦ Data warehouse prototyping
♦ Prototyping application migration
♦ Extending a Composite data source with data from any supported PowerCenter source using ODBC
♦ Verifying assumptions about the source data through data profiling
♦ Obtaining a single view of the customer
PowerCenter integrates with the following components of Composite Information Server to provide federated data access:
♦ Composite Server. Core run-time environment that lets users access data sources through JDBC and ODBC. The Composite Server also hosts a metadata repository to store Composite metadata. PowerCenter connects to the Composite Server to read source data, import views, and write target data. Data Analyzer connects to the Composite Server to retrieve data for reports.
♦ Composite JDBC. Lets clients access the Composite Server with a JDBC driver. Use the JDBC driver when you want to use Composite as a data source in Data Analyzer.
♦ Composite ODBC. Lets clients access the Composite Server with an ODBC driver. Use the ODBC driver when you want to import Composite data services as source or target definitions in PowerCenter and run sessions that read from and write to Composite.
Composite Information Server also includes Composite Studio. Composite Studio provides an interface to manage virtual databases. You can import Composite virtual databases you define in Composite Studio as
1
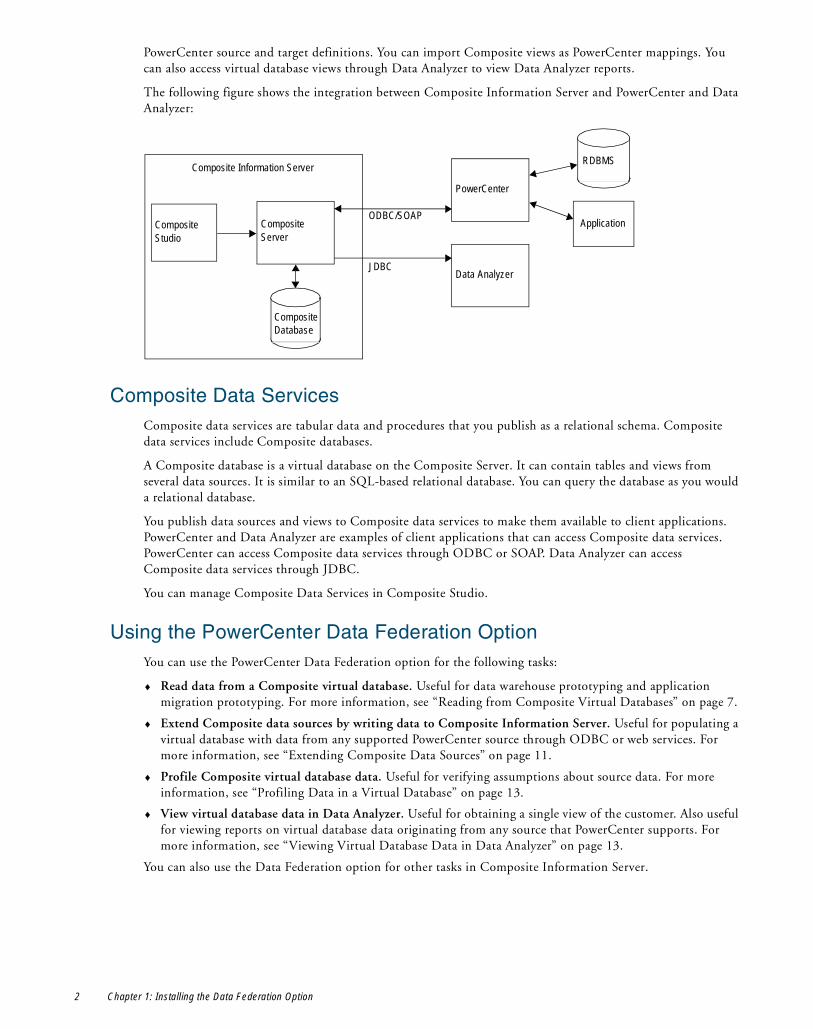
PowerCenter source and target definitions. You can import Composite views as PowerCenter mappings. You can also access virtual database views through Data Analyzer to view Data Analyzer reports.
The following figure shows the integration between Composite Information Server and PowerCenter and Data Analyzer:
Composite Data ServicesComposite data services are tabular data and procedures that you publish as a relational schema. Composite data services include Composite databases.
A Composite database is a virtual database on the Composite Server. It can contain tables and views from several data sources. It is similar to an SQL-based relational database. You can query the database as you would a relational database.
You publish data sources and views to Composite data services to make them available to client applications. PowerCenter and Data Analyzer are examples of client applications that can access Composite data services. PowerCenter can access Composite data services through ODBC or SOAP. Data Analyzer can access Composite data services through JDBC.
You can manage Composite Data Services in Composite Studio.
Using the PowerCenter Data Federation OptionYou can use the PowerCenter Data Federation option for the following tasks:
♦ Read data from a Composite virtual database. Useful for data warehouse prototyping and application migration prototyping. For more information, see “Reading from Composite Virtual Databases” on page 7.
♦ Extend Composite data sources by writing data to Composite Information Server. Useful for populating a virtual database with data from any supported PowerCenter source through ODBC or web services. For more information, see “Extending Composite Data Sources” on page 11.
♦ Profile Composite virtual database data. Useful for verifying assumptions about source data. For more information, see “Profiling Data in a Virtual Database” on page 13.
♦ View virtual database data in Data Analyzer. Useful for obtaining a single view of the customer. Also useful for viewing reports on virtual database data originating from any source that PowerCenter supports. For more information, see “Viewing Virtual Database Data in Data Analyzer” on page 13.
You can also use the Data Federation option for other tasks in Composite Information Server.
Composite Server
RDBMS
Composite Database
PowerCenter
ODBC/SOAPApplication
Composite Information Server
Composite Studio
Data AnalyzerJDBC
2 Chapter 1: Installing the Data Federation Option

Installation and Configuration
The Data Federation option is powered by Composite Software version 4.6. When you install the Data Federation option, you install Composite Information Server. You can also select components of Composite Information Server you want to install, such as ODBC.
Data Federation Option License InformationAfter you install the Data Federation option, the Composite Server starts automatically. Each time you start the Composite Server, it validates the Data Federation option license.
Minimum System RequirementsFor information about minimum system requirements for installing Composite Information Server, see the Composite Installation and Administration Guide.
Before You BeginBefore you install the Data Federation option, complete the following tasks:
♦ Optionally, purchase the PowerCenter Data Profiling option. If you want to use Data Profiling with the Data Federation option, purchase a PowerCenter Data Profiling option.
♦ Install Microsoft .NET Framework. The Data Federation option on Windows requires Microsoft .NET Framework 2.0. You can download Microsoft .NET Framework 2.0 from the following web site:
http://msdn2.microsoft.com/en-us/netframework/aa731542.aspx
Steps to Install the Data Federation OptionWhen you install the Data Federation option, complete the following steps:
1. Install PowerCenter.
2. Install the Data Federation option. Follow the instructions in the installation program. After the installation is complete, the Composite Server starts. The Composite Server validates the Data Federation option license.
3. Import the SQLNormalizer.car file into Composite Studio. For more information, see “Importing SQLNormalizer.car” on page 4.
4. Install the Composite ODBC driver on the machine hosting the PowerCenter Client. For more information, see “Installing the Composite ODBC Driver” on page 4.
5. Configure ODBC data sources. Configure Composite ODBC data sources when you want to use PowerCenter to read data from and write data to a Composite virtual database. For more information, see “Configuring a Composite ODBC Data Source” on page 4.
6. Optionally, copy the Composite JDBC driver to the Data Analyzer installation directory. Copy the Composite JDBC driver if you want to view reports on data in a Composite virtual database using Data Analyzer. For more information, see “Using Composite with Data Analyzer” on page 5.
Validating the Data Federation Option LicenseEach time you start the Composite Server it validates the Data Federation option license by verifying the Data Federation option license key in the PowerCenter license. If the validation succeeds, you can use the Composite Server. If the validation fails, the Composite Server starts. However, you cannot execute queries using Composite Studio, JDBC, ODBC, or SOAP.
Installat ion and Configuration 3

Importing SQLNormalizer.carThe Data Federation option requires that you import the file SQLNormalizer.car into Composite Studio. SQLNormalizer.car is provided on the Data Federation option installation DVD.
To import SQLNormalizer.car into Composite Studio:
1. Start Composite Studio as a user with administrative privileges.
2. Open the modeler.
3. Import the SQLNormalizer resource into the root node (Desktop) of the resource tree.
SQLNormalizer.car is in the following location on the Data Federation option installation DVD:
\PowerCenterMetadataExchange\CompositeMetadataExchangeProcedure\SQLNormalizer.car
4. Make sure the Custom Jar check box is checked.
5. Click Import.
6. Verify that the following resource appears as a published resource:
Composite Data Services/Databases/PowerCenter/SQLNormalizer
Installing the Composite ODBC DriverInstall the Composite ODBC driver on each PowerCenter Client machine.
To install the ODBC driver:
1. Start the Data Federation option installation program.
2. Click Next until you reach Composite Software Components.
3. Clear all components except ODBC. Click Next.
4. Follow the instructions to complete the installation.
Configuring a Composite ODBC Data SourceWhen you install the Data Federation option on the Integration Service node, a Composite ODBC driver installs. You must also install the Composite ODBC driver on the machine hosting the PowerCenter Client.
The driver is called Composite 4.6. Use the driver to configure Composite ODBC data sources to complete the following integration tasks between PowerCenter and Composite Information Server:
♦ Import Composite data services as source and target definitions in the PowerCenter Designer. Configure Composite ODBC data sources on the machine hosting the PowerCenter Client.
♦ Read data from a Composite virtual database. Configure Composite ODBC data sources on the node hosting the Integration Service.
♦ Extend Composite data sources. Configure Composite ODBC data sources on the node hosting the Integration Service.
Create an ODBC data source for each Composite virtual database you want to read from or write to. You must publish the data source as a data service in Composite before you can access the data source through ODBC.
You may also need to configure ODBC data sources for the components of Composite Information Server to interact with each other.
For more information about configuring a Composite ODBC data source on Windows, see the Composite User’s Guide. For more information about configuring a Composite ODBC data source on UNIX, see the Composite Installation and Administration Guide.
4 Chapter 1: Installing the Data Federation Option
Using Composite with Data AnalyzerBefore you can use Composite with Data Analyzer, you must copy the Composite JDBC driver csjdbc.jar file to the Data Analyzer installation directory.
The csjdbc.jar file is in the following folder:
<Composite installation directory>\apps\jdbc\lib
Copy the JAR file to the following directory:
<PowerCenter Installation Directory>\server\tomcat\jboss\server\informatica\lib.
Installat ion and Configuration 5

6 Chapter 1: Installing the Data Federation Option

C H A P T E R 2
Reading from Composite Virtual Databases
This chapter includes the following topics:
♦ Overview, 7
♦ Creating Mappings from Composite Views, 8
♦ Creating Source Definitions, 9
Overview
You can read data from a Composite virtual database and write data to a data warehouse or other PowerCenter target. You might want to do this in the following cases:
♦ When you prototype data migration from one application to another. For example, you want to migrate data from a legacy system to a new system. Before you migrate data, create a virtual database that allows you to see the results of the migration. When you are ready to migrate the data, use the Data Federation Option to read the data from the virtual database and load it into the new system.
♦ When you prototype a data warehouse. For example, you want to view data in a virtual database before you load it to the physical data warehouse. You can use the virtual database to prototype the data warehouse. After you successfully prototype the data warehouse, use the Data Federation Option to read the data from the virtual database and load it into the new data warehouse.
When you read data from a Composite virtual database, you create a mapping in PowerCenter with a Composite data service as a source. You can create a mapping with a data service as a source in the following ways:
♦ Create a mapping from a Composite view. Use the Data Federation Metadata Wizard to import Composite views as PowerCenter mappings. The Data Federation Metadata Wizard uses SQL of a view to create sources, transformations, and ODBC targets. For more information, see “Creating Mappings from Composite Views” on page 8.
♦ Create a source definition based on a Composite data service and manually create the mapping. Use the Data Federation Option to import Composite data sources. Or, create the source definitions manually. You can then create mappings that use the sources you create. For more information, see “Creating Source Definitions” on page 9.
You also create a PowerCenter workflow with a relational database connection that reads from a Composite data service and writes the data to a target. Select ODBC as the connection type. When you configure the workflow, select the relational database connection as the source connection.
7

Creating Mappings from Composite Views
You can create PowerCenter mappings based on published Composite views. Use the Data Federation Metadata Wizard in the Designer to import the view. The wizard imports and translates the Composite view to one or more mappings. In each mapping, it creates source definitions from the sources in the view, transformations based on the SQL query of the view, and an ODBC target definition. If the Designer cannot translate the view, it does not import it.
For example, if the view you import joins source data from an Oracle and a Sybase ASE source, the Data Federation Metadata Wizard creates a mapping that contains an Oracle and a Sybase ASE source definition, a Source Qualifier for each source definition, a Joiner transformation, and an ODBC target definition.
To create mappings from a Composite view, publish the view in Composite and then import the view into the Designer. If the mapping that the Designer creates from the view contains a flat file source definition, you need to manually define the delimiter in the source definition.
Publishing Views in CompositeBefore you can import views from a Composite data source into the Designer, create and publish the view to a Composite Data Service in Composite Studio.
Importing Views into the DesignerTo import a view, connect to the Composite data service from the Designer. You can import multiple views from the same data service.
When you import a view, the Data Federation Metadata Wizard creates one mapping for each unpublished view that the view depends on. The Data Federation Metadata Wizard uses the following naming convention for mappings for published views: m_df_<service_name>/<catalog_name>/<schema_name>/<view_name>
It uses the following naming convention for mappings for unpublished views: m_df_<path>/<view_name>
If the path and view name for a published or unpublished view exceeds 72 characters, the Data Federation Metadata Wizard truncates the path name from the left, excluding the “m_df_” prefix.
In each mapping, the Data Federation Metadata Wizard creates an ODBC target definition with the same name as the view. If you import multiple views with the same name, the Data Federation Metadata Wizard gives the first target definition the same name as the view. It names other target definitions tgt_<view_name>1, tgt_<view_name>2, and so on.
For example, you import the published view “Service1/Catalog1/Schema1/View1” based on the unpublished view “Shared/examples/CompositeView.” The Data Federation Metadata Wizard creates one mapping called “m_df_Service1/Catalog1/Schema1/View1.” This mapping contains one source definition for each table in the unpublished view, a Source Qualifier for each source, and an ODBC target definition called “View1.” The mapping may also contain one or more transformations depending on the SQL of the view.
Next, you import the published view “Service1/View2” that is based on unpublished view “Shared/examples/View2.” Unpublished view “Shared/examples/View2” depends on unpublished views “Shared/examples/View3” and “Shared/examples/View4.” The Data Federation Metadata Wizard creates the following mappings:
♦ m_df_Shared/examples/View3. Contains ODBC target “View3.”
♦ m_df_Shared/examples/View4. Contains ODBC target “View4.”
♦ m_df_Service1/View2. Contains ODBC sources “View3” and “View4,” and ODBC target “View2.”
To import Composite views:
1. In the PowerCenter Designer, open the folder where you want to import the views.
2. Open the Mapping Designer.
8 Chapter 2: Reading from Composite Virtual Databases
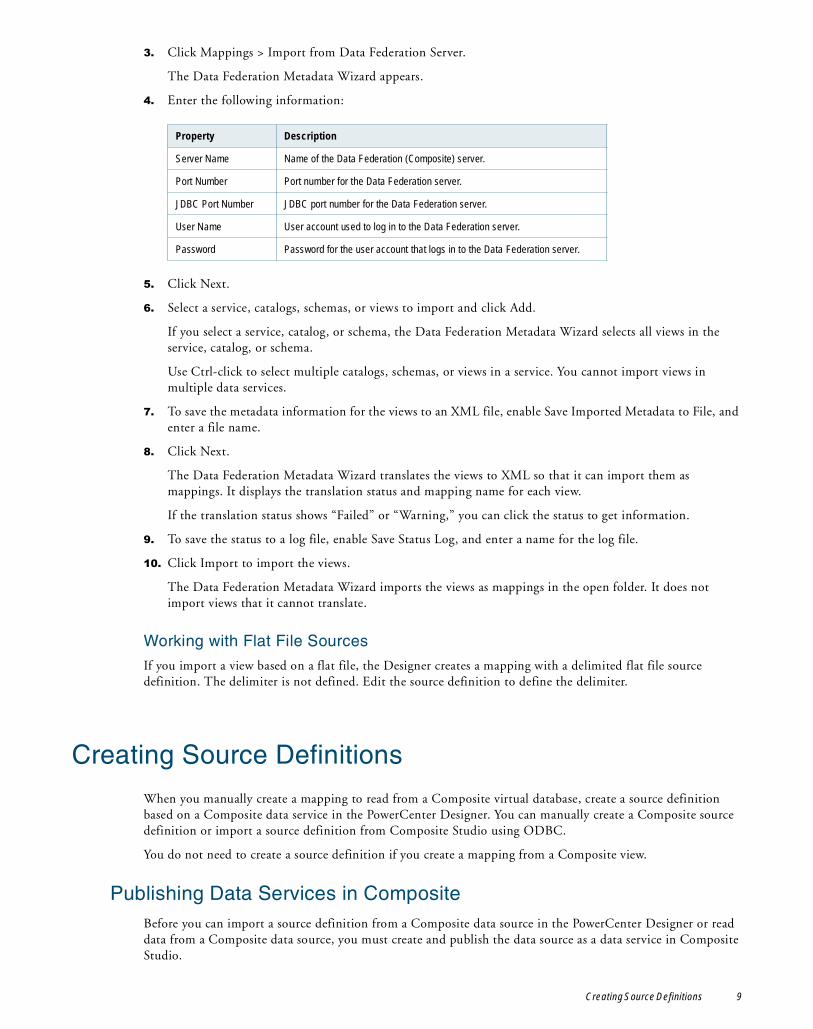
3. Click Mappings > Import from Data Federation Server.
The Data Federation Metadata Wizard appears.
4. Enter the following information:
5. Click Next.
6. Select a service, catalogs, schemas, or views to import and click Add.
If you select a service, catalog, or schema, the Data Federation Metadata Wizard selects all views in the service, catalog, or schema.
Use Ctrl-click to select multiple catalogs, schemas, or views in a service. You cannot import views in multiple data services.
7. To save the metadata information for the views to an XML file, enable Save Imported Metadata to File, and enter a file name.
8. Click Next.
The Data Federation Metadata Wizard translates the views to XML so that it can import them as mappings. It displays the translation status and mapping name for each view.
If the translation status shows “Failed” or “Warning,” you can click the status to get information.
9. To save the status to a log file, enable Save Status Log, and enter a name for the log file.
10. Click Import to import the views.
The Data Federation Metadata Wizard imports the views as mappings in the open folder. It does not import views that it cannot translate.
Working with Flat File Sources
If you import a view based on a flat file, the Designer creates a mapping with a delimited flat file source definition. The delimiter is not defined. Edit the source definition to define the delimiter.
Creating Source Definitions
When you manually create a mapping to read from a Composite virtual database, create a source definition based on a Composite data service in the PowerCenter Designer. You can manually create a Composite source definition or import a source definition from Composite Studio using ODBC.
You do not need to create a source definition if you create a mapping from a Composite view.
Publishing Data Services in CompositeBefore you can import a source definition from a Composite data source in the PowerCenter Designer or read data from a Composite data source, you must create and publish the data source as a data service in Composite Studio.
Property Description
Server Name Name of the Data Federation (Composite) server.
Port Number Port number for the Data Federation server.
JDBC Port Number JDBC port number for the Data Federation server.
User Name User account used to log in to the Data Federation server.
Password Password for the user account that logs in to the Data Federation server.
Creating Source Definitions 9

Manually Creating a Source DefinitionWhen you manually create a target definition, use ODBC as the database type.
Importing a Source DefinitionTo import a source definition, you must be able to connect to the Composite data service from the client machine with a properly configured ODBC data source.
To import a source definition from a Composite data service:
1. In the Designer, open the Source Analyzer.
2. Click Sources > Import from Database to create a source definition from a Composite data service.
3. Select the ODBC data source used to connect to the Composite data service.
If you need to create or modify an ODBC data source, click the Browse button to open the ODBC Administrator. Create the appropriate data source and click OK. Select the new ODBC data source.
4. Enter a user name and password to connect to the Composite data service.
Note: The user name must have the appropriate permissions to view the object.
5. Click Connect.
6. If no table names appear or if the data service you want to import does not appear, click All.
7. Select the data services you want to import.
10 Chapter 2: Reading from Composite Virtual Databases

C H A P T E R 3
Extending Composite Data Sources
This chapter includes the following topic:
♦ Extending Composite Data Sources, 11
Extending Composite Data Sources
You can use the Data Federation Option to add data from any supported PowerCenter source to a Composite virtual database. You can add data from mainframe sources that you access through PowerExchange, ERP data from sources like PeopleSoft and SAP, and message data from sources like TIBCO and WebSphere MQ.
You can add source data to a Composite virtual database using one of the following methods:
♦ ODBC. The Integration Service can read data from PowerCenter sources and write the data to a Composite virtual database using ODBC.
♦ Web Services Provider. Composite can consume data from PowerCenter sources using web services.
Publishing Data Services in CompositeBefore you can import a target definition from a Composite data source in the PowerCenter Designer or write data to a Composite data source, you must create and publish the data source as a data service in Composite Studio.
Extending Composite Sources Using ODBCWhen you want to add source data from PowerCenter sources to a Composite virtual database, you create a mapping in PowerCenter with a Composite data service as a target. You also create a PowerCenter workflow with a relational database connection that reads from a Composite data service and writes the data to a target.
When you create a target definition in the Designer, create it based on a Composite data service. You can manually create a Composite target definition or import a target definition from Composite Studio using ODBC.
Manually Creating a Target Definition
When you manually create a target definition, use ODBC as the database type.
11

Importing a Target Definition
To import a target definition, you must be able to connect to the Composite data service from the client machine using a properly configured ODBC data source.
To import a target definition from a Composite data service:
1. In the Target Designer, click Targets > Import from Database.
2. Select the ODBC data source used to connect to the Composite data service.
If you need to create or modify an ODBC data source, click the Browse button to open the ODBC Administrator. Create the appropriate data source and click OK. Select the new ODBC data source.
3. Enter a user name and password to connect to the Composite data service.
Note: The user name must have the appropriate permissions to view the object.
4. Click Connect.
5. If no table names appear or if the data service you want to import does not appear, click All.
6. Select the data services you want to import.
Creating a Relational Database Connection to Write to a Composite Virtual Database
Before you configure a PowerCenter workflow, create a relational database connection in the Workflow Manager to connect to the Composite virtual database you want to write to. Select ODBC as the connection type. When you configure the workflow, select the relational database connection as the target connection.
Extending Composite Sources Using Web ServicesComposite can consume data from PowerCenter through the Web Services Hub. For Composite to consume data from PowerCenter, create a mapping and service workflow in PowerCenter. After you create the workflow, start the Web Services Hub. When you start the Web Services Hub, the PowerCenter Server publishes the WSDL associated with the workflow.
Before you can run the service workflow, create a WSDL data source in Composite Studio. Specify the name of the WSDL file the Web Services Hub published and execute it. When you execute the data source, the WSDL becomes a Composite data service. The Composite Server calls the Web Services Hub to start the service workflow. Composite Server then consumes the data from PowerCenter.
To configure a workflow for the Composite Server to consume data from PowerCenter:
1. In the PowerCenter Designer, create a mapping with an XML target definition.
You can import the target definition from the WSDL data source you want to write to.
2. In the Workflow Manager, create a workflow enabled for web services.
3. When you configure the session for the workflow, change the reader from Flat File Reader to Web Services Provider Reader for Flat Files.
4. Start the Integration Service.
5. Start the Web Services Hub.
You can read data from a source and write data to a Composite cache. If the source data is on mainframe data, you can use PowerExchange with PowerCenter to read the source data.
12 Chapter 3: Extending Composite Data Sources

C H A P T E R 4
Profiling and Viewing Virtual Database Data
This chapter includes the following topics:
♦ Profiling Data in a Virtual Database, 13
♦ Viewing Virtual Database Data in Data Analyzer, 13
Profiling Data in a Virtual Database
You can use PowerCenter Data Profiling to profile virtual database data. You can profile data to verify data quality when prototyping a data warehouse or during application migration. You can determine if the assumptions you made about source data during the project are still valid. For example, you want to view statistics about how many rows satisfied a business rule and how many did not. Or, you want to verify that join conditions between source tables are correct.
To profile virtual database data:
1. In the PowerCenter Designer create a source definition based on a Composite data service.
2. Create a custom or auto profile to profile the Composite data.
Viewing Virtual Database Data in Data Analyzer
You can use Data Analyzer to view reports on data in a Composite virtual database. You can use reports to provide a single view of customer data when you have real-time and historical customer data from various systems. You can use the Data Federation Option to join the data from the various systems and display it in a Data Analyzer report. As a result, you no longer have to submit multiple requests for data from multiple systems. Also, you can obtain up-to-date data rather than delayed data from various queries.
For example, call center representatives need to quickly obtain up-to-date information for each customer they speak with. Customer data resides in a CRM system and a data warehouse. You can create one virtual database view that contains the CRM and data warehouse data. In Data Analyzer, you can connect to this view. Call center representatives can then run a Data Analyzer report to view the consolidated information on every customer.
13

To view reports on data in a Composite virtual database, complete the following steps:
1. Combine data from various systems into a virtual database.
2. In Data Analyzer, configure data sources and data connectors.
3. Create fact tables, dimension tables, and schemas.
4. Create reports.
Step 1. Combine Data into a Virtual DatabaseConfigure a PowerCenter mapping and workflow to load data from various systems into a Composite virtual database. The data you load into the virtual database can be from any source that PowerCenter supports. For example, you can include data from a CRM system or mainframe data in the virtual database.
Step 2. Configure Data Sources and Data Connectors In Data Analyzer, configure a JDBC data source for each Composite virtual database from which you want to read data. In Data Analyzer, a data source is the object that contains the connection information that Data Analyzer requires to connect to a database, web service, or XML document. You also configure data connectors to define the data sources, schemas, and time dimensions available for reports.
You must be a Data Analyzer user with the System Administrator role or Maintain Schema privilege to configure data sources and data connectors in Data Analyzer.
Before you can view reports, complete the following steps:
1. Configure a JDBC data source for a Composite virtual database in Data Analyzer.
2. Create a data connector in Data Analyzer. If you do not already have a data connector, you must create one. When you create the data connector, add the Composite virtual database data source to the data connector. If you create a data connector, you can skip the next step.
3. Add the Composite virtual database data source to a data connector in Data Analyzer. If you already have a data connector, add the Composite virtual database data source to the data connector. If you recently created a data connector, you should have already added the Composite virtual database data source to the data connector.
Step 3. Create Fact Tables, Dimension Tables, and SchemasBefore you create reports, create fact tables, dimension tables, and schemas in Data Analyzer. Fact tables contain the metrics by which you measure the success of your business. Dimension tables contain the elements, or attributes, that characterize a business metric.
Step 4. Create ReportsCreate reports based on the fact tables, dimension tables, and schemas you defined. After you create reports, you can schedule reports and create dashboards that show reports on particular business processes.
14 Chapter 4: Profiling and Viewing Virtual Database Data
I N D E X
CComposite Information Server
JDBC driver 5ODBC driver 4version number 3
Composite Serverstarting 3
Composite source definitionscreating 7
Composite target definitionscreating 11
Composite viewsimporting into Designer 8
DData Analyzer
using with Composite Information Server 5viewing virtual database data 13
data migrationData Federation option, example 7
Data Profilingvirtual database data 13
data warehouse prototypingData Federation option, example 7
JJDBC
Composite Information Server JDBC driver 5
Llicense
validating for Data Federation option 3
Mmappings
Data Federation option, creating from Composite views 8Microsoft .NET Framework
installing for Data Federation option 3
OODBC (Open Database Connectivity)
Composite Information Server ODBC driver 4reading from Composite Information Server 7writing to Composite Information Server 11
Pprofiling
See Data Profiling
Rrelational database connections
Data Federation Option, configuring 12Data Federation option, configuring 7
SSQLNormalizer.car
importing into Composite Studio 4
UUNIX
Data Federation option, installing 3
15

16 Index

NOTICES
This Informatica product (the “Software”) includes certain drivers (the “DataDirect Drivers”) from DataDirect Technologies, an operating company of Progress Software Corporation (“DataDirect”) which are subject to the following terms and conditions:
1. THE DATADIRECT DRIVERS ARE PROVIDED “AS IS” WITHOUT WARRANTY OF ANY KIND, EITHER EXPRESSED OR IMPLIED, INCLUDING BUT NOT LIMITED TO, THE IMPLIED WARRANTIES OF MERCHANTABILITY, FITNESS FOR A PARTICULAR PURPOSE AND NON-INFRINGEMENT.
2. IN NO EVENT WILL DATADIRECT OR ITS THIRD PARTY SUPPLIERS BE LIABLE TO THE END-USER CUSTOMER FOR ANY DIRECT, INDIRECT, INCIDENTAL, SPECIAL, CONSEQUENTIAL OR OTHER DAMAGES ARISING OUT OF THE USE OF THE ODBC DRIVERS, WHETHER OR NOT INFORMED OF THE POSSIBILITIES OF DAMAGES IN ADVANCE. THESE LIMITATIONS APPLY TO ALL CAUSES OF ACTION, INCLUDING, WITHOUT LIMITATION, BREACH OF CONTRACT, BREACH OF WARRANTY, NEGLIGENCE, STRICT LIABILITY, MISREPRESENTATION AND OTHER TORTS.
