pointing with lime mortars
TRANSCRIPT

POINTING WITH LIME MORTARS
Built Environment Division


1
his leaflet provides practical guidance on the use of soft, permeable lime mortars based on lime putty, which are
ideal for repairing and repointing the mortar joints of old masonry walls. It does not deal with the use of mortars containing hydraulic lime or lime putty gauged with cement, both of which provide significantly harder and generally less permeable mortars.
T Modern construction techniques generally rely on a cement mortar to create rigid foundations and walls which allow a minimum of movement and restrict the passage of moisture. (Movement in large areas of masonry is allowed by expansion joints.) Damp is kept out of the structure by damp-proof courses, cement renders, waterproof paints and cavity walls.
Although it might initially seem like a good idea to prevent the ingress of moisture with a hard, waterproof material such as a cement render, in practice such a rigid material cannot cope with the regular small movements of the old building: it becomes cracked (often microscopically) and water is drawn in anyway. As most of the wall surface remains covered with this waterproof layer, evaporation cannot take place and the amount of damp actually increases.
It is essential reading for building owners, building contractors and others who are responsible for the care of an old building but do not specialise in the field.
WHY USE LIME? In traditional construction, lime is as fundamental a material as timber, stone or brick. Lime is used for making building mortar, external render, internal plaster, limewash and solid floors. Mortars made with lime putty cure slowly but result in strong, yet flexible, permeable and stable building fabric. However, after cement became universally available at the end of the 19th Century, lime putty came to be seen as slow and old-fashioned, and the immediate results obtained with cement were considered superior.
If lime-based masonry is pointed with a cement mortar which is less permeable than the stones or bricks (most cement mortars are), then the moisture will be forced out of the wall through the blocks themselves, causing erosion in that part of the wall which is most difficult to repair. In frosty weather this leads to the rapid deterioration of both stones and bricks as the moisture in them freezes.
Where the cement pointing is harder than the stone or brick, deterioration may also be caused by the development of stress in the face of the wall. Stress arises because walls move gradually with changes in temperature and moisture content; old lime mortar in the core of the wall acts like a cushion, accommodating expansion and contraction, transferring loads onto the narrow depth of the wall which has been repointed. If the stone or brick is softer than the mortar, the edges of the stone will shear and 'spall'. (In modern construction this movement is accommodated by dividing large areas of cemented masonry into panels separated by flexible joints usually filled with mastic.)
By the 1950s the use of lime in building construction had virtually ceased. Although cement has undoubtedly made possible buildings which could never have been constructed with lime, cement's consistent use in the repair of old buildings has led to increasing problems, especially with damp.
Both cement- and lime-based methods of construction work effectively when properly maintained, but a hybrid of the two - solid walls with a soft lime mortar core and hard cement pointing, for example - is doomed to eventual failure.
Even more damage has been caused to old masonry where the joints have been made to project beyond the face of the wall with a hard band of cement. Not only does this look wrong, but it also provides small ledges all over the wall face which encourage moisture penetration and promote decay.
Today the use of lime putty is increasing as the damage caused by the use of cement in traditional construction and repair techniques becomes more widely known.
The Advantages of Lime over Cement Cement pointing has often been 'buttered' over
existing eroded joints without proper preparation being made, making the joints appear much wider than they really are. These feather-thin edges tend to crack into sections and become detached from the wall, inviting rain and damp into the structure. In some ways this helps in the preparation of the wall prior to repointing as poor pointing is often easier to remove, having already cracked. It can often be picked off by hand!
Lime-based buildings expand, contract and flex with changes in temperature and moisture. The use of lime also allows damp to be absorbed to a limited degree and then evaporate harmlessly away. Our ancestors accepted that rain and rising damp were bound to find a way into the walls of their houses, so they built them thick, and the soft, permeable mortars and renders acted as a wick to draw the moisture out again.

Figure 1. Effects of Pointing
2

General Principles The choice of a mortar will be influenced by the
g should
he
hat is ‘original’ and it
, ly
ect the mortar which is
of the stones in the wall, whereas grey cement pointing will contrast with the colour of
TAR INGREDIENTS
d
referred to as 'the aggregate' by
f old
chemically the same. However, lime which was
chemical analysis, from lime
match
a
er
icularly if it is clear
rom ble
s led
nts,
le squeezed
o
en if described as
t, t often looks rather artificial;
should be stored under cover,
be
d. y
However, they are often appropriate for garden
need to maintain the historic interest of the building, its structural integrity, and its appearance.
From the historical perspective, repointinbe carried out using the same material as originally used, in the same proportions and tothe same technique, including the same aggregate, binder and other additives unless toriginal specification is at fault. However, it is often difficult to determine wis better to err on the side of caution, using a suitable lime-putty based mortar than to recreate mistakes made in the past.
From a practical point of view, a masonry wall should be pointed with a carefully chosen lime mortar, which is just softer and more porous than the material with which the wall is constructedand the mortar should be finished flush or slightrecessed from the face of the brick or stone (see Figure 1). Any problems which do occur are therefore more likely to affcan be repaired through periodic repointing. This easier and cheaper than having to replace whole areas of masonry.
On a purely visual note, we would all prefer to see stones than joints. A well chosen lime mortar, properly used, will enhance the natural beauty
some stone, dominating the appearance of the wall.
MOR
Sand All mortars contain a binder (such as lime or cement, the sticky part that hardens in situ), ana filler (the bulk of the mix). All fillers are generically specifiers, although some builders' merchants use the term 'aggregate' to describe stone chippings.
The choice and quality of the filler or aggregatehas as profound an effect on the final mortar asthe type of binder (in our case, lime). Traditionally, fillers have included sand and a wide variety of other materials including earth,stone dust, brick dust or rubble, reused old mortar, and crushed shells. The reuse omortar and other forms of calcium carbonate such as shell and limestone has meant that mortar analysis sometimes suggests a disproportionately high lime content. (Limestone and shell may be distinguished from carbonated lime under a magnifying glass, despite being
added as an aggregate or filler in the form of old, carbonated mortar cannot be distinguished, either visually or by which was added as fresh lime putty when the mortar was made.)
Where possible the sand and other aggregates used in repair and restoration work shouldthose originally used, so that the character and historic interest of the original structure is maintained. Usually it will be sufficient to crushsample and examine it under a magnifying glass to identify the size and range of particle size. However, in some cases the conservation officinvolved may require samples to be sent away for laboratory analysis, partthat important samples cannot be matched by locally available material.
Generally, the best aggregate for lime mortar is a well graded sand mix comprising angular particles ranging in size from large to small (f6 millimetres in diameter to dust) in a suitacolour. This sort of sand has various nameaccording to locality: it is sometimes cal'concreting sand'. Sand should always be ordered from a sample, not just from a description. On visiting the builders' merchasand should be made available for you to examine. Do not assume that the builders' merchants will know what you need. A suitabsand will feel gritty and 'crunchy' whenin the hand, and there should be little colour staining on your hands. Sometimes a combination of sand and 'aggregate' is needed tobtain the right range of particle sizes. 'Sharp sand' does not have enough fine particles. Sea sand should be avoided, ev'washed', as any residual salt will cause furtherproblems for the masonry.
Mortar colours may be adjusted with pigmenbut the effecchoosing the right coloured sand is always preferable.
If possible, sand or at least sheeted over during rain, to keep it asdry as possible.
Although not strictly an aggregate, earth canvery useful for making extremely soft mortars - such as for stone plinths in earth buildings. Subsoil should be used and sticky clays avoideHowever, earth is difficult to mix in an ordinardrum mixer as it tends to form balls, and mayhave to be mixed by hand or in a pan mixer. These ‘lime stabilised earth mortars’ tend to shrink more than conventional lime mortars.
A more comprehensive specification for the grading of aggregates is to be found in the English Heritage Technical Handbook Volume 2 (see 'Recommended Reading').
3

walls and barns where used originally.
Figure 2. The Lime Cycle
2
sieved and stored
ill eventually
priate form to use in the repair of
for
dvance and stored for a few months before use.
ted Lime (non-hydraulic
s ior
up
t, it is d lime to
y of a similar age, and freshly soaked hydrated lime
h mature lime putty.
ay,
e made with a
e
for d it was widely used for
ed from the Continent, some of s
ity
lso
Lime Putty (non-hydraulic lime) Lime is produced by burning limestone (calcium carbonate - CaCO3) during which process carbondioxide (CO2) is driven off. The resulting 'super-dry' material is quicklime (calcium oxide - CaO).When mixed with water, a process called 'slaking', the quicklime reacts violently and the water boils. The result is a creamy textured slurryof slaked lime (calcium hydroxide Ca(OH) ) known as lime putty, which isin its moist state until used.
The longer lime putty is stored, the better it will be as the particles of slaked lime gradually breakdown and any unslaked particles wslake themselves during storage.
When exposed to the air the lime putty makes its'set', a process known as 'carbonating', by re-absorbing carbon dioxide and combining with it to form calcium carbonate once again. Thus the lime processes effectively transfer lime from rockto building in a neat cycle of chemical reactions:
Lime produced in this way is described as 'non-hydraulic' because it requires exposure to air tocarbonate, and will not set under water. (The term 'hydraulic' means the ability to set under water.) Non-hydraulic lime is the form of lime which allows buildings to 'breathe' most easily because it is so permeable, and it is generally the most approold buildings.
Small-scale lime slaking is quite feasible, but the majority of jobs it is more practical to purchase commercially produced lime putty. Ideally it should be bought in a
Hydralime) Non-hydraulic lime is also available as dry 'hydrated' lime or 'bag lime' from most builders'
merchants. It is produced by slaking quicklime with a precise amount of water so that all the water either combines in the reaction or is driven off in the process. For making lime mortars thidry powder is better than nothing, but it is inferto properly made lime putty due to its coarse particle size and its tendency to carbonate on contact with air from the moment it is made. Bythe time it is delivered some hydrated lime will already have turned to calcium carbonate, the proportion depending on its age, treatment and storage condition, making its effect on a mortarless predictable. Just as you would not grind an old bag of cement and expect it to seunreasonable to expect dry hydratework effectively in a mortar if its setting properties are already exhausted.
If hydrated lime is the only option it should be obtained as fresh as possible, and soaked in clean water for a couple of days (or longer) to form a putty. However, no matter how long it is soaked it will never be as good as a lime putt
cannot be compared wit
Hydraulic Lime Hydraulic lime is produced in the same way as hydrated lime but from limestone containing cland it sets by a complex chemical reaction withwater, without exposure to air. Mortars made with a hydraulic lime have the advantage that they set more rapidly than thosnon-hydraulic lime but they are also harder and they can be less permeable.
In the past, hydraulic lime was principally used inareas where the local limestone produced a naturally hydraulic lime - a feebly hydraulic limfrom Totternhoe near Dunstable, for example, was widely used in London. Its ability to set rapidly and its relative hardness made it idealexposed conditions, anengineering structures until it was ultimately replaced by cement.
Some limes produced in the UK are 'mildly' hydraulic when fresh and one is 'moderately' hydraulic. The strongest hydraulic limes are mainly importwhich contain cement or pozzolanic additive(see below).
Hydraulic lime certainly has the potential to replace cement in much new construction, and ithas advantages over cement in both its flexibilityand, to a lesser degree, its vapour permeabil(depending on its degree of hydraulicity). From the ecological perspective, less fuel is burnt during the manufacture of hydraulic lime as it is fired at a lower temperature than cement, andsome carbon dioxide, a ‘greenhouse’ gas, is aabsorbed as it sets. Nevertheless, hydraulic
4

limes are less permeable than non-hydraulic limes, and eminently hydraulic limes can be almost as hard and impermeable as cement. Furthermore, for most repair and conservation
unnecessary.
es s gypsum.
mage
d
with
use through
ic mixes. There is a risk that these mixes may damage soft stone and it is best to avoid
a
er, lanic additives do not
n
:
Cru
ade
ave
rpose by a
Met
rom
Pul
Pum
Tufa from Santorini, Greece, s
ke f mortar.
arried out with a simple non-hydraulic lime mortar
s a
ir are sometimes found in old mortars and may be
propriate.
of
g d in
nnecessary and, in some cases, may also pair the performance of a lime mortar.
work they are
Cement Cement is made by burning a mixture of chalk and clay in a series of firings, with some typhaving various other additives such aLike hydraulic lime it sets under water and makes a hard impermeable mortar.
When those responsible for the maintenance of our older buildings became aware of the dacaused by hard cement mortars, the use of lime was gradually revived. However, common practice has been to 'gauge' lime mortars with a small amount of cement to provide a more rapiand slightly more durable set, particularly on veryexposed buildings. Lime mortars gaugedcement are certainly less damaging to masonry than the hard cement mixes of previous decades. However, very weak cement mortars (less than 1 part cement to 3 parts lime to 12 parts aggregate) should never be used becathe cement actually weakens the mortara process know as ‘segregation’, and even moderately strong cement mortars are significantly harder and less porous than non-hydraul
them.
Pozzolanic Additives The term 'pozzolan' derives from the volcanic ash of Pozzuoli in Italy which was used by the Romans to encourage the set of lime mortars.Today it is used to describe several materials including brick dust which can be added to non-hydraulic lime mortar to give it hydraulic properties, so that the mortar sets without exposure to carbon dioxide in the air. Howevunlike cement, pozzoreduce the permeability of mortars, and caactually enhance it.
Pozzolanic materials commonly used as additives in lime mortars include the following
shed Brick or Tile: Brick fired at a low temperature provides probably the best pozzolanic additive of all and is widely foundin old mortars. Particles of old handmclay bricks or tiles, even flowerpots, can be ground up and used. However, their pozzolanic effect varies and some may hno pozzolanic affect at all. Crushed brick supplied specially for this pusupplier of lime mortars is more reliable, although more expensive.
akaolin and High Temperature Insulation (HTI): These highly reactive pozzolanic additives are both forms of fired china clay, which is white, so it will not add colour to the mortar. Metakaolin is readily available fmortar suppliers in a form developed for theconcrete industry and is most reliable.
verised Fuel Ash: PFA is a waste productfrom coal-fired power stations and, when uncontaminated by sulphates, is a useful artificial pozzolan. However, its dark grey colour can be a problem (unless the mortar being matched is similarly dark in colour).
ice: Some types of pumice imported from volcanic areas provide a natural pozzolan which is effective but expensive. Trass from Germany andboth of which are volcanic, may be used aalternatives.
Pozzolans are most useful where deep holes need to be filled quickly, in one go, as their use avoids the need to wait for carbonation to taplace before applying the next layer oThey are also useful in exposed conditions where a more rapid set is required.
Although pozzolans may be useful in some conservation work, most pointing can be c
(composed of lime putty and sand only).
Hair, Straw and Other Fibres Although used extensively in lime and earth plasters to reduce the effects of shrinkage, fibreis not usually added to mortar for pointing, ashrinkage across the relatively small area ofmasonry joint can be accommodated more easily. However, fibres such as ox ha
used where historically ap
Other Additives A wide variety of other additives, including casein, beer and oil mastics, have been used in the past and may be revealed by analysisoriginal material. However, modern plasticisers, anti-freeze, air entrainers, waterproofinmaterials and other additives commonly founmodern cement mortars are generally uim
5

Figure 3. Mortar Groups and Selection of Mortar Group Numbers
6

PRACTICAL GUIDANCE
Slaking Lime If it is decided to make lime putty on site, slaking should take place out of doors, well away from children and animals as quicklime reacts violently with all moisture (including perspiration) causing burns to the skin. It should be slaked as soon as possible after delivery not only because it is dangerous to store, but also because it tends to slake itself in damp air and carbonate.
The quicklime is best slaked in a metal container such as an old galvanised water tank or a drinking trough. A strong water-tight wooden container can also be used, but plastic is not suitable as the lime gets extremely hot. Remember that quicklime boils in water - if you get a bit in your eye, it will boil there instead - and the dust can burn the skin. WEAR GOGGLES. You will also need protective clothing and gloves, and so will any onlookers. You will also need a strong stick, or better still a rake, to stir with, and something to cover the tank afterwards (see illustration).
Figure 4 (a) Equipment for Slaking
First make sure your tank is level, then run in clean cold water, no more than halfway up the sides. (One 25kg bag of quicklime will need approx. 40 litres of water - if in doubt, use more water). Gently tip the quicklime into the water. If using less than a whole bag, be sure water does not splash back into the remainder in the bag. The reaction may start immediately, and the lime will need to be stirred continuously to prevent caking and sticking. This stirring should continue until the lime is no longer reacting and no lumps remain (10 minutes or so). The lime may then be sieved by running through some mesh into another container to remove any particles of unburnt limestone (which will be grey) and odd bits of duff lime (which will be white). If baling out the tank and sieving by hand, it is probably better to leave the lime to cool first. Cover the tank securely to prevent anything falling in.
Figure 4 (b) Equipment for Pointing
Storage Lime water, which will form on top of this putty as it settles, should be prevented from evaporating as it protects the lime from the air. Plastic dustbins with lids make good storage containers but, being large, they will be heavy. Lidded 10 litre tubs (often available cheaply from bakeries or restaurants) may be stacked up when full, and are easier to move.
Although lime putty may still be used after it has frozen, it becomes granular and is difficult to mix. If storing lime over the winter, efforts should be made to avoid letting it freeze. Large quantities can be stored in a polythene-lined pit in the ground, where freezing is less likely (covered with rigid boards to prevent accidents). Lime should be stored as long as possible before use: two months is the absolute minimum; after six months the lime will be much easier to use; and after one year it will be better still. Well stored, it will last indefinitely.
Buying Lime Putty There are many outlets for lime putty, some of whom hold stocks of older putty. However, if you can plan ahead, buy your putty as early as possible and store it yourself as matured lime putty costs more. (Ideally every old building should have a store of lime putty put by.) Ask your supplier how old the putty is, and beware: the most expensive is not necessarily the oldest.
7

Basic Rules of Use 1. If the lime mortar dries out too quickly it will
shrink and pull away from the stone or brick; the slower it dries out and makes its set, the better and stronger the end result. In practice this means that the surface the lime is applied to should be thoroughly dampened to prevent the water being drawn out of the mortar too fast. It also means that lime should not be used on a south-facing wall on a hot sunny day unless some temporary covering (such as wet sacking and plastic sheeting) can be provided to reduce the effects of the sun. Similar protection will also be required if there is a stiff drying breeze.
2. As with all building work, frost can be very damaging. As lime takes longer to go off, the threat from frost is greater, and protection may be needed for several weeks if the weather is bad. Ideally lime work should be avoided from six weeks before the first frosts are likely.
3. The more mixing, turning and 'knocking up', the softer and more pliable the lime becomes, without any water having to be added. Coarse stuff (sand and lime which has been mixed and stored) often seems dry and impossible to use, but mixing and turning will make it workable again. If water is added to this dry coarse stuff before knocking up, then the end result will be far too wet. Too much water increases the shrinkage and cracking occurs. All lime mortars should be used as dry as possible, and pressed very firmly into place. Lime is physically harder to work than the squishier soft sand and cement, but there is considerably more time available to work it before it sets, compensating for this problem.
Mixing The lime mortar may be mixed as it is required or, if preferred, prepared in advance and stored as coarse stuff until required. This can be very useful in DIY pointing, as the labour and the mixer can be hired for the arduous task of mixing the mortar, then the slower, skilful job of pointing can be carried out at leisure. (However, a hydraulic mortar or a mortar to which a pozzolan or cement has been added must be used immediately or it will start to set prematurely.) The coarse stuff, which must be kept well covered (in a dustbin for example) will stiffen up naturally in storage, but quickly loses its stiffness when it is turned out and 'knocked up' before use - without adding extra water.
Lime mortar can be mixed perfectly well in an ordinary drum cement mixer, though a mortar mill makes mixing easier. Small quantities can be
mixed by hand. A good basic mix would be one part lime putty to three parts sand/aggregate, by volume. Less lime may lead to an incomplete set and lack of durability. Too much lime (more than one part lime putty with two parts sand/aggregate) may lead to lime being washed out of the mortar, causing staining and frost damage.
Figure 5. Preparation for Pointing
Figure 6. Good example of new facing brickwork. Showing slightly recessed pointing with the faces of the brick kept clean of mortar.
8
With the mixer running, add sand and lime alternately (and in the right proportions), and leave to mix for about ten minutes. If the mixture sticks to the drum and does not drop off the paddles, it can be helpful to raise the back feet of the mixer slightly. Do not add any water until the lime has been mixing for some time, or the mortar will end up too wet. With lime putty and sand that is not bone dry, you may not need to add any water at all. 20 - 30 minutes overall is ample mixing time.
Preparation of the Wall Preparing the wall for pointing is often the longest part of the job as it is vital to prepare it adequately. Old cement mortar may well come off quite easily, but the joints will need to be raked out carefully, to a depth greater than that of the width of the joint. With some really wide joints in rubble stone this depth is not always practical. With narrow joints, the depth should be twice the width. The back of the raked-out joint should be square so that the new mortar may be packed well into the corners. For raking out soft mortar joints, a hoof-pick is a very useful tool (which is available from a saddler for about 50p).
Where the joints were raked out thoroughly prior to cement pointing and the cement mortar has stuck firmly, the mortar may be tapped out with a narrow chisel, taking great care not to break off the edges or ‘arrises’ of the stones or bricks. Best results are achieved with narrow, flat-bladed chisel, sometimes known as a ‘quirk’, which has a blade no wider than its shaft. Using a chisel with a shaft or blade which is wider than the joint risks damaging the arrises. Joints should never be cleaned out with an angle grinder for the same reason.
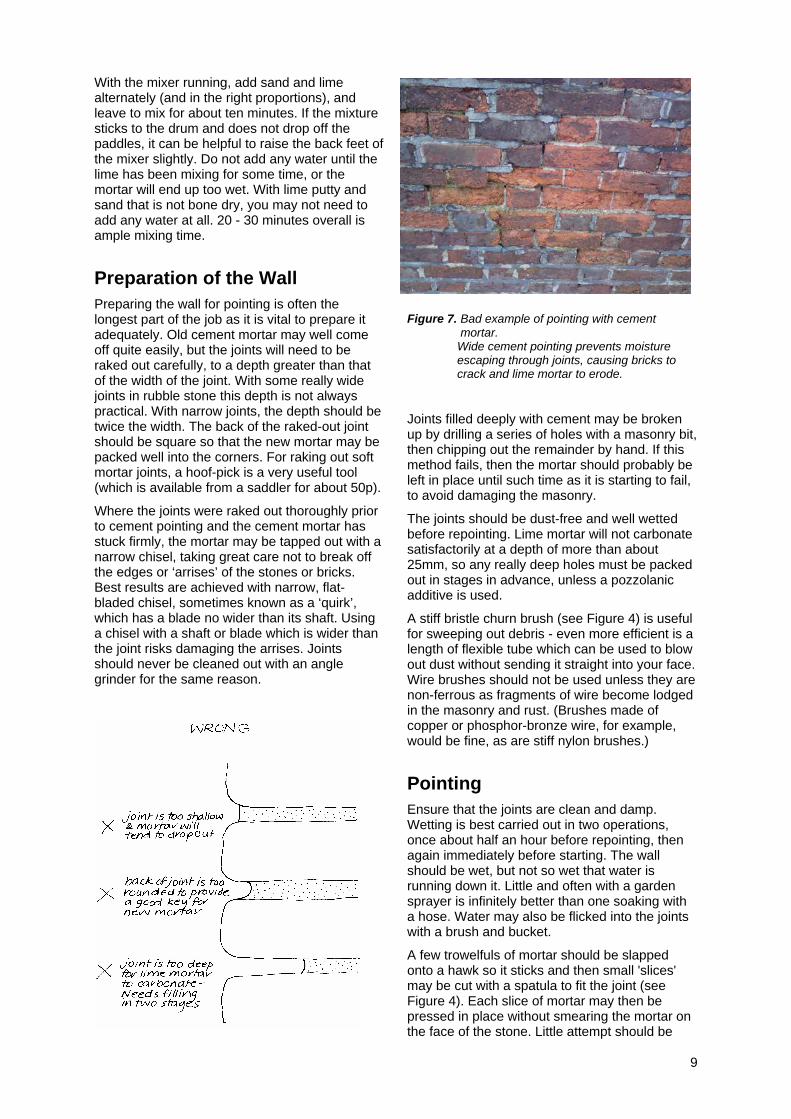
Figure 7. Bad example of pointing with cement mortar. Wide cement pointing prevents moisture escaping through joints, causing bricks to crack and lime mortar to erode. Joints filled deeply with cement may be broken up by drilling a series of holes with a masonry bit, then chipping out the remainder by hand. If this method fails, then the mortar should probably be left in place until such time as it is starting to fail, to avoid damaging the masonry.
The joints should be dust-free and well wetted before repointing. Lime mortar will not carbonate satisfactorily at a depth of more than about 25mm, so any really deep holes must be packed out in stages in advance, unless a pozzolanic additive is used.
A stiff bristle churn brush (see Figure 4) is useful for sweeping out debris - even more efficient is a length of flexible tube which can be used to blow out dust without sending it straight into your face. Wire brushes should not be used unless they are non-ferrous as fragments of wire become lodged in the masonry and rust. (Brushes made of copper or phosphor-bronze wire, for example, would be fine, as are stiff nylon brushes.)
Pointing Ensure that the joints are clean and damp. Wetting is best carried out in two operations, once about half an hour before repointing, then again immediately before starting. The wall should be wet, but not so wet that water is running down it. Little and often with a garden sprayer is infinitely better than one soaking with a hose. Water may also be flicked into the joints with a brush and bucket.
A few trowelfuls of mortar should be slapped onto a hawk so it sticks and then small 'slices' may be cut with a spatula to fit the joint (see Figure 4). Each slice of mortar may then be pressed in place without smearing the mortar on the face of the stone. Little attempt should be
9
10
made at this stage to achieve a smooth, tidy joint - it just needs to be filled firmly, with the right amount of mortar, bringing it roughly level with the face of the blocks (or slightly recessed if the blocks are badly eroded), leaving no air pockets in the back of the joint. Mortar need not be 'struck' at an angle as it is not intended to shed water like a cement joint.
It is important that the mortar is well compacted in the joint, otherwise as it dries out the loss of water will cause it to crumble. If the mortar is put in very dry it may be compacted immediately. However, the safest method is to go back over the joints 20 minutes or so after the mortar has been introduced and compact it once again with the spatula.
The joints are then left until the mortar has become ‘green-hard' or 'leather-hard' (too hard to dent with a knuckle, but soft enough to mark with a fingernail). The timing of this stage varies according to the conditions - anything from three hours to three days - but it is ideally achieved over about 24 hours, as the mortar should not be encouraged to dry out too fast.
When the green-hard stage is reached, then the vitally important brushing takes place. (Brushing too soon results in brush marks in the mortar, and lime may be smeared over the stones: brushing too late becomes very hard work indeed.) Brushing fulfils four purposes: it cleans any smears and blobs of mortar off the edges of the stones; it improves the contact between the edges of the stones and the mortar; it cleans the lime off the large particles of the mix so that the shapes and colours of the aggregate are exposed, giving the joints a much more interesting finish; and finally, it also removes any 'spare' surface lime which might be washed over the stonework by the rain, causing white stains.
The pointing will continue to dry and carbonate over several weeks, and should be protected from the effects of severe weather (frost, torrential rain, blazing sun) where feasible.
Conclusion Good pointing can transform a building, both in practical terms (reducing levels of damp, preventing erosion, keeping the structure sound) and visually. A well pointed wall looks solid and sound, and the appearance of the stones and bricks is enhanced.
Lime mortars made with lime putty without hydraulic lime or cement are soft and porous and are unlikely to harm even soft old bricks and stones. The key to success lies in careful preparation and lots of patience.
There are excellent short courses designed for
builders and owners of historic buildings and a number of invaluable publications offering further guidance.
Pointing with lime mortar is the ideal introduction to the use of lime, and confidence to tackle other projects will be gained from doing it.
Recommended Reading
Ashurst, John & Nicola; Practical Building Conservation/English Heritage Technical Handbook, Volume 3: Mortars, Plasters & Renders. Gower Technical Press, Aldershot, Hants, 1988
Ashurst, John & Nicola; Practical Building Conservation/English Heritage Technical Handbook, Volume 2: Brick, Terracotta & Earth. Gower Technical Press, Aldershot, Hants, 1988
The English Heritage Directory of Building Limes. Donhead Publishing, Shaftesbury, Wiltshire 1996
Schofield, Jane; Lime in Building - a Practical Guide. Black Dog Press, Crediton, Devon, 1997.
A video is also available from English Heritage.
Council Information Re-rendering or re-pointing of a listed building may require listed building consent, and advice from the Heritage and Conservation department should be sought prior to the commencement of any works.
Further Information For further information and advice concerning these leaflets please contact:
The Conservation and Heritage Department Cheltenham Borough Council PO Box12 Municipal Offices Promenade Cheltenham GL50 1PP
Tel: 01242 775 218 01242 775 219
Fax: 01242 227 323
Email: [email protected]
All rights reserved. No part of this publication may be reproduced without the permission of the Council.