point-of-sale button editing nbs tips in counterpoint … premier radiant retail partner . p:...
TRANSCRIPT
NBS Northeastern Business Systems, Inc.
Your Premier Radiant Retail Partner
P: 518.783.0222 | F: 914.885.1116 | 596 New Loudon Road, Latham, NY 12110 | www.CounterPointSQL.com
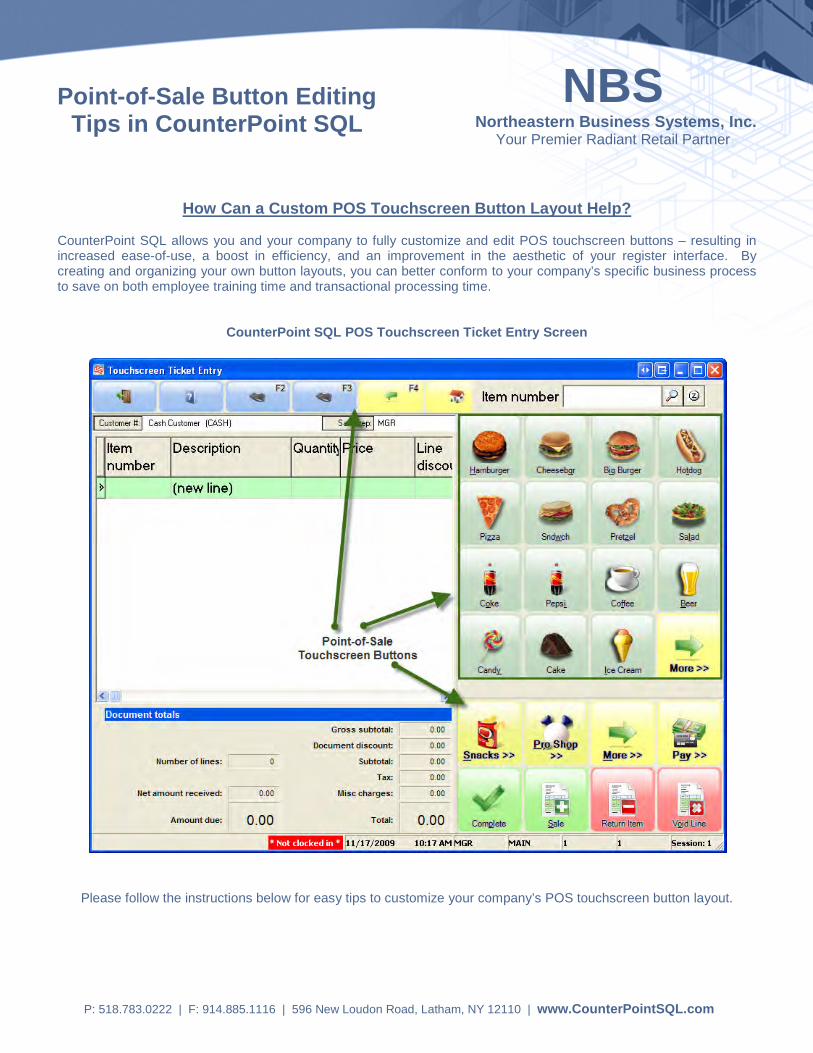
How Can a Custom POS Touchscreen Button Layout Help? CounterPoint SQL allows you and your company to fully customize and edit POS touchscreen buttons – resulting in increased ease-of-use, a boost in efficiency, and an improvement in the aesthetic of your register interface. By creating and organizing your own button layouts, you can better conform to your company’s specific business process to save on both employee training time and transactional processing time.
CounterPoint SQL POS Touchscreen Ticket Entry Screen
Please follow the instructions below for easy tips to customize your company’s POS touchscreen button layout.
Point-of-Sale Button Editing Tips in CounterPoint SQL
Setting Up Point of Sale Data 6-45 07/17/09
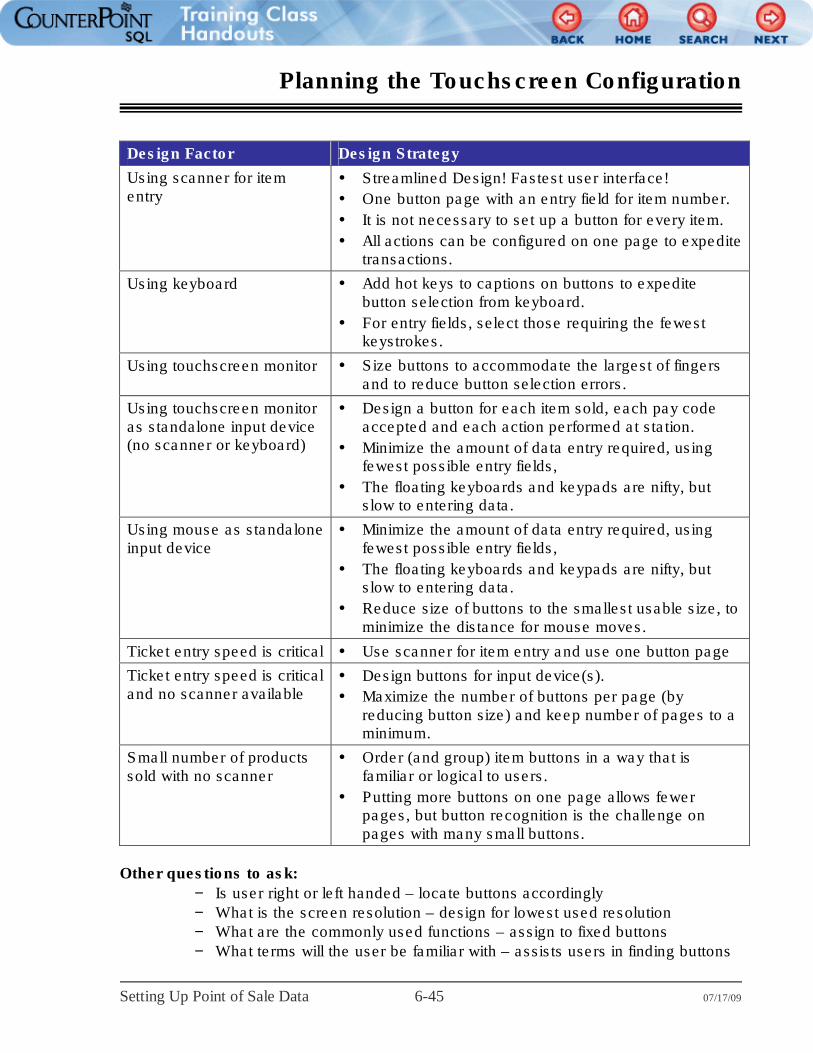
Planning the Touchscreen Configuration
Design Factor Design Strategy
Using scanner for item entry
� Streamlined Design! Fastest user interface!
� One button page with an entry field for item number.
� It is not necessary to set up a button for every item.
� All actions can be configured on one page to expedite transactions.
Using keyboard � Add hot keys to captions on buttons to expedite button selection from keyboard.
� For entry fields, select those requiring the fewest keystrokes.
Using touchscreen monitor � Size buttons to accommodate the largest of fingers and to reduce button selection errors.
Using touchscreen monitor as standalone input device (no scanner or keyboard)
� Design a button for each item sold, each pay code accepted and each action performed at station.
� Minimize the amount of data entry required, using fewest possible entry fields,
� The floating keyboards and keypads are nifty, but slow to entering data.
Using mouse as standalone input device
� Minimize the amount of data entry required, using fewest possible entry fields,
� The floating keyboards and keypads are nifty, but slow to entering data.
� Reduce size of buttons to the smallest usable size, to minimize the distance for mouse moves.
Ticket entry speed is critical � Use scanner for item entry and use one button page
Ticket entry speed is critical and no scanner available
� Design buttons for input device(s).
� Maximize the number of buttons per page (by reducing button size) and keep number of pages to a minimum.
Small number of products sold with no scanner
� Order (and group) item buttons in a way that is familiar or logical to users.
� Putting more buttons on one page allows fewer pages, but button recognition is the challenge on pages with many small buttons.
Other questions to ask:
− Is user right or left handed – locate buttons accordingly − What is the screen resolution – design for lowest used resolution − What are the commonly used functions – assign to fixed buttons − What terms will the user be familiar with – assists users in finding buttons
NBS Northeastern Business Systems, Inc.
Your Premier Radiant Retail Partner
P: 518.783.0222 | F: 914.885.1116 | 596 New Loudon Road, Latham, NY 12110 | www.CounterPointSQL.com
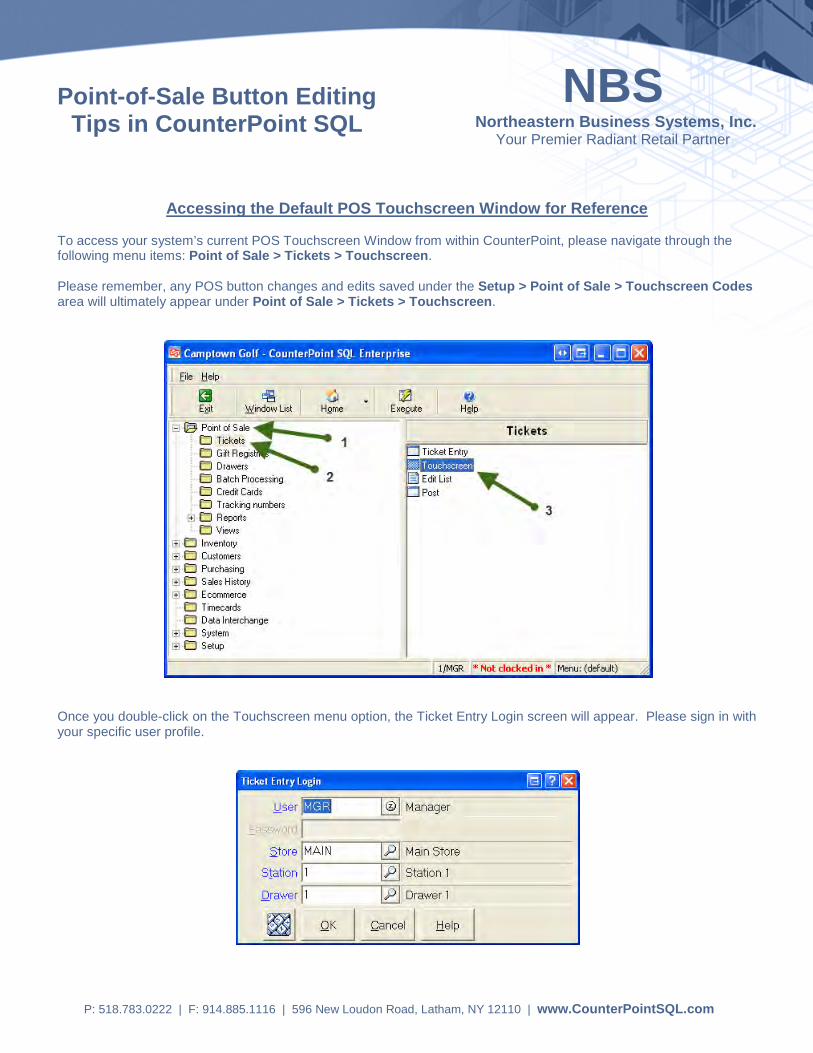
Accessing the Default POS Touchscreen Window for Reference
To access your system’s current POS Touchscreen Window from within CounterPoint, please navigate through the following menu items: Point of Sale > Tickets > Touchscreen. Please remember, any POS button changes and edits saved under the Setup > Point of Sale > Touchscreen Codes area will ultimately appear under Point of Sale > Tickets > Touchscreen.
Once you double-click on the Touchscreen menu option, the Ticket Entry Login screen will appear. Please sign in with your specific user profile.
Point-of-Sale Button Editing Tips in CounterPoint SQL
NBS Northeastern Business Systems, Inc.
Your Premier Radiant Retail Partner
P: 518.783.0222 | F: 914.885.1116 | 596 New Loudon Road, Latham, NY 12110 | www.CounterPointSQL.com
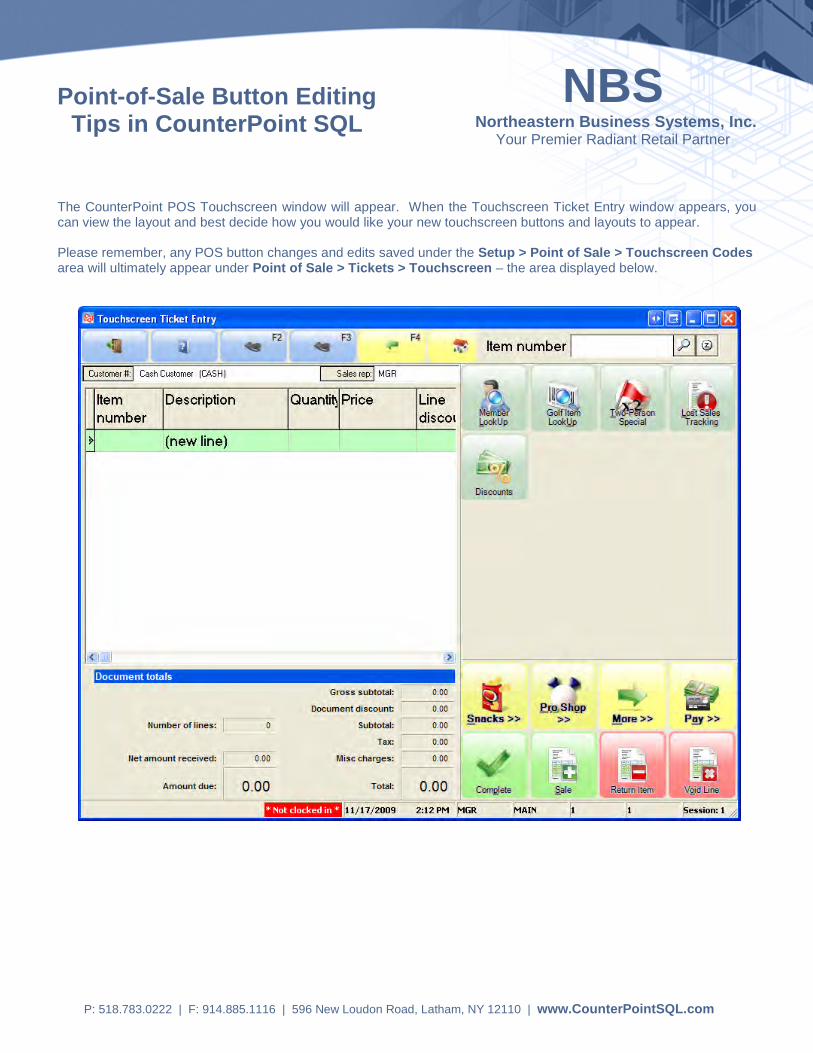
The CounterPoint POS Touchscreen window will appear. When the Touchscreen Ticket Entry window appears, you can view the layout and best decide how you would like your new touchscreen buttons and layouts to appear. Please remember, any POS button changes and edits saved under the Setup > Point of Sale > Touchscreen Codes area will ultimately appear under Point of Sale > Tickets > Touchscreen – the area displayed below.
Point-of-Sale Button Editing Tips in CounterPoint SQL
NBS Northeastern Business Systems, Inc.
Your Premier Radiant Retail Partner
P: 518.783.0222 | F: 914.885.1116 | 596 New Loudon Road, Latham, NY 12110 | www.CounterPointSQL.com
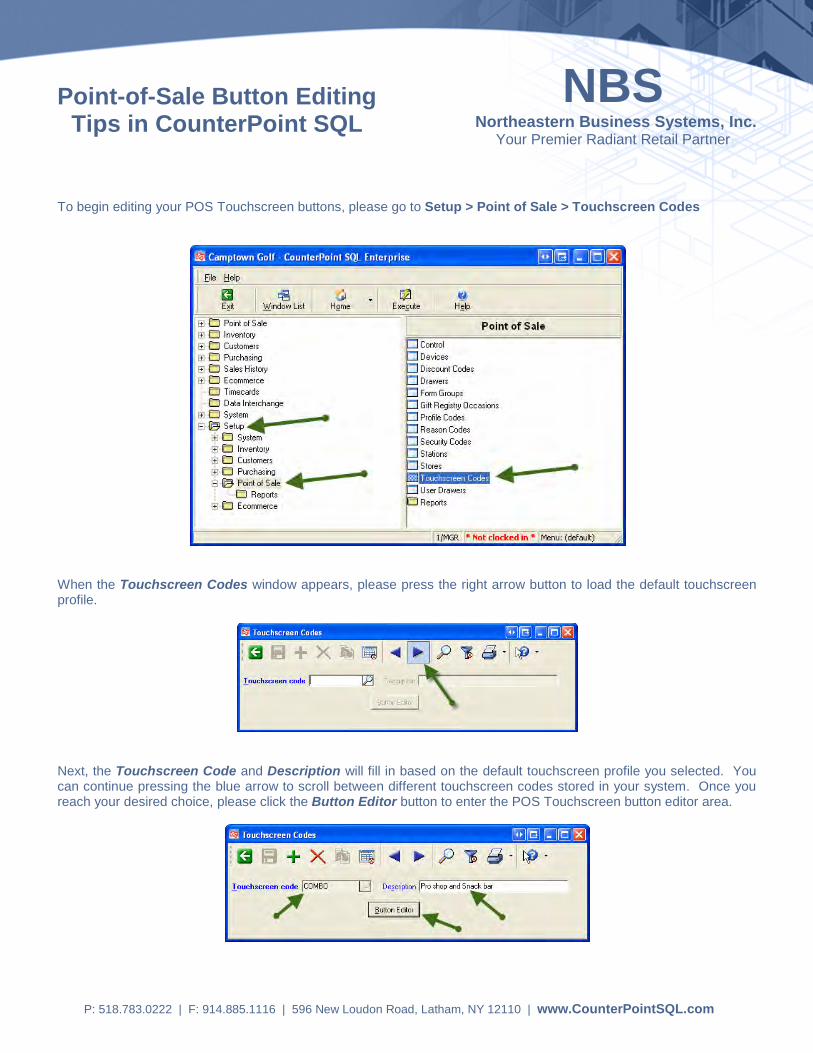
To begin editing your POS Touchscreen buttons, please go to Setup > Point of Sale > Touchscreen Codes
When the Touchscreen Codes window appears, please press the right arrow button to load the default touchscreen profile.
Next, the Touchscreen Code and Description will fill in based on the default touchscreen profile you selected. You can continue pressing the blue arrow to scroll between different touchscreen codes stored in your system. Once you reach your desired choice, please click the Button Editor button to enter the POS Touchscreen button editor area.
Point-of-Sale Button Editing Tips in CounterPoint SQL
NBS Northeastern Business Systems, Inc.
Your Premier Radiant Retail Partner
P: 518.783.0222 | F: 914.885.1116 | 596 New Loudon Road, Latham, NY 12110 | www.CounterPointSQL.com
The ability to create different POS Touchscreen button layouts allows you to assign different touchscreen codes to different register stations. By doing so, you have the flexibility to create many different layouts which can be assigned to different areas in your store – automotive, grocery, food service, and any other department you prefer. In addition,
your store can create different POS touchscreen button layouts for different seasons and holidays.
The most efficient way to create new touchscreen code and button area is to copy an existing touchscreen code and edit the buttons from there. To do so, please visit:
Setup > Point of Sale > Touchscreen Codes
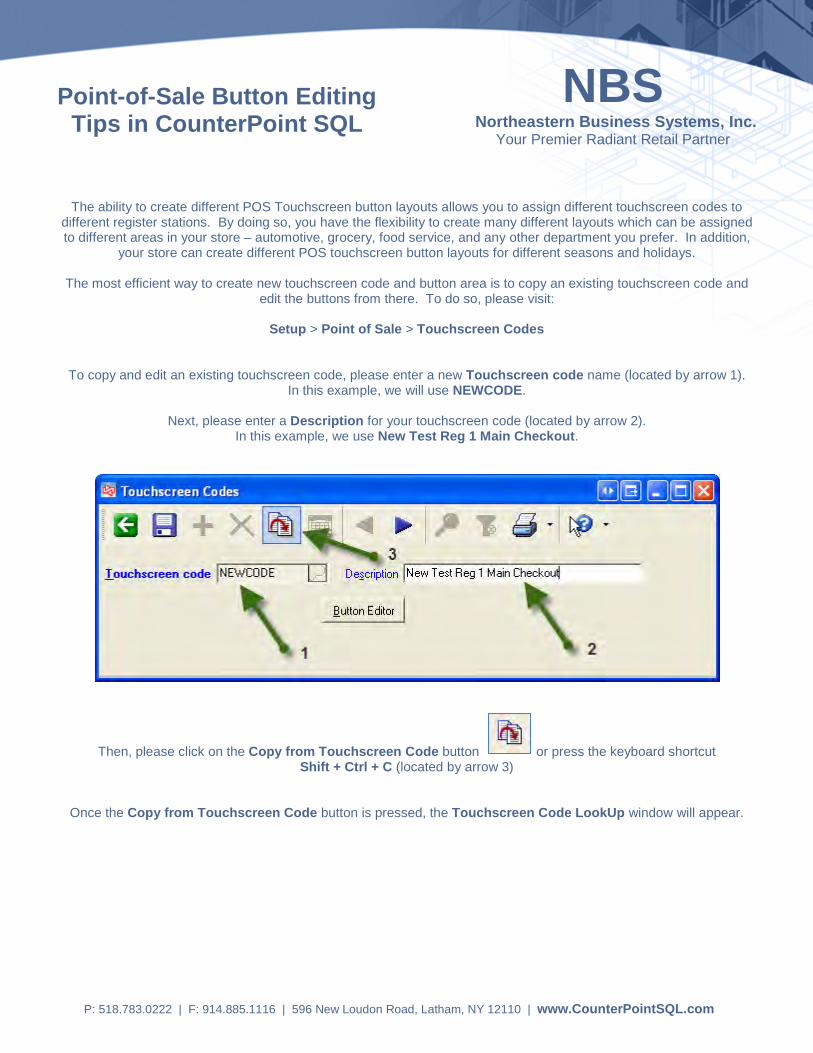
To copy and edit an existing touchscreen code, please enter a new Touchscreen code name (located by arrow 1). In this example, we will use NEWCODE.
Next, please enter a Description for your touchscreen code (located by arrow 2).
In this example, we use New Test Reg 1 Main Checkout.
Then, please click on the Copy from Touchscreen Code button or press the keyboard shortcut Shift + Ctrl + C (located by arrow 3)
Once the Copy from Touchscreen Code button is pressed, the Touchscreen Code LookUp window will appear.
Point-of-Sale Button Editing Tips in CounterPoint SQL
NBS Northeastern Business Systems, Inc.
Your Premier Radiant Retail Partner
P: 518.783.0222 | F: 914.885.1116 | 596 New Loudon Road, Latham, NY 12110 | www.CounterPointSQL.com
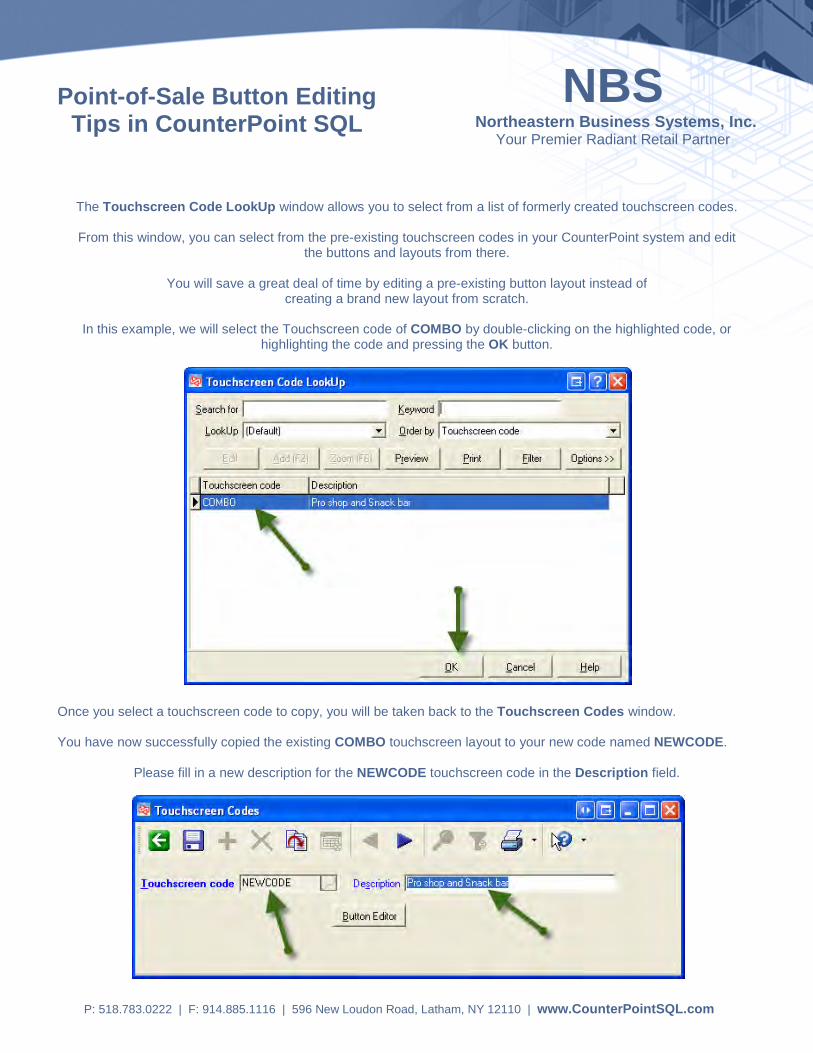
The Touchscreen Code LookUp window allows you to select from a list of formerly created touchscreen codes.
From this window, you can select from the pre-existing touchscreen codes in your CounterPoint system and edit the buttons and layouts from there.
You will save a great deal of time by editing a pre-existing button layout instead of
creating a brand new layout from scratch.
In this example, we will select the Touchscreen code of COMBO by double-clicking on the highlighted code, or highlighting the code and pressing the OK button.
Once you select a touchscreen code to copy, you will be taken back to the Touchscreen Codes window. You have now successfully copied the existing COMBO touchscreen layout to your new code named NEWCODE.
Please fill in a new description for the NEWCODE touchscreen code in the Description field.
Point-of-Sale Button Editing Tips in CounterPoint SQL
NBS Northeastern Business Systems, Inc.
Your Premier Radiant Retail Partner
P: 518.783.0222 | F: 914.885.1116 | 596 New Loudon Road, Latham, NY 12110 | www.CounterPointSQL.com
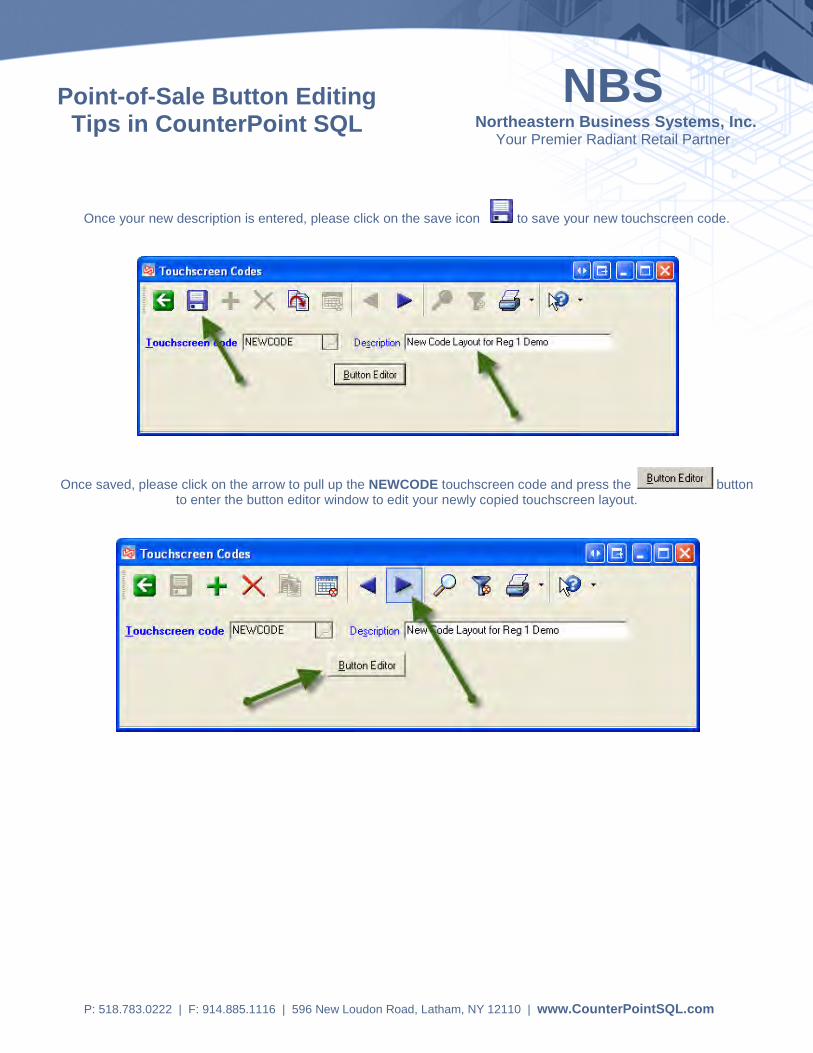
Once your new description is entered, please click on the save icon to save your new touchscreen code.
Once saved, please click on the arrow to pull up the NEWCODE touchscreen code and press the button to enter the button editor window to edit your newly copied touchscreen layout.
Point-of-Sale Button Editing Tips in CounterPoint SQL
NBS Northeastern Business Systems, Inc.
Your Premier Radiant Retail Partner
P: 518.783.0222 | F: 914.885.1116 | 596 New Loudon Road, Latham, NY 12110 | www.CounterPointSQL.com
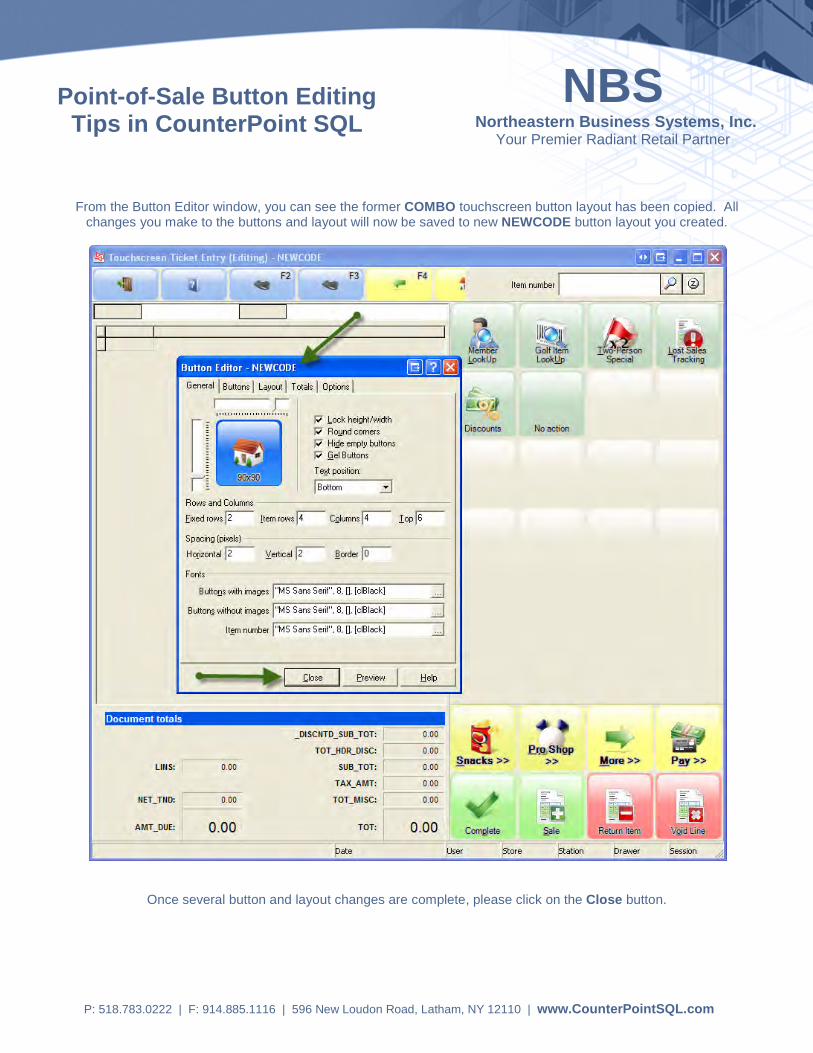
From the Button Editor window, you can see the former COMBO touchscreen button layout has been copied. All changes you make to the buttons and layout will now be saved to new NEWCODE button layout you created.
Once several button and layout changes are complete, please click on the Close button.
Point-of-Sale Button Editing Tips in CounterPoint SQL
NBS Northeastern Business Systems, Inc.
Your Premier Radiant Retail Partner
P: 518.783.0222 | F: 914.885.1116 | 596 New Loudon Road, Latham, NY 12110 | www.CounterPointSQL.com
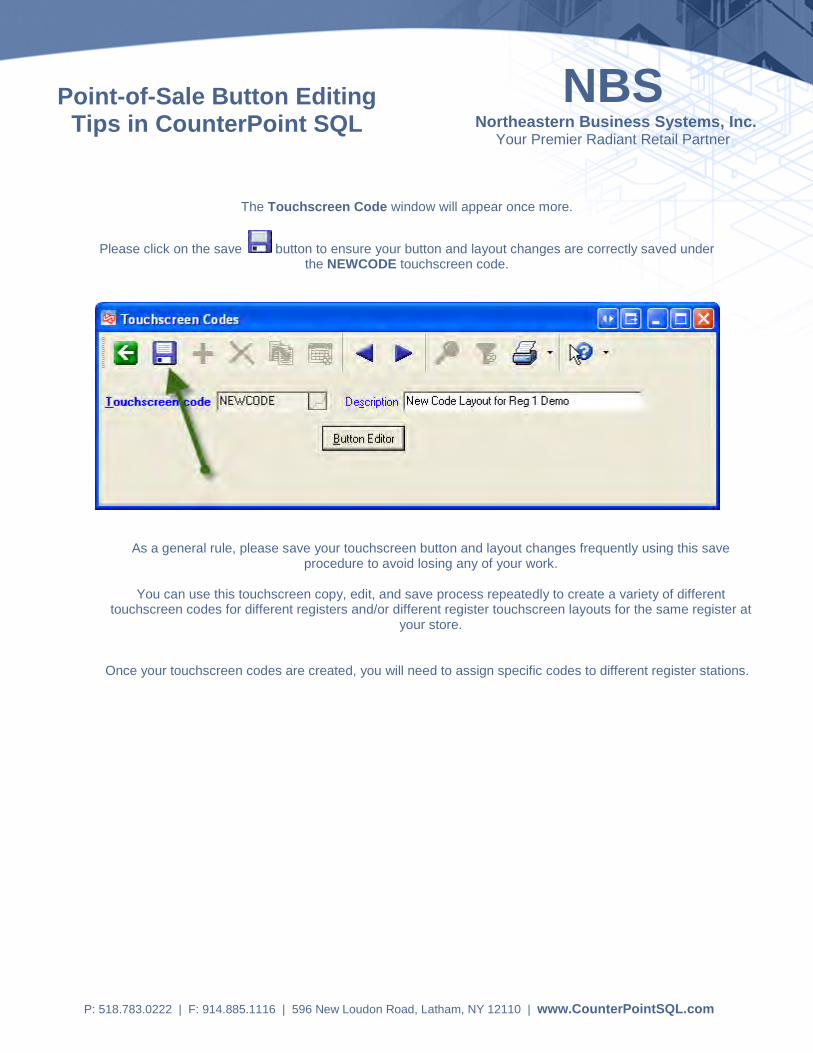
The Touchscreen Code window will appear once more.
Please click on the save button to ensure your button and layout changes are correctly saved under the NEWCODE touchscreen code.
As a general rule, please save your touchscreen button and layout changes frequently using this save procedure to avoid losing any of your work.
You can use this touchscreen copy, edit, and save process repeatedly to create a variety of different
touchscreen codes for different registers and/or different register touchscreen layouts for the same register at your store.
Once your touchscreen codes are created, you will need to assign specific codes to different register stations.
Point-of-Sale Button Editing Tips in CounterPoint SQL
NBS Northeastern Business Systems, Inc.
Your Premier Radiant Retail Partner
P: 518.783.0222 | F: 914.885.1116 | 596 New Loudon Road, Latham, NY 12110 | www.CounterPointSQL.com
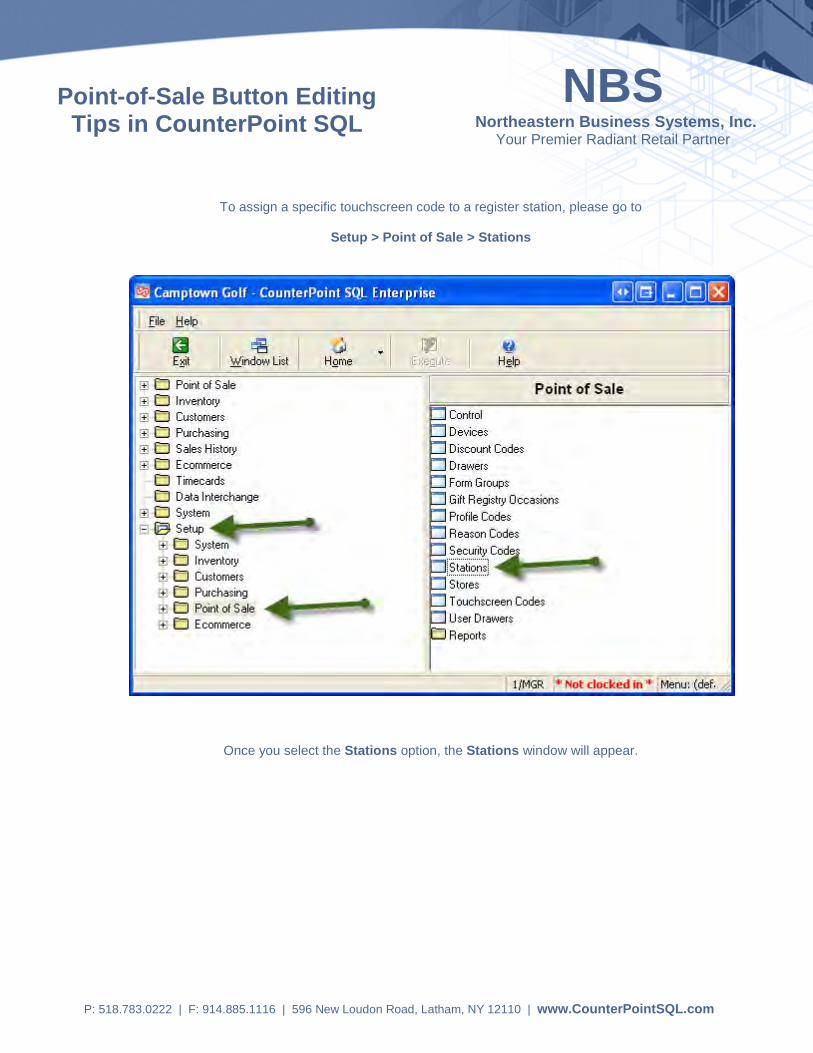
To assign a specific touchscreen code to a register station, please go to
Setup > Point of Sale > Stations
Once you select the Stations option, the Stations window will appear.
Point-of-Sale Button Editing Tips in CounterPoint SQL
NBS Northeastern Business Systems, Inc.
Your Premier Radiant Retail Partner
P: 518.783.0222 | F: 914.885.1116 | 596 New Loudon Road, Latham, NY 12110 | www.CounterPointSQL.com
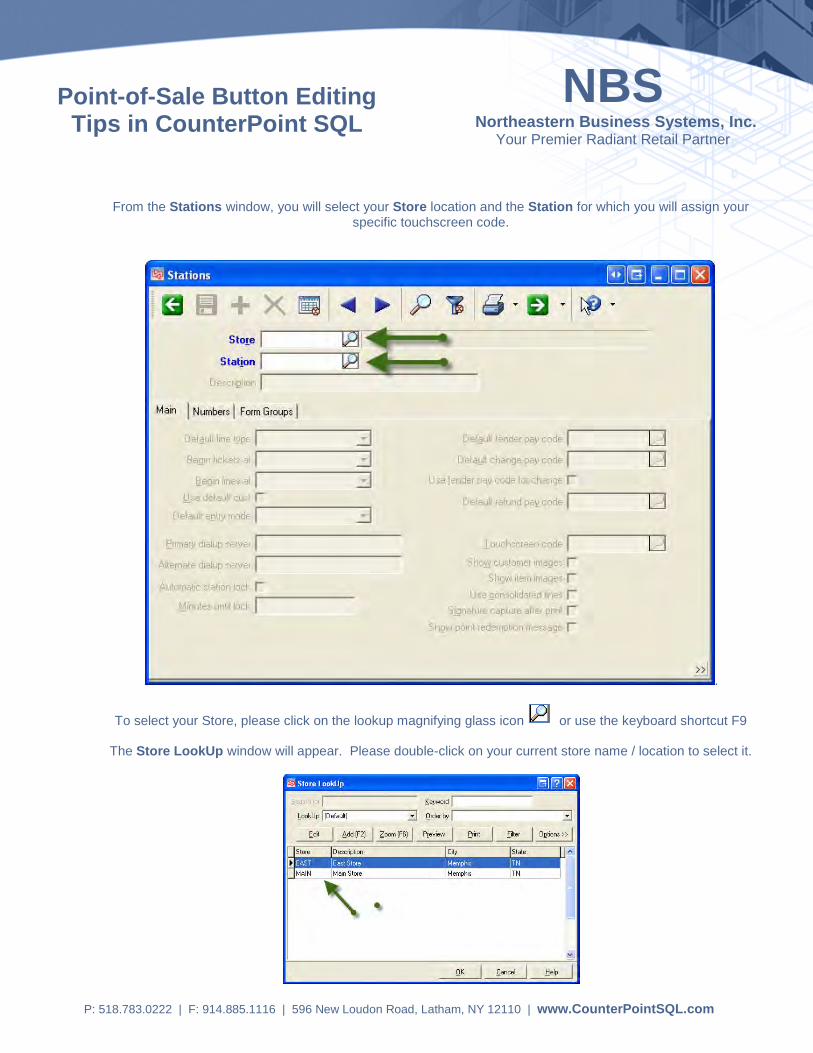
From the Stations window, you will select your Store location and the Station for which you will assign your specific touchscreen code.
.
To select your Store, please click on the lookup magnifying glass icon or use the keyboard shortcut F9
The Store LookUp window will appear. Please double-click on your current store name / location to select it.
Point-of-Sale Button Editing Tips in CounterPoint SQL
NBS Northeastern Business Systems, Inc.
Your Premier Radiant Retail Partner
P: 518.783.0222 | F: 914.885.1116 | 596 New Loudon Road, Latham, NY 12110 | www.CounterPointSQL.com
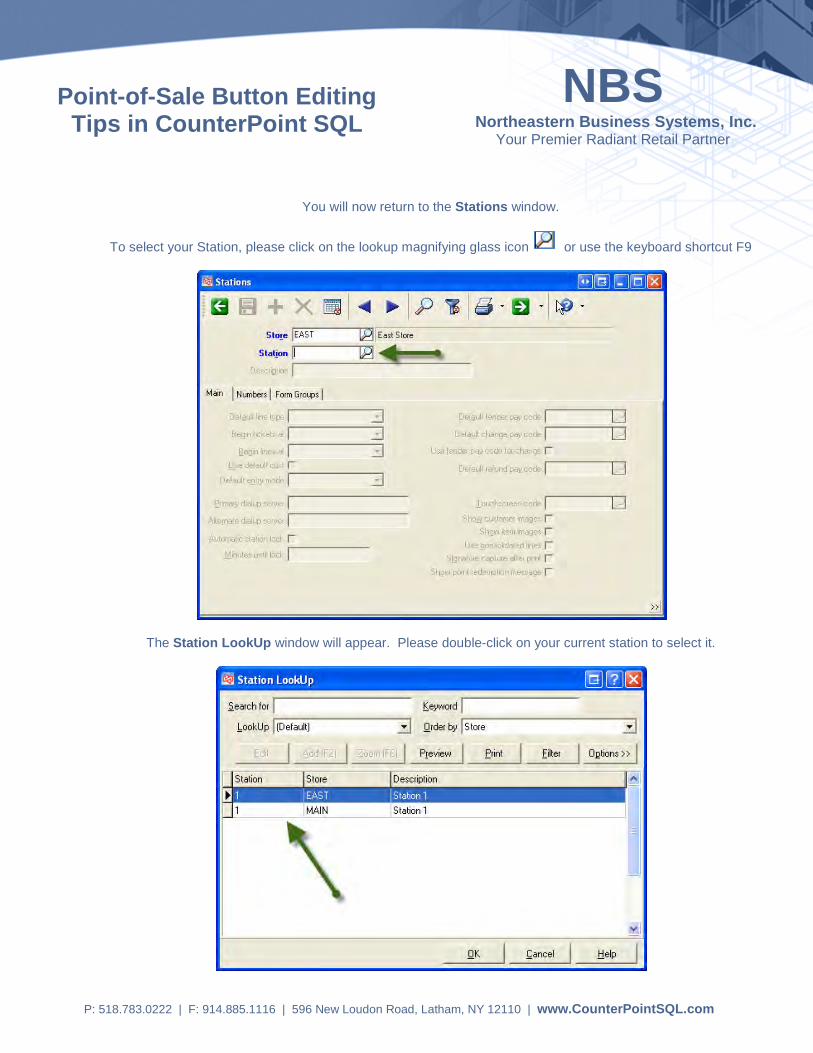
You will now return to the Stations window.
To select your Station, please click on the lookup magnifying glass icon or use the keyboard shortcut F9
The Station LookUp window will appear. Please double-click on your current station to select it.
Point-of-Sale Button Editing Tips in CounterPoint SQL

NBS Northeastern Business Systems, Inc.
Your Premier Radiant Retail Partner
P: 518.783.0222 | F: 914.885.1116 | 596 New Loudon Road, Latham, NY 12110 | www.CounterPointSQL.com
From Stations window, please click on the Touchscreen code magnifying glass icon or press F9 to bring up the Touchscreen Code LookUp window
From the Touchscreen code LookUp window, please select the specific touchscreen code you would like to use with your specific station and double-click on the code name.
Point-of-Sale Button Editing Tips in CounterPoint SQL
NBS Northeastern Business Systems, Inc.
Your Premier Radiant Retail Partner
P: 518.783.0222 | F: 914.885.1116 | 596 New Loudon Road, Latham, NY 12110 | www.CounterPointSQL.com
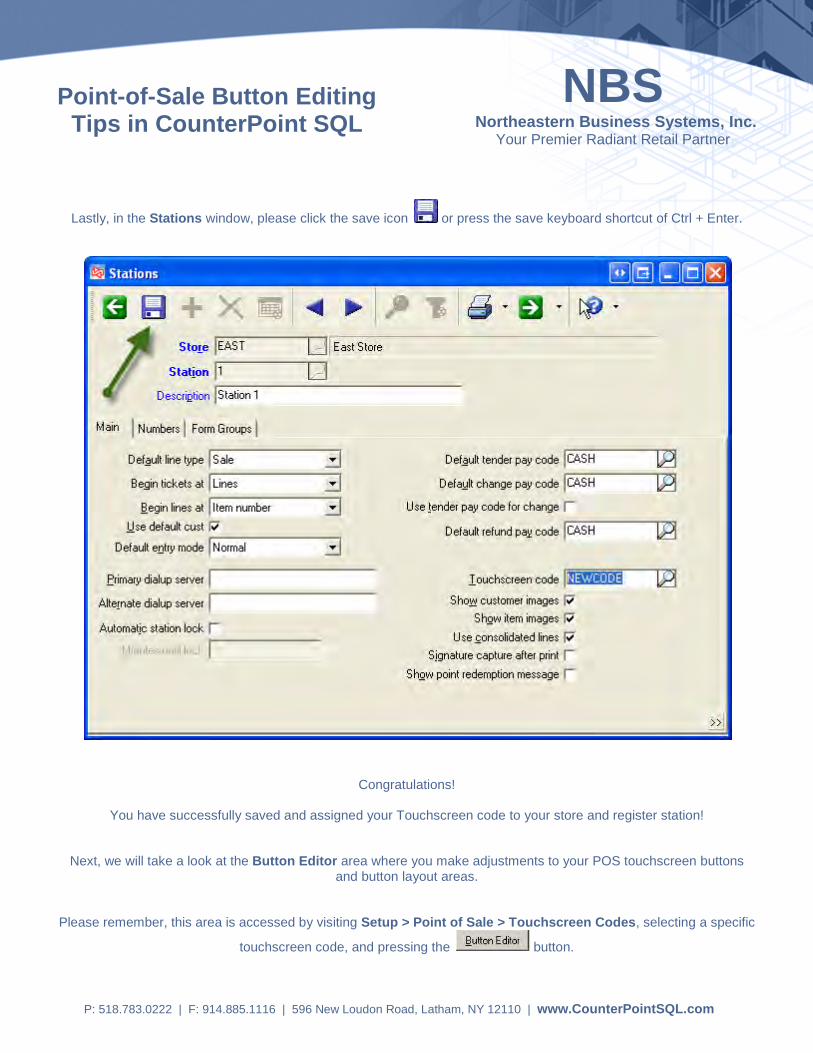
Lastly, in the Stations window, please click the save icon or press the save keyboard shortcut of Ctrl + Enter.
Congratulations!
You have successfully saved and assigned your Touchscreen code to your store and register station!
Next, we will take a look at the Button Editor area where you make adjustments to your POS touchscreen buttons and button layout areas.
Please remember, this area is accessed by visiting Setup > Point of Sale > Touchscreen Codes, selecting a specific
touchscreen code, and pressing the button.
Point-of-Sale Button Editing Tips in CounterPoint SQL

NBS Northeastern Business Systems, Inc.
Your Premier Radiant Retail Partner
P: 518.783.0222 | F: 914.885.1116 | 596 New Loudon Road, Latham, NY 12110 | www.CounterPointSQL.com
The Touchscreen Ticket Entry Button Editor screen has two main areas – the Button Editor window and the actual POS touchscreen button areas. The Button Editor window is where you define and customize your touchscreen buttons. As buttons are defined and edited, the results will be displayed in one of three different button areas below once you click
To begin, we will take a closer look at different sections of the Touchscreen Ticket Entry Editing screen. Then, we will look at the different areas and tabs associated with the Button Editor window
Point-of-Sale Button Editing Tips in CounterPoint SQL

Setting Up Point of Sale Data 6-47 07/17/09
Setting Up Touchscreen Codes
Layout of the Configuration Editing Window
“Fixed” buttons (always displayed)
A “Page” of buttons (buttons not yet defined)
Entry control area
Top panel buttons (always displayed)
NBS Northeastern Business Systems, Inc.
Your Premier Radiant Retail Partner
P: 518.783.0222 | F: 914.885.1116 | 596 New Loudon Road, Latham, NY 12110 | www.CounterPointSQL.com
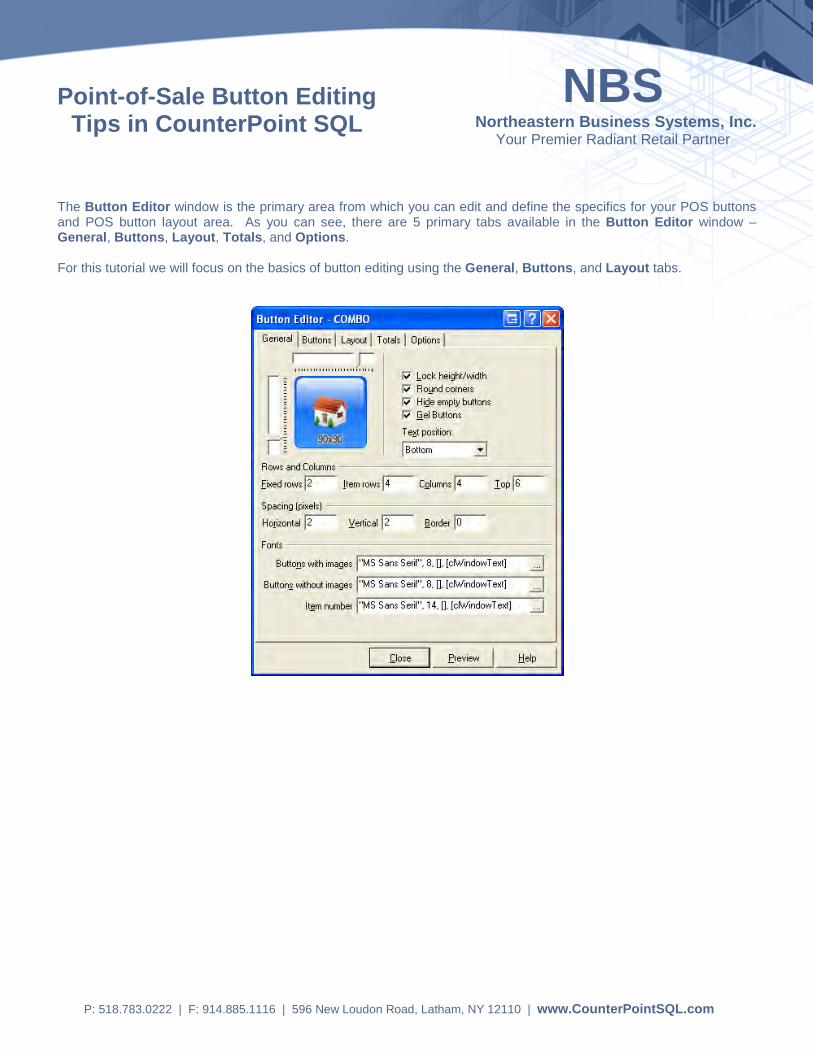
The Button Editor window is the primary area from which you can edit and define the specifics for your POS buttons and POS button layout area. As you can see, there are 5 primary tabs available in the Button Editor window – General, Buttons, Layout, Totals, and Options. For this tutorial we will focus on the basics of button editing using the General, Buttons, and Layout tabs.
Point-of-Sale Button Editing Tips in CounterPoint SQL
NBS Northeastern Business Systems, Inc.
Your Premier Radiant Retail Partner
P: 518.783.0222 | F: 914.885.1116 | 596 New Loudon Road, Latham, NY 12110 | www.CounterPointSQL.com
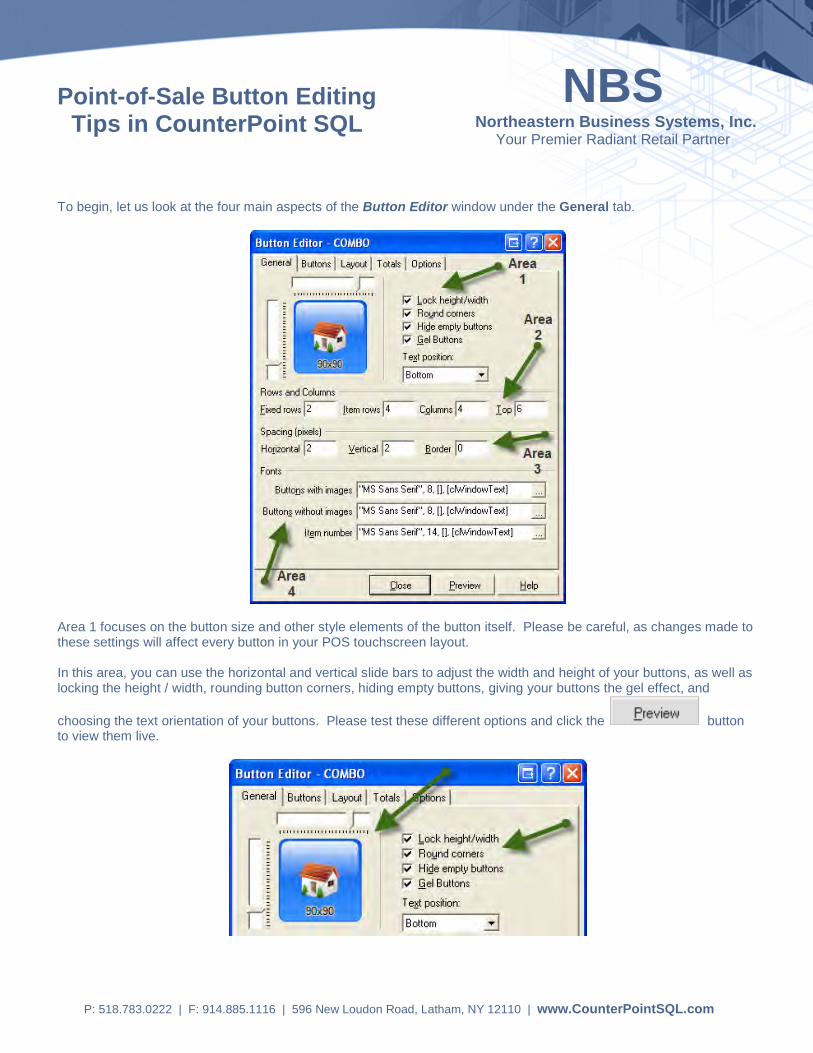
To begin, let us look at the four main aspects of the Button Editor window under the General tab.
Area 1 focuses on the button size and other style elements of the button itself. Please be careful, as changes made to these settings will affect every button in your POS touchscreen layout. In this area, you can use the horizontal and vertical slide bars to adjust the width and height of your buttons, as well as locking the height / width, rounding button corners, hiding empty buttons, giving your buttons the gel effect, and
choosing the text orientation of your buttons. Please test these different options and click the button to view them live.
Point-of-Sale Button Editing Tips in CounterPoint SQL
NBS Northeastern Business Systems, Inc.
Your Premier Radiant Retail Partner
P: 518.783.0222 | F: 914.885.1116 | 596 New Loudon Road, Latham, NY 12110 | www.CounterPointSQL.com
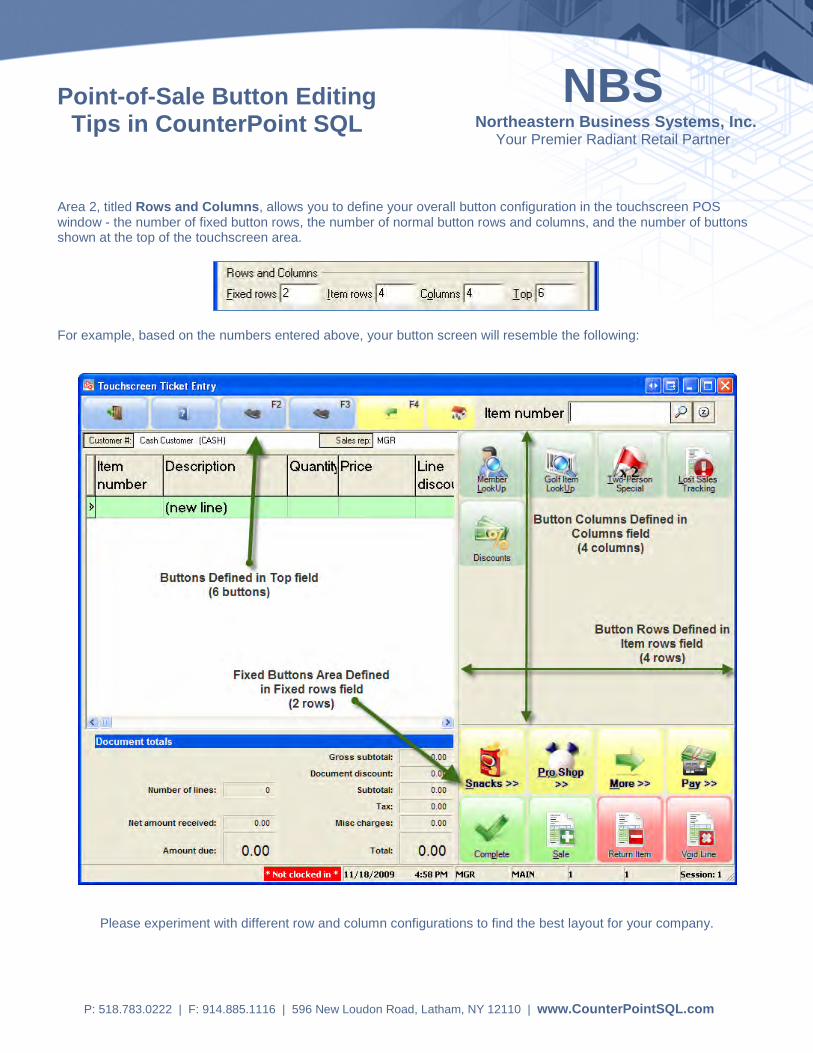
Area 2, titled Rows and Columns, allows you to define your overall button configuration in the touchscreen POS window - the number of fixed button rows, the number of normal button rows and columns, and the number of buttons shown at the top of the touchscreen area.
For example, based on the numbers entered above, your button screen will resemble the following:
Please experiment with different row and column configurations to find the best layout for your company.
Point-of-Sale Button Editing Tips in CounterPoint SQL
NBS Northeastern Business Systems, Inc.
Your Premier Radiant Retail Partner
P: 518.783.0222 | F: 914.885.1116 | 596 New Loudon Road, Latham, NY 12110 | www.CounterPointSQL.com
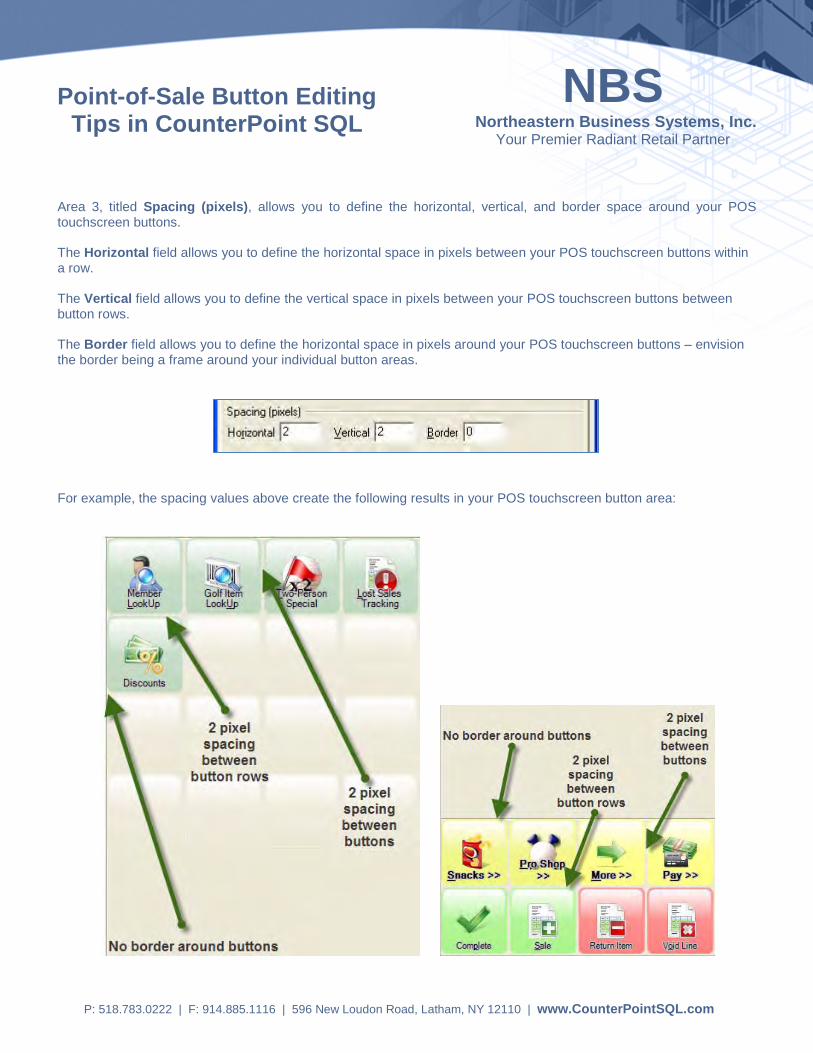
Area 3, titled Spacing (pixels), allows you to define the horizontal, vertical, and border space around your POS touchscreen buttons. The Horizontal field allows you to define the horizontal space in pixels between your POS touchscreen buttons within a row. The Vertical field allows you to define the vertical space in pixels between your POS touchscreen buttons between button rows. The Border field allows you to define the horizontal space in pixels around your POS touchscreen buttons – envision the border being a frame around your individual button areas.
For example, the spacing values above create the following results in your POS touchscreen button area:
Point-of-Sale Button Editing Tips in CounterPoint SQL
NBS Northeastern Business Systems, Inc.
Your Premier Radiant Retail Partner
P: 518.783.0222 | F: 914.885.1116 | 596 New Loudon Road, Latham, NY 12110 | www.CounterPointSQL.com
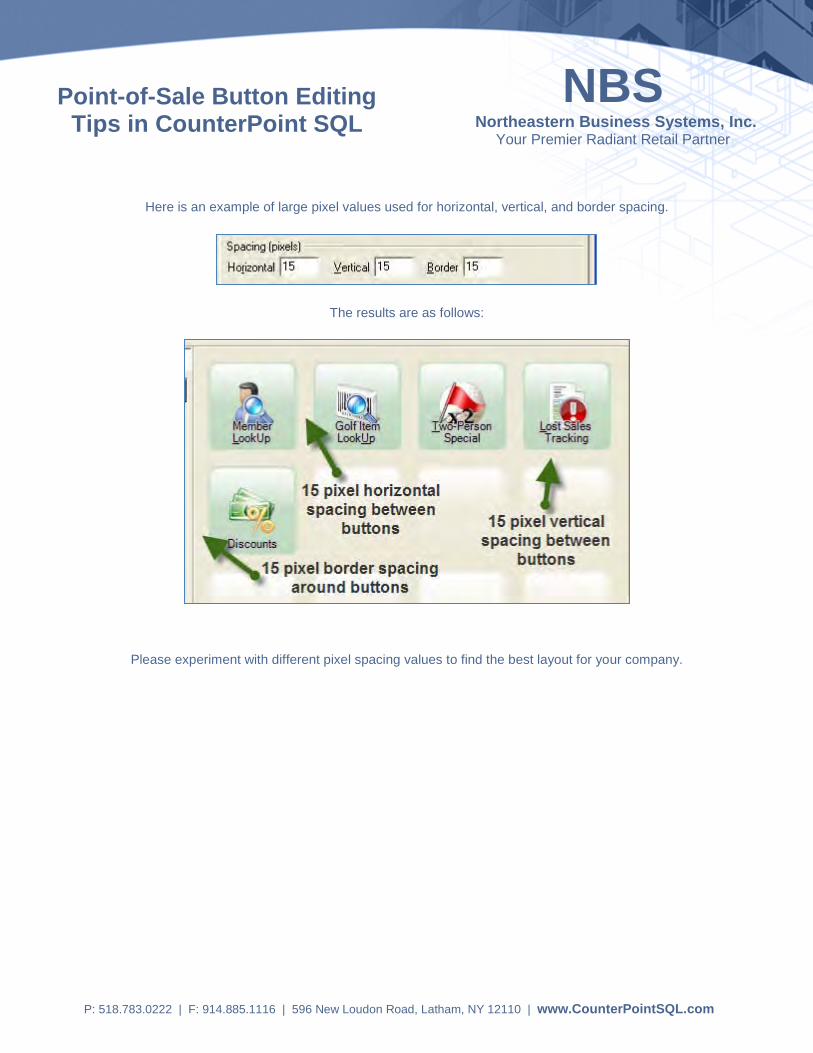
Here is an example of large pixel values used for horizontal, vertical, and border spacing.
The results are as follows:
Please experiment with different pixel spacing values to find the best layout for your company.
Point-of-Sale Button Editing Tips in CounterPoint SQL
NBS Northeastern Business Systems, Inc.
Your Premier Radiant Retail Partner
P: 518.783.0222 | F: 914.885.1116 | 596 New Loudon Road, Latham, NY 12110 | www.CounterPointSQL.com
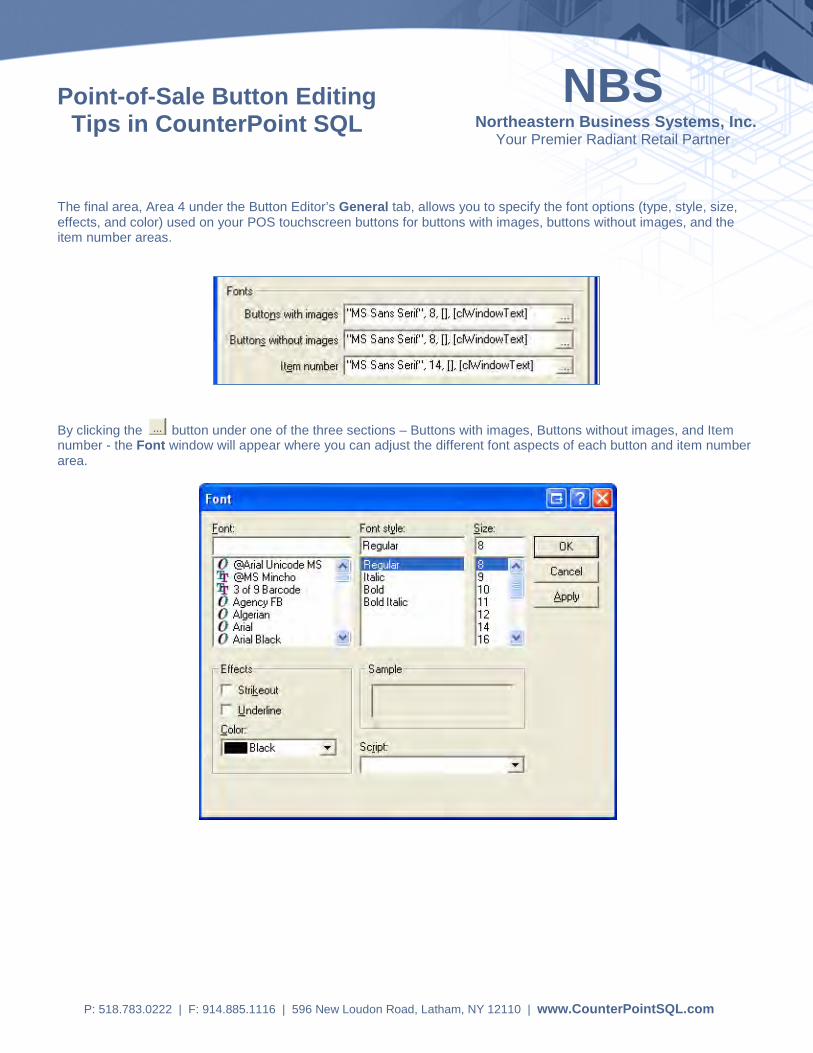
The final area, Area 4 under the Button Editor’s General tab, allows you to specify the font options (type, style, size, effects, and color) used on your POS touchscreen buttons for buttons with images, buttons without images, and the item number areas.
By clicking the button under one of the three sections – Buttons with images, Buttons without images, and Item number - the Font window will appear where you can adjust the different font aspects of each button and item number area.
Point-of-Sale Button Editing Tips in CounterPoint SQL
NBS Northeastern Business Systems, Inc.
Your Premier Radiant Retail Partner
P: 518.783.0222 | F: 914.885.1116 | 596 New Loudon Road, Latham, NY 12110 | www.CounterPointSQL.com
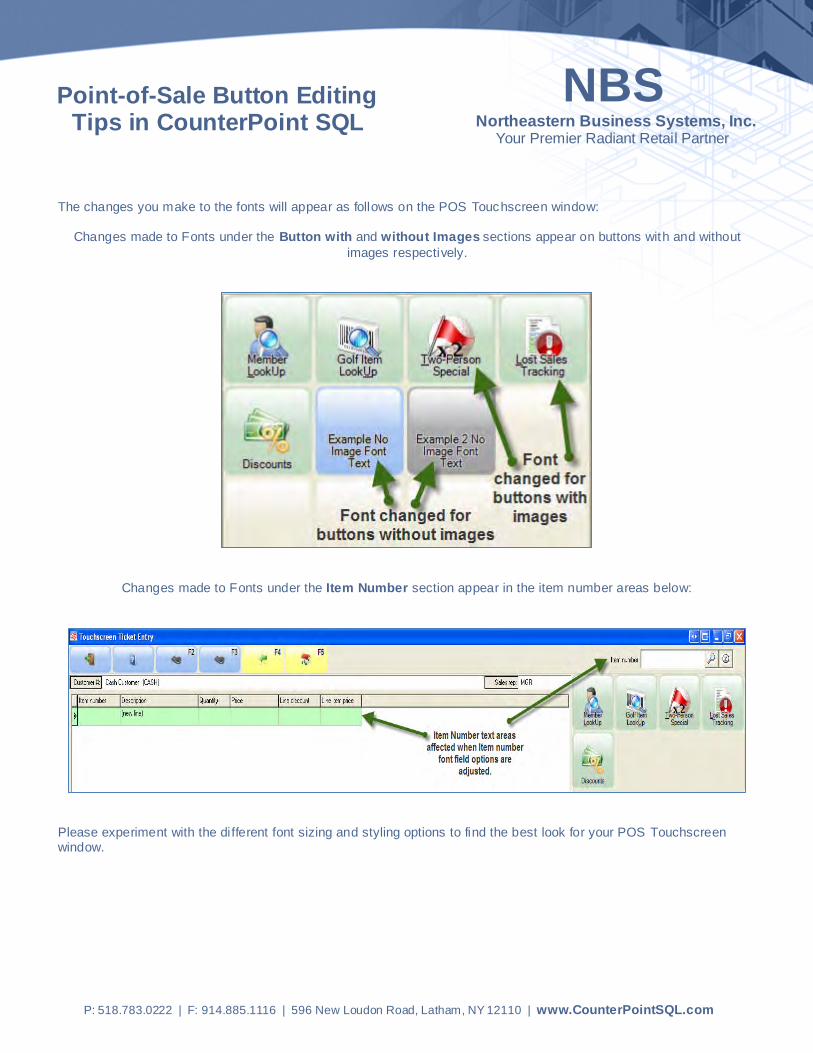
The changes you make to the fonts will appear as follows on the POS Touchscreen window:
Changes made to Fonts under the Button with and without Images sections appear on buttons with and without images respectively.
Changes made to Fonts under the Item Number section appear in the item number areas below:
Please experiment with the different font sizing and styling options to find the best look for your POS Touchscreen window.
Point-of-Sale Button Editing Tips in CounterPoint SQL
Setting Up Point of Sale Data 6-49 07/17/09
Setting Up Touchscreen Codes
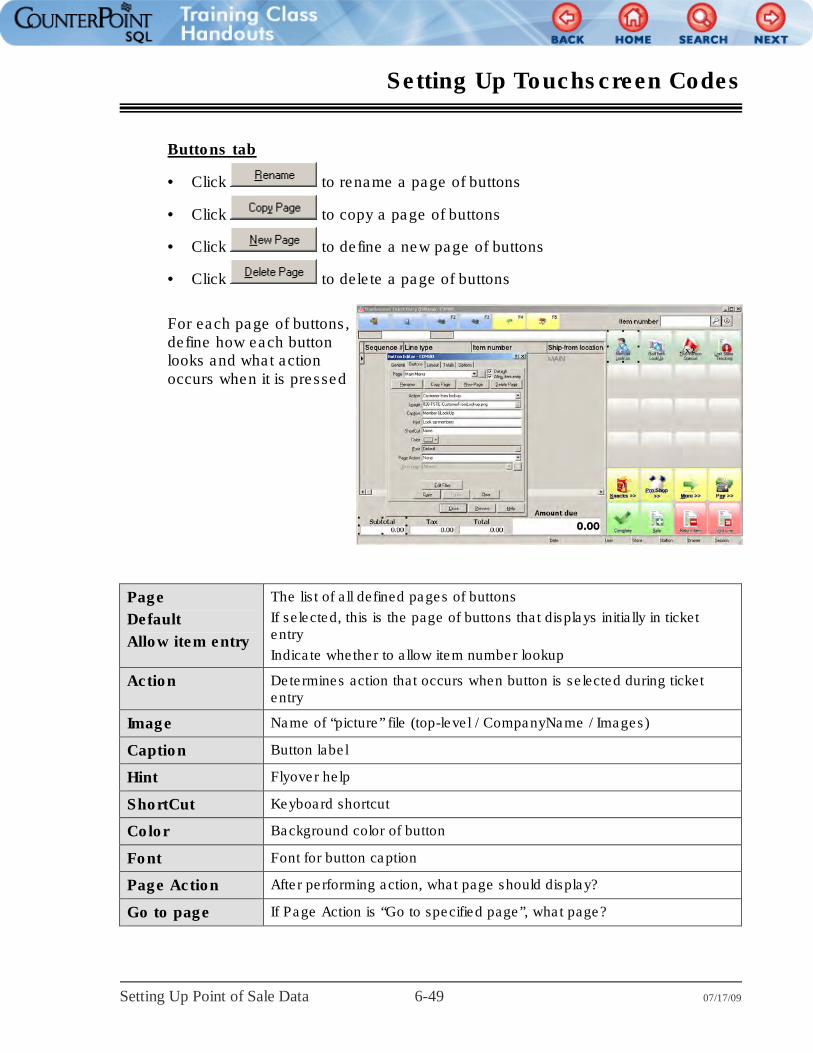
Buttons tab
• Click to rename a page of buttons
• Click to copy a page of buttons
• Click to define a new page of buttons
• Click to delete a page of buttons
For each page of buttons, define how each button looks and what action occurs when it is pressed
Page
Default
Allow item entry
The list of all defined pages of buttons
If selected, this is the page of buttons that displays initially in ticket entry
Indicate whether to allow item number lookup
Action Determines action that occurs when button is selected during ticket entry
Image Name of “picture” file (top-level / CompanyName / Images)
Caption Button label
Hint Flyover help
ShortCut Keyboard shortcut
Color Background color of button
Font Font for button caption
Page Action After performing action, what page should display?
Go to page If Page Action is “Go to specified page”, what page?
Setting Up Point of Sale Data 6-60 07/17/09
Setting Up Touchscreen Codes
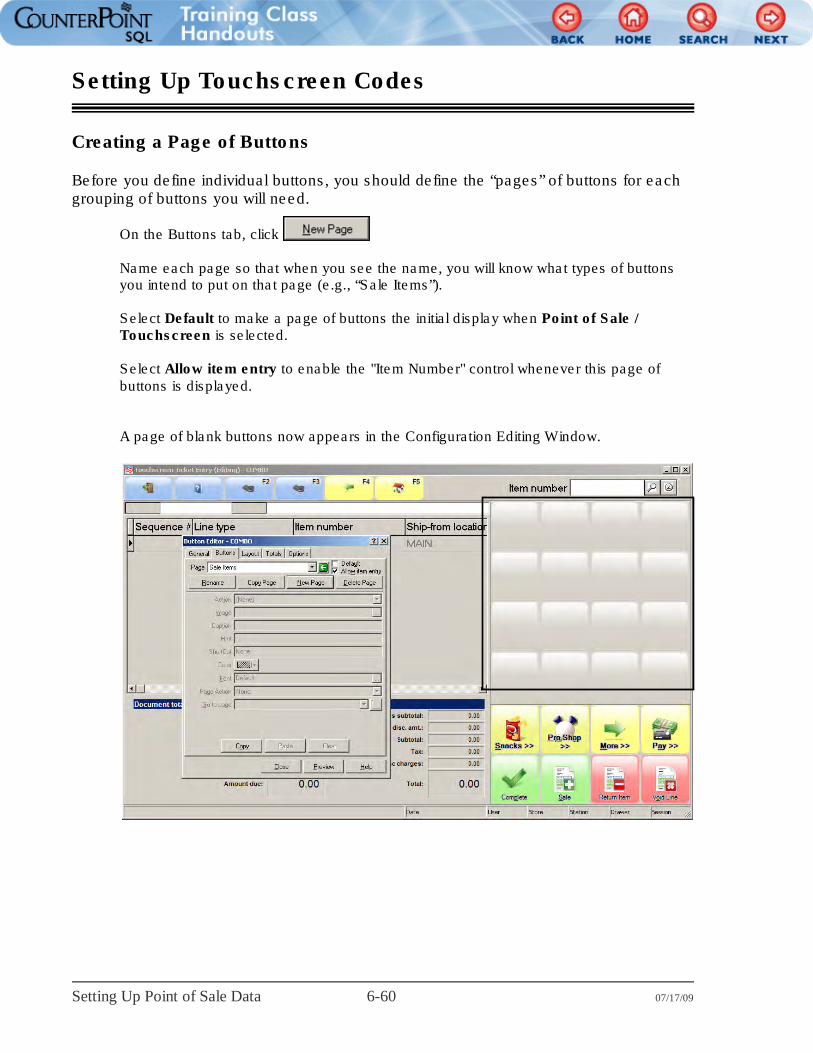
Creating a Page of Buttons
Before you define individual buttons, you should define the “pages” of buttons for each grouping of buttons you will need.
On the Buttons tab, click Name each page so that when you see the name, you will know what types of buttons you intend to put on that page (e.g., “Sale Items”). Select Default to make a page of buttons the initial display when Point of Sale / Touchscreen is selected. Select Allow item entry to enable the "Item Number" control whenever this page of buttons is displayed. A page of blank buttons now appears in the Configuration Editing Window.
NBS Northeastern Business Systems, Inc.
Your Premier Radiant Retail Partner
P: 518.783.0222 | F: 914.885.1116 | 596 New Loudon Road, Latham, NY 12110 | www.CounterPointSQL.com
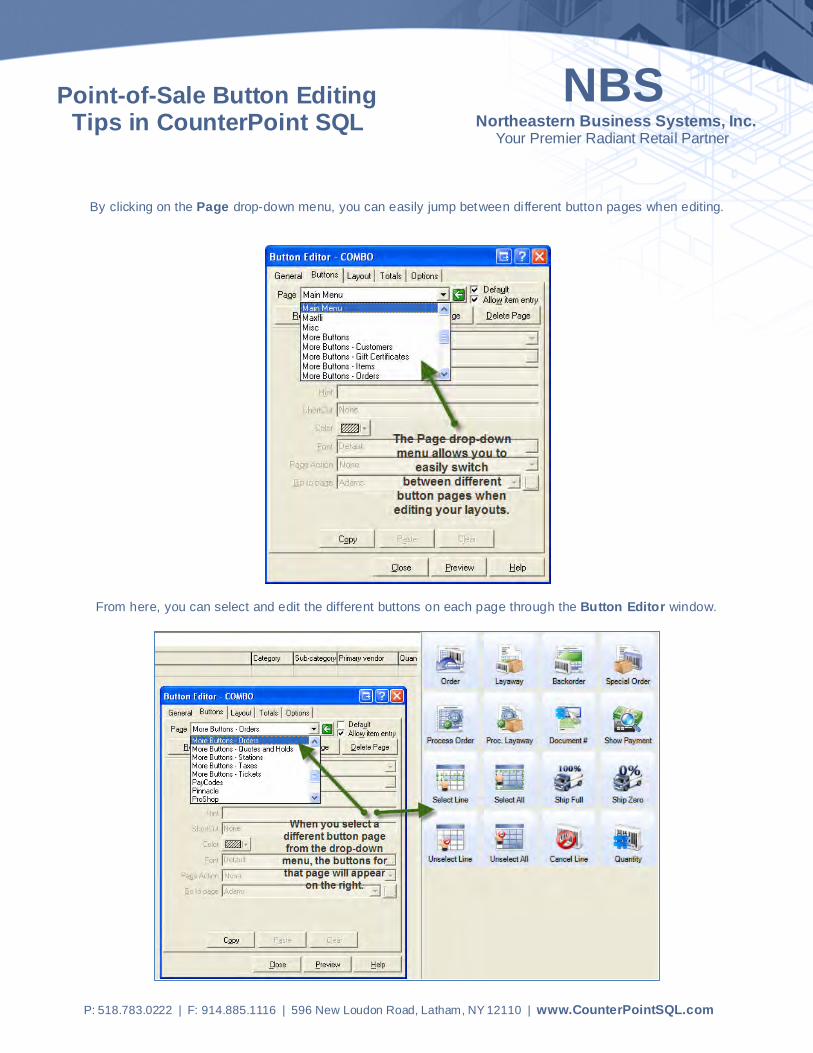
By clicking on the Page drop-down menu, you can easily jump between different button pages when editing.
From here, you can select and edit the different buttons on each page through the Button Editor window.
Point-of-Sale Button Editing Tips in CounterPoint SQL
NBS Northeastern Business Systems, Inc.
Your Premier Radiant Retail Partner
P: 518.783.0222 | F: 914.885.1116 | 596 New Loudon Road, Latham, NY 12110 | www.CounterPointSQL.com
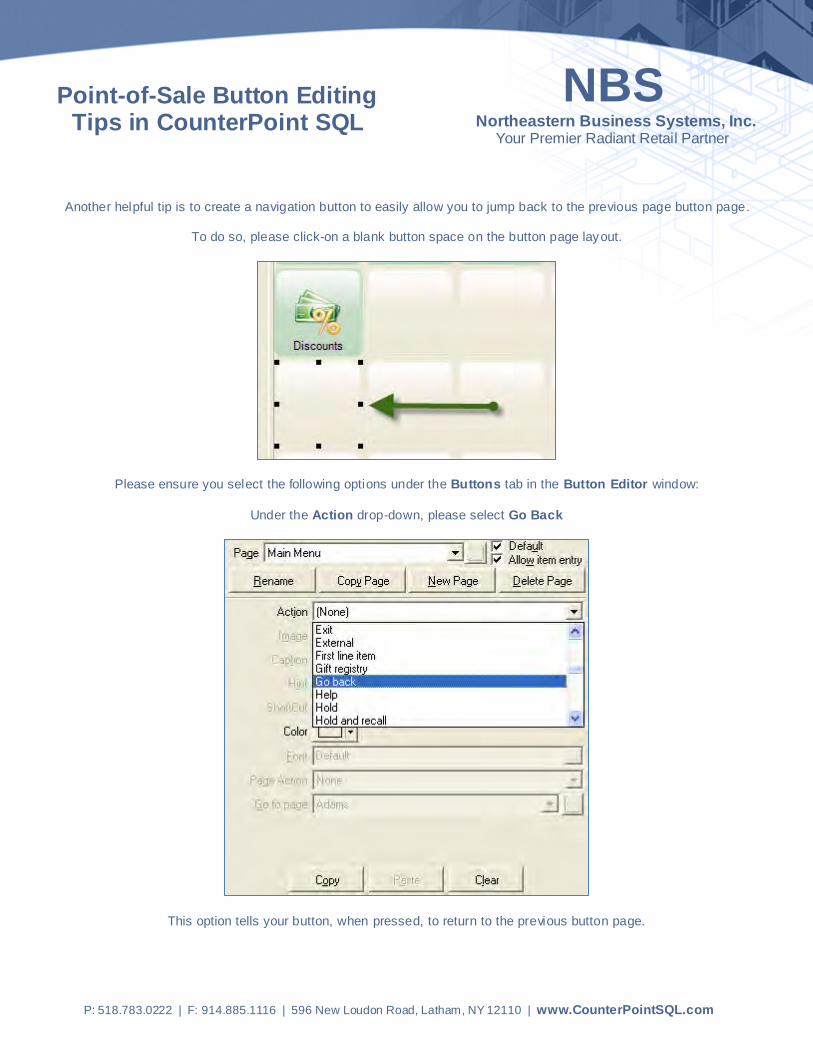
Another helpful tip is to create a navigation button to easily allow you to jump back to the previous page button page.
To do so, please click-on a blank button space on the button page layout.
Please ensure you select the following options under the Buttons tab in the Button Editor window:
Under the Action drop-down, please select Go Back
This option tells your button, when pressed, to return to the previous button page.
Point-of-Sale Button Editing Tips in CounterPoint SQL
NBS Northeastern Business Systems, Inc.
Your Premier Radiant Retail Partner
P: 518.783.0222 | F: 914.885.1116 | 596 New Loudon Road, Latham, NY 12110 | www.CounterPointSQL.com
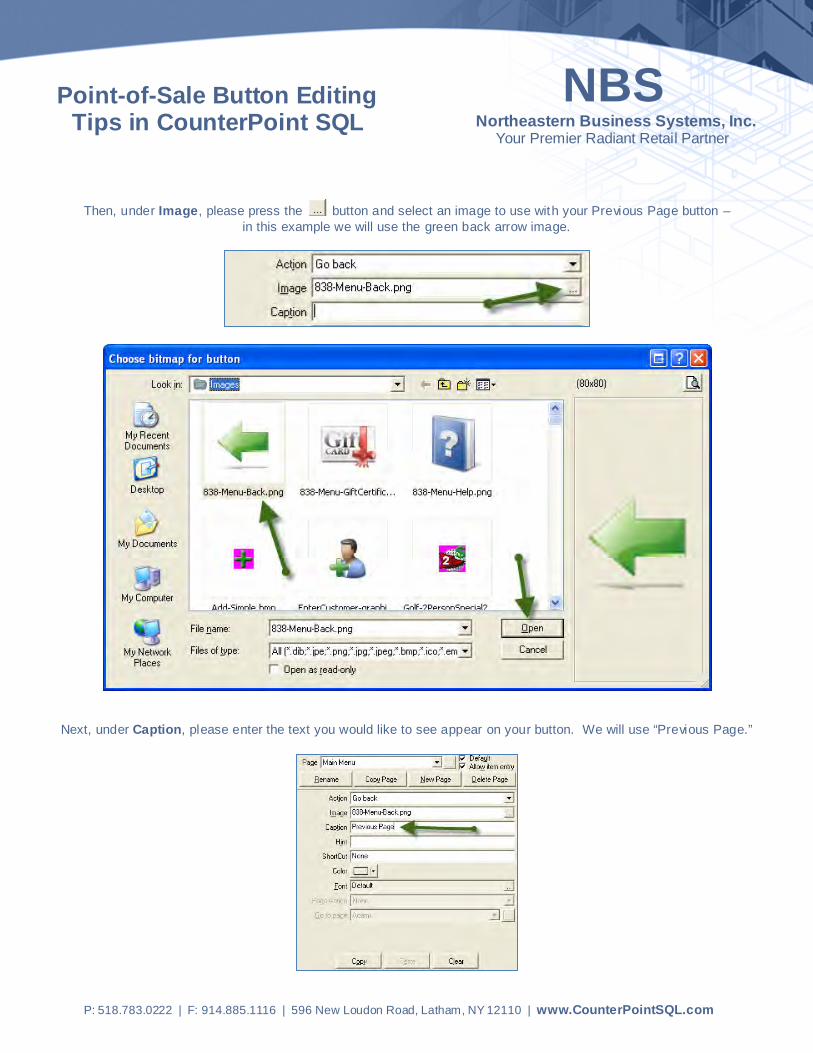
Then, under Image, please press the button and select an image to use with your Previous Page button – in this example we will use the green back arrow image.
Next, under Caption, please enter the text you would like to see appear on your button. We will use “Previous Page.”
Point-of-Sale Button Editing Tips in CounterPoint SQL
NBS Northeastern Business Systems, Inc.
Your Premier Radiant Retail Partner
P: 518.783.0222 | F: 914.885.1116 | 596 New Loudon Road, Latham, NY 12110 | www.CounterPointSQL.com
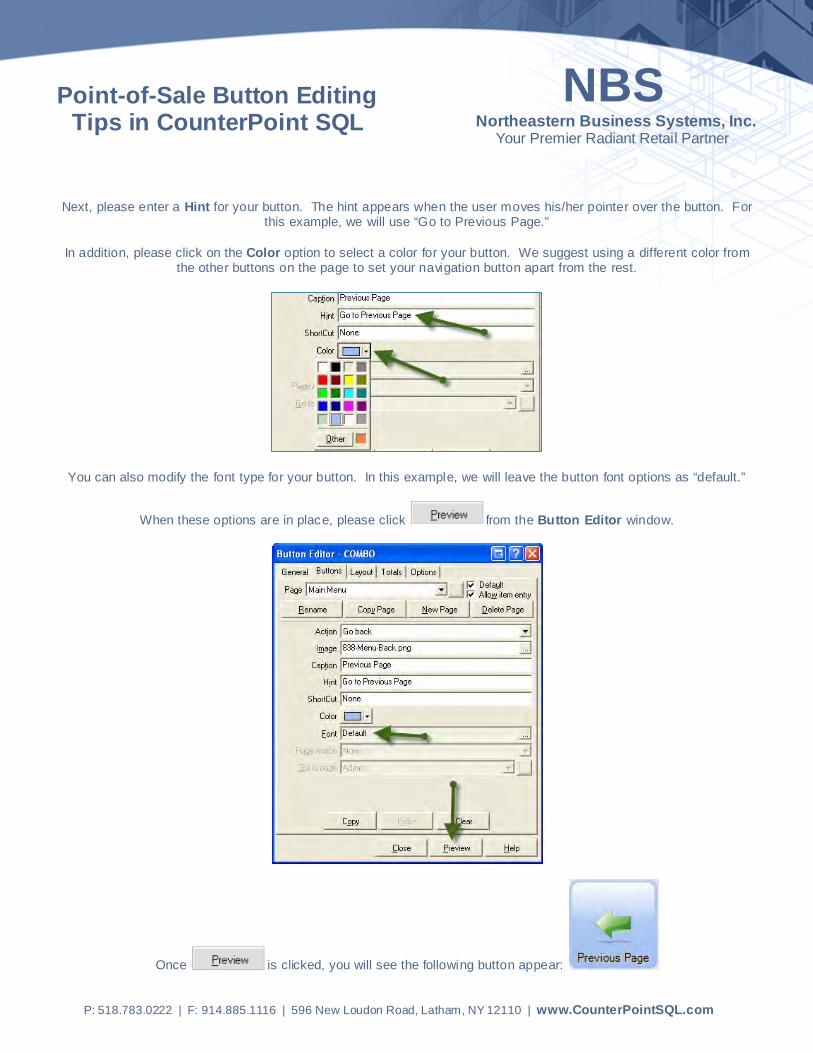
Next, please enter a Hint for your button. The hint appears when the user moves his/her pointer over the button. For this example, we will use “Go to Previous Page.”
In addition, please click on the Color option to select a color for your button. We suggest using a different color from
the other buttons on the page to set your navigation button apart from the rest.
You can also modify the font type for your button. In this example, we will leave the button font options as “default.”
When these options are in place, please click from the Button Editor window.
Once is clicked, you will see the following button appear:
Point-of-Sale Button Editing Tips in CounterPoint SQL
NBS Northeastern Business Systems, Inc.
Your Premier Radiant Retail Partner
P: 518.783.0222 | F: 914.885.1116 | 596 New Loudon Road, Latham, NY 12110 | www.CounterPointSQL.com
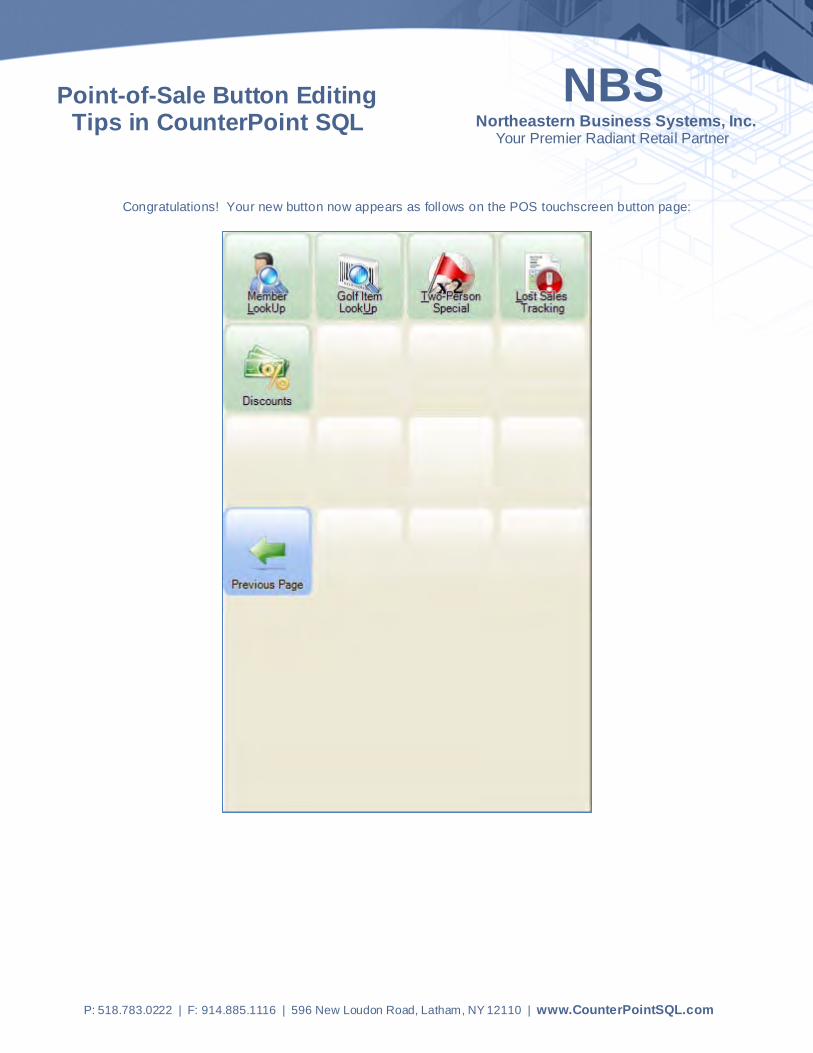
Congratulations! Your new button now appears as follows on the POS touchscreen button page:
Point-of-Sale Button Editing Tips in CounterPoint SQL
NBS Northeastern Business Systems, Inc.
Your Premier Radiant Retail Partner
P: 518.783.0222 | F: 914.885.1116 | 596 New Loudon Road, Latham, NY 12110 | www.CounterPointSQL.com
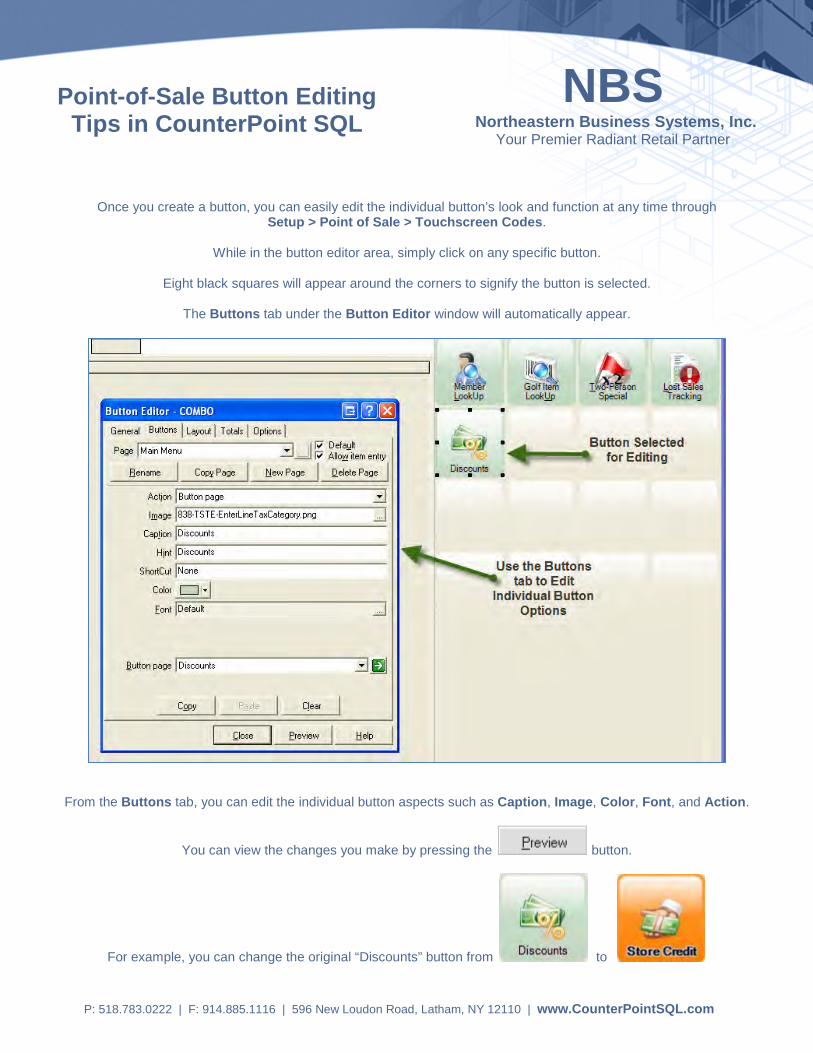
Once you create a button, you can easily edit the individual button’s look and function at any time through Setup > Point of Sale > Touchscreen Codes.
While in the button editor area, simply click on any specific button.
Eight black squares will appear around the corners to signify the button is selected.
The Buttons tab under the Button Editor window will automatically appear.
From the Buttons tab, you can edit the individual button aspects such as Caption, Image, Color, Font, and Action.
You can view the changes you make by pressing the button.
For example, you can change the original “Discounts” button from to
Point-of-Sale Button Editing Tips in CounterPoint SQL
NBS Northeastern Business Systems, Inc.
Your Premier Radiant Retail Partner
P: 518.783.0222 | F: 914.885.1116 | 596 New Loudon Road, Latham, NY 12110 | www.CounterPointSQL.com
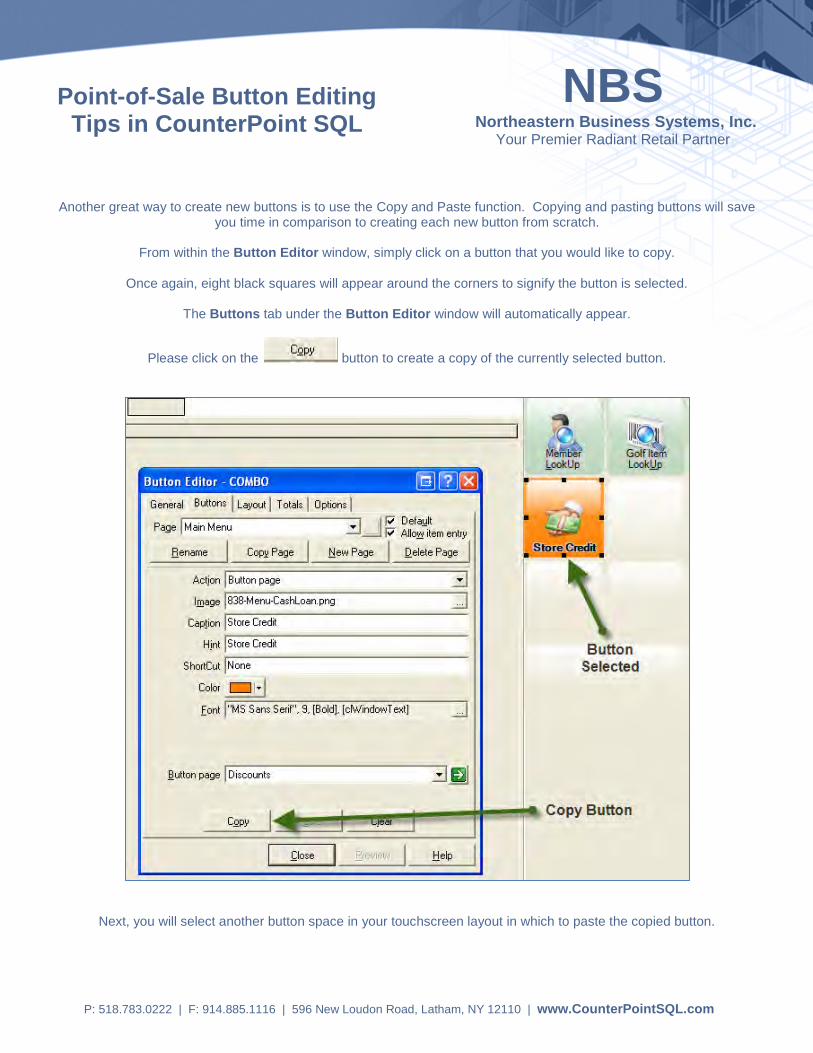
Another great way to create new buttons is to use the Copy and Paste function. Copying and pasting buttons will save you time in comparison to creating each new button from scratch.
From within the Button Editor window, simply click on a button that you would like to copy.
Once again, eight black squares will appear around the corners to signify the button is selected.
The Buttons tab under the Button Editor window will automatically appear.
Please click on the button to create a copy of the currently selected button.
Next, you will select another button space in your touchscreen layout in which to paste the copied button.
Point-of-Sale Button Editing Tips in CounterPoint SQL

NBS Northeastern Business Systems, Inc.
Your Premier Radiant Retail Partner
P: 518.783.0222 | F: 914.885.1116 | 596 New Loudon Road, Latham, NY 12110 | www.CounterPointSQL.com
To select an open button space, simply click on the open space in the layout.
As usual, the eight squares will appear to signify the button area is selected.
Then, click on the button to copy your button to the new location.
(The button appears as soon as the button is clicked)
Point-of-Sale Button Editing Tips in CounterPoint SQL
NBS Northeastern Business Systems, Inc.
Your Premier Radiant Retail Partner
P: 518.783.0222 | F: 914.885.1116 | 596 New Loudon Road, Latham, NY 12110 | www.CounterPointSQL.com
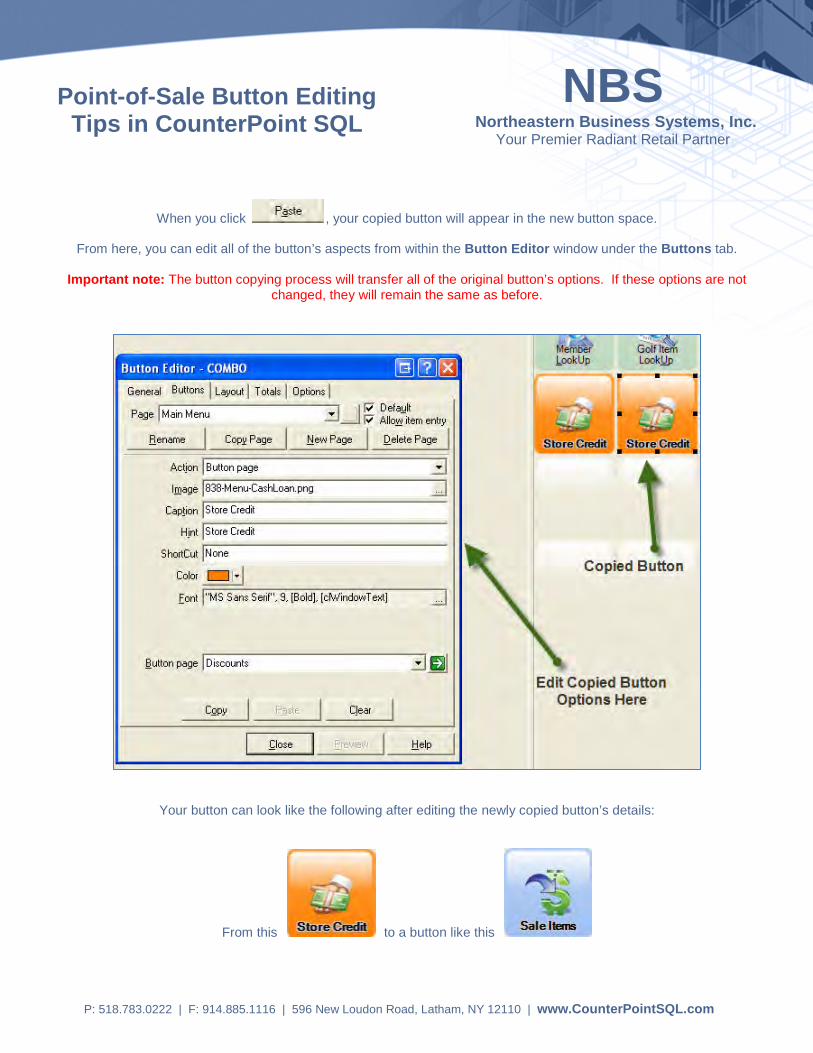
When you click , your copied button will appear in the new button space.
From here, you can edit all of the button’s aspects from within the Button Editor window under the Buttons tab.
Important note: The button copying process will transfer all of the original button’s options. If these options are not changed, they will remain the same as before.
Your button can look like the following after editing the newly copied button’s details:
From this to a button like this
Point-of-Sale Button Editing Tips in CounterPoint SQL
NBS Northeastern Business Systems, Inc.
Your Premier Radiant Retail Partner
P: 518.783.0222 | F: 914.885.1116 | 596 New Loudon Road, Latham, NY 12110 | www.CounterPointSQL.com
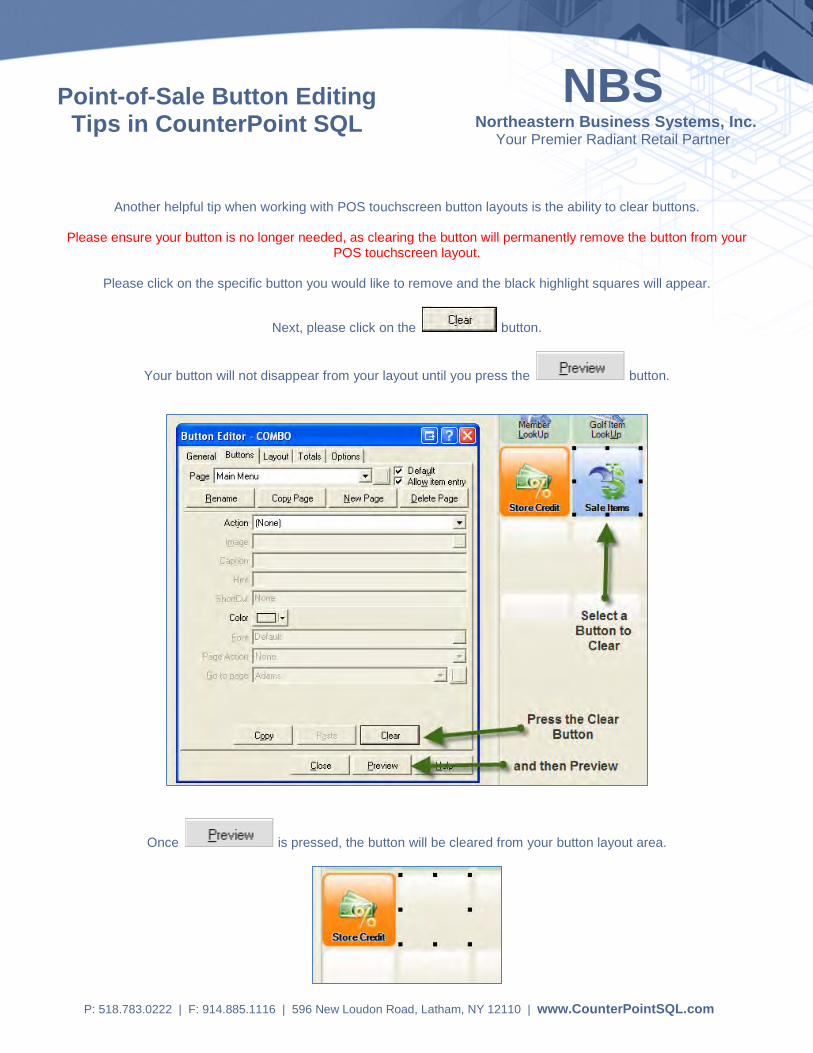
Another helpful tip when working with POS touchscreen button layouts is the ability to clear buttons.
Please ensure your button is no longer needed, as clearing the button will permanently remove the button from your POS touchscreen layout.
Please click on the specific button you would like to remove and the black highlight squares will appear.
Next, please click on the button.
Your button will not disappear from your layout until you press the button.
Once is pressed, the button will be cleared from your button layout area.
Point-of-Sale Button Editing Tips in CounterPoint SQL
NBS Northeastern Business Systems, Inc.
Your Premier Radiant Retail Partner
P: 518.783.0222 | F: 914.885.1116 | 596 New Loudon Road, Latham, NY 12110 | www.CounterPointSQL.com
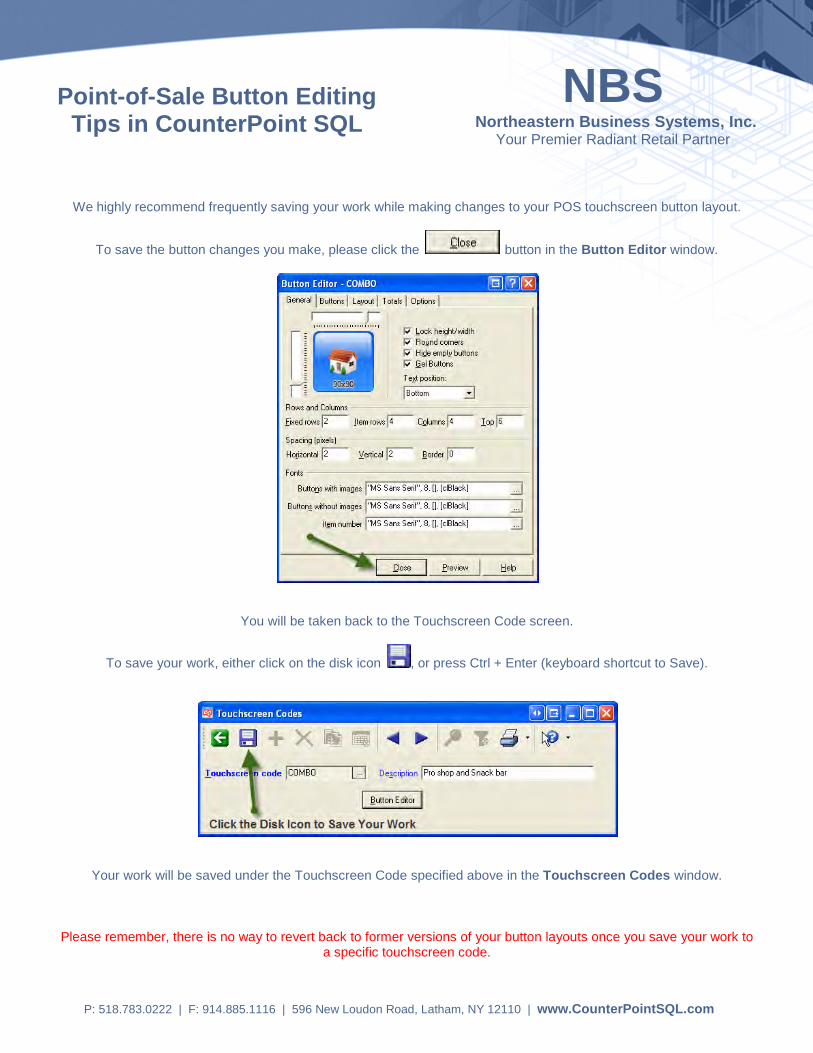
We highly recommend frequently saving your work while making changes to your POS touchscreen button layout.
To save the button changes you make, please click the button in the Button Editor window.
You will be taken back to the Touchscreen Code screen.
To save your work, either click on the disk icon , or press Ctrl + Enter (keyboard shortcut to Save).
Your work will be saved under the Touchscreen Code specified above in the Touchscreen Codes window.
Please remember, there is no way to revert back to former versions of your button layouts once you save your work to a specific touchscreen code.
Point-of-Sale Button Editing Tips in CounterPoint SQL

Setting Up Point of Sale Data 6-50 07/17/09
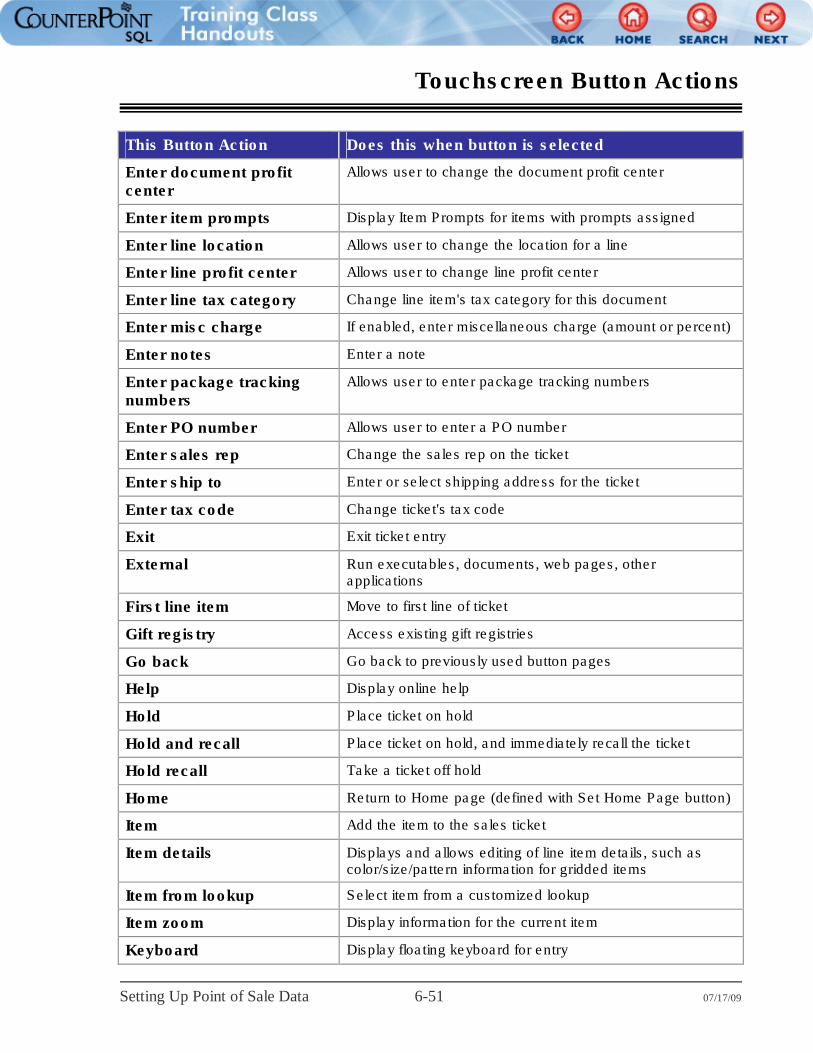
Touchscreen Button Actions
This Button Action Does this when button is selected
None Button has no action (default setting)
Add backorder line Enter a backorder line on the ticket
Add layaway line Enter a layaway line on the ticket
Add order line Enter an order line on the ticket
Add special order line Enter a special order line on the ticket
Button page Move to another page of touchscreen buttons
Cancel document changes Cancel changes to the document
Cancel line Cancel the additional of the current line
Cash drop Remove cash from drawer
Cash loan Add cash to drawer
Change line taxable status Change line item from taxable to non-taxable, or vice-versa
Clear all discounts Clear all entered discounts
Clear document discount Clear entered document discounts
Clear line discount Clear entered line discounts
Clear payments Clear all pay codes and amounts entered on this ticket
Clock in out Allow the user to clock in / clock out
Complete Save the paid ticket, print it, and begin a new ticket
Custom action Executes a custom action defined in company's Actions.xml
Customer from lookup Select customer from a customized lookup
Customer zoom Display information for the current customer
Discount Code Enter the code for the discount
Edit gift certificate sold Display lookup of gift certificates to allow user to select an existing gift certificate for the current ticket or add a new one
Enter bill to Change bill-to name and address info for the ticket
Enter customer Change the customer on the ticket
Enter description Enter or edit item descriptions, if allowed for item
Enter document discount Enter a discount for the current document
Enter document location Allows user to change the default location
Enter document number Enter your own ticket or order number
Setting Up Point of Sale Data 6-51 07/17/09
Touchscreen Button Actions
This Button Action Does this when button is selected
Enter document profit center
Allows user to change the document profit center
Enter item prompts Display Item Prompts for items with prompts assigned
Enter line location Allows user to change the location for a line
Enter line profit center Allows user to change line profit center
Enter line tax category Change line item's tax category for this document
Enter misc charge If enabled, enter miscellaneous charge (amount or percent)
Enter notes Enter a note
Enter package tracking numbers
Allows user to enter package tracking numbers
Enter PO number Allows user to enter a PO number
Enter sales rep Change the sales rep on the ticket
Enter ship to Enter or select shipping address for the ticket
Enter tax code Change ticket's tax code
Exit Exit ticket entry
External Run executables, documents, web pages, other applications
First line item Move to first line of ticket
Gift registry Access existing gift registries
Go back Go back to previously used button pages
Help Display online help
Hold Place ticket on hold
Hold and recall Place ticket on hold, and immediately recall the ticket
Hold recall Take a ticket off hold
Home Return to Home page (defined with Set Home Page button)
Item Add the item to the sales ticket
Item details Displays and allows editing of line item details, such as color/size/pattern information for gridded items
Item from lookup Select item from a customized lookup
Item zoom Display information for the current item
Keyboard Display floating keyboard for entry

Setting Up Point of Sale Data 6-52 07/17/09
Touchscreen Button Actions
This Button Action Does this when button is selected
Keypad Display floating keypad for numeric entry
Last line item Move to last line of ticket
Lock station Lock the station, requiring user login for access
Mail center Access the mail center
Move cursor down Move down in line item list
Move cursor up Move up in line item list
Move line down Move down one line
Move line up Move up one line
No action Do nothing (default setting)
No sale Open physical cash drawer without a sale
No tax Set tax amount to zero and require entry of tax exempt number
Pay code Accept tender using this as the pay code
Pay in Add money to the cash drawer
Pay on account Record payments for A/R customers
Pay out Remove money from the cash drawer
Pay with customer card on file
Uses credit card type, number, expiration date, and cardholder name entered in customer’s record
Price override Change the price of the current ticket line
Price override percent Discount price of current ticket line by a percentage
Process layaways Work with an existing layaway
Process orders Work with an existing order
Quantity Change the quantity of the current ticket line
Quote Convert ticket into a Quote
Quote recall Convert Quote into a ticket
Repeat last line Copy the last line entered to another new line
Reprice all lines Update all lines with current pricing
Reprint ticket Reprint receipt for ticket
Return line Treat current line as returned merchandise
Run page Execute all buttons on a specified page
Setting Up Point of Sale Data 6-53 07/17/09
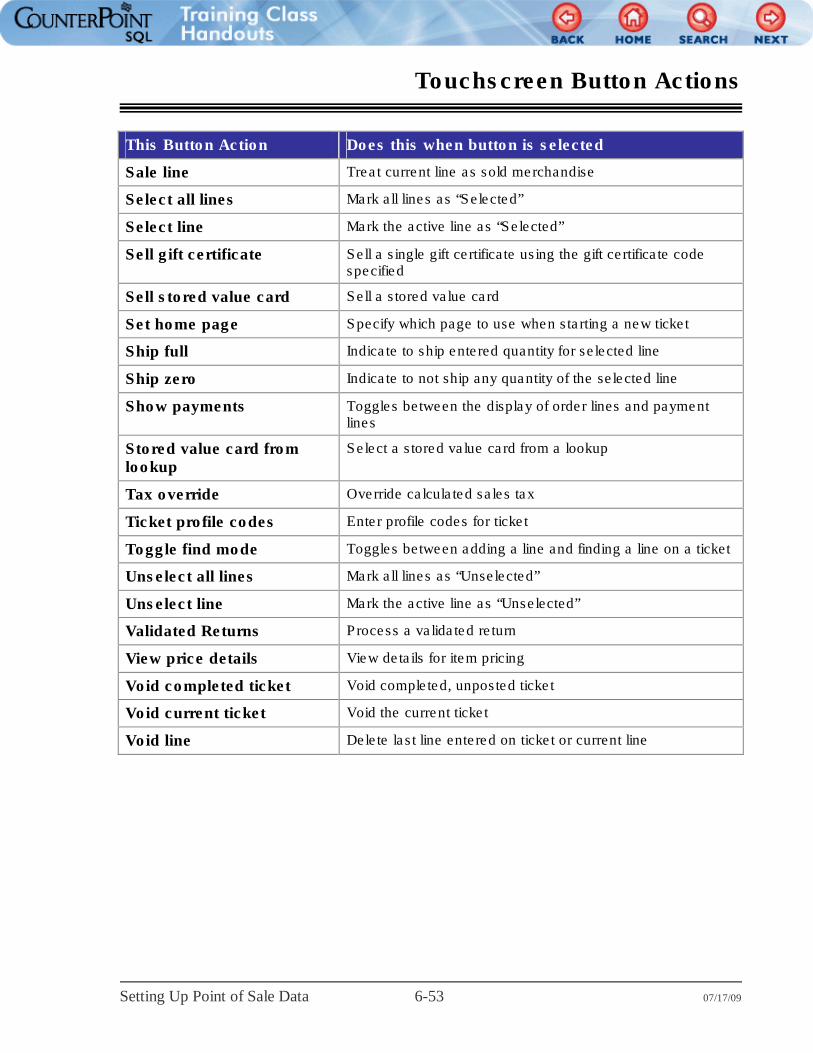
Touchscreen Button Actions
This Button Action Does this when button is selected
Sale line Treat current line as sold merchandise
Select all lines Mark all lines as “Selected”
Select line Mark the active line as “Selected”
Sell gift certificate Sell a single gift certificate using the gift certificate code specified
Sell stored value card Sell a stored value card
Set home page Specify which page to use when starting a new ticket
Ship full Indicate to ship entered quantity for selected line
Ship zero Indicate to not ship any quantity of the selected line
Show payments Toggles between the display of order lines and payment lines
Stored value card from lookup
Select a stored value card from a lookup
Tax override Override calculated sales tax
Ticket profile codes Enter profile codes for ticket
Toggle find mode Toggles between adding a line and finding a line on a ticket
Unselect all lines Mark all lines as “Unselected”
Unselect line Mark the active line as “Unselected”
Validated Returns Process a validated return
View price details View details for item pricing
Void completed ticket Void completed, unposted ticket
Void current ticket Void the current ticket
Void line Delete last line entered on ticket or current line
Setting Up Point of Sale Data 6-56 07/17/09
Setting Up Touchscreen Codes
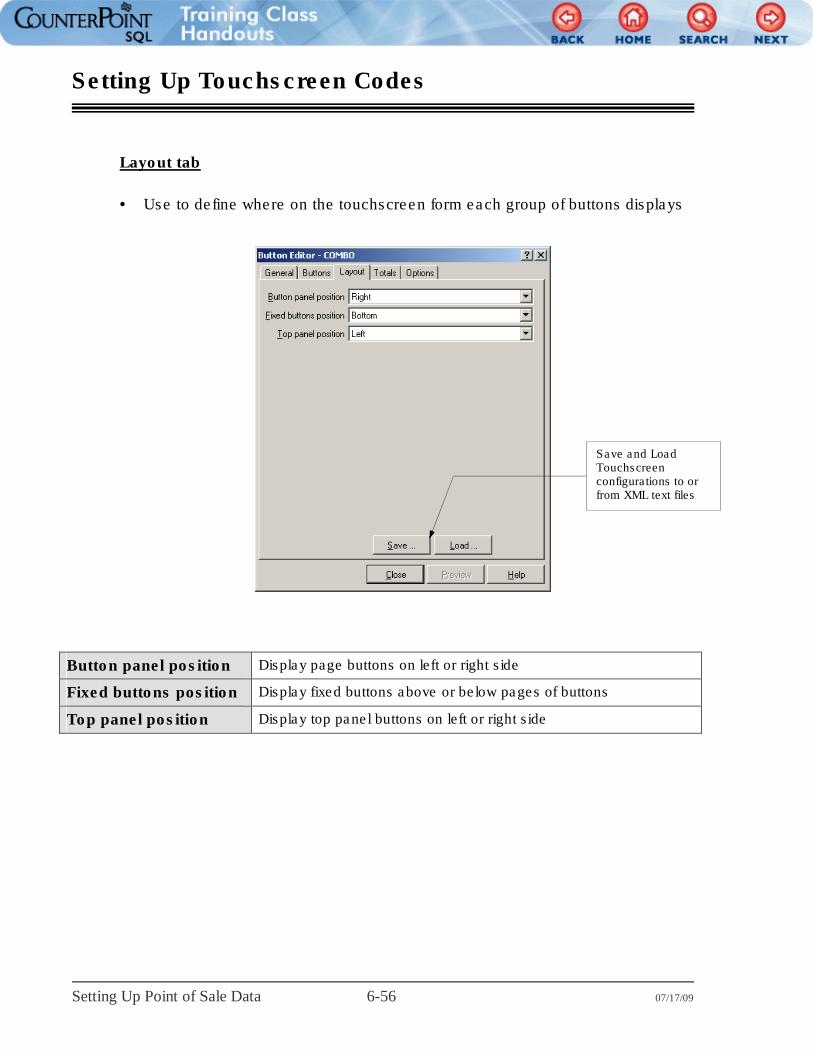
Layout tab
• Use to define where on the touchscreen form each group of buttons displays
Button panel position Display page buttons on left or right side
Fixed buttons position Display fixed buttons above or below pages of buttons
Top panel position Display top panel buttons on left or right side
Save and Load Touchscreen configurations to or from XML text files