point-hd trainer software installation guide trainer software installation... · point-hd trainer...
TRANSCRIPT
P a g e | 1
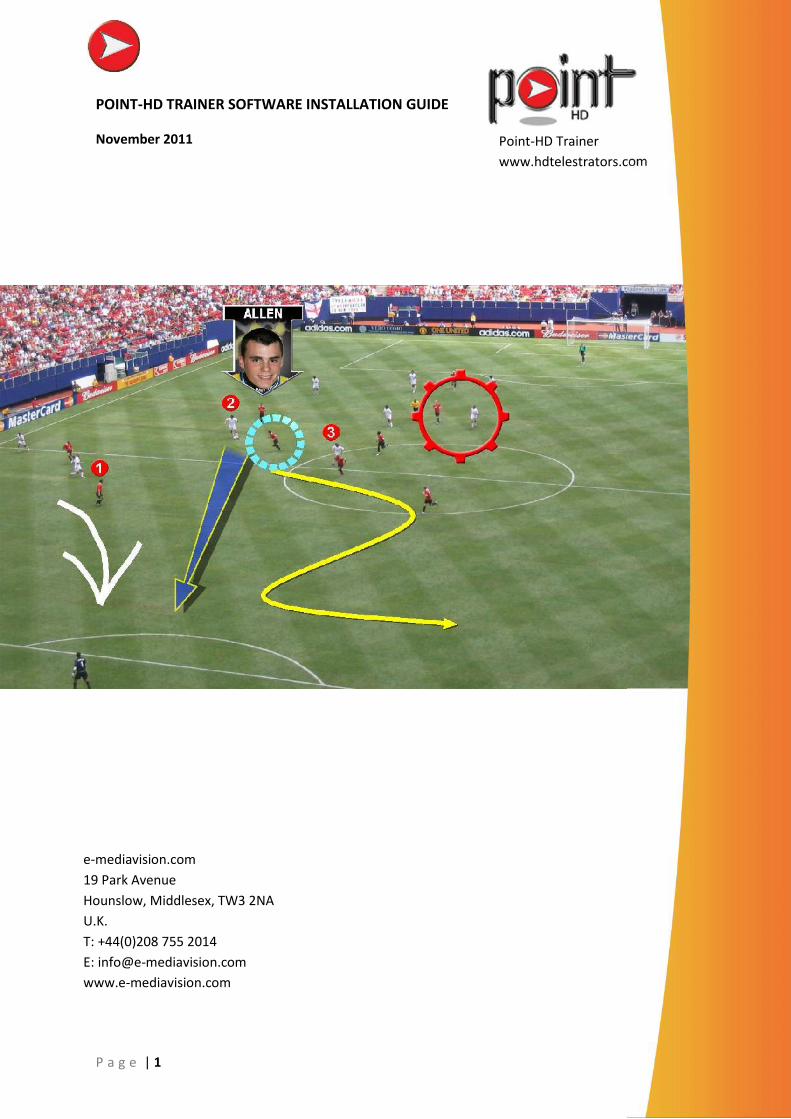
POINT-HD TRAINER SOFTWARE INSTALLATION GUIDE
November 2011
e-mediavision.com19 Park AvenueHounslow, Middlesex, TW3 2NAU.K.T: +44(0)208 755 2014E: [email protected]
Point-HD Trainerwww.hdtelestrators.com

P a g e | 2
IntroductionThis guide provides step by step instructions on how to install the POINT-HD Trainer application.
If you intend to install the Point-HD Trainer on a new computer then the following steps will berequired;
Run the Point-HD Validator application to verify if the target computer has the requiredgraphics capability to run the Point-HD Trainer application. Please see the additional notesincluded in this section for things to try if the Validation fails.
Carry out Windows update, until all updates have been installed. Install the Point-HD Trainer application if validation passes. Enter or purchase a license key to activate the Point-HD Trainer. Install 3rd party Codec's - this is only required if you wish to playback various video files.
If you are upgrading from a previous installation, then the following steps will be required;
Run the most current Point-HD Trainer installer to remove old version and update withnew.
Check if new updated versions of any 3rd party Codec's are available and install theseaccordingly.
Check if any new Windows updates are available and install these.
P a g e | 3
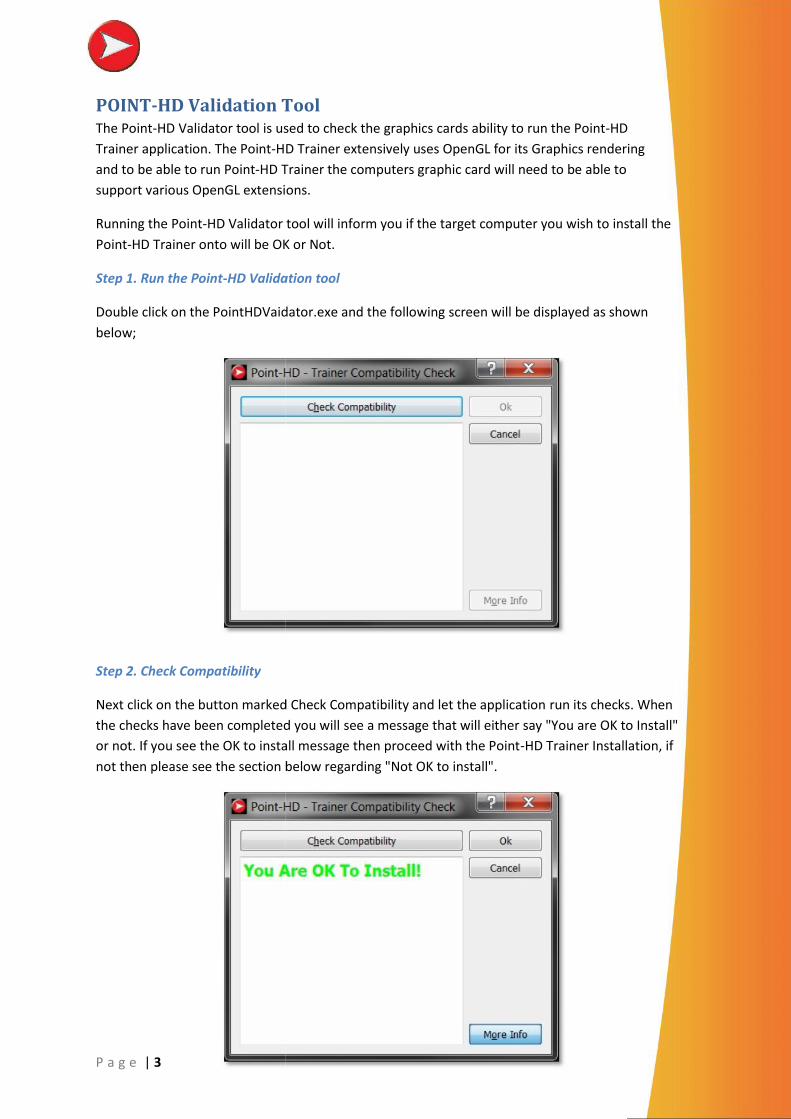
POINT-HD Validation ToolThe Point-HD Validator tool is used to check the graphics cards ability to run the Point-HDTrainer application. The Point-HD Trainer extensively uses OpenGL for its Graphics renderingand to be able to run Point-HD Trainer the computers graphic card will need to be able tosupport various OpenGL extensions.
Running the Point-HD Validator tool will inform you if the target computer you wish to install thePoint-HD Trainer onto will be OK or Not.
Step 1. Run the Point-HD Validation tool
Double click on the PointHDVaidator.exe and the following screen will be displayed as shownbelow;
Step 2. Check Compatibility
Next click on the button marked Check Compatibility and let the application run its checks. Whenthe checks have been completed you will see a message that will either say "You are OK to Install"or not. If you see the OK to install message then proceed with the Point-HD Trainer Installation, ifnot then please see the section below regarding "Not OK to install".
P a g e | 3
POINT-HD Validation ToolThe Point-HD Validator tool is used to check the graphics cards ability to run the Point-HDTrainer application. The Point-HD Trainer extensively uses OpenGL for its Graphics renderingand to be able to run Point-HD Trainer the computers graphic card will need to be able tosupport various OpenGL extensions.
Running the Point-HD Validator tool will inform you if the target computer you wish to install thePoint-HD Trainer onto will be OK or Not.
Step 1. Run the Point-HD Validation tool
Double click on the PointHDVaidator.exe and the following screen will be displayed as shownbelow;
Step 2. Check Compatibility
Next click on the button marked Check Compatibility and let the application run its checks. Whenthe checks have been completed you will see a message that will either say "You are OK to Install"or not. If you see the OK to install message then proceed with the Point-HD Trainer Installation, ifnot then please see the section below regarding "Not OK to install".
P a g e | 4
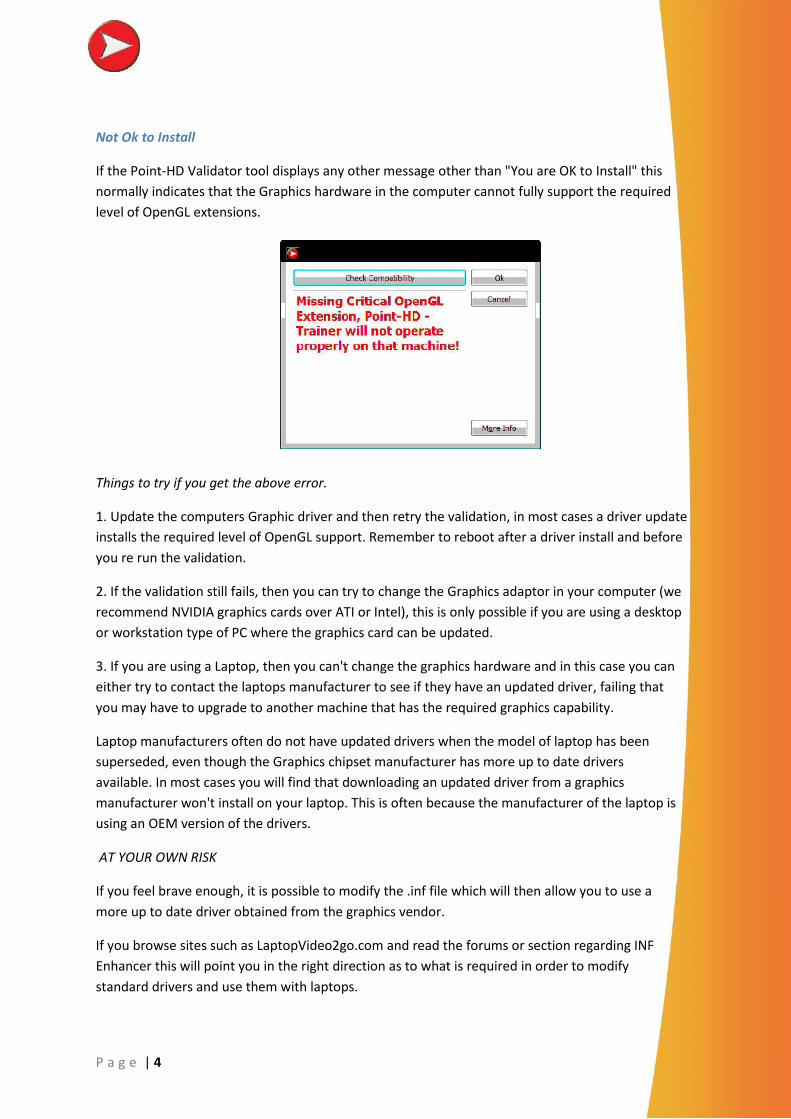
Not Ok to Install
If the Point-HD Validator tool displays any other message other than "You are OK to Install" thisnormally indicates that the Graphics hardware in the computer cannot fully support the requiredlevel of OpenGL extensions.
Things to try if you get the above error.
1. Update the computers Graphic driver and then retry the validation, in most cases a driver updateinstalls the required level of OpenGL support. Remember to reboot after a driver install and beforeyou re run the validation.
2. If the validation still fails, then you can try to change the Graphics adaptor in your computer (werecommend NVIDIA graphics cards over ATI or Intel), this is only possible if you are using a desktopor workstation type of PC where the graphics card can be updated.
3. If you are using a Laptop, then you can't change the graphics hardware and in this case you caneither try to contact the laptops manufacturer to see if they have an updated driver, failing thatyou may have to upgrade to another machine that has the required graphics capability.
Laptop manufacturers often do not have updated drivers when the model of laptop has beensuperseded, even though the Graphics chipset manufacturer has more up to date driversavailable. In most cases you will find that downloading an updated driver from a graphicsmanufacturer won't install on your laptop. This is often because the manufacturer of the laptop isusing an OEM version of the drivers.
AT YOUR OWN RISK
If you feel brave enough, it is possible to modify the .inf file which will then allow you to use amore up to date driver obtained from the graphics vendor.
If you browse sites such as LaptopVideo2go.com and read the forums or section regarding INFEnhancer this will point you in the right direction as to what is required in order to modifystandard drivers and use them with laptops.
P a g e | 5
Installation Procedure for POINT-HD Trainer
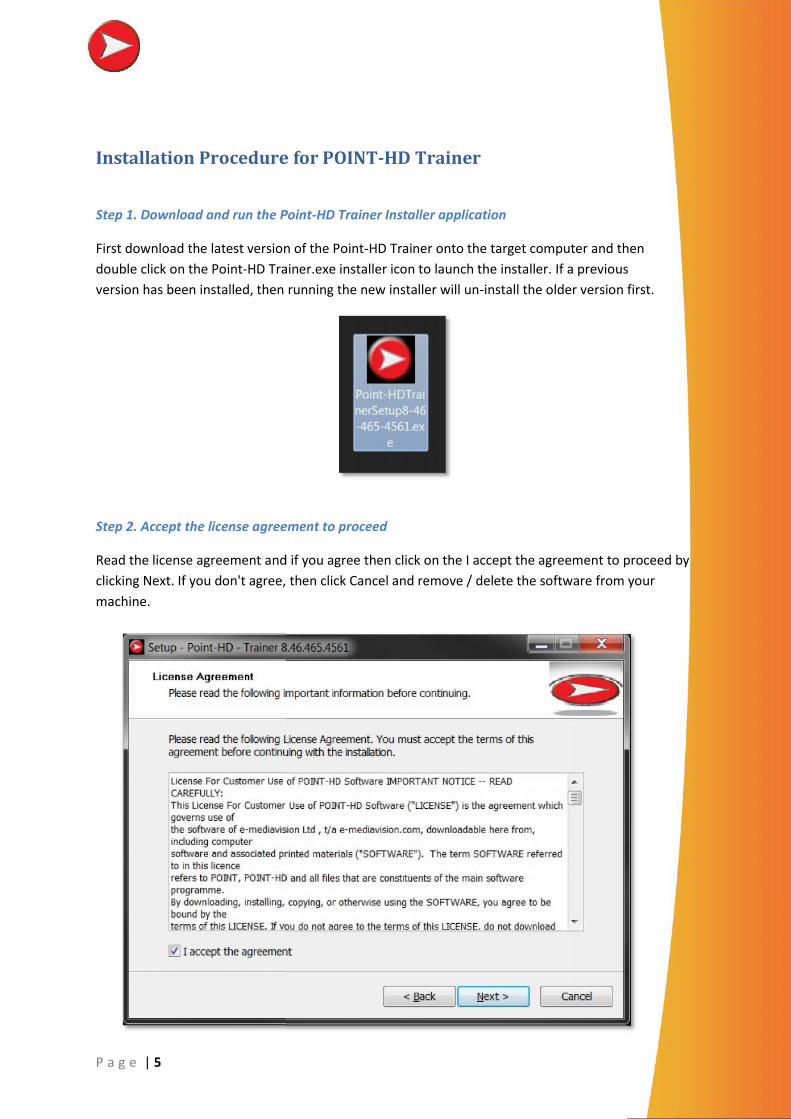
Step 1. Download and run the Point-HD Trainer Installer application
First download the latest version of the Point-HD Trainer onto the target computer and thendouble click on the Point-HD Trainer.exe installer icon to launch the installer. If a previousversion has been installed, then running the new installer will un-install the older version first.
Step 2. Accept the license agreement to proceed
Read the license agreement and if you agree then click on the I accept the agreement to proceed byclicking Next. If you don't agree, then click Cancel and remove / delete the software from yourmachine.
P a g e | 5
Installation Procedure for POINT-HD Trainer
Step 1. Download and run the Point-HD Trainer Installer application
First download the latest version of the Point-HD Trainer onto the target computer and thendouble click on the Point-HD Trainer.exe installer icon to launch the installer. If a previousversion has been installed, then running the new installer will un-install the older version first.
Step 2. Accept the license agreement to proceed
Read the license agreement and if you agree then click on the I accept the agreement to proceed byclicking Next. If you don't agree, then click Cancel and remove / delete the software from yourmachine.
P a g e | 6
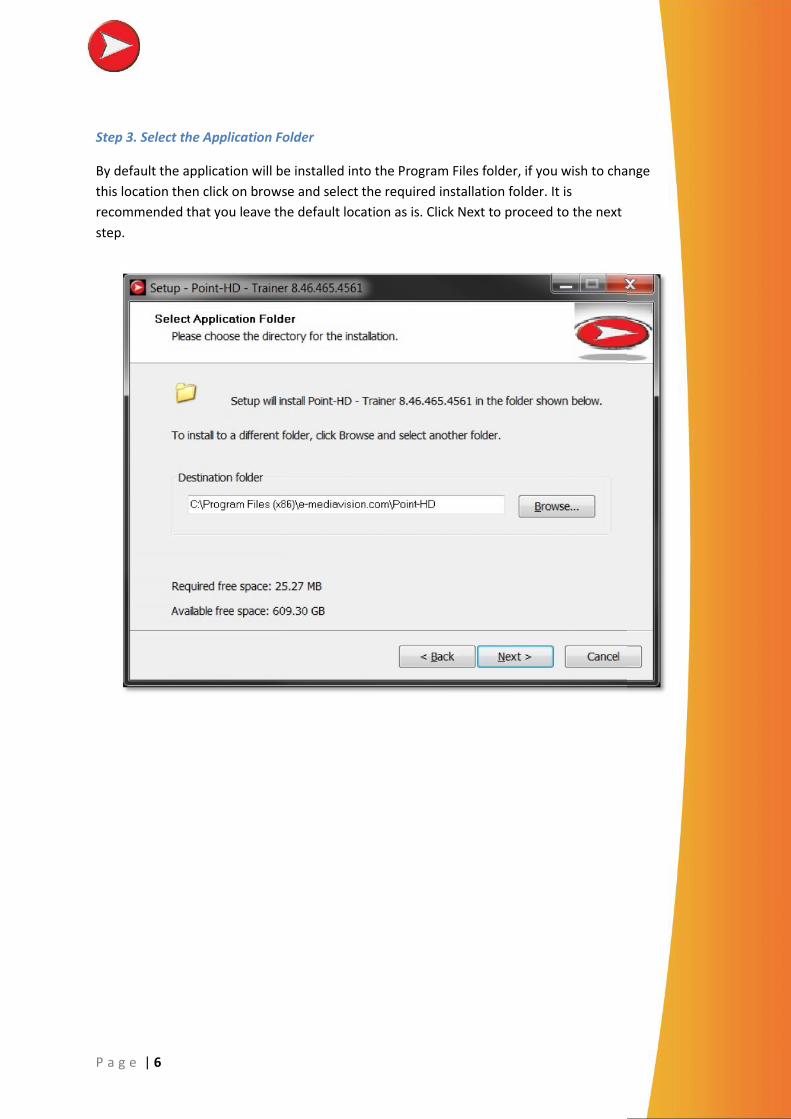
Step 3. Select the Application Folder
By default the application will be installed into the Program Files folder, if you wish to changethis location then click on browse and select the required installation folder. It isrecommended that you leave the default location as is. Click Next to proceed to the nextstep.
P a g e | 6
Step 3. Select the Application Folder
By default the application will be installed into the Program Files folder, if you wish to changethis location then click on browse and select the required installation folder. It isrecommended that you leave the default location as is. Click Next to proceed to the nextstep.

P a g e | 7
Step 4. Placing Shortcuts
The next screen will place the Point-HD Trainer's shortcuts onto the desktop, if you don't wantshortcuts then un-tick the Create Shortcuts on the desktop box, otherwise click on Next.
P a g e | 7
Step 4. Placing Shortcuts
The next screen will place the Point-HD Trainer's shortcuts onto the desktop, if you don't wantshortcuts then un-tick the Create Shortcuts on the desktop box, otherwise click on Next.
P a g e | 7
Step 4. Placing Shortcuts
The next screen will place the Point-HD Trainer's shortcuts onto the desktop, if you don't wantshortcuts then un-tick the Create Shortcuts on the desktop box, otherwise click on Next.
P a g e | 8
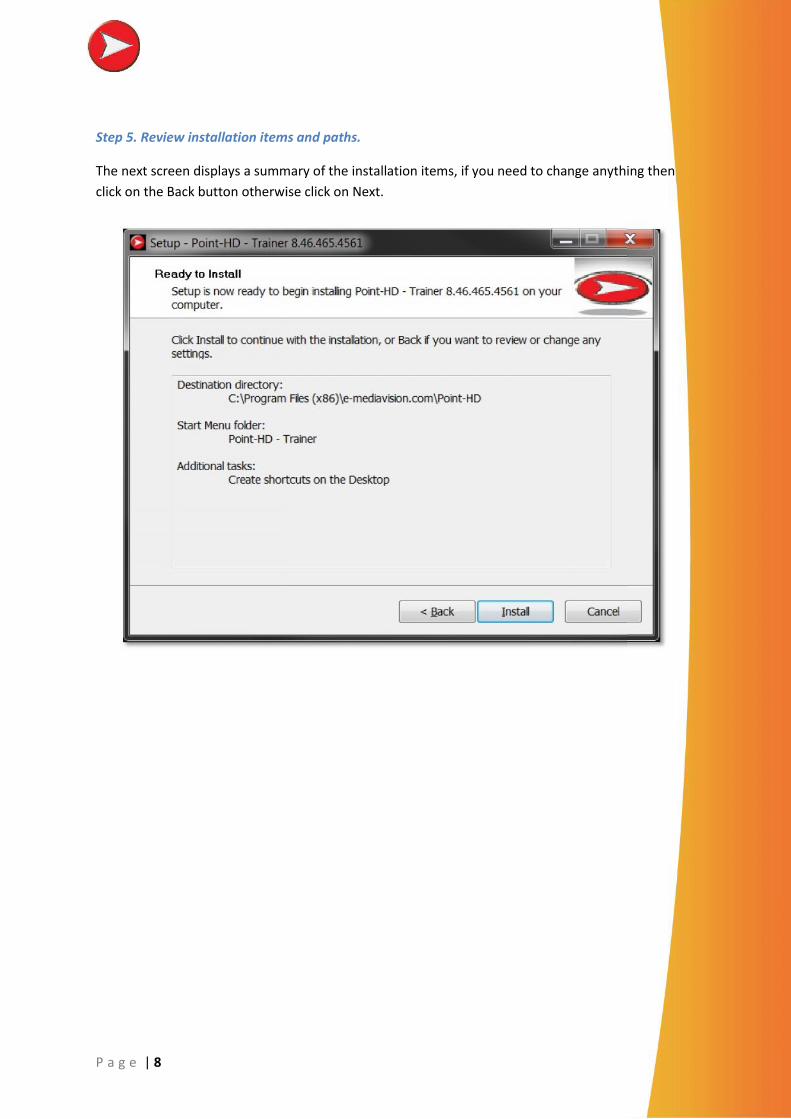
Step 5. Review installation items and paths.
The next screen displays a summary of the installation items, if you need to change anything thenclick on the Back button otherwise click on Next.
P a g e | 8
Step 5. Review installation items and paths.
The next screen displays a summary of the installation items, if you need to change anything thenclick on the Back button otherwise click on Next.
P a g e | 8
Step 5. Review installation items and paths.
The next screen displays a summary of the installation items, if you need to change anything thenclick on the Back button otherwise click on Next.

P a g e | 9
Step 6. Installing Files
The next screen displays the progress of the installation.
Step 6a. Updating from previous installed version
If you are updating from an older version that was previously installed on the machine, then youwill see the message shown below, it is recommended that you click on Yes and overwrite thePoint-HD.ini file unless you have been advised otherwise by support.
P a g e | 10
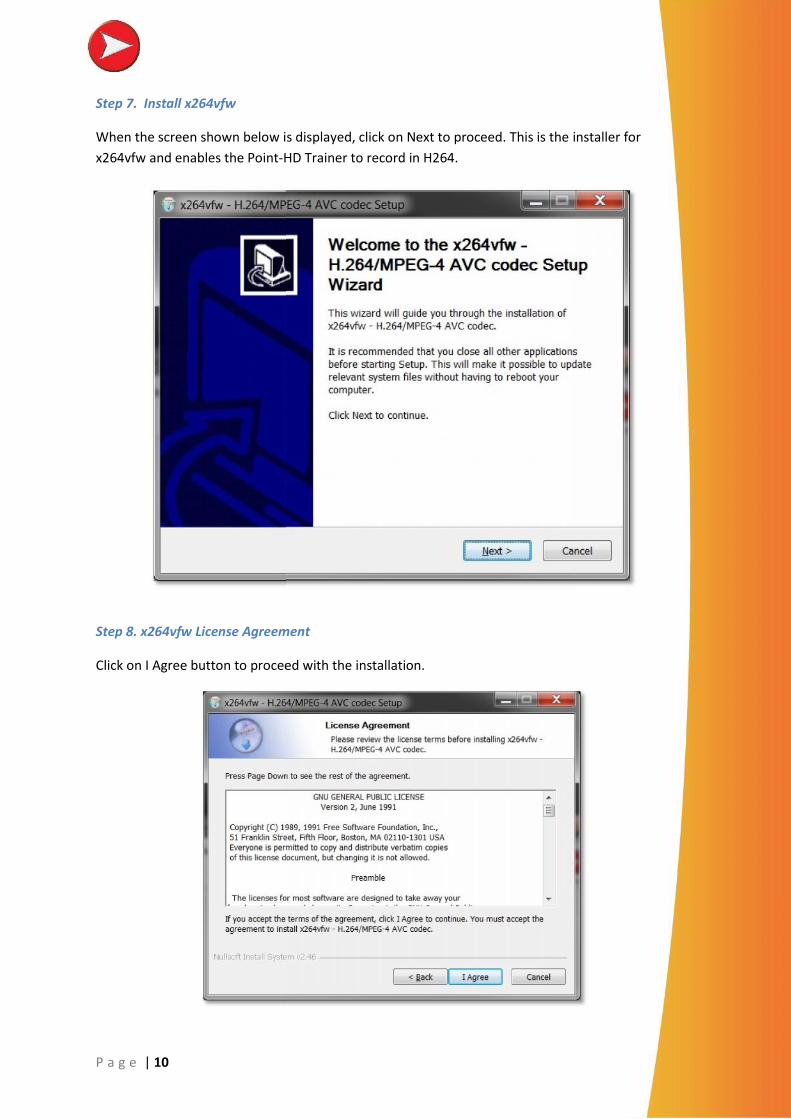
Step 7. Install x264vfw
When the screen shown below is displayed, click on Next to proceed. This is the installer forx264vfw and enables the Point-HD Trainer to record in H264.
Step 8. x264vfw License Agreement
Click on I Agree button to proceed with the installation.
P a g e | 10
Step 7. Install x264vfw
When the screen shown below is displayed, click on Next to proceed. This is the installer forx264vfw and enables the Point-HD Trainer to record in H264.
Step 8. x264vfw License Agreement
Click on I Agree button to proceed with the installation.
P a g e | 10
Step 7. Install x264vfw
When the screen shown below is displayed, click on Next to proceed. This is the installer forx264vfw and enables the Point-HD Trainer to record in H264.
Step 8. x264vfw License Agreement
Click on I Agree button to proceed with the installation.
P a g e | 11
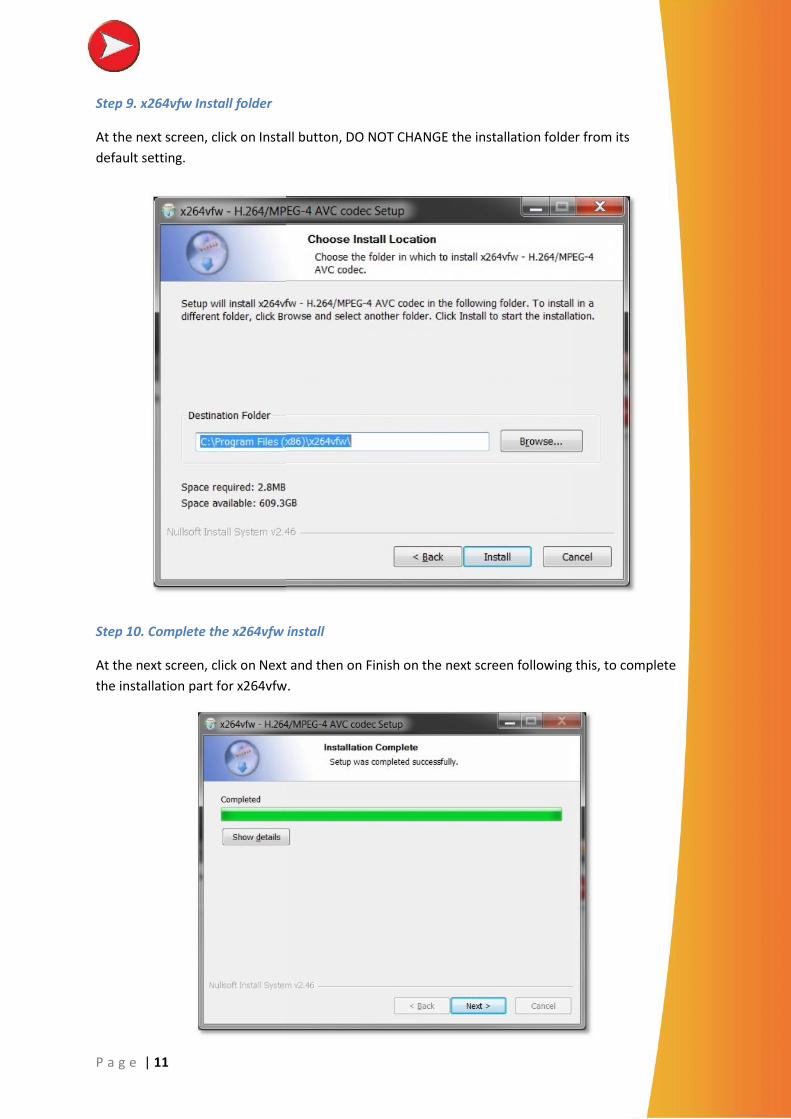
Step 9. x264vfw Install folder
At the next screen, click on Install button, DO NOT CHANGE the installation folder from itsdefault setting.
Step 10. Complete the x264vfw install
At the next screen, click on Next and then on Finish on the next screen following this, to completethe installation part for x264vfw.
P a g e | 11
Step 9. x264vfw Install folder
At the next screen, click on Install button, DO NOT CHANGE the installation folder from itsdefault setting.
Step 10. Complete the x264vfw install
At the next screen, click on Next and then on Finish on the next screen following this, to completethe installation part for x264vfw.
P a g e | 12
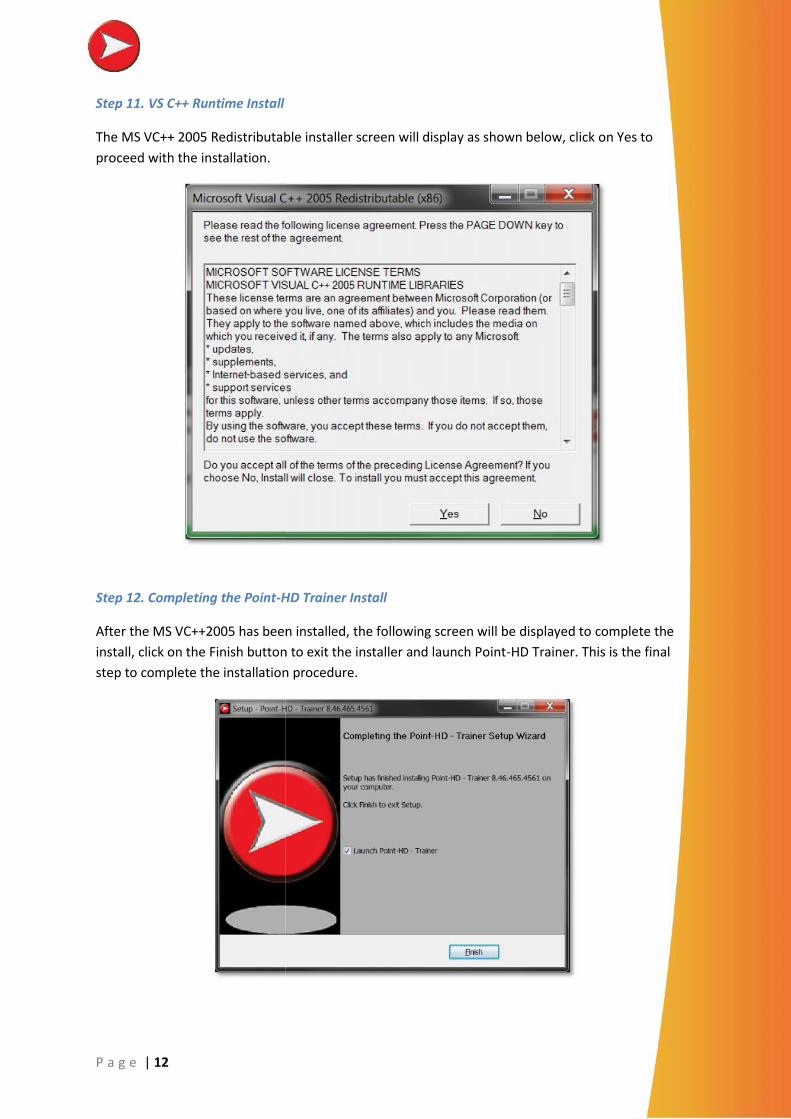
Step 11. VS C++ Runtime Install
The MS VC++ 2005 Redistributable installer screen will display as shown below, click on Yes toproceed with the installation.
Step 12. Completing the Point-HD Trainer Install
After the MS VC++2005 has been installed, the following screen will be displayed to complete theinstall, click on the Finish button to exit the installer and launch Point-HD Trainer. This is the finalstep to complete the installation procedure.
P a g e | 12
Step 11. VS C++ Runtime Install
The MS VC++ 2005 Redistributable installer screen will display as shown below, click on Yes toproceed with the installation.
Step 12. Completing the Point-HD Trainer Install
After the MS VC++2005 has been installed, the following screen will be displayed to complete theinstall, click on the Finish button to exit the installer and launch Point-HD Trainer. This is the finalstep to complete the installation procedure.

P a g e | 13
Point-HD Trainer License KeyIf Point-HD Trainer is installed on a machine for the first time, it will be installed in Trial mode,this will allow you to verify that the intended machines performance with the application isacceptable.
The Trial mode runs for 30 days, after which the application will be deactivated.
To activate an installation from Trial mode to Full mode, you will need to purchase and enter alicense key.
When you start up the application (in Trial Mode) you will see the following screen:
To continue using Trial mode press OK
To purchase a license key, first click on the Enter Key button which will take you to the followingscreen:
Firstly, write down the hardware fingerprint, this number is unique to each machine andinstallation, you will then need to email this Hardware fingerprint number along with a name thatyou wish the license to be registered with, you can email [email protected] with the aboveinformation and you will be sent information regarding purchasing the key. Alternatively pleaseemail your dealer / reseller with the above to purchase.
Once you have purchased the license key, you will be sent an email with a text file, copy theName exactly as in the attached text document and the license key into the above blank fieldsand then click on OK, your key will be registered and the application will launch in full mode.

P a g e | 14
If you are upgrading from a previous version and have installed the key before, the upgrade willautomatically detect the key and start in full mode.
Please note that the license key is unique to each computer and cannot be transferred toanother machine, if you wish to transfer the application to another computer after the keyhas been issued, you will need to purchase a new key.
P a g e | 15
Installing 3rd Party CODEC'sThe Point-HD Trainer has the ability to playback video files stored on the local computer as abackground, the user is able to pause and annotate over the video as may be required.
Since there are many video formats in use today, it is necessary to have CODEC's which enablethe video format to be decoded and played back on the PC.
By installing the suggested 3rd party CODEC's / Filters listed below, the Point-HD Trainer willbe able to playback the majority of the common video formats used today.
1. K-Lite Codec Pack
Download the current version of the K-Lite Codec pack fromhttp://www.codecguide.com/download_kl.htm
(www.codecguide.com)
There are a number of variants of the K-Lite Codec pack, the one to use is Full or Mega.
Note: Point-HD Trainer does not require 64-bit Codec's to be installed.
The following guide detailed below is based on installing the K-Lite Mega Codec Pack onto a Win 7computer.
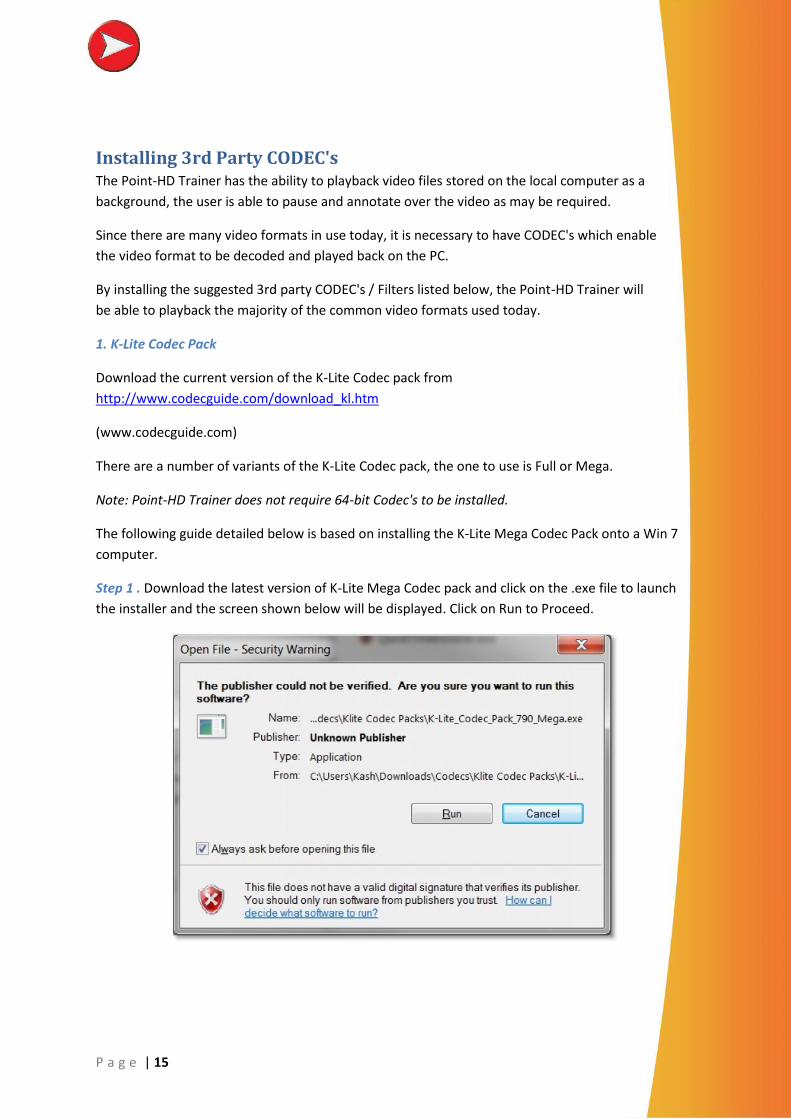
Step 1 . Download the latest version of K-Lite Mega Codec pack and click on the .exe file to launchthe installer and the screen shown below will be displayed. Click on Run to Proceed.
P a g e | 15
Installing 3rd Party CODEC'sThe Point-HD Trainer has the ability to playback video files stored on the local computer as abackground, the user is able to pause and annotate over the video as may be required.
Since there are many video formats in use today, it is necessary to have CODEC's which enablethe video format to be decoded and played back on the PC.
By installing the suggested 3rd party CODEC's / Filters listed below, the Point-HD Trainer willbe able to playback the majority of the common video formats used today.
1. K-Lite Codec Pack
Download the current version of the K-Lite Codec pack fromhttp://www.codecguide.com/download_kl.htm
(www.codecguide.com)
There are a number of variants of the K-Lite Codec pack, the one to use is Full or Mega.
Note: Point-HD Trainer does not require 64-bit Codec's to be installed.
The following guide detailed below is based on installing the K-Lite Mega Codec Pack onto a Win 7computer.
Step 1 . Download the latest version of K-Lite Mega Codec pack and click on the .exe file to launchthe installer and the screen shown below will be displayed. Click on Run to Proceed.
P a g e | 16
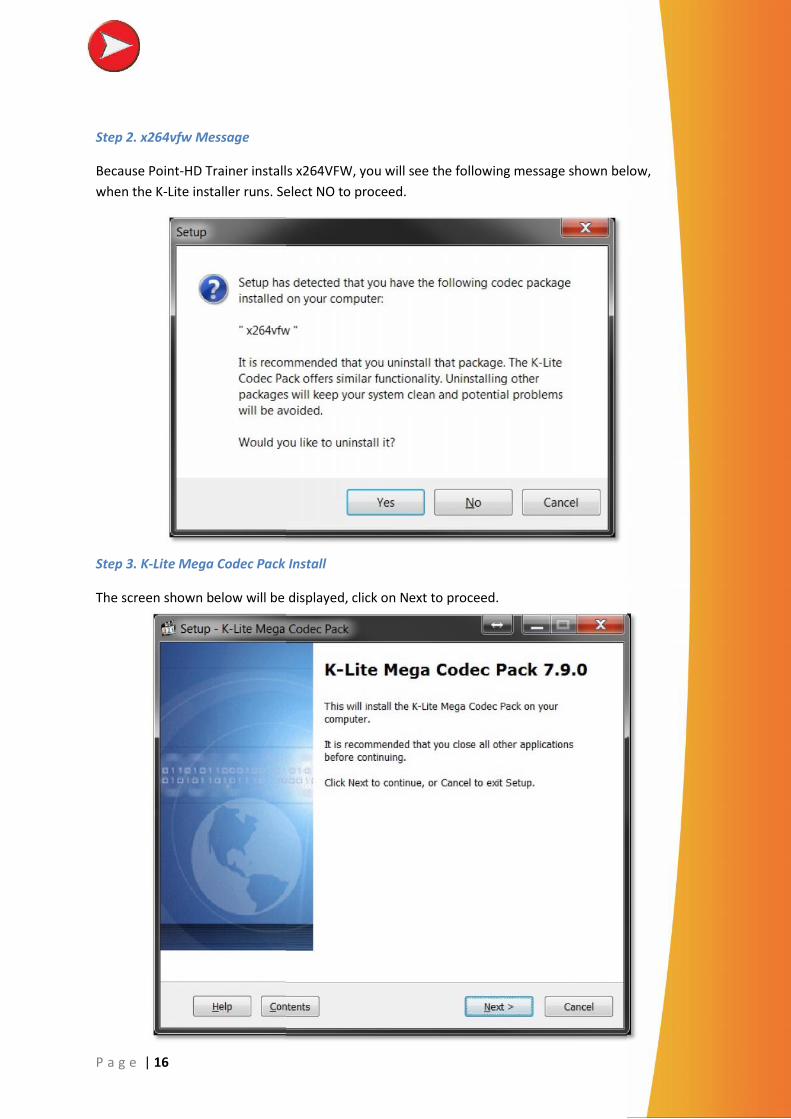
Step 2. x264vfw Message
Because Point-HD Trainer installs x264VFW, you will see the following message shown below,when the K-Lite installer runs. Select NO to proceed.
Step 3. K-Lite Mega Codec Pack Install
The screen shown below will be displayed, click on Next to proceed.
P a g e | 16
Step 2. x264vfw Message
Because Point-HD Trainer installs x264VFW, you will see the following message shown below,when the K-Lite installer runs. Select NO to proceed.
Step 3. K-Lite Mega Codec Pack Install
The screen shown below will be displayed, click on Next to proceed.
P a g e | 16
Step 2. x264vfw Message
Because Point-HD Trainer installs x264VFW, you will see the following message shown below,when the K-Lite installer runs. Select NO to proceed.
Step 3. K-Lite Mega Codec Pack Install
The screen shown below will be displayed, click on Next to proceed.
P a g e | 17
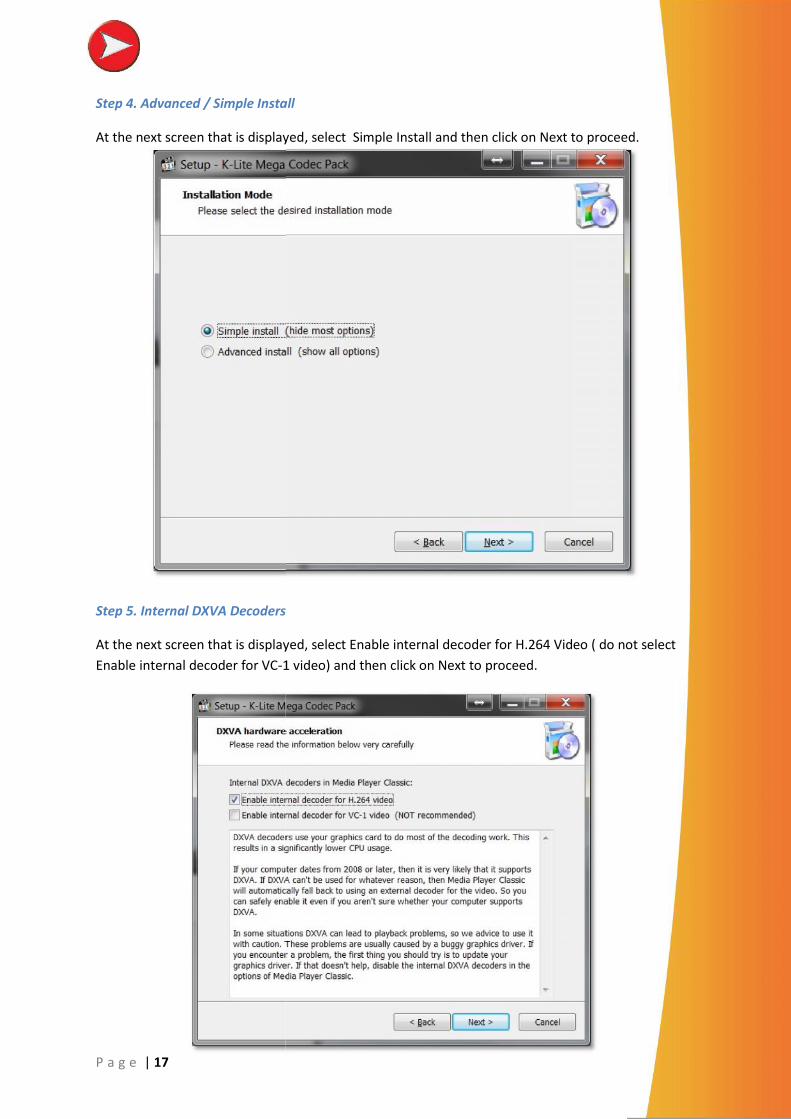
Step 4. Advanced / Simple Install
At the next screen that is displayed, select Simple Install and then click on Next to proceed.
Step 5. Internal DXVA Decoders
At the next screen that is displayed, select Enable internal decoder for H.264 Video ( do not selectEnable internal decoder for VC-1 video) and then click on Next to proceed.
P a g e | 17
Step 4. Advanced / Simple Install
At the next screen that is displayed, select Simple Install and then click on Next to proceed.
Step 5. Internal DXVA Decoders
At the next screen that is displayed, select Enable internal decoder for H.264 Video ( do not selectEnable internal decoder for VC-1 video) and then click on Next to proceed.
P a g e | 18
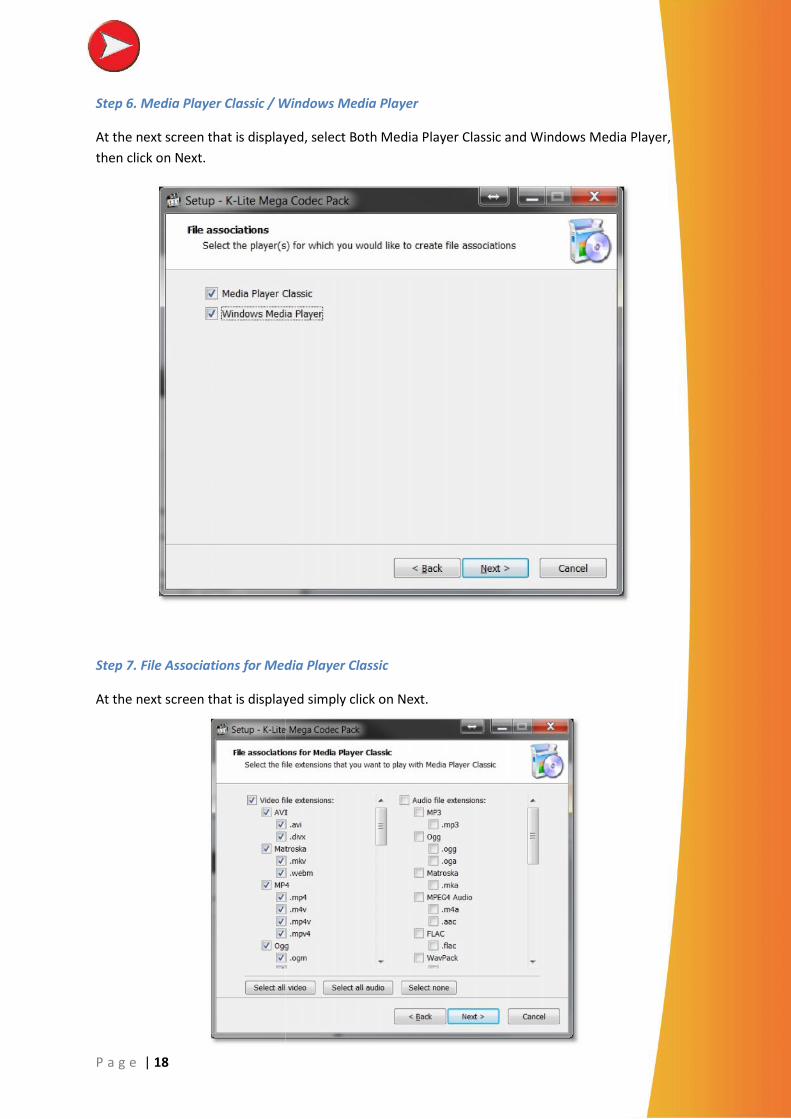
Step 6. Media Player Classic / Windows Media Player
At the next screen that is displayed, select Both Media Player Classic and Windows Media Player,then click on Next.
Step 7. File Associations for Media Player Classic
At the next screen that is displayed simply click on Next.
P a g e | 18
Step 6. Media Player Classic / Windows Media Player
At the next screen that is displayed, select Both Media Player Classic and Windows Media Player,then click on Next.
Step 7. File Associations for Media Player Classic
At the next screen that is displayed simply click on Next.
P a g e | 18
Step 6. Media Player Classic / Windows Media Player
At the next screen that is displayed, select Both Media Player Classic and Windows Media Player,then click on Next.
Step 7. File Associations for Media Player Classic
At the next screen that is displayed simply click on Next.
P a g e | 19
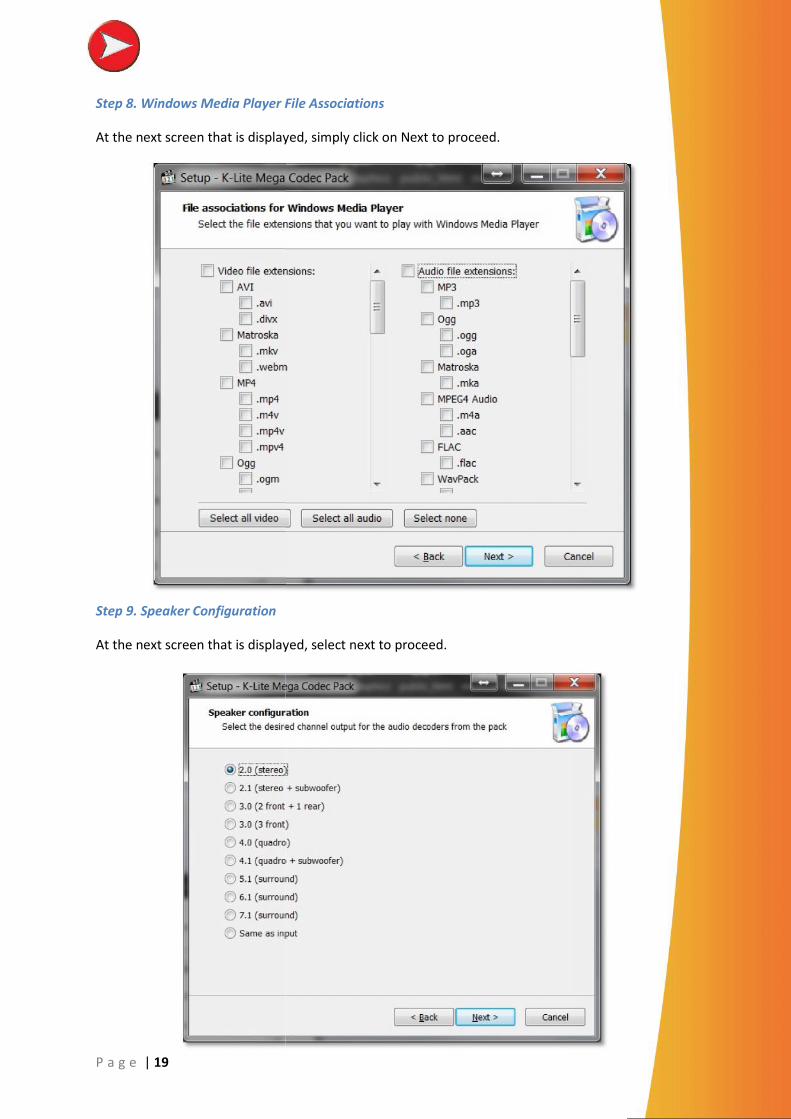
Step 8. Windows Media Player File Associations
At the next screen that is displayed, simply click on Next to proceed.
Step 9. Speaker Configuration
At the next screen that is displayed, select next to proceed.
P a g e | 19
Step 8. Windows Media Player File Associations
At the next screen that is displayed, simply click on Next to proceed.
Step 9. Speaker Configuration
At the next screen that is displayed, select next to proceed.
P a g e | 19
Step 8. Windows Media Player File Associations
At the next screen that is displayed, simply click on Next to proceed.
Step 9. Speaker Configuration
At the next screen that is displayed, select next to proceed.
P a g e | 20
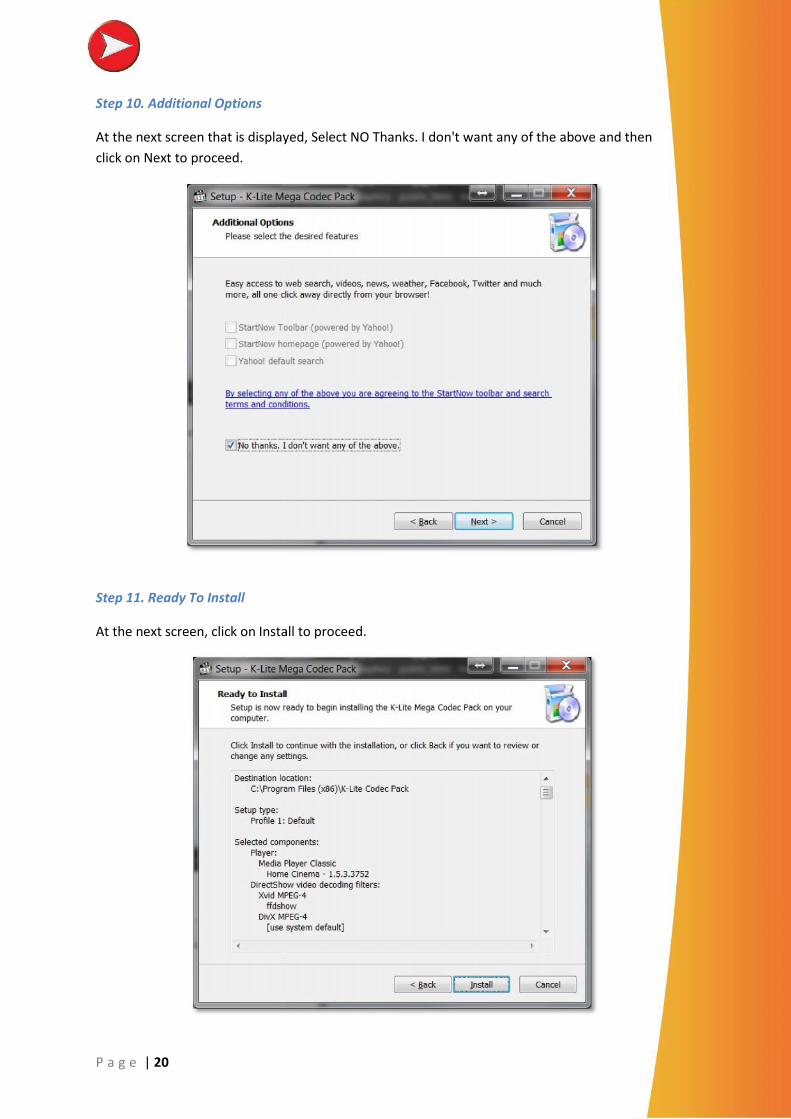
Step 10. Additional Options
At the next screen that is displayed, Select NO Thanks. I don't want any of the above and thenclick on Next to proceed.
Step 11. Ready To Install
At the next screen, click on Install to proceed.
P a g e | 20
Step 10. Additional Options
At the next screen that is displayed, Select NO Thanks. I don't want any of the above and thenclick on Next to proceed.
Step 11. Ready To Install
At the next screen, click on Install to proceed.
P a g e | 20
Step 10. Additional Options
At the next screen that is displayed, Select NO Thanks. I don't want any of the above and thenclick on Next to proceed.
Step 11. Ready To Install
At the next screen, click on Install to proceed.
P a g e | 21
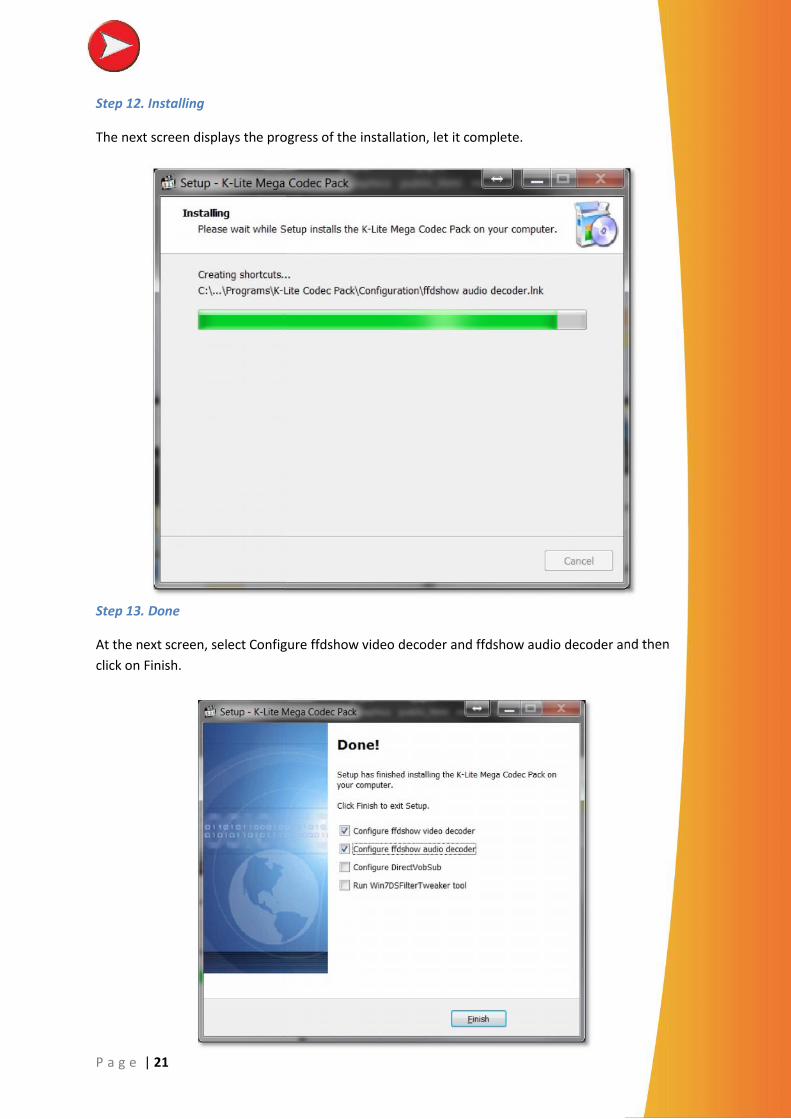
Step 12. Installing
The next screen displays the progress of the installation, let it complete.
Step 13. Done
At the next screen, select Configure ffdshow video decoder and ffdshow audio decoder and thenclick on Finish.
P a g e | 21
Step 12. Installing
The next screen displays the progress of the installation, let it complete.
Step 13. Done
At the next screen, select Configure ffdshow video decoder and ffdshow audio decoder and thenclick on Finish.
P a g e | 21
Step 12. Installing
The next screen displays the progress of the installation, let it complete.
Step 13. Done
At the next screen, select Configure ffdshow video decoder and ffdshow audio decoder and thenclick on Finish.
P a g e | 22
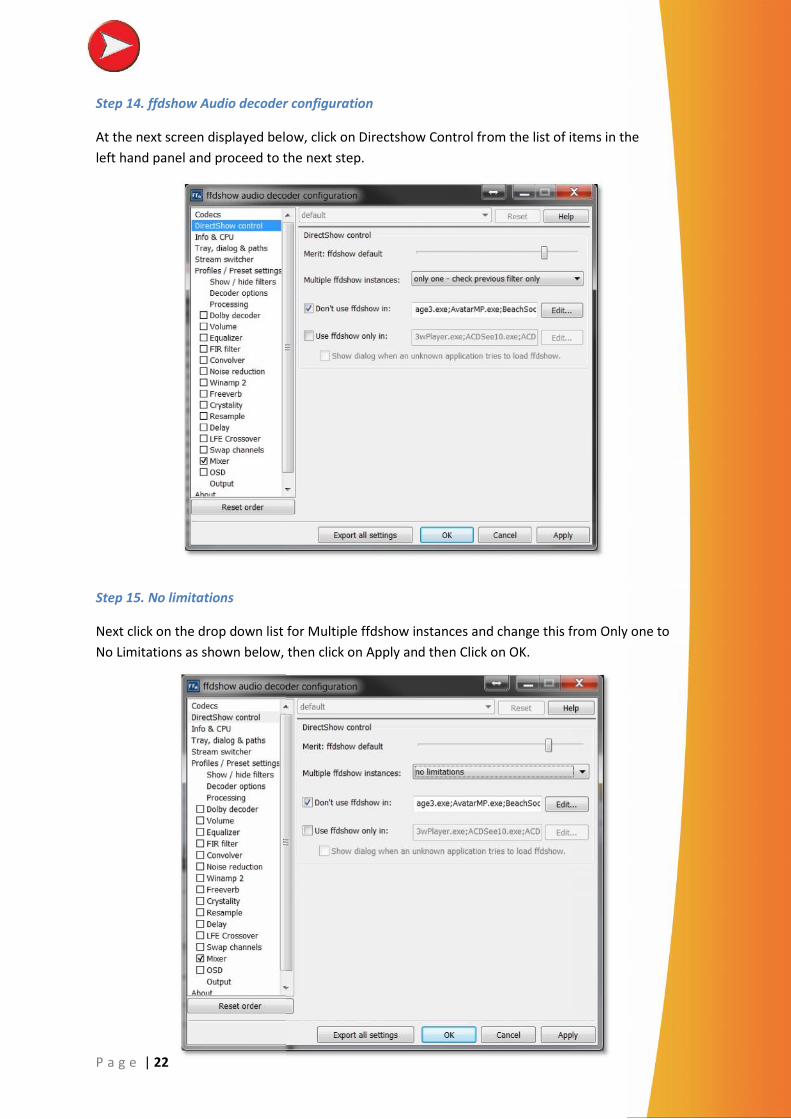
Step 14. ffdshow Audio decoder configuration
At the next screen displayed below, click on Directshow Control from the list of items in theleft hand panel and proceed to the next step.
Step 15. No limitations
Next click on the drop down list for Multiple ffdshow instances and change this from Only one toNo Limitations as shown below, then click on Apply and then Click on OK.
P a g e | 22
Step 14. ffdshow Audio decoder configuration
At the next screen displayed below, click on Directshow Control from the list of items in theleft hand panel and proceed to the next step.
Step 15. No limitations
Next click on the drop down list for Multiple ffdshow instances and change this from Only one toNo Limitations as shown below, then click on Apply and then Click on OK.
P a g e | 23
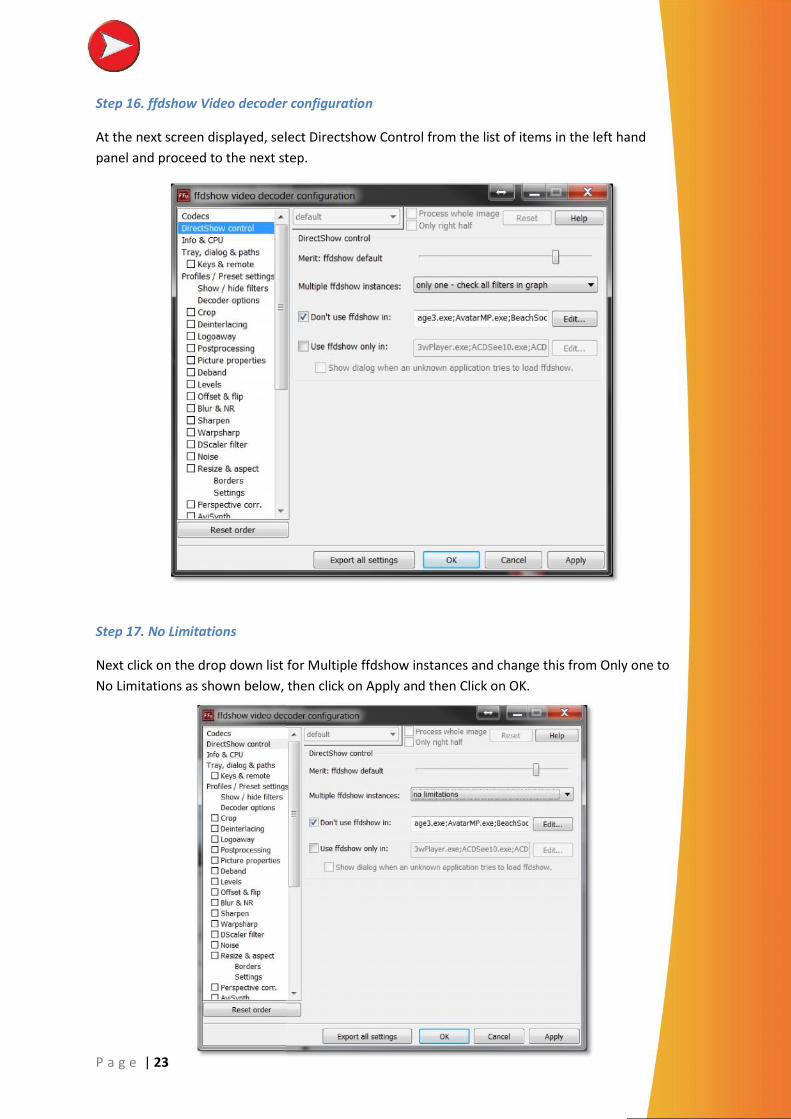
Step 16. ffdshow Video decoder configuration
At the next screen displayed, select Directshow Control from the list of items in the left handpanel and proceed to the next step.
Step 17. No Limitations
Next click on the drop down list for Multiple ffdshow instances and change this from Only one toNo Limitations as shown below, then click on Apply and then Click on OK.
P a g e | 23
Step 16. ffdshow Video decoder configuration
At the next screen displayed, select Directshow Control from the list of items in the left handpanel and proceed to the next step.
Step 17. No Limitations
Next click on the drop down list for Multiple ffdshow instances and change this from Only one toNo Limitations as shown below, then click on Apply and then Click on OK.

P a g e | 24
Step 18. K-Lite Installation Complete
The K-Lite Codec Pack has completed it's installation, at this stage we recommend that youreboot your computer, so that the CODEC's installed are available to use.
FLV Video PlaybackIf you are unable to playback FLV video, then download the FLV splitter from the link below andthen run the installer to install FLV splitter. Remember to reboot the computer after installationand before trying to playback FLV video.
http://www.free-codecs.com/download_soft.php?d=4386&s=630