podium view visual presenter image software user manual ... view 2.0... · control the visual...
TRANSCRIPT
Podium ViewTM
2.0
Visual Presenter Image Software User Manual - English
(WINDOWS)

1
TTaabbllee ooff CCoonntteennttss
1. Introduction .................................................................................................... 2
2. System Requirements .................................................................................... 2
3. Installing Podium View™ ................................................................................ 3
4. Connection to the Hardware ........................................................................... 5
5. Start to Use Podium View™ ........................................................................... 5
6. Operation Interface Description ...................................................................... 6
6.1 Software screen introduction ....................................................................................... 6
6.2 Thumbnail (Saved image window) .............................................................................. 7
6.3 Main menu .................................................................................................................. 8
6.4 Annotation Tools .......................................................................................................... 9
6.5 Camera Settings ....................................................................................................... 11
6.6 Options ...................................................................................................................... 12
6.7 Time Lapse (Burst Settings) ...................................................................................... 13
7. Function Descriptions ................................................................................... 14
7.1 Turn on/off the Visual Presenter ................................................................................ 14
7.2 I would like to display a live image ............................................................................ 14
7.3 I would like to capture images ................................................................................... 14
7.4 I would like to capture images continuously .............................................................. 14
7.5 I would like to freeze the live image .......................................................................... 14
7.6 I would like to annotate the displayed image. ............................................................ 15
7.7 I would like to add textual annotation to images ........................................................ 16
7.8 I would like to adjust the drawing object .................................................................... 17
7.9 I would like to record images ..................................................................................... 17
7.10 I would like to use the mask mode ............................................................................ 17
7.11 I would like to use the spotlight mode ....................................................................... 18
7.12 I would like to manage saved image files. ................................................................. 18
8. Troubleshooting ........................................................................................... 19

2
1. Introduction After installing the Podium View™ application, you can use the software to:
Control the Visual Presenter.
Capture and record images
Annotate the image, highlight important details and save it.
Support the full screen function.
2. System Requirements Windows XP
Min CPU: Intel Core 2 Duo 2GHz and above
Min Memory: 1GB RAM
Supporting Direct X 9
Min Screen Resolution: 1024 x 768
Min Hard Drive Space: 1GB
Windows XP SP2 and above
Windows Vista / 7 / 8
Min CPU: Intel Core 2 Duo 2GHz and above
Min Memory: 1 GB (32-bits)/2 GB (64-bits) RAM
Supporting Direct X 9 (with WDDM 1.0 or higher)
Min Resolution: 1024 x 768
Min Hard Drive Space: 1GB
3
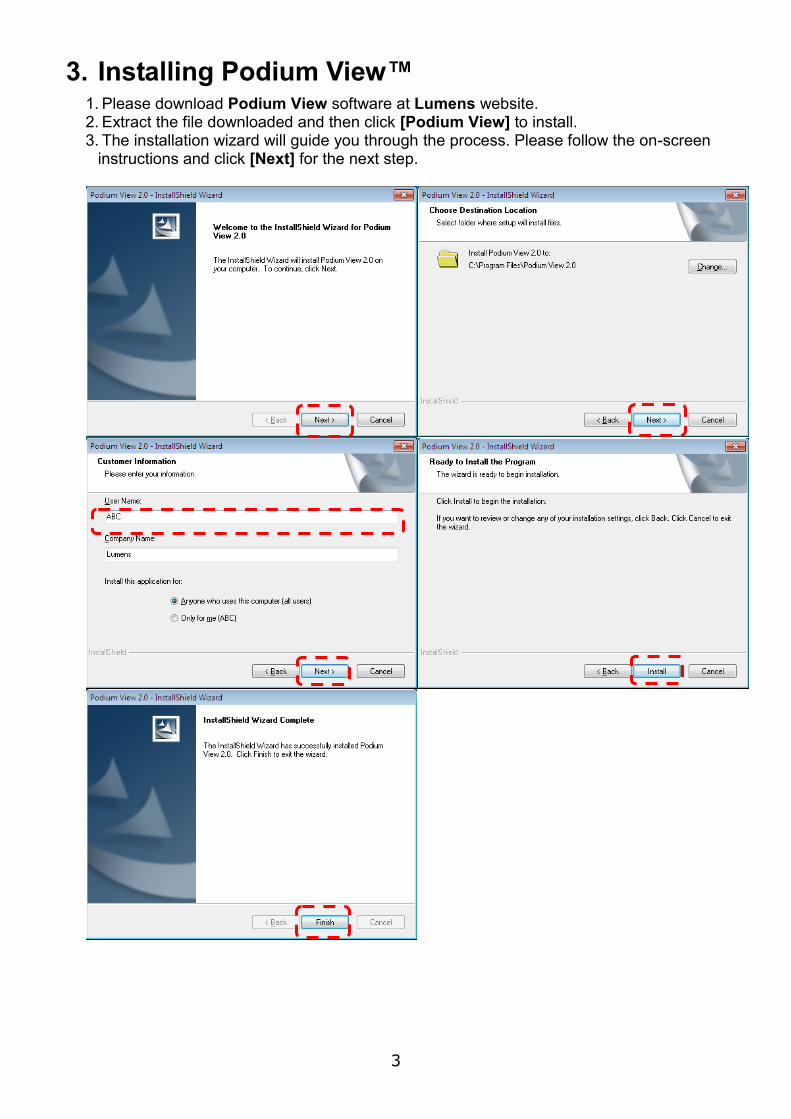
3. Installing Podium View™ 1. Please download Podium View software at Lumens website. 2. Extract the file downloaded and then click [Podium View] to install. 3. The installation wizard will guide you through the process. Please follow the on-screen
instructions and click [Next] for the next step.

4
4. Click [Yes] to create Podium View™ shortcut on your desktop.
5. Once the installation is completed, click [Finish] to restart the computer.

5
4. Connection to the Hardware
4.1. Connect the power cord of the Visual Presenter.
<Note> Appearance may vary depending on country/region.
4.2. Connect USB cable to the Visual Presenter and your computer.
5. Start to Use Podium View™ 5.1. Double-click the [Podium View] icon on the desktop to activate Podium View™.
5.2. Click [POWER] icon to power on.
5.3. Click [PREVIEW] icon to start to use.
AC Outlet
<Very Important> To ensure successful installation, please follow each of the following steps.

6
6. Operation Interface Description 6.1 Software screen introduction
1. Live image
22.. Main menu
33.. Thumbnail window
4. Menu for file management

7
6.2 Thumbnail (Saved image window)
1. OFF/ON Thumbnail
2. Thumbnail image of saved video or captured image
(It will be displayed as if it is a video)
3. Save the image which has been edited
4. Save as a new file
5. Change the storage folder
6. Delete the file
7. Send the captured image by e-mail

8
6.3 Main menu
Turn on and off the Visual Presenter:
Turn on/off the Visual Presenter
Lamp:
Turn on/off the lamp
Auto Tune:
Automatically adjust the image to have the best brightness and focusing performance
Display live images:
Display live images
Settings:
Select image compression method and the audio source. Please refer to 6.6 Options for the setting screen
Brightness:
Adjust the brightness of the image
PODIUM VIEW:
Open the main functions menu.Right click on this icon to show information about the Podium View.
Zoom:
Increase or decrease the image size
Mask:
Open the mask mode. Please refer to 7.10 I would like to use the mask mode
Camera Setting:
Activate the Camera Settings window to adjust live images. Please refer to 6.5 Camera Settings for the setting screen
Freeze:
Freeze the live image
Drawing:
Open annotation tools. Please refer to 6.4 Annotation
Spotlight:
Open the spotlight mode. Please refer to 7.11 I would like to use the spotlight mode
Time Lapse:
Use the continuous mode and adjust the interval of automatic image capturing. Please refer to 7.4 I would like to capture images continuously
Record:
Record the current image
Capture Static Images:
Capture images
9
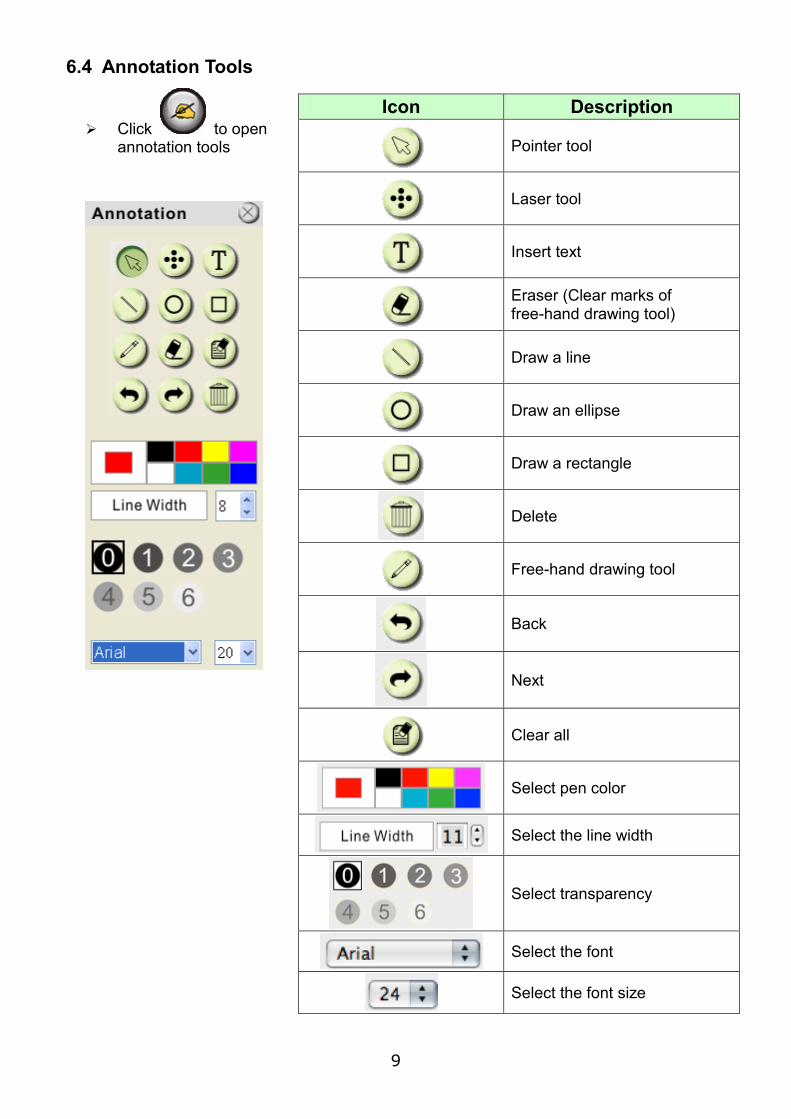
6.4 Annotation Tools
Click to open annotation tools
Icon Description
Pointer tool
Laser tool
Insert text
Eraser (Clear marks of free-hand drawing tool)
Draw a line
Draw an ellipse
Draw a rectangle
Delete
Free-hand drawing tool
Back
Next
Clear all
Select pen color
Select the line width
Select transparency
Select the font
Select the font size
10
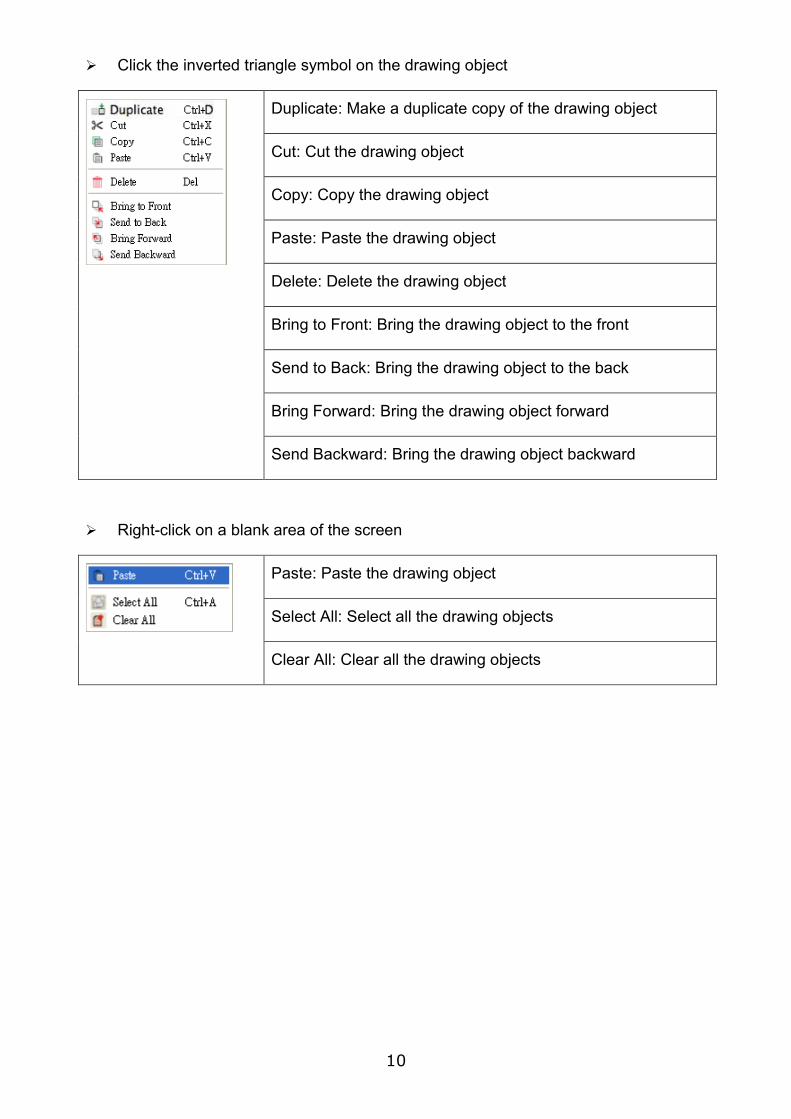
Click the inverted triangle symbol on the drawing object
Duplicate: Make a duplicate copy of the drawing object
Cut: Cut the drawing object
Copy: Copy the drawing object
Paste: Paste the drawing object
Delete: Delete the drawing object
Bring to Front: Bring the drawing object to the front
Send to Back: Bring the drawing object to the back
Bring Forward: Bring the drawing object forward
Send Backward: Bring the drawing object backward
Right-click on a blank area of the screen
Paste: Paste the drawing object
Select All: Select all the drawing objects
Clear All: Clear all the drawing objects

11
6.5 Camera Settings
Control the live image via the Camera Settings interface. The operating procedure is the same as the control panel and remote control of the Visual Presenter. Refer to the Visual Presenter user manual for more information.
<Remark> The display of the button may vary depending on product functions. An inactive button will grey out.
6.5.1 Click to open Camera Settings interface
Case 1
Case 2

12
6.6 Options
Click to open Options menu
1. Factory Reset: Activate the factory reset.
2. Language: Set the language.
3. Video Compression Type: Set the recording format.
<Note> You need to enable the [Enable Video Compress] before setting in Windows OS.
44.. Enable Audio Recorder: Enable the audio record device and set the audio source.
55.. Software Mode: Normal mode: All functions are available. Live mode: Better performance without the functions of annotation, spotlight and mask.
13
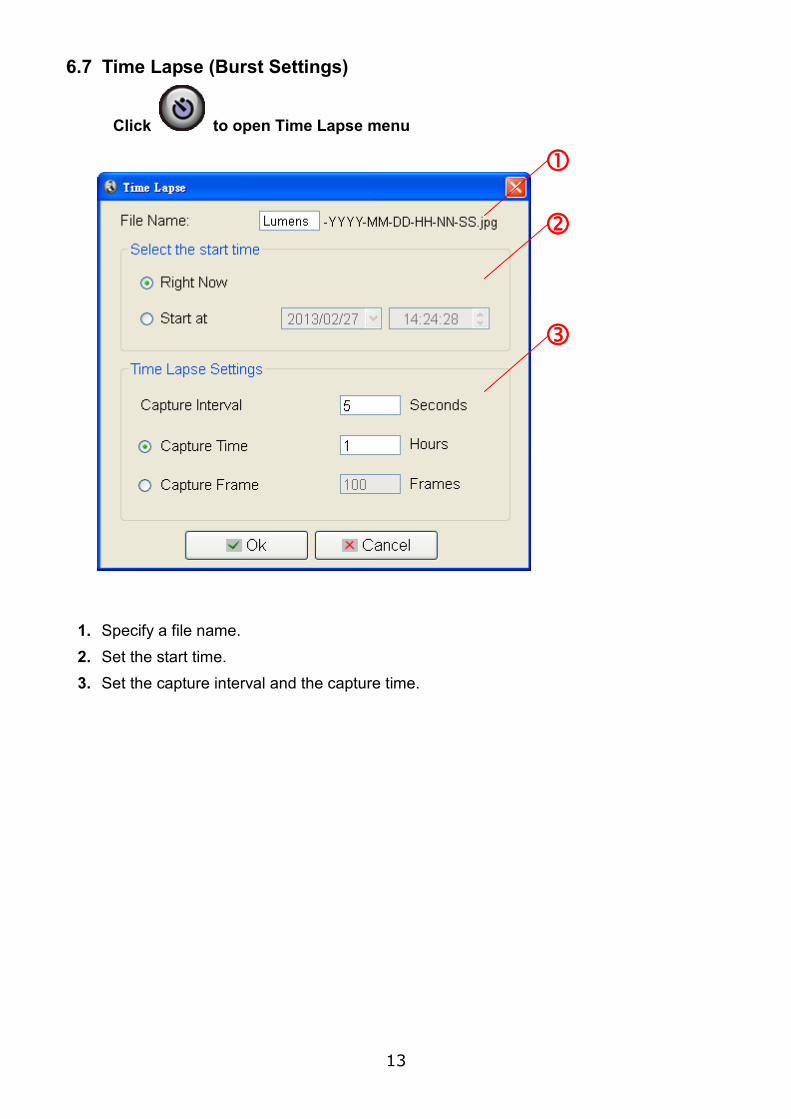
6.7 Time Lapse (Burst Settings)
Click to open Time Lapse menu
1. Specify a file name.
2. Set the start time.
3. Set the capture interval and the capture time.

14
7. Function Descriptions 7.1 Turn on/off the Visual Presenter
Click to turn on/off the power
<Note> When the machine is turned on, the light will flash. After shutdown, you cannot restart it until the light finishes flashing
7.2 I would like to display a live image
Click to display the live image
7.3 I would like to capture images
Click to capture images
[Note] The captured images will be displayed in the Thumbnail area
7.4 I would like to capture images continuously
Click to open continuous mode setting. Click [OK] after setting.
<Note> Refer to 6.7 Time Lapse for more information about Time Lapse setting
<Note> The captured images will be displayed in the Thumbnail area
7.5 I would like to freeze the live image
Click to freeze the live image of Podium View™.
Click once again to lift the freeze
15
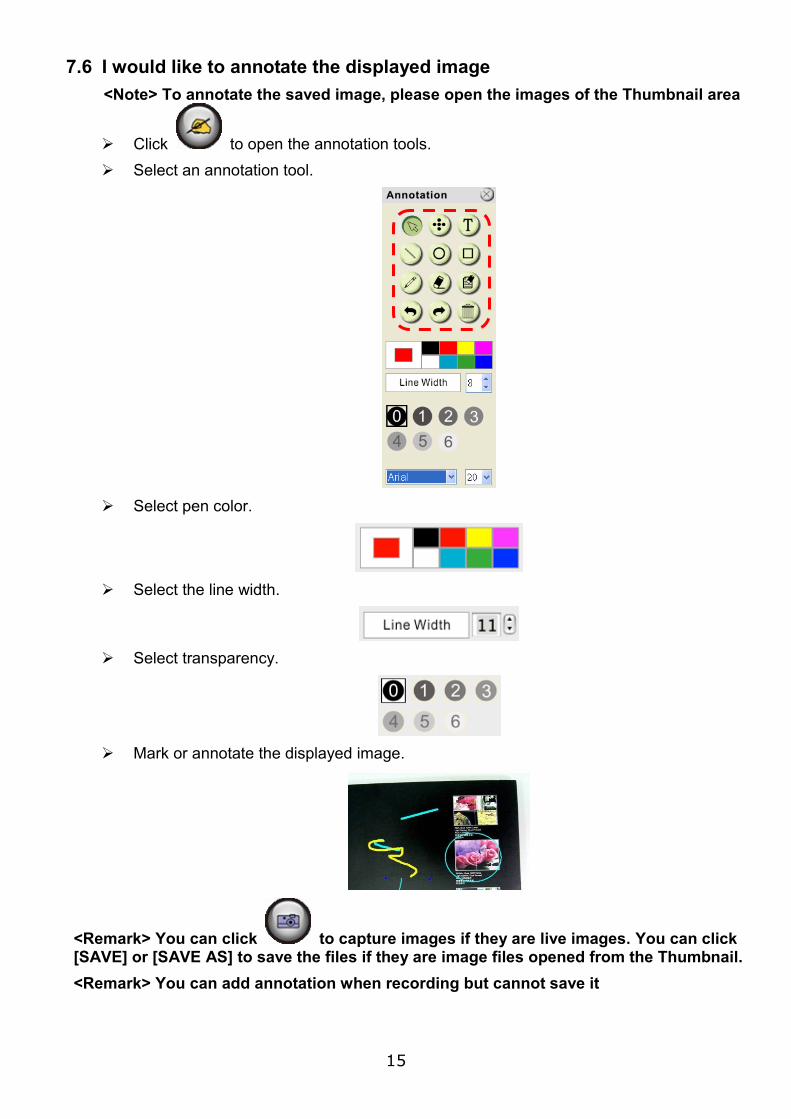
7.6 I would like to annotate the displayed image
<Note> To annotate the saved image, please open the images of the Thumbnail area
Click to open the annotation tools.
Select an annotation tool.
Select pen color.
Select the line width.
Select transparency.
Mark or annotate the displayed image.
<Remark> You can click to capture images if they are live images. You can click [SAVE] or [SAVE AS] to save the files if they are image files opened from the Thumbnail.
<Remark> You can add annotation when recording but cannot save it

16
7.7 I would like to add textual annotation to images
Click to open the annotation tools.
Select .
Click the screen to display the [Text Tool] window.
Enter text in the blank area and click [OK].
Click the object and select the color of text.
Click the object and select the transparency.

17
Click the object and select the font and font size.
<Remark> You can click to capture images if they are live images. You can click [SAVE] or [SAVE AS] to save files if they are image files.
7.8 I would like to adjust the drawing object
Rotate the direction of the object: Click the object and move it to the green point on the screen. Click and hold the left mouse button, and move to left and right to rotate the object.
Change the size of the object: Click the object and move it to the white point on the screen. Click and hold the left mouse button to adjust the size of the object.
Click the object, and click the “inverted triangle” icon on the top right of the object or right-click on the object to open the operation menu. Please refer to 6.4 Annotation for more information about the menu.
7.9 I would like to record images
Click to open the recording tool.
<Note> Click to open the setting window of image format and audio source. Please refer to 6.6 Options for more information
Click to start recording.
Click to stop recording.
Click to close the recording tool.
<Remark> You can add annotation when recording but cannot save it
7.10 I would like to use the mask mode
Click to open the mask mode.
You can use the mouse to directly modify the length and the width of the block.
Click to modify the transparency of the block.
18
Click to close the mask mode.
7.11 I would like to use the spotlight mode
Click to open emphasizing mode.
You can use the mouse to directly modify the length and the width of the block.
Click to modify the transparency of the block.
Click to close the emphasizing mode.
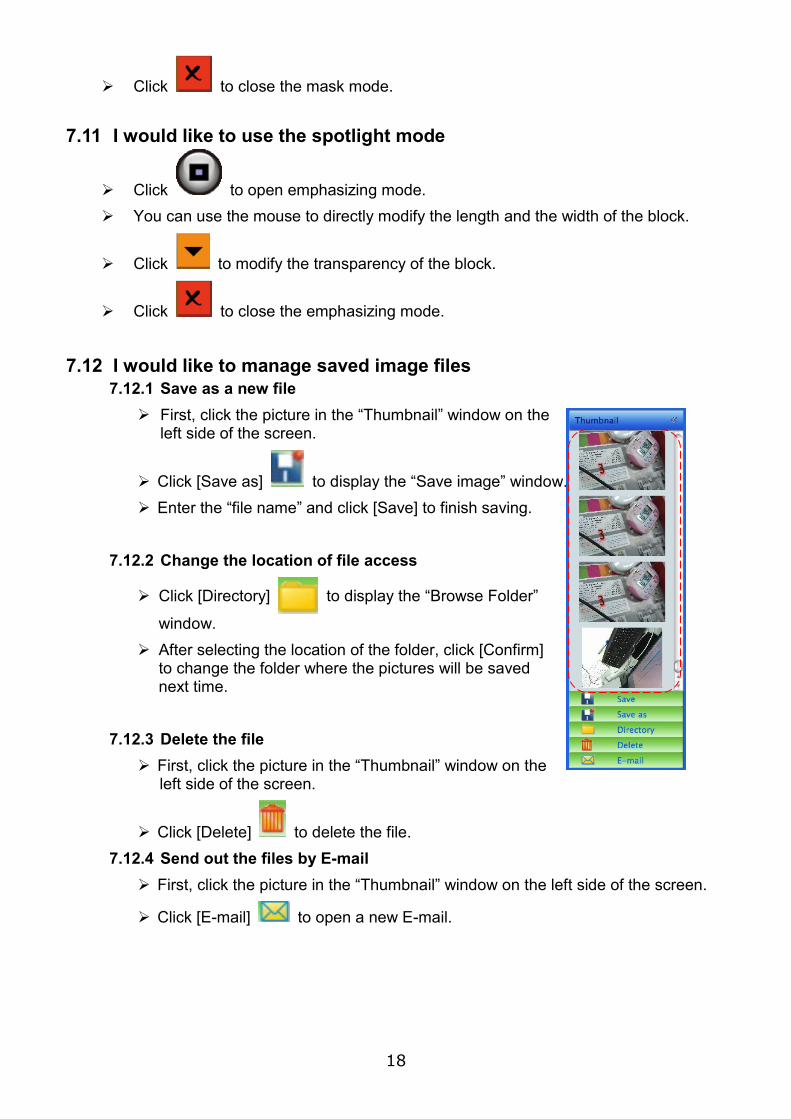
7.12 I would like to manage saved image files
7.12.1 Save as a new file
First, click the picture in the “Thumbnail” window on the left side of the screen.
Click [Save as] to display the “Save image” window.
Enter the “file name” and click [Save] to finish saving.
7.12.2 Change the location of file access
Click [Directory] to display the “Browse Folder”
window.
After selecting the location of the folder, click [Confirm] to change the folder where the pictures will be saved next time.
7.12.3 Delete the file
First, click the picture in the “Thumbnail” window on the left side of the screen.
Click [Delete] to delete the file.
7.12.4 Send out the files by E-mail
First, click the picture in the “Thumbnail” window on the left side of the screen.
Click [E-mail] to open a new E-mail.

19
8. Troubleshooting 8.1. Q: Black screen is displayed in live image after Podium View™ was re-installed
A:
1. Remove the Podium View™, and then restart the computer 2. Re-install the Podium View™
8.2. Q: When the Podium View™ is run, no image is displayed and a Podium View error message occurs:
“System video limitation reached. Please refer to the troubleshooting section of the Podium View user’s manual.”
A:
1. Please check if you are using an extended desktop (two monitors) hooked up to the computer. If so, please try to move the Podium View™ shortcut to the extended desktop (the second monitor) and launch it. If extended desktop is not used, please skip to step 5
2. If step 1 still does not work, please turn off extended desktop
3. If step 2 still does not work, please reduce the resolution of the screen
4. If step 3 still does not work, please re-install Podium View™ software
5. Please go to our website http://www.Mylumens.com/goto.htm to download the compressed dll file (including mfc71.dll/msvcr71.dll), and extract it to “Program Files/Podium View” after the download is completed. Please re-start Podium View™
8.3. Question: Screen flicker occurs during the use of Podium View™ through connection to DC-A11
Solution:
1. Please change the setting of antivirus software. Do not use Podium View™ until firewall has been disabled.