pneuro workbook version 3 - pmod · activate the . load pet. ... (wm) and csf represented by the...
TRANSCRIPT

PNEURO Workbook Version 3.5 Scope and Intended Use This document has been prepared for the PMOD Brain PET / MR Analysis Course in Zürich, March 13, 2013, and further developed for the 3.5 version. It is an addition to the PNEURO User’s Guide and aims at illustrating PNEURO operation with some application cases. The workbook starts with step-by-step descriptions and progresses towards higher-level outlines. Note that bold face is used for indicating strings corresponding to elements in the user interface of PNEURO.
Copyright and Disclaimer The example data for the course demonstrations and exercises are organized in the Neuro database. This database is not included in the standard distribution but is available upon request for PNEURO users. The data are by courtesy of the Nuclear Medicine Department, University Hospital, Zürich, Switzerland. Note that the original data have been processed and optimized for training purposes.
IMPORTANT: • The data from the Neuro database may only be used for PMOD training purposes. The owners
of the original data reserve all rights regarding any type of public use of this data. Particularly, the data may not be used for any kind of publication purposes without getting written consent.
• The content of this document is proprietary and may not be reproduced without permission of PMOD Technologies. It corresponds to the functionality of PMOD at the time of writing and can be changed without notice.
PNEURO Workbook Version 3.5 ...................................................................................................................1
Scope and Intended Use .......................................................................................................................1 Copyright and Disclaimer ......................................................................................................................1
PNEURO Application Cases .........................................................................................................................2 1. MRI and Dynamic 11C-Raclopride PET .................................................................................................2
Analysis using the Maximum Probability Atlas Method .........................................................................2 Analysis using the T1-Parcellation Method ........................................................................................ 10
2. MRI and Dynamic 11C-PIB PET.......................................................................................................... 14 3. MRI and Static FDG PET ................................................................................................................... 15
PET-based Analysis using the Maximum Probability Atlas Method ................................................... 15 Comparison of the Outcome using Different Methodologies ............................................................. 18
PNEURO Hints ........................................................................................................................................... 19
© PMOD Technologies, Last Rev. 2013/10/08

PNEURO Workbook Version 3.5 Raclopride PET: Maximum Probability Analysis 2
PNEURO Application Cases Three example data sets are available in the Neuro database (DB). In order to reduce the RAM requirements during the PNEURO analyses the MR images have been resampled to 1.2mm isotropic pixel size. This allows running the Maximum Probability Atlas (MPA) analysis with systems having 4GB of RAM, and the T1-Parcellation analysis with 8GB RAM. The following sections describe typical analyses with the example data. It is recommended reading them sequentially, as the level of description detail decreases progressively. The Neuro DB has been configured in the course software environment. However, if you downloaded the Neuro DB on your own and use it in your private environment, please make sure that you configure the DB using the Config facility as described in the Readme which accompanies the data.
1. MRI and Dynamic 11C-Raclopride PET The data set of “patient” MRI-Raclo Dynamic includes a dynamic PET acquisition of 11C-Raclopride during 60 minutes as well as a resampled T1-weighted MRI. The brain anatomy in the PET image is not ideal for brain VOI generation, as the initial frames are very noisy and late uptake concentrates in the basal ganglia. Therefore the brain structures will be derived from the MR image and applied to the PET series for regional statistics. The MPA and the T1-Parcellation approaches are described in the following.
Analysis using the Maximum Probability Atlas Method PET Image Loading, Averaging and Cropping Please start the Neuro tool from the PMOD ToolBox and select the Maximum Probability Atlas tab. Activate the Load PET button with the database format configured. In the appearing DB interface make sure the Neuro DB is selected. Three “patients” are listed in the Patients area. Select MRI-Raclo Dynamic, and in the updated Series list the Dyn 60 min PET. Load the data with the Open button. The images appear in an orthogonal layout with the default PET color table. Note that the original dynamic PET images are fused with an image calculated from averaging a range of dynamic frames. The averaged PET will be used for the rigid matching with the MR, so the frame averaging should provide an image containing information about the whole brain with sufficient quality. The optimal averaging range strongly depends on the tracer uptake characteristics. For the present Raclopride PET please define the frame range From and To as 10 and 31, respectively. Whenever the range definition is changed, the average image is updated immediately. To only see the average PET drag the fusion slider fully to the right. For avoiding excessive RAM needs and speeding calculations up, the image is then cropped to the relevant portion of the data. Activate the Crop box and place the appearing yellow crop box such that the brain is completely enclosed. The box position can be changed by simply clicking at the brain center in all plane orientations. If needed, the box edge sizes can be adjusted by the three size selection buttons.
© PMOD Technologies, 2013

PNEURO Workbook Version 3.5 Raclopride PET: Maximum Probability Analysis 3
Activate the PET image button next to the Crop checkbox in order to execute image cropping. This completes the preparation of the PET image. The next step is to load an anatomical image. Ideally, a T1-weighed MR image is available which presents the brain anatomy with good resolution in all directions. If this is not the case, an FDG image might be used alternatively. As the MRI is available for this exercise please select the T1 radio button and activate the MR action button in the lower right. Correspondingly, the program switches to the MR loading page. MR Image Loading and Cropping Data loading is started using the Load MR button. In the DB window select the same patient MRI-Raclo Dynamic, and in the Series list the Brain MR. Load the images with the Open button and then define a crop box in the same way as for PET. Activate MR image to effectively crop the data. Note that during loading the MR images are always brought to standard radiological orientation, even if the data was acquired in sagittal orientation. In the next step, probability maps of grey matter (GM), white matter (WM) and cerebrospinal fluid (CSF) will be calculated. This process is tailored by some parameters above the red action button: Denoising strength can be set to different levels. It may improve the image quality and consequently the outcome of segmentation. As it is quite time-consuming and the MR image quality is sufficient, please select None to skip this pre-processing step. The Bias regularization and Cleanup threshold parameters are related to the actual segmentation. Please set both of them to the default value of Light. Sampling is an important parameter as it determines how much of the data is actually used for segmentation. The smaller the sampling size becomes, the more information is used and the longer the segmentation will take. With the present data, 6 mm Sampling works properly. In other situations, if the segmentation outcome is unsatisfactory, please try smaller sampling settings, starting with the default setting of 3 pixels.
Finally, activate Segment MR to start the segmentation process. Calculation time may be around 2.5 minutes on a decent notebook system. The segmentation result is shown on the next page as illustrated above. The MR SEGMENTS image tab contains the tissue label image with gray matter (GM), white matter (WM) and CSF represented by the label values 1, 2 and 3, respectively. MRI-PET Matching The next step establishes the mapping between the MR and the PET spaces. To this end the average PET image is rigidly matched to the MR image using the Normalized Mutual Information criterion. There are several available parameter for this procedure is Matching sampling. Activating the default button as
© PMOD Technologies, 2013

PNEURO Workbook Version 3.5 Raclopride PET: Maximum Probability Analysis 4
indicated below sets it to 3 pixels. The Smoothing options may help avoiding local minima. If the data were already matched, this step could be skipped by checking the box PET already matched to MR.
Activate Match PET to MR to start rigid matching. The result is shown as a fusion image on the MATCHED PET page. Please check the alignment quality of the two images using the fusion slider.
In this exercise the matching outcome is satisfactory. In case of a failure there are three options to try: 1. Interactive correction: activate the Adjust Matching button and drag/tilt the PET images in all
directions. 2. Return to the MR SEGMENTS page using the list selection illustrated below,
reduce the Matching sampling parameter, and start matching again.
3. Match the PET externally to MR, save it, load the matched PET into PNEURO, and skip matching. MR-based Normalization The next step establishes the stereotactic transformation between the patient brain anatomy and the standard anatomy in the MNI space (Montreal Neurological Institute). Actually, this transformation was already determined during the segmentation process. It is now applied to the MR image by activating the Normalize button. The result is shown on the NORMALIZED page as a fusion of the T1 MNI TEMPLATE with the NORMALIZED MR. Shift the fusion slider left/right in order to validate the outcome. Additionally, iso-contours can be introduced into the images for highlighting boundaries in the brain as illustrated below. To arrive at this representation proceed as follows: Enable the iso-contours, select the NORMALIZED image tab, activate the iso-contour tab, change the contour color to blue and finally adjust the iso-contour level. Next, adjust the iso-contour level of the TEMPLATE image similarly.
© PMOD Technologies, 2013

PNEURO Workbook Version 3.5 Raclopride PET: Maximum Probability Analysis 5
Atlas Transformation At this time, the rigid transformation between MR and PET is known as well as the stereotactic transformation between the patient brain and the template. Therefore, all images as well as the atlas regions can be transformed to any involved space: the MNI atlas space, the patient MR space which probably has the highest resolution, and the patient PET space. In the next step, these transformations are applied to the data so that the user can inspect the VOI results on top of the PET and the MR images in any space. Before proceeding, the user needs to decide on the atlas definition he or she would like to use. There are two main atlas choices available in the Select Atlas panel: the maximum probability atlas Hammers N30R83 which is the default choice, and the single-subject atlas variants AAL-Merged and AAL-VOIs. Note that user-defined atlases will appear in the lower part of the selection together with the animal atlases which are currently not applicable in PNEURO.
If the Select Atlas panel is not visible at the left window side, it can be shown using the atlas show/hide arrow button in the upper right as indicated above. Please select the Hammers-N30R83 atlas and start the transformation of all data sets with the Segment Brain button on the NORMALIZED page. Volume of Interest Outlining A fusion of the transformed MR image and the atlas segments is shown on the BRAIN SEGMENTS page. Please verify that there is a good match of the segments with the anatomy. This is again most conveniently achieved by shifting the fusion slider left/right.
© PMOD Technologies, 2013

PNEURO Workbook Version 3.5 Raclopride PET: Maximum Probability Analysis 6
The images are always shown in the Result space selected in the configuration area. Please explore the differences in representation when selecting the Atlas space, the Input/MR and the Input/PET space. The image is updated whenever the result space is changed. Because of the superior resolution of the MR images, Input/MR brings out most detail.
Next, explore the impact of restricting the brain regions to pixels with high grey matter probability. Set the Mask radio button to Individual for using the GM probability map of this particular patient and move the threshold slider left/right. The trimmed regions are updated in the display as soon as it is released. The smaller the threshold values are, the larger the regions become. When switched to Standard Mask trimming is based on a population GM map. Because of the lower probabilities the regions grow considerably. With the Segments option, the GM label from the individual tissue label map will be used instead of a probability map. The basal nuclei definitions are usually excluded from this masking operation. So see how GM trimming affects them enable the Mask basal nuclei box. It is evident, that significant parts of the basal nuclei structures become discarded. Therefore, please define the parameters as illustrated above and activate Outline to convert the segment image into an outline definition. Volume of Interest Exploration The resulting VOI outlines are shown on the VOIS page together with the tools for manipulating them. Initially, a fusion of the MR and the PET images is shown in the selected result space using an orthogonal layout. As the images may be small, use the layout tab to change the representation to a single axial slice. Next, bring the fusion balance fully to the right to show the MR image only.
© PMOD Technologies, 2013

PNEURO Workbook Version 3.5 Raclopride PET: Maximum Probability Analysis 7
In this representation the region contours can be conveniently explored by scrolling through the slices. It is evident how the cortical VOIs follow the grey matter boundaries. The basal nuclei, however, show some aberration from the anatomy. Initially, all the VOIs are shown in the image overlay. The tree in the VOI Group panel organizes the VOIs hierarchically into left/right branches followed by lobe/central structure branches. Individual VOIs or whole branches can be hidden or shown by checking the corresponding box as indicated in the illustration below. Note that the S checkbox has to be active for this selective visualization to work. Otherwise, all VOIs will be shown irrespective of the settings in the tree.
Modifications can be applied to the VOIs in many ways as described in the PMOD Base User’s Guide. For instance, while the Group tab is active, all VOIs selected in the tree can be shifted. As illustrated below, activate the x button for disabling all VOIs, then click into the Central_structures check box of the L branch. Only the 5 central structures are shown in the overlay. Next activate the VOI operation button.
© PMOD Technologies, 2013

PNEURO Workbook Version 3.5 Raclopride PET: Maximum Probability Analysis 8
A box appears around the contours with a handle in the middle. Try out how the group of VOIs can be moved by dragging the handle, and scaled by dragging the edges of the bounding box. Finally use the Undo button multiple times to bring the VOIs back to the original position. Note also the Union button which combines all VOIs selected in the tree into a single new VOI. To try this out clear all selections with x, enable the left and right Cerebellum, activate Union and enter Merged_Cerebellum as the new VOI name in the confirmation dialog window. As a result, a new VOI branch appears at the end of the VOI tree while the original VOIs disappear at the same time. This is necessary to ensure proper operation of the optional partial-volume correction (PVC). Please return to the original VOI set by activating the Undo button. The editing of single VOIs is done in a different way. First, the List tab has to be activated. On this list, the VOI arrangement is linear. Double-click at VOI 57 CaudateNucl_l to select it. It is not clearly seen among all the VOIs. Therefore enable the S checkbox which became disabled when switching the panels. Now, only the left caudate VOI is shown. Scroll to slice 63 and note that the VOI seems to be somewhat too large. To trim its size interactively select the Eraser tool and drag along the VOI boundaries to wipe away pixels. Alternatively, try out the Hammer tool and the tool for the erosion/dilation. Note the small arrows which allow configuring the tool sizes.
Finally reset all changes with the Undo button. As an alternative for re-establishing the standard VOI definition, return to the BRAIN SEGMENTS page with the selection in the upper right and activate the Outline button once again. Results Saving After completion of the VOI adjustments save the VOIs with the corresponding button above the VOI list
and name it Max. Probability MR space. Any time later, this VOI set can be retrieved and applied to any data in the MR space. PNEURO offers a convenient facility for saving all generated data at once with the Save all button in the lateral taskbar illustration below. As can be seen, the images are available in all spaces, as well as the spatial transformations between all the spaces. Note that the transformations cannot only be applied to the images, but also for transferring the VOIs between the different spaces. Another way of saving the whole processing is using the Save Protocol button in the status line. Activate the button and save the protocol as MaxProbability-MR-PET. This saves the processing settings together with the final VOIs.
© PMOD Technologies, 2013

PNEURO Workbook Version 3.5 Raclopride PET: Maximum Probability Analysis 9
Statistics Calculation and TAC Transfer to Kinetic Modeling Tool Finally, start calculation of the regional PET statistics with the Statistics button. PNEURO switches to the dedicated Statistics page and shows 83 tissue time-activity curves (TAC) representing the regional PET average in the dynamic frames of the Raclopride PET series. Often, PET scans are static rather than dynamic. To see how the result would look like for an acquisition 50-60 minutes after tracer injection average the last two 5 minutes frames as follows. With the TACs radio button enabled set the lower range value to frame 30 (50-55min) and the upper to 31 (55-60min).
Then switch the Aver radio button on. Immediately, the TAC curves are replaced by a table which shows the average uptake per region as well as the region volume. To transfer these results activate Copy to Clipboard, start a program like Excel and select the Paste operation. The full table is pasted and can be further processed. Return to the TAC display by switching again the TACs radio button on. These TACs can be quantified by the Simplified Reference Tissue model using cerebellum uptake as the reference. In order to obtain an averaged cerebellum signal from left and right proceed as follows: Use Deselect All to switch off all curves. Look for the Cerebellum_r and Cerebellum_l entries towards the end of the list and check both of them. Activate the Merge menu as illustrated below, choose the Selected entry, and enter Cerebellum as the TAC name.
A volume-weighted average of the two curves is calculated and assigned to the TAC Cerebellum which appears at the end of the list. Note that opposed to the VOI merging the original curves are still available. Finally, activate the Kinetic Modeling button to transfer all curves to the PKIN tool.
© PMOD Technologies, 2013

PNEURO Workbook Version 3.5 PIB PET: MR-based MPA and MR-Parcellation 10
Analysis using the T1-Parcellation Method When exploring the outcome of the MPA analysis in the exercise above it turned out that the basal nuclei definition - which is most relevant for Raclopride - was not ideal. The following exercise applies the T1-based parcellation approach which is specialized for those structures. Many of the processing steps are the same as for the MPA method and will not anymore be described in detail. Please close and restart PMOD first to free RAM. This is important because the parcellation is challenging for most non-workstation systems. PET Image Loading, Averaging and Cropping Start the Neuro tool and select the Brain Parcellation tab. Using the Load PET button, load the C11-Raclopride PET series of the MRI-Raclo Dynamic patient, average the frame range 10 to 31, and Crop. Move on to MR loading with the MR action button. MR Image Loading, Averaging and Cropping Using the Load MR button load the 3D MPRAGE-like [1.2mm] series and Crop. Before proceeding switch the Denoising strength to None because the data quality is good and denoising takes significant calculation time. Continue with the Denoising action button. MR Image Segmentation Still on the MR page, set the parameters for the GM/WM/CSF segmentation to the same values as for the MPA method.
Then activate Segment MR to proceed. The segmentation result is shown on the MR SEGMENTS page as a fusion of the GM/WM label map with the MR image.
© PMOD Technologies, 2013

PNEURO Workbook Version 3.5 PIB PET: MR-based MPA and MR-Parcellation 11
Note that there is a well-defined boundary between the GM (blue) and the WM (pink). It is possible to shift this boundary line towards GM or WM with the tools in the Seg. Touch-up panel, but for this exercise the segmentation is accepted. Landmark Definition An important difference of the T1-parcellation method to the MPA method is that the processing requires four anatomical landmarks. The position of these landmarks is estimated during the segmentation. The user only has to check their accuracy and shift them if necessary. Shift the fusion slider to the left for a better view of the MR image. Enter the marker adjustment mode by activating the markers button indicated below.
The panel with the marker control elements opens. Use the Go to facility for localizing the IC (inter-caudate), AC (Anterior Commissure), PC (Posterior Commissure) and an inter-hemispheric (IC) point.
The recommended marker locations can be visualized in a help window by the ? button. If a marker needs adjustment just drag it with the left mouse button in any of the plane orientations. Finally, save the set of landmarks using the button. If you are not sure about the placement of the landmarks, please load the definition saved in the Neuro DB under the name of Markers with the button right to the saving button. Parcellation In the next step, the program will select the most similar hemispheres from the knowledge base (KB) in order to construct a maximum probability atlas of the basal nuclei. This selection is based on a number of indexes which were calculated during the segmentation. They can be inspected by activating the button illustrated below.
The number of selected references is defined by the Number of subjects parameter in the Parcellation tab. According to a study the optimal number to use is 8. As the calculation time for the corresponding 16 hemispheres is quite substantial, please set the number of subjects to 2. Make sure that the Deep nuclei
© PMOD Technologies, 2013

PNEURO Workbook Version 3.5 PIB PET: MR-based MPA and MR-Parcellation 12
parcellation box is checked, as these are the results of interest. Because the derivation of the cortical VOIs doesn’t involve major calculations, also check the Cortex parcellation box. Finally, with the parameters set as illustrated above, initiate Parcellation by the corresponding action button. With the setting of 2 subjects the program has to process 4 hemispheres and will try to do this in parallel. Therefore, a system with 4 processing cores will only take 50% calculation time compared to a 2 core system. Most likely, processing will take about 10-15 minutes while you can monitor the progress in the status bar. Brain Segments and PET-MR Matching The parcellation results are presented as label map which is fused with the MR image on the BRAIN SEGMENTS page. Please inspect the parcellation quality by dragging the fusion slider left/right.
In the next step, PET will be rigidly matched to the MRI. Set the default parameter configuration by clicking the default button indicated below. The Matching sampling becomes 3 pixels.
Activate Match PET to MR to start rigid matching. The result is shown on the MATCHED PET page for inspection and correction. As the result is fine, don’t interfere with the matching at this time. In order to compare the parcellation quality with that of the MPA choose MR as the Result space and start contour creation with the Outline button.
Volume of Interest Exploration The resulting VOI outlines are shown on the VOIs page. Note that the VOI tree arrangement is somewhat different as for the MPA. The cortical VOIs are derived by intersecting the Maximum Probability Atlas with the GM label segment, the Deep_Nuclei result from the parcellation. Configure the axial single-slice layout, set the fusion weighting to 100% MR, and then compare the basal nuclei segmentation quality.
© PMOD Technologies, 2013

PNEURO Workbook Version 3.5 PIB PET: MR-based MPA and MR-Parcellation 13
It is superior to the MPA result, and it can be further improved by using more than 2 knowledge base subjects. The illustration below demonstrates a slight improvement of the caudate definition when using 8 subjects.
From this stage on processing is identical to that described for the MPA exercise. Please Save the Protocol under the name Parcellation-MR-PET (2subj) and the VOIs under Parcellation MR space (2 subj).
© PMOD Technologies, 2013

PNEURO Workbook Version 3.5 PIB PET: MR-based MPA and MR-Parcellation 14
2. MRI and Dynamic 11C-PIB PET The data set of “patient” MRI-PIB Dynamic includes a dynamic PET acquisition of 11C-PIB during 70 minutes as well as a resampled T1-weighted MRI. The patient was classified as MCI with MMSE 27 at the time of the PIB scan and had converted to AD one year later. The data can be processed in exactly the same way as described for Raclopride. The only difference is the PET uptake pattern, which however makes no difference for the MR-based VOI-finding. The illustrations below show the VOI outcome in the MR space on slice 60. These results can be reproduced using the protocols available in the Neuro DB. MR-based Maximum Probability Atlas Result
T1-Parcellation Result Parcellation using 8 knowledge base subjects.
© PMOD Technologies, 2013

PNEURO Workbook Version 3.5 Static FDG: Maximum Probability Atlas based on PET 15
3. MRI and Static FDG PET The data set of “patient” MRI-FDG Static includes a static FDG PET acquisition as well as a resampled T1-weighted MRI. This data set can be processed using the MRI and PET workflows as described for the Raclopride study above. However, for the exercise described in this section, we will neglect the MRI and directly apply the MPA methodology to the FDG image. This illustrates the PET-only case where the information in the PET image is sufficiently close to the MNI PET template for a direct normalization.
PET-based Analysis using the Maximum Probability Atlas Method PET Image Loading and Cropping Please restart PMOD, launch the Neuro tool from the ToolBox and select the Maximum Probability Atlas tab. Activate the Load PET button, select the MRI-FDG Static patient, and load the FDG Brain PET series. Crop the image, set the Anatomical reference to None, and use the Norm action button to start the PET-only workflow.
PET Normalization The controls on the MATCHED PET page are appropriately set for the PET-based normalization.
Ideally, one would use an FDG template in the MNI space which could be selected by the User Defined choice in the Normalization Template menu. However, as no FDG template is available, please select the PET choice. Keep the 8mm Gaussian filtering definition and proceed with the Normalize button to start the calculation of the stereotactic normalization. Normalization Validation The resulting NORMALIZED FDG image is shown together with the PET template. Please use the iso-contours and the fusion slider for verifying that the normalization was indeed successful.
© PMOD Technologies, 2013

PNEURO Workbook Version 3.5 Static FDG: Maximum Probability Atlas based on PET 16
Proceed with the Segment Brain button to apply the normalization transform to the Maximum Probability Atlas. Brain Segment Validation The BRAIN SEGMENTS page shows the FDG image together with the transformed atlas image in a fusion display. As the PNEURO settings are serialized, the fusion image seen will depend on the last configuration settings of this page. Because the MRI has not been considered for the normalization, the only Result space options are Atlas and Input/PET, and the GM probability threshold is evaluated using an a-priori GM map.
With the configuration settings above the following result is seen. Please try out how the result changes when selecting the Atlas result space and when shifting the GM probability Mask threshold.
Finally, proceed with the Outline button to obtain the outline contour definition of the brain structures.
© PMOD Technologies, 2013

PNEURO Workbook Version 3.5 Static FDG: Maximum Probability Atlas based on PET 17
Volume of Interest Exploration The resulting VOI outlines are shown on the VOIS page. Change the layout to show a single axial slice and select the Gray color table. The following result is shown.
Apparently the caudate/putamen VOIs don’t fit too well, while the cortical VOIs seem to be positioned too much to the inner of the brain at the left and lower side in the image. A global scaling of all selected VOIs can easily be applied by dragging the left lower corner of the bounding box with the VOI action button active. Statistics Calculation Finally, calculate the regional PET uptake with the Statistics button. The result on the Statistics page shows the average uptake in the 83 structures of the MPA together with their volumes.
© PMOD Technologies, 2013
PNEURO Workbook Version 3.5 Static FDG: Maximum Probability Atlas based on PET 18
Copy the results to the clipboard and paste them to Excel. Return to the BRAIN SEGMENTS page, change the Result Space to Atlas, outline, calculate the statistics and copy them also to the Excel. Compare the results in the Atlas and PET space by calculating their % difference in Excel.
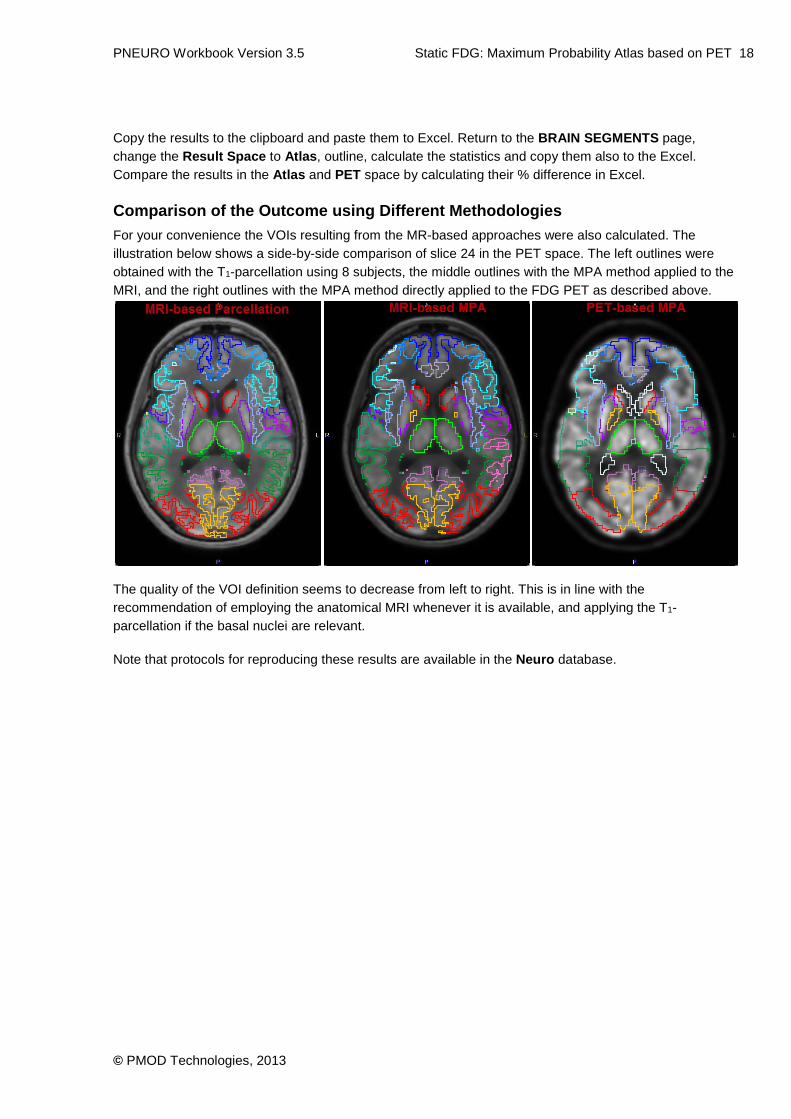
Comparison of the Outcome using Different Methodologies For your convenience the VOIs resulting from the MR-based approaches were also calculated. The illustration below shows a side-by-side comparison of slice 24 in the PET space. The left outlines were obtained with the T1-parcellation using 8 subjects, the middle outlines with the MPA method applied to the MRI, and the right outlines with the MPA method directly applied to the FDG PET as described above.
The quality of the VOI definition seems to decrease from left to right. This is in line with the recommendation of employing the anatomical MRI whenever it is available, and applying the T1-parcellation if the basal nuclei are relevant. Note that protocols for reproducing these results are available in the Neuro database.
© PMOD Technologies, 2013

PNEURO Workbook Version 3.5 PNEURO Hints 19
PNEURO Hints Computer System: For the effective use of PNEURO with original high-resolution data workstation systems with 8 cores and 16GB RAM (or better) are highly recommended. The availability of multiple cores will speed up denoising as well as parcellation, because all hemispheres of the subjects selected in the knowledge base can potentially be processed in parallel. Note that the number of cores can effectively be doubled be enabling hyper-threading on some processor chips like the Intel core i7. When to Apply Parcellation: The T1-MR-based parcellation is preferable for questions related to the deep nuclei because of the construction of an individual maximum probability atlas in this area. If only cortical structures are relevant, the Maximum Probability Atlas might be preferable because the cortical outcome is very similar for both methods, but it is faster and additionally allows evaluating the results in the MNI space. Waiting Time Reduction: While the step-wise workflow with inspection of intermediate results is aimed at robust results, it involves some waiting time during the different processing steps. One approach to partially circumvent this problem is using the Run all button in the lateral taskbar:
The procedure for the MPA and the T1-parcellation is: • Load PET image and Crop • Load MR image and Crop • Set the parameters on the different pages, if there is any change to the settings of the prior analysis, • Start Run all Note the button in the lateral taskbar which establishes the parameter defaults on all pages. Batch Mode: A convenient way to process multiple data sets non-interactively is as follows: Load a data set (PET and/or MR), define the bounding boxes, adjust the parameters on the different pages without calling the actual processes, save the protocol. Repeat for all data sets. Start the batch mode from the menu, select all protocol files, and run the processing. While PMOD will be busy, other work can be completed. Saving of Information: There are different ways of saving the intermediate and final results of PNEURO. Generally it is recommended saving a protocol, so that any time later the details of the analysis configuration as well as the manually edited VOIs may be inspected. If you would like to re-use intermediate results such as spatial transformations and/or transformed images, the most convenient procedure is to open the Save all window with the lateral button, check all items of interest and save, optionally with replacing the patient name by a new string.
© PMOD Technologies, 2013