plug and play magic mirror plug and play magic mirror • features breathalyzer, speaks your tweets...
TRANSCRIPT

RB-See-116
Plug and Play Magic Mirror
• Features Breathalyzer, Speaks your Tweets from Twitter, Weather Forecast, Stock
Performance, LED Control, Sends X-10 Commands
• Princess, Pirate, Halloween, and Insult Characters , Add your own Characters
• Easy to Use Setup Programs
• Text to Speech, Picasa Web Album Streaming Open Source, Runs on Windows, Mac
(Intel only), and
• Linux
HOW IT WORKS
The Magic Mirror plays animations based on input from various sensors which you choose based on your installation type. Featuring four characters, each character responds to the sensor inputs with its own personality.
Plug the open source Magic Mirror Sensor Hub into a PC USB port and install the DIY Magic Mirror Software.
Breathalyzer
Ditch that keychain device and Breathalyze your guests in style. Plug the USB device into your laptop and have your guests blow into the Talking Breathalyzer. From your laptop screen, your guests will watch an animated response proportional to their alcohol intake from one of four selectable characters. Cap off the night by having the character speak a personalized message to an unsuspecting guest by sending a stealth Twitter command.

CAUTION: The Magic Mirror breathalyzer is not a professional breathalyzer and should
be used for novelty purposes only. Drive safely!
How to Personalize the Animations
The DIY Magic Mirror was designed to be personalized. To personalize, you'll over-write the
existing animation files which are in Flash .FLV format with your own. Author your videos
using your favorite video editing software and ensure the output file is in Flash .FLV format.
One option is Crazy Talk which is a fun program that allows you to animate your own picture
automatically syncing mouth movements with the audio of your choice. It also outputs in Flash
.FLV format. After authoring the .FLV files in Crazy Talk, proceed to step 4.
Step 1. If you'd like to add your own audio to the existing characters, first purchase the character
(each character is $15) you would like to personalize from http://www.imagineerieing.com/
Step 2. Record the audio separately. Then manually move the mouth movements of the digital
puppet from imagineerieing using your keyboard to sync the audio. The digital puppet comes
with instructions telling you which keys to use to control the character. Use a video capture
program (FRAPS works well for Windows XP users) to record the performance. Then assemble
the audio and video together in your favorite video editing program. Rotate the video 90 degrees
as per pumpkin screen shot below.

Step 4. Over-write the respective files in “Install Directory\videos” with your own. Files that end
with _princess.flv are for the princess mode, _pirate.flv for the pirate mode, and _halloween.flv
for the halloween mode.
Sensor Triggered Video Filename
Proximity Proximity 1, Proximity 2, and Proximity 3 Videos
proximity1_princess.flv proximity2_princess.flv proximity3_princess.flv proximity1_halloween.flv proximity2_halloween.flv proximity3_halloween.flv proximity1_pirate.flv proximity2_pirate.flv proximity3_pirate.flv proximity1_insult.flv proximity2_insult.flv proximity3_insult.flv
Touch 1 - Weather
Plays one of three videos depending on the weather forecast
weather_good_princess.flv weather_ok_princess.flv weather_rain_princess.flv weather_good_halloween.flv weather_ok_halloween.flv weather_rain_halloween.flv

weather_good_pirate.flv weather_ok_pirate.flv weather_rain_pirate.flv weather_good_insult.flv weather_ok_insult.flv weather_rain_insult.flv
Touch 2 - Stock
Plays one of three stock videos depending on your stock portfolio performance for the day
stock_up_princess.flv stock_no_change_princess.flv stock_down_princess.flv stock_up_halloween.flv stock_no_change_halloween.flv stock_down_halloween.flv stock_up_pirate.flv stock_no_change_pirate.flv stock_down_pirate.flv stock_up_insult.flv stock_no_change_insult.flv stock_down_insult.flv
Touch 3 X-10 Generic ON/OFF
x10_off_princess.flv x10_on_princess.flv x10_off_halloween.flv x10_on_halloween.flv x10_off_pirate.flv x10_on_pirate.flv x10_off_insult.flv x10_on_insult.flv
Switch 1 Door Video
doorbell_princess.flv doorbell_halloween.flv doorbell_pirate.flv doorbell_insult.flv
Switch 2 Weather
weather_good_princess.flv weather_ok_princess.flv weather_rain_princess.flv weather_good_halloween.flv weather_ok_halloween.flv weather_rain_halloween.flv weather_good_pirate.flv weather_ok_pirate.flv weather_rain_pirate.flv weather_good_insult.flv weather_ok_insult.flv weather_rain_insult.flv
Switch 3 Stock
stock_up_princess.flv stock_no_change_princess.flv stock_down_princess.flv stock_up_halloween.flv

stock_no_change_halloween.flv stock_down_halloween.flv stock_up_pirate.flv stock_no_change_pirate.flv stock_down_pirate.flv stock_up_insult.flv stock_no_change_insult.flv stock_down_insult.flv
Switch 4 Picasa Slide Show Picasa Slide Show
Switch 5 Breathalyzer drink1_princess.flv drink2_princess.flv drink3_princess.flv drink4_princess.flv drink1_halloween.flv drink2_halloween.flv drink3_halloween.flv drink4_halloween.flv drink1_pirate.flv drink2_pirate.flv drink3_pirate.flv drink4_pirate.flv drink1_insult.flv drink2_insult.flv drink3_insult.flv drink4_insult.flv
If you replace one of the idle videos (these are the videos that loop when the Magic Mirror is idle), you must also create a Navigation cue point (not Event type cue point) called “idle_end” towards the end of your idle video. If you don’t do this, your idle video will play just once and not loop. IMPORTANT: Create the navigation cue point at least 10 seconds before the end of the video.

Video Tutorial for the Advanced Setup Program
The Magic Mirror has two software setup programs, a Quick Setup program for the novice/non-
technical user and an Advanced Setup program. Use the Quick Setup program to get up and
running quickly with the default settings. Use the Advanced Setup program if using additional
sensors (proximity, doorbell) and features (X-10 control, IP camera, Picasa streaming Web
album). Also use the Advanded Setup program to adjust the character size and position.

Quick Setup
.

DIY Magic Mirror Source Code Overview
* The DIY Magic Mirror is written in Adobe Flash Action Script 3.0
* Adobe AIR is used which enables the DIY Magic Mirror to run on the PC, Mac, and Linux.
* All external Action Script libraries are provided including AS3Glue which enables Arduino
communication to Flash and picasaflashapi which enables the DIY Magic Mirror to stream
Picasa Web Albums.
* If you do modify the source code and feel it will benefit the community, please do send it in to
us and we'll do our best to include in a future release.
* The program is currently 3,000+ lines of code.
* Here's some key pieces of the source code, it will give you a feel for how its coded and what
you would need to understand in order to modify for your own use
* You'll need a copy of Adobe Flash Professional CS4 to open and modify the source code
(.FLA file and action script file).

Source Code Files
mirror.fla - Flash File for Magic Mirror Main Program
mirror.as - ActionScript 3.0 File for Magic Mirror Main Program
configure.fla - Flash File for the Configuration Program
configure.as - ActionScript 3.0 File for the Configuration Program
diymagicmirror.p12 - certficiate you can use for the Adobe AIR build - the password is < mirror
> in lowercase.
\sounds - various mp3 sound files used by the program, you can replace these with your own
mp3's but you must use the same filename
\images - images used by the program, do not modify these files
\mac - files needed if your installation is on the Mac
\linux - files needed if your installation is on Linux
\Firmata2 - the program that needs to be uploaded to the Magic Mirror Sensor Hub/Arduino
Source Code Action Script 3.0 Libraries
\net - Enables the Arduino to talk to Flash via serproxy
\sk - Streaming pics from Picasa
MJPEG.as - Streaming video from an IP camera
\mx - used for formatting
\ascb - used for formatting and drawing
\com - used for formatting
1. First install the DIY Magic Mirror software from http://diymagicmirror.com/install.html
2. Unzip the source code zip file to any directory on your computer.
3. From Adobe Flash CS4, open the file < configure.fla >.

4. From the Flash CS4 menu, choose < File > and < Publish Settings > and then click the folder
below and navigate to your source code directory
After selecting the directory, click < Save >.

Click < OK >.

5. From Adobe Flash CS4, open the file < mirror.fla > and repeat step 4 but save to the filename
of < mirror > instead of < configure >.
6. From the Adobe Flash CS4 menu, click < File > and < AIR Settings > and click the < Select
Icon Images > button.

Click the folder icon next to the 128 x 128 row.

Navigate to your source code directory and choose the < icons > directory.

Pick the corresponding icon and click < Open >.

Repeat for the other 3 icons and then click < OK > when done.

For the Digital signature, click < Change >.

Select your own certificate or you can use < diymagicmirror.p12 >.

The password is < mirror > in lowercase if using < diymagicmirror.p12 >.
7. Repeat step 6 for the file < mirror.fla >.
8. Launch the file C:\Program Files\DIY Magic Mirror\serproxy.exe or C:\Program Files\DIY
Magic Mirror (x86)\serproxy.exe if your Windows OS is 64-bit. This must be running before you
run the file < mirror.fla>.
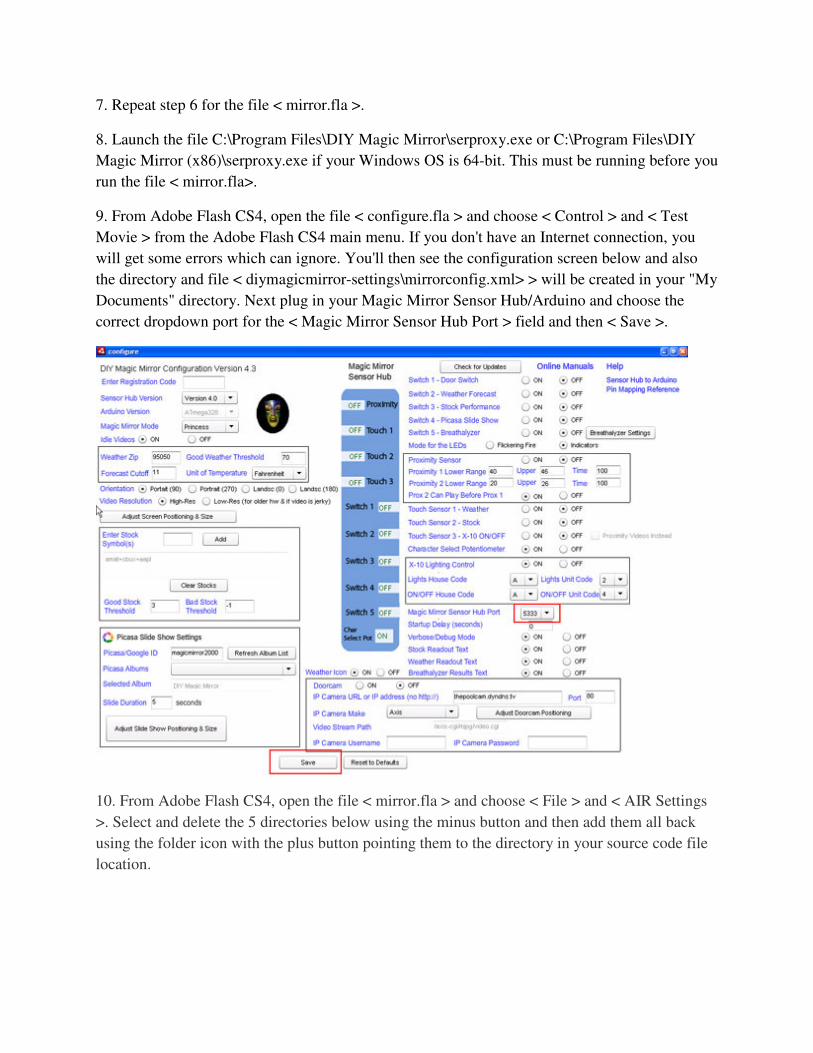
9. From Adobe Flash CS4, open the file < configure.fla > and choose < Control > and < Test
Movie > from the Adobe Flash CS4 main menu. If you don't have an Internet connection, you
will get some errors which can ignore. You'll then see the configuration screen below and also
the directory and file < diymagicmirror-settings\mirrorconfig.xml> > will be created in your "My
Documents" directory. Next plug in your Magic Mirror Sensor Hub/Arduino and choose the
correct dropdown port for the < Magic Mirror Sensor Hub Port > field and then < Save >.
10. From Adobe Flash CS4, open the file < mirror.fla > and choose < File > and < AIR Settings
>. Select and delete the 5 directories below using the minus button and then add them all back
using the folder icon with the plus button pointing them to the directory in your source code file
location.


11. From the Adobe Flash CS4 menu with < mirror.fla > open, choose < Control > and < Test
Movie >. If your Magic Mirror Sensor Hub/Arduino is plugged in and the correct port is set,
you'll get:

If the Magic Mirror Sensor Hub is not plugged in or the wrong port is set, you'll get:

12. Assuming everything ran correctly, you can now make your changes to the files <
configure.as > and < mirror.as >.
13. After you've made your changes and are ready to build your AIR install file, you can use the
certificate < diymagicmirror.p12 > with the password of < mirror > in lowercase.