pleural drains in adults - agency for clinical innovation · • ben harris • baerin houghton •...
TRANSCRIPT

Collaboration. Innovation. Better Healthcare.
CONSENSUS GUIDELINE
Pleural Drains in Adults
ACI Respiratory Network
Collaboration. Innovation. Better Healthcare.

ACI Respiratory Network – Pleural Drains in Adults – A consensus guideline Page 2
AGENCY FOR CLINICAL INNOVATION
Level 4, Sage Building
67 Albert Avenue
Chatswood NSW 2067
PO Box 699 Chatswood NSW 2057
T +61 2 9464 4666 | F +61 2 9464 4728
E [email protected] | www.aci.health.nsw.gov.au
SHPN: (ACI) 130351 ISBN: 978-1-74187-922-3
Produced by: ACI Respiratory Network
Further copies of this publication can be obtained from the
Agency for Clinical Innovation website at www.aci.health.nsw.gov.au
Disclaimer: Content within this publication was accurate at the time of publication. This work is copyright. It may be reproduced
in whole or part for study or training purposes subject to the inclusion of an acknowledgment of the source. It may not be
reproduced for commercial usage or sale. Reproduction for purposes other than those indicated above, requires written
permission from the Agency for Clinical Innovation.
Cover image: Preparing a patient for insertion of the pleural drain in the triangle of safety
Version: V2.4
Date Amended: 2/11/2016
© Agency for Clinical Innovation 2016
The Agency for Clinical Innovation (ACI) works with clinicians, consumers and managers to design and promote better healthcare for NSW. It does this by:
• service redesign and evaluation – applying redesign methodology to assist healthcare providers and
consumers to review and improve the quality, effectiveness and efficiency of services
• specialist advice on healthcare innovation – advising on the development, evaluation and adoption of
healthcare innovations from optimal use through to disinvestment
• initiatives including guidelines and models of care – developing a range of evidence-based healthcare
improvement initiatives to benefit the NSW health system
• implementation support – working with ACI Networks, consumers and healthcare providers to assist
delivery of healthcare innovations into practice across metropolitan and rural NSW
• knowledge sharing – partnering with healthcare providers to support collaboration, learning capability and
knowledge sharing on healthcare innovation and improvement
• continuous capability building – working with healthcare providers to build capability in redesign, project
management and change management through the Centre for Healthcare Redesign.
ACI Clinical Networks, Taskforces and Institutes provide a unique forum for people to collaborate across clinical
specialties and regional and service boundaries to develop successful healthcare innovations.
A priority for the ACI is identifying unwarranted variation in clinical practice and working in partnership with
healthcare providers to develop mechanisms to improve clinical practice and patient care.
www.aci.health.nsw.gov.au

ACI Respiratory Network – Pleural Drains in Adults – A consensus guideline Page 3
Acknowledgements
The Agency for Clinical Innovation (ACI) recognises the unique position of Aboriginal people in the history and
culture of NSW. The ACI would like to acknowledge the traditional owners of the lands referred to in this report.
We would also like to acknowledge and pay respect to elders of the communities covered in this report.
Firstly we would like to express sincere thanks to the large number of people involved in consultations for this
project who gave willingly of their time, experience and stories so that this report can truly reflect consensus for
safe practice and support clinicians and acute facilities to implement improved care processes for management of
adults with a pleural drain.
Special thanks to the Clinical Expert reference group members for their continual support of the project.
The commitment and enthusiasm of current and past working and reference group members was integral
to each phase of the project. Members showed a willingness to share their knowledge and skills that was very
much appreciated.
ACI Pleural Procedures Respiratory Clinical Expert Reference Group:
• Cecily Barrack
• Belinda Cochrane
• Mary Dunford
• David Foster
• Ben Harris
• Baerin Houghton
• Ben Kwan
• Matthew Peters
• Paul Torzillo
• Scott Twadell
• Adriaan Venter
• Jonathon Williamson
• Peter Wu
Pleural Drains Specialist Nurses Reference Group:
• Mayrose Chan
• Cheryl Dickson
• Mary Dunford
• Kylie Furness
• Ann Limpic
• Pat Lynch
• Cate McAlary
• Jocelyn McClean
• Catherine Reilly
• Patricia Reynolds
Thanks also to the Department Respiratory Medicine, Western Sydney Local Health District for permission to
include Pleural Procedures Training Form as an appendix.
The Agency for Clinical Innovation (ACI) is the lead agency in NSW for promoting innovation, engaging clinicians
and designing and implementing new models of care.
All ACI models of care are built on the needs of patients, and are underpinned by extensive research conducted in
collaboration with leading researchers, universities and research institutions.
For further details on the ACI visit: www.aci.health.nsw.gov.au
Cecily Barrack
Respiratory Network Manager

ACI Respiratory Network – Pleural Drains in Adults – A consensus guideline Page 4
Contents
Introduction 1
Be aware of the risks associated with pleural drains 2
Ten pleural drain risk reduction strategies 2
Pleural drain golden rules 3
Background 4
Section 1. Pre insertion of a pleural drain 5
Indications for pleural drains 5
Skilled operators 5
Thoracic ultrasound guidance 6
Pre-insertion risk assessment 6
Consent and pre medication 7
Confirm the site for drain insertion 8
Position the patient 8
Tube selection 9
Section 2. Insertion of a pleural drain 10
Equipment required for pleural drain insertion 10
Summary flowcharts 10
Seldinger technique 10
Insertion procedure 11
Blunt dissection 12
Pleural drain complications 14
Drainage systems 14
Immediate care post insertion of pleural drain 15
Secure the drain and connections 15
Section 3. Management and trouble shooting of pleural drains 16
Equipment required at bedside 16
Receiving a patient with an UWSD 16
Transferring a patient with an UWSD 17
Observations 17
Drainage 19
Flushing 23
Clamping 23
Unblocking a Pleural Catheter 24
Patient activity, hygiene and pain relief 27

ACI Respiratory Network – Pleural Drains in Adults – A consensus guideline Page 5
Section 4. Removal of a pleural drain 28
Indications for removal 28
Skilled operators 28
Prior to removal 28
Equipment for removal of pleural drain 29
Patient preparation 29
Preparation for removal of pleural drain 29
Role of the pleural drain remover 29
Role of assistant 30
Care after removal of a pleural drain 30
Patient education post removal 30
Glossary 31
Appendices 32
Appendix 1. Insertion of chest drain 32
Appendix 2. Diagnostic algorithm for the investigation of a unilateral pleural effusion 33
Appendix 3. Management of Spontaneous Pneumothorax 34
Appendix 4. Local health policy and procedures 35
Appendix 5. Pleural procedures training form 36
Appendix 6. Guidelines for assessing competency 37
Appendix 7. Chest drain observation chart 52
References 55

ACI Respiratory Network – Pleural Drains in Adults – A consensus guideline Page 1
Introduction
The Pleural Drains in Adults – Consensus Guideline has been developed with the aim to improve the care provided
to adult patients with a pleural drain in NSW acute hospital facilities. The recommendations contained within this
document may also be suitable for older adolescents requiring pleural drain insertion. The need for this consensus
guideline has arisen from concerns raised by respiratory clinicians related to instances of suboptimal and unsafe
clinical management of adult patients with pleural drains within NSW acute facilities. The clinician concerns were
substantiated through a Clinical Excellence Commission review of 185 pleural drain related incidents reported in
NSW (2010/11) which showed that two thirds were attributed to suboptimal clinical management.
The Agency for Clinical Innovation (ACI) Respiratory Network convened a Pleural Procedures group comprising
respiratory physicians and respiratory clinical nurse specialists in 2012. The ACI Pleural Procedures Group identified
the need for appropriate and safe care of patients with a pleural drain to be detailed in a consensus guideline. The
guideline describes aspects of clinical care, clinician skills and processes within a facility that if followed will reduce
the risks associated with the insertion of pleural drains (non-emergency), ongoing management, trouble shooting
and removal of pleural drains in adult patients.
The British Thoracic Society Pleural Disease Guidelines 20101-8 are widely accepted by respiratory clinicians as the
key evidence based guidelines for the investigation and management of pleural disease including specific pleural
drain procedures in adults. The ACI Pleural Drains in Adults – Consensus Guideline describes aspects of care that fall
outside the Pleural Disease Guidelines.
The recommendations for clinical care outlined in this consensus document are available to be incorporated into
local clinical resources with the aim to support health care professionals and facility managers within NSW Local
Health Districts to provide safe and effective care of adults with a pleural drain.
Exclusion
Indwelling Pleural Catheters or Tunnelled Catheters are specialised procedures which are performed in dedicated
units and as such are considered outside the scope of this document.

ACI Respiratory Network – Pleural Drains in Adults – A consensus guideline Page 2
Pleural procedures which involve the insertion of
intercostal catheters into the pleural cavity incur a high
risk of adverse outcomes including death.
The NSW Clinical Excellence Commission has identified
185 reported incidents related to pleural procedures in
NSW from January 2010 to October 2011.
Of the 185 pleural procedure incidents there were
Severity Assessment Code (SAC) 1 (n=6) and SAC 2 (n=5)
adverse events.
Clinical management was attributed as the principal
incident type in 69% of all incidents reported.
Incidents related to pleural drains occurred in both
metropolitan and regional facilities and within
operating theatres, critical care units, emergency
departments, specialised surgical and medical wards,
general wards and medical imaging departments.
Be Aware of the Risks Associated with Pleural Drains
1. Do not insert a pleural drain out of hours except in
an emergency.
2. Do not proceed with any pleural drain procedure if
you do not feel fully confident.
3. Do not proceed with pleural drain insertion without
further imaging if air (in the case of pneumothorax)
is not confirmed at the time of local anaesthetic
infiltration, including at the time of needle
decompression if a suspected tension pneumothorax.
4. Do not insert a pleural drain
• for pleural effusion outside the triangle of
safety without ultrasound guidance
• for pneumothorax in a position other than
5th intercostal space in the mid axillary line or
2nd intercostal space in the mid clavicular line
without ultrasound guidance.
5. Do not proceed with insertion of a pleural drain
without ultrasound guidance if fluid (in the case of
an effusion) is not aspirated at the time of local
anaesthetic infiltration.
6. Do not insert a pleural drain through breast tissue.
7. Do not use force when the guide-wire or intercostal
catheter is not moving easily during insertion.
8. In the event of accidental dislodgement or removal
of pleural drain - do not re-insert the same tube or a
new tube into the previous site .
9. Do not clamp a pleural drain when transporting
the patient.
10. Do not clamp a bubbling pleural drain.
Ten Pleural Drain Risk Reduction Strategies

ACI Respiratory Network – Pleural Drains in Adults – A consensus guideline Page 3
Clinicians
• In the event that any aspect of a pleural drain
procedure starts to go wrong or not as expected,
stop immediately and escalate for assistance.
• Thoracic ultrasound should be available and used
where intercostal catheters are inserted for
drainage of pleural fluid.
• Mandate a ‘Time out’ period prior to insertion to
confirm the correct side and site both clinically
and radiologically.
• Check coagulation profile prior to insertion or
removal of a pleural drain. Insertion or removal of
pleural drain should be avoided in anticoagulated
patients until international normalized ratio (INR)
<1.5 or platelets >50 x109/L is achieved.
• Ensure that a post insertion chest X-ray is
performed within one hour of insertion and
reviewed promptly by the Medical Officer (MO)
who inserted the pleural drain.
Facilities
• Each facility should reduce to a minimum the
number of designated clinical areas where a pleural
drain can be inserted.
• Each facility and the relevant clinical location should
have a designated ‘stop person’ whose role is to
prevent an inexperienced operator from
attempting or continuing to perform a pleural
drain procedure without appropriate supervision.
This designated ‘stop person’ should be either a
senior or respiratory specialist nurse within the
relevant ward or unit.
• Facilities should audit the range of pleural
intercostal catheters, drainage systems and
equipment that they stock for insertion and after
care. There is a prima facie case that reducing the
variety will reduce the risk of human error and
incorrect equipment being used.
• Facilities are encouraged to reduce to a minimum
the numbers of non-critical care areas in which
patients with a pleural drain in situ are cared for.
It is better to move the patient to a ward where
the pleural drain nursing expertise exists
(exceptions if patients require care in specialised
units e.g. oncology).
Pleural Drains Golden Rules

ACI Respiratory Network – Pleural Drains in Adults – A consensus guideline Page 4
Background
The Pleural Drains in Adults – Consensus Guideline has been developed by respiratory clinicians with the aim to
support clinicians and facility managers to provide a safe standard of care that aims to ensure that optimal patient
outcomes are achieved irrespective of where a patient with a pleural drain is being managed within an acute
hospital facility.
The insertion of a pleural drain and the ongoing care of patients with a pleural drain in situ carries the potential for
significant morbidity and mortality especially when insertion does not proceed as expected or complications occur.
The procedure of inserting a pleural drain into the pleural cavity to drain air or fluid may be performed as a life-
saving emergency procedure, as a planned procedure post surgery or as part of the medical management of
patients with pleural disease.
Over recent decades this has led to an expanded number of health care professionals from multiple specialties who
may be required to insert a pleural drain and provide ongoing care of adult patients with a pleural drain within a
variety of settings across acute facilities.
To ensure optimal outcomes for patients with a pleural drain, care needs to be provided by appropriately skilled
staff who maintain close vigilance of the patient, pleural drain and under water drainage system and implement
appropriate action in the event that complications arise.
The care processes and strategies described in the consensus guideline are available for NSW Local Health Districts
to incorporate into local pleural drain protocols or procedure documents.

ACI Respiratory Network – Pleural Drains in Adults – A consensus guideline Page 5
Indications for Pleural Drains
• Pneumothorax: tension pneumothorax
(following emergency needle decompression),
persistent or recurrent pneumothorax, large
spontaneous pneumothorax, pneumothorax in
any ventilated patient
• Pleural effusion: malignant, para-pneumonic or
other non-malignant causes e.g. liver failure
• Traumatic haemothorax or pneumothorax
• Empyema or pyothorax (the approach to
management of a pleural drain for treatment
of empyema may vary)
• Post-operative: thoracic, cardiac, oesophageal
or spinal surgery.
Skilled Operators
Medical Officer (MO) Training
All doctors expected to be able to insert a pleural drain
should be trained using a combination of:
• an initial theoretical component describing the
risks and techniques
• simulated practice
• directly observed supervised practice until
considered competent*.
• the trainee should ensure each insertion procedure
is documented in their log book and signed by the
experienced trainer (Appendix 5: Pleural Procedures
Training Form, an extract from the Western Sydney
Local Health District Pleural Procedure Log)
• The procedures of inserting a Small Bore Intercostal
Catheter by Seldinger technique and Large Bore
Intercostal Catheter by blunt dissection should be
performed by operators who have competency in
the specific insertion procedure and its indications,
risks and complications (See Appendix 6 Guidance
for assessing competency in pleural procedures for
advanced trainees and specialist nurses)
• In the anticipated absence of fluid or air at the
time of insertion (e.g. prophylactic drains) the
intercostal drain should only be inserted by
operators who have been deemed competent in
the specific procedure and its indications, risks
and complications.
Pleural Drain Endorsed Nurse
A facility endorsed pleural drain nurse (one with prior
experience assisting in the insertion of intercostal
catheters and the management of pleural drains and
UWSD) is present throughout the procedure. See
Appendix 6 Guidance for assessing competency in
pleural procedures for advanced trainees and
specialist nurses.
A procedure safety checklist level 2 is undertaken
by MO operator and nurse
• Check correct patient
• Check the correct site both clinically and
radiologically
• Consent
• Allergies
• Check anti coagulation status.
Pre insertion of a pleural drain
Section 1
*The MO performing the procedure will have been deemed competent through having performed supervised insertions of pleural drains (large bore and/or small bore intercostal catheters) based on operative credentialing systems in place at their respective facility.
MO will have previously witnessed one such insertion AND has present a MO credentialed in large bore and/or small bore intercostal catheter (ICC) insertion (as applicable) directly supervising the procedure throughout.
OR

ACI Respiratory Network – Pleural Drains in Adults – A consensus guideline Page 6
The nurse’s role is to:
• ensure resuscitation trolley available
• ensure the required equipment is present
• monitor patient’s vital signs and observe for
evidence of patient deterioration throughout
the procedure
• in the event of patient deterioration follow
Between the Flags escalation process assist and
maintain optimal patient position
• ensure a sterile field is maintained throughout
the procedure
• observe the proceduralist to ensure no deviation
from correct insertion procedure
• provide patient advocacy
• ‘Call Stop’ if unwarranted risks are observed before
or during the procedure and escalate for assistance.
Thoracic ultrasound guidance
Real time bedside thoracic ultrasound guidance is gold
standard for the insertion of non-emergency pleural
drains for management of pleural fluid.
Pre-insertion risk assessment
The admitting consultant should be informed prior
to the procedure and again informed if there are any
complications resulting from the procedure.
The decision to use needle aspiration or pleural drain
should consider the operator’s experience/ competence
in each of these procedures.
Check correct patient, correct site clinically and
radiologically.
Obtain written consent (may waiver in emergency
situations and critical care areas).
Safe environment
• Insertion of non-emergency pleural drains should
not take place out of normal day time working
hours
• Pleural aspirations and pleural drains should be
inserted in a clean area using full aseptic technique.
• Patient privacy should be respected and wherever
possible insertion of a pleural drain should be
performed in a specifically dedicated procedure
room (as defined by NSW Ministry of Health) or for
isolated patients within their isolation room.
Underlying abnormal lung pathology
• Needle aspiration for management of
pneumothorax is not recommended as first line
management in a patient with underlying
abnormal lung pathology
• Differential diagnosis between a pneumothorax
versus bullous disease or complete lung
consolidation versus large pleural effusion requires
careful radiological assessment
• Drainage of a pleural space that has had prior
surgical intervention must only be performed after
consultation with the patient’s cardiothoracic
surgeon/consultant physician
• Lung that is densely adherent to the chest wall
throughout the hemi thorax is an absolute
contraindication to pleural drain insertion.
Haemorrhage
• There is significant risk of haemorrhage when
inserting a pleural drain in any patient with a
coagulopathy or platelet deficiency
• In non-emergency situations, coagulopathy should
be corrected prior to insertion of a pleural drain or
pleural aspiration
• Insertion of a pleural drain or pleural aspiration
should be avoided in anti-coagulated patients until
international normalized ratio (INR) <1.5 or
platelets >50 x109/L. It is recommended not to give
heparin/clexane on the day of insertion or if already
administered, to delay insertion until six hours after
delivery of the last dose.
Infection
• Antibiotic prophylaxis is not recommended for
non-trauma patients requiring a pleural drain
• Antibiotic prophylaxis should be considered for
trauma patients requiring pleural drains, especially
after penetrating trauma.
• A single dose of cephazolin 2g, given intravenously,
provides adequate antimicrobial cover. Where
cephazolin is contra -indicated, a single dose of
vancomycin 15mg/kg, given by intravenous
infusion, is recommended.
Non invasive ventilation (NIV)
In the presence of a pneumothorax, the use of NIV is
not contraindicated once the patient has an intercostal
catheter inserted with a patent pleural drain which
is oscillating and connected to an under water seal
drainage system (UWSD) bottle.
ACI Respiratory Network – Pleural Drains in Adults – A consensus guideline Page 7
Consent and pre-medication
Explain the procedure and associated risks to
the patient.
Obtain written consent for the procedure (may waiver
in emergency situation and critical care areas).
Consider the need for intravenous (IV) access prior to
commencing the procedure.
Record baseline observations – temperature, blood
pressure, respiratory rate, pulse and oxygen saturation.
To reduce the pain associated with insertion of a
pleural drain, analgesia should be administered as a
premedication if required, and should be prescribed for
all patients with a pleural drain in place.
Pre-medication
Pre-medication should consist of an opioid to achieve
adequate analgesia prior to the commencement of the
procedure and if required benzodiazepine for reducing
anxiety unless there are contraindications to use. Aim to
avoid giving further opioids once benzodiazepine has
been administered.
Where both an opioid and benzodiazepine are used,
the procedure and immediate post insertion care is
recommended to occur in a close observation unit or
critical care area.
Sedation
If formal sedation is to be used during the procedure,
this should be given in line with recommendations
of the Australian and New Zealand College of
Anaesthetists for conscious sedation which includes
the need for IV access, adequately trained staff
and monitoring including oximetry throughout the
procedure9.
Sedation minimum requirements:
• Patient triage and risk assessment
• Someone to monitor the airway
• Some with bag and mask ventilation skills
https://www.anzca.edu.au/resources/professional-
documents
Local anaesthetic
• Lignocaine 1% with or without adrenaline, should
be infiltrated prior to the procedure paying
particular attention to the skin, periosteum and
the pleura. Do not exceed the maximum volume
of lignocaine
• Lignocaine 1 % without adrenaline
| Maximum dose is 3 mg / kg
| 50 kg adult - 150 mg - 15 ml
| 70 kg adult - 210 mg - 21 ml
| 90 kg adult - 270 mg - 27 ml
• Lignocaine 1 % with adrenaline (1:100 000)
| Maximum dose is 7 mg / kg
| 50 kg adult - 350 mg - 35 ml
| 70 kg adult - 490 mg - 49 ml
| 90 kg adult - 630 mg - 63 ml
• Lignocaine 2% should not be used
• Particular care should be taken in relation to the
dose of lignocaine where a pleural drain is required
soon after another procedure for which local
anaesthetic has been used (especially bronchoscopy
or fine needle airway biopsy)
• Infiltrating local anaesthetic. Make sure the patient
has no allergies. Using 2-5mls infiltrate the area
where the skin incision is to be made. Then pass the
needle vertically over the top of the rib (so as to
avoid the intercostal nerve/neurovascular bundle),
while maintaining a negative pressure on the
plunger, until air or fluid is aspirated into the
syringe. Withdraw the needle slowly until air or
fluid just stops being aspirated. The tip of the
needle is now in the extrapleural plane. Withdraw
the needle slowly injecting the remaining local
anaesthetic as you go. Allow sufficient time for
local anaesthetic (LA) to take effect before
commencing insertion.

ACI Respiratory Network – Pleural Drains in Adults – A consensus guideline Page 8
Confirm the site for drain insertion
The marking of a site using thoracic ultrasound for
subsequent remote aspiration or pleural drain insertion
is not recommended.
Real time bedside ultrasound imaging, wherever
available, should be used to select the appropriate site
for pleural drain placement.3, 10
A CXR must be available at the time of drain insertion
unless the patient is in shock or has haemodynamic
compromise from the tension pneumothorax. In this
instance, an urgent CXR should be obtained after
needle decompression.
A pleural drain should not be inserted without further
image guidance if:
• the expected free air (in case pneumothorax) or
fluid (in case of pleural effusion) cannot be
aspirated with a needle at the time of inserting the
local anaesthesia
• the expected free air is not evident at the time of
needle/cannula decompression of suspected
tension pneumothorax.
Triangle of safety
Insertion of a pleural drain should be made within the
triangle of safety (Figure 1) with the following potential
exceptions:
• where breast tissue covers the triangle of safety
and insertion would require the drain to pass
through breast tissue
• when an ultrasound assessment has defined a
better position for access to a pleural effusion
• the mid clavicular line is considered more
appropriate for management of pneumothorax.
Figure 1: Triangle of Safety
Havelock T et al. Thorax 2010;65:i61-i76 Copyright © BMJ Publishing Group Ltd & British Thoracic Society
Position the patient
The preferred position for standard pleural drain insertion is on the bed, head and trunk elevated 30-45 degrees
and slightly rotated, with the arm on the side of the lesion behind the patients head or on the hips to expose the
lateral decubitus position. (Figure 2).
An alternative is for the patient to sit upright leaning over an adjacent table with a pillow under the arms or in the
lateral posture.
Figure 2: Common patient positions for chest drain insertion
Havelock T et al. Thorax 2010;65:i61-i76. Copyright © BMJ Publishing Group Ltd & British Thoracic Society.

ACI Respiratory Network – Pleural Drains in Adults – A consensus guideline Page 9
Tube selection
Tube selection for non-emergency pleural drains
should be made in consultation with the admitting
medical officer.
Types of Pleural Drains
Small Bore Pleural Catheters +<20Fr
Indications: spontaneous pneumothorax: free flowing
pleural effusions or empyema11-13.
Small bore catheters may include straight catheters or
pigtail catheters with or without an indwelling tension
mechanism.
The procedure is less painful for the patient but there is
increased risk of tube blockage and failed drainage
Large Bore Intercostal Catheter (ICC) >20Fr
Indications: haemothorax, acute trauma, open
thoracostomy, post cardiothoracic, oesophageal or
spinal surgery.
Exclusion
Indwelling Pleural Catheters or Tunnelled Catheters are
a specialised procedure that is performed in dedicated
units and therefore considered outside the scope of
this document.
Pleural Pigtail Catheters have a variety of
locking mechanisms.
Facilities should ensure that information related to
type of pigtail drain and locking mechanism in use is
available for relevant clinicians.
Figure 3: Large Bore Intercostal Catheter and Pleural Pigtail Catheter
Figure 4: Pigtail drain with thread formation of pigtail shape
Table 1: Tube Selection in adults
Pleural Drain Insertion Technique
Haemothorax Pleural Effusion PneumothoraxPyothorax Empyema
Blunt DissectionLarge Bore
Size >20 Fr Size >20 FrSize 24 Fr traumatic only
Size >20 Fr
Seldinger TechniqueSmall Bore
Not applicableFine bore tube for low viscosity effusions only
8-14 FrorSmall bore only
Size ≥14 Fr

ACI Respiratory Network – Pleural Drains in Adults – A consensus guideline Page 10
Equipment required for pleural drain insertion
• Large or small bore kit as applicable
• Sterile gloves and gown
• Skin antiseptic solution (e.g. iodine or 2%
chlorhexidine in 70% alcohol)
• Sterile drapes
• Gauze swabs
• A selection of syringes and needles (19-25 gauge in
adults)
• Local anaesthetic (e.g. lignocaine 1%)
• Scalpel and blade
• Suture kit
• Suture (stout and non-absorbable /1.0 - 2.0 silk
or prolene)
• Instrument for blunt dissection if required
(curved clamp)
• Guide wire and dilators for Seldinger technique
• Chest tube
• Connecting tube
• Closed drainage system (including sterile water if
UWSD is being used)
• Dressing equipment may also be available in a
kit form
• Chest tube clamps (required for small or large bore
catheters in the absence of 3 way tap).
Summary Flowcharts
• Appendix 1: Insertion of Chest Drain (Havelock T et
al. Thorax 2010; 65:i61-i76)
• Appendix 2: Diagnostic algorithm for the
investigation of a unilateral pleural effusion
(Hooper C et al. Thorax 2010; 65:ii4-ii17)
• Appendix 3: Management of Spontaneous
Pneumothorax (MacDuff A et al. Thorax 2010;
65:ii18-ii31)
Seldinger Technique
Small Bore Intercostal Catheters ≤20 Fr
Includes straight pleural catheters or flexible pigtail
catheters.
(*New intercostal catheters > 20Fr which may be
inserted with Seldinger technique are available for
use in a limited number of facilities. In this instance,
operators should follow local facility protocols and
specific manufacturer’s instructions.)
• Due to the need to insert a needle into the pleural
space blindly, it should only be inserted into the
pleural space at a site known to be free of
underlying lung or cardiac structures
• Do not proceed without further imaging if air
(pneumothorax) or fluid (pleural effusion) is not
confirmed at the time of local anaesthetic
infiltration.
Immediately prior to the procedure ensure:
• Time Out check has been completed
• Baseline observations including SpO2 are taken and
recorded
• Supplemental oxygen is administered
• The patient has received adequate analgesia
• SpO2 continuous monitoring is in place
• The small bore catheter kit is present.
Insertion of a pleural drain
Section 2
ACI Respiratory Network – Pleural Drains in Adults – A consensus guideline Page 11
Insertion site
Wherever available the choice of insertion site for
a pleural drain should be made based on real time
ultrasound guidance. This may be done immediately
prior to the procedure at the bedside (as long as the
patient’s position during the chest drain insertion
remains the same as during the ultrasound) or
ultrasound may be performed during the procedure if
the machine is appropriately set up before hand and a
sterile sleeve is used for the ultrasound probe.
The marking of a site using thoracic ultrasound for
subsequent remote aspiration or pleural drain insertion
is not recommended.
Where real time ultrasound guidance is not used, the
insertion site should only be
• within the triangle of safety
• above the mid-clavicular line in the second
intercostal space (pneumothorax only).
Sterile procedure
Perform hand hygiene: aseptic technique requires
operator to use mask, sterile gown and gloves. Apply
aseptic skin prep widely around the insertion site and
allow three minutes to dry. Drape widely.
Local anaesthetic
• Infiltrate local anaesthetic widely around the
insertion site and down to the pleural space
• Injection of local anaesthetic into the pleura (also
allowing confirmation of the presence of air/fluid)
is advisable
• Do not inject again into the tissues once pleural
fluid has been aspirated into the local anaesthetic
syringe
• Allow at least five minutes for local anaesthetic to
work.
Insertion Procedure
(Note: some aspects of insertion will depend on the
specific kit used).
• Attach the needle to the stop syringe
• Insert the needle firmly and confirm the position is
within the pleural space by aspirating air
(pneumonthorax) or fluid (effusion). Then proceed
to pass the guidewire through so at least half the
wire is in the pleural cavity. Avoid insertion of
excess guidewire as this may increase the risk of
kinking
• Remove the assembly needle and pass an 8-14 Fr
dilator over the wire to create a tract
• Be aware that a standard dilator fully inserted can
reach mediastinal structures and therefore the
dilator should be inserted over the wire only so far
as to allow its greatest diameter to have passed
through the full chest wall. Chest wall width can
and should be measured by real time bedside
ultrasound or can be estimated at the time of
instilling the local anaesthetic or the kit needle
(using the depth of insertion at which fluid or air is
aspirated)
• Remove the dilator (leaving the wire in situ) and
pass the catheter over the wire into the pleural
cavity. Ensure all drainage holes of the catheter are
completely within the pleural cavity. Consider
utilizing the markers on the catheter to estimate
how far the catheter will need to be inserted as this
may avoid kinking of the catheter and the
subsequent need for removal of sutures and
withdrawal of the catheter
• Remove the guidewire and close the stop cock to
ensure that no air enters the pleural cavity
• Secure to the skin with suture. Use a silk 0 or 1-0
suture. Place a ‘stay’ suture to close the skin incision
at the site of insertion which includes adequate skin
and subcutaneous tissue to ensure it is secure
• The ends of this suture are left long, then wrapped
tightly and repeatedly around the chest tube and
tied securely. The sutures must be tied tightly
enough to avoid slippage
• Secure the drain by taping to the skin at another
site. This does not replace the need to stitch the
drain firmly in place

ACI Respiratory Network – Pleural Drains in Adults – A consensus guideline Page 12
• Dress with water permeable transparent dressing so
the insertion site is visible at all times
• A suture to close the wound is not usually required
for small bore pleural drain
• When the tube is inserted to drain fluid, inclusion
of a three-way tap is possible for some drain types
which will facilitate sterile flushing of the catheter
• Observe the five moments of hand hygiene.
Confirm drain position
A chest x-ray should be performed within 1 hour and
reviewed by the inserting MO within four hours to
confirm the tube position and successful drainage of
air/fluid.
Document the procedure in patient’s medical record
and medication chart
• Sedation given and total volume local
anaesthetic instilled
• Depth of insertion and any complications
• Type of tube inserted including serial number and
bar code
• Method of drain fixation and wound closure
• Suture or locking mechanisms for removal / to be
disabled before removal
Blunt Dissection
Large Bore Intercostal Catheter >20 Fr
• Large Bore Intercostal Catheters should only be
inserted by operators who have specific
competency in this technique
• The technique of ‘finger sweep’ to confirm the
absence of pleural adhesions is unreliable in
inexperienced hands and should be only be
performed by experienced operators
• Thoracic ultrasound should be utilized to confirm
the position of the pleural collection/
pneumothorax. This may be done immediately prior
to the procedure at the bedside (as long as the
patient’s position during the chest drain insertion
remains the same as during the ultrasound) or
ultrasound may be performed during the procedure
if the machine is appropriately set up before hand
and a sterile sleeve is used for the ultrasound probe
• Do not insert pleural drain through breast tissue
• Mark the 5th intercostal space in the mid axillary
line (or use the site identified by real time
ultrasound). As a rule of thumb in male adults,
use a hand’s breadth lateral to and no lower than
the nipple
• Trocars should not be used.
Immediately prior to the procedure ensure that:
• Time Out check has been completed
• Baseline observations including SpO2 are taken
and recorded
• The patient has received adequate analgesia
• SpO2 continuous monitoring has commenced.
Blunt Dissection Procedure
• Perform hand hygiene
• Aseptic technique – everyone in the room should
wear a mask. The operator requires, sterile gown
and gloves in addition to a mask
• Clean the skin and apply 2% chlorhexidine skin prep
or equivalent from at least the nipple line to the
posterior axillary line. Allow the prep to dry fully.
Drape widely
• Infiltrate local anaesthetic widely around the
incision site and down to the pleural space. Allow
five minutes for local anaesthetic to work. If
insufficient analgesia, obtain a new syringe of local
anaesthetic and re-inject to a maximum of 20mL of
1% solution (healthy 70kg adult male)
• Do not inject into the tissues once fluid has been
aspirated into the local anaesthetic syringe
• Do not proceed without further imaging if air/fluid
is not confirmed at the time of local anaesthetic
infiltration in the pleural space
• Incise the skin (along the rib or perpendicular to the
rib) to a sufficient length to allow passage of finger
or tube
• Place two sutures in the optimal position in
preparation for securing the drain following
insertion

ACI Respiratory Network – Pleural Drains in Adults – A consensus guideline Page 13
• Blunt dissect tissue to pleural space using Harrison-
Cripp forceps. When dissecting, it is helpful to
imagine where you want the tip to lie once it is
placed, and to make your dissection in that
direction as the tube will generally follow the tract
that you have prepared for it
• It is difficult to anaesthetise the parietal pleura.
Addition of more clean local anaesthetic (total
within the maximum volume limit) at this point may
be required
• Blunt dissect into the pleural space. Take care at this
stage to ensure that you are dissecting towards the
same intercostal space. It is easy for the skin to ride
up or down one space
• Insert the tube into the tract formed by blunt
dissection. It may help to clamp the tube using
the distal part of the forceps to achieve insertion.
In spontaneous breathing patients clamping
the UWSD end of the tube may also be helpful
to prevent loss of fluid or air whilst securing
the connections
• Insert the tube to ensure the most distal tube
hole is within the pleural space. If possible, direct
the tube tip basally to collect fluid or apically to
collect air but this is not critical if there are no areas
of loculation
• Attach the tube to an UWSD which has been set up
per manufacturer’s instructions
• Release the clamp (if used) from the distal tube
once connected to UWSD
• Suture the skin to close any gaping. A mattress
suture or sutures across the incision are usually
employed and, whatever closure is used, the stitch
must be of a type that is appropriate for a linear
incision. Complicated purse string sutures are not to
be used as they convert a linear wound into a
circular one that is more painful for the patient and
may leave an unsightly scar
• A horizontal mattress suture straddling the tube
should be tied loosely with a significant length
of suture
• The tube should be secured using a separate deep
suture tied at the skin
• The ends of this suture are left long, then wrapped
tightly and repeatedly around the chest tube and
tied securely. The sutures must be tied tightly
enough to avoid slippage
• Secure the drain by taping to the skin at another
site. This does not replace the need to stitch the
drain firmly in place
• Include adequate skin and subcutaneous tissue to
ensure it is secure
• In the case of a pleural effusion, fluid may be
collected for diagnosis:
| pH - Blood gas syringe
| Blood culture - 2x Blood Culture bottles
| Cytology - 2x Heparinised cytology bottles
| Microbial culture and sensitivity (MC&S) -
2x MC&S yellow jars 1 red, + purple/yellow
blood tubes
• Apply a sterile occlusive dressing
• Secure all connections with zinc tape or equivalent
• Observe the five moments of hand hygiene.
Confirm drain position
A chest x-ray should be performed within one hour and
be reviewed by the inserting MO within four hours to
confirm the tube position, exclude new pneumothorax
and confirm the successful drainage of air or fluid.
Document procedure in patient’s medical record and
medication chart
• Sedation given and total local anaesthetic instilled
• Depth of insertion and any complications
• Type of tube inserted including serial number and
bar code
• Method of fixation and wound closure
• Sutures that are required to be removed before
tube removal.
ACI Respiratory Network – Pleural Drains in Adults – A consensus guideline Page 14
Pleural drain complications
• Tension pneumonthorax
• Trauma to intrathoracic structures, intra-abdominal
structures and intercostal muscles
• Re-expansion pulmonary oedema
• Haemorrhage
• Incorrect tube position
• Blocked tube
• Pleural drain falls out
• Subcutaneous emphysema
• Infection.
Preventing a pleural drain from falling/pulling out
• Insert chest drain so the proximal holes are well
inside the chest wall
• Secure drain with a deep suture to skin, wrapped
tightly around the tube to prevent slippage
• Secure the drain at a second site by taping to
the skin
• Ensure adequate length of tubing to the under
water drain to minimise traction on the chest tube
• Care when transferring patient from bed to bed/
bed to chair
• Patient education.
Drain malposition
• If malposition of a pleural drain is suspected, a CT
scan is the best method to determine position. If
access to urgent CT scan is not available, arrange an
urgent repeat CXR and urgent review
• A chest drain may be withdrawn to correct a
malposition but should never be pushed further in.
Re-expansion pulmonary oedema
• Typical clinical signs of re expansion pulmonary
oedema include shoulder tip pain, coughing,
a sudden drop of blood pressure and/or
oxygen saturations and increased respiratory
rate and distress
• A maximum fluid drainage of 1.0 -1.5 litres per hour
is recommended to reduce the risk of re-expansion
pulmonary oedema
• In patients of small stature or those with complex
comorbidities, provision should be made for setting
the maximum aspiration volume at less than one
litre, or specify an initial volume, clamp and wait
time before proceeding to drain
• Define and document maximum anticipated
hourly fluid drainage based on the individual
clinical need for a pleural drain. The MO should be
notified if maximum output is exceeded over two
consecutive hours
Recommended actions if haemodynamic instability
or severe hypoxemia suspected to be related to re
expansion pulmonary oedema are present:
• Prevent further air or fluid drainage
• Administer high-flow oxygen
• Place a rapid response call.
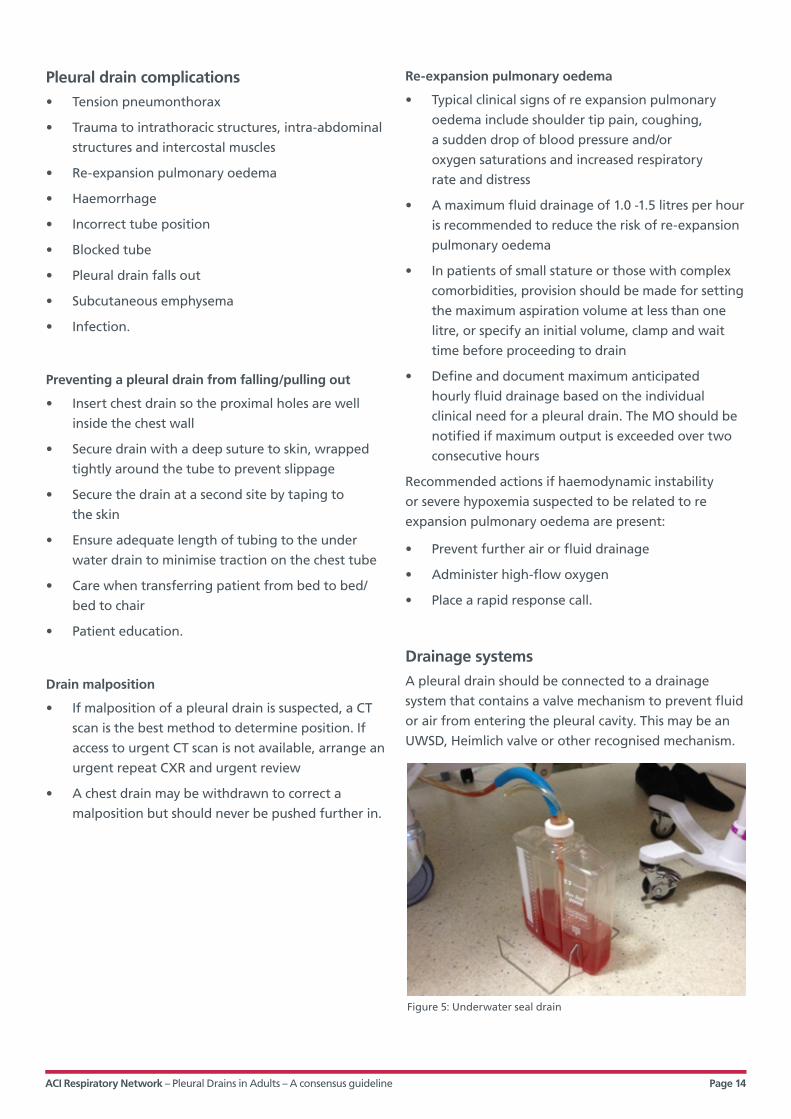
Drainage systems
A pleural drain should be connected to a drainage
system that contains a valve mechanism to prevent fluid
or air from entering the pleural cavity. This may be an
UWSD, Heimlich valve or other recognised mechanism.
Figure 5: Underwater seal drain

ACI Respiratory Network – Pleural Drains in Adults – A consensus guideline Page 15
Immediate care post insertion of pleural drain
Observations
Frequency
Commence immediately post insertion.
Continue frequently (< 30 minutes) until the patient is
stable and drainage volumes are within specified limits.
Then continue every 30 minutes for two hours.
Then hourly for four hours.
Once stable continue observations 4/24.
Patient observations
Closely observe respiratory status for signs of
respiratory distress.
Check that air entry is equal and the trachea is midline
Blood pressure (BP), Temperature, pulse, respiration
(TPR), SpO2
Pleural drain observations
Drainage: oscillation: air leak: suction (if applicable) and
insertion site (Full description – see Section 3)
In adults >100mls of blood drained within 1-2 hours is
very significant and must be reported to MO as the loss
may need to be replaced.
Record pleural drain observations on an UWSD chart
Secure the drain and connections
The drain itself should be secured with a suture after
insertion to prevent it from falling out. The chosen
suture should be stout and non-absorbable (silk or
prolene) and it should include adequate skin and
subcutaneous tissue to ensure it is secure.
Commercially available dressings which fix to the skin
and then attach to the drain may also be used. It should
be emphasized that, whilst these dressings are useful
for stabilizing the drain at the skin and preventing
kinking at the skin surface, they do not replace the
need to stitch the drain firmly in place.
The use of an omentum tag of tape or specific device
(Flexitrak) is recommended as this allows the tube to lie
a little away from the chest wall which will prevent the
tube kinking and reduce the pain experienced by the
patient due to tension or dragging at the insertion site.
The connections between the intercostal catheter and
drainage tubing should be secured with non- stretch
tape to prevent dislodgement. Taping should be applied
to allow the connection point/s to be clearly visible.
Insertion site dressing
Large amounts of tape and padding to dress the site are
unnecessary and may restrict chest wall movement and/
or increase moisture collection. A transparent dressing
allows the wound site to be inspected by nursing staff
frequently for leakage or infection. (See Figure 10:
Insertion site dressings in Section 3.)
Figure 6: The omental tape technique
Havelock T et al. Thorax 2010;65:i61-i76. Copyright © BMJ Publishing Group Ltd & British Thoracic Society.
Figure 7: Connecting intercostal catheter to drainage tubing

ACI Respiratory Network – Pleural Drains in Adults – A consensus guideline Page 16
If multiple drains are present, label each drain so that
they can be easily identified (e.g. apical or basal drain).
• All patients with a pleural drain should be cared for
by a medical or surgical team experienced with
intercostal catheter management and nursed on a
ward familiar with the care of intercostal catheters
and drainage systems
• The UWSD should be kept below the level of the
patient’s chest at all times
• Reassure the patient frequently and reinforce their
need to adhere to the correct UWSD position
• Provide adequate pain relief whilst a pleural
drain is in situ.
Equipment required at bedside
• Clamps (for emergency use only) – the type and
number as per facility or unit protocol (Howard
Kelly: smooth angle bladed clamps)
• Bottle frame or carrier (if not inbuilt in the
UWSD system)
• UWSD observation chart
• Non stretch tape to secure all connections.
Receiving a patient with an UWSD
Always check the following:
• Ensure the system is set up according to
manufacturer’s guidelines to accommodate both
wet and dry suction systems
• Check all connections and ensure that they are
visible and reinforced with non-stretch tape
• Ensure the tubing is long enough to allow the
patient to move comfortably without pulling
on the tube
• If using a wet seal system, ensure that the
underwater seal is activated i.e. that the water level
is set as per system instructions, and that the rod is
immersed 2cm under the water
• The outlet from the UWSD must be open to the
atmosphere to promote escape of any air present
within the pleural space. Occluding the outlet can
cause tension pneumothorax. The only exception is
when low wall suction is applied to the UWSD
outlet to restore negative pressure to the pleural
space and to promote lung re-expansion
• Alert Suction. Set suction control according to the
specific drainage system instruction. In the absence
of an inbuilt suction control mechanism, use low
pressure wall suction 3-5 kpa and set to the correct
pressure as ordered
• In hospitals where high level wall suction gauges
are available, these should be changed to low
suction gauges before any suction is applied to an
UWSD system which requires low range 3-5 kpa.
Low wall suction refers to 20mmHg or 3 Kpa.
Staff should take care to accurately read suction
pressure when selecting low wall suction pressure as
mmHg or Kpa on the dial.
Management and trouble shooting of pleural drains
Section 3
Figure 8: A low wall suction unit which displays both mmHg and Kpa.

ACI Respiratory Network – Pleural Drains in Adults – A consensus guideline Page 17
Transferring a patient with an UWSD
Transfer of Care must be in line with bedside
handover requirements and include verbal and
written documentation.
All patients being transported from Operating Theatre,
Radiology or Emergency Department with an UWSD
bottle must have a RN escort or Enrolled Nurse (EN)
who is accredited to care for UWSD.
• Never clamp an UWSD tube while transporting
a patient
• The UWSD bottle/s needs to remain below the
patient’s chest at all times
• MO must document if a patient can come off
suction for transfer to and the duration of a
procedure. In the case of CXR – a portable CXR
will be required unless removal of suction and
adequate time off suction has been documented
by MO
• If suction is required during a procedure –
arrangements must be made for suction to be set
up prior to transfer
• For showering a patient, extension tubing may be
applied to existing tubing or a MO must document
that suction may be paused during showering
• Large bore catheter attached to UWSD must have
clamp(s) available on transfer – note for use only in
an emergency situation
• Small bore catheter can use the three way tap (if
present) or locking mechanism for use in an
emergency situation during transfer
• Provide handover including instructions on care of
the specific UWSD.
Observations
Patient Observations
Frequency – minimum four hourly
Physical assessment to include particular attention to
the respiratory status:
• observe for the development of respiratory distress
• chest auscultation to listen for bilateral air entry
• RR, SpO2, HR, BP, temperature and capillary refill
• pain assessment
• record baseline observations of the drainage
system
• bowel motions when narcotic and codeine based
analgesia is ordered.
Observation of UWSD
Regular and accurate observation of air leak, oscillation
and drainage which is documented on an UWSD chart
is essential.
Limitations for Practice. Observations are performed by
an RN or EN (an EN must be specifically instructed in
the procedure and the RN remains responsible
reviewing the observations and for interpretation of
measurements). See Appendix 6 Guidance for assessing
competency in pleural procedures for advance trainees
and specialist nurses.
• Observations are recorded on UWSD Chart (See
Appendix 7, Chest drain observation chart)
• Frequency recommended hourly
• Check insertion site and tube for dislodgement
each time UWSD observations are performed to
ensure patient safety
• Measure and record depth of ICC insertion at the
skin 4/24
• If suction is applied – check suction is set at the
correct pressure

ACI Respiratory Network – Pleural Drains in Adults – A consensus guideline Page 18
Air leak
Air leak is indicated by bubbling in UWSD bottle.
A sudden large volume air leak may indicate
bronchopleural fistula.
Sudden cessation of air leak may indicate malfunction
of UWSD system – look for tube occlusion, tube
disconnection, patient sitting on the tube or kinking.
Documenting air leak
++++ Large amount, bubbling all the time e.g. large
pneumothorax, large excessive intra thoracic
pressures on inspiration and expiration.
+++ Moderate amount, bubbling on every
spontaneous expiration, or positive ventilated
breath in patients receiving mechanical
ventilation.
++ Minimal amount, bubbling when talking or
small air leak, occasionally on spontaneous or
ventilated breath (mechanical breath).
+ Bubbling on forced expiration e.g. cough.
Nil No Bubbles.
Oscillation (Respiratory Swing)
Oscillation reflects changes in intrathoracic pressure
during breathing and is indicated by movement of fluid
in the tube.
Oscillation is observed when the patient is NOT
on suction.
Record oscillation as present - it is not necessary to
quantify oscillation.
When suction is applied:
• Removal of suction for observations should only
be performed when this is clearly defined and
documented within a unit or facility protocol
and the instruction and frequency is clearly
documented.
• Oscillation does not occur when suction is applied
(UNLESS patient has had major thoracic surgery
with large intrathoracic volumes).
• Where a patient is on suction, staff generally do
not disconnect from suction to check for oscillation
but document ‘on suction’ on the UWSD
observation chart. Measurement of fluid level in
UWSD must be performed on suction and
documented as such.
• Removal of suction breaks the seal and delays
patient progress.
Absence of Oscillation
If Oscillation is absent, it may mean one of four things:
• The patient is lying on the tube, leading to
occlusion of the drain
• The tube is blocked. If examination reveals no
kinking and changing the patient’s position does
not rectify the problem, the absence of a swing
should be reported to the medical officer
• The chest tube has been dislodged and is no longer
within the pleural space
• The lung has fully expanded.
ACI Respiratory Network – Pleural Drains in Adults – A consensus guideline Page 19
Drainage
The amount and appearance of fluid is recorded on UWSD chart.
Table 2: How to measure and record drainage
Amount of drainage Drainage type
• Drainage is measured as level above the 0 ml marking on the bottle
• The amount is accumulative
• Total drainage returns to 0mls when the bottle is changed
• Amount drainage should decrease over a 48 hour period
• If >100 mls of blood drained post procedure/surgery in 1-2 hours this is very significant and must be reported to an MO as the loss may need to be replaced.
Record appearance
HS = HaemoserousHP = HaemopurulentP = PurulentS = Serous
Draining of a large metastatic or pneumonic
pleural effusion
• A large effusion should be drained in maximum
volumes of 1000 -1500 mls at one time, with lesser
volume limits applicable dependent on patient
weight and physical condition. Greater drainage
than the defined maximum amount may lead to
re-expansion pulmonary oedema
• Typical clinical signs of re expansion pulmonary
oedema include shoulder tip pain, coughing,
a sudden drop of blood pressure and/or
oxygen saturations and increased respiratory
rate and distress
• Normal practice is to drain a pre- determined
amount, then clamp or turn off drain for 15
minutes and reassess the patient. If patient
observations show no deterioration, unclamp
and continue to drain
• If signs of patient deterioration, call for urgent
MO review or escalate for clinical review or call for
a rapid response as applicable
• The drain should not be left clamped over
prolonged periods of time with haemorrhagic or
pus effusion as it may lead to a blocked drain.
Tube patency
Ensure adequate tube length to allow safe movement
but avoid looping of tubing which could lead to a
“fluid lock” in the tube.
Ensure patient does not lie on the tube.
Check tubing for presence of clots or fibrinous
material each time observations are performed. If
present follow specialized unit or facility protocol in
relation to orders for:
• flushing (pleural effusion or empyema only)
• changing the drain
• milking - gently and intermittently compressing
and releasing the ICC between fingers whilst
moving toward drainage bottle.
Check Connections
All pleural drains and UWSD connections should all be
checked each time the observations are performed to
ensure the tube has not dislodged and that all
connections remain secure and taped.

ACI Respiratory Network – Pleural Drains in Adults – A consensus guideline Page 20
Surgical Emphysema
Surgical emphysema is the presence of air under the
subcutaneous layer of the skin and is often present in
patients with a pneumothorax but rarely in large
amounts in normal circumstances.
It is characterised by the feeling of “crackling” or “rice
bubbles” on palpation and /or a change in voice.
Surgical emphysema starts at the site of insertion of
the drain and can spread.
Tracing a line around the border of the subcutaneous
emphysema can be used, in combination with other
observations, to indicate progression or resolution.
Surgical emphysema must be checked for each time
UWSD observations are performed and reported to a
MO immediately if newly present or enlarging.
Surgical emphysema (in severe cases) can cause changes
to a patient’s voice and facial appearance. It is vital that
staff reassure the patient and carers that their upper
airway will not obstruct.
Surgical emphysema may be treated conservatively, or
by applying suction, or a new pleural drain may need to
be inserted. In the surgical setting applying suction to
the drainage system is almost always required.
Table 3: Pleural drain emergencies
If an intercostal catheter (ICC) falls outDo not attempt to re insert the existing pleural drain
1 Pinch the skin edges together with a gloved hand
2 Ring for assistance
3 Redress drain site with Vaseline infused gauze and an appropriate dressing • occlusive pressure for pleural fluid• gauze dressing secured on three sides for pneumothorax
4 Notify MO
5 Document incident and vital signs especially respiratory rate
6 Observe and reassure the patient
If the bottle or ICC becomes disconnected
1 Cross clamp the tubing closer to the patient than the disconnection
2 Reconnect system to a new drainage bottle
3 Unclamp ICC
4 Notify MO
5 Observe and reassure the patient
6 Document vital signs especially respiratory rate
ACI Respiratory Network – Pleural Drains in Adults – A consensus guideline Page 21
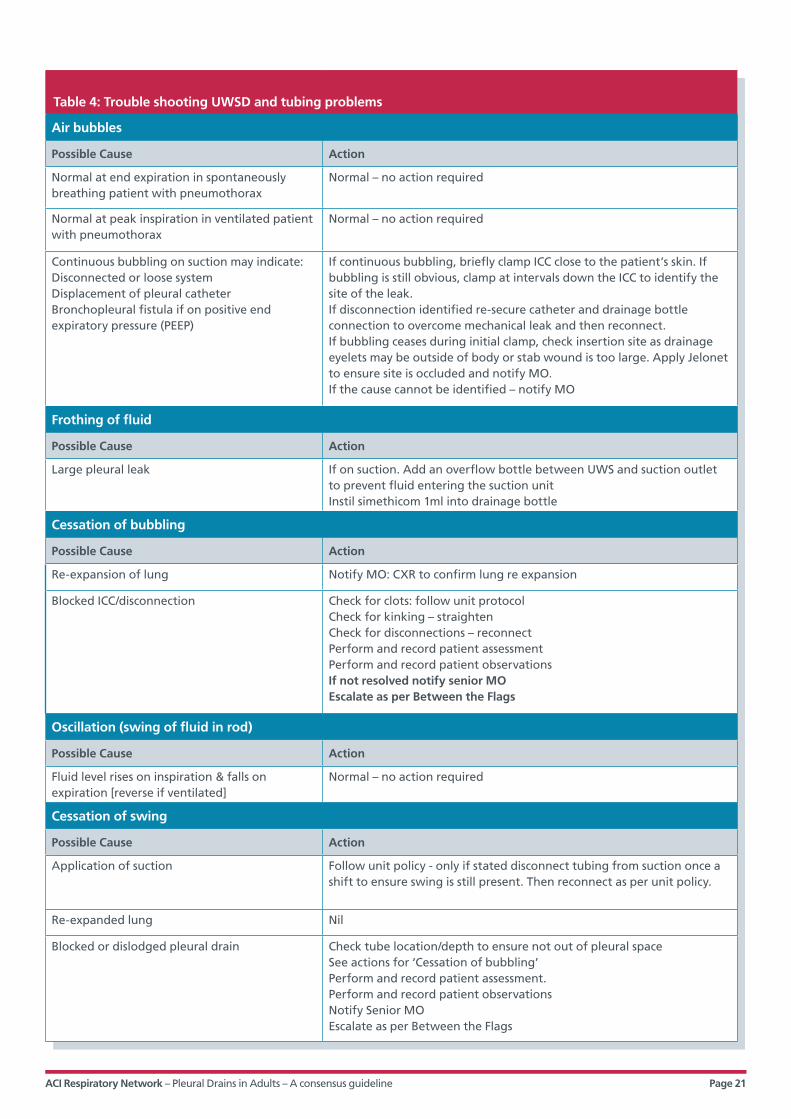
Table 4: Trouble shooting UWSD and tubing problems
Air bubbles
Possible Cause Action
Normal at end expiration in spontaneously breathing patient with pneumothorax
Normal – no action required
Normal at peak inspiration in ventilated patient with pneumothorax
Normal – no action required
Continuous bubbling on suction may indicate:Disconnected or loose systemDisplacement of pleural catheterBronchopleural fistula if on positive end expiratory pressure (PEEP)
If continuous bubbling, briefly clamp ICC close to the patient’s skin. If bubbling is still obvious, clamp at intervals down the ICC to identify the site of the leak. If disconnection identified re-secure catheter and drainage bottle connection to overcome mechanical leak and then reconnect.If bubbling ceases during initial clamp, check insertion site as drainage eyelets may be outside of body or stab wound is too large. Apply Jelonet to ensure site is occluded and notify MO.If the cause cannot be identified – notify MO
Frothing of fluid
Possible Cause Action
Large pleural leak If on suction. Add an overflow bottle between UWS and suction outlet to prevent fluid entering the suction unitInstil simethicom 1ml into drainage bottle
Cessation of bubbling
Possible Cause Action
Re-expansion of lung Notify MO: CXR to confirm lung re expansion
Blocked ICC/disconnection Check for clots: follow unit protocolCheck for kinking – straightenCheck for disconnections – reconnectPerform and record patient assessmentPerform and record patient observationsIf not resolved notify senior MO Escalate as per Between the Flags
Oscillation (swing of fluid in rod)
Possible Cause Action
Fluid level rises on inspiration & falls on expiration [reverse if ventilated]
Normal – no action required
Cessation of swing
Possible Cause Action
Application of suction Follow unit policy - only if stated disconnect tubing from suction once a shift to ensure swing is still present. Then reconnect as per unit policy.
Re-expanded lung Nil
Blocked or dislodged pleural drain Check tube location/depth to ensure not out of pleural space See actions for ‘Cessation of bubbling’ Perform and record patient assessment. Perform and record patient observationsNotify Senior MOEscalate as per Between the Flags

ACI Respiratory Network – Pleural Drains in Adults – A consensus guideline Page 22
Drainage (fluid loss)
Possible Cause Action
Normal or excessive loss Check amount hourly or more frequently if required Consider need to change bottle, or for suction application
Rapid of excessive blood stained drainage (>100mls/2 hours)
Possible Cause Action
Haemorrhage Measure drainage, record vital signs and immediately report to MO Check for need to change bottle Check need for urgent blood tests including cross match
Cessation of drainage
Possible Cause Action
Restoration of normal lung physiology Notify Resident medical officer (RMO): CXR to confirm lung re-expanded: MO orders to remove drain
Blocked tube See blocked tube under ‘Cessation of bubbling’
Increased fluid level in rod
Possible Cause Action
Excessive drainage see ‘Rapid &/or Excessive Drainage
Suction turned off/disconnected Check suction orders and resume suction as orderedCheck all connections
Bleeding around the insertion site
Possible Cause Action
Haemorrhage from small vessels at insertion site Redress with gentle compression: notify MO: observe for further bleeding
Trauma at insertion site As above
Drainage tube dislodged from insertion site Check position of tube eyelets. If external to the skin redress as above and notify MO
Drainage tube inadvertently removed With gloved hand pinch the sides of the insertion site together and access assistance both medical and nursing to assist and re assess the need for re insertion of new ICC.Do not re-insert the existing pleural drain or new pleural drain via the same insertion site.Aseptically dress the old infection site with an occlusive dressing (effusion) or gauze taped on three sides (pneumothorax).Order CXR

ACI Respiratory Network – Pleural Drains in Adults – A consensus guideline Page 23
Flushing
Flushing should only to be performed by clinicians that
are experienced and accredited by the facility to
undertake the procedure.
Indications
• To maintain tube patency in patient with pleural
effusion or empyema ONLY
• Flushing of pleural catheters for any other
conditions is CONTRAINDICATED
• Flush frequency and volume must be ordered
on the medication chart by an MO and
administered by an RN competent in the
procedure normally 6/24.
Contraindications for flushing fine bore catheters
• An inexperienced operator should not flush a
pleural catheter
• Pneumothorax - pleural catheters and drainage
bottles for pneumothorax should have a label
affixed which is clearly marked ‘Not to be flushed’.
Equipment for flushing
• Personal protective equipment (PPE) – non sterile
gloves and facial protection
• Flat bladed clamps for ICC, three way tap for
pleural pigtail catheter (PPC)
• 1 x sterile 50ml luer lock syringe loaded with 10mls
sodium chloride for irrigation
• Chlorhexidine 2% & alcohol 70% swabs x 3
• Large dressing pack.
Flushing procedure
• Turn three way tap off to the patient and
TOWARDS the pleural drain
• Perform hand hygiene
• Ensure there is a needleless access device (smart site
bung) attached to the three way tap port
• Connect a 50ml luer lock syringe using either of the
following two methods:
a) disinfect the bung with the alcohol swabs and
connect a 50ml luer lock syringe loaded with
10mls of sodium chloride
OR
b) disconnect the bung, clean with alcohol
swabs and connect a 50ml luer lock syringe
loaded with 10mls sodium chloride
• Turn the three way tap off to the UWSD (i.e. turned
on to the patient)
• Gently aspirate and then instil the sodium chloride
into the PPC i.e. towards the patient
• Turn the three way tap off to the patient and
disconnect syringe
• Replace bung if required
• Return tap to normal drainage position
• Perform hand hygiene
• Document the procedure and outcome in the
clinical notes and document the additional 10mls of
sodium chloride on the UWSD chart – ensure the
entry is made across the line so that the flush is
clearly documented
• The UWSD should oscillate post flushing – if not
inform the MO.
Clamping
Clamping a pleural drain is contraindicated in any
patient receiving positive pressure ventilation or NIV.
Pleural drains should only be clamped on medical
orders in specific circumstances which include:
• post pneumonectomy
• during drainage of large volumes of fluid
• in preparation for removal of large bore intercostal
catheters
• for short periods to drain collected fluid from drain
system tubing
• for change of bottle and /or tubing
• to assess for air leaks
• if is not possible to maintain the drainage system
below the patient’s chest e.g. moving a patient
from bed to bed.

ACI Respiratory Network – Pleural Drains in Adults – A consensus guideline Page 24
Unblocking a Pleural Catheter
Indications
• A blocked pleural catheter in patient with pleural
effusion or empyema ONLY
• Flushing of pleural catheter for any other
conditions is CONTRAINDICATED
• Medical request for unblocking of pleural catheter
must be documented in the clinical notes and
medication chart prior to attempting the
unblocking procedure.
Procedure
Two RNs must be in attendance, with at least one
trained and competent in the procedure. See Appendix
6, Guidance for assessing competency in pleural
procedures for advanced trainees and specialist nurses.
Don PPE - non sterile gloves, gown, apron and facial
protection.
Table 5: Unblocking large and small bore intercostal catheter
Large bore pleural catheters
Equipment Procedure
Howard Kelly clamps
3x sterile catheter tip syringes each with 30mls sodium chloride for irrigation
Large dressing pack
Clamp ICC near patient and above connections
Disconnect UWSD tubing
Unclamp and slowly aspirate tube, then instil sodium chloride
Gently aspirate sodium chloride from ICC
Clamp the tube and remove syringe
Reconnect to UWSD
Remove clamps and check patency
Repeat process with another catheter tip syringe + 30mls sodium chloride if indicated
Document the procedure and outcome in clinical notes
The UWSD should oscillate post procedure – if not notify MO.
Small bore pleural catheters
Equipment Procedure
Three way tap port
3x sterile 50ml luer lock syringes each with 10mls sodium chloride for irrigation
Large dressing pack
Turn three way tap off to the patient
Ensure smart site bung is attached to three way tap port
Connect a 50ml luer lock syringe either:
• directly into disinfected bung • disconnect bung and connect
Turn three way tap to neutral position
Gently aspirate PPC and then instil sodium chloride
Gently aspirate sodium chloride from PPC
Turn three way tap off to patient and on to the drain, push fluid into drain
Turn three way tap off to patient and disconnect syringe
Reconnect bung if required and turn tap to neutral position
Repeat the process with another syringe and sodium chloride if required
Document procedure and outcome in clinical notes and document additional (up to 30mls) on UWSD chart
The UWSD should oscillate post procedure – if not notify MO.

ACI Respiratory Network – Pleural Drains in Adults – A consensus guideline Page 25
Insertion site dressings
• Observe five moments of hand hygiene within the
dressing procedure
• Ensure that when applying a pleural catheter
insertion site dressing that the tube does not
become kinked
• Ensure the tubing is anchored to the chest wall or
abdomen using an appropriate method (statlock or
omentum flap)
• Change the dressing at least 48 hourly and prn to
keep the drain insertion site clean and dry.
Ensure each dressing applied to a pleural drain
insertion site is:
• a key hole dressing /or other dressing that allows
easy inspection of the tube exit site from the skin
• applied with the tube exiting from the centre of
the dressing with only a small combine (if
necessary) below the tube exit site to cushion the
tube away from the patient if required
• not excessively bulky as this will prevent close
observation and access to the drain site.
Bottle changes
• Performed by two RNs who have been instructed in
the procedure (See Appendix 6, Guidance for
assessing competency in pleural procedures for
advanced trainees and specialist nurses)
• The frequency of drainage system changes is
guided by manufacturer’s instructions and their
specified volumes
• Prepare the new system and ensure water seal is
set as per manufacturer’s instructions
• Perform hand hygiene
• Full PPE - Don gloves, apron, facial protection and
non-sterile gloves
• Clean connections with antiseptic solution
• If no air leak - clamp ICC above the connection for
the duration of approximately one breath as UWSD
bottle / chamber is changed
• If there is an air leak (indicated by bubbling in the
UWSD) do not clamp the catheter but ask the
patient to hold their breath while changing the
drainage system
• Ensure all connections are secure before
unclamping the ICC
• Change bottle/chamber
• Perform hand hygiene
• Document UWSD system change in patient’s
medical record.
Disposal of drainage
All UWSD bottles /chambers are disposable.
Do not empty the UWSD contents - seal the UWSD unit
prior to disposal in a yellow contaminated waste bin.

ACI Respiratory Network – Pleural Drains in Adults – A consensus guideline Page 26
Figure 9: Insertion site prepared for application of dressing
Figure 10: Insertion site dressing completed
ACI Respiratory Network – Pleural Drains in Adults – A consensus guideline Page 27
Patient activity, hygiene and pain relief
• Select positions for the patient that avoid kinking
and occlusion of tubing
• Offer rolled towels or pillows to splint the chest on
the affected side as required
• Provide adequate analgesia to patients to enable
deep breathing (hourly) and regular range of
motion arm exercises on the affected side
• Encourage patients to mobilize several times a day
and to sit out of bed for meals
• Avoid pressure areas by regular repositioning
the patient and where required the use of
bariatric devices
• Apply anti embolic stockings if mobility is reduced
• Advise patient of their responsibilities regarding
care of the pleural drain and the need to maintain
the drainage system below the chest especially
when mobilizing
• Constipation and subsequent straining to empty
bowel should be avoided in this patient group
• Patients may shower with assistance – if on
suction check with MO if extended tubing is
required or if brief discontinuation of suction is
preferred for showering
• Refer to physiotherapy if additional mobility
assistance is required.
The decision for removal must be documented by the
MO in the progress notes.
Pigtail drains must be uncoiled prior to removal. Follow
manufacturer’s instructions regarding removal of
drainage device, distance from the chest to cut the
catheter and release the string. Failure to uncoil a
pigtail drain prior to removal can cause severe pain
and internal tissue damage to the patient.8
Prior to drain removal, check INR is =<1.5 and or
platelets >50 x109/L.
Check when anticoagulants were last given in all
patients with anticoagulation therapy. The risk
of haemorrhage will be reduced if removal of the
drain occurs more than six hours since last dose
of anticoagulants.
Recognise that the perception of the procedure will
be unique for each patient.

ACI Respiratory Network – Pleural Drains in Adults – A consensus guideline Page 28
The decision for removal must be documented by the
MO in the progress notes.
Pigtail drains must be uncoiled prior to removal.
Follow manufacturer’s instructions regarding removal
of drainage device, distance from the chest to cut the
catheter and release the string. Failure to uncoil a
pigtail drain prior to removal can cause severe pain
and internal tissue damage to the patient.14
Prior to drain removal, check INR is =<1.5 and or
platelets >50 x109/L.
Check when anticoagulants were last given in all
patients with anticoagulation therapy. The risk of
haemorrhage will be reduced if removal of the
drain occurs more than six hours since last dose
of anticoagulants.
Recognise that the perception of the procedure will
be unique for each patient.
Indications for removal
• Cessation of bubbling and oscillation
(pneumothorax)
• Minimal amount of drainage (effusion/empyema)
• Re-expansion of lung has been confirmed by CXR.
Skilled operators
Removal of pleural drain may be undertaken by RN and
MO who have achieved competence in chest drain
management or under the direct supervision of a
competent staff member. See Appendix 6, Guidance
for assessing competency in pleural procedures for
advanced trainees and specialist nurses.
Prior to removal
• Check for written orders for drain removal
• Check INR is 1.5 or less and when anticoagulants
were last given prior to drain removal in patients
with anticoagulant therapy
• Consider giving analgesia to the patient as
soon as the decision for removal is confirmed
and documented
• Perform a pain assessment prior to removal and
offer analgesia as required
• Check that a recent CXR has been viewed to ensure
the lung is re inflated
• Identify if the small bore intercostal catheter has
any self-retaining mechanism which will need
unlocking /disabling and confirm the appropriate
procedure for removing the intercostal catheter
and suture
• In the event that releasing the self-retaining
locking mechanism does not work, arrange for
either patient transfer to radiology for removal or
follow the facility endorsed protocol
• Check the facility or unit preference for the specific
phase of breathing required when the tube is
being removed.
Removal of pleural drain
Section 4

ACI Respiratory Network – Pleural Drains in Adults – A consensus guideline Page 29
Equipment for removal of pleural drain
• Dressing pack
• Gauze squares x 6
• 0.9% saline for skin cleansing
• Skin closure strips (if no mattress/anchoring suture)
• Scissors to release locking mechanism of a small
bore catheter (as applicable)
• Suture cutter
• Occlusive dressing
• Plastic backed protective sheet
• PPE (clinically clean gloves for removal of
dressing, impervious gown/plastic apron, eye
protection, mask)
• Sterile gloves are required for MO or RN removing
the pleural drain and for the RN tying the suture or
applying steri-strips and dressing.
Patient preparation
Administer analgesia and wait for it to be effective.
Explain procedure to patient and advise that they may
experience a brief sensation of burning or pain as the
drain is removed.
Explain how you want the patient to breath during the
procedure and get the patient to demonstrate. Note
that formal techniques may be difficult to teach and
beyond the capability of many patients including those
with cognitive or language barriers.
Place plastic backed sheet under the patient.
Position the patient in a semi fowlers to upright
position to allow for ease of access to the pleural
drain insertion site while maintaining patient privacy
and comfort.
Support tubing throughout to prevent tension on the
insertion site.
Preparation for removal of pleural drain
Both staff should sight the medical order for removal.
Large bore pleural drains require a closing mattress
suture for effective wound closure following removal.
Small bore catheters generally only require suture
closure strips or an occlusive dressing.
• Remove the dressing and anchor tape using
clinically clean gloves
• Prepare sterile field
• Prepare occlusive dressing
• Discuss the procedure with assistant to ensure a
coordinated approach
• Perform hand hygiene
• Don full PPE (gown, mask, gloves, goggles).
Role of the pleural drain remover
Thoroughly cleanse the drain insertion site and the first
10cm of the drain with skin cleansing solution 2%
chlorhexidine & 70% alcohol or equivalent.
Dry the area with gauze (to ensure occlusive dressing
adheres to skin) identify anchor suture, cut and remove
the suture whilst supporting pleural drain.
Hold drain in dominant hand whilst gently pinching the
skin at the insertion site with non dominant hand.
Remove the drain swiftly but gently while
simultaneously pinching the skin around the
insertion site.
There should be no excessive force required to remove
the drain. If any resistance is met, STOP the procedure
and review the device/procedure for additional sutures
or locking device. If resistance continues STOP the
procedure and call for senior medical assistance.
Check that the tip of the drain is intact.
Cut excessive suture material, dry skin and apply
occlusive dressing, then label with date and
time of removal.
Perform hand hygiene.
Document removal in the patient’s medical record.

ACI Respiratory Network – Pleural Drains in Adults – A consensus guideline Page 30
Role of assistant
Encourage the patient to take deep breaths and release
muscle tension during exhalation. Continuously
reassure the patient during the procedure.
Get the patient to practice the required breathing prior
to removal of the drain.
Identify purse string sutures – if present prepare purse
suture for tying and ensure there is enough length of
suture material to tie with ease.
Pull sutures until insertion wound is sealed – do not
pucker the skin.
Tie purse string three times (if present) – double loop
tie first knot of purse suture and then tie second and
third knot.
Post removal of a chest drain the drain site needs to be
closed. This is achieved by either tightening the
mattress suture and/or applying steri strips.
If a mattress suture is used to close the drain site, check
for gaping and apply steri strip/s if required. Then apply
adaptic or gelonet, a sterile gauze and occlusive
dressing. The dressing is changed every 48 hours until
the suture is removed (generally 7 days).
If steri- strips are used to close the drain site, apply an
occlusive dressing. Change dressing every 48 hours and
remove when the drain site has healed.
Instruct the patient to breathe normally once the drain
is removed.
Care after removal of a pleural drain
• Assist patient into a comfortable position.
• Assess patient’s condition, including chest
auscultation.
• Advise patient to rest quietly for 1 hour or
until reviewed
• Arrange a post removal chest x-ray to be
performed within 2- 4 hours and prompt review
by MO
• Review the dressing for signs of air or fluid leakage
daily – reinforce dressing with combines as required
• MO to review post removal chest X-ray and
document findings
• Inspect insertion site for signs of local cutaneous
sepsis or continued drainage once per shift. Take
down an occlusive dressing after 48 hours to
inspect site. Reapply occlusive dressing as required.
• Remove sutures at 72 hours post removal or
as ordered.
Patient education post removal
Advise the patient and their carer regarding follow up
arrangements for the removal of sutures/and dressings
as required.
Advise patient and their carer regarding activities that
should be avoided following pleural drain drainage -
strenuous exercise, carrying heavy objects (>5kg for
adults) and lifting objects above head height.
Advise patient and carer that air travel is not
permitted until they have medical clearance from a
designated specialist.
Advise the patient/and their carer to report any new or
increasing symptoms to a health professional:
• breathlessness
• pain on inspiration
• pain at insertion site
• discharge from drain insertion site
• fevers.

ACI Respiratory Network – Pleural Drains in Adults – A consensus guideline Page 31
Glossary
BP Blood pressure
CT scan Cat scan
CXR Chest x-ray
EN Enrolled nurse
FNAB Fine needle airway biopsy
HR Heart rate
ICC Intercostal catheter
INR International normalised ratio
IV Intravenous
MC&S Microbial culture and sensitivity
MO Medical officer
NIV Non invasive ventilation
PEEP Positive end expiratory pressure
PPC Pigtail pleural catheter
PPE Personal protective equipment
prn when necessary [lit. pro re nata]
RMO Resident medical officer
RN Registered nurse
RR Respiratory rate
Sac Severity assessment code
SpO2 Blood oxygen saturation
TPR Temperature, pulse, respiration
U/S Ultrasound
UWSD Under water seal drainage system

ACI Respiratory Network – Pleural Drains in Adults – A consensus guideline Page 32
Appendix 1 - Insertion of chest drain
Appendices
Insert drain
Insert drain
Seek senior help
Insert drain. Ultrasound guidance strongly recommended.
Prepare patient for chest drainageDelay procedure until
working hours.
Consider pleural aspiration to relieve symptoms and delay a drain insertion until
working hours and when appropriate
expertise and/or supervision is
available.
Pneumothorax or pleural fluid requiring drainage
YES YES
YES
YES
NO
NO NO
Does this need to be done as an emergency?
(eg. tension)
Does the patient have significant respiratory
compromise?
Is it outside of normal working
hours?
Is the drain required for
fluid?
Is the operator experienced?
NO
NO
YES
Requirements for insertion of chest drain
• Written consent• Clean area to perform procedure• Competent operator or supervisor• Nursing staff familiar with drain
management.
Equipment required for chest drain insertion
• 1% lignocaine• Alcohol based skin cleanser x2 coats• Sterile drapes, gown, gloves• Needles, syringes, gauze swabs• Scalpel, suture (0 or 1-0 silk)• Chest tube kit• Closed system drain (including
water) and tubing• Dressing• Clamp.
Havelock T et al. Thorax 2010;65:i61-i76. Copyright © BMJ Publish Group Ltd and British Thoracic Society. All rights reserved.

ACI Respiratory Network – Pleural Drains in Adults – A consensus guideline Page 33
Appendix 2. Diagnostic algorithm for the investigation of a unilateral pleural effusion
Treat the
cause
Treat the cause
Treat appropriately
Treat appropriately
STOP
Refer to chest physician
Pleural aspiration (with ultrasound guidance). Send for: cytology, protein. LDH, pH Gram stain, culture and sensitivity. (Additional tests if warranted - see text box).
Re-consider treatable conditions such as PE, TB, chronic heart failure and lymphoma. Watchful waiting often appropriate.
History, clinical examinations & CXR
YES
YES
YES
YES
YES
NO
NO
NO
NO
NO
Does the clinical picture suggest a transudate? eg. LVF, hypoalbuminaemia,
dialysis.
Has the fluid analysis and clinical features given
a diagnosis?
Is it a transudate?
Resolved?
Request contrast enhanced CT thorax.
Consider LA thoracoscopy or surgical VATS.
Consider radiological guided pleural biopsy +/- chest tube drainage if symptomatic.
Cause found?
Hooper C et al. Thorax 2010;65:ii4-ii17. Copyright © BMJ Publishing Group Ltd and British Thoracic Society. All rights reserved.

ACI Respiratory Network – Pleural Drains in Adults – A consensus guideline Page 34
Appendix 3 - Management of Spontaneous Pneumothorax
Consider discharge review in OPD in 2-4 weeks
* In some patients with a large pneumothorax but minimal symptoms conservative management may be appropriate.
Aspirate 16-18G cannula Aspirate <2.5l
Aspirate. 16-18G cannula Aspirate <2.5l
Spontaneous Pneumothorax
If Bilateral/Haemodynamically unstable proceed to chest drain.
YES
YES*
YES
NO
YES
YES
YES
NONO
NO
NO
NO
Age >50 and significant smoking history. Evidence of underlying lung
disease on exam or CXR?
Size >2cm and/or
breathless
Success (<2cm and breathing
improved).
Success. Size now
<1cm.
Size 1–2cm
>2cm or breathless
Chest drain. Size 8-14Fr. Admit.
Admit. High flow oxygen
(unless suspected oxygen sensitive). Observe for 24 hours.
PRIMARY Pneumothorax
SECONDARY Pneumothorax
# measure the interpleural distance at the level of the hilum
MacDuff A et al. Thorax 2010;65:ii18-ii31. Copyright © BMJ Publishing Group Ltd and British Thoracic Society. All rights reserved.

ACI Respiratory Network – Pleural Drains in Adults – A consensus guideline Page 35
Appendix 4 – Local Health District Policies and Procedures
The following Local Health District (formerly Area
Health Service) clinical resources were reviewed and
content adapted for inclusion in the Pleural Drain in
Adults – Consensus Guideline.
• Sydney South Western Area Health Service,
Intercostal Catheters (ICC) and Underwater Seal
Drains (UWSD) Clinical Manual, MC_PD2011_422
• St George and Sutherland Hospitals and Health
Services (2011), Respiratory – Underwater Seal Drain
(UWSD), Clinical Business Rule SGSHHS Clin145.
• Sydney Local Health District, Chest Tubes and
Intercostal Catheters Policy, RPAH_PD2011_034
• Northern Sydney Central Coast, Underwater Sealed
Drains (UWSD) and Intercostal Catheters Guideline
– North Shore Ryde HS, GE2009_063, Nov 2010.

ACI Respiratory Network – Pleural Drains in Adults – A consensus guideline Page 36
Appendix 5 – Pleural Procedures Training Form
Type of Procedure/Date of Procedure: _____________________________________________________________
Indication: _______________________________________________________________________________________
Supervisor: ______________________________________________________________________________________
Site: _____________________________________________________________________________________________
Type of Tube: ____________________________________________________________________________________
Size of Tube: _____________________________________________________________________________________
Technique: Seldinger Blunt dissection
Use of Pleural Ultrasound: Yes No
Complications: ___________________________________________________________________________________
_________________________________________________________________________________________________
Outcome: _______________________________________________________________________________________
_________________________________________________________________________________________________
Reflections: ______________________________________________________________________________________
_________________________________________________________________________________________________
_________________________________________________________________________________________________
_________________________________________________________________________________________________
Accredited to Perform Procedure Independently?*
Yes No Supervisor Signature
INSERT STICKER HERE
* Please review log book to ensure adequate numbers of supervised procedure and technical competency has been achieved. Department Respiratory Medicine, Western Sydney Local
Health District, 2013

ACI Respiratory Network – Pleural Drains in Adults – A consensus guideline Page 37
Appendix 6 – Guidelines for assessing competency
A6: Pleural procedures Guidance for assessing competency in pleural procedures for advanced trainees and specialist nurses
ACI Respiratory Network

ACI Respiratory Network – Pleural Drains in Adults – A consensus guideline Page 38
A6: Acknowledgements
The Agency for Clinical Innovation (ACI) recognises the unique position of Aboriginal people in
the history and culture of NSW. The ACI would like to acknowledge the traditional owners of the
lands referred to in this report. We would also like to acknowledge and pay respect to elders of
the communities covered in this report.
Special thanks to the ACI Pleural Procedures Education Group for their continual support of the project. The
commitment and enthusiasm of current and past working and reference group members was integral to each phase
of the Pleural Procedures project. Members showed a willingness to share their knowledge and skills that was very
valuable and appreciated by their peers.
ACI Pleural Procedures Education Group:
• Belinda Cochrane
• Mary Dunford
• Ben Kwan
• Erica Meggitt
• Matthew Peters
• Scott Twaddell
• Jonathon Williamson
• Peter Wu
• Cecily Barrack.
AGENCY FOR CLINICAL INNOVATION
Level 4, Sage Building
67 Albert Avenue
Chatswood NSW 2067
PO Box 699 Chatswood NSW 2057
T +61 2 9464 4666 | F +61 2 9464 4728
E [email protected] | www.aci.health.nsw.gov.au
Produced by: ACI Respiratory Network
Cecily Barrack, Respiratory Network Manager
Ph. +61 2 9464 4625
Email. [email protected]
Further copies of this publication can be obtained from the
Agency for Clinical Innovation website at www.aci.health.nsw.gov.au
Disclaimer: Content within this publication was accurate at the time of publication. This work is copyright. It may be reproduced
in whole or part for study or training purposes subject to the inclusion of an acknowledgment of the source. It may not be
reproduced for commercial usage or sale. Reproduction for purposes other than those indicated above, requires written
permission from the Agency for Clinical Innovation.
Version: 1.0
Date Amended: May 2015
Revision Date: May 2020
© Agency for Clinical Innovation 2010

ACI Respiratory Network – Pleural Drains in Adults – A consensus guideline Page 39
A6: Foreword
Pleural procedures that involve the insertion of intercostal catheters into the pleural cavity incur a
high risk of adverse outcomes, including death. A review of 185 adverse incidents related to
pleural drains in NSW in 2010–11) found that the majority (69%) were attributable to suboptimal
clinical management. Incidents related to pleural drains occurred in both metropolitan and
regional facilities, and within diverse settings including operating theatres, critical care units,
emergency departments, specialised surgical and medical wards, general wards and medical
imaging departments.
The Guidance for assessing competency in pleural procedures for advanced trainees and specialist nurses resource
has been developed by members of the ACI Pleural Procedures Education Group, made up of respiratory physicians,
respiratory nurses and managers from metropolitan and regional facilities across NSW.
The aim of the resource is to reduce the risks associated with pleural procedures in adults within all NSW hospitals.
The resource defines a consistent standard for education, training and assessment of procedural and clinical skills. It
applies to designated medical and nursing staff across clinical streams who are responsible for the insertion of
pleural drains and care of adult patients with a pleural drain.
This resource is intended to be used in conjunction with ACI Pleural drains in adults: a consensus guideline, which is
available from ACI website (http://www.aci.health.nsw.gov.au/networks/respiratory/pleural-drains)
The resource is available online for local health districts, special health Networks and clinical streams to review,
adopt and endorse as per local requirements. Implementation of the recommendations will need to be tailored
to align with the specific casemix and workforce as determined by local clinical streams and managers.

ACI Respiratory Network – Pleural Drains in Adults – A consensus guideline Page 40
A6: Contents
Foreword ii
Section 1. About ACI 1
Section 2. Background 2
Section 3. Purpose 3
Section 4. Aims 4
Section 5. Recommendations for assessing competency in advanced trainees 5
5.1 Advanced trainee pleural drain competency 5
5.1.1 Theoretical knowledge and familiarisation with equipment 5
5.1.2 Procedural technique 5
5.1.3 Assessing procedural competency in an advanced trainee 6
5.1.4 Quality assurance 6
5.2 Maintenance of procedural skills 6
5.3 Supervisor roles and responsibilities 6
5.4 Advanced trainee roles and responsibilities 7
5.5 Inability to achieve competency 7
Section 6. Pleural drain education for respiratory advanced trainees 8
6.1 Pleural Drain Lung School 8
6.2 Thoracic ultrasound 8
6.3 Practical aspects of pleural disease for doctors 8
6.4 E-learning 8
6.5 Workplace clinical skills training 8
Section 7. Recommendations for assessing competency in nurses 9
7.1 Registered nurse/endorsed enrolled nurse pleural drain competency 9
7.1.1 Demonstrates an understanding of the fundamental principles of normal breathing
and pleural drainage including: 9
7.1.2 Ability to perform patient and drainage system assessment including: 9
7.1.3 Able to identify cardinal signs of pleural drain complications and emergencies including: 9
7.1.4 Demonstrates ability to set up equipment, prepare and appropriately manage a patient
undergoing a pleural procedure including: 9
7.1.5 Displays knowledge of equipment required, current guidelines and procedure for: 9
7.1.6 Maintains effective communication with patient, staff and others including: 10
Section 8. Pleural drain education for nurses 11
8.1 E-learning and face-to-face 11
8.2 Practical skills 11
8.3 Quality assurance 11

ACI Respiratory Network – Pleural Drains in Adults – A consensus guideline Page 41
The Agency for Clinical Innovation (ACI) works
with clinicians, consumers and managers to
design and promote better healthcare for NSW.
ACI Clinical Networks, Taskforces and Institutes provide
a unique forum for people to collaborate across clinical
specialties and regional and service boundaries to
develop successful healthcare innovations.
A priority for the ACI is identifying unwarranted
variation in clinical practice and working in partnership
with healthcare providers to develop mechanisms to
improve clinical practice, patient care and outcomes
(www.aci.health.nsw.gov.au).
A6: About ACI
Section 1

ACI Respiratory Network – Pleural Drains in Adults – A consensus guideline Page 42
Accumulation of fluid or air within the pleural
space is common and frequently requires
drainage and/or other interventions. Significant
and avoidable adverse events related to pleural
drainage procedures have been identified via
NSW Health clinical incident monitoring
systems, of which the majority relate to
suboptimal clinical management.
The ACI convened a Pleural Procedures Working Group
(comprising clinical expert respiratory physicians and
nurses) to lead the development of Pleural drains in
adults: a consensus guideline. The guideline underwent
extensive consultation prior to endorsement and release
to the NSW Health system in May 2014.
To support statewide implementation of the guideline
within NSW hospitals, the working group members
identified the need to develop formal and consistent
processes to determine competency for relevant
advanced trainees and specialist nurses who are
required to insert pleural drains and care for adult
patients with a pleural drain.
A6: Background
Section 2
ACI Respiratory Network – Pleural Drains in Adults – A consensus guideline Page 43
The recommendations define a standard for
training and assessment of the knowledge and
skills clinicians require in order to perform
pleural procedures and provide ongoing pleural
drain management. The primary targets are
advanced trainees and respiratory nurses.
The recommendations relate to a range of pleural
procedures including: needle thoracocentesis; closed
pleural biopsy; insertion of small and large pleural
catheters via Seldinger or blunt dissection technique;
medical thoracoscopy; and indwelling (tunnelled)
pleural catheters.
While it is recognised that other clinical specialties
(including emergency care, critical care, interventional
radiology, surgical specialties and paediatrics) may use
specialty-specific credentialing processes, this set of
recommendations is available for other clinical
specialties to freely adopt or adapt for their own use.
The recommendations are intended for use in
conjunction with the Pleural drains in adults: a
consensus guideline, available at http://www.aci.health.
nsw.gov.au/networks/respiratory/pleural-drains.
A6: Purpose
Section 3

ACI Respiratory Network – Pleural Drains in Adults – A consensus guideline Page 44
The recommendations aim to:
• ensure pleural procedures are performed safely,
effectively and without adverse events
• define a standard process for demonstrating that
clinicians have undertaken the pleural procedural
training and attained the clinical skills required
across the range of pleural procedures
• help Local Health Districts and Special Health
Networks adopt formal processes to ensure that
relevant clinicians have undertaken appropriate
pleural procedural training and demonstrated the
clinical skills required to perform pleural procedures
and care for patients following a pleural procedure
• enhance the pleural procedural experience for both
patients and operators.
Some facilities, especially regional hospitals, may lack
the full range of sub-specialty clinical services, including
respiratory. In this instance, a facility may decide that
the best means of achieving the recommendations is by
creating a ‘pleural team’ or a ‘chest drain team’ whose
members across a range of specialties have the
appropriate experience and expertise in pleural
procedures. A ‘pleural team’ may take on the role of
auditing pleural procedures and monitoring patient
outcomes within the facility.
In circumstances where appropriate expertise is not
available within a hospital, formal telemedicine
arrangements may be developed between a hub centre
and its feeder peripheral hospital which would enable
the hub centre to provide an on-call pleural procedure
support service.
A6: Aims
Section 4

ACI Respiratory Network – Pleural Drains in Adults – A consensus guideline Page 45
Each facility is responsible for accrediting
advanced trainees for pleural/chest
drain management in line with their
scope of practice.
Each facility is responsible for ensuring patients
undergoing any pleural procedure are managed in a
safe clinical environment where medical officers and
specialist nurses deemed competent to insert and
manage pleural drains are available at all times.
The competency recommendations aim to ensure that
all NSW facilities follow a consistent process for
educating and training advanced trainees and
demonstrating that they have attained competency.
5.1 Advanced trainee pleural drain
competency
The essential elements in the process of demonstrating
pleural procedural competency are:
• the trainee gaining theoretical knowledge and
becoming familiar with the equipment in use
• the trainee learning the physical skills and
techniques required to complete the
specific procedure
• the supervisor assessing the trainee’s competency
in pleural procedures
• the trainee participating in quality
assurance processes.
5.1.1 Gaining theoretical knowledge and
familiarisation with equipment
The advanced trainee should demonstrate satisfactory
theoretical knowledge of, and be familiar with, the
specific equipment in use before progressing to the
practical aspects of procedural training.
This may be achieved by a combination of:
• the supervisor quizzing the advanced trainee to
assess their knowledge of anatomy, physiology and
pleural disease
• the advanced trainee completing one or more
pleural procedure training courses, which include
an assessment component (such as those provided
by the Thoracic Society of Australia and New
Zealand (TSANZ) and the Clinical Training and
Evaluation Centre, University of Western Australia)
• the supervisor directing the advanced trainee to
access recommended online resources (see section
6.4 E-learning resources).
5.1.2 Learning the procedural technique
Procedural training should occur via incremental
experience, beginning with simulation, progressing to
practise using models and eventually to performing
procedures on patients under supervision.
Competency in less invasive procedures (such as
thoracocentesis) should be gained before more complex
procedures (such as pleural catheter insertion) are
attempted. At each stage, the advanced trainee should
demonstrate proficiency before progressing to a
subsequent stage.
The emphasis should be on safe and effective
technique, rather than on the absolute number of
procedures performed. For all procedures, more than
one supervised attempt is recommended.
It is expected that, with the variety and increasing
complexity of procedures practised and the variable
rate of skill acquisition by individual advanced trainees,
multiple supervised attempts will be required before
proficiency is achieved.
A6: Recommendations for assessing competency in advanced trainees
Section 5

ACI Respiratory Network – Pleural Drains in Adults – A consensus guideline Page 46
5.1.3 Assessing procedural competency in an
advanced trainee
Proficiency and/or competency are not rigidly defined
but depend on the supervisor’s judgement as to
whether the advanced trainee is capable of performing
the specific pleural procedure independently.
This judgement will entail specific consideration of all
aspects of the pleural procedure, including:
• the decision to perform the procedure
• choice of an appropriate location and timing for
the procedure
• obtaining consent for the procedure
• appropriate administration of sedation, topical
anaesthesia and analgesia
• completion of Clinical Procedure Level 2 Safety
Checklist
• interpretation of contemporaneous imaging
• use of bedside ultrasound to assist a
pleural procedure
• maintenance of aseptic technique throughout
the procedure
• the procedural technique, including hand-eye
coordination
• adherence to local policies and guidelines
• leadership skills and respectful interaction with
the assisting staff
• accurate and appropriate documentation
• management of pleural drain complications
and emergencies.
• use of an appropriate procedure for removal of
the pleural drain.
5.1.4 Quality assurance
The advanced trainee requires insight into their own
skill mix and limitations to ensure they know when to
seek help and/or abandon a procedure to ensure a safe
outcome for the patient. Recording evidence of
participation in quality assurance processes, including
self-reflection, completion a Pleural Procedure Training
log (see ACI Pleural Drain in Adults Appendix 5), quality
audit and critical incident monitoring is recommended
throughout the training process.
Once deemed competent to perform a specific
procedure, the advanced trainee will be formally
credentialed for the specific pleural procedure in line
with local facility processes.
5.2 Maintenance of procedural skills
Given insufficient evidence on which to base
recommendations as to the number and frequency of
procedures required each year to maintain clinical
competency, this document relies on consensus expert
opinion (ACI Pleural Procedures Working Group).
The working group recommends that each year the
advanced trainee performs at least one supervised
procedure and one procedure performed
independently without adverse events.
Involvement in quality assurance processes is
also recommended.
5.3 Supervisor roles and responsibilities
The supervisor is a medical officer deemed competent
by the healthcare organisation governance bodies to
perform pleural procedures.
The role of the supervisor is to:
• ensure that the advanced trainee has acquired
appropriate theoretical knowledge
• ensure physical procedural skills are adequate and
the advanced trainee is able to demonstrate
procedural technique as required
• supervise and observe each procedural attempt
until procedural competence is attained, which
includes provision of timely and constructive
feedback as required
• oversee quality assurance processes and monitor
logbook entries
• maintain their own pleural procedural
performance skills by periodically updating via peer
review, pleural courses or similar means, sufficient
to intervene (when necessary) while undertaking a
supervisory role.

ACI Respiratory Network – Pleural Drains in Adults – A consensus guideline Page 47
5.4 Advanced trainee roles and
responsibilities
The advanced trainee is responsible for:
• attaining background theoretical knowledge prior
to attempting any procedural techniques
• acquiring incremental procedural experience,
starting with simulation, models and simple
procedures before progressing to complex
procedural techniques or applying procedures
to patients
• practising pleural procedural techniques with the
goal of achieving procedural competence and
developing appropriate quality assurance processes
• completing procedures under direct supervision/
observation following the Royal Australasian
College of Physicians’ training requirements
• documenting procedures and keeping a
procedural log book
• accepting and using supervisor feedback to achieve
continuous improvement in performance
• maintaining procedural performance skills once
credentialed via supervised procedures,
independent procedures and assuming the
supervisor role for other advanced trainees.
5.5 Inability to achieve competency
Some advanced trainees may not achieve procedural
competency by the completion of their training period.
Should such a trainee wish to undertake pleural
procedures, further supervised training is required.
This scenario may increase in frequency as pleural
procedures become more specialised and complex.
At present, all NSW respiratory advanced trainees are
required to achieve competency in specific procedural
techniques and will fail to satisfy training requirements
if they do not.
The Guide for assessing competency in pleural
procedures for advanced trainees and specialist nurses
aligns with:
• Clinical Procedure Safety Standards, NSW Health
(PD 2014_36) http://www.cec.health.nsw.gov.au/
programs/clinical-procedure-safety
• Royal Australian College of Physicians Adult
Respiratory Medicine Advanced Training
Curriculum. Physician Readiness for Expert Practice
(PREP) Training Program. http://cms.racp.edu.au/
docs/default-source/default-document-library/
respiratory-medicine-(adult)-advanced-training-
curriculum-(pdf).pdf?sfvrsn=0

ACI Respiratory Network – Pleural Drains in Adults – A consensus guideline Page 48
6.1 Pleural Drain Lung School
A dedicated annual NSW Pleural Drain Lung School supported by the Thoracic Society of Australia and New Zealand
NSW Branch commenced in 2015. It is recommended that all first-year respiratory advanced trainees attend this
training. Training includes background knowledge, quality assurance and practical sessions covering blunt
dissection, Seldinger technique, aspirating a pneumothorax and talc pleurodesis.
6.2 Thoracic ultrasound
It is recommended advanced trainees participate in formal thoracic ultrasound training in their first year to attain
the skills required to perform real time ultrasound guidance during pleural drain insertion in line with ACI Pleural
drains in adults: a consensus guideline (http://www.aci.health.nsw.gov.au/networks/respiratory/pleural-drains).
6.3 Practical aspects of pleural disease for doctors
The Clinical Training and Evaluation Centre, University Western Australia, provides simulated hospital training
experience (http://www.ctec.uwa.edu.au/).
6.4 E-learning resources
Recommended online resources include:
• Queensland Chest Drain online resource package (available from TSANZ web public domain): http://www.
thoracic.org.au/professional-information/elearning-course-chest-drain-program/
• British Thoracic Society Pleural disease guidelines 2010: http://scholar.google.com.au/
scholar?q=british+thoracic+society+pleural+disease+guideline+2010
• ACI Pleural drain in adults: a consensus guideline: http://www.aci.health.nsw.gov.au/networks/respiratory/
pleural-drains
• ACI Video insertion of pleural drain by Seldinger technique: http://www.aci.health.nsw.gov.au/networks/
respiratory/pleural-drains
6.5 Workplace clinical skills training
Clinical supervisors provide trainees with incremental and individually tailored knowledge and procedural skills
training, plus support opportunities for reflective practice and participation in quality assurance processes.
A6: Pleural drain education for respiratory advanced trainees
Section 6

ACI Respiratory Network – Pleural Drains in Adults – A consensus guideline Page 49
Patients with a pleural drain should be
managed in a clinical environment where
nurses deemed competent to manage chest/
pleural drains are available at all times.
Each facility is responsible for accrediting designated
nurses for pleural/chest drain management in line with
their scope of practice. The competency
recommendations aim to ensure that a consistent
process is undertaken for nursing education, training
and attaining competency in management of pleural
drains within NSW.
7.1 Registered nurse/endorsed enrolled nurse
pleural drain competency
Assessment of competency will entail specific
consideration of all aspects required for the
management of patients with a pleural drain and
drainage devices.
7.1.1 Demonstrates an understanding of the
fundamental principles of normal breathing
and pleural drainage including:
• intrathoracic pressures
• regulatory mechanisms
• indications for insertion and removal of a
pleural drain
• principles of chest/pleural drainage systems.
7.1.2 Competently assesses patient and drainage
system, including:
• drainage type and amount
• oscillation
• air leak
• patent tube and secure connections
• dressing correct and intact
• appropriate use of suction
• need for bottle change.
7.1.3 Identifies cardinal signs of pleural drain
complications and emergencies, including:
• tension pneumothorax
• surgical emphysema
• blocked chest drain
• dislodgement of chest drain
• haemorrhage.
7.1.4 Demonstrates ability to set up equipment,
prepare and appropriately manage a patient
undergoing a pleural procedure, including:
• understanding the role of an RN assisting
the procedure
• obtaining valid consent
• maintaining Clinical Procedure Level 2 Safety
Checklist Aseptic techniques and hand hygiene
• pain assessment and ensuring adequate analgesia
is ordered
• educating patient and family
• selecting appropriate equipment and assembling
it correctly
• recognising and managing complications
• taking pre-, peri- and post-procedural observations
• requirements for transfer and handover.
7.1.5 Displays knowledge of equipment required,
current guidelines and procedure for:
• clamping
• flushing
• correct dressing
• changing bottles
• performing observations according to risk and/or
the patient’s condition
• managing a dislodged pleural drain
• unblocking a blocked drain
• removing a pleural drain.
A6: Recommendations for assessing competency in nurses
Section 7

ACI Respiratory Network – Pleural Drains in Adults – A consensus guideline Page 50
7.1.6 Maintains effective communication with patient,
staff and others, including:
• explaining procedures and interventions to patient
and family
• discussing and reporting adverse findings to the
medical officer or senior nurses
• appropriately documenting assessment findings on
a chest drain chart and within progress notes
• Sharing information related to interventions and
management of drainage system with colleagues
at handover and when clinically relevant.
ACI Respiratory Network – Pleural Drains in Adults – A consensus guideline Page 51
8.1 E-learning and face-to-face
Recommended resources include:
• ACI Pleural Drain in Adults Consensus Guideline and ACI Video Insertion of Pleural Drain by Seldinger
technique: http://www.aci.health.nsw.gov.au/networks/respiratory/pleural-drains
• Queensland Chest Drain online resource package (Thoracic Society of Australia and New Zealand website;
members only)
• local health district or facility policy or guidelines
• local health district or facility workshops
• ward in-services.
8.2 Practical skills
Practical skills can be gained by:
• observing pleural drain insertion/observations/removal procedures
• simulating pleural drain techniques (if available)
• performing actions under supervision until deemed competent.
8.3 Quality assurance
Opportunities are available for participation in audits, incidence information management system (IIMS)
review and feedback.
A6: Pleural drain education for nurses
Section 8

ACI Respiratory Network – Pleural Drains in Adults – A consensus guideline Page 52
Appendix 7 – Chest drain observation chart
Purpose
Patients with a pleural drain need regular and accurate observations of the drainage system, tubing and insertion
site to ensure the system is working appropriately and to rapidly identify complications.
A review of chest drain charts in use across NSW showed significant variation in measures used and guiding
information.
ACI formed an expert nursing advisory group across both medical and surgical care settings to develop a chest drain
observation chart and instructions.
The ACI Chest Drain Chart is available for sites as a reference resource or for local endorsement.
Acknowledgements
Cate McAlary
Lucy Anne Winyard
Mayrose Chan
Mary Dunford

ACI Respiratory Network – Pleural Drains in Adults – A consensus guideline Page 53
Chest drain observation chart
Drain Side: L R Site: Basal Apical Other: ________________________
Intercostal catheter type: Intercostal catheter Pleural pigtail catheter Tunnelled catheter Other: _________________
Drainage system type: Single or three-bottle system (underwater seal drain) Dry seal system (atrium)
Emergency equipment: Clamps Three-way tap
Depth of insertion (Optional) Number exposed markers on chest drain OR ___________ cm from insertion site to hub
Guide to this chartALL parameters should be checked and recorded every time observations are performed
Constant accurate observation of air leak, oscillation and drainage is essential. Neglect or inaccurate observations may lead to serious complications.
• Chart applies to all drains above the diaphragm • One chart for each drain• Total cumulative drainage MUST also be recorded on the Fluid balance chart• Use in conjunction with regular observations on the SAGO chart • Any variance requires mandatory medical officer (MO) review AND documentation in progress notes
• All bottle changes or flushing should be recorded by a line and descriptor across the observation chart row (see example).
Frequency of chest drain observationsImmediately post insertion: Half-hourly for two hours, then hourly for minimum four hours and then four-hourly when haemodynamically stable Routine: Minimum four-hourly or more frequently as per clinical need or MO orders
Addressograph
Date/
time
Suction
(Kpa/
cm H2O/
Nil)
Air leak
(bubbling
score)
Oscillation
/swing
(Y/N)
Cumulative
drainage
(mL)
OPTIONAL
Drainage
amount
(mL)
Drainage
type
(HS/
HP/P/S/C)
Surgical
emphysema
(Y/N)
Air
entry
(R=L/
R>L/
L>R
Connections
taped/
secure/
tube not
kinked
(Y/N)
OPTIONAL
Airvent
(Open/
On
suction/
N/A)
Nursing
care
(e.g.
Dressing,
flush)
Pain score
(VAS)
At rest/
with
movement
RN / EEN
(Initial)
OPTIONAL: Cumulative total drainage (this chart)________________ Previous cumulative total drainage (last 24 hours) ________________

ACI Respiratory Network – Pleural Drains in Adults – A consensus guideline Page 54
Observations:Suction: Must be ordered by MO Record: _______kpa or ______cm H2O or Nil Check suction complies with medical order. Thoraseal drain LOW WALL SUCTION UNIT ONLY (range 3–5 kpa) Atrium drain Check suction dial e.g.: - 20cmH2O (independent of level of suction from wall). Must ensure orange
suction bellows are inflated to Δ mark. When off suction, suction tubing must be disconnected from the drain.
Air leak: Indicated by bubbling in underwater seal drain (UWSD) or drain chamber. Record: Nil no bubbling + bubbling only on forced expiration/coughing ++ talking or forced expiration/occasionally on a spontaneous or ventilated breath +++ moderate amount of bubbling on every spontaneous expiration or positive ventilated breath ++++ large amounts, bubbling all the time.
Oscillation: Indicates change in intra-pleural pressure. Record: Y or N Oscillation does not normally occur when suction is applied. If oscillation is present, the drain is patent. If oscillation is absent, it may indicate: • tubing may be twisted, kinked, blocked, dislodged or disconnected • lung may be re- expanded (CXR required to assess). Thoraseal drain: a rise and fall of fluid in the tubing or UWSD. Atrium drain: a rise and fall of the float ball in the water seal chamber.
Cumulative drainage: Total amount drained since bottle was last changed (mL)
OPTIONAL: Drainage amount: Amount drained since last measure (mL)
Drainage type: Record: HS haemo serous HP haemo purulent P purulent S serous C chyle
Surgical emphysema: Indicates air in the subcutaneous tissue. Must notify the MO immediately if newly present or increased. Record: Y or N
Air entry: Assess by auscultation Record: R=L or R>L or L>R
Connections/tubing: Check Record: Y or N for: • insertion site/depth of insertion • connections are taped and secure • tubing is not kinked • drain is secured to patient.
OPTIONAL: Air vent open Record: Open or On Suction NB: Airvent must be uncapped in Thoraseal 1 system if not on suction.
Nursing care: For example, Dressing, flushing
Record: action completed
Pain score: Record VAS score (1-10) for pain related to the drain at rest (R) and with deep breathing and coughing (M).
Bottle changes: Should be performed when the bottle is: ¾ full (adults); ½ full (paediatrics); or as clinically indicated. Record all bottle changes or flushing when completed on the chart and then draw a line across the observations row
to indicate the action. NB: Bottles are disposable and must not be emptied.
Date/
time
Suction
(Kpa/
cm H2O/
Nil)
Air leak
(bubbling
score)
Oscillation
/swing
(Y/N)
Cumulative
drainage
(mL)
OPTIONAL
Drainage
amount
(mL)
Drainage
type
(HS/
HP/P/S/C)
Surgical
emphysema
(Y/N)
Air
entry
(R=L/
R>L/
L>R
Connections
taped/
secure/
tube not
kinked
(Y/N)
OPTIONAL
Airvent
(Open/
On
suction/
N/A)
Nursing care
(e.g. Dressing,
flush)
Pain score
(VAS)
At rest/
with
movement
RN / EEN
(Initial)
15/5/15
0600
-20cm + Nil 1250 100 HS N R=L Y n/a Dressing & wound swab [√]
5 JS
1000 -20cm ++ Nil 1400 150 HS N R=L Y n/a 6 JS
1005 BOTTLE CHANGED JS
1400 -10cm Nil Nil 1580 180 HS N R=L Y n/a Connections retaped
JS
1800 FLUSH JS
2215 -20cm + Nil 1700 120 HS N R=L Y n/a 3-way tap off for 15 minutes.
BP = 73/123
5 JS
2230 -20cm ++ Nil 1795 95 HS N R=L Y n/a 6 JS

ACI Respiratory Network – Pleural Drains in Adults – A consensus guideline Page 55
References
1. Davies HE, Davies RJ, Davies CW, Group BTSPDG.
Management of pleural infection in adults: British
Thoracic Society Pleural Disease Guideline 2010.
Thorax. 2010;65 Suppl 2:ii41-53. doi: 10.1136/
thx.2010.137000
2. Du Rand I, Maskell N. Introduction and methods:
British Thoracic Society Pleural Disease Guideline
2010. Thorax. 2010;65 Suppl 2:ii1-3. doi: 10.1136/
thx.2010.137042
3. Havelock T, Teoh R, Laws D, Gleeson F, Group
BTSPDG. Pleural procedures and thoracic ultrasound:
British Thoracic Society Pleural Disease Guideline
2010. Thorax. 2010;65 Suppl 2:ii61-76. doi: 10.1136/
thx.2010.137026
4. Hooper C, Lee YC, Maskell N, Group BTSPG.
Investigation of a unilateral pleural effusion in
adults: British Thoracic Society Pleural Disease
Guideline 2010. Thorax. 2010;65 Suppl 2:ii4-17. doi:
10.1136/thx.2010.136978
5. MacDuff A, Arnold A, Harvey J, Group BTSPDG.
Management of spontaneous pneumothorax:
British Thoracic Society Pleural Disease Guideline
2010. Thorax. 2010;65 Suppl 2:ii18-31. doi: 10.1136/
thx.2010.136986
6. Rahman NM, Ali NJ, Brown G, Chapman SJ, Davies
RJ, Downer NJ, et al. Local anaesthetic thoracoscopy:
British Thoracic Society Pleural Disease Guideline
2010. Thorax. 2010;65 Suppl 2:ii54-60. doi: 10.1136/
thx.2010.137018
7. Roberts ME, Neville E, Berrisford RG, Antunes G, Ali
NJ, Group BTSPDG. Management of a malignant
pleural effusion: British Thoracic Society Pleural
Disease Guideline 2010. Thorax. 2010;65 Suppl 2:ii32-
40. doi: 10.1136/thx.2010.136994
8. British Thoracic Society Pleural Disease Guideline
Group. BTS Pleural Disease Guideline 2010; A Quick
Reference Guide. British Thoracic Society Reports
2010;2(3).
9. Australian and New Zealand College of
Anaesthetists. Guidelines on Sedation and/
or Analgesia for Diagnostic and Interventional
Medicine, Dental or Surgical Procedures. 2010.
10. Horsley A, Jones L, White J, Henry M, Horsley
A, Jones L, et al. Efficacy and complications of
small-bore, wire-guided chest drains. Chest.
2006;130(6):1857-63.
11. Fysh ET, Smith NA, Lee YC, Fysh ETH, Smith NA, Lee
YCG. Optimal chest drain size: the rise of the small-
bore pleural catheter. Seminars in Respiratory &
Critical Care Medicine. 2010;31(6):760-8.
12. Light RW, Light RW. Pleural controversy: optimal
chest tube size for drainage. Respirology.
2011;16(2):244-8.
13. Wrightson JM, Fysh E, et al. Risk reduction in pleural
procedures: sonography, simulation and supervision.
Curr Opin Pulm Med. 2010;16(4):340-50.
14. NSW Department of Health. Managing Pigtail Drains
Safely North Sydney: Quality Safety, Clinical and
Governance Branch, 2009 Safety Notice 019/09.