please read all instructions carefully to familiarize ... horseline instuction... · please read...
TRANSCRIPT


Please read all instructions carefully to familiarize yourself with the Wahl Clipper before using.
THIS CLIPPER IS INTENDED FOR HOUSEHOLD USE ONLY.
Save these instructions for further reference.
For any further assistance or information call customer services on T: 01227 744330
or visitW: www.wahl.co.uk
INDEX
ESSENTIAL INFORMATION Page 3GENERAL ADVICE ON CLIPPING & TRIMMING Page 4AVALON Page 5ARTIKO Page 9ADELAR Page 12BLADE CARE Page 15IMPORTANT SAFEGUARDS Page 17WEEE & GUARANTEE Page 18PROBLEM SOLVING GUIDE Page 19
2. INDEX

3. ESSENTIAL INFORMATION
ESSENTIAL INFORMATIONFor maximum efficiency, durability and satisfaction from these products, please note the following points:-1. Prior to using either the Avalon or the Adelar, ensure you charge the battery pack for a minimum of 3 hours or until the light on the unit flashes.2. Always ensure the horse’s coat is dry, as clean as possible and brushed thoroughly to remove grease and dirt particles from the hair.3. Whilst clipping take time to regularly brush hairs and dirt from the blades.4. We recommend that you use a blade wash to ensure grease and dirt particles are washed from the blade surface. This wash should be applied regularly throughout the clip.5. Always re-oil the blades after using the blade wash.6. Regularly apply a few drops of oil to the blades during clipping. The oil lubricates the blades and will ensure your clippers perform to maximum capacity. Without oil, friction is increased therefore generating heat. If blades are getting hot then insufficient oil is being applied or the blades need cleaning or sharpening.7. Always clean your machine and blades thoroughly when you have finished clipping. DO NOT separate the top and bottom blade when cleaning. This may lead to the tension Shim being dislodged which will stop the cutting process.8 Check the air filter is clear of obstructions to avoid overheating the clippers.9. Disconnect all cables and store your clipping kit in a dry temperate environment.10. Always oil your blades before use and before storing to prevent atmospheric moisture causing damage.

GENERAL ADVICE ON CLIPPING & TRIMMING1. When working with horses Wahl recommend that you use a circuit breaker when connecting any electrical appliance directly into an electric socket.2. Ensure the horse is dry, as clean as possible and brushed thoroughly. 3. Ideally have a responsible person to hold the horse whilst you clip or trim.4. Position the clipper / trimmer with the blade flat to the coat surface thus the clipper body is at a 45° angle.5. Without applying any downward pressure, pass the clipper through the coat working against the lay of the hair.6. Do not push the clipper through the coat too quickly – this may cause hairs to get between the blades and separate them, thus reducing performance.7. Always keep the flat surface of the blades against the coat – do not push the teeth of the blades into the coat or operate the clipper / trimmer at a 90° angle.8. When negotiating areas with folds of skin (elbows, chin etc) pull out the skin to avoid the folds catching between the blades and cutting the animal. See (i)7. Regularly use the cleaning brush to flick away any hair from the blades and apply oil frequently.8. Apply blade wash to rinse through any dirt and grease. Wipe away excess liquid. See (ii)9. Always apply clipper oil to the blades before re-starting the clippers. See (iii)10. Never adjust the screws or tension system on the blade set.11. Do not separate the top and bottom blade. This will affect the factory-set tensioning and may reduce performance.12. Do not cover the air intake filter at the base of the clipper or allow this to become clogged.
(i) (ii) (iii)
4. GENERAL ADVICE ON CLIPPING & TRIMMING
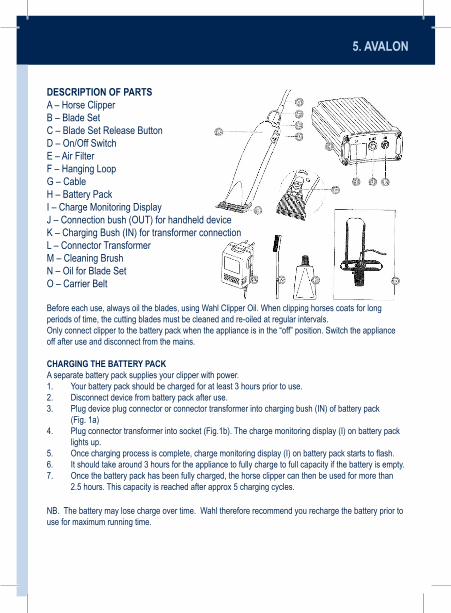
DESCRIPTION OF PARTSA – Horse ClipperB – Blade SetC – Blade Set Release ButtonD – On/Off SwitchE – Air FilterF – Hanging LoopG – CableH – Battery PackI – Charge Monitoring DisplayJ – Connection bush (OUT) for handheld deviceK – Charging Bush (IN) for transformer connectionL – Connector TransformerM – Cleaning Brush N – Oil for Blade Set O – Carrier Belt
Before each use, always oil the blades, using Wahl Clipper Oil. When clipping horses coats for long periods of time, the cutting blades must be cleaned and re-oiled at regular intervals.Only connect clipper to the battery pack when the appliance is in the “off” position. Switch the appliance off after use and disconnect from the mains.
CHARGING THE BATTERY PACKA separate battery pack supplies your clipper with power.1. Your battery pack should be charged for at least 3 hours prior to use.2. Disconnect device from battery pack after use.3. Plug device plug connector or connector transformer into charging bush (IN) of battery pack (Fig. 1a)4. Plug connector transformer into socket (Fig.1b). The charge monitoring display (I) on battery pack lights up.5. Once charging process is complete, charge monitoring display (I) on battery pack starts to flash.6. It should take around 3 hours for the appliance to fully charge to full capacity if the battery is empty.7. Once the battery pack has been fully charged, the horse clipper can then be used for more than 2.5 hours. This capacity is reached after approx 5 charging cycles.
NB. The battery may lose charge over time. Wahl therefore recommend you recharge the battery prior to use for maximum running time.
5. AVALON

NOTE ON Ni-MH BATTERIESThis battery pack contains environmentally-friendly metal hybrid batteries that are free from lead, cadmium and mercury. A prolonged storage period with too low a charge status can have a negative effect on the lifetime of the battery. For this reason, if you do not use your machine for a longer period of time (2-3 months), you should fully charge the battery pack before an extended storage period. It is also recommended that the battery pack be recharged after approx 2 - 3 months in order to extend the lifetime of the batteries.
OPERATING INSTRUCTIONS1. If required put on the belt harness. The fastening clip can be used to secure the battery pack to the belt. The clipper may be placed in the holding pouch if required.2. Ensure the clipper is switched off before attaching to the power supply.3. Connect the plug from the clipper into battery socket marked ‘OUT’ (Fig. 2.)4. Attach the blade onto the clipper following the instructions in this booklet.5. Ensure the blade is oiled before switching the clipper on.
6. AVALON

7. AVALON
6. Use the on / off button at the base of the clipper to switch on the device (Fig. 3.)7. When clipping we recommend the blades are cleaned and re-oiled at regular intervals.8. Never use a blade that is damaged in any way as this may cause injury.9. Always switch the appliance off and disconnect from the power supply when you have finished using it.
ATTACHING THE BLADE SETFor detailed blade instructions see page 15/161. For optimum performance we recommend that blades produced by Wahl or Moser are used with the Avalon clipper.2. Ensure the clipper is switched off. The snap-on blade should be placed onto the clip (Fig 5a). The clip must be in the open position.3. Lock the blade into place by pushing the blade towards the clipper until it snaps shut.4. If the blade has not locked into place, switch the clipper on and press the blade firmly towards the clipper until you hear it snap into place (Fig. 5b).5. Always oil blades before use.
REMOVING THE BLADE SET For detailed blade instructions see Page 15/161. Press the release button (Fig. 4a) towards the blade set.2. Keeping this button pressed in, pull the blade towards you to release the clip (Fig. 4b).3. When the clip is released and pulled forward the blade will lift upwards (Fig. 4c).
CLEANING THE BLADE SETFor detailed blade cleaning instructions see Page 15/161. Switch the clipper off.2. Remove hair from the blades with the cleaning brush.3. Use the Hygienic Spray to flush through any grease and dirt.4. Wipe excess fluid from the blades with a cloth.5. Apply clipper oil before commencing clipping again.
CLEANING THE AIR FILTERTo ensure a good supply of air to the motor it is essential that the air filter is cleaned regularly.1. Remove the filter cover (Fig.6a) and clean the air filter with the cleaning brush.2. Re-insert the filter cover until it locks into position (Fig. 6b).
8. AVALON
CLEANING AND MAINTANANCERegular cleaning will ensure a long service life for your clipper.Always disconnect from the power source prior to cleaning.We recommend using the Hygienic Spray to degrease and clean blades.Do not use solvents or scouring agents to clean any part of your clipper or blades.Water based lubricating solutions should not be used to oil the blades.To maintain your blades in optimum condition please see the notes on page 16.Never operate your clippers without applying oil to the blades. Repeated oil application should be carried out during the clipping process.Always oil blades before storing the clipper.We recommend that your clipper is stored in a dry area and blades are removed.Operating your clipper without full battery power or blunt blades may damage the motor and will impede the performance.Wahl recommend that this product is serviced by a qualified technician regularly to maintain performance and efficiency. (Manufacturer contact details on page 18.)The clipper case may be cleaned with a soft cloth, which may be dampened slightly. Do not use solvents or scouring agents as this will damage the coating.
WIRING WARNING: If the supply cord is damaged it must be replaced by the manufacturers service agent or a similarly qualified person in order to avoid a hazard.This product must only be used with the transformer supplied.Should a replacement be required contact the manufacturer (Details on page 18).
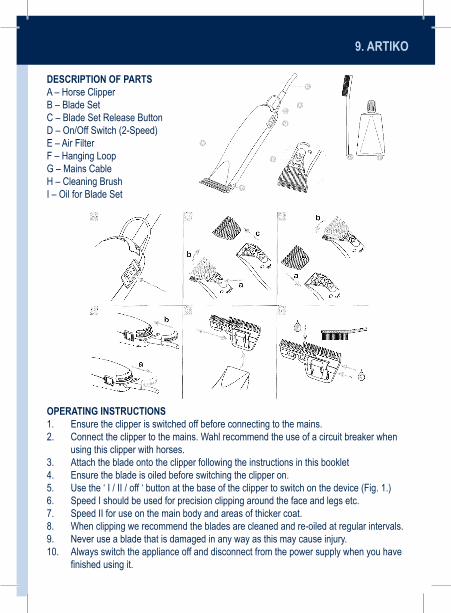
DESCRIPTION OF PARTSA – Horse ClipperB – Blade SetC – Blade Set Release Button D – On/Off Switch (2-Speed)E – Air Filter F – Hanging LoopG – Mains CableH – Cleaning BrushI – Oil for Blade Set
OPERATING INSTRUCTIONS1. Ensure the clipper is switched off before connecting to the mains.2. Connect the clipper to the mains. Wahl recommend the use of a circuit breaker when using this clipper with horses.3. Attach the blade onto the clipper following the instructions in this booklet4. Ensure the blade is oiled before switching the clipper on.5. Use the ‘ I / II / off ‘ button at the base of the clipper to switch on the device (Fig. 1.)6. Speed I should be used for precision clipping around the face and legs etc.7. Speed II for use on the main body and areas of thicker coat.8. When clipping we recommend the blades are cleaned and re-oiled at regular intervals.9. Never use a blade that is damaged in any way as this may cause injury.10. Always switch the appliance off and disconnect from the power supply when you have finished using it.
9. ARTIKO
10. ARTIKO
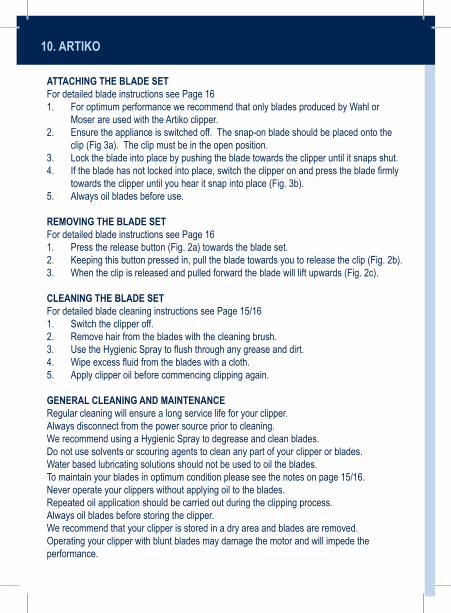
ATTACHING THE BLADE SETFor detailed blade instructions see Page 161. For optimum performance we recommend that only blades produced by Wahl or Moser are used with the Artiko clipper.2. Ensure the appliance is switched off. The snap-on blade should be placed onto the clip (Fig 3a). The clip must be in the open position.3. Lock the blade into place by pushing the blade towards the clipper until it snaps shut.4. If the blade has not locked into place, switch the clipper on and press the blade firmly towards the clipper until you hear it snap into place (Fig. 3b).5. Always oil blades before use.
REMOVING THE BLADE SETFor detailed blade instructions see Page 161. Press the release button (Fig. 2a) towards the blade set.2. Keeping this button pressed in, pull the blade towards you to release the clip (Fig. 2b).3. When the clip is released and pulled forward the blade will lift upwards (Fig. 2c).
CLEANING THE BLADE SETFor detailed blade cleaning instructions see Page 15/161. Switch the clipper off.2. Remove hair from the blades with the cleaning brush.3. Use the Hygienic Spray to flush through any grease and dirt.4. Wipe excess fluid from the blades with a cloth.5. Apply clipper oil before commencing clipping again.
GENERAL CLEANING AND MAINTENANCERegular cleaning will ensure a long service life for your clipper.Always disconnect from the power source prior to cleaning.We recommend using a Hygienic Spray to degrease and clean blades.Do not use solvents or scouring agents to clean any part of your clipper or blades.Water based lubricating solutions should not be used to oil the blades.To maintain your blades in optimum condition please see the notes on page 15/16.Never operate your clippers without applying oil to the blades. Repeated oil application should be carried out during the clipping process.Always oil blades before storing the clipper.We recommend that your clipper is stored in a dry area and blades are removed.Operating your clipper with blunt blades may damage the motor and will impede the performance.

11. ARTIKO
Wahl recommend this product is serviced by a qualified technician regularly to maintain performance and efficiency. (Manufacturer contact details on page 18.)
CLEANING THE AIR FILTERTo ensure a good supply of air to the motor it is essential that the air filter is cleaned regularly.1. Remove the filter cover (Fig.4a) and clean the air filter with the cleaning brush.2. Re-insert the filter cover until it locks into position (Fig. 4b).
The clipper case may be cleaned with a soft cloth, which may be dampened slightly. Do not use solvents or scouring agents as this will damage the coating.
WIRINGWARNING: If the supply cord is damaged it must be replaced by the manufacturer’s service agent or a similarly qualified person in order to avoid a hazard.
The wires in the mains lead of this clipper are coloured in accordance to the following code:
Blue Neutral (N) Brown Live (L)
This appliance is fitted with a 3pin plug which has a 13amp fuse fitted
If the supply cord is not suitable for your socket or becomes damaged, it should be cut off and disposed of, and a suitable plug fitted as detailed:
As the colours of the wires in the mains lead of this clipper may not correspond with the colour markings identifying the terminals in your plug proceed as follows:
The wire which is coloured BLUE must be connected to the terminal in the plug which is marked with the letter N or coloured BLUE or BLACK.
The wire which is coloured BROWN must be connected to the terminal in the plug which is marked with the letter L or coloured BROWN or RED.
Do not connect either wire to the terminal in the plug which is marked with the letter E, has the Earth symbol, or coloured GREEN or GREEN AND YELLOW.

12. ADELAR
DESCRIPTION OF PARTSA – Blade Set B – On/Off SwitchC – Battery Level DisplayD – Battery PackE – Battery ChargerF – Cable CompartmentG – Charge indicatorH – Quick Release Battery PackI – OilJ – Cleaning Brush
CHARGING THE BATTERY A separate battery pack supplies your trimmer with power.1. Before the trimmer is used for the first time, each battery pack should be charged for approximately 1 ½ hours.2. Plug the battery charging unit into the mains power supply.3. The battery pack should be removed from the trimmer by pressing the release buttons at the side and sliding it away from the trimmer unit (Fig 1a).4. Place the battery pack into the charging unit. The red charge indicator light on the battery charger (G) will light up.5. When the battery is fully charged the red charge indicator light (G) will flash to indicate charging is complete.6. Remove the battery pack from the charging unit and insert it into the trimmer case until it clicks into position (Fig. 1b).7. Once fully charged the trimmer will provide approximately 1 hour of constant use.8. Recharging of the battery is necessary when the ‘battery level’ display (C) lights up during operation. This indicates the battery has a remaining capacity of 15%.9. The second battery supplied with this trimmer may be left on the charging stand indefinitely as it cannot be over-charged.
Recommendation: In order to prolong the service life of the batteries we recommend that they are only recharged when the red battery level display on the trimmer lights up.
OPERATING INSTRUCTIONS1. Ensure the trimmer is switched off before inserting the battery.2. Attach the blade onto the trimmer following the instructions below.3. Ensure the blade is oiled before switching the trimmer on.4. Use the on / off switch in the middle of the trimmer to switch the device on (Fig. 2a).5. This trimmer has the capacity to vary the length of hair that it leaves. In order to adjust the blade setting to leave between 0.1mm and 3mm the blade adjustment lever (Fig. 4.) must be moved.

13. ADELAR
6. To achieve the closest clip (0.1mm) the blade adjustment lever should be positioned to the right.7. To achieve the longest clip (3mm) the blade adjustment lever should be positioned to the left.8. Position the trimmer with the blade flat to the coat surface and the trimmer body at 45° angle to the clipping area.9. Without applying any downward pressure, pass the trimmer through the coat working against the lay of the hair.10. Do not push the trimmer through the coat too quickly – this may cause hairs to get between the blades and separate them, thus reducing performance.11. Always keep the flat surface of the blades against the coat – do not push the teeth of the blades into the skin or operate the trimmer at a 90° angle.12. When negotiating areas with folds of skin (elbows, chin etc) pull out the skin to avoid the folds catching between the blades and cutting the animal.13. When clipping we recommend the blades are cleaned and re-oiled at regular intervals.14. Never use a blade that is damaged in any way as this may cause injury.15. Always switch the appliance off when you have finished using it.
ATTACHING THE BLADE SET1. For optimum performance we recommend that blades produced by Wahl or Moser are used with the Adelar trimmer.2. Ensure the trimmer is switched off. 3. The small clip at the base of the blade above the blade adjustment lever should be aligned with the indentation on trimmer case.4. Lock the blade into place by pushing the blade towards the clipper until it snaps shut (Fig.4b).
14. ADELAR
REMOVING THE BLADE SET1. Hold the trimmer firmly in one hand with the switch facing you.2. Apply downward pressure to the centre of the blade pushing it away from the trimmer casing (Fig. 4a).3. Take care to prevent the blade falling.
CLEANING THE BLADE SET1. Switch the trimmer off.2. Remove the blade set from the trimmer as described above.3. Press the cleaning lever (Fig. 5) to remove cut hairs from between the blades with the cleaning brush.4. We recommend the use of a Hygienic Spray to flush through grease and dirt.4. Wipe excess fluid from the blades with a cloth.5. Apply clipper oil before replacing the blade onto the trimmer (Fig. 6.)
GENERAL CLEANING AND MAINTENANCERegular cleaning will ensure a long service life for your trimmer.The charging contacts on the trimmer and charging stand must always be kept clean.We recommend using the Hygienic Spray to degrease and clean blades.Do not immerse this equipment in water.The clipper case may be cleaned with a soft cloth, which may be dampened slightly. Do not use solvents or scouring agents as this will damage the coating.Do not use solvents or scouring agents to clean any part of your clipper or blades.Water based lubricating solutions should not be used to oil the blades.Never operate your trimmers without applying oil to the blades before and after every use – Always oil blades before storing the trimmer. Repeated oil application should be carried out during the trimming process.We recommend that your trimmer is stored in a dry area and blades are removed.Operating your trimmer with blunt blades may damage the motor and will impede the performance.If the cutting performance deteriorates after long use despite regular cleaning and oiling, the blade set should be replaced.Wahl recommend that this product is serviced by a qualified technician regularly to maintain performance and efficiency. (Manufacturer contact details on page 18.)
WIRINGWarning: This product must only be used with the charger unit supplied. Should a replacement be required contact the manufacturer (Details on page 18).

15. BLADE CARE
BLADES – Avalon & ArtikoTo maintain maximum cutting performance and durability of your clippers, the blade set must be cleaned and oiled regularly. Never use a blade set that is damaged in any way as this may cause injury.Whilst in use we recommend the blades are cleaned and oiled at least every 15 minutes.
GENERAL CLEANING PROCESS FOR THE BLADE SETGeneral Cleaning Process for the Blade Set1. Switch the clipper off.2. Remove hair from the blades with the cleaning brush.3. Use the Hygienic Spray to flush through any grease and dirt.4. Wipe excess fluid from the blades with a cloth.5. Apply clipper oil before commencing clipping again.
At the end of each use or if the blade becomes clogged or blocked, it should be thoroughly cleaned as follows:-1. Switch the clipper off and remove the blade set from the clipper.2. Push the top blade to the side (Page 6 Fig. 7) and remove hairs from both blades using the cleaning brush (Fig. 8). Do not separate the blades completely.3. After cleaning, return the top blade to the centre.4. Hold the blade on it’s side and apply the Hygienic Spray to the top of the blade allowing the liquid to flush away any dirt or grease.5. Wipe away any excess fluid from the blade.6. Oil the blades with Wahl Clipper Oil7. The top blade should be aligned in the centre of the bottom blade. Do not adjust the screws on the blade.8. Attach the blade set to the clipper for continuing use or store the blade in a dry environment.NB. The application of oil to a stored blade will eliminate the risk of pitting or rust damage caused by moisture in the atmosphere.
Only replace a blunt or damaged blade set with Wahl or Moser blades. Replacements may be ordered through your dealer, service centre or from Wahl (UK) Ltd. (Contact details on page 18).ALWAYS OIL NEW BLADES BEFORE USE

16. BLADE CARE
CLEANING AND CAREDo not adjust the screws on the blade set – these should only be adjusted by a qualified technician.Do not separate the top and bottom blades even when cleaning. This will affect the factoryset tensioning and may reduce performance.Wahl recommend that only oil specifically designed for use with clippers is used to lubricate the clipper blades.It will be necessary to clean your blades with the brush provided whilst you are clipping. We recommend you regularly apply the Hygienic Spray to degrease the blades and always re-oil before continuing to clip.Dirt and grease within the coat will blunt clipper blades.
ATTACHING THE BLADE SET1. Ensure the blade clip is clear of the hinge assembly. The blade set can only be attached when the clip is open. If the clip has closed flat, insert a small knife or screwdriver between the hinge assembly and the clip and prise it upwards. Ensure you only apply upward pressure to the clip.2. Place the blade onto the clip (Page 6). There is a clear space at the base of the blade into which the clip will slide.3. Close the clip by applying pressure to the flat surface of the blade (Fig. 5b). Do not hold the cutting edges as you may cause injury.4. The blade may not lock into position as it closes. In this event switch the clipper on and apply pressure to the large flat surface of the blade pushing firmly towards the clipper (Page 6 Fig.5b) until you hear it snap into place and a smooth operating noise is audible.5. If the blade is noisy or rattles when the clipper is switched on then it is not locked into position correctly.
REMOVING THE BLADE SET1. Hold the clipper in an upright position with the back of the appliance facing you.2. Press the release button (Page 6 Fig. 4a) upwards towards the blade and with the other hand, carefully push the blade set towards you.3. Lift the blade set upwards from the clip (Fig. 4c).

17. IMPORTANT SAFEGUARDS
When using this electrical appliance, especially when children are present, basic safety precautions should always be observed including the following.
TO REDUCE THE RISK OF FIRE AND INJURY1. This appliance is not intended for use by persons (including children) with reduced physical, sensory or mental capabilities, or lack of experience and knowledge, unless they have been given supervision or instruction concerning use of the appliance by a person responsible for their safety. Children should be supervised to ensure that they do not play with the appliance.2. Never touch or allow contact with moving parts while in motion. Keep hands, hair clothing and other utensils away from the moving parts during operation to prevent accident, injury or damage to the appliance. 3. Switch off the appliance and unplug from outlet when not in use, before putting on or taking off attachments and also before cleaning the appliance. 4. Never use your appliance without paying attention! Always unplug the unit when not in use, even for a moment.5. Do not operate the appliance with a broken cord or plug, or if the appliance malfunctions, or is dropped or damaged in anyway. 6. Any servicing or repair must be performed by an authorized service representative.7. Do not let the cord hang over the edge of the work surface or let it touch any hot surfaces.8. The use of attachments that are not supplied by the manufacturer may cause fire, electric shock or injury and damage to the appliance9. To protect against risk of electrical shock, never immerse the unit or let it come into contact with water or any other liquids. Do not use the unit with wet hands. If the appliance should become wet, damp or fall in water, remove plug from mains socket immediately. Do not put your hands in the water.10. Never carry the unit by its power cord.11. Use this appliance only for its intended purpose.12. Apart from when charging, always disconnect from the mains after use.13. When using an electrical appliance around animals Wahl recommend the use of a circuit breaker to minimize risk.
18. WEEE/GUARANTEE
GENERAL MAINTENANCE• Regularly clean hair clippings from the blade and keep air filters clear.• Inspect the Hinge and Latch for damage and/or signs of wear.• Inspect the Drive Lever for signs of wear and/or damage.• Examine any cables for damage or breaks.• The clippers / trimmers will require regular servicing to maintain performance.• Blunt blades will seriously affect the ability of the clippers and trimmers. Blades should be sharpened or replaced regularly.
WASTE ELECTRICAL & ELECTRONIC EQUIPMENT DIRECTIVE 2002/96/EC (WEEE)
At the end of this products life it should not be disposed of with general household waste.Care should be taken to dispose of in a suitable manner in accordance with your Local Authority regulation.
This marking indicates that this product should not be disposed with other household wastes throughout the EU. To prevent possible harm to the environment or human health from uncontrolled waste disposal, recycle it responsiblyto promote sustainable reuse or material resources. To return your used device, contact the retailer where the product was purchased. They can take this product for environmental safe recycling.
GUARANTEEThis product is guaranteed against defects in material and workmanship for a period of Twelve months from the date of original purchase or receipt as a gift.
The guarantee becomes invalid in the case of misuse or repair by unauthorised persons.
Should this product become defective during the warranty period, return it to the store of purchase together with your proof of purchase for repair or replacement without any charges to you.This guarantee in no way affects your rights under statutory law in the United Kingdom.
CONTACT Wahl (UK) Ltd Customer Services Department 01227 744330 / 740066 For technical advice, service, blade sharpening and replacement parts.
www.wahlstore.co.uk For online ordering.

19. PROBLEM SOLVING GUIDE
Clipper will not operate Avalon Ensure the battery is fully charged and the mains adaptor is working correctly Ensure the plug from the clipper is fully inserted into the battery pack Artiko Ensure the mains power supply is working correctly Check the fuse in the plug – ONLY replace this with a 3 amp fuse Adelar Is the battery fully charged and correctly inserted into the unit?
Clipper will not cut or is pulling the hairCheck the cutting blade (top) is moving when the clipper is operatingIs the latch retaining the blade?Can the blade be removed without pressing the blade release button?Is the clipper making excessive noise and rattling?All the above indicate that the blade is not locked onto the clipper correctly. Remove it and follow theinstructions on page 15-16.
Insufficient oil or the blades are clogged – If you hear the clipper begin to slow down or labour it is essential that you clean the blade and add more oil.Check the plastic shim is still present on the end of the tension arm where it makes contact with the cutting blade. If this piece of plastic is missing (usually caused when the blades are separated) then blade tension will be lost and the blade will not cut.The blade may be blunt and require sharpening or replacing.The horse’s coat may not be dry, we recommend you wait and try again later.
Cannot attach the blade to the clipperIs the hinge latch snapped shut, if so gently prise it open with a flat blade screwdriver.Check for signs of wear or damage to the hinge or blade assembly.
Clipper is making excessive noiseThe blade is not attached correctly.The drive tip may need replacing.
Clipper is getting hotThere is insufficient oil on the bladesThe blades are dirty and unable to move freelyThe battery pack needs to be rechargedThe blades are blunt and putting excessive stress on the motorThe air vents are blockedThe clipper is in need of servicing
Tramlines on the horseThere is damage to the blade, possibly a tooth missing – Stop – this is dangerous to use.Uneven pressure on the clippers as the user passes them through the coat.There is insufficient overlap between one clipping sweep and the next.The clippers are not being used directly against the lie of the coat.The user is not keeping the flat surface of the blade against the horse.

WAHL (UK) LIMITEDHERNE BAY TRADE PARK, SEA STREETHERNE BAY, KENT, CT6 8JZ.TECHNICAL SUPPORT TEL: 01227 744331CUSTOMER CARE TEL: 01227 740066www.wahl.co.uk
Form No. ZB032Rev1-02/12