platform of virtual courses user manual - tecsup … · user manual – platform of virtual courses...
TRANSCRIPT
User Manual – Platform of Virtual Courses
1/17
PLATFORM OF VIRTUAL COURSES
User Manual

User Manual – Platform of Virtual Courses
2/17
I. Application Requirements
Updated Google Chrome Navigator or Internet Explorer 9 or superior.
Adobe Flash Player 10 or superior.
Adobe Acrobat Reader 10 or superior.
II. User Entry
Execute the navigator
Type in the application web site address in the navigation bar :
http://www.tecsup-aqp.edu.pe/cursossmcv
Enter the username, the password and click on the “Enter” button.
Figure 01 – Access Form
III. User Interface
1. Principal Graphic Interface
Permits acceding the course interface from buttons and images that function as links.
User Manual – Platform of Virtual Courses
3/17
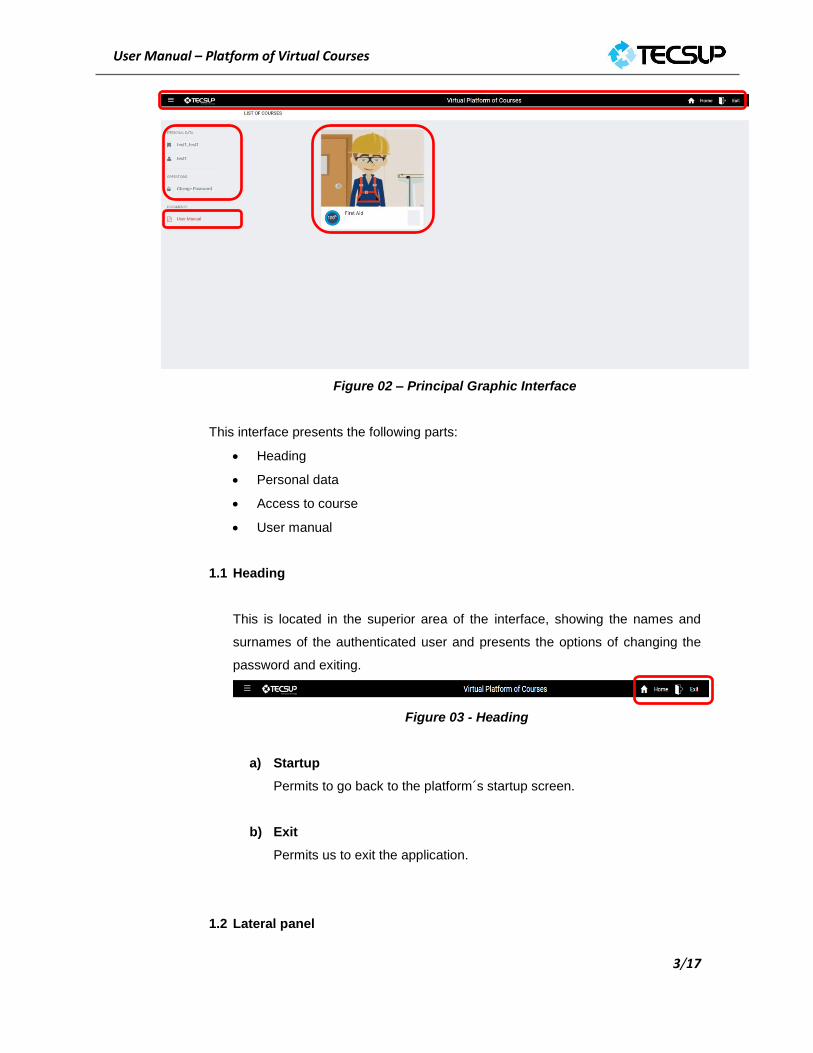
Figure 02 – Principal Graphic Interface
This interface presents the following parts:
Heading
Personal data
Access to course
User manual
1.1 Heading
This is located in the superior area of the interface, showing the names and
surnames of the authenticated user and presents the options of changing the
password and exiting.
Figure 03 - Heading
a) Startup
Permits to go back to the platform´s startup screen.
b) Exit
Permits us to exit the application.
1.2 Lateral panel

User Manual – Platform of Virtual Courses
4/17
Includes the user´s personal data, the control to change the user password , and
the access to the user manual document.
Figure 04 – Lateral Panel
a) Change password
Permits to change the authenticated user password; the following steps
are to be followed:
Click on the link “Change Password”
Type in the current password
Enter the new password
Reenter the new password to confirm
Figure 05 – Form for password change

User Manual – Platform of Virtual Courses
5/17
1.3 List of courses
You will be able to observe the courses in which you are registered; you will
identify them via a link comprised by:
Image of the course
Link towards the content
Progress of the course (%)
In order to accede to the course content, click on its corresponding link or image.
Figure 06 – Course Mosaic
2. Graphic Interface of the Course
This interface will show the content of the course in detailed manner and will be
comprised of two parts:
1. Course Heading
2. Content Explorer
3. Area of Contents
4. Means Panel

User Manual – Platform of Virtual Courses
6/17
Figure 07 – Graphic Interface Parts of the Course
The content explorer areas and the media panel can be hidden to expand the content
area via buttons that are indicated in the following manner:
Figure 08 – Redimension Buttons
1
2
3
4

User Manual – Platform of Virtual Courses
7/17
2.1 Course Heading
This is located on the upper area of the interface, and in it the current selected
course can be appreciated as well as Course Progress (%), Time in the
Course and the grade obtained. In order to pass the course, a minimum of 80%
is required.
Figure 09 – Course Heading
Additionally, on the right hand side of the area heading, there are the names and
surnames of the authenticated user and the options to Return to the main menu
of courses and Exit the application.
Figure 10 – User Data and Options
a) Return
Permits to go back to the main graphic interface.
b) Exit
Permits to exit the application
2.2 Content Explorer
This is located on the left area of the interface, presenting the report tools, the
agenda and the course´s navigation menu.
IMPORTANT. Take into account that each item of the course will be blocked
initially, and these will enabled while the user progresses in the course.
User Manual – Platform of Virtual Courses
8/17
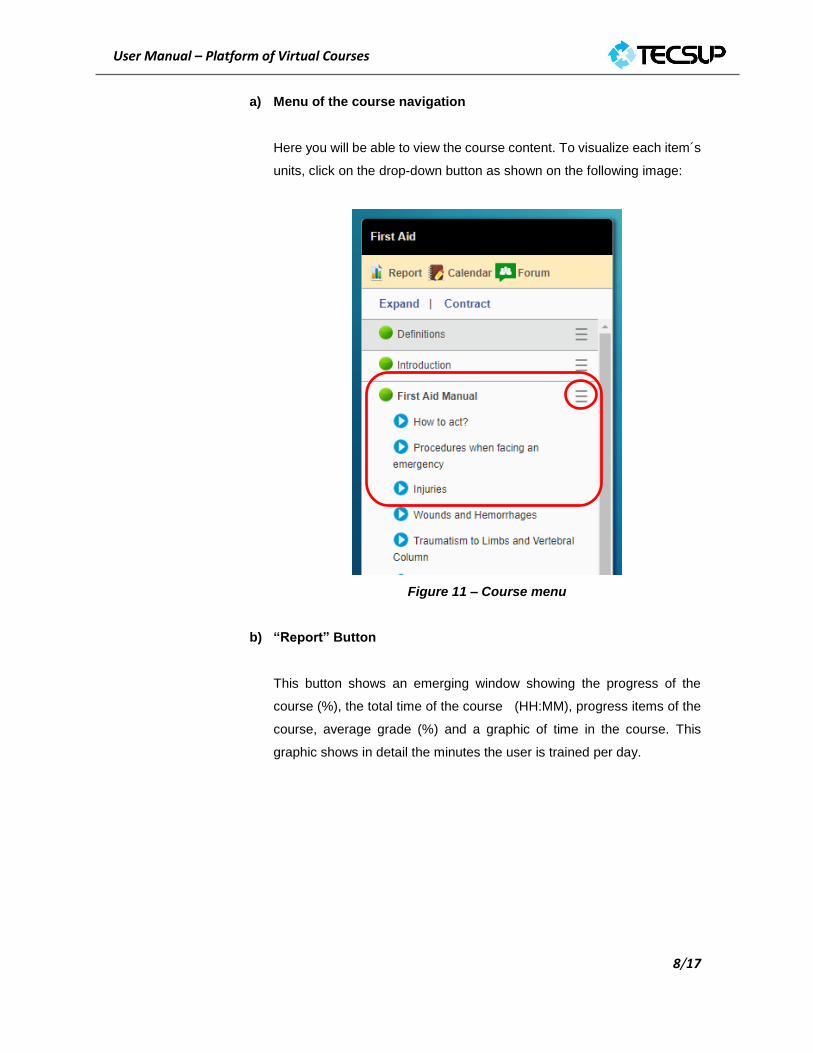
a) Menu of the course navigation
Here you will be able to view the course content. To visualize each item´s
units, click on the drop-down button as shown on the following image:
Figure 11 – Course menu
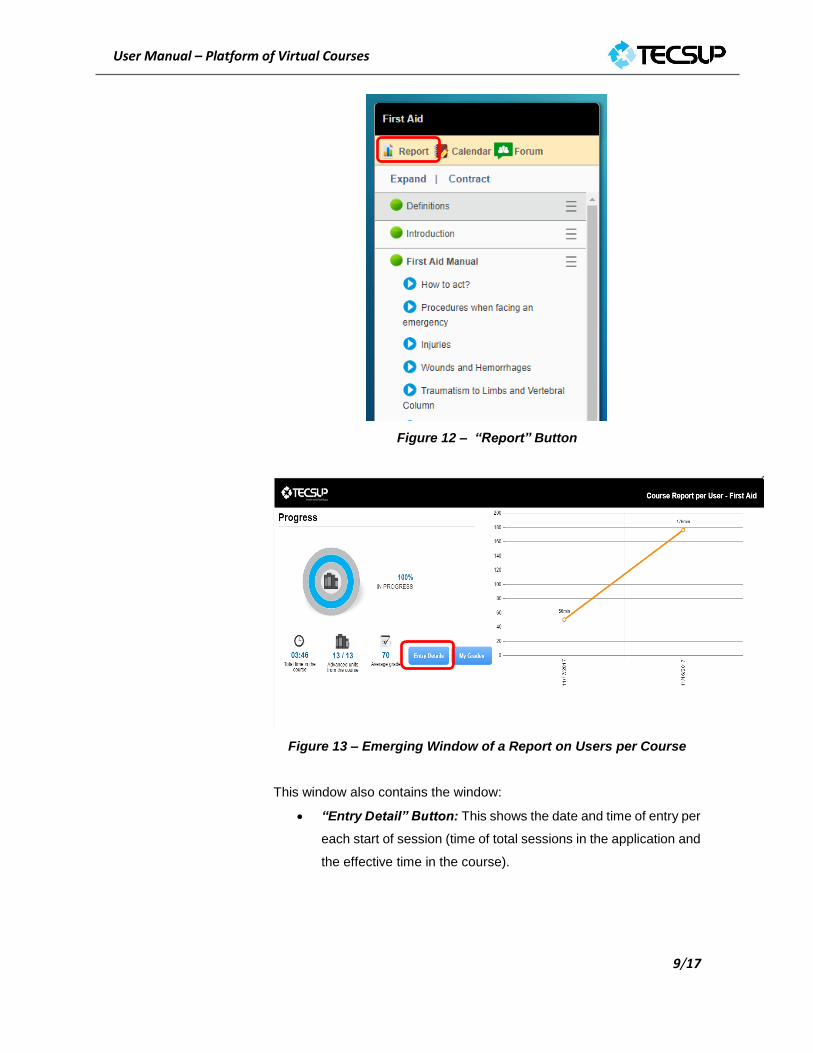
b) “Report” Button
This button shows an emerging window showing the progress of the
course (%), the total time of the course (HH:MM), progress items of the
course, average grade (%) and a graphic of time in the course. This
graphic shows in detail the minutes the user is trained per day.
User Manual – Platform of Virtual Courses
9/17
Figure 12 – “Report” Button
Figure 13 – Emerging Window of a Report on Users per Course
This window also contains the window:
“Entry Detail” Button: This shows the date and time of entry per
each start of session (time of total sessions in the application and
the effective time in the course).
User Manual – Platform of Virtual Courses
10/17
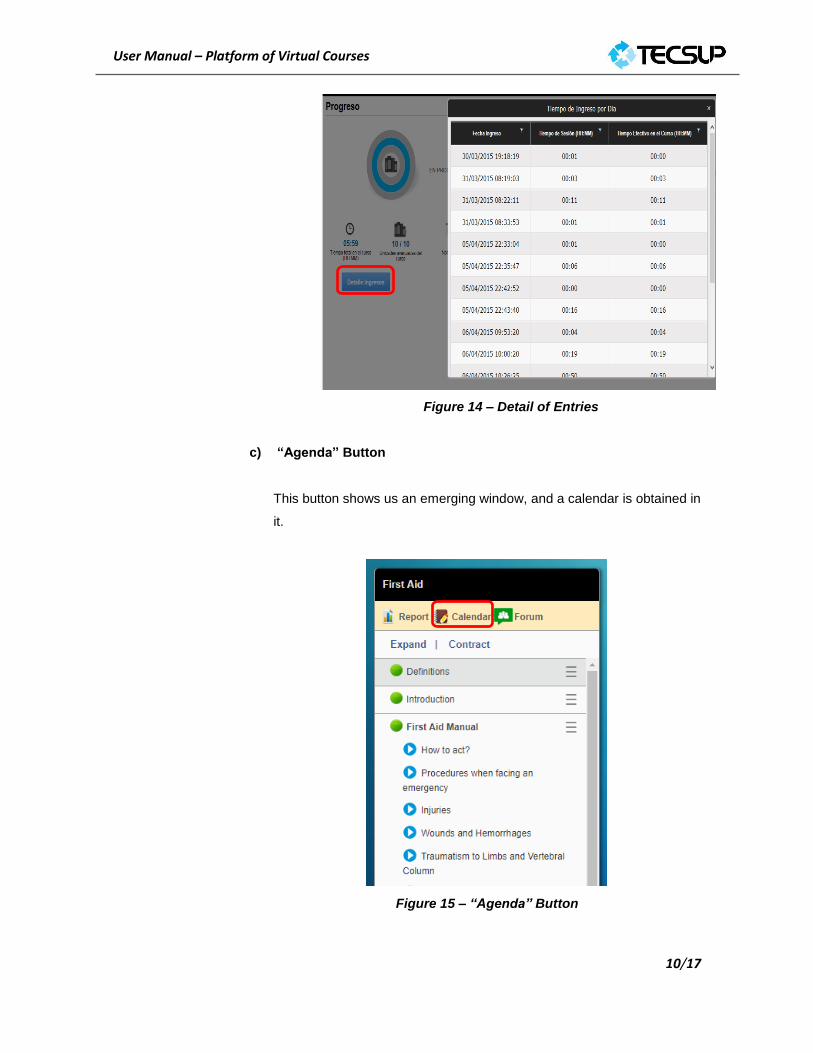
Figure 14 – Detail of Entries
c) “Agenda” Button
This button shows us an emerging window, and a calendar is obtained in
it.
Figure 15 – “Agenda” Button

User Manual – Platform of Virtual Courses
11/17
Figure 16 – Agenda Window
This simple utilitarian can be used to add the different tasks that one plans
to perform during the course. The following will be done:
Click on the desired day and enter the name of the task.
Figure 17 – Task designation
Once the task has been done, it will be sent on the date designated on
the user´s email address as a reminder.
2.3 Content Area
The content of each item of the course that can be text, images or videos, is
shown in this area.

User Manual – Platform of Virtual Courses
12/17
Figure 18 – Content Area
In the case of videos, a reproduction bar is shown, with reproduction and pause
buttons regarding the progress of the course.
To begin the video, click on the reproduction button as shown following:
Figure 19 – Reproduction Bar
Take into account that the video will not be able to be advanced, and this is why
we recommend paying attention to the content so as not to need to reproduce
the video again.
It is important to take into account that the advance or return options regards the
unit´s reproduction will only be enabled after the course´s first reproduction.
To advance to the next item or lesson we have to wait for the right hand button
“Next” to be activated. This can be observed in the following image:

User Manual – Platform of Virtual Courses
13/17
Figure 20 – “Next” Button
2.4 Means Panel (Complementary Information)
During the course development, some units, or items or lessons possess means
(documents, photos, videos and images) related to each one of these, and to
accede to them it is only necessary to click on the means section located to the
right.
Figure 21 – Means

User Manual – Platform of Virtual Courses
14/17
To see the complementary information of each theme, the means bar should be
opened, or click on the icon of the means you want to review. A list will appear
from where you will be able to accede to information of each means as is shown
in the following image.
Figure 22 – List of Means
2.5 Evaluation of Course
At the end of the course you will find your corresponding evaluation, and you
should carefully read the instructions before beginning.
IMPORTANT
Once the evaluation has begun, it should not be interrupted under any
circumstance, if not, the system will qualify it with a grade of Cero and your
quantity of opportunities will decrease. To Pass the course, you will need a
minimum percentage of 80%. Take into account that you only count with three
opportunities to perform the evaluation and that the last grade obtained will
replace the previous one.

User Manual – Platform of Virtual Courses
15/17
To start the evaluation, click on the Start button.
Figure 23 – Initial Message of the Evaluation
A window will appear automatically with the remaining time, the questions and
the alternatives. You should select one of the alternatives until completing the
evaluation.
To go on to the following question, click on the arrow to the right or on the
enumeration underneath.
Figure 24 – Interface of the evaluation
User Manual – Platform of Virtual Courses
16/17
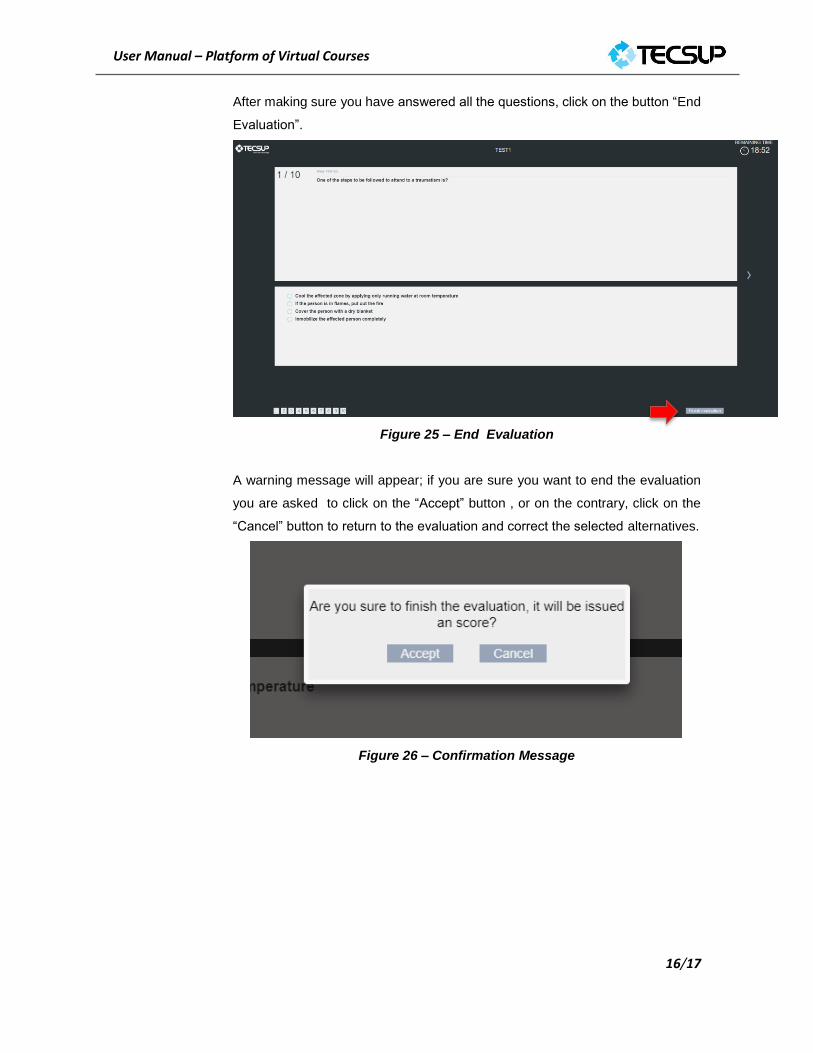
After making sure you have answered all the questions, click on the button “End
Evaluation”.
Figure 25 – End Evaluation
A warning message will appear; if you are sure you want to end the evaluation
you are asked to click on the “Accept” button , or on the contrary, click on the
“Cancel” button to return to the evaluation and correct the selected alternatives.
Figure 26 – Confirmation Message

User Manual – Platform of Virtual Courses
17/17
The percentage obtained, the correct and incorrect answers, date and time of
the evaluation will be shown in the Content Area.
Figure 27 – Results of the Evaluation