pipeta / pipette vitlab micropipette · 4 1. todo usuario debe haber leído estas instruc-ciones de...
TRANSCRIPT

VITLAB®
micropipette
VITLAB GmbH
Linus-Pauling-Str.163762 GrossostheimGermanytel: +49 6026 97799-0fax: +49 6026 [email protected]
Instrucciones de manejoMode d’emploi
Pipeta / Pipette


3
Contenido
1. Normas de seguridad 4
2. Aplicación 5
3. Limitaciones de empleo 5
4. Limitaciones de uso 5
5. Excepciones de uso 5
6. Elementos funcionales y operativos 6
7. Pipetear 7
8. Controlar el volumen 9
9. Tabla de precisión 10
10. Ajustar 11
11. Autoclavage 12
12. Esterilización con UV 12
13. Filtro pipeta 5 ml / 10 ml 12
14. Mantenimiento y limpieza 13
14.1. VITLAB® micropipette hasta 1000 µl 13
14.2. VITLAB® micropipette 5 ml / 10 ml 14
15. Referencias · Accesorios 15
15.1. Referencias 15
15.2. Accesorios 15
16. Recambios 16
16.1. VITLAB® micropipette hasta 1000 µl 16
16.2. VITLAB® micropipette 5 ml / 10 ml 17
17. ¿Qué hacer en caso de avería? 18
18. Reparación · Servicio de calibración 19
18.1. Envios para reparación 19
18.2. Servicio de calibración 19
19. Garantía 20
20. Eliminación 20
57

4
1. Todo usuario debe haber leído estas instruc-ciones de manejo antes de utilizar el aparato, y debe seguirlas.
2. Observar las advertencias de peligro y las reglas de seguridad generales, como por ejemplo utilizar vestimenta, protección de los ojos y guantes de protección. Al trabajar con muestras infecciosas o peligrosas, de-berán seguirse las normativas estándar de laboratorios y tomar las medidas pertinentes.
3. Observar las indicaciones del fabricante de los reactivos.
4. El aparato deberá utilizarse exclusivamente para pipetear líquidos cumpliendo siempre con las limitaciones de empleo y de uso. Observar las excepciones de uso (véase pág. 5). En caso de duda, dirigirse sin falta al fabricante o al distribuidor.
5. Trabajar siempre de tal manera que no co-rran peligro ni el operador ni otras personas. Evitar salpicaduras. Utilizar un recipiente apropriado.
1. Normas de seguridad
¡Rogamos lea este documento cuidadosamente!
Este aparato puede entrar en contacto con instalaciones, aplicaciones o materiales peligrosos. Estas instrucciones de manejo no tienen por objeto enumerar todas las limitaciones de seguridad que pue-den presentarse durante el uso. El usuario del aparato tiene responsabilidad de tomar las medidas suficientes para su seguridad y su salud, así como determinar las limitaciones de uso correspondien-tes antes de su utilización.
6. Al trabajar con medios agresivos, evitar el contacto con la abertura de las puntas.
7. No emplear nunca la fuerza.
8. Utilizar sólo recambios originales. No efec-túe ninguna modificación técnica. ¡No des-monte el aparato más allá de lo descrito en las instrucciones de manejo!
9. Antes de cada uso, comprobar el estado correcto de aparato. En el caso de que se produzcan averías en el aparato (por ej. desplazamiento difícil del émbolo, falta de hermeticidad), inmediatamente dejar de pipetear y seguir las instrucciones del capítu-lo ‚¿Qué hacer en caso de avería?‘ (véase pág. 18). En caso necesario dirigirse al fa-bricante.

5
3. Limitaciones de empleoEl aparato sirve para pipetear muestras teniendo en consideración las siguientes limitaciones:
- emplear entre +15 °C et +40 °C (de aparato y reactivos: pueden obtenerse otras temperaturas si así se desea)
- Presión de vapor de hasta 500 mbar
- Viscosidad: 260 mPa s
2. Aplicación
Pipeta con cojín de aire para pipeteado de soluciones acuosas densidad medias y de viscosidad baja a media.
4. Limitaciones de uso
Los líquidos viscosos y humectantes pueden afectar a la exactitud del volumen. Al igual que los líquidos cuya temperatura difiera en más de ± 1 °C de la temperatura ambiente.
5. Excepciones de uso
El usuario debe asegurarse de la compatibilidad del aparato para cada aplicación.
El aparato no debe ser utilizado:
- con líquidos que ataquen el polipropileno- con líquidos que ataquen el policarbonato (visor de inspección)- con líquidos que tengan una alta presión de vapor- con líquidos que ataquen FKM y la polieteretercetona

6
Selector de volumen
Tecla de eyección de puntas*
Indicación de volumen**
Pulsador de pipeteado
Función de calibración
Estribo para dedo
**Indicación de volumenLas cifras del visor se leen de arriba hacia abajo, el trazo corresponde al punto decimal.
Vástago de la pipeta
Cono del acoplamiento de puntas
*Tecla de eyección de puntasEl número de serie se encontra detrás de la tecla de eyección de puntas.
6. Elementos funcionales y operativos
Empuñadura
(Ilustr.: VITLAB® micropipeta100 µl)
Indicación:Los resultados analíticos perfectos sólo se logran con puntas de alta calidad. Recomenda-mos puntas de pipetas de VITLAB.

7
7. Pipetear
2. Ajuste de volumen
Para fijar el volumen requerido, girar el selector de volumen. Haga el giro de forma uniforme y evite movimientos bruscos.
3. Aspirar la muestra
a) Oprimir el mando de pipeteado hasta el primer tope.
b) Mantenga el aparato en posición vertical y sumerja la punta 2-3 mm en el líquido.
c) Soltar lentamente el pulsador de pipeteado. Para que el líquido alcance su posición final, dejar la punta sumergida durante 1-2 segundos más.
d) Tocar ligeramente la pared del recipiente con la punta.
1. Acoplar la punta
Utilizar la punta apropiada, de acuerdo con el rango de volumen y el código de color. Verificar que el asiento de la punta sea hermé-tico y esté bien firme.Punitas de pipeta son articulos desechables!
- Los aparatos de 5 ml y 10 ml sólo deben utilizarse teniendo un filtro PE instalado (ver pág. 12).
- Puntas de pipeta son artículos desechables!
Gamma de ajuste
Profundidad de inmersión en mm
Tiempo de espera en s
> 1 µl - 100 µl 2 - 3 1
> 100 µl - 1000 µl 2 - 4 1
> 1000 µl 3 - 6 3

8
4. Expulsar la muestra
a) Apoyar la punta de la pipeta en la pared del recipiente. So-stener la pipeta contra la pared del recipiente en un ángulo de 30-45°.
b) Apretar el pulsador de pipeteado hasta el primer tope y mantenerlo así. Con sueros, líquidos de alta viscosidad o hume-ctantes seleccionar tiempo de espera adecuado para mejorar la exactitud.
c) Apretar hasta el segundo tope para vaciar completamente la punta.
d) Al hacerlo, escurrir la punta de la pipeta contra la pared del recipiente.
e) Retirar la punta de la pipeta de la pared del recipiente y dejar retroceder el pulsador.
5. Expulsar la punta
Mantenga el vástago de pipeta sobre un recipiente de residuos adecuado y pulse hacia abajo la tecla de eyección de la punta hasta el tope.
Indicación:La norma ISO 8655 prescribe que la punta de la pipeta, antes del proceso de pipeteado propiamente dicho, debe enjuagarse con el líquido de la muestra.
Importante!¡No colocar nunca el aparato con la punta llena en posición horizontal! Ya que introduciría el liquido en el interior del mismo y puede contaminarlo. Guardar el aparato siempre derecho y sin punta dentro del soporte para estantería o so-porte de mesa que debe pedirse por separado.

9
8. Controlar el volumenRecomendamos, dependiendo del uso, que el aparato pase por un control cada 3-12 meses. No obstante, el ciclo puede adaptarse a sus necesidades individuales.La comprobación de volumen gravimétrica de la pipeta se realiza en pasos subsiguientes y cumple con la norma DIN EN ISO 8655, parte 6.
1. Ajustar el volumen nominal
Ajuste el volumen al máximo volumen indica-do en el instrumento (para informarse sobre el modo de proceder, véase la página 7).
2. Condicionar la pipeta
Condicionar la pipeta antes de realizar la comprobación, aspirando y sacando el líqui-do de comprobación (H2O dest.) cinco veces con una punta de pipetear.
3. Realizar la comprobación
a) Acople la nueva punta de pipetear y enjua-gue una vez con el líquido de comprobación.
Cálculo para el volumen nominal V0
xi = resultados de las pesadasn = número de pesadasZ = factor de corrección (por ej. 1,0029 µl/mg a una temperatura de 20 °C, 1013 hPa)
b) Aspire el líquido de comprobación y pipetée-lo en el recipiente de pesar.
c) Pese la cantidad pipeteada con una balanza de análisis. Siga las instrucciones de manejo del fabricante de la balanza.
d) Calcule el volumen pipeteado. A la hora de hacerlo, tenga en cuenta la temperatura de líquido de comprobación.
e) Se recomienda hacer al menos 10 pipetea-dos y pesarlos en 3 márgenes de volumen (100%, 50%, 10%).
Valor medio
x = Σ xi
n
Volumen medio
Exactitud*
Coeficiente de variación*
Desviación standard
V = x · Z
V – V0
V0
E% = · 100
100 s
VCV% =
Σ (xi – x ) 2
n – 1s = Z ·
*) = Cálculo de la exactitud (E%) y el coeficien-te de variación (CV%): E% y CV% se calculan según las fórmulas de control estadístico de calidad.
Indicación:Bajo www.vitlab.com se encuentran instruc-ciones de ensayo disponibles (SOPs).

10
Gama de ajuste μl
Volumen parcial
μl
E*
≤ ± %
CV*
≤ %
Pasos parciales
μl
Tipo de punta rec. μl
0,5 - 101051
11,67
0,514
0,01 0,5 - 20
2 - 2020102
0,81,25
0,40,72
0,02 2 - 200
10 - 100100
5010
0,60,83
0,20,41
0,1 2 - 200
20 - 200200100
20
0,60,83
0,20,30,6
0,2 2 - 200
100 - 10001000500100
0,60,83
0,20,30,6
1 50 - 1000
500 - 500050002500500
0,60,83
0,20,30,6
5 500 - 5000
1000 - 100001000050001000
0,60,83
0,20,30,6
10 1000 - 10000
9. Tabla de precisión
VITLAB® micropipette, tipo digital
Los valores finales de comprobación referentes al volumen nominal impreso en el apa-rato (= vol. máximo) a la misma temperatura (20 °C) del aparato, entorno y agua dest. según la norma DIN EN ISO 8655
* E = Exactitud* CV = Coeficiente de variación
20 °C Ex
11
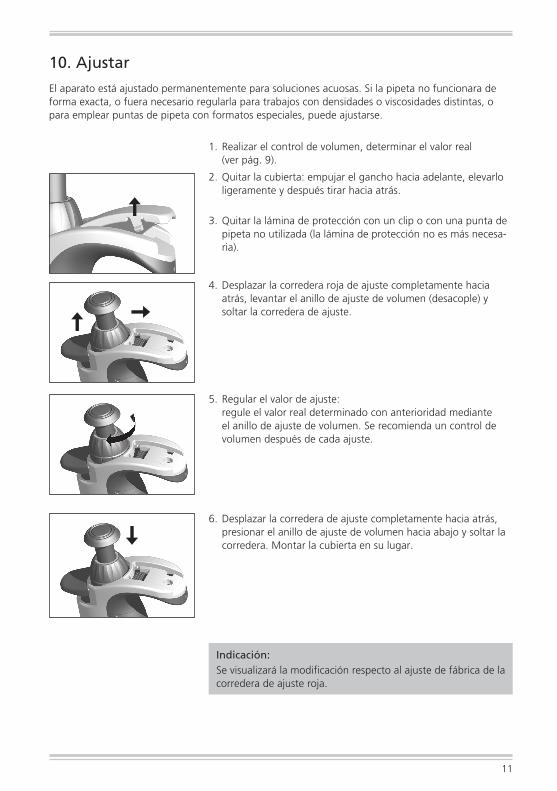
10. Ajustar
El aparato está ajustado permanentemente para soluciones acuosas. Si la pipeta no funcionara de forma exacta, o fuera necesario regularla para trabajos con densidades o viscosidades distintas, o para emplear puntas de pipeta con formatos especiales, puede ajustarse.
1. Realizar el control de volumen, determinar el valor real (ver pág. 9).
2. Quitar la cubierta: empujar el gancho hacia adelante, elevarlo ligeramente y después tirar hacia atrás.
3. Quitar la lámina de protección con un clip o con una punta de pipeta no utilizada (la lámina de protección no es más necesa-ria).
4. Desplazar la corredera roja de ajuste completamente hacia atrás, levantar el anillo de ajuste de volumen (desacople) y soltar la corredera de ajuste.
5. Regular el valor de ajuste: regule el valor real determinado con anterioridad mediante el anillo de ajuste de volumen. Se recomienda un control de volumen después de cada ajuste.
6. Desplazar la corredera de ajuste completamente hacia atrás, presionar el anillo de ajuste de volumen hacia abajo y soltar la corredera. Montar la cubierta en su lugar.
Indicación:Se visualizará la modificación respecto al ajuste de fábrica de la corredera de ajuste roja.

12
11. AutoclavageLa pipeta es completamente autoclavable a 121 °C (2 barres) y con un tiempo de detención de como mínimo 15 minutos según la norma DIN EN 285.
1. Expulsar la punta de la pipeta.
2. Sin desmontarlo adicionalmente, autoclavar la pipeta completo En el caso de las pipetas de 5 ml y 10 ml, extraer el filtro antes de esterilizarlas en autoclave.
3. Dejar que la pipeta se enfríe y seque completamente.
Indicación:La eficacia del autoclavado deberá ser comprobada por el pro-pio usuario. La esterilización al vacío proporciona la máxima seguridad. Recomendamos el uso de bolsas de esterilización.
Atención:Antes de realizar el autoclavado, el regulador de volumen debe ajustarse en un volumen disponible (por ejemplo 11,25 u 11,26, pero no entre medio de ambos valores).
En caso de que se autoclave el vástago de la pipeta con fre-cuencia, el émbolo y la junta deberán engrasar con grasa de silicona para mejorar el paso. Por favor sólo usar grasa de silicona recomendado, véase página 15 de accesorios. Eventualmente, después del autoclavado apretar la conexión roscada entre la empuñadura y la parte dosificador.
12. Esterilización con UVEl aparato es resistente contra el proceso habitual de esterilización con lámpara UV. Debido a la acción de la radiación UV, puede producirse un cambio de color.
13. Filtro pipeta 5 / 10 ml
El filtro hidrófobo de PE se emplea como protección contra la entrada de líquido en la pipeta.Si el filtro se humedece o ensucia, cámbielo de inmediato:
- Utilice un objeto plano, por ejemplo un destornillador.- Retire el filtro cuidadosamente, sin dañar la punta cónica.
¡Saque el filtro antes de autoclavar!El aparato también puede utilizarse sin filtro.

A
B
D
E
S
C
13
(¡Figura sólo atítulo de ejemplo!)
14. Mantenimiento y limpieza14.1. VITLAB® micropipette hasta 1000 μl
1. Mantenimiento
Compruebe que el cono de acoplamiento de puntas de pipetas no está dañado. Compruebe también si los émbolos y la obtura-ción están limpios. Compruebe la hermeticidad del aparato. Para ello, absorba una muestra y mantenga el aparato en posición vertical durante unos 10 segundos. En caso de que en la punta de la pipeta se forme una gota: consulte el apartado„¿Qué hacer en caso de avería?“ pág. 18.
2. Desmontaje y limpieza
1. Desenrosque el vástago de la pipeta (S) de la empuñadura.
2. Destornille la parte superior de eyección (A)del vástago de la pipeta.
3. Extraiga el vástago (B, C y D) de la parte inferior de eyección (E).
4. Desenrosque la unidad (B) del émbolo.
Indicación:El émbolo debe permanecerdentro de la unidad (B).
5. Saque la junta (C) con el muelle (en la pipeta de 10 µl esto no es posible).
6. Limpie las piezas ilustradas con una solución jabonosa o con isopropanol, y a continuación, aclárelas con agua destilada.
7. Seque las piezas (temperatura máx. 120 °C)
8. Engrasa ligeramente el émbolo y la junta con grasa de silicona. Por favor sólo usar grasa de silicona recomendado, véase página 15 de accesorios.
9. Vuelva a montar las piezas enfriadas en el orden inverso al desmontaje. Apriete la unidad de émbolo y la pieza superior de eyección (A, B) sólo con las manos.

S
K
F
G
I
H
F´
14
14.2. VITLAB® micropipette 5 ml, 10 ml
1. Mantenimiento
Compruebe que el cono de acoplamiento de puntas de pipetas no está dañado. Compruebe también que el émbolo y la junta (anillo O) estén limpios. Compruebe la hermeticidad del aparato. Para ello, aspire una muestra y mantenga el aparato en posición vertical durante unos 10 segundos. En caso de que en la punta de la pipeta se forme una gota: consulte el apartado „¿Qué hacer en caso de avería?“ pág. 18.
2. Desmontaje y limpieza
1. Girando la pieza superior de eyección (F) separe el vástago completo (S) de su unión con la empuñadura, luego retire el filtro (K) de la parte inferior del vástago (H).
2. Separe la pieza superior de eyección (F’) desenroscándola de la pieza inferior de eyección (F).
3. Desenrosque la unidad de émbolo (G) con el resorte (I) y la parte inferior del vástago (H), separándolos.
4. Retirar el anillo O de la unidad de émbolo y limpiarlo.
Indicación:¡No desmontar la unidad de émbolo (G) más de lo indicado!
5. Limpie unidad de émbolos (G) y la parte inferior del vástago (H) con una solución jabonosa o con isopropanol, y a conti-nuación, aclárelas con agua destilada.
6. Seque las piezas (max. 120 °C) y dejar enfriar.
7. Lubricar el anillo O adentro y ofuera y volvera montarlo.
8. Vuelva a montar los componentes individuales en el orden inverso al desmontaje.
(¡Figura sólo atítulo de ejemplo!)

15
15. Referencias · Accesorios
Soporte de mesa para hasta 6 pipetasRef. 1672002
Soporte de estante para 1 pipetaRef. 1672000
VITLAB® micropipette
Volumen Ref.
0,5 - 10 µl 1641000
2 - 20 µl 1641002
10 - 100 µl 1641004
20 - 200 µl 1641006
100 - 1000 µl 1641008
0,5 - 5 ml 1641010
1,0 - 10 ml 1641012
15.2. Accesorios
15.1. Referencias
Filtro para VITLAB® micropipette 5 ml 25 unidades por emb. Ref. 1672010
Filtro para VITLAB® micropipette 10 ml 25 unidades por emb. Ref. 1672012
Grasa de silicona para VITLAB® micropipette, hasta 1000 μlpara émbolos en acero, 1 unidades por emb. Ref. 1672015
Grasa de silicona para VITLAB® micropipette, 5 ml/10 ml1 unidades por emb. Ref. 1672016

A
B
EC
D
16
16. Recambios
16.1. VITLAB® micropipette hasta 1000 μl
Pieza superiorde eyección
Unidad deémbolos
Junta conmuelle
Vástago con mu-elle de eyección
Pieza inferiorde eyección
Volumen A B C D E
0,5 - 10 µl 1671400 1671411 - 1671431* 1671441
2 - 20 µl 1671401 1671412 1671420 1671432 1671442
10 - 100 µl 1671402 1671416 1671424 1671433 1671443
20 - 200 µl 1671403 1671417 1671425 1671434 1671444
100 - 1000 µl 1671404 1671418 1671426 1671435 1671445
* 0,5-10 µl inclusive junta
Antes de realizar un pedido adicional de una unidad del émbolo o de una junta con resorte para su VITLAB® micropipette con émbolo de vidrio (hasta el número de serie 08N), por favor dirigirse [email protected].(¡Figura sólo a título de ejemplo, aspecto y dimensiones de las piezas de repuesto según el volumen nominal correspondiente!)

I
H
G
F´F
17
16.2. VITLAB® micropipette 5 ml y 10 ml
Pieza superior de eyección
Pieza inferior de eyección
Unidad de ém-bolo
Parte inferior del vástago
Muelle de eyección
(¡Figura sólo a título de ejemplo, aspecto y dimensiones de las piezas de repuesto según el volumen nominal correspondiente!)
Volumen F + F‘ G H I
0,5 - 5 ml 1671451 1671455 1671461 1671465
1 - 10 ml 1671452 1671456 1671462 1671465

18
17. ¿Qué hacer en caso de avería?
Avería Causa probable ¿Qué hacer?
La punta gotea (el aparato no eshermético)
- Punta no adecuada - Utilizar sólo puntas de calidad
- La punta no está biensujeta
- Apretar más fuerte la punta
El aparato no aspira o aspira muy poco, el volumen dispen-sado es muy pequeño.
- La junta está sucia - Limpiar las juntas
- Junta o cono dañado - Reemplazar junta o vástago
- Embolo sucio o dañado - Limpiar o reemplazar el émbolo
Aspiración muy lenta - Vástago está obstruido - Limpiar el vástago
- En aparatos de 5 ml y 10 ml, el filtro está sucio
- Cambiar el filtro
Volumen dispensado demasia-do grande
- Opresión del pulsador de pipeteado antes de aspirar el líquido hasta el segundo tope (sobre embralada)
- Realizar un pipeteado correcto ver „Pipetear“, pág. 7.
El émbolo se mueve condificultad
- Embolo sucio o sin aceite - Limpiar el émbolo y engrasar

19
18. Reparación · Servicio de calibración
En caso de que no sea posible solucionar una avería de funcio-nes en el propio laboratorio mediante la sustitución de piezas de repuesto, deberá enviarse el aparato a reparación.
Rogamos tenga en cuenta que, por motivos de seguridad, sólo podrán comprobarse y repararse los aparatos limpios y descontaminados.
18.1. Envíos para reparación
a) Limpiar y descontaminar el aparato con cuidado.b) Rellenar el formulario „Declaración sobre la ausencia de riesgos
para la salud“ (podrá solicitar los formularios al comerciante o fabricante, y también están a su disposición listos para ser descargados en www.vitlab.com).
c) Enviar el formulario cumplimentado junto con el aparato al fa-bricante o comerciante, adjuntando una descripción detallada del tipo de avería y de los medios utilizados.
El remitente será quien corra con la responsabilidad y los costes del envío de vuelta.
18.2. Servicio de calibración
Las normas ISO 9001 y las directivas BPL exigen el control regular de sus aparatos volumétricos. Nosotros recomendamos un control cada 3-12 meses. El intervalo depende de las exigencias indivi-duales al instrumento. En el caso de uso frecuente o del uso de medios agresivos, se debe de controlar en intervalos más cortos. Las instrucciones de calibrado detalladas se pueden descargar de la página www.vitlab.com para un download.Además, VITLAB le ofrece la posibilidad de calibrar sus instrumen-tos por medio del servicio de calibrado de VITLAB.Mándenos sencillamente los instrumentos a calibrar con la infor-mación qué tipo de calibrado desea. Recibirá los instrumentos con un certificadode fábrica o con un certificado de calibrado DAkkS después de pocos días. Puede obtener informaciones detalladas de su provee-dor o directamente de VITLAB.

20
No seremos responsables de las consecuencias derivadas del trato, manejo, mantenimiento, uso incorrecto o reparación no autorizada del aparato, ni de las consecuencias derivadas del desgaste normal, en especial de partes susceptibles de abrasión, tales como émbolos, juntas hermeticas, valvulas, ni de la rotura de partes de vidrio o del incumplimiento de las instrucciones de manejo. Tampoco seremos responsables de los daños provocados de acciones no descritas en las instrucciones de manejo o por el uso piezas no originales.
20. EliminaciónRespectar las correspondientes normas nacionales de eliminación al eliminar los aparatos y las puntas.
Salvo cambios técnicos, errores y errores de impresión.
19. Garantía

Contents
1. Safety Instructions 22
2. Purpose 23
3. Limitations of use 23
4. Operating Limitations 23
5. Eperating Exclusions 23
6. Operating and Control Elements 24
7. Pipetting 25
8. Checking the Volume 27
9. Accuracy Table 28
10. Adjustment 29
11. Autoclaving 30
12. UV sterilisation 30
13. Filter pipette 5 ml / 10 ml 30
14. Servicing and Cleaning 31
14.1. VITLAB® micropipette up to 1000 µl 31
14.2. VITLAB® micropipette 5 ml / 10 ml 32
15. Ordering Information · Accessories 33
15.1. Ordering Information 33
15.2. Accessories 33
16. Spare Parts 34
16.1. VITLAB® micropipette up to 1000 µl 34
16.2. VITLAB® micropipette 5 ml / 10 ml 35
17. Troubleshooting 36
18. Repairs · Calibration Service 37
18.1. Return for repair 37
18.2. Calibration Service 37
19. Warranty Information 38
20. Disposal 38
21

Please read the following carefully!
This instrument may sometimes be used with hazardous materials, operations, and equipment. It is beyond the scope of this manual to address all of the potential safety risks associated with its use in such applications. It is the responsibility of the user of this pipette to consult and establish appropri-ate safety and health practices and determine the applicability of regulatory limitations prior to use.
1. Safety Instructions
1. Every user must read and understand this operating manual prior to using the instru-ment and observe these instructions during use.
2. Follow general instructions for hazard pre-vention and safety instructions; e.g., wear protective clothing, eye protection and gloves. When working with infectious or other hazardous samples, all appropriate re-gulations and precautions must be followed.
3. Observe all specifications provided by rea-gent manufacturers.
4. Only use the instrument for pipetting liquids that conform to the specifications defined in the limitations of use and operating limi-tations. Observe operating exclusions (see page 23). If in doubt, contact the manufac-turer or supplier.
5. Always use the instrument in such a way that neither the user nor any other person is endangered. Avoid splashes. Use only suita-ble vessels.
6. Avoid touching the tip orifices when wor-king with hazardous samples.
7. Never use force on the instrument!
8. Use only original spare parts. Do not at-tempt to make any technical alterations. Do not dismantle the instrument any further than is described in the operating manual!
9. Before use check the instrument for visible damages. If there is a sign of a potential malfunction (e.g., piston difficult to move, leakage), immediately stop pipetting. Con-sult the ‘Troubleshooting’ section of this manual (see page 36), and contact the manufacturer if needed.
22

2. Purpose Air-displacement pipette for pipetting aqueous solutions of medi-um density and low to medium viscosity.
3. Limitations of UseThe instrument is intended for the pipetting of liquids within the following limitations:- Temperature of both the instrument and solution should be between 15 °C to 40 °C (59 °F to 104 °F). Consult the ma- nufacturer for use in temperatures outside of this range. - Vapor pressure up to 500 mbar- Viscosity: 260 mPa s (260 cps)
4. Operating LimitationsViscous and highly adhesive liquids may impair volumetric accu-racy. Volumetric accuracy may also be impaired when pipetting liquids that differ from ambient temperature by more than ± 1 °C/ ± 1.8 °F.
5. Operating ExclusionsThe user has to ensure the compatibility of the instrument with the intended application.This instrument cannot be used:- for liquids incompatible with polypropylene- for liquids incompatible with polycarbonate (inspection window)- for liquids of a very high vapor pressure- for liquids incompatible with FKM and polyetheretherketone
(PEEK)
23
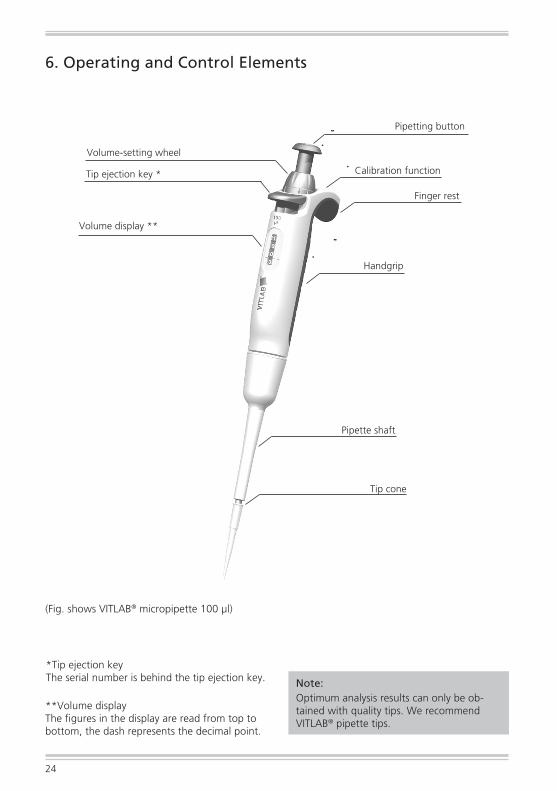
6. Operating and Control Elements
Volume-setting wheel
Tip ejection key *
Volume display **
Pipetting button
Calibration function
Finger rest
Handgrip
Tip cone
Pipette shaft
**Volume displayThe figures in the display are read from top to bottom, the dash represents the decimal point.
*Tip ejection keyThe serial number is behind the tip ejection key. Note:
Optimum analysis results can only be ob-tained with quality tips. We recommend VITLAB® pipette tips.
(Fig. shows VITLAB® micropipette 100 µl)
24

Use the correct tips according to the volume range or the color code.Ensure that the tips is securely seated.
a) Press pipetting button to the first stop.
b) Hold the pipette vertically and immerse the tip 2 to 3 mm into the liquid.
c) Let the pipetting button slide back slowly. In order for the liquid to reach its end position, leave the tip immersed for another 1-2 s.
d) Touch the tip against the container wall.
3. Aspirate sample
2. Volume setting
Select the desired volume by rotating the volumes setting wheel. Avoid twisting and abrupt rotating motions during this adjust-ment.
7. Pipetting
1. Fitting the tip
- 5 ml and 10 ml instruments should only be used with the PE filter installed (see page 30).
- Pipette tips are disposable items!
25
Volume range
Immersion depth in mm
Waiting time in s
> 1 µl - 100 µl 2 - 3 1
> 100 µl - 1000 µl 2 - 4 1
> 1000 µl 3 - 6 3

5. Ejecting the tip
Hold the pipette shaft over a suitable disposal container and press the tip ejection key to the stop.
Note:ISO 8655 prescribes rinsing the pipette tip once with the sam-ple liquid prior to the actual pipetting process.
Important!Don‘t lay the instrument horizontal when the tip is filled. Liquid may enter and contaminate the instrument. The instru-ment should be stored without tips, placed upright in the shelf/rack mount or bench top rack which can be ordered seperately.
c) The blow-out stroke empties the tip completely: Press the pi-petting button down to the second stop.
d) While doing this, wipe the pipette tip against the wall of the container.
e) Remove the pipette tip from the container wall and let the pipetting button slide back.
a) Place the pipette tip against the wall of the vessel. Hold the pipette at an angle of 30-45° relative to the container wall.
b) Press the pipetting button slowly to the first stop and hold it down. For serum and liquids of high viscosity or low surface tension, observe adequate waiting time to improve accuracy.
4. Discharge sample
26

Mean value
x = Σ xi
n
Mean volume
Accuracy*
Coefficient of Variation*
Standard Deviation
V = x · Z100 s
V CV% =
Σ (xi – x ) 2
n – 1s = Z ·
V – V0
V0
A% = · 100
8. Checking the VolumeDepending on use, we recommend inspection of the instrument every 3 to 12 months. The cycle can, however, be adjusted to individual requirements.The gravimetric testing of the pipette volume is performed according to the following steps and is in accordance with DIN EN ISO 8655, Part 6.
1. Set nominal volume
Set volume to the maximum volume indi-cated on the instrument (see page 25 for procedure).
2. Condition the pipette
Condition the pipette before testing by using a pipette tip to aspirate and discharge the test liquid (distilled H2O) five times.
3. Carry out the test
a) Attach new pipette tip and prerinse one time with test liquid.
b) Aspirate liquid and pipette it into the weigh-ing vessel.
c) Weigh the pipetted quantity with an analytical balance. Please follow the operat-ing manual instructions from the balance manufacturer.
d) Calculate the volume, taking the tempera-ture of test liquid into account.
e) At least 10 pipettings and weighings in three volume ranges (100%, 50%, 10% of nomi-nal volume) are recommended for statistical analysis.
Calculation for nominal volume V0
xi = Weighing results n = Number of weighings Z = Correction factor (e.g. 1,0029 µl/mg at 20 °C, 1013 hPa)
*) = Calculation of accuracy (A%) and variation coefficient (CV%): A% and CV% are calculated according to the formulas for statistical control.
Note:Testing instructions (SOPs) are available for download at www.vitlab.com.
27

Volume rangeµl
Volume stepµl
A*≤ ± %
CV*≤ %
Incrementµl
Recommended type of tip, µl
0.5 - 101051
1 1.6 7
0.514
0.01 0.5 - 20
2 - 2020102
0.8 1.2 5
0.40.72
0.02 2 - 200
10 - 1001005010
0.60.83
0.20.41
0.1 2 - 200
20 - 20020010020
0.60.83
0.20.30.6
0.2 2 - 200
100 - 10001000500100
0.60.83
0.20.30.6
1 50 - 1000
500 - 500050002500500
0.60.83
0.20.30.6
5 500 - 5000
1000 - 100001000050001000
0.60.83
0.20.30.6
10 1000 - 10000
9. Accuracy Table
VITLAB® micropipette, Digital adjustable
Final test values related to the nominal capacity (maximum volume) indicated on the instrument, obtained when instrument and distilled water are equilibrated at ambient temperature (20 °C/68 °F) and with smooth operation. According to DIN EN ISO 8655.
* A = Accuracy* CV = Coefficient of Variation
28
20 °C Ex

10. AdjustmentThe instrument is permanently adjusted for aqueous solutions. If the pipette operation is clearly inaccurate, or if the instrument must be adjusted for solutions of different densities and viscosities or specially-shaped pipette tips, adjustments can be made.
1. Check the volume, determine actual value (see page 27).
2. Remove the cover: Push the hook forward, raise it slightly and then pull it back.
3. Using a paperclip or an unused pipette tip, remove the protec-tive film (this protective film can be discarded).
4. Push the red adjustment slider completely back, raise the volume-setting wheel (decoupling) and release the adjustment slider.
5. Set the adjustment value: set the volume-setting wheel to the previously determined
actual value. A volume check is recommended after every adjustment.
6. Push the adjustment slider completely back again, push the volume-setting wheel downwards and release the adjustment slider. Re-insert the cover.
Note:The change to the factory settings is indicated by the red adjustment slider now visible in the lable window.
29

13. Filter pipette 5 ml / 10 ml
A hydrophobic PE filter is used as a safeguardagainst liquid entering the pipette.Change the filter if it becomes wet or contaminated.
- Use a flat object such as a screwdriver
- Remove the filter without damaging the tip cone.
Remove the filter before autoclaving!The instrument can be operated without a filter.
11. AutoclavingThe pipette is completely autoclavable at 121 °C (250 °F), 2 bar absolute (30 psi) with a holding time of at least 15 minutes, ac-cording to DIN EN 285.
1. Eject the pipette tip.
2. Autoclave the complete pipette without any further disas-sembling. Remove the filter of pipette 5 ml and 10 ml before autoclaving.
3. Allow the pipette to completely cool and dry.
Note:The effectiveness of the autoclaving must beverified by the user. Maximum reliability is obtained with vacu-um sterilization. We recommend the use of sterilization bags.
Attention!Prior to autoclaving, the volume adjustmentmust be set on an available numbered volume (e.g., 11.25 or 11.26 but not between).
If the pipette is autoclaved frequently, the piston and the seal should be greased with silicone grease in order to preserve smooth movement. Please use only the recommended silicone grease, see accessories page 33. If necessary after sterilization, tighten the connection between the hand grip and the pipette shaft.
12. UV sterilizationThe unit can withstand the usual output of a UV sterilization lamp. The effects of the UV may cause some color change.
30

A
B
D
E
S
C
14. Servicing and Cleaning
14.1. VITLAB® micropipette up to 1000 µl
2. Disassembly and cleaning
1. Unscrew the pipette shaft (S) from the hand grip.
2. Unscrew the upper part of the ejector (A) from the pipette shaft.
3. Pull the shaft (B, C and D) out of the lower part (E) of the ejec-tor.
4. Unscrew the piston unit (B).
Note:Piston remains connected with piston unit (B)!
5. Remove the seal with spring (C) (this is non-removable on 10 µl pipette models).
6. Clean the parts shown with a mild soap solution or isopropa-nol and then rinse with distilled water.
7. Allow the parts to dry (max.120 °C/ 248 °F).
8. Grease piston and seal with a very thin layer of silicone grease. Please use only the recommended silicone grease, see acces-sories page 33.
9. Assemble the ambient temperature parts in reverse order from above. Piston unit and upper part of the ejector (A, B) should only be hand-tight.
(For illustration purposes only)
1. Servicing
Inspect the pipette tip cone for damage. Inspect the piston and seal for contamination. Test the instrument‘s piston seal. To do this affix a tip, and aspirate a sample. Hold the instrument vertically, with the sample in the tip for approximately 10 s. If a drop forms at the tip orifice, see the troubleshooting guide on page 36.
31

S
K
F
G
I
H
F´
14.2. VITLAB® micropipette 5 ml and 10 ml
1. Servicing
Inspect the pipette tip cone for damage. Inspect the piston and O-Ring-seal for contamination. Test the instrument‘s piston seal. To do this, affix a tip, and aspirate a sample. Hold the instrument vertically, with the sample in the tip for approximately 10 s. If a drop forms at the tip orifice, see the troubleshooting guide on page 36.
2. Disassembly and cleaning
1. Remove the entire shaft (S) from the handgrip by rotating at the upper end of the ejector (F) and remove the filter (K) from the bottom part of the shaft (H).
2. Separate the bottom part of the ejector (F‘) by unscrewing it from the upper part of the ejector (F).
3. Unscrew and dismantle the piston unit (G) with the ejector spring ( I ) and the bottom part of the shaft (H).
4. Remove the O-Ring-seal from the piston unit and clean it.
Note:Do not disassemble pistonunit (G) any further!
5. Clean piston unit (G) and lower part of pipette shaft (H) with a soap solution or isopropanol and then rinse with distilled water.
6. Allow the parts to dry (max. 120 °C / 248 °F) and to cool down.
7. Carefully lubricate the inside and outside of the O-ring and mount it on the piston.
8. Assemble the individual components in the reverse order from that described above.
(For illustrationpurposes only)
32

15. Ordering Information and Accessories
Bench-top rack for 6 pipettesCat. No. 1672002
Shelf/rack mount for 1 pipetteCat. No. 1672000
VITLAB® micropipette
Volume Cat. No.
0.5 - 10 µl 1641000
2 - 20 µl 1641002
10 - 100 µl 1641004
20 - 200 µl 1641006
100 - 1000 µl 1641008
0.5 - 5 ml 1641010
1.0 - 10 ml 1641012
15.2. Accessories
15.1. Ordering Information
Filter for VITLAB® micropipette 5 ml, pack of 25 Cat. No.1672010
Filter for VITLAB® micropipette 10 ml, pack of 25 Cat. No. 1672012
Silicone grease for VITLAB® micropipette up to 1000 µl with stainless steel piston, pack of 1 Cat. No. 1672015
Silicone grease for VITLAB® micropipette 5 ml/10 mlpack of 1 Cat. No. 1672016
33

A
B
EC
D
16. Spare parts
16.1. VITLAB® micropipette up to 1000 µl
Upper partof ejector
Pistonunit
Seal with spring
Shaft with ejector spring
Lower Part of ejector
Volume A B C D E
0.5 - 10 µl 1671400 1671411 - 1671431* 1671441
2 - 20 µl 1671401 1671412 1671420 1671432 1671442
10 - 100 µl 1671402 1671416 1671424 1671433 1671443
20 - 200 µl 1671403 1671417 1671425 1671434 1671444
100 - 1000 µl 1671404 1671418 1671426 1671435 1671445
* 0.5-10 µl including seal
Before reordering a piston unit or seal and spring for your VITLAB® micropipette with glass piston (up to serial number 08N), please contact [email protected]. (For illustration purposes only, parts will differ slightly de-pending on nominal volume of instrument.)
34

I
H
G
F´F
Upper partof ejector
Lower part of ejector
Pistonunit
Lower part of pipette shaft
Ejector spring
16.2. VITLAB® micropipette 5 ml and 10 ml
(For illustration purposes only, parts will differ slightly depen-ding on nominal volume of instrument.)
Volume F + F‘ G H I
0.5 - 5 ml 1671451 1671455 1671461 1671465
1 - 10 ml 1671452 1671456 1671462 1671465
35

17. Troubleshooting
Problem Possible cause Corrective action
Tip dripping(instrument leaks)
- Unsuitable tip - Only use high-quality tips
- Tip not seated tightly - Press tip on firmly
The instrument does not aspi-rate or aspirates too little; the discharged volume is too low
- Seal contaminated - Clean seal
- The seal or cone is damaged - Replace seal or shaft
- The piston is contaminated or damaged
- Clean or replace piston
Aspiration is too slow - Shaft clogged - Clean shaft
- The filter in the 5 ml and 10 ml models is contaminated
- Change the filter
Discharged volume is too large - Pipetting button pressed too far into the blow-out position before sample uptake
- Operate properly.See ‚Pipetting‘, page 25.
Piston is difficult to move - The piston is contaminated or needs oil
- Clean and oil piston
36

18. Repairs - Calibration ServiceIf a problem cannot be fixed by following the troubleshooting guide, or by replacing spare parts, then the instrument must be sent in for repair.
For safety reasons, instruments returned for checks and repairs must be clean and decontaminated!
18.1. Return for repair
a) Clean and decontaminate the instrument carefully.
b) Complete the „Declaration on Absence of Health Hazards“ (ask your supplier or manufacturer for the form. The form can also be downloaded from www.vitlab.com).
c) Send the completed form along with the instrument to the manufacturer or to the dealer with an exact description of the type of malfunction and the media used.
The return transport of the instrument is at risk and cost of the sender.
18.2. Calibration Service
ISO 9001 and GLP-guidelines require regular examinations of your volumetric instruments. We recommend checking the volume every 3-12 months. The interval depends on the specific require-ments on the instrument. For instruments frequently used or in use with aggressive media, the interval should be shorter. The detailed testing instruction can be downloaded on www.vitlab.com.VITLAB also offers you the possibility to have your instruments calibrated by the VITLAB Calibration Service.Just send in the instruments to be calibrated, accompanied by an indication of which kind of calibration you wish. Your instru-ments will be returned within a few days together with a test report (VITLAB calibration service) or with a DAkkS Calibration Certificate. For further information, please contact your dealer or VITLAB.
37
19. Warranty
We shall not be liable for the consequences of improper handling, use, servicing, operating or unauthorized repairs of the instru-ment or the consequences of normal wear and tear especially of wearing parts such as pistons, seals, valves and the breakage of glass as well as the failure to follow the instructions of the operat-ing manual. We are not liable for damage resulting from any actions not described in the operating manual or if non-original parts have been used.
20. Disposal
For the disposal of instruments and tips, please observe the rel-evant national disposal regulations.
Subject to technical modification without notice.We will not be held responsible for printing or typographical errors.
38


13 / 1695043 / 0916 / 2