pink peony bag - sew mama sew | outstanding … · on the fabric piece for the wristlet strap...
TRANSCRIPT

Pink Peony Bag
1
Finished measurements (approx.)
5 1/2“ x 9 1/2“ x 1“ / 14 x 24 x 2.5 cm (height x width x depth) You need:
Exterior fabric: 1/4 yd or 25 cm Lining fabric: 1/3 yd or 30 cm Heavy fusible stabilizer e.g. Pellon Peltex 71F: 1/2 yd or 0.5 m* Fusible interfacing (mid-weight), e. g. Pellon 931 TD: 1/2 yd or 0.5 m 1 magnetic snap 1 D-ring (1/2”/1.5 cm) 1 swivel clip Pattern pieces #1 through #3 (see last pages)
* Helpful hint: You may exchange heavy stabilizer for fusible fleece, e. g. Pellon 987F. This will make the bag a little easier to sew since fleece does not have quite the sturdiness that heavy stabilizer has. For helpful information about different types of bag stabilizers you are welcome to check out my blog post on Sew Mama Sew: http://www.sewmamasew.com/2013/12/bag-interfacing-reviews-all-about-interfacing/ NOTE: When printing the pattern pieces make sure your printer settings (size options) are set to “actual size” and not to “fit”, otherwise the pattern will NOT be the right size! Use the 1”/2.5 cm square for comparison.
Please read all instructions before you begin.
All seam allowances are 3/8” (1 cm) unless stated otherwise. All pattern pieces include the seam allowance. All cutting measurements given are height x width. Cut out the pattern pieces. Cut: From exterior fabric:
(2 x) pattern piece #1 on the fold – main body (1 x) pattern piece #2 on the fold – flap (outer part with pleats) (1 x) pattern piece #3 on the fold – flap (inner part without pleats)
From lining fabric:
(2 x) pattern piece #1 on the fold – main body
(1 x) 2 1/4" x 44” (5.5 x 110 cm) – strap (1 x) 2 1/4" x 13” (5.5 x 35 cm) – wristlet
strap (1 x) 2 1/4" x 2 3/4" (5.5 x 7 cm) – wristlet
strap extender
Pink Peony Bag
2
From heavy fusible stabilizer: ( To prevent bulk you may cut heavy fusible stabilizer without the seam allowance of 3/8” (1 cm), i. e. cut it 3/8” (1 cm) shorter on all edges)
(2 x) pattern piece #1 on the fold – main body (1 x) pattern piece #3 on the fold – flap (inner part)
From fusible interfacing:
(2 x) pattern piece #1 on the fold – main body (1 x) pattern piece #2 on the fold – flap (outer part)
Instructions:
a) Prepare the fabric pieces
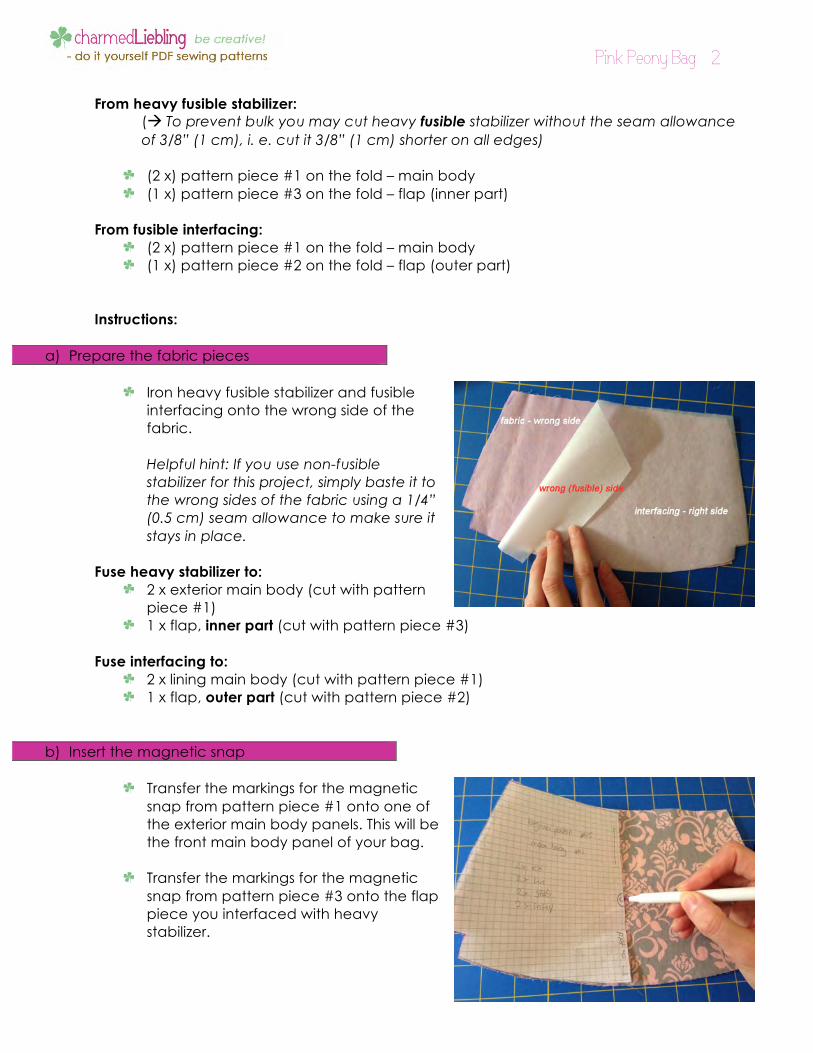
Iron heavy fusible stabilizer and fusible interfacing onto the wrong side of the fabric.
Helpful hint: If you use non-fusible stabilizer for this project, simply baste it to the wrong sides of the fabric using a 1/4” (0.5 cm) seam allowance to make sure it stays in place.
Fuse heavy stabilizer to:
2 x exterior main body (cut with pattern piece #1)
1 x flap, inner part (cut with pattern piece #3) Fuse interfacing to:
2 x lining main body (cut with pattern piece #1) 1 x flap, outer part (cut with pattern piece #2)
b) Insert the magnetic snap
Transfer the markings for the magnetic snap from pattern piece #1 onto one of the exterior main body panels. This will be the front main body panel of your bag.
Transfer the markings for the magnetic snap from pattern piece #3 onto the flap piece you interfaced with heavy stabilizer.

Pink Peony Bag
3
Insert the magnetic snap at the spots you marked: the female part (which has a recess in the center) goes on one of the exterior main body panels. Using the washer (the little plate that goes on the back of the snap), mark the two slots for the snap centered on the spot you marked.
With your seam ripper make two small slits into the main body panel.
Push the prongs of the magnetic snap through the slits. Place the washer on top
and bend the prongs down.
Repeat the three previous steps to insert the male part of the magnetic snap on the flap.

Pink Peony Bag
4
c) Make the exterior main body
On the right side of one of the exterior main body panels fold one of the top
corners down so that the two edges of the cut-out bottom corner match. Pin in place and stitch the corner darts. Repeat with the other bottom corner of
the main body panel and then with the two corners of the second exterior main body panel. You should end up with two corner darts on either main body panel.
Trim the seam allowance. Put the two exterior main body panels right sides together, matching all edges and stitch along the side edges and the bottom edge. Make sure that the corner seams are aligned.
Trim the seam allowance and notch the curves (i. e. cut small “v”s into the fabric). Be careful not to cut into the stitching. --- pictures on the next page ---

Pink Peony Bag
5
Turn the exterior right side out and press.
d) Make the bag lining
Follow the previous instructions of step c) to assemble the bag lining, except leave an opening at the bottom edge of approx. 4.5” (12 cm). Leave the bag lining wrong side out.
e) Make the wristlet strap extender
On the fabric piece for the wristlet strap extender, fold down both short edges (the ones that measure 2 1/4" in height) to the wrong side by 3/8” (1 cm). Then fold the fabric piece in half horizontally wrong sides together and press (see picture below to the left). Open up again and fold both long edges towards the middle crease and press again. Fold horizontally again, matching the two folded edges (see picture below to the right). Press. Your folded strap should now measure 2” x 1/2” (5 x 1.8 cm).

Pink Peony Bag
6
Topstitch along both long edges using a 1/8” (3 mm) seam allowance.
Fold the strap extender in half and slide it over the D-ring. Place D-ring and extender onto the inner flap (the one you cut with pattern piece #3 and interfaced with heavy stabilizer), having the D-ring face towards the side edge of the bag flap and the strap end towards the center of the flap: the strap end should be positioned 2” (5 cm) in from the side edge of the flap and 3/4” (2 cm) up from the straight edge of the flap. Topstitch the strap extender in place. Use the picture to the right for help.
f) Make the cross-body strap and wristlet strap
Repeat the folding and stitching of step e) for the cross-body strap. You don’t need to fold down the short edges. Both short ends will be unfinished after folding.
Set the cross-body strap aside.
Repeat the folding and stitching of step e) for the wristlet strap but only fold down one of the short edges. You will have one finished and one unfinished short end after folding.

Pink Peony Bag
7
Slide the end with the unfinished edge through the swivel clip and fold it down (see picture below to the left). Now bring the other (finished) end of the strap over and on top of the unfinished edge so that both strap ends overlap (see picture below to the right).
Pin in place and stitch across the spot where both strap ends overlap. Go back and forth a few times to make sure the strap is well secured.
Set the wristlet strap aside.
g) Make the flap
On the outer flap piece (cut with pattern piece #2), fold the pleats: On the right-hand side of the flap, bring the “a”-marking up and over to the center and pin the fold in place.
Repeat for the left-hand side pleat. In the picture to the right you can see the result after making the first two (inner) pleats in the center of the bag flap. The outer pleats are still unfolded.

Pink Peony Bag
8
Fold the remaining two pleats, again starting on the right-hand side of the flap: bring the “c”-marking up and over the “b”-marking and pin the pleat in place.
Repeat for the last pleat on the left-hand side of the flap. Baste across the pleats using a 1/8” (3 mm) seam allowance to make sure they stay in place.
Place the inner flap piece and the outer flap piece right sides together, all edges matching. Pin in place and stitch around the edges but leave the top edge open. Trim the seam allowance and notch the curves.
Turn the flap right side out and press. Topstitch all around the finished edges using a 1/4” (0.5 cm) seam allowance.

Pink Peony Bag
9
Put the flap (outer side down so that you will see the inner side with the snap) centered onto the outer side of the upper edge of the back exterior main body (the one without the snap). Pin in place and stitch along the top edge using a 1/4” (0.5 cm) seam allowance.
Place your cross-body strap with both raw edges onto the bag flap: place the
outer edges of the strap right next to the edges of the flap. The raw edges of strap and flap should be aligned. Before you stitch the strap down, make sure it is not twisted. Pin in place and stitch across the strap ends using a 1/4” (0.5 cm) seam allowance.
Put the bag exterior aside.
h) Assemble the bag
Pull the bag lining (which is still wrong side out) over the bag exterior (which is
right side out). Tuck in the flap and the strap. Align all edges of both lining and exterior, making sure that the side seams match. --- pictures on the next page ---

Pink Peony Bag
10
Pin in place and stitch around the top edge. Use sewing clips if the layers are too thick for pins due to the heavy stabilizer.
Trim the seam allowance. Turn the bag right side out by pulling the exterior through the opening of the lining. Poke out all corners and iron well.

Pink Peony Bag
11
Fold the seam allowances of the opening
of the lining down to the inside and topstitch the opening closed.
Tuck the lining into the exterior. Topstitch around the top edge of the bag, approx. 1/2" (0.5 cm) down from the top edge.
Clip the wristlet strap to the strap extender on the inside of the bag flap.
Your bag is now complete. Enjoy!
If you have any further questions or comments about this pattern, please don’t hesitate to contact me and I will be happy to help you out! [email protected] You are welcome to sell items made with this pattern. In this case I'd appreciate if you gave me credit as the pattern designer. Share your finished item with the sewing community at charmed Liebling’s flickr group: www.flickr.com/groups/charmed-liebling/
Copyright © charmed Liebling 2014

Pin
k Pe
on
y Ba
g -
p
att
ern
pie
ce
#1
(m
ain
bo
dy)
cu
t:
- 2
x e
xte
rior f
ab
ric-
2 x
linin
g fa
bric
- 2
x fu
sible
inte
rfa
cin
g-
2 x
fusib
le fl
ee
ce
or h
ea
vy s
tab
ilize
r
© c
ha
rme
d L
ieb
ling
sea
m a
llow
an
ce
of 3
/8”
(1 c
m)
alre
ad
y in
clu
de
d!
place on fold
2.5
cm
/1“
sq
ua
re
top
sna
p p
lac
em
en
t
Pin
k Pe
on
y Ba
g -
p
att
ern
pie
ce
#3
(f
lap
- in
ne
r pa
rt)
cu
t:
- 1
x e
xte
rior f
ab
ric-
1 x
fusib
le fl
ee
ce
© c
ha
rme
d L
ieb
ling
sea
m a
llow
an
ce
of 3
/8”
(1 c
m)
alre
ad
y in
clu
de
d!
top
place on fold
sna
p p
lac
em
en
t

Pink Peony Bag - pattern piece #2 (flap - outer part)
cut: - 1 x exterior fabric- 1 x fusible interfacing
© charmed Liebling
seam allowance of 3/8” (1 cm) already included!
top
pla
ce
on
fold
fold foldabc