piling slide assembly install instructions...piling slide assembly installation instructions step 2...
TRANSCRIPT

Inner TubeOuter Tube
Cosmetic Cover
Piling Slide Assembly Installation Instructions"Piling Slide Assembly Layout"
2 1
A
B
A
B
12
1ATT - PSL
SHEET 1 OF 5SCALE: 1:10
REV
REF #: CHECKED:PART:DRAWN:
DATE:
Piling Slide AssembliesC. DiBiasio
J. Harrison
12/21/15
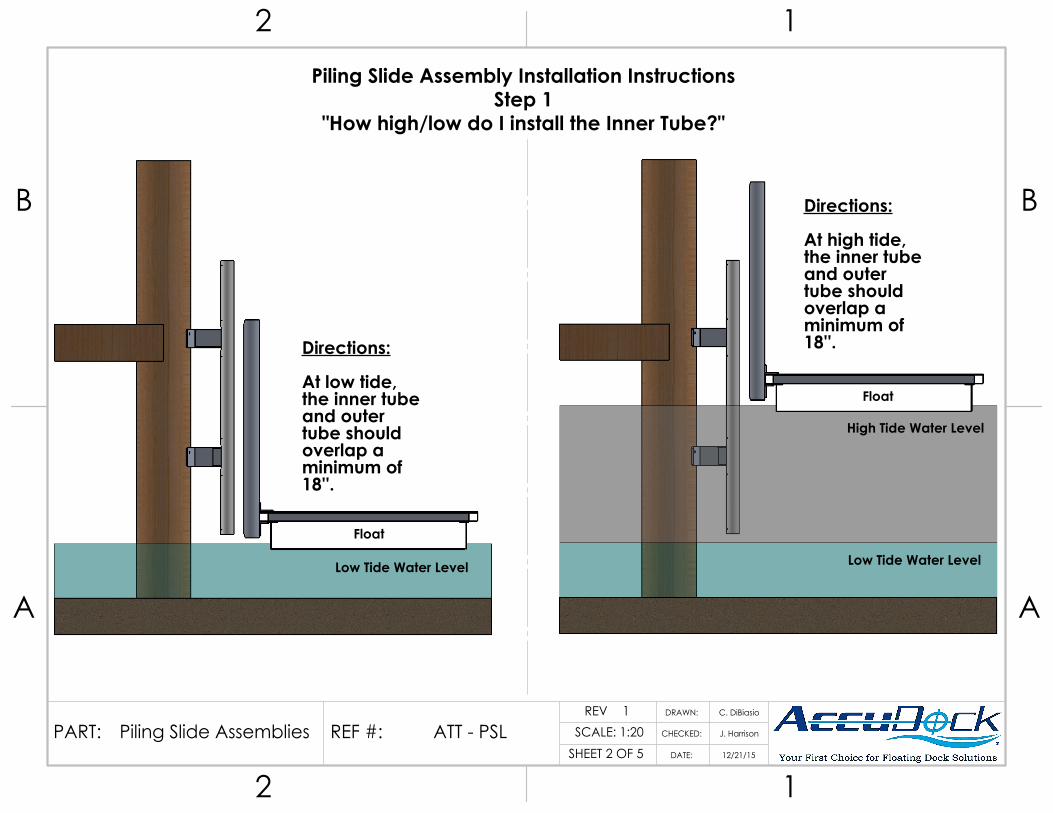
Low Tide Water Level
Float
Directions:
At low tide, the inner tube and outer tube should overlap a minimum of 18''.
Directions:
At high tide, the inner tube and outer tube should overlap a minimum of 18''.
Piling Slide Assembly Installation InstructionsStep 1
"How high/low do I install the Inner Tube?"
Low Tide Water Level
High Tide Water Level
Float
2 1
A
B
A
B
12
1ATT - PSL
SHEET 2 OF 5SCALE: 1:20
REV
REF #: CHECKED:PART:DRAWN:
DATE:
Piling Slide AssembliesC. DiBiasio
J. Harrison
12/21/15

A
B
Piling Slide Assembly Installation InstructionsStep 2
"Attaching the Inner Tube to the Piling"
DETAIL ASCALE 1 : 5
1/2'' SS Lag BoltDETAIL B
SCALE 1 : 5
1/2'' SS Lag Bolt
3/8'' SS Hex Bolts
Directions: (See Detail B)
After attaching the top bracket, line up the lower bracket with the extender arm and bolt the bracket to the piling with 1/2'' SS lag bolts.
Then use a 3/8'' drill bit to drill through the extender arm, and insert two 3/8'' SS hex bolts with hardware to secure the lower bracket to the extender arm. Use a level to make sure the tube is perfectly vertical.
Directions: (See Detail A)
Once you have chosen the location for the slide assembly, attach the top bracket to the piling with 1/2'' stainless steel lag bolts, as shown here. It is important that the tube is perfectly vertical.
2 1
A
B
A
B
12
1ATT - PSL
SHEET 3 OF 5SCALE: 1:15
REV
REF #: CHECKED:PART:DRAWN:
DATE:
Piling Slide AssembliesC. DiBiasio
J. Harrison
12/21/15

Directions:
First, slide the outer tube over the inner tube, before attaching to the float.
Directions: (See Detail C)
Determine where the outer tube will attach to the float, then line it up so the bracket can be bolted through the frame on the float. Use a 1/2'' drill bit to drill through the frame so that 1/2'' SS bolts and hardware can be used for attachment.
Piling Slide Assembly Installation InstructionsStep 3
"Attaching the Outer Tube to the Float"
CDETAIL C
SCALE 1 : 41/2'' SS Hex Bolt
Flat Washer& Lock Washer& 1/2'' Hex Nut
1/2'' Flat Washer
2 1
A
B
A
B
12
1ATT - PSL
SHEET 4 OF 5SCALE: 1:15
REV
REF #: CHECKED:PART:DRAWN:
DATE:
Piling Slide AssembliesC. DiBiasio
J. Harrison
12/21/15
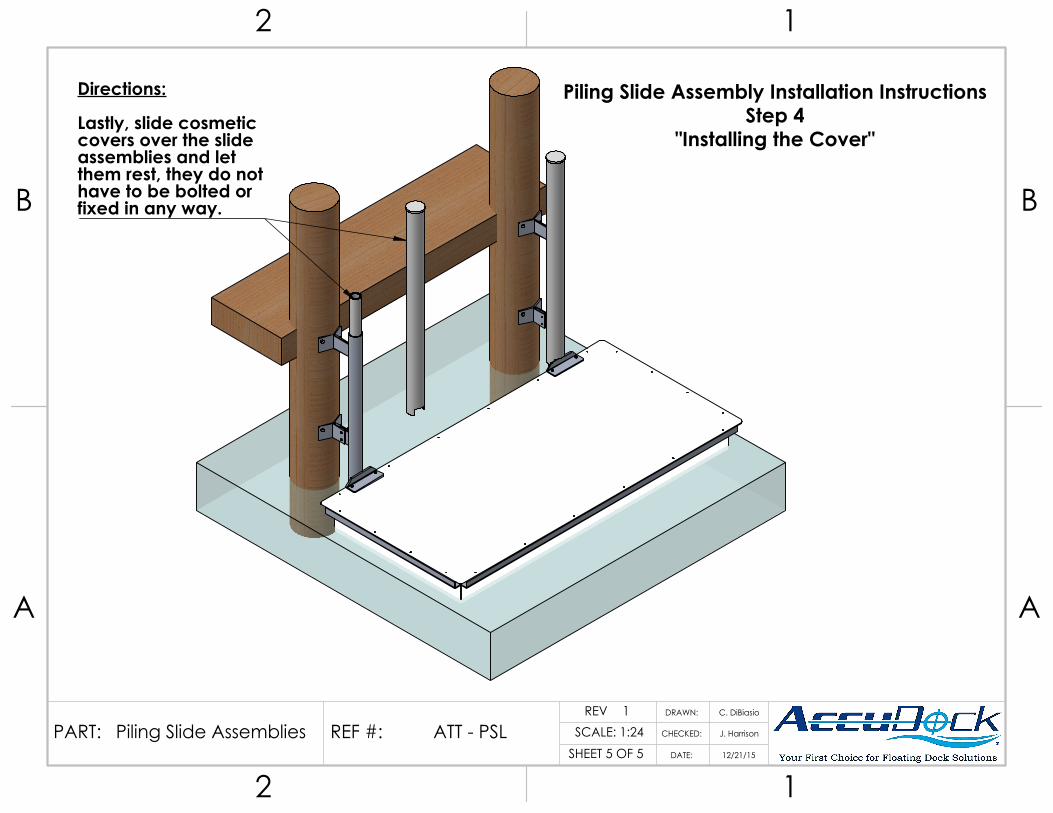
Directions:
Lastly, slide cosmetic covers over the slide assemblies and let them rest, they do not have to be bolted or fixed in any way.
Piling Slide Assembly Installation InstructionsStep 4
"Installing the Cover"
2 1
A
B
A
B
12
1ATT - PSL
SHEET 5 OF 5SCALE: 1:24
REV
REF #: CHECKED:PART:DRAWN:
DATE:
Piling Slide AssembliesC. DiBiasio
J. Harrison
12/21/15