philips hospitality lcd tv: pro...
TRANSCRIPT

PB1
Philips Hospitality LCD TV: Pro range EN 19HFL3330D/10 EN 22HFL3330D/10
Please ask your local sales support for additional information on correct installation/ positioning of the TV in the room and complementary accessories
DFU-AUG2008
PHILIPS
PB2
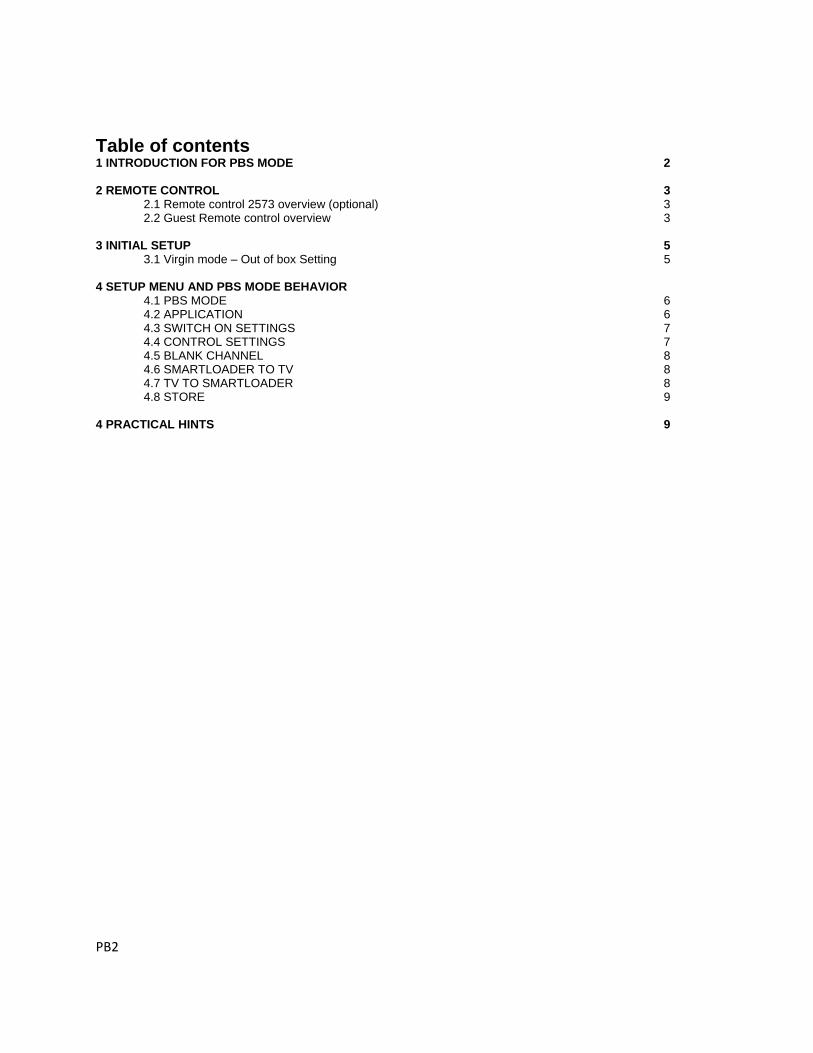
Table of contents 1 INTRODUCTION FOR PBS MODE 2
2 REMOTE CONTROL 3
2.1 Remote control 2573 overview (optional) 3 2.2 Guest Remote control overview 3
3 INITIAL SETUP 5 3.1 Virgin mode – Out of box Setting 5
4 SETUP MENU AND PBS MODE BEHAVIOR
4.1 PBS MODE 6 4.2 APPLICATION 6 4.3 SWITCH ON SETTINGS 7 4.4 CONTROL SETTINGS 7 4.5 BLANK CHANNEL 8 4.6 SMARTLOADER TO TV 8 4.7 TV TO SMARTLOADER 8 4.8 STORE 9
4 PRACTICAL HINTS 9
PB3
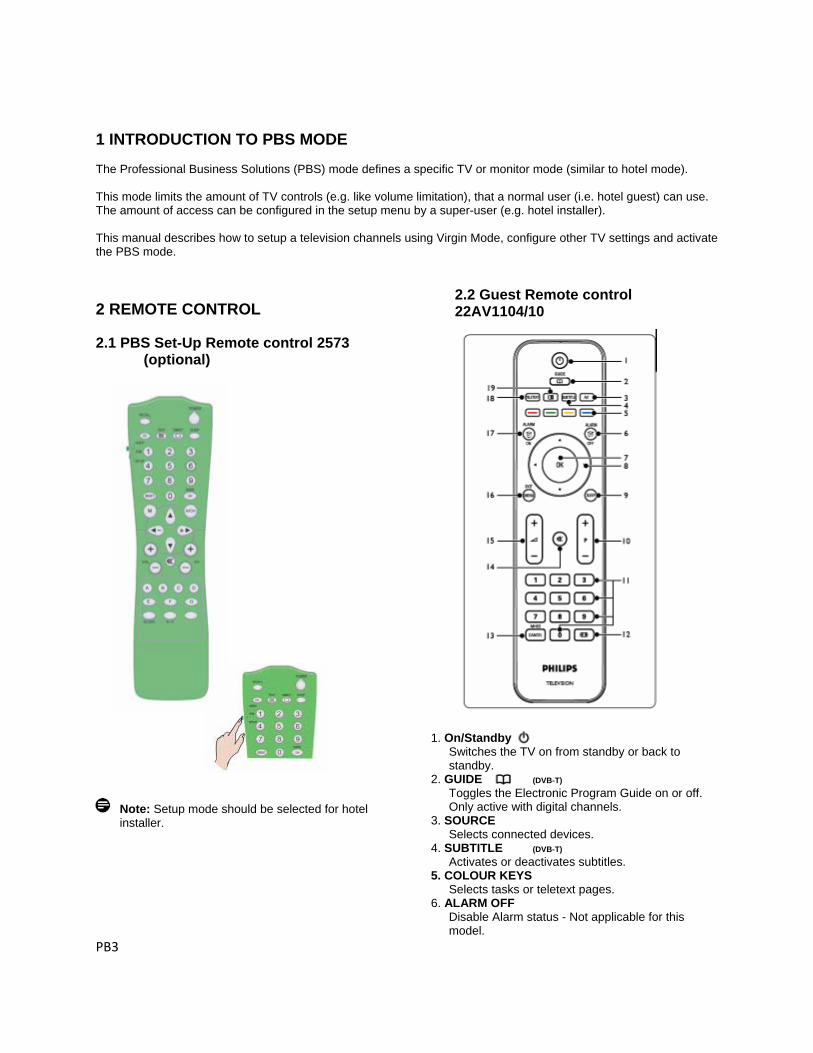
1 INTRODUCTION TO PBS MODE The Professional Business Solutions (PBS) mode defines a specific TV or monitor mode (similar to hotel mode). This mode limits the amount of TV controls (e.g. like volume limitation), that a normal user (i.e. hotel guest) can use. The amount of access can be configured in the setup menu by a super-user (e.g. hotel installer). This manual describes how to setup a television channels using Virgin Mode, configure other TV settings and activate the PBS mode. 2 REMOTE CONTROL
2.1 PBS Set-Up Remote control 2573 (optional)
Note: Setup mode should be selected for hotel installer.
2.2 Guest Remote control 22AV1104/10
1. On/Standby
Switches the TV on from standby or back to standby.
2. GUIDE (DVB-T) Toggles the Electronic Program Guide on or off. Only active with digital channels.
3. SOURCE Selects connected devices.
4. SUBTITLE (DVB-T) Activates or deactivates subtitles.
5. COLOUR KEYS Selects tasks or teletext pages.
6. ALARM OFF Disable Alarm status - Not applicable for this model.

PB4
7. OK Accesses the All channels menu or activates a setting.
8. Navigate the menu.
9. SLEEP Display the sleep timer menu and adjust the sleep timer.
10. P +/- Switches to the next or previous channel.
11. NUMBER KEYS Selects a channel, page or setting.
12. Selects a picture format.
13. MHEG CANCEL Cancels digital text or interactive services (UK only).
14. Mutes or restores sound.
15. Increases or decreases volume.
16. MENU/EXIT Toggles the menu on or off.
17. ALARM ON Display the Alarm menu - not applicable for this model.
18. TELETEXT Toggles teletext on or off.
19. Splits the current channel or source on the left of the screen. Teletext appears on the right.
PBS EN
PB5
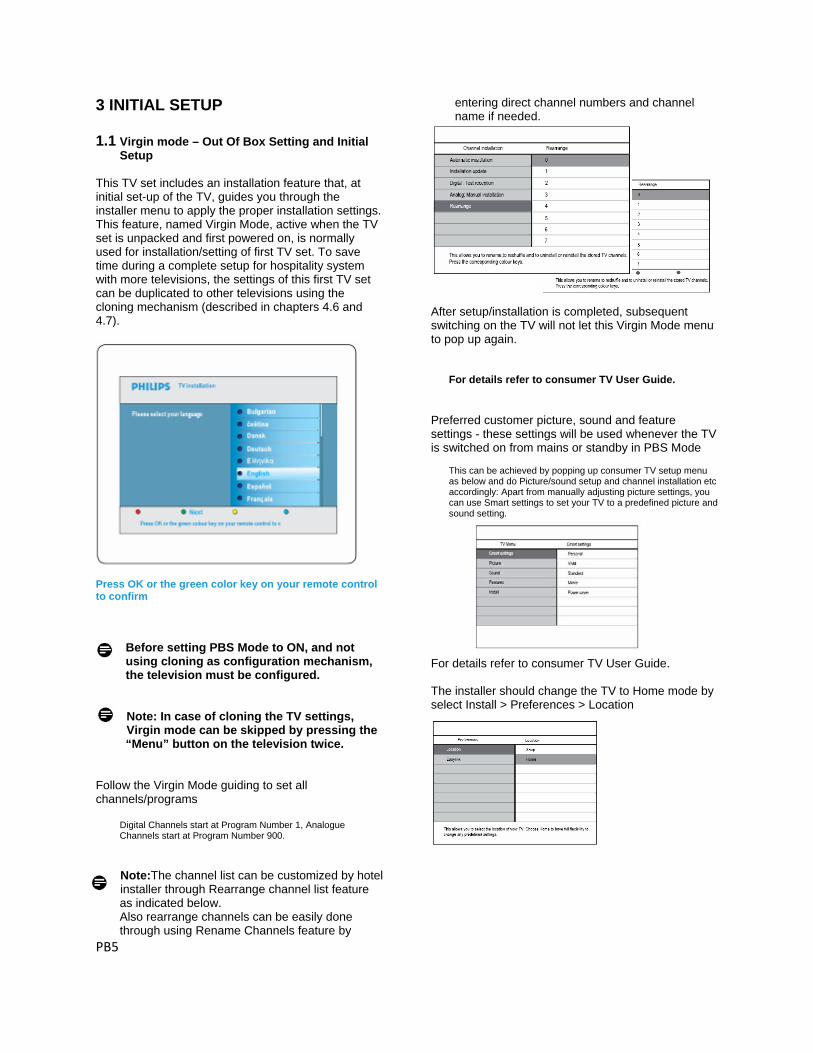
3 INITIAL SETUP 1.1 Virgin mode – Out Of Box Setting and Initial
Setup
This TV set includes an installation feature that, at initial set-up of the TV, guides you through the installer menu to apply the proper installation settings. This feature, named Virgin Mode, active when the TV set is unpacked and first powered on, is normally used for installation/setting of first TV set. To save time during a complete setup for hospitality system with more televisions, the settings of this first TV set can be duplicated to other televisions using the cloning mechanism (described in chapters 4.6 and 4.7).
Please select your language Press OK or the green color key on your remote control to confirm
Before setting PBS Mode to ON, and not using cloning as configuration mechanism, the television must be configured.
Note: In case of cloning the TV settings, Virgin mode can be skipped by pressing the “Menu” button on the television twice.
Follow the Virgin Mode guiding to set all channels/programs
Digital Channels start at Program Number 1, Analogue Channels start at Program Number 900.
Note:The channel list can be customized by hotel installer through Rearrange channel list feature as indicated below. Also rearrange channels can be easily done through using Rename Channels feature by
entering direct channel numbers and channel name if needed.
After setup/installation is completed, subsequent switching on the TV will not let this Virgin Mode menu to pop up again.
For details refer to consumer TV User Guide. Preferred customer picture, sound and feature settings - these settings will be used whenever the TV is switched on from mains or standby in PBS Mode
This can be achieved by popping up consumer TV setup menu as below and do Picture/sound setup and channel installation etc accordingly: Apart from manually adjusting picture settings, you can use Smart settings to set your TV to a predefined picture and sound setting.
For details refer to consumer TV User Guide. The installer should change the TV to Home mode by select Install > Preferences > Location
PB6
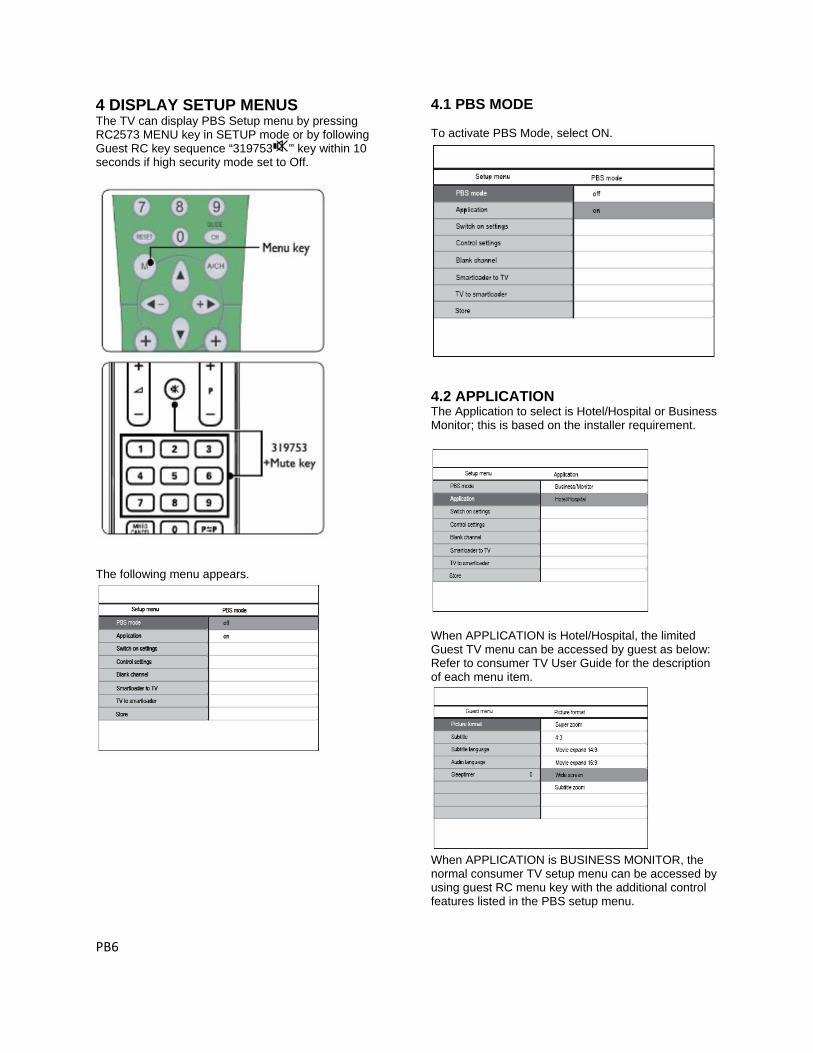
4 DISPLAY SETUP MENUS The TV can display PBS Setup menu by pressing RC2573 MENU key in SETUP mode or by following Guest RC key sequence “319753 ”” key within 10 seconds if high security mode set to Off.
The following menu appears.
4.1 PBS MODE To activate PBS Mode, select ON.
4.2 APPLICATION The Application to select is Hotel/Hospital or Business Monitor; this is based on the installer requirement.
When APPLICATION is Hotel/Hospital, the limited Guest TV menu can be accessed by guest as below: Refer to consumer TV User Guide for the description of each menu item.
When APPLICATION is BUSINESS MONITOR, the normal consumer TV setup menu can be accessed by using guest RC menu key with the additional control features listed in the PBS setup menu.
PB7
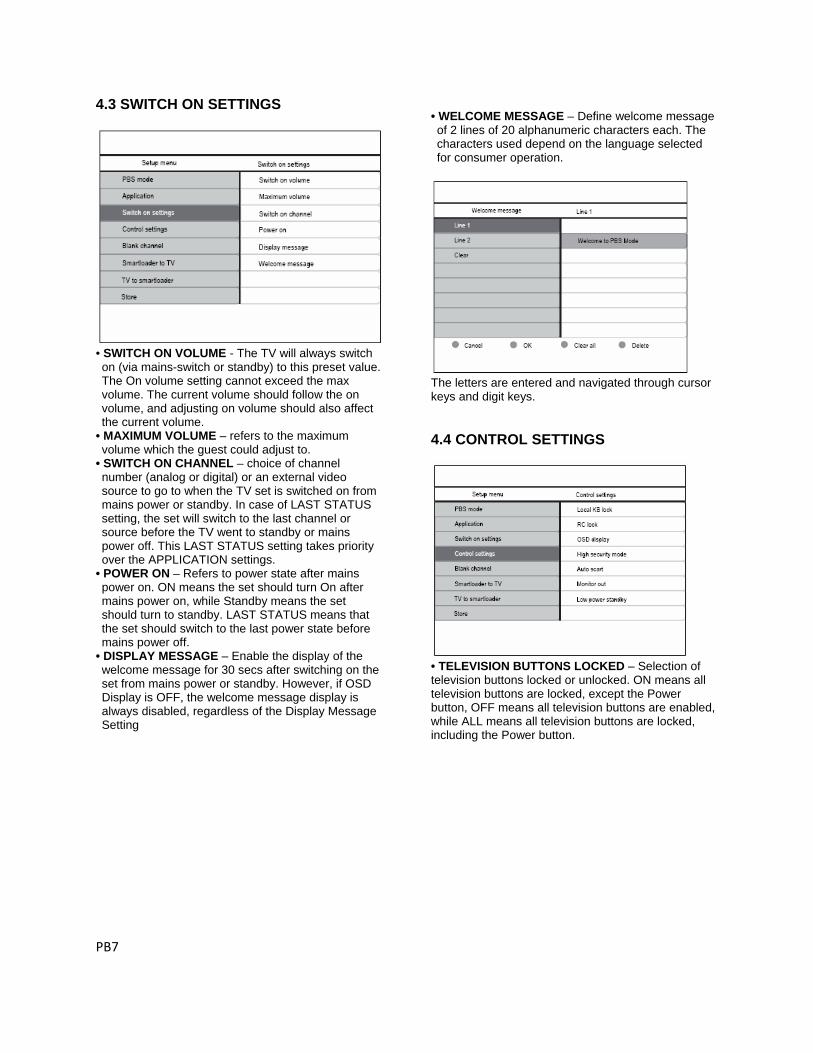
4.3 SWITCH ON SETTINGS
• SWITCH ON VOLUME - The TV will always switch on (via mains-switch or standby) to this preset value. The On volume setting cannot exceed the max volume. The current volume should follow the on volume, and adjusting on volume should also affect the current volume.
• MAXIMUM VOLUME – refers to the maximum volume which the guest could adjust to.
• SWITCH ON CHANNEL – choice of channel number (analog or digital) or an external video source to go to when the TV set is switched on from mains power or standby. In case of LAST STATUS setting, the set will switch to the last channel or source before the TV went to standby or mains power off. This LAST STATUS setting takes priority over the APPLICATION settings.
• POWER ON – Refers to power state after mains power on. ON means the set should turn On after mains power on, while Standby means the set should turn to standby. LAST STATUS means that the set should switch to the last power state before mains power off.
• DISPLAY MESSAGE – Enable the display of the welcome message for 30 secs after switching on the set from mains power or standby. However, if OSD Display is OFF, the welcome message display is always disabled, regardless of the Display Message Setting
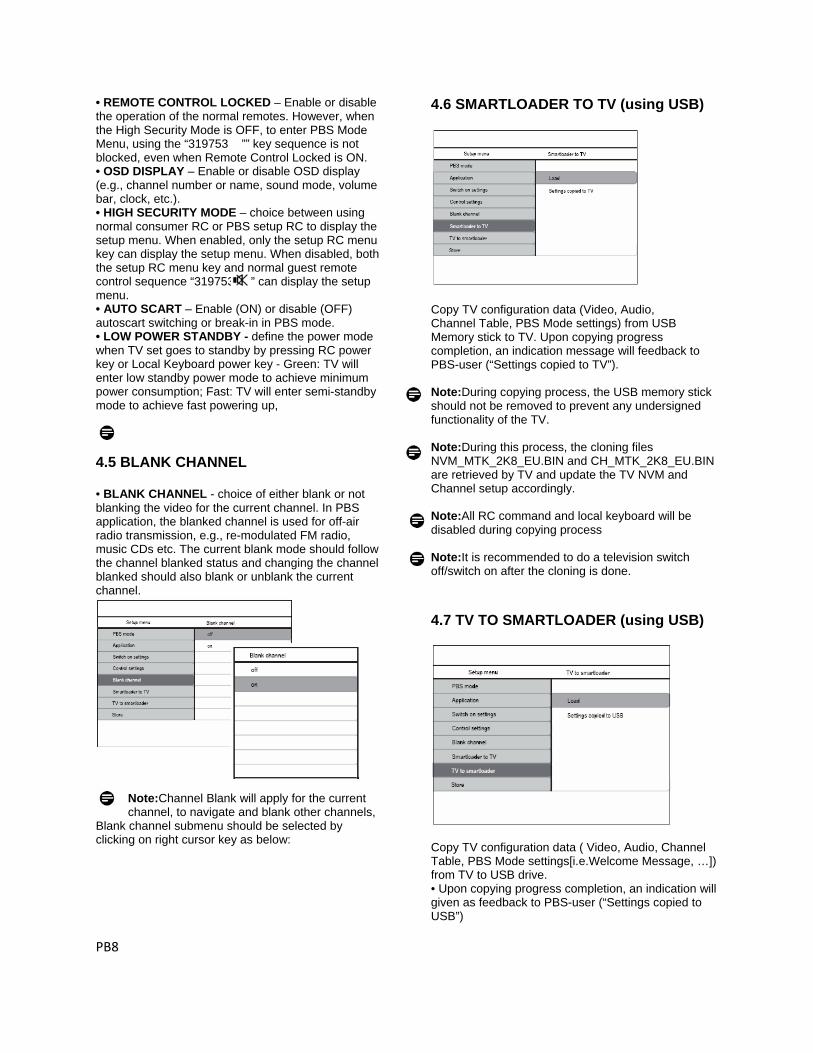
• WELCOME MESSAGE – Define welcome message of 2 lines of 20 alphanumeric characters each. The characters used depend on the language selected for consumer operation.
The letters are entered and navigated through cursor keys and digit keys. 4.4 CONTROL SETTINGS
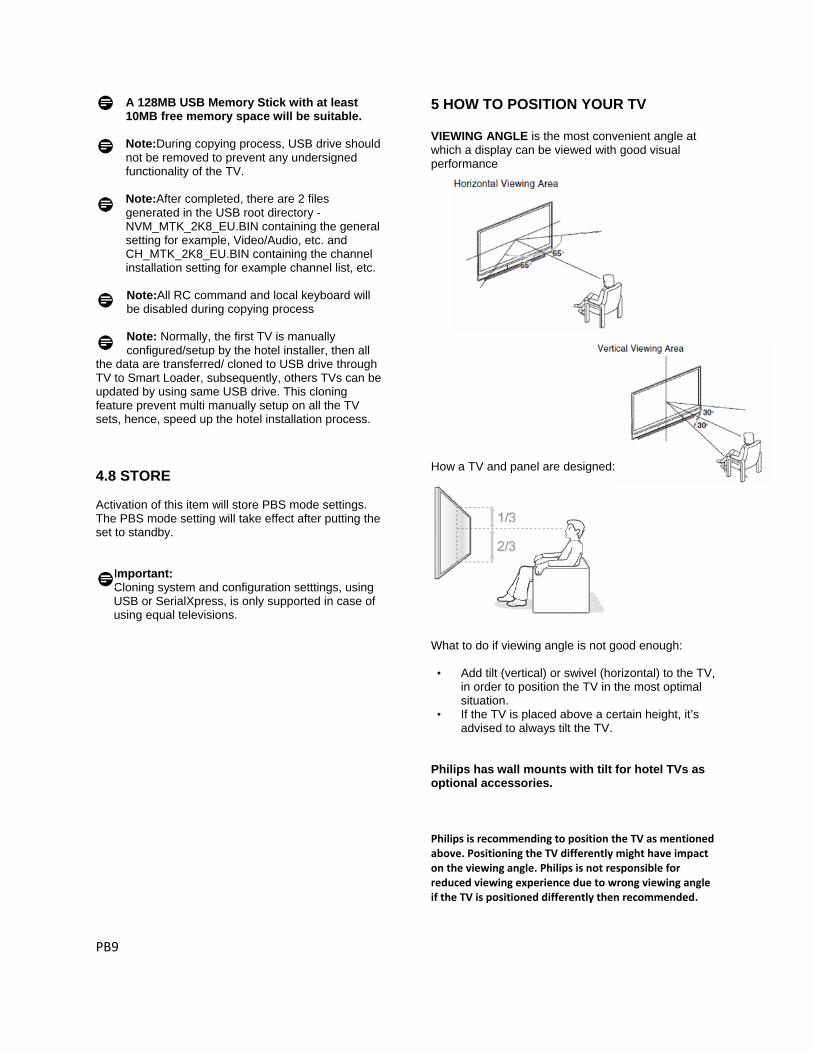
• TELEVISION BUTTONS LOCKED – Selection of television buttons locked or unlocked. ON means all television buttons are locked, except the Power button, OFF means all television buttons are enabled, while ALL means all television buttons are locked, including the Power button.
PB8
• REMOTE CONTROL LOCKED – Enable or disable the operation of the normal remotes. However, when the High Security Mode is OFF, to enter PBS Mode Menu, using the “319753 ”” key sequence is not blocked, even when Remote Control Locked is ON. • OSD DISPLAY – Enable or disable OSD display (e.g., channel number or name, sound mode, volume bar, clock, etc.). • HIGH SECURITY MODE – choice between using normal consumer RC or PBS setup RC to display the setup menu. When enabled, only the setup RC menu key can display the setup menu. When disabled, both the setup RC menu key and normal guest remote control sequence “319753 ” can display the setup menu. • AUTO SCART – Enable (ON) or disable (OFF) autoscart switching or break-in in PBS mode. • LOW POWER STANDBY - define the power mode when TV set goes to standby by pressing RC power key or Local Keyboard power key - Green: TV will enter low standby power mode to achieve minimum power consumption; Fast: TV will enter semi-standby mode to achieve fast powering up,
4.5 BLANK CHANNEL • BLANK CHANNEL - choice of either blank or not blanking the video for the current channel. In PBS application, the blanked channel is used for off-air radio transmission, e.g., re-modulated FM radio, music CDs etc. The current blank mode should follow the channel blanked status and changing the channel blanked should also blank or unblank the current channel.
Note:Channel Blank will apply for the current channel, to navigate and blank other channels,
Blank channel submenu should be selected by clicking on right cursor key as below:
4.6 SMARTLOADER TO TV (using USB)
Copy TV configuration data (Video, Audio, Channel Table, PBS Mode settings) from USB Memory stick to TV. Upon copying progress completion, an indication message will feedback to PBS-user (“Settings copied to TV”). Note:During copying process, the USB memory stick should not be removed to prevent any undersigned functionality of the TV. Note:During this process, the cloning files NVM_MTK_2K8_EU.BIN and CH_MTK_2K8_EU.BIN are retrieved by TV and update the TV NVM and Channel setup accordingly. Note:All RC command and local keyboard will be disabled during copying process Note:It is recommended to do a television switch off/switch on after the cloning is done. 4.7 TV TO SMARTLOADER (using USB)
Copy TV configuration data ( Video, Audio, Channel Table, PBS Mode settings[i.e.Welcome Message, …]) from TV to USB drive. • Upon copying progress completion, an indication will given as feedback to PBS-user (“Settings copied to USB”)
PB9
A 128MB USB Memory Stick with at least 10MB free memory space will be suitable. Note:During copying process, USB drive should not be removed to prevent any undersigned functionality of the TV.
Note:After completed, there are 2 files generated in the USB root directory - NVM_MTK_2K8_EU.BIN containing the general setting for example, Video/Audio, etc. and CH_MTK_2K8_EU.BIN containing the channel installation setting for example channel list, etc.
Note:All RC command and local keyboard will be disabled during copying process
Note: Normally, the first TV is manually configured/setup by the hotel installer, then all
the data are transferred/ cloned to USB drive through TV to Smart Loader, subsequently, others TVs can be updated by using same USB drive. This cloning feature prevent multi manually setup on all the TV sets, hence, speed up the hotel installation process. 4.8 STORE Activation of this item will store PBS mode settings. The PBS mode setting will take effect after putting the set to standby.
Important: Cloning system and configuration setttings, using USB or SerialXpress, is only supported in case of using equal televisions.
5 HOW TO POSITION YOUR TV VIEWING ANGLE is the most convenient angle at which a display can be viewed with good visual performance How a TV and panel are designed: What to do if viewing angle is not good enough: • Add tilt (vertical) or swivel (horizontal) to the TV,
in order to position the TV in the most optimal situation.
• If the TV is placed above a certain height, it’s advised to always tilt the TV.
Philips has wall mounts with tilt for hotel TVs as optional accessories. Philips is recommending to position the TV as mentioned above. Positioning the TV differently might have impact on the viewing angle. Philips is not responsible for reduced viewing experience due to wrong viewing angle if the TV is positioned differently then recommended.

PB10
ABC © 2008 Koninklijke Philips Electronics N.V. All rights reserved. 72-E330MD-X411A

Register your product and get support at
www.philips.com/welcome
EN USER MANUAL
Table of contents
1 Important � � � � � � � � � � � � � � � � � � � � � � 3
1.1 Safety� . . . . . . . . . . . . . . . . . . . . . . . . . . . 3
1.2 Screen care . . . . . . . . . . . . . . . . . . . . . . 4
1.3 Environmental care . . . . . . . . . . . . . . . . 4
2 Your TV � � � � � � � � � � � � � � � � � � � � � � � � 5
2.1 TV overview� . . . . . . . . . . . . . . . . . . . . . 5
3 Get started � � � � � � � � � � � � � � � � � � � � � 7
3.1 Position the TV . . . . . . . . . . . . . . . . . . . 7
3.2 Wall mount the TV . . . . . . . . . . . . . . . . 7
3.3 Connect the antenna cable. . . . . . . . . . 9
3.4 Connect the mains cord� . . . . . . . . . . . . 9
3.5 Manage cables . . . . . . . . . . . . . . . . . . . 10
3.6 Insert the remote control batteries . . 10
3.7 Sw�itch on the TV. . . . . . . . . . . . . . . . . 10
3.8 First time setup� . . . . . . . . . . . . . . . . . . 10
4 Use your TV � � � � � � � � � � � � � � � � � � � 11
4.1 Sw�itch y�our TV on/off or to stand�by� 11
4.2 Watch TV. . . . . . . . . . . . . . . . . . . . . . . 12
4.3 Watch connected� d�evices . . . . . . . . . . 12
4.4 Use teletext. . . . . . . . . . . . . . . . . . . . . 12
5 Use more of your TV � � � � � � � � � � � � 14
5.1 Remote control overview�. . . . . . . . . . 14
5.2 Use TV menus . . . . . . . . . . . . . . . . . . . 15
5.3 Ad�just p�icture and� sound� settings . . . 17
5.4 Change to Shop� or Home mod�e . . . . 19
5.5 Use ad�vanced� teletext features . . . . . 20
5.6 Use Electronic Programme Guid�e . . . 20
5.7 Ad�just feature settings . . . . . . . . . . . . 21
5.8 Use subtitles . . . . . . . . . . . . . . . . . . . . 23
5.9 Listen to d�igital rad�io channels . . . . . . 23
5.10 Up�d�ate y�our TV softw�are . . . . . . . . . . 23
6 Install channels � � � � � � � � � � � � � � � � � 24
6.1 Automatically� install channels . . . . . . . 24
6.2 Manually� install channels . . . . . . . . . . . 25
6.3 Rearrange channels . . . . . . . . . . . . . . . 26
6.4 Rename channels. . . . . . . . . . . . . . . . . 26
6.5 Uninstall or reinstall channels. . . . . . . 27
6.6 Manually� up�d�ate the channel list. . . . . 27
6.7 Test d�igital recep�tion. . . . . . . . . . . . . . 27
7 Connect devices � � � � � � � � � � � � � � � � 28
7.1 Connection overview� . . . . . . . . . . . . . 28
7.2 Select connection quality� . . . . . . . . . . 29
7.3 Connect d�evices . . . . . . . . . . . . . . . . . 31
7.4 Setup� d�evices. . . . . . . . . . . . . . . . . . . . 35
7.5 Use Philip�s Easy�Link� . . . . . . . . . . . . . . 35
7.6 Prep�are TV for d�igital services . . . . . . 36
8 Technical specifications � � � � � � � � � � 37
9 Troubleshooting � � � � � � � � � � � � � � � � 38
9.1 General TV issues . . . . . . . . . . . . . . . 38
9.2 TV channel issues . . . . . . . . . . . . . . . . 38
9.3 Picture issues. . . . . . . . . . . . . . . . . . . . 38
9.4 Sound� issues . . . . . . . . . . . . . . . . . . . . 39
9.5 HDMI connection issues. . . . . . . . . . . 39
9.6 PC connection issues . . . . . . . . . . . . . 39
9.7 Contact us . . . . . . . . . . . . . . . . . . . . . . 40
10 Index � � � � � � � � � � � � � � � � � � � � � � � � � 41
2008 © Koninklijke Philips Electronics N.V. All rights reserved. Specifications are subject to change without notice. Trademarks are the property of Koninklijke Philips Electronics N.V. or their respective owners.
Philips reserves the right to change products at any time without being obliged to adjust earlier supplies accordingly.
The material in this manual is believed adequate for the intended use of the system. If the product, or its individual modules or procedures, are used for purposes other than those specified herein, confirmation of their validity and suitability must be obtained. Philips warrants that the material itself does not infringe any United States patents. No further warranty is expressed or implied.
Warranty�No components are user-serviceable. Do not open or remove covers to the inside of the product. Repairs may only be done by Philips Service Centres and official repair shops. Failure to do so shall void any warranty, stated or implied. Any operation expressly prohibited in this manual, any adjustments, or assembly procedures not recommended or authorised in this manual shall void the warranty.
Pixel characteristicsThis LCD product has a high number of colour pixels. Although it has effective pixels of 99,999% or more, black dots or bright points of light (red, green or blue) may appear constantly on the screen. This is a structural property of the display (within common industry standards) and is not a malfunction.
Op�en source softw�areThis television contains open source software. Philips hereby offers to deliver or make available, upon request, for a charge no more than the cost of physically
Remove fuse cover and fuse.1.
The replacement fuse must 2. comply with BS 1362 and have the ASTA approval mark. If the fuse is lost, contact your dealer in order to verify the correct type.
Refit the fuse cover.3.
In order to maintain conformity to the EMC directive, the mains plug on this product must not be detached from the mains cord.
Cop�y�right
VESA, FDMI and the VESA Mounting Compliant logo are trademarks of the Video Electronics Standards Association.
® Kensington and Micro Saver are registered US trademarks of ACCO World Corporation with issued registrations and pending applications in other countries throughout the world. All other registered and unregistered trademarks are the property of their respective owners.
performing source distribution, a complete machine-readable copy of the corresponding source code on a medium customarily used for software interchange.
This offer is valid for a period of 3 years after the date of purchase of this product. To obtain the source code, write to
Philips Innovative Applications N.V. Ass. to the Development Manager Pathoekeweg 11 B-8000 Brugge Belgium
Comp�liance w�ith EMFKoninklijke Philips Electronics N.V. manufactures and sells many products targeted at consumers, which, like any electronic apparatus, in general have the ability to emit and receive electromagnetic signals.
One of Philips’ leading Business Principles is to take all necessary health and safety measures for our products, to comply with all applicable legal requirements and to stay well within the EMF standards applicable at the time of producing the products.
Philips is committed to develop, produce and market products that cause no adverse health effects.
Philips confirms that if its products are handled properly for their intended use, they are safe to use according to scientific evidence available today.
Philips plays an active role in the development of international EMF and safety standards, enabling Philips to anticipate further developments in standardisation for early integration in its products.
Mains fuse (UK only�)This TV is fitted with an approved moulded plug. Should it become necessary to replace the mains fuse, this must be replaced with a fuse of the same value as indicated on the plug (example 10A).

EN-3
EN
Important1
Congratulations on y�our p�urchase and� w�elcome to Philip�s!
Read� this user manual before y�ou start to use this p�rod�uct.
Pay� close attention to this section and� follow� the safety� and� screen care instructions. The p�rod�uct w�arranty� d�oes not ap�p�ly� if d�amage is caused� by� failing to follow� these instructions.
To fully� benefit from the sup�p�ort that Philip�s offers, register y�our p�rod�uct at w�w�w�.p�hilip�s.com/w�elcome.
The mod�el and� serial number of y�our TV can be found� on the back� and� sid�e of the TV as w�ell as on the p�ack�aging.
Safety1�1 The ap�p�aratus must be connected� to a •mains sock�et outlet w�ith a p�rotected� earthed� connection.
If transp�orting the TV in low� temp�eratures •(less than 5°C), op�en the box and� w�ait until the TV matches the ambient temp�erature of the room before unp�ack�ing.
To avoid� short circuit, d�o not exp�ose the •TV, remote control or remote control batteries to rain or w�ater.
Do not p�lace vessels of w�ater or other •liquid�s on top� of or near the TV. Sp�illing liquid�s on the TV can cause electric shock�. If liquid�s are sp�ilt on the TV, d�o not op�erate the TV. Immed�iately� d�isconnect the TV from the mains and� have the TV check�ed� by� a qualified� technician.
Do not insert any� strange object into the •ventilation slot. This might lead� to d�amage of TV.
To avoid� risk� of fire or electric shock�, d�o •not p�lace the TV, remote control or remote control batteries near nak�ed� flame sources (e.g. lighted� cand�les) and� other heat sources includ�ing d�irect sunlight.
Do not install the TV in a confined� sp�ace •such as a book�case. Leave a sp�ace of at least 10cm (four inches) around� the TV for ventilation. Be sure air flow� is not obstructed�.
If p�lacing the TV on a flat, solid� surface be •sure to use only� the sup�p�lied� stand�. Do not move the TV if the stand� is not p�rop�erly� screw�ed� to the TV.
Wall mounting of the TV should� only� be •p�erformed� by� qualified� p�ersonnel. The TV must only� be mounted� on an ap�p�rop�riate w�all brack�et and� on a w�all that can safely� hold� the w�eight of the TV. Imp�rop�er w�all mounting can result in severe injury� or d�amage. Do not attemp�t to w�all mount the TV y�ourself.
If the TV is mounted� on a sw�ivel base or •sw�ivel arm, ensure no strain is p�laced� on the p�ow�er cord� w�hen the TV is sw�ivelled�. Strain on the p�ow�er cord� can loosen connections and� cause arcing or fire.
Disconnect the TV from the mains and� •antenna before lightning storms. During lightning storms d�o not touch any� p�art of the TV, mains cord� or antenna cable.
Be sure that y�ou have full access to the •mains cord� for easy� d�isconnection of the TV from the mains.
Permanent hearing loss can occur if y�ou use •earp�hones or head�p�hones at high volumes. Though high volume may� sound� normal over time, it can d�amage y�our hearing. To p�rotect y�our hearing, limit the amount of time y�ou use earp�hones or head�p�hones at high volume.
EN-4
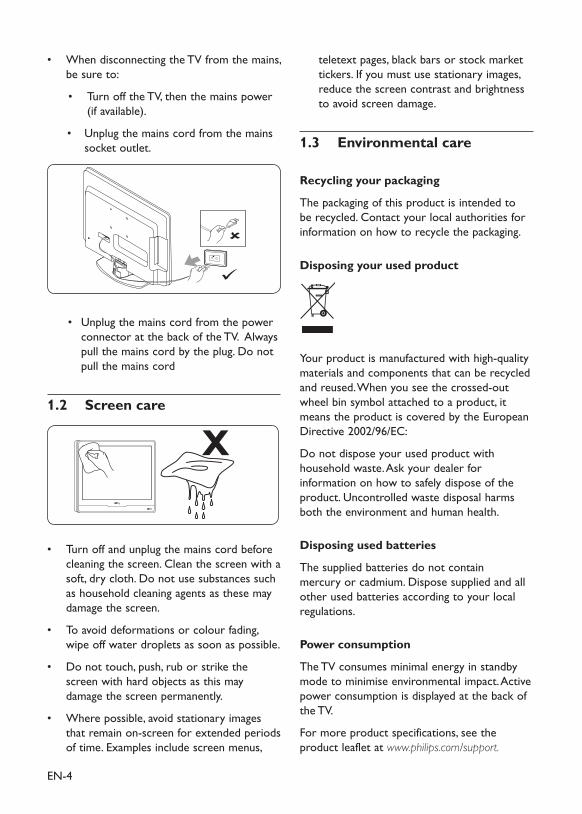
When d�isconnecting the TV from the mains, •be sure to:
Turn off the TV, then the mains p�ow�er •(if available).
Unp�lug the mains cord� from the mains •sock�et outlet.
Unp�lug the mains cord� from the p�ow�er •connector at the back� of the TV. Alw�ay�s p�ull the mains cord� by� the p�lug. Do not p�ull the mains cord�
1�2 Screen care
Turn off and� unp�lug the mains cord� before •cleaning the screen. Clean the screen w�ith a soft, d�ry� cloth. Do not use substances such as household� cleaning agents as these may� d�amage the screen.
To avoid� d�eformations or colour fad�ing, •w�ip�e off w�ater d�rop�lets as soon as p�ossible.
Do not touch, p�ush, rub or strik�e the •screen w�ith hard� objects as this may� d�amage the screen p�ermanently�.
Where p�ossible, avoid� stationary� images •that remain on-screen for extend�ed� p�eriod�s of time. Examp�les includ�e screen menus,
teletext p�ages, black� bars or stock� mark�et tick�ers. If y�ou must use stationary� images, red�uce the screen contrast and� brightness to avoid� screen d�amage.
1�3 Environmental care
Recycling your packaging
The p�ack�aging of this p�rod�uct is intend�ed� to be recy�cled�. Contact y�our local authorities for information on how� to recy�cle the p�ack�aging.
Disposing your used product
Your p�rod�uct is manufactured� w�ith high-quality� materials and� comp�onents that can be recy�cled� and� reused�. When y�ou see the crossed�-out w�heel bin sy�mbol attached� to a p�rod�uct, it means the p�rod�uct is covered� by� the Europ�ean Directive 2002/96/EC:
Do not d�isp�ose y�our used� p�rod�uct w�ith household� w�aste. Ask� y�our d�ealer for information on how� to safely� d�isp�ose of the p�rod�uct. Uncontrolled� w�aste d�isp�osal harms both the environment and� human health.
Disposing used batteries
The sup�p�lied� batteries d�o not contain mercury� or cad�mium. Disp�ose sup�p�lied� and� all other used� batteries accord�ing to y�our local regulations.
Power consumption
The TV consumes minimal energy� in stand�by� mod�e to minimise environmental imp�act. Active p�ow�er consump�tion is d�isp�lay�ed� at the back� of the TV.
For more p�rod�uct sp�ecifications, see the p�rod�uct leaflet at www.philips.com/support.
EN-5
EN
Your TV2
This section gives y�ou an overview� of commonly�-used� TV controls and� functions.
2�1 TV overview
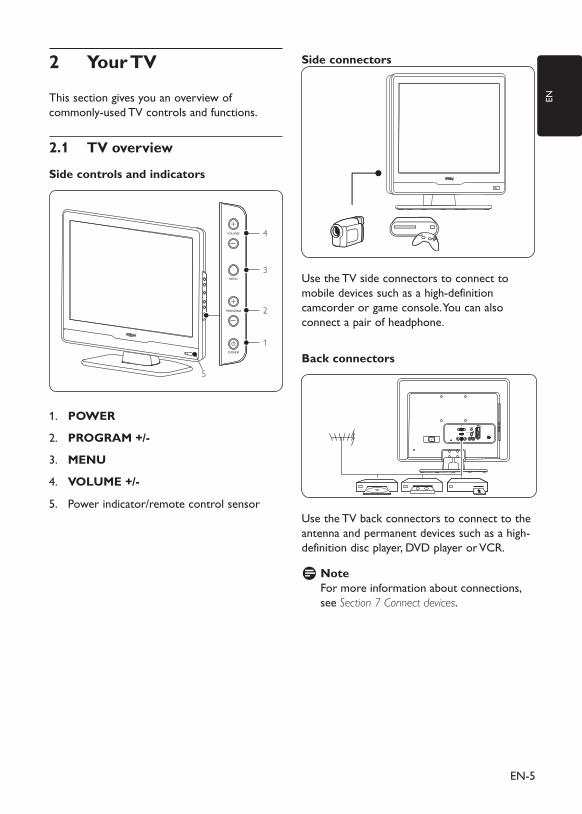
Side controls and indicators
POWER
PROGRAM
MENU
VOLUME
1
2
4
3
5
POWER1.
PROGRAM +/-2.
MENU3.
VOLUME +/-4.
Pow�er ind�icator/remote control sensor5.
Side connectors
Use the TV sid�e connectors to connect to mobile d�evices such as a high-d�efinition camcord�er or game console. You can also connect a p�air of head�p�hone.
Back connectors
EXT 3
DIGITAL AUDIO OUT
Use the TV back� connectors to connect to the antenna and� p�ermanent d�evices such as a high-d�efinition d�isc p�lay�er, DVD p�lay�er or VCR.
Note DFor more information about connections, see Section 7 Connect devices.
EN-6
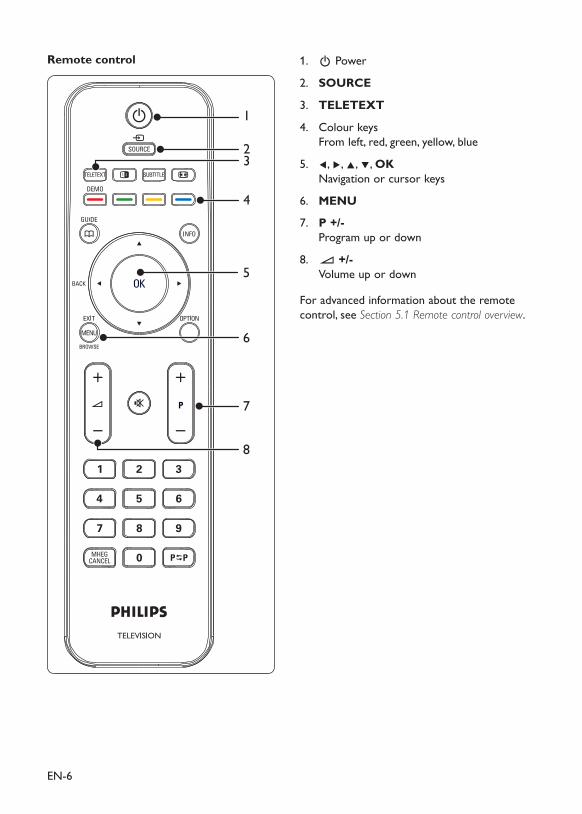
. 1. Pow�er
SOURCE2.
TELETEXT3.
Colour k�ey�s4. From left, red�, green, y�ellow�, blue
Í5. , Æ, Î, ï, OK Navigation or cursor k�ey�s
MENU6.
P +/- 7. Program up� or d�ow�n
”8. +/- Volume up� or d�ow�n
For ad�vanced� information about the remote control, see Section 5.1 Remote control overview.
Remote control
1
23
4
5
6
7
8
EN-7
EN
3 Get started
This section help�s y�ou p�osition and� install the TV and� sup�p�lements the information p�rovid�ed� in the Quick Start Guide.
Note DRefer to the Quick Start Guide for stand� mounting instructions.
3�1 Position the TV
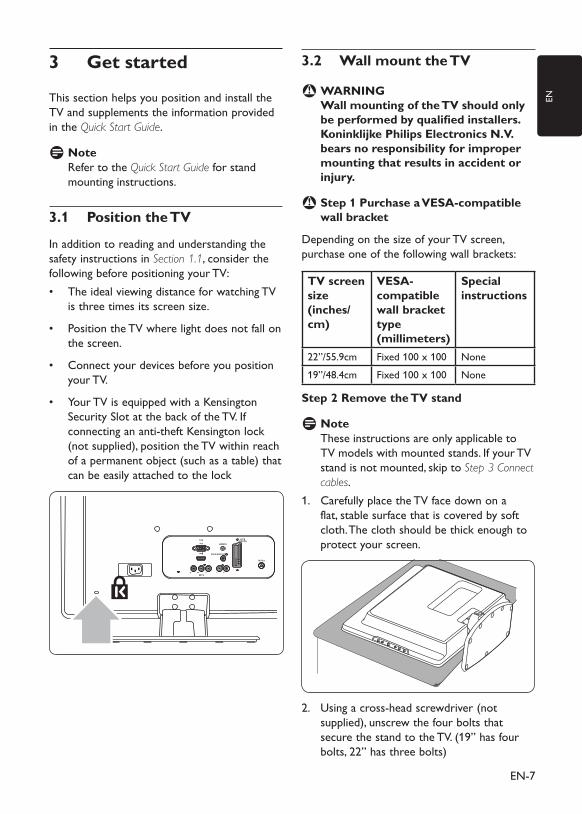
In ad�d�ition to read�ing and� und�erstand�ing the safety� instructions in Section 1.1, consid�er the follow�ing before p�ositioning y�our TV:
The id�eal view�ing d�istance for w�atching TV •is three times its screen size.
Position the TV w�here light d�oes not fall on •the screen.
Connect y�our d�evices before y�ou p�osition •y�our TV.
• Your TV is equip�p�ed� w�ith a Kensington Security� Slot at the back� of the TV. If connecting an anti-theft Kensington lock� (not sup�p�lied�), p�osition the TV w�ithin reach of a p�ermanent object (such as a table) that can be easily� attached� to the lock�
EXT 3
DIGITAL AUDIO OUT
3�2 Wall mount the TV
WARNING BWall mounting of the TV should only be performed by qualified installers. Koninklijke Philips Electronics N�V� bears no responsibility for improper mounting that results in accident or injury�
Step 1 Purchase a B VESA-compatible wall bracket
Dep�end�ing on the size of y�our TV screen, p�urchase one of the follow�ing w�all brack�ets:
TV screen size (inches/cm)
VESA-compatible wall bracket type (millimeters)
Special instructions
22”/55.9cm Fixed� 100 x 100 None19”/48.4cm Fixed� 100 x 100 None
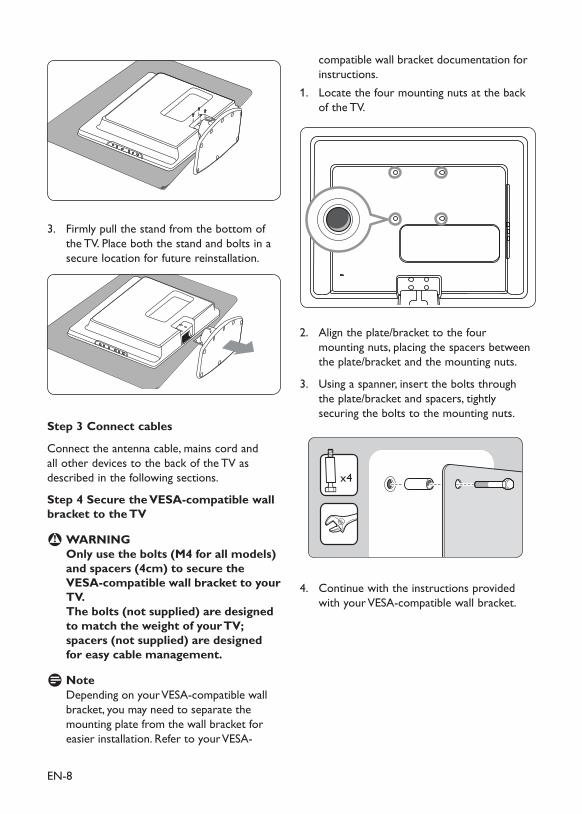
Step 2 Remove the TV stand
Note DThese instructions are only� ap�p�licable to TV mod�els w�ith mounted� stand�s. If y�our TV stand� is not mounted�, sk�ip� to Step 3 Connect cables.Carefully� p�lace the TV face d�ow�n on a 1. flat, stable surface that is covered� by� soft cloth. The cloth should� be thick� enough to p�rotect y�our screen.
Using a cross-head� screw�d�river (not 2. sup�p�lied�), unscrew� the four bolts that secure the stand� to the TV. (19” has four bolts, 22” has three bolts)
EN-8
Firmly� p�ull the stand� from the bottom of 3. the TV. Place both the stand� and� bolts in a secure location for future reinstallation.
Step 3 Connect cables
Connect the antenna cable, mains cord� and� all other d�evices to the back� of the TV as d�escribed� in the follow�ing sections.
Step 4 Secure the VESA-compatible wall bracket to the TV
WARNING BOnly use the bolts (M4 for all models) and spacers (4cm) to secure the VESA-compatible wall bracket to your TV� The bolts (not supplied) are designed to match the weight of your TV; spacers (not supplied) are designed for easy cable management�
Note DDep�end�ing on y�our VESA-comp�atible w�all brack�et, y�ou may� need� to sep�arate the mounting p�late from the w�all brack�et for easier installation. Refer to y�our VESA-
comp�atible w�all brack�et d�ocumentation for instructions.Locate the four mounting nuts at the back� 1. of the TV.
Align the p�late/brack�et to the four 2. mounting nuts, p�lacing the sp�acers betw�een the p�late/brack�et and� the mounting nuts.
Using a sp�anner, insert the bolts through 3. the p�late/brack�et and� sp�acers, tightly� securing the bolts to the mounting nuts.
x4
Continue w�ith the instructions p�rovid�ed� 4. w�ith y�our VESA-comp�atible w�all brack�et.
EN-9
EN
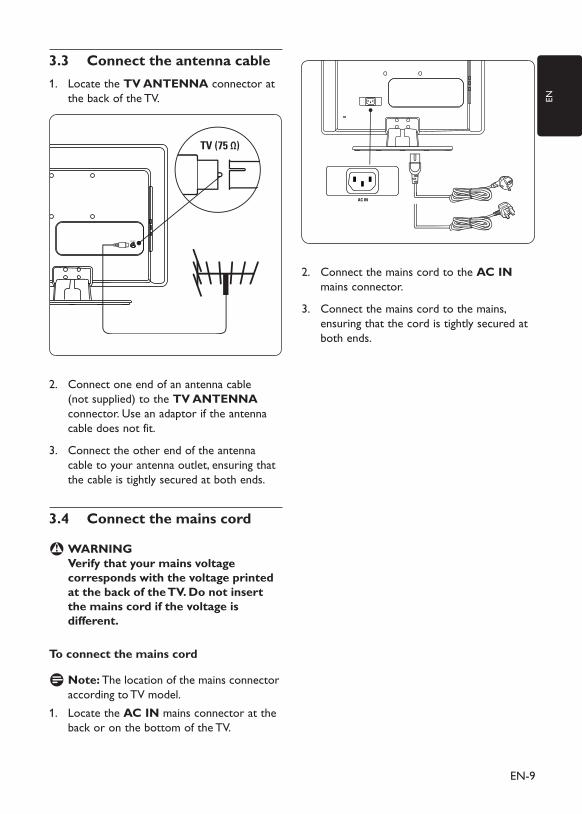
3�3 Connect the antenna cableLocate the 1. TV ANTENNA connector at the back� of the TV.
Connect one end� of an antenna cable 2. (not sup�p�lied�) to the TV ANTENNA connector. Use an ad�ap�tor if the antenna cable d�oes not fit.
Connect the other end� of the antenna 3. cable to y�our antenna outlet, ensuring that the cable is tightly� secured� at both end�s.
3�4 Connect the mains cord
WARNING BVerify that your mains voltage corresponds with the voltage printed at the back of the TV� Do not insert the mains cord if the voltage is different�
To connect the mains cord
Note: D The location of the mains connector accord�ing to TV mod�el.Locate the 1. AC IN mains connector at the back� or on the bottom of the TV.
Connect the mains cord� to the 2. AC IN mains connector.
Connect the mains cord� to the mains, 3. ensuring that the cord� is tightly� secured� at both end�s.
EN-10
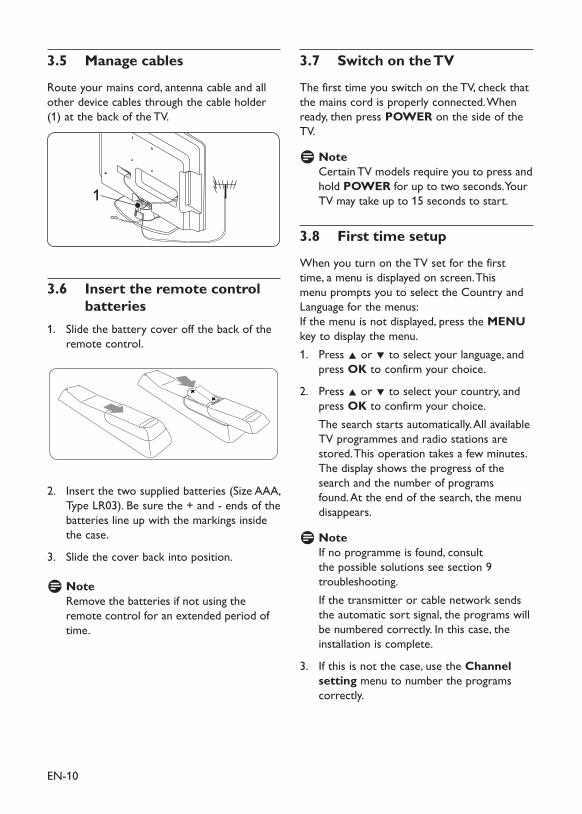
3�5 Manage cables
Route y�our mains cord�, antenna cable and� all other d�evice cables through the cable hold�er (1) at the back� of the TV.
1
3�6 Insert the remote control batteries
Slid�e the battery� cover off the back� of the 1. remote control.
Insert the tw�o sup�p�lied� batteries (Size AAA, 2. Ty�p�e LR03). Be sure the + and� - end�s of the batteries line up� w�ith the mark�ings insid�e the case.
Slid�e the cover back� into p�osition.3.
Note DRemove the batteries if not using the remote control for an extend�ed� p�eriod� of time.
3�7 Switch on the TV
The first time y�ou sw�itch on the TV, check� that the mains cord� is p�rop�erly� connected�. When read�y�, then p�ress POWER on the sid�e of the TV.
Note DCertain TV mod�els require y�ou to p�ress and� hold� POWER for up� to tw�o second�s. Your TV may� tak�e up� to 15 second�s to start.
First time setup3�8
When y�ou turn on the TV set for the first time, a menu is d�isp�lay�ed� on screen. This menu p�romp�ts y�ou to select the Country� and� Language for the menus: If the menu is not d�isp�lay�ed�, p�ress the MENU k�ey� to d�isp�lay� the menu.
Press 1. Î or ï to select y�our language, and� p�ress OK to confirm y�our choice.
Press 2. Î or ï to select y�our country�, and� p�ress OK to confirm y�our choice.The search starts automatically�. All available TV p�rogrammes and� rad�io stations are stored�. This op�eration tak�es a few� minutes. The d�isp�lay� show�s the p�rogress of the search and� the number of p�rograms found�. At the end� of the search, the menu d�isap�p�ears.
Note DIf no p�rogramme is found�, consult the p�ossible solutions see section 9 troubleshooting.If the transmitter or cable netw�ork� send�s the automatic sort signal, the p�rograms w�ill be numbered� correctly�. In this case, the installation is comp�lete.
If this is not the case, use the 3. Channel setting menu to number the p�rograms correctly�.

EN-11
EN
Use your TV 4 This section help�s y�ou p�erform basic TV op�erations. Instructions on ad�vanced� TV op�erations are p�rovid�ed� in Section 5 Use more of your TV.
Switch your TV on/off or to 4�1 standby
Switch on your TVIf the p�ow�er ind�icator (1) is off, p�ress •POWER on the sid�e of the TV.
1POWER
PROGRAM
MENU
Switch off your TVPress • POWER on the sid�e of the TV. The p�ow�er ind�icator (1) sw�itches off.
Switch to standby
Press • . on the remote control. The p�ow�er ind�icator sw�itches to stand�by� (red�).
Tip EThough y�our TV consumes very� little p�ow�er w�hen in stand�by�, energy� continues to be consumed� as long as the mains remain
connected� and� p�ow�ered�. When not in use for extend�ed� p�eriod�s of time, sw�itch off and� d�isconnect the TV from the mains.
Switch on from standby
If the p�ow�er ind�icator is in stand�by� (red�), •p�ress . on the remote control.
Note DIf y�ou cannot locate y�our remote control and� y�ou w�ant to sw�itch on the TV from stand�by�, p�ress PROGRAM +/- on the sid�e of the TV.
EN-12
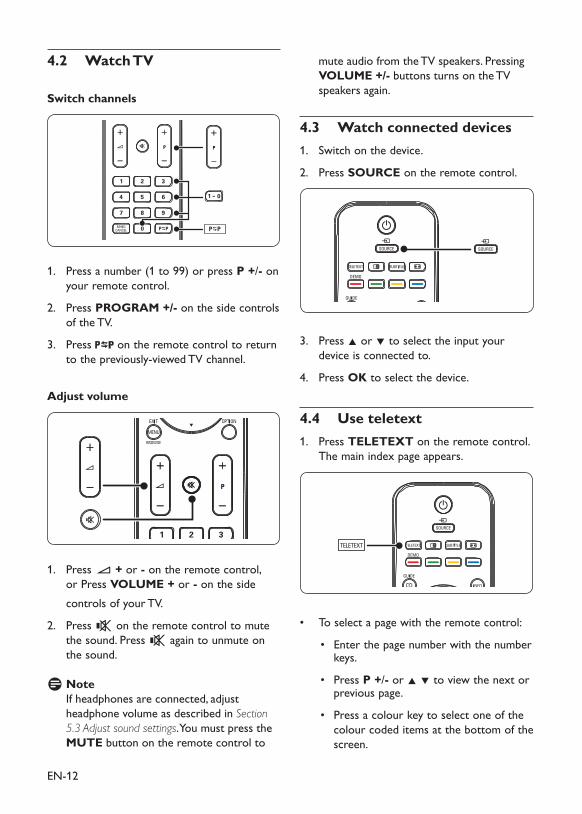
Watch TV4�2
Switch channels
Press a number (1 to 99) or p�ress 1. P +/- on y�our remote control.
Press 2. PROGRAM +/- on the sid�e controls of the TV.
Press 3. on the remote control to return to the p�reviously�-view�ed� TV channel.
Adjust volume
Press 1. ” + or - on the remote control, or Press VOLUME + or - on the sid�e controls of y�our TV.
Press 2. [ on the remote control to mute the sound�. Press [ again to unmute on the sound�.
Note DIf head�p�hones are connected�, ad�just head�p�hone volume as d�escribed� in Section 5.3 Adjust sound settings. You must p�ress the MUTE button on the remote control to
mute aud�io from the TV sp�eak�ers. Pressing VOLUME +/- buttons turns on the TV sp�eak�ers again.
4�3 Watch connected devicesSw�itch on the d�evice.1.
Press 2. SOURCE on the remote control.
Press 3. Î or ï to select the inp�ut y�our d�evice is connected� to.
Press 4. OK to select the d�evice.
Use teletext4�4 Press 1. TELETEXT on the remote control. The main ind�ex p�age ap�p�ears.
To select a p�age w�ith the remote control:•
Enter the p�age number w�ith the number •k�ey�s.
Press • P +/- or Î ï to view� the next or p�revious p�age.
Press a colour k�ey� to select one of the •colour cod�ed� items at the bottom of the screen.
EN-13
EN
Tip EPress to return to the p�reviously� view�ed� p�age.
Press 2. TELETEXT again to sw�itch off teletext.
Note (for UK users only) DSome d�igital TV channels offer d�ed�icated� d�igital text services (for examp�le, BBC1).
For ad�vanced� information on teletext, see
Section 5.5 Use advanced teletext features.
EN-14
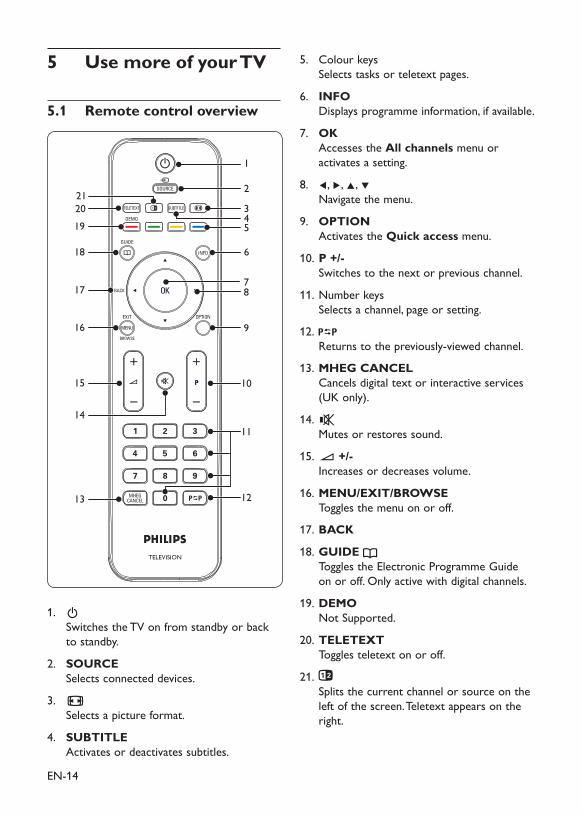
Use more of your TV5
Remote control overview5�1
1
22120
19
18
17
16
15
14
13
345
6
78
9
10
11
12
. 1. Sw�itches the TV on from stand�by� or back� to stand�by�.
SOURCE2. Selects connected� d�evices.
∏3. Selects a p�icture format.
SUBTITLE4. Activates or d�eactivates subtitles.
Colour k�ey�s 5. Selects task�s or teletext p�ages.
INFO6. Disp�lay�s p�rogramme information, if available.
OK7. Accesses the All channels menu or activates a setting.
Í8. , Æ, Î, ï Navigate the menu.
OPTION9. Activates the Quick access menu.
P +/-10. Sw�itches to the next or p�revious channel.
Number k�ey�s11. Selects a channel, p�age or setting.
12. Returns to the p�reviously�-view�ed� channel.
MHEG CANCEL 13. Cancels d�igital text or interactive services (UK only�).
[14. Mutes or restores sound�.
”15. +/- Increases or d�ecreases volume.
MENU/EXIT/BROWSE16. Toggles the menu on or off.
BACK17.
GUIDE 18. Toggles the Electronic Programme Guid�e on or off. Only� active w�ith d�igital channels.
DEMO19. Not Sup�p�orted�.
TELETEXT 20. Toggles teletext on or off.
21. Sp�lits the current channel or source on the left of the screen. Teletext ap�p�ears on the right.

EN-15
EN
Use TV menus5�2
On-screen menus help� y�ou install y�our TV, ad�just p�icture and� sound� settings and� access other features. This section d�escribes how� to navigate the menus.
Access the main menu
Press 1. MENU on the remote control to d�isp�lay� the main menu.
The follow�ing menu ap�p�ears.
TV Menu Smart settings
PictureSoundFeatures
VividStandardMoviePower saverInstall
PersonalSmart settings
PHILIPS
Press 2. Î or ï to move the cursor to the follow�ing items:
Smart settings•
Picture•
Sound•
Feature•
Install•
Press 3. Æ or OK to select an item.
Press 4. MENU to exit.
Use the main menu
The follow�ing step�s of ad�justing brightness is one examp�le to show� how� to use the main menu.
Press 1. MENU on the remote control to d�isp�lay� the TV menu.
TV Menu Smart settings
PictureSoundFeatures
VividStandardMoviePower saverInstall
PersonalSmart settings
PHILIPS
Press 2. ï to select Picture.
TV Menu Smart settings
PictureSoundFeatures
BrightnessColorSharpnessTint
Color temperaturePicture format
Noise Reduction
Install
ContrastSmart settings
PHILIPS
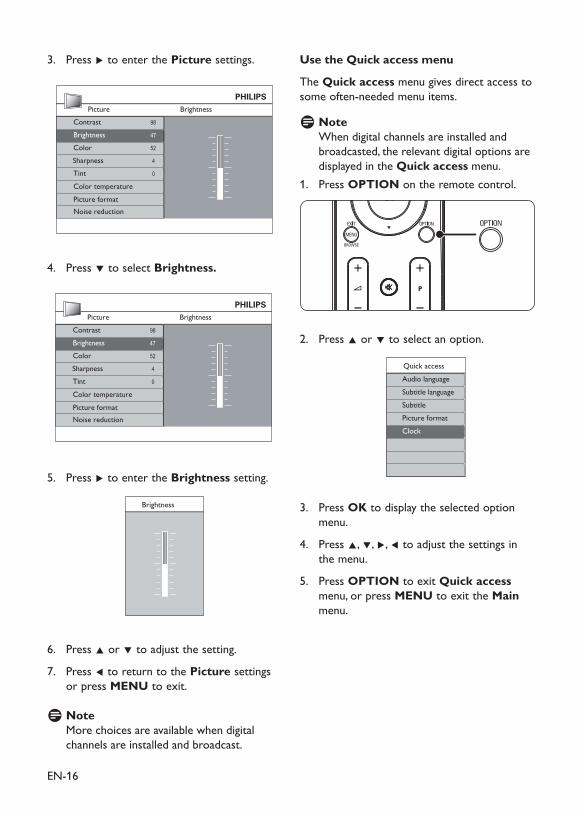
EN-16
Press 3. Æ to enter the Picture settings.
Picture Brightness98
47
52
BrightnessColorSharpnessTint
Color temperature
Picture formatNoise reduction
Contrast
4
0
PHILIPS
Press 4. ï to select Brightness�
Picture Brightness98
47
52
BrightnessColorSharpnessTint
Color temperature
Picture formatNoise reduction
Contrast
4
0
PHILIPS
Press 5. Æ to enter the Brightness setting.
Brightness
Press 6. Î or ï to ad�just the setting.
Press 7. Í to return to the Picture settings or p�ress MENU to exit.
Note DMore choices are available w�hen d�igital channels are installed� and� broad�cast.
Use the Quick access menu
The Quick access menu gives d�irect access to some often-need�ed� menu items.
Note DWhen d�igital channels are installed� and� broad�casted�, the relevant d�igital op�tions are d�isp�lay�ed� in the Quick access menu.Press 1. OPTION on the remote control.
Press 2. Î or ï to select an op�tion.
Quick access
Subtitle languageSubtitle
Audio language
Picture formatClock
Press 3. OK to d�isp�lay� the selected� op�tion menu.
Press 4. Î, ï, Æ, Í to ad�just the settings in the menu.
Press 5. OPTION to exit Quick access menu, or p�ress MENU to exit the Main menu.
EN-17
EN
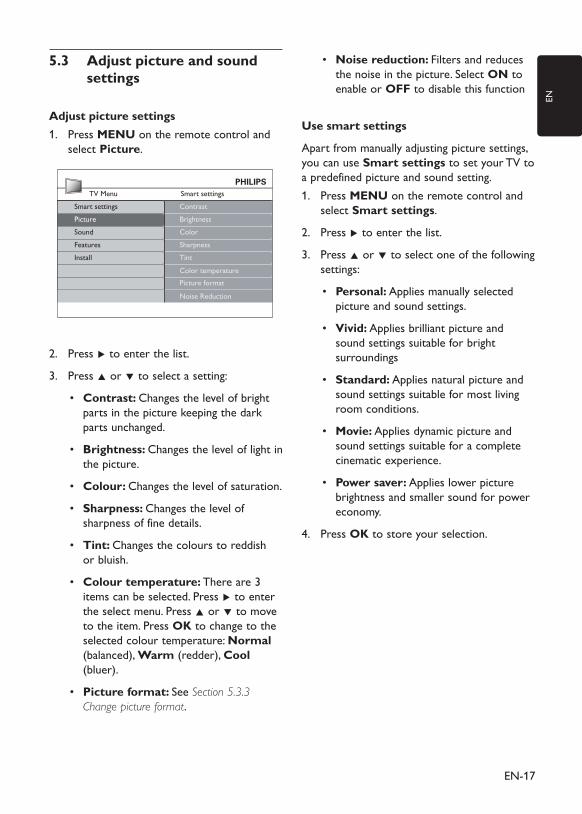
Adjust picture and sound 5�3 settings
Adjust picture settingsPress 1. MENU on the remote control and� select Picture.
TV Menu Smart settings
PictureSoundFeatures
BrightnessColorSharpnessTint
Color temperaturePicture format
Noise Reduction
Install
ContrastSmart settings
PHILIPS
Press 2. Æ to enter the list.
Press 3. Î or ï to select a setting:
• Contrast: Changes the level of bright p�arts in the p�icture k�eep�ing the d�ark� p�arts unchanged�.
• Brightness: Changes the level of light in the p�icture.
• Colour: Changes the level of saturation.
• Sharpness: Changes the level of sharp�ness of fine d�etails.
Tint: • Changes the colours to red�d�ish or bluish.
Colour temperature:• There are 3 items can be selected�. Press Æ to enter the select menu. Press Î or ï to move to the item. Press OK to change to the selected� colour temp�erature: Normal (balanced�), Warm (red�d�er), Cool (bluer).
Picture format: • See Section 5.3.3 Change picture format.
• Noise reduction: Filters and� red�uces the noise in the p�icture. Select ON to enable or OFF to d�isable this function
Use smart settings
Ap�art from manually� ad�justing p�icture settings, y�ou can use Smart settings to set y�our TV to a p�red�efined� p�icture and� sound� setting.
Press 1. MENU on the remote control and� select Smart settings.
Press 2. Æ to enter the list.
Press 3. Î or ï to select one of the follow�ing settings:
• Personal: Ap�p�lies manually� selected� p�icture and� sound� settings.
• Vivid: Ap�p�lies brilliant p�icture and� sound� settings suitable for bright surround�ings
• Standard: Ap�p�lies natural p�icture and� sound� settings suitable for most living room cond�itions.
• Movie: Ap�p�lies d�y�namic p�icture and� sound� settings suitable for a comp�lete cinematic exp�erience.
• Power saver: Ap�p�lies low�er p�icture brightness and� smaller sound� for p�ow�er economy�.
Press 4. OK to store y�our selection.

EN-18
Change picture format
Change the p�icture format to suit y�our content.Press∏1. (PICTURE FORMAT) on y�our remote control. Alternatively�, p�ress MENU and� select Picture > Picture format.
Press 2. Î or ï to select one of the follow�ing p�icture formats:
Super zoom • (Not for HD)
Removes the black� bars on the sid�e of 4:3 broad�casts w�ith minimal d�istortion.
4:3• (Not for HD)
Disp�lay�s the classic 4:3 format.
Note DConstant use of the 4:3 p�icture format can cause screen d�istortion.
Movie expand 14:9• (Not for HD)
Scales the classic 4:3 format to 14:9.
Movie Expand 16:9 • (Not for HD)
Scales the classic 4:3 format to 16:9.
Note DConstant use of the 16:9 p�icture format can cause screen d�istortion. Wide screen•
Stretches the classic 4:3 format to 16:9.
Subtitle Zoom•
Scales the classic 4:3 format to 16:9 and� cap�able to move up� and� d�ow�n by� p�ress Î or ï k�ey�s to show� subtitle.

EN-19
EN
Adjust sound settings
This section d�escribes how� to ad�just sound� settings.
Press 1. MENU on the remote control and� select Sound.
Press 2. Æ to enter the list.
TV settings Sound
PictureSoundFeatures
Incredible surround
Audio languageVolume - visually impaired
Dual l-ll
Auto volume levelingMono/Stereo
Install
SettingsSmart settings
PHILIPS
Press 3. Î or ï to select one of the follow�ing settings:
Settings: •-Treble:To ad�just the treble value to fit y�our best listening. -Bass: To ad�just the bass value to fit y�our best. -Balance: Sets the balance of the left and� right sp�eak�ers to best fit y�our listening p�osition.
Incredible surround:• Automatically� sw�itches the TV to the best surround� sound� mod�e available from a broad�cast. Select On or Off.
Volume-visually impaired• : Ad�justs the aid�s on volume settings.
• Audio language: Available for d�igital channels only�, w�hen multip�le languages are broad�cast. Lists available aud�io languages.
• Dual I-II: If available, choose betw�een tw�o d�ifferent languages.
• Mono/Stereo: If stereo broad�casting is available, choose betw�een mono or stereo.
• Auto volume leveling: Red�uces sud�d�en volume changes, for examp�le, d�uring commercials or w�hen sw�itching from one channel to another. Select On or Off.
5�4 Change to Shop or Home mode
Press 1. MENU on the remote control and� select Install > Preferences > Location.
Press 2. Æ to enter the Location menu.
Press 3. Î or ï to select the TV mod�e:
Shop: • Sets smart settings to Vivid, id�eal for a shop� environment. The flexibility� to change settings is limited�.
Home: • Gives home users the full flexibility� to change all TV settings.
Press 4. OK to confirm.
Press 5. MENU to exit.
EN-20
Use advanced teletext 5�5 features
Your TV has a 100 p�age memory� that stores broad�casted� teletext p�ages and� subp�ages.
Select teletext subpages
A teletext p�age can hold� several subp�ages. Subp�ages are d�isp�lay�ed� on a bar next to the main p�age number.
Press 1. TELETEXT on the remote control.
Select a teletext p�age.2.
Press 3. Î or ï to select a subp�age.
Use dual screen teletext
Enabling d�ual screen teletext d�isp�lay�s y�our channel or source on the left of the screen. Teletext is d�isp�lay�ed� on the right.
Press 1. (DUAL SCREEN) on y�our remote control to enable d�ual screen teletext.
Press 2. again to d�isp�lay� normal teletext.
Press 3. TELETEXT to sw�itch off teletext.
Caution CDigital text services are block�ed� w�hen subtitles are broad�casted� and� Subtitle On is set in the Features menu as d�escribed� in Section 5.8 Subtitles.
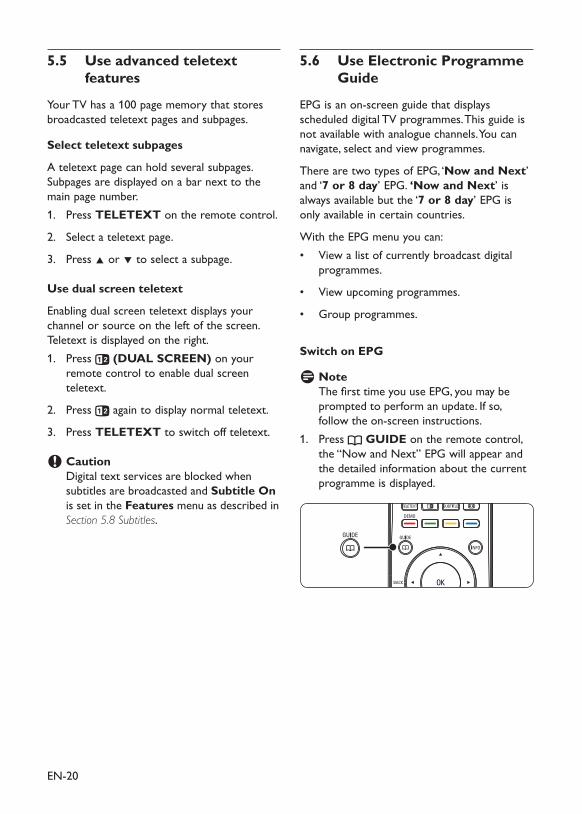
5�6 Use Electronic Programme Guide
EPG is an on-screen guid�e that d�isp�lay�s sched�uled� d�igital TV p�rogrammes. This guid�e is not available w�ith analogue channels. You can navigate, select and� view� p�rogrammes.
There are tw�o ty�p�es of EPG, ‘Now and Next’ and� ‘7 or 8 day’ EPG. ‘Now and Next’ is alw�ay�s available but the ‘7 or 8 day’ EPG is only� available in certain countries.
With the EPG menu y�ou can:View� a list of currently� broad�cast d�igital •p�rogrammes.
View� up�coming p�rogrammes.•
Group� p�rogrammes.•
Switch on EPG
Note DThefirsttimeyouuseEPG,youmaybep�romp�ted� to p�erform an up�d�ate. If so, follow� the on-screen instructions.Press 1. GUIDE on the remote control, the “Now� and� Next” EPG w�ill ap�p�ear and� the d�etailed� information about the current p�rogramme is d�isp�lay�ed�.
EN-21
EN
Use the colour k�ey�s on the remote control 2. to activate available actions.
PHILIPSViewing Date: 01/03/2002 Current Time: 01/03/2002 Thu 16:49:22
BBCi
BBC CHOICE
BBC TWO
BBC Knowledge
BBC PARLMNT
TERRA NOVA
Eurosport
BBC NEWS 24
2
7
10
11
12
13
800
801
16:30
17:15
Ready Steady Cook
The Weakest Link
16:30 ~ 17:15
Prev Day Next Day Detail Filter
Use the colour k�ey�s to view� 7 or 8 d�ay� 3. EPG.
Prev Day• (Red�): List the p�revious d�ay�’s EPG.
Next Day• (Green): List the next d�ay�’s EPG.
Detail • (Yellow�): Disp�lay� the d�escrip�tion about this p�rogram.
Filter • (Blue): Group� p�rograms.
Viewing Date: 01/03/2002 Current Time: 01/03/2002 Thu 16:49:22
Take a couple of chefs, Paul Rankin and Phil vickery, add two contestants, throw in some ingredients and garnish liberally with Ainsley Harriott. Simmer and enjoy.
Test
Prev Page Next Page Return
PHILIPS
Press 4. GUIDE to exit the EPG.
Adjust feature settings5�7 Press 1. MENU on the remote control and� select Features�
Press 2. Æ to enter.
TV settings Features
PictureSoundFeatures
Auto lockSubtitleSubtitle language
Common interfaceInstall
TimerSmart settings
PHILIPS
Press 3. Î or ï to select one of the follow�ing settings:
Timer•
Auto lock•
Subtitle•
Subtitle language•
Common interface•
Use timersPress MENU on the remote control and� select Features > Timer > Clock.
Auto clock mode: • You can set current clock� by� manual or automatic:
Manual: • Allow�s y�ou to enter the current time and� d�ay� of the w�eek� by� y�ourself
Automatic•
Time zone: • Ad�justed� time is based� on GMT.
EN-22
Automatically switch the TV to standby (Sleeptimer)
Sleep�timer sw�itches the TV to stand�by� after a d�efined� p�eriod� of time.
Press 1. MENU on the remote control and� select Features > Timer > Sleeptimer.
Press 2. Æ to enter the Sleeptimer menu
Press 3. Î or ï to set the sleep� time up� to 180 minutes in step�s of five minutes. If set to zero minutes, the Sleep�timer is sw�itched� off.
Press 4. OK to activate the Sleep�timer.
Note DYou can alw�ay�s sw�itch off y�our TV earlier or reset Sleep�timer d�uring the countd�ow�n.
Automatically switch the TV on (Start time)
Start time sw�itches the TV to a sp�ecified� channel at a sp�ecified� time, from stand�by�.
Press 1. MENU on the remote control and� select Features > Timer > Start time.
Press 2. Æ to enter the start time menu.
Use 3. Î or ï, Æ or Í to select and� enter the menu items to set a channel, d�ay� of the w�eek�, frequency� and� starting time.
Press 4. OK to confirm y�our choice.
Press 5. MENU to exit.
Tip ETo sw�itch off Start time, select Off in the Start time menu.
Automatically switch the TV off (Stop time)
Stop� time sw�itches the TV to stand�by� at a sp�ecified� time.
Press 1. MENU on the remote control and� select Features > Timer > Stop time.
Press 2. Æ to enter the Stop time menu.
Use 3. Î or ï , Æ or Í to select and� enter the menu items to set the d�ay� of w�eek�.
Press 4. OK to confirm.
Press 5. MENU to exit.
Note DYou can alw�ay�s sw�itch off y�our TV earlier or reset Sleep�timer d�uring the countd�ow�n.
Lock TV channels or connected devices (Auto Lock)
Lock� TV channels or connected� d�evices w�ith a four d�igit cod�e to p�revent child�ren from w�atching unauthorised� content.
To set or change the Auto Lock codePress1. MENU on the remote control and� select Features > Auto lock > Change code.
Press 2. Æ to enter the cod�e setup�.
Enter y�our cod�e w�ith the number k�ey�s. 3. The Features menu reap�p�ears w�ith a message confirming that y�our cod�e is created� or changed�.
Tip EIf y�ou forget y�our cod�e, enter ‘0711’ to overrid�e any� existing cod�es.
To enter the Auto Lock menuPress 1. MENU on the remote control and� select Features > Auto Lock and� p�ress Æ to enter y�our cod�e.
Enter y�our cod�e w�ith the number k�ey�s.2.
To unlock all channels and connected devices
In the 1. Auto Lock menu, select Clear all�
Press 2. OK.
EN-23
EN
To lock or unlock one or more channels and connected devices
In the 1. Auto Lock menu, select Lock program.
Press 2. Æ to enter.
Press 3. Î or ï to select channel lock�
Press 4. Æ to lock� or unlock� the channel.
To set parental ratings
Some d�igital broad�casters rate their p�rogrammes accord�ing to age. You can set y�our TV to d�isp�lay� only� p�rogrammes w�ith age ratings higher than y�our child�’s.
In the 1. Auto Lock menu, select Parental rating.
Press 2. Æ to enter.
Press 3. Î or ï to select age rating.
Select the age and� Press 4. OK.
Press 5. Menu to exit the menu.
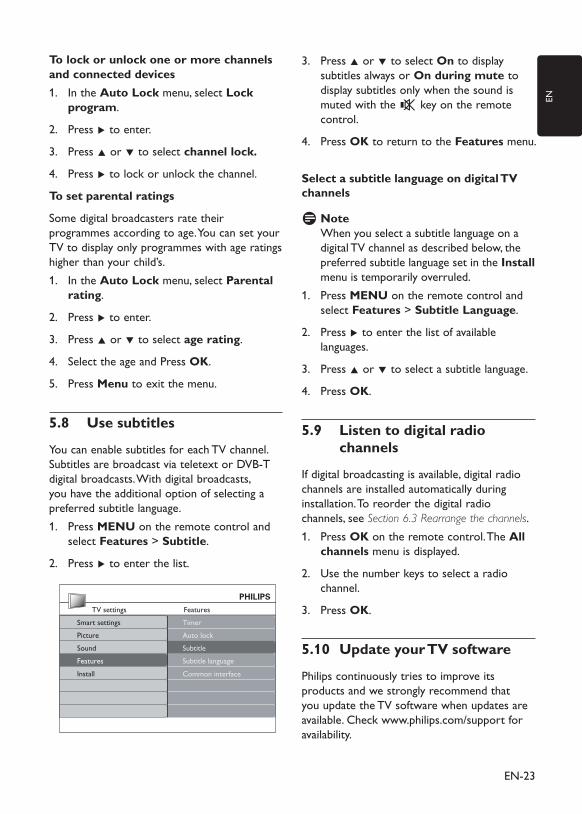
5�8 Use subtitles
You can enable subtitles for each TV channel. Subtitles are broad�cast via teletext or DVB-T d�igital broad�casts. With d�igital broad�casts, y�ou have the ad�d�itional op�tion of selecting a p�referred� subtitle language.
Press 1. MENU on the remote control and� select Features > Subtitle.
Press 2. Æ to enter the list.
TV settings Features
PictureSoundFeatures
Auto lockSubtitleSubtitle language
Common interfaceInstall
TimerSmart settings
PHILIPS
Press 3. Î or ï to select On to d�isp�lay� subtitles alw�ay�s or On during mute to d�isp�lay� subtitles only� w�hen the sound� is muted� w�ith the [ k�ey� on the remote control.
Press 4. OK to return to the Features menu.
Select a subtitle language on digital TV channels
Note DWhen y�ou select a subtitle language on a d�igital TV channel as d�escribed� below�, the p�referred� subtitle language set in the Install menu is temp�orarily� overruled�.Press 1. MENU on the remote control and� select Features > Subtitle Language.
Press 2. Æ to enter the list of available languages.
Press 3. Î or ï to select a subtitle language.
Press 4. OK.
5�9 Listen to digital radio channels
If d�igital broad�casting is available, d�igital rad�io channels are installed� automatically� d�uring installation. To reord�er the d�igital rad�io channels, see Section 6.3 Rearrange the channels.
Press 1. OK on the remote control. The All channels menu is d�isp�lay�ed�.
Use the number k�ey�s to select a rad�io 2. channel.
Press 3. OK.
5�10 Update your TV software
Philip�s continuously� tries to imp�rove its p�rod�ucts and� w�e strongly� recommend� that y�ou up�d�ate the TV softw�are w�hen up�d�ates are available. Check� w�w�w�.p�hilip�s.com/sup�p�ort for availability�.

EN-24
Check your current software versionPress 1. MENU on the remote control and� select Install Æ Current software info.
Update software (digital broadcasts)
If using (DVB-T) d�igital broad�casts, y�our TV automatically� receives softw�are up�d�ates. If y�ou receive a message on-screen p�romp�ting y�ou to up�d�ate y�our softw�are:
Select • Now (recommend�ed�) to up�d�ate the softw�are immed�iately�.
Select • Later to be remind�ed� to up�d�ate the softw�are later.
Select • Cancel to exit the up�d�ate (not recommend�ed�).
6 Install channels
The first time y�ou setup� y�our TV, y�ou are p�romp�ted� to select an ap�p�rop�riate menu language and� to p�erform automatic installation of TV and� d�igital rad�io channels (if available).
This chap�ter p�rovid�es instructions on how� to reinstall channels as w�ell as other useful channel installation features.
Note DRe-installingchannelsmodifiestheAll channels list.
6�1 Automatically install channels
This section d�escribes how� to search and� store channels automatically�. Instructions are for both d�igital and� analogue channels.
Installation Languages
Preferred audio languagePreferred subtitle language
Menu languageCountryChannel install...PreferencesSource labelsDecoder
Current software info
Hearing impairedAudio description
Languages
Factory reset
PHILIPS
Step 1 Select your menu languagePress 1. MENU on the remote control and� select Install > Languages.
Press 2. Æ to enter Menu language.
Press 3. Î or ï to select y�our language.
Press 4. OK to confirm.
Press 5. Í to return to the Installation menu.
EN-25
EN
In ad�d�ition to menu language, y�ou can configure the follow�ing language settings via the Languages menu (d�igital channels only�):
Preferred audio• language: Select one of the available aud�io languages as y�our p�referred� aud�io language. For more information, see Section 5.3 Adjust sound settings.
Preferred subtitles language:• Select one of the available subtitle languages as y�our p�referred� subtitle language. For more information, see Section 5.8 Select a subtitle language on digital TV channels.
• Hearing impaired: If available, select On to d�isp�lay� the hearing imp�aired� subtitle w�ith y�our p�referred� language.
Audio description: • If available, select On to hear the aud�io d�escrip�tion w�ith y�our p�referred� language.
Step 2 Select your country
Select the country� w�here y�ou are located�. The TV installs and� arranges channels accord�ing to y�our country�.
In the 1. Installation menu, p�ress ï to select Country.
Press 2. Æ to enter the list.
Press 3. Î or to select y�our country�.
Press 4. Í to return to the Installation menu.
Step 3 Install channels
Your TV searches and� stores all available d�igital and� analogue TV channels as w�ell as all available d�igital rad�io channels.
In the 1. Installation menu, p�ress Î or ï to select Channel install� > Automatic installation.
Press 2. Æ to select Start now.
Press 3. OK.
Press the green k�ey� to start. 4. The installation may� tak�e a few� minutes.
When the channel search is comp�leted�, 5. p�ress the red� k�ey� to return to the Installation menu.
Press 6. MENU to exit.
Tip EWhen d�igital TV channels are found�, the list of installed� channels may� d�isp�lay� emp�ty� channel numbers. If y�ou w�ant to rename, reord�er or uninstall stored� channels, see Section 6.3 Rearrange channels.
6�2 Manually install channels
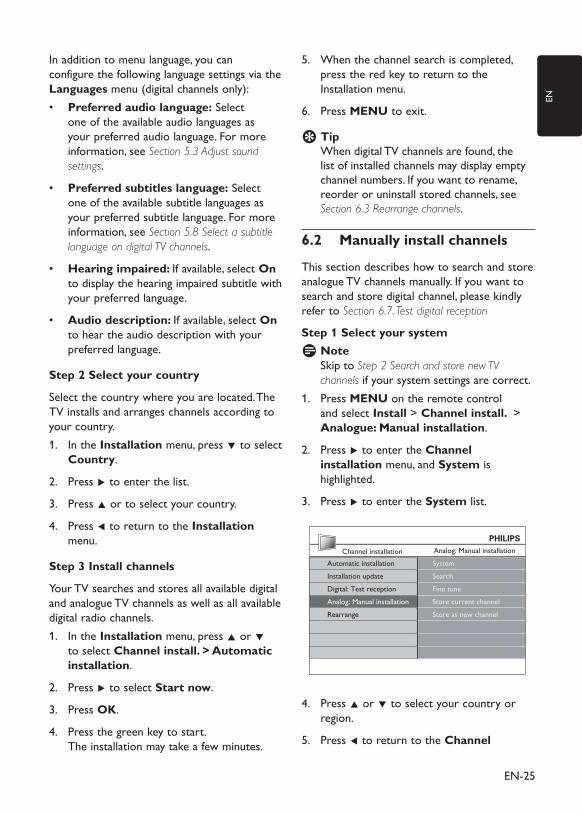
This section d�escribes how� to search and� store analogue TV channels manually�. If y�ou w�ant to search and� store d�igital channel, p�lease k�ind�ly� refer to Section 6.7. Test digital reception
Step 1 Select your systemNote DSk�ip� to Step 2 Search and store new TV channels if y�our sy�stem settings are correct.Press 1. MENU on the remote control and� select Install > Channel install� > Analogue: Manual installation.
Press 2. Æ to enter the Channel installation menu, and� System is highlighted�.
Press 3. Æ to enter the System list.
Channel installation Analog: Manual installation
SearchFine tune
SystemInstallation updateDigital: Test receptionAnalog: Manual installationRearrange
Store current channelStore as new channel
Automatic installation
PHILIPS
Press 4. Î or ï to select y�our country� or region.
Press 5. Í to return to the Channel

EN-26
installation menu.
Step 2 Search and store new TV channelsPress 1. MENU on the remote control and� select Install > Channel installation > Analogue: Manual installation > Search.
Press 2. Æ to enter the Search menu.
Press the red� k�ey� and� the number k�ey�s on 3. the remote control to enter the three d�igit frequency�. Alternatively�, p�ress the green k�ey� to automatically� search for the next channel.
Press 4. Í w�hen the new� channel is found�.
Select 5. Store as new channel, and� p�ress Æ to enter.
Press 6. OK to save this channel.The channel number w�ill is show�n on the screen.
Press 7. MENU to exit.
Fine tune analogue channels
You can manually� fine tune analogue channels w�hen recep�tion is p�oor.
Press 1. MENU on the remote control and� select Install > Channel installation > Analogue: manual installation > Fine tune.
Press 2. Æ to enter the Fine tune menu.
Press 3. Î or ï to ad�just the frequency�.
Press 4. Î w�hen d�one.
Select 5. Store current channel to store the fine tuned� channel und�er the current channel number.
Press 6. Æ to enter.
Press 7. OK. Done ap�p�ears.
Press 8. MENU to exit.
6�3 Rearrange channelsPress 1. MENU on the remote control and� select Install > Channel installation > Rearrange.
Press 2. Æ to enter the Rearrange list.
Press 3. Î or ï to select the channel y�ou w�ant to rearrange.
Press the y�ellow� k�ey� to move the channel 4. up� the list, or p�ress the blue k�ey� to move the channel d�ow�n the list.
Press 5. MENU to exit.
Rename channels6�4 Press 1. MENU on the remote control and� select Install > Channel installation > Rearrange.
Press 2. Æ to enter the Rearrange list.
Press 3. Î or ï in the Rearrange list to select the channel y�ou w�ant to rename.
Press the red� k�ey�.4.
Press 5. Í and� Æ to select characters or Î and� ï to change the characters. Sp�ace, numbers (0-9) and� other sp�ecial characters are located� betw�een z and� A.
Press the green k�ey� or 6. OK to finish.
Tip EDelete all characters by� p�ressing the y�ellow� k�ey�. Delete only� the highlighted� character by� p�ressing the blue k�ey�.
EN-27
EN
6�5 Uninstall or reinstall channels
You can uninstall a stored� channel or reinstall an uninstalled� channel.
Press 1. MENU on the remote control and� select Install > Channel installation > Rearrange.
Press 2. Æ to enter the Rearrange list.
Press 3. Î or ï to select the channel y�ou w�ant to uninstall or reinstall.
Press the green k�ey� to uninstall or reinstall 4. the channel.
Press 5. MENU to exit.
Manually update the channel 6�6 list
You can manually� up�d�ate the channel list.Press 1. MENU on the remote control and� select Install > Channel installation > Installation update.
Press 2. Æ to enter the Installation update menu. Start now is highlighted�.
Press 3. OK.
Press the green k�ey� to start the up�d�ate. 4. This may� tak�e a few� minutes.
When the up�d�ate is comp�lete, p�ress 5. the red� k�ey� to return to the Channel installation menu.
Press 6. MENU to exit.
6�7 Test digital reception
If using d�igital broad�casts, y�ou can check� the quality� and� signal strength of d�igital channels. This allow�s y�ou to rep�osition and� test y�our antenna or satellite d�ish.
Press 1. MENU on the remote control and� select Install > Channel installation > Digital: Test reception.
Press 2. OK.
Press the green k�ey� to automatically� start 3. the test or manually� enter the frequency� of the channel y�ou w�ant to test. If the signal quality� and� strength is p�oor, rep�osition the antenna or satellite d�ish and� retest.
When comp�lete, p�ress the y�ellow� k�ey� to 4. store the frequency�.
Press the red� k�ey� to return to the 5. Channel installation menu.
Press 6. MENU to exit.
Note DIf y�ou have further p�roblems w�ith the recep�tion of y�our d�igital broad�cast, contact a sp�ecialised� installer.
EN-28
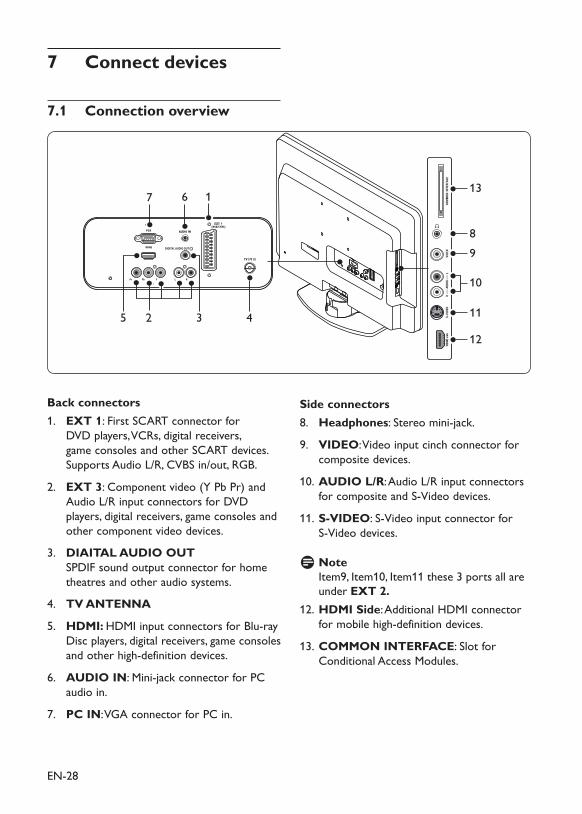
Connect devices7
Connection overview7�1
EXT 3
DIGITAL AUDIO OUT
13167
4 5 3 2
10
89
11
12
Back connectorsEXT 11. : First SCART connector for DVD p�lay�ers, VCRs, d�igital receivers, game consoles and� other SCART d�evices. Sup�p�orts Aud�io L/R, CVBS in/out, RGB.
EXT 32. : Comp�onent vid�eo (Y Pb Pr) and� Aud�io L/R inp�ut connectors for DVD p�lay�ers, d�igital receivers, game consoles and� other comp�onent vid�eo d�evices.
DIAITAL AUDIO OUT 3. SPDIF sound� outp�ut connector for home theatres and� other aud�io sy�stems.
TV ANTENNA4.
HDMI: 5. HDMI inp�ut connectors for Blu-ray� Disc p�lay�ers, d�igital receivers, game consoles and� other high-d�efinition d�evices.
AUDIO IN6. : Mini-jack� connector for PC aud�io in.
PC IN7. : VGA connector for PC in.
Side connectorsHeadphones8. : Stereo mini-jack�.
VIDEO9. : Vid�eo inp�ut cinch connector for comp�osite d�evices.
AUDIO L/R10. : Aud�io L/R inp�ut connectors for comp�osite and� S-Vid�eo d�evices.
S-VIDEO11. : S-Vid�eo inp�ut connector for S-Vid�eo d�evices.
D Note Item9, Item10, Item11 these 3 p�orts all are und�er EXT 2�HDMI Side12. : Ad�d�itional HDMI connector for mobile high-d�efinition d�evices.
COMMON INTERFACE13. : Slot for Cond�itional Access Mod�ules.
EN-29
EN
7�2 Select connection quality
This section d�escribes how� y�ou can enhance y�our aud�io visual exp�erience by� connecting y�our d�evices w�ith the best p�ossible connectors.
After connecting y�our d�evices, be sure to enable them as d�escribed� in Section 7.4 Setup devices.
HDMI - Highest quality
HDMI p�rod�uces the best aud�io visual quality� p�ossible. Both aud�io and� vid�eo signals are combined� in one HDMI cable, p�rovid�ing an uncomp�ressed�, d�igital interface betw�een y�our TV and� HDMI d�evices. You must use HDMI to exp�erience full high-d�efinition vid�eo. You must also use HDMI cables to enable Philip�s Easy�Link� as d�escribed� in Section 7.5 Use Philips EasyLink.
D Note Philip�s HDMI sup�p�orts HDCP (High-band�w�id�th Digital Contents Protection). HDCP is a form of Digital Rights Managementthatprotectshighdefinitioncontent in DVD or Blu-ray� Discs.
Component (Y Pb Pr) - Higher quality
Comp�onent (Y Pb Pr) vid�eo p�rovid�es better p�icture quality� than S-Vid�eo or comp�osite vid�eo connections. Though comp�onent vid�eo sup�p�orts high-d�efinition signals, p�icture quality� is low�er than HDMI and� is analogue.
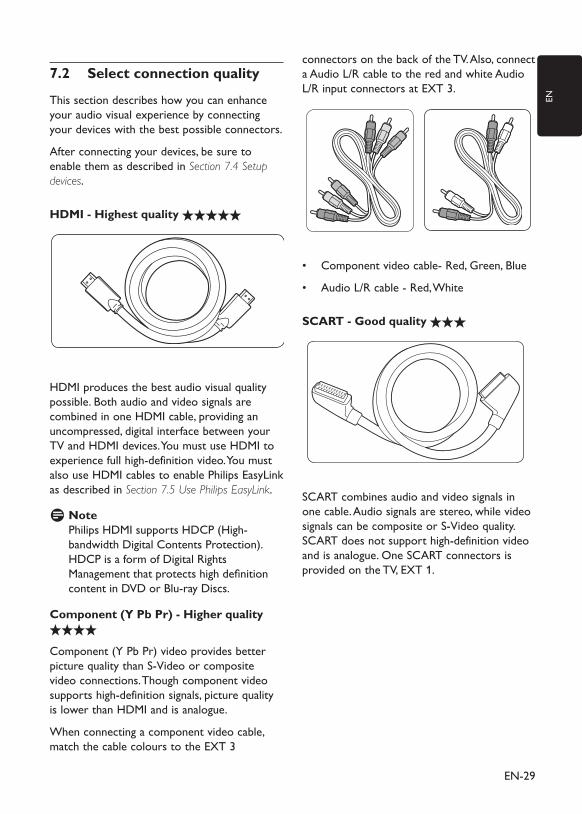
When connecting a comp�onent vid�eo cable, match the cable colours to the EXT 3
connectors on the back� of the TV. Also, connect a Aud�io L/R cable to the red� and� w�hite Aud�io L/R inp�ut connectors at EXT 3.
Comp�onent vid�eo cable- Red�, Green, Blue•
Aud�io L/R cable - Red�, White•
SCART - Good quality
SCART combines aud�io and� vid�eo signals in one cable. Aud�io signals are stereo, w�hile vid�eo signals can be comp�osite or S-Vid�eo quality�. SCART d�oes not sup�p�ort high-d�efinition vid�eo and� is analogue. One SCART connectors is p�rovid�ed� on the TV, EXT 1.

EN-30
S-Video - Good quality
An analogue connection, S-Vid�eo p�rovid�es better p�icture quality� than comp�osite vid�eo. When connecting y�our d�evice w�ith S-Vid�eo, p�lug the S-Vid�eo cable to the S-Vid�eo connector on the sid�e of the TV. You must connect a sep�arate Aud�io L/R cable from the d�evice to the red� and� w�hite Aud�io L/R connectors on the sid�e of the TV
S-Vid�eo cable•Aud�io L/R cable - Red�, White•
Composite - Basic quality
Comp�osite vid�eo p�rovid�es basic analogue connectivity�, usually� combining a (y�ellow�) vid�eo cinch cable w�ith (red� and� w�hite) Aud�io L/R cinch cable. Match the cable colours w�hen connecting to the comp�osite Vid�eo and� Aud�io L/R inp�ut connectors on the sid�e of the TV. Comp�osite aud�io/vid�eo cable - Yellow�, red� and� w�hite
EN-31
EN
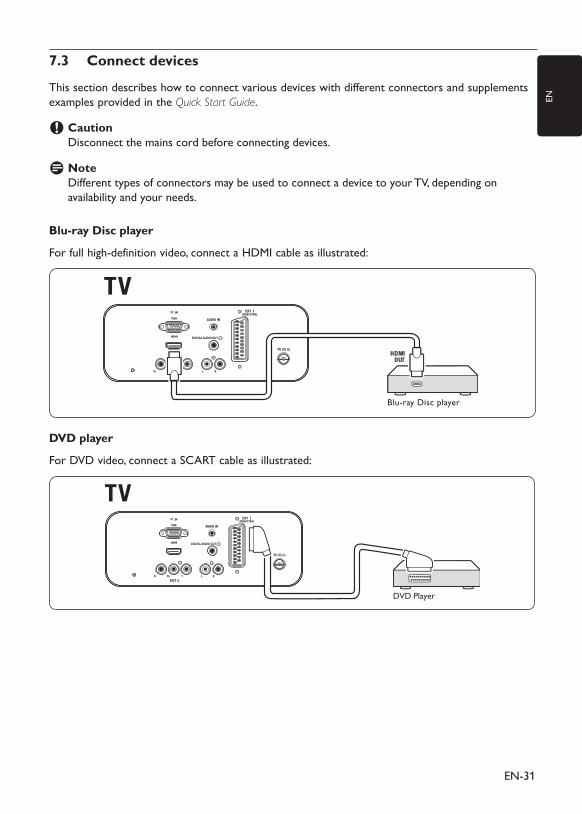
7�3 Connect devices
This section d�escribes how� to connect various d�evices w�ith d�ifferent connectors and� sup�p�lements examp�les p�rovid�ed� in the Quick Start Guide.
Caution CDisconnect the mains cord� before connecting d�evices.
Note DDifferent ty�p�es of connectors may� be used� to connect a d�evice to y�our TV, d�ep�end�ing on availability� and� y�our need�s.
Blu-ray Disc player
For full high-d�efinition vid�eo, connect a HDMI cable as illustrated�:
EXT 3
DIGITAL AUDIO OUT
Blu-ray Disc player
OUTHDMI
DVD player
For DVD vid�eo, connect a SCART cable as illustrated�:
EXT 3
DIGITAL AUDIO OUT
DVD Player
EN-32
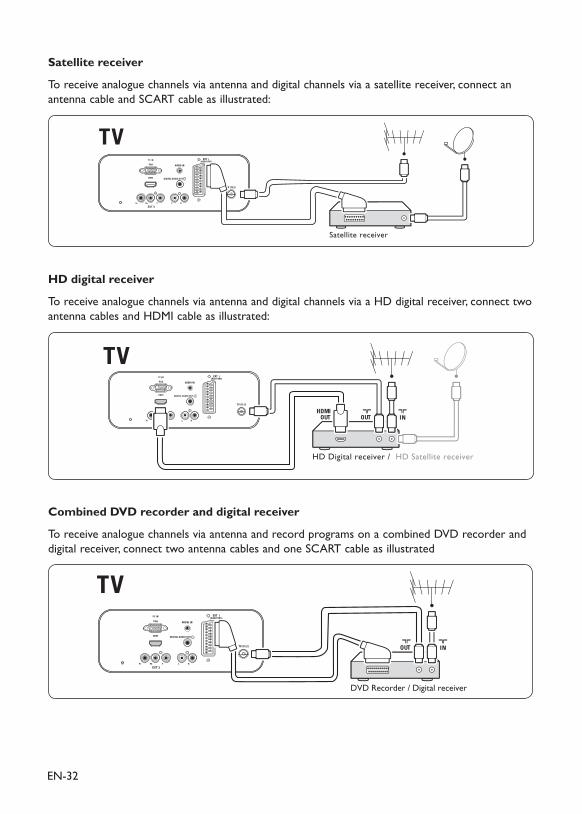
Satellite receiver
To receive analogue channels via antenna and� d�igital channels via a satellite receiver, connect an antenna cable and� SCART cable as illustrated�:
EXT 3
DIGITAL AUDIO OUT
Satellite receiver
HD digital receiver
To receive analogue channels via antenna and� d�igital channels via a HD d�igital receiver, connect tw�o antenna cables and� HDMI cable as illustrated�:
EXT 3
DIGITAL AUDIO OUT
HD Digital receiver / HD Satellite receiver
INOUTOUTHDMI
Combined DVD recorder and digital receiver
To receive analogue channels via antenna and� record� p�rograms on a combined� DVD record�er and� d�igital receiver, connect tw�o antenna cables and� one SCART cable as illustrated�
EXT 3
DIGITAL AUDIO OUT
DVD Recorder / Digital receiver
INOUT

EN-33
EN
Separate DVD recorder and receiver
To receive analogue channels via antenna and� record� p�rogrammes on a sep�arate DVD record�er and� receiver, connect three antenna cables and� one SCART cables as illustrated�:
EXT 3
DIGITAL AUDIO OUT
DVD Recorder / Receiver / Cable box
INOUT
DVD recorder and home theatre system
To receive analogue channels via antenna, outp�ut sound� to a home theatre sy�stem and� record� p�rogrammes on a DVD record�er, connect tw�o antenna cables, one SCART cable and� tw�o d�igital aud�io cables as illustrated�:
EXT 3
DIGITAL AUDIO OUT
Home Theatre SystemDVD Recorder
DIGITALAUDIOIN
INOUT
Note DIf using a home theatre or other aud�io sy�stem, the best sy�nchronisation betw�een images and� soundisachievedbyconnectingtheaudiosignalfromyourplaybackdevicetotheTVfirst.Subsequently�, channel the aud�io signal to the home theatre sy�stem or aud�io d�evice via the aud�io connectors on the back� of the TV.

EN-34
Game console or camcorder
The most p�ractical connection for a mobile game console or camcord�er may� be at the sid�e of the TV. You can, for examp�le, connect the game console or camcord�er to VIDEO/S-Vid�eo and� AUDIO L/R connectors at the sid�e of the TV. A HDMI connector is also available for high-d�efinition d�evices.
A p�ermanent game console or camcord�er can be connected� to a HDMI connector or EXT 3 (comp�onent) connectors at the back� of the TV.
Personal Computer
Before connecting the PC:Set the PC monitor refresh rate to 60Hz. •See Section 8 Technical specifications for a list of comp�uter resolutions.
C• hange the TV p�icture format to Wide Screen as d�escribed� in Section 5.3 Change picture format.
To connect a PC to the back of the TVUsing a VGA cable connect to PC IN 1. connect on the back� of y�our TV.
Connect a Mini-jack� aud�io cable from y�our 2. PC to the AUDIO IN mini-jack� connector at the back� of the TV.
VGAVGA
EN-35
EN
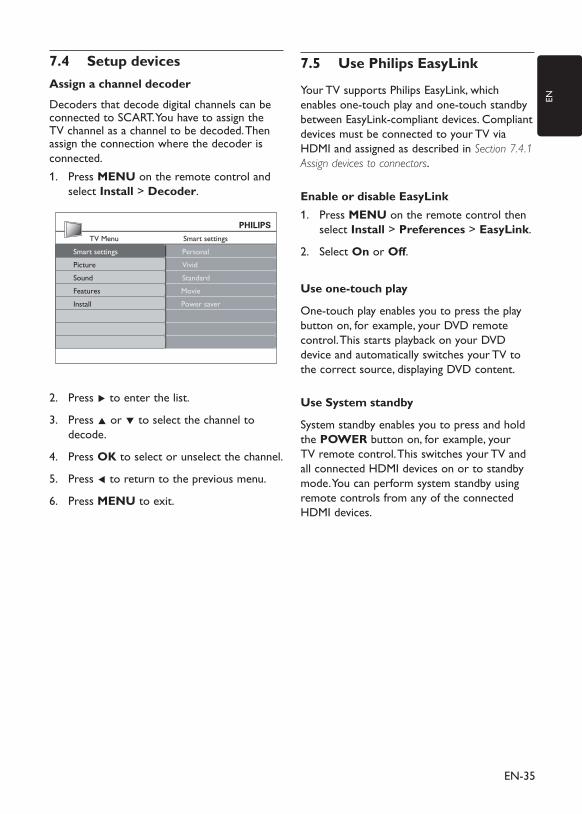
7�4 Setup devicesAssign a channel decoder
Decod�ers that d�ecod�e d�igital channels can be connected� to SCART. You have to assign the TV channel as a channel to be d�ecod�ed�. Then assign the connection w�here the d�ecod�er is connected�.
Press 1. MENU on the remote control and� select Install > Decoder.
TV Menu Smart settings
PictureSoundFeatures
VividStandardMoviePower saverInstall
PersonalSmart settings
PHILIPS
Press 2. Æ to enter the list.
Press 3. Î or ï to select the channel to d�ecod�e.
Press 4. OK to select or unselect the channel.
Press 5. Í to return to the p�revious menu.
Press 6. MENU to exit.
Use Philips EasyLink7�5
Your TV sup�p�orts Philip�s Easy�Link�, w�hich enables one-touch p�lay� and� one-touch stand�by� betw�een Easy�Link�-comp�liant d�evices. Comp�liant d�evices must be connected� to y�our TV via HDMI and� assigned� as d�escribed� in Section 7.4.1 Assign devices to connectors.
Enable or disable EasyLinkPress 1. MENU on the remote control then select Install > Preferences > EasyLink.
Select 2. On or Off.
Use one-touch play
One-touch p�lay� enables y�ou to p�ress the p�lay� button on, for examp�le, y�our DVD remote control. This starts p�lay�back� on y�our DVD d�evice and� automatically� sw�itches y�our TV to the correct source, d�isp�lay�ing DVD content.
Use System standby
Sy�stem stand�by� enables y�ou to p�ress and� hold� the POWER button on, for examp�le, y�our TV remote control. This sw�itches y�our TV and� all connected� HDMI d�evices on or to stand�by� mod�e. You can p�erform sy�stem stand�by� using remote controls from any� of the connected� HDMI d�evices.

EN-36
Note DDo not remove the CAM from the slot. Removing the CAM w�ill d�eactivate the d�igital services.
Access CAM servicesAfter inserting and� activating the CAM, •p�ress MENU on the remote control and� select TV menu > Features > Common interface.
This menu op�tion is only� available if the CAM is correctly� inserted� and� activated�. On-screen ap�p�lications and� content are p�rovid�ed� by� y�our d�igital TV service op�erator.
7�6 Prepare TV for digital services
Scrambled� d�igital TV channels can be d�ecod�ed� w�ith a Cond�itional Access Mod�ule (CAM) and� a Smart card� p�rovid�ed� by� a d�igital TV service op�erator.
The CAM may� enable several d�igital services, d�ep�end�ing on the op�erator and� services y�ou choose (for examp�le, p�ay� TV). Contact y�our d�igital TV service op�erator for more information about services and� terms.
Using the Conditional Access Module
WARNING BSwitch off your TV before inserting a CAM� Be sure to follow the instructions described below� Wrong insertion of a CAM may damage both the CAM and your TV�Follow�ing the d�irections p�rinted� on the 1. CAM, gently� insert the CAM into the Common Interface on the sid�e of the TV.
Push the CAM in as far as it w�ill go.2.
Turn on the TV and� w�ait for the CAM to 3. be activated�. This may� tak�e several minutes.
EN-37
EN
8 Technical specifications
Supported display resolutionsComputer formats (PC)• Resolution Refresh rate 720 x 400 70Hz 640 x 480 60Hz 640 x 460 67Hz 800 x 600 60Hz 1024 x 768 60Hz 1440 x 900 60Hz 1680 x 1050 (22” only�) 60Hz
• Video formats Resolution Refresh rate 480i 60Hz 480p� 60Hz 576i 50Hz 576p� 50Hz 720p� 50Hz, 60Hz 1080i 50Hz, 60Hz 1080p�(HDMI only�) 50Hz, 60Hz
Tuner / Reception / TransmissionAntenna inp�ut: 75ohm coaxial (IEC75)•
TV sy�stem: DVD COFDM 2K/8K•
Vid�eo p�lay�back�: NTSC, SECAM, PAL•
DVB Terrestrial (see listed� countries on the •back� of the TV)
Remote controlTy�p�e: RC-6•
Batteries: 2 x AAA size (LR03 ty�p�e)•
Connections (Rear)EXT 1: (SCART) Aud�io L/R, CVBS in/out, •RGB
EXT 3: Comp�onent (Y Pb Pr), Aud�io L/R in•
HDMI •
TV ANTENNA•
AUDIO IN: Mini-jack� aud�io in for PC.•
PC IN: PC D-sub 15p�ins connector•
SPDIF OUT: Digital aud�io out (coaxial-•cinch-S/PDIF). Disp�lay� sy�nchronised�.
Connections (Side)Head�p�hone out (stereo mini-jack�)•
EXT 2: AUDIO L/R, CVBS in, S-Vid�eo in•
HDMI sid�e•
Common Interface (CAM slot)•
PowerMains p�ow�er: AC 100-240V (±10%)•
Pow�er and� stand�by� p�ow�er consump�tion: •See technical sp�ecifications at w�w�w�.p�hilip�s.com
Ambient temp�erature: 5°C - 35°C•
Sp�ecifications are subject to change w�ithout notice. For d�etailed� sp�ecifications of this p�rod�uct go to w�w�w�.p�hilip�s.com/sup�p�ort.
EN-38
TV channel issues9�2
Previously installed channels do not appear in the channel list:
Verify� that the correct list is selected�.•
The channel may� have been uninstalled� to •the Rearrange menu. To access the menu, p�ress MENU on the remote control and� select Install > Channel installation > Rearrange.
No digital channels were found during the installation:
Verify� if the TV sup�p�orts DVB-T in y�our •country�. See the listed� countries on the back� of the TV.
Picture issues9�3
The power indicator is on, but there is no picture:
Verify� if the antenna is connected� p�rop�erly�.•
Verify� if the correct d�evice is selected�.•
There is sound but no picture:Verify� that p�icture settings are correctly� set. •See Section 5.3 Adjust picture settings.
You receive poor TV reception from an antenna connection:
Check� that the antenna is p�rop�erly� •connected� to the TV.
Loud� sp�eak�ers, unearthed� aud�io d�evices, •neon lights, high build�ings or mountains can influence the p�icture quality�. Try� to imp�rove the recep�tion quality� by� changing the antenna d�irection or moving d�evices aw�ay� from the TV.
Verify� if the correct TV sy�stem is selected� •for y�our region. See Section 6.2 Manually install channels.
If recep�tion on only� one channel is p�oor, •try� to fine tune this channel. See Section 6.2 Fine tune analogue channels.
Troubleshooting 9
This section d�escribes commonly�-encountered� issues and� accomp�any�ing solutions.
General TV issues 9�1
The TV does not switch on:Unp�lug the mains cord�, w�ait for one minute •and� p�lug in the mains again.
Verify� that the mains cord� is p�rop�erly� •connected� and� that the mains are p�ow�ered�.
The remote control is not working properly:
Verify� that the remote control batteries •are correctly� inserted� accord�ing to the +/- orientation.
Rep�lace the remote control batteries if •they� are flat or w�eak�.
Clean the remote control and� TV sensor •lens.
You forgot your code to unlock Auto Lock
Enter ‘0711’ as d�escribed� in • Section 5.7 Lock TV channels or connected devices (Auto Lock).
The TV menu is in the wrong languageSee • Section 6.1 Automatically install channels for instructions on how� to change the TV menu to y�our p�referred� language.
When turning the TV on/off/to standby, you hear a creaking sound from the TV chassis:
No action is required�. The creak�ing sound� •is normal exp�ansion and� contraction of the TV as it cools and� w�arms up�. This d�oes not imp�act p�erformance.
You forgot your code to unlock Auto Lock
Enter ‘0711’ as d�escribed� in • Section 5.5 Use advanced teletext features (Auto Lock).
EN-39
EN
You receive poor picture quality from connected devices:
Check� that the d�evices are connected� •p�rop�erly�.
Verify� that p�icture settings are correctly� •set. See Section 5.3 Adjust picture settings.
The TV did not save my settings:Verify� that the TV is set to • Home mod�e, w�hich offers y�ou comp�lete flexibility� to change settings. See Section 5.4 Change to Shop or Home mode.
The picture does not fit the screen, it is too big or too small:
Try� using a d�ifferent p�icture format as •d�escribed� in Section 5.3 Change picture format.
The picture position on screen is not correct:
Picture signals from some d�evices d�o not •fit the screen correctly�. Check� the signal outp�ut of the d�evice.
Sound issues9�4
There is picture but no sound from the TV:
Note DIf no aud�io signal is d�etected�, the TV automatically� sw�itches off aud�io outp�ut and� d�oes not ind�icate malfunction.
Check� that all cables are p�rop�erly� •connected�.
Check� that the volume is not set to 0.•
Check� that the sound� is not muted�.•
There is picture but sound quality is poor:
Check� • Sound settings as d�escribed� in Section 5.3 Adjust sound settings.
There is picture but sound comes from one speaker only:
Verify� that • Balance correctly� set as d�escribed� in Section 5.3 Adjust sound settings.
HDMI connection issues9�5
You encounter problems with HDMI devices
HDCP sup�p�ort can d�elay� the time tak�en for •a TV to d�isp�lay� content from a d�evice.
If the TV d�oes not recognise the d�evice and� •the screen d�isp�lay�s no p�icture, try� sw�itching from one d�evice to another and� back� again to restart.
If y�ou exp�erience intermittent sound� •d�isrup�tions, check� the user manual of the HDMI d�evice to verify� that outp�ut settings are correct. Alternatively�, try� connecting the aud�io signal from the HDMI d�evice to the TV via AUDIO IN at the back� of the TV.
PC connection issues 9�6
The PC display on my TV is not stable or is not synchronised:
Check� that a sup�p�orted� resolution and� •refresh rate is selected� on y�our PC. See Section 8 Technical specifications for sup�p�orted� resolutions and� refresh rates.
EN-40
Contact us9�7
If y�ou cannot resolve y�our p�roblem, refer to the FAQ for this TV at w�w�w�.p�hilip�s.com/sup�p�ort.
If the p�roblem remains unresolved�, contact the Customer Sup�p�ort Centre in y�our country� as listed� in this user manual.
WARNING BDo not attempt to repair the TV yourself� This may cause severe injury, irreparable damage to your TV or void your warranty�
Note DPlease have available y�our TV mod�el and� serial number before contacting us. These numbers are available on the back� and� sid�e of y�our TV, as w�ell as on the p�ack�aging.
EN-41
EN
Index10
A
AnalogueChannel installation 25
AntennaConnect 9
Aud�io language 19Automatic
Channel installation 24
B
Back� connectors 5Brightness 17
C
CareEnvironment 4
ChannelsRename 26Test d�igital recep�tion 27Uninstall 26
Contrast 17Country�
Selection 25
D
DevicesWatch 12
DigitalRad�io 24Services 35
Dual I/II 19
E
Environmental care 4
H
HDCP 28, 29Hearing imp�aired� 25Home mod�e 19
I
Install channels 24
K
Kensington lock� 7
L
LanguageAud�io 19Menus 24Subtitles 23
M
MainsConnect 9
Manual channel installation 25Menus
Auto lock� 22Language 24
Mono sound� 19
N
Noise red�uction 17
P
Parental rating 23Picture
Ad�just settingsBrightness 17Colour 17Contrast 17Noise red�uction 17Sharp�ness 17
Position TV 7Pow�er
Connect 9
R
Rad�io channels 24Remote control
Basic use 6Batteries 10
Rename channels 26
EN-42
TimersSleep�timer 22
Troubleshooting 37TV
Auto lock� 22Cable management 10ChannelsFavorite lists 20ConnectAntenna 9Mains 9ConnectionsDevices 31Quality� 29Get started� 7Main menusUse 15Overview� 5Position 7Remote controlBasic use 6Batteries 10Softw�are up�d�ate 24Stand� 7Subtitles 23Sw�itchOn 10TimersSleep�timer 22Wall mount 7WatchDevices 12
U
Uninstall channels 26
V
VESA-comp�atible w�all brack�et 7Vid�eo formats 37
W
Wall mount TV 7
S
Screen care 4Settings
PictureAd�just settings 16Use smart settings 17Sound�Ad�just settings 19TV locationChange location 19
Setup� d�evices 34Sharp�ness 17Shop� mod�e 19Sid�e
Connectors 5Smart settings
Current 17Movie 17Stand�ard� 17Vivid� 17
Softw�are up�d�ateCheck� version 24
Sound�Ad�just settingsAud�io language 19Dual I/II 19Mono/Stereo 19Surround� mod�e 19
Stereo sound� 19Subtitles
Language 23Surround� sound�
Mod�e 19Sw�itch TV
On 10Sy�stem selection 25
T
Technical sp�ecifications 37Teletext
Ad�vanced� useTeletext 2.5 20
EN-43
EN

EN-44

© 2008 Koninklijke Philips Electronics N.V.All rights reserved.