performance testing with a raspberry pi wall running java
TRANSCRIPT
CON4177 - Performance Testing with a Raspberry Pi Wall running Java
Erik WramnerCodeMint ABhttp://codemint.com

This session describes how we built a Raspberry Pi wall and used it for affordable and realistic load tests
• Background
• Alternatives
• Implementation
• Load tests
• Live demo
• Results
• Questions
Agenda…
1

Background
2

Erik Wramner has worked with Java since 1997 and has developed and tuned network applications for a long time
• Erik has been an active Java developer since 1997 and wrote
distributed network applications even earlier in C/C++
• Performance has often been a key requirement
• Cross-border stock trading gateway
• Credit card payment backend
• Telecom SS7 recorder
• Delivery chain replenishment & forecasting
• …
• Erik has worked as a performance expert internationally,
helping failing projects to get back on track
Background…
3

CodeMint is a Swedish consulting company with an edge in Java, Oracle’s technology stack and performance tuning
• Java is our platform of choice – we have built many mission-
critical applications in Java, particularly for the finance industry
• We have worked extensively with Oracle’s technology stack
• Performance tuning is often included when we build
applications – in addition we perform health checks and help
customers test and tune existing systems
Background…
4
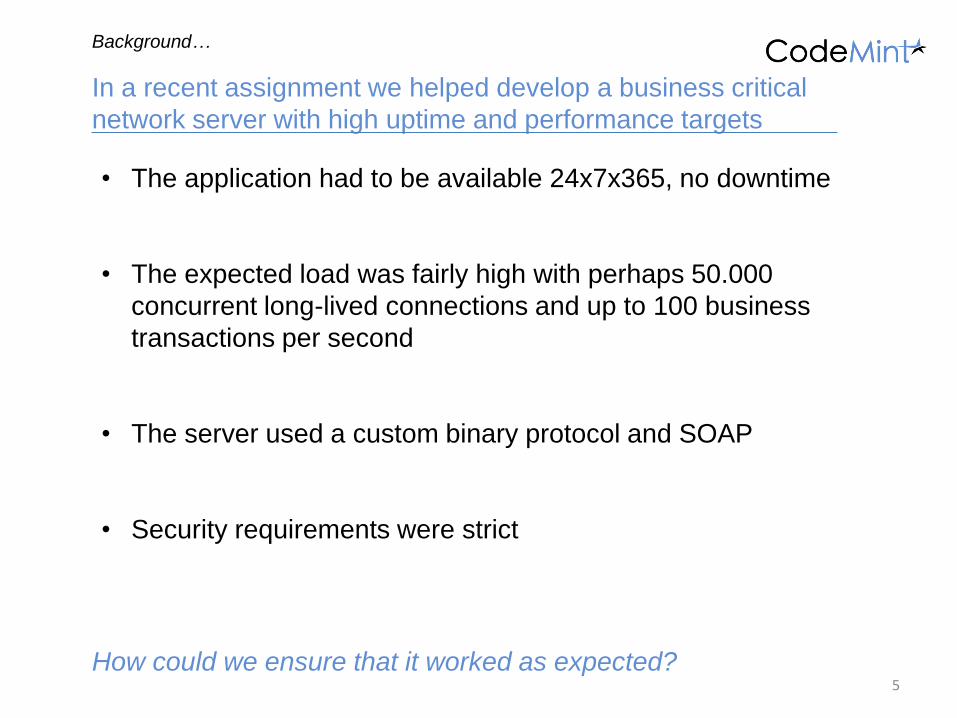
In a recent assignment we helped develop a business critical
network server with high uptime and performance targets
• The application had to be available 24x7x365, no downtime
• The expected load was fairly high with perhaps 50.000
concurrent long-lived connections and up to 100 business
transactions per second
• The server used a custom binary protocol and SOAP
• Security requirements were strict
Background…
How could we ensure that it worked as expected?5

Alternatives
6

We decided to run prolonged load tests and considered
several alternatives before settling on a “Raspberry Wall”
• Single server
• Developer workstations
• The cloud
• …and finally the Raspberry Wall
Alternatives…
7

The most common approach is probably to use a single
server1 for load tests, but that is far from ideal
• A dedicated server is expensive and hard to obtain in many
organizations, in particular when time is short
• A shared server may not have the resources necessary for
proper long-running and intensive load tests
• A single server does not generate a realistic work load
If the tests run on the application’s own server they
consume resources (skewing the results) and use the
loopback2 interface
If the tests run on another server they are still likely to use
a single network interface
Alternatives – Single Server…
8
Note 1: Usually the build server or the application’s own server or a single developer workstation.
Note 2: A simple Grinder test on Windows 7 runs more than ten times faster when the network cable is removed! This is dodgy.

Another alternative is to use several developer workstations
for distributed load tests, but again there are problems
• In some organizations the developers are not allowed to install
software on their own machines
• In many organizations the developer workstations are rebooted
regularly for automated upgrades, that would break the tests
• Developer productivity and morale will suffer if their (perhaps
already slow) machines get overloaded by tests
• Developer machines are typically heavily utilized every now
and then, it can be tricky to generate a consistent load profile
over time
Alternatives – Developer Workstations…
9

Cloud-based load tests can be a big win, but in our case they
were simply not an option
• Cloud-based load tests have many advantages in general
They are quick to setup for simple applications
They can generate realistic load from many remote sites
They come loaded with canned reports and analysis tools
They can be very cost-effective for short tests
• Unfortunately they were not an option in this case
They could not be allowed through the firewall
They are obviously expensive1 for long-running tests with
many concurrent users
They can sometimes support custom protocols, but “up
and running in five minutes” assume simple HTTP tests
Alternatives – The Cloud…
10
Note 1: We needed 40-50.000 concurrent users and wanted to run the tests repeatedly for months or at least weeks. There are many
variables. With the free load tester from webperformance.com and Amazon EC2 load generators at $1 per hour and generator and the
recommended 25 generators for 50.000 users it would cost $16.800 per month. Most vendors publish no price at this level (call for
options). For example blazemeter.com refers to the Enterprise option (no published price), but they charge $1499 per month for 30 test
hours with 40.000 users. You get the idea.
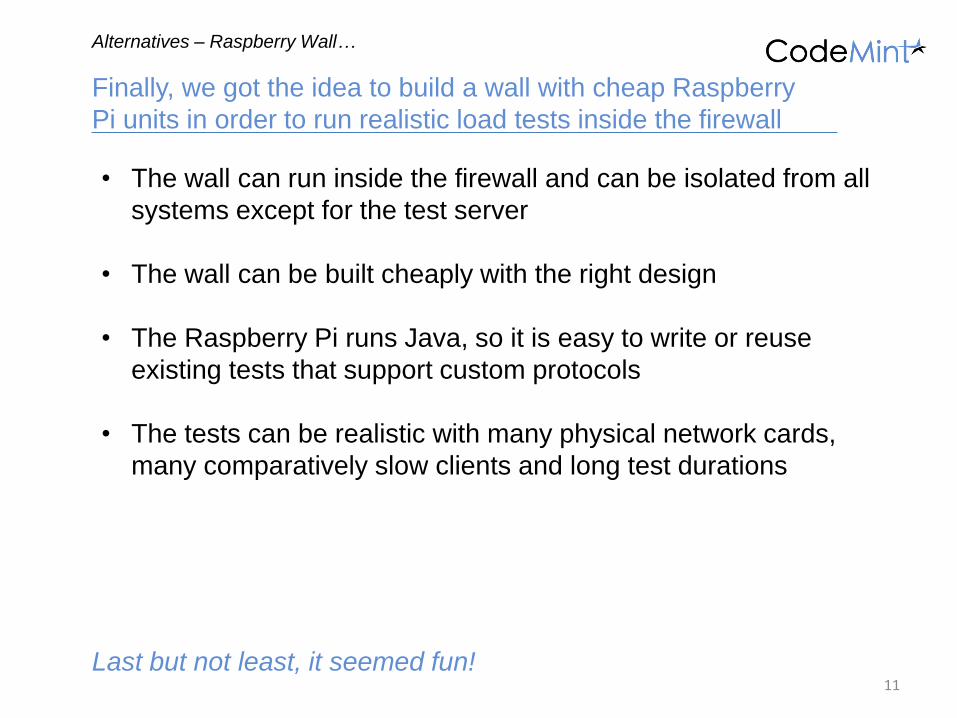
Finally, we got the idea to build a wall with cheap Raspberry
Pi units in order to run realistic load tests inside the firewall
• The wall can run inside the firewall and can be isolated from all
systems except for the test server
• The wall can be built cheaply with the right design
• The Raspberry Pi runs Java, so it is easy to write or reuse
existing tests that support custom protocols
• The tests can be realistic with many physical network cards,
many comparatively slow clients and long test durations
Alternatives – Raspberry Wall…
Last but not least, it seemed fun!11

For reference the Raspberry Pi is about as fast as a 300MHz
Pentium 2, but with much better graphics
• ARM1176JZFS 700MHz
• 512M RAM
• 10/100M Ethernet
• SD card for storage
• No real time clock
Alternatives – Raspberry Wall…
12
Source: http://www.raspberrypi.org/faqs, 2013-09-04.

Implementation
13

We came up with a cost-effective design and built a small
prototype – then we built and configured a large wall
• Design
• Construction
• Installation and configuration
• Framework support
• Cloning and individualization
Implementation…
14
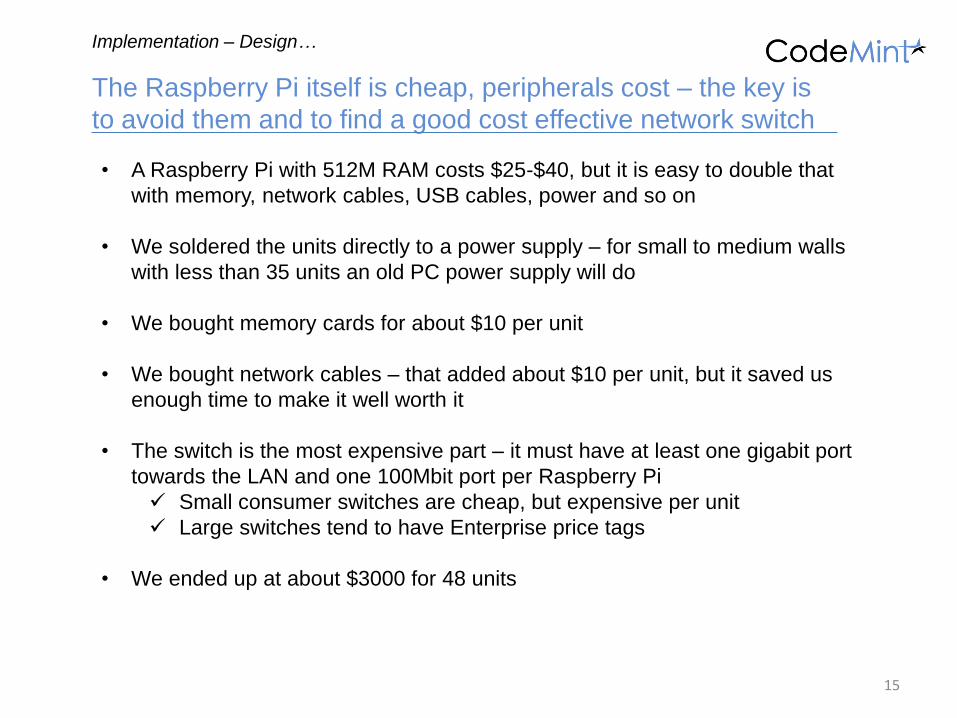
The Raspberry Pi itself is cheap, peripherals cost – the key is
to avoid them and to find a good cost effective network switch
• A Raspberry Pi with 512M RAM costs $25-$40, but it is easy to double that
with memory, network cables, USB cables, power and so on
• We soldered the units directly to a power supply – for small to medium walls
with less than 35 units an old PC power supply will do
• We bought memory cards for about $10 per unit
• We bought network cables – that added about $10 per unit, but it saved us
enough time to make it well worth it
• The switch is the most expensive part – it must have at least one gigabit port
towards the LAN and one 100Mbit port per Raspberry Pi
Small consumer switches are cheap, but expensive per unit
Large switches tend to have Enterprise price tags
• We ended up at about $3000 for 48 units
Implementation – Design…
15

Carefully consider what Java version to use – the choice is
primarily between free and fast
• Java SE 8 Embedded
(early release) supports
hard float and is the
fastest out there, but it
cannot legally be used in
production yet
• Java SE 7 Embedded is
fast, but requires soft float
and must be licensed1 for
production use
• OpenJDK is free and
supports hard float, but it
is much slower – in
particular with the default
Zero engine, Avian seems
to be the fastest choice
Implementation – Design…
TIME IN SECONDS FOR SIMPLE TEST
16
Note 1: Contact Oracle for a quote. According to http://www.oracle.com/us/corporate/pricing/price-lists/java-embedded-price-list-
1977272.pdf the cost would be $300 times the number of units times 0.002 plus a yearly support fee of 19% which is added on top of the
license the first year. That would mean $0.174 per unit. Not much, but the administration costs.
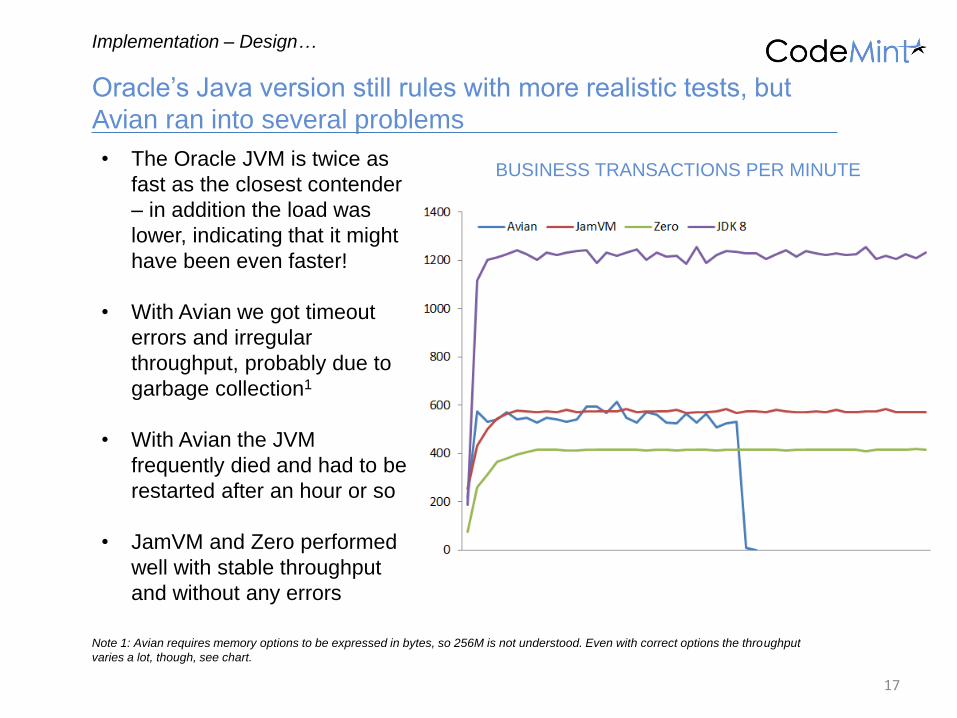
Oracle’s Java version still rules with more realistic tests, but
Avian ran into several problems
• The Oracle JVM is twice as
fast as the closest contender
– in addition the load was
lower, indicating that it might
have been even faster!
• With Avian we got timeout
errors and irregular
throughput, probably due to
garbage collection1
• With Avian the JVM
frequently died and had to be
restarted after an hour or so
• JamVM and Zero performed
well with stable throughput
and without any errors
Implementation – Design…
17
BUSINESS TRANSACTIONS PER MINUTE
Note 1: Avian requires memory options to be expressed in bytes, so 256M is not understood. Even with correct options the throughput
varies a lot, though, see chart.

Note that recent Raspberry Pi units fail to boot with the soft-
float image – fortunately there is a solution
• As of this writing Java SE 7 Embedded is still the only supported Java
version from Oracle and it works only with the old soft float image
Implementation – Design…
18
• Recent Raspberry Pi units with the Hynix1 memory chip
cannot boot with the old soft-float image (we encountered
this, some units worked and some seemed broken with the
same memory card – nasty!)
• Luckily the old kernel works if it gets past the boot sequence – if the boot
files are updated from a recent image the old image can be used
Write the soft float image to a memory card
Write the latest hard float image to another card or device and copy
bootcode.bin, start.elf and fixup.dat from the boot partition to the
boot partition for the soft-float image – copying only start.elf as some
blog posts suggest is not enough
The updated soft float image should boot and everything should
work as expected
Note 1: The black, square RAM chip in the middle of the board – if it says Hynix or Samsung the unit will probably not boot with soft float.
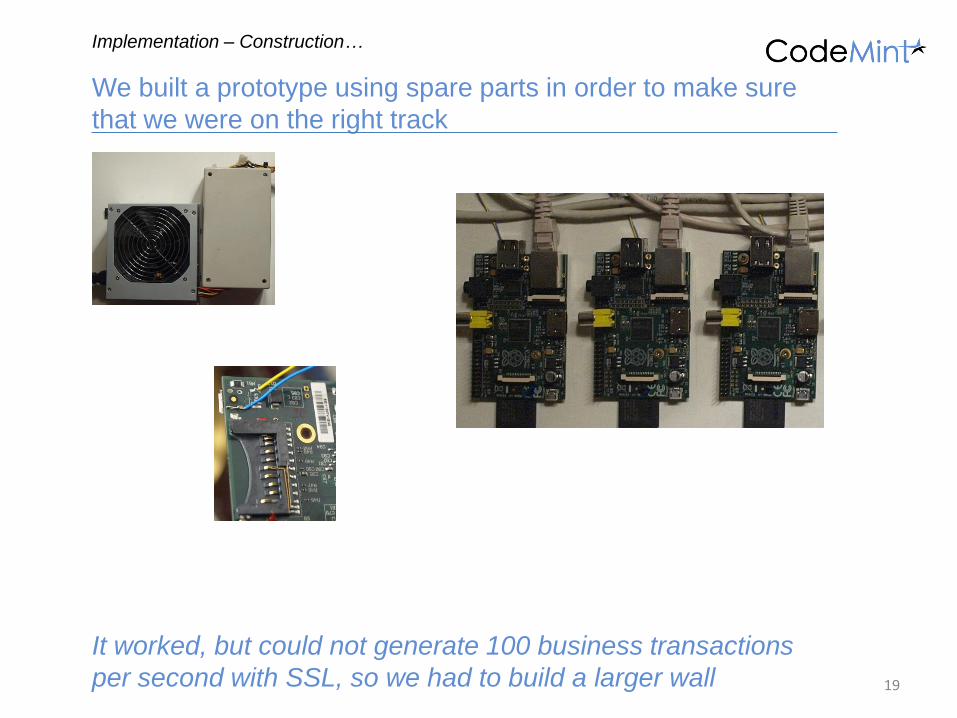
We built a prototype using spare parts in order to make sure
that we were on the right track
Implementation – Construction…
It worked, but could not generate 100 business transactions
per second with SSL, so we had to build a larger wall 19

We built the real wall with 48 Raspberry Pi units soldered to a
5V power supply using a network switch for small businesses
• The network switch has 48
100Mbit ports and two 1Gbit
ports, perfect for our
application
• The power supply has ample
margins and can easily
support 48 units
• The Raspberry Pi units are
soldered to the power supply,
no expensive USB cables
are used
Implementation – Construction…
20
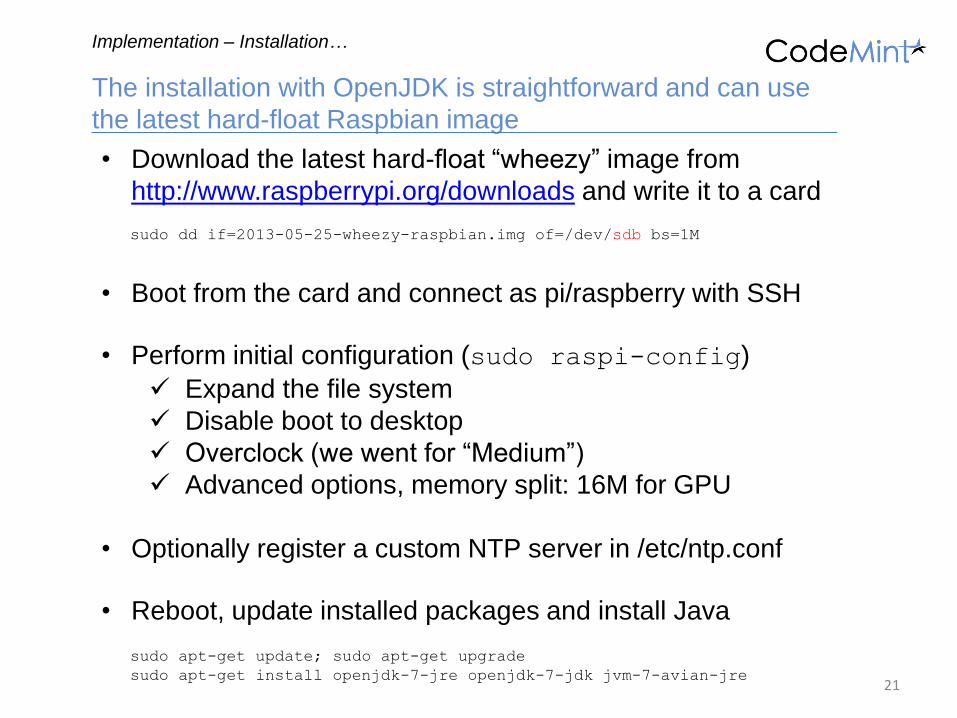
The installation with OpenJDK is straightforward and can use
the latest hard-float Raspbian image
• Download the latest hard-float “wheezy” image from
http://www.raspberrypi.org/downloads and write it to a card
sudo dd if=2013-05-25-wheezy-raspbian.img of=/dev/sdb bs=1M
• Boot from the card and connect as pi/raspberry with SSH
• Perform initial configuration (sudo raspi-config)
Expand the file system
Disable boot to desktop
Overclock (we went for “Medium”)
Advanced options, memory split: 16M for GPU
• Optionally register a custom NTP server in /etc/ntp.conf
• Reboot, update installed packages and install Java
sudo apt-get update; sudo apt-get upgrade
sudo apt-get install openjdk-7-jre openjdk-7-jdk jvm-7-avian-jre
Implementation – Installation…
21
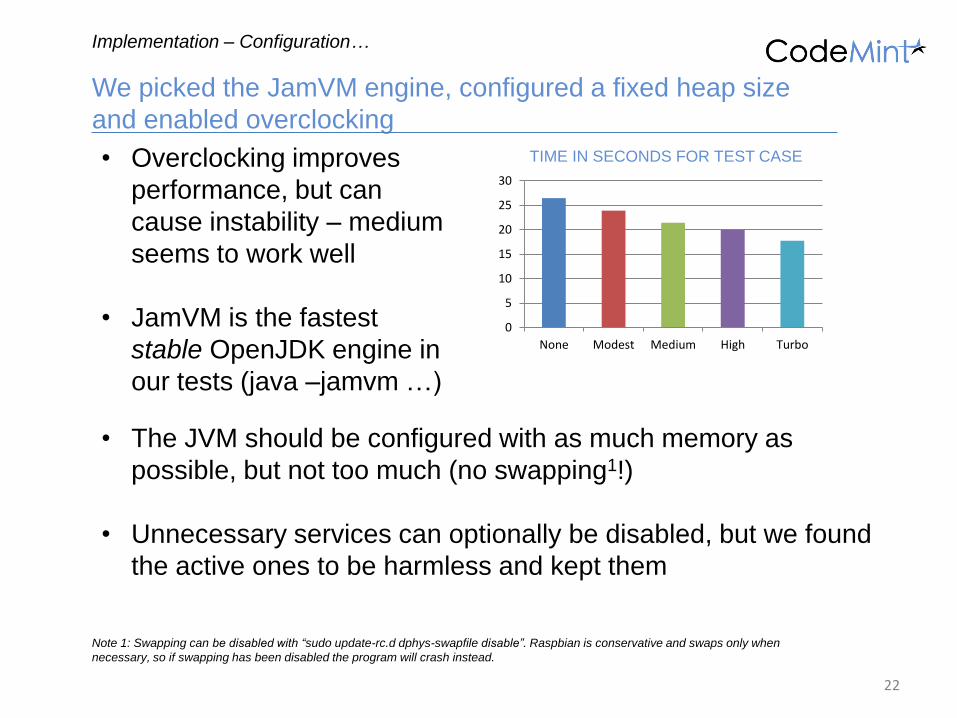
We picked the JamVM engine, configured a fixed heap size
and enabled overclocking
• Overclocking improves
performance, but can
cause instability – medium
seems to work well
• JamVM is the fastest
stable OpenJDK engine in
our tests (java –jamvm …)
Implementation – Configuration…
0
5
10
15
20
25
30
None Modest Medium High Turbo
• The JVM should be configured with as much memory as
possible, but not too much (no swapping1!)
• Unnecessary services can optionally be disabled, but we found
the active ones to be harmless and kept them
TIME IN SECONDS FOR TEST CASE
22
Note 1: Swapping can be disabled with “sudo update-rc.d dphys-swapfile disable”. Raspbian is conservative and swaps only when
necessary, so if swapping has been disabled the program will crash instead.

The Raspberry Pi probably supports your load test framework
of choice, but consider the CPU and memory limitations
• We had existing tests for The Grinder 3 (one of the leading
Java load test frameworks where tests are written in Jython)
and they worked out of the box – in general this is probably the
way to go, especially for HTTP, as it makes the tests more
portable
• The Raspberry is much slower than a PC and it has a fairly
limited amount of memory – we wrote our own tailored load
test framework in order to reduce unnecessary overhead
No Jython engine
Fewer classes, smaller footprint
Several simulated clients per thread (think times), making
it easier to translate the results into business terms and
reducing the number of context switches
Implementation – Framework Support…
23
Installation and configuration takes time – do it once, then
clone the memory card and script individualization afterwards
• Install and test everything with a single Raspberry Pi
• If you are using soft float, make sure that all Raspberry Pi units
support it or update the boot files as described earlier in this
presentation
• Create an image from the SD card
• Copy the image to all the other cards
• Start the wall and optionally apply individual settings such as
unique host names using scripted SSH
Implementation – Cloning and Individualization…
The image also serves as an excellent backup, just in case!24

Load tests
25

A load test should determine if the application meets its performance
requirements – they should be measurable and measured
• Determine targets (requirements)
• Generate load (Raspberry Wall)
• Measure
Client-side statistics
Server-side statistics
Performance monitors (jconsole, perfmon, top)
Profiling (visualvm)
• Analyze results
Load tests…
26

A test is only meaningful if it has clear success criteria
• 50.000 concurrent connections
• 100 business transactions per second
• Stable performance over time (at least one week)
• “Few” errors, preferably none
Load tests – Determine targets…
27

The wall generates requests, preferably ramping up the load
gradually in order not to kill the server
Load tests – Generate load…
28

The times for successful tests as well as any errors should be
recorded by the clients along with client side workload
Load tests – Measure…
• The load tests should measure and record connect times,
processing times and errors – some of this can be recorded on
the server as well, but only the client has the entire picture
• For complex tests the individual steps should be recorded with
processing times
• Use a performance monitor on the client side – if the client is
swamped (not that unlikely with a Raspberry) timeouts and
other errors are likely to occur – adjust the work load
accordingly!
Detailed logging is expensive, it may be wise to run one pass
with logging and one where it is disabled on the client side 29

Server-side statistics are at least as important – if possible
the server should be instrumented
Load tests – Measure…
• Total number of successful transactions
• Total number of errors
• Number of active connections
• Number of active threads
• Processing time per step for each business transaction (if
possible – this can be expensive)
These statistics can be invaluable in production30

With or without instrumentation the server performance and
the JVM internals should be measured
Load tests – Measure…
Java comes with jconsole out of the box – use it!31

It is also a good idea to use a profiler in order to find
bottlenecks in the code
Load tests – Measure…
• The visualvm profiler is included with Java SE 7 – while it is not
my personal favorite, you can’t beat the price and it is always
there when you need it
• A profiler shows where the application spends its time – don’t
optimize code that never runs
32
Note: The screenshot includes platform classes, which is unusual. With the default filters the hot spots in the application code would show
up instead. Platform hot spots may also be interesting at times, in particular when comparing JVM:s.

If the targets are met the test was successful – if not, the logs should
indicate where the bottleneck is
• Ideally the problem stands out, perhaps in the profiler
• In more complex cases the detailed logs must be analyzed –
make sure that they are in a format that can be imported into
Excel and/or a database!
• Some issues are JVM or platform specific, test the application
on several platforms if there are weird problems
• Google is your friend (well, at least in this case) – some issues
can be very hard to track down, but chances are that someone
has done it for you and blogged about it
Load tests – Analyze results…
33

Live demo
34
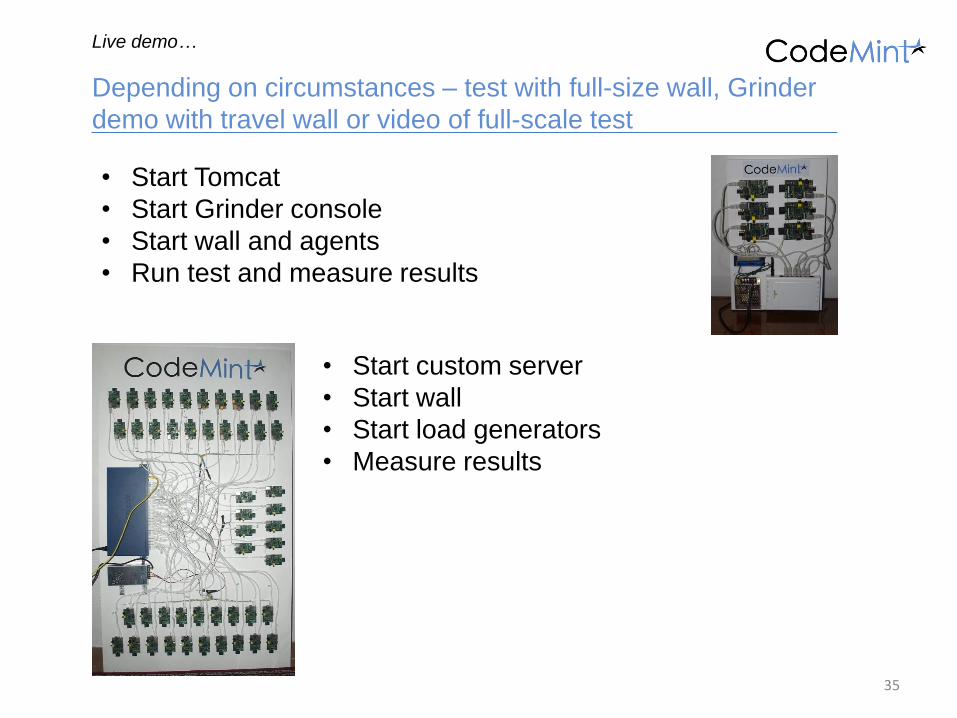
Depending on circumstances – test with full-size wall, Grinder
demo with travel wall or video of full-scale test
Live demo…
35
• Start Tomcat
• Start Grinder console
• Start wall and agents
• Run test and measure results
• Start custom server
• Start wall
• Start load generators
• Measure results

Results
36

The load tests did make a difference – we found and fixed
some issues, mostly related to JVM tuning
• Profiling found some bottlenecks in the light-weight SOAP
implementation that we could eliminate
• Profiling also told us what we didn’t need to tune – SSL
handshakes and XML parsing accounts for so much that
improvements in our code would hardly be noticeable
• Full GC pause times caused timeout errors with the original
settings – armed with that knowledge we could tune for short
pause times and pay with somewhat reduced throughput
• On some platforms performance would degrade over time – we
managed to work around that with JVM settings
Results…
37
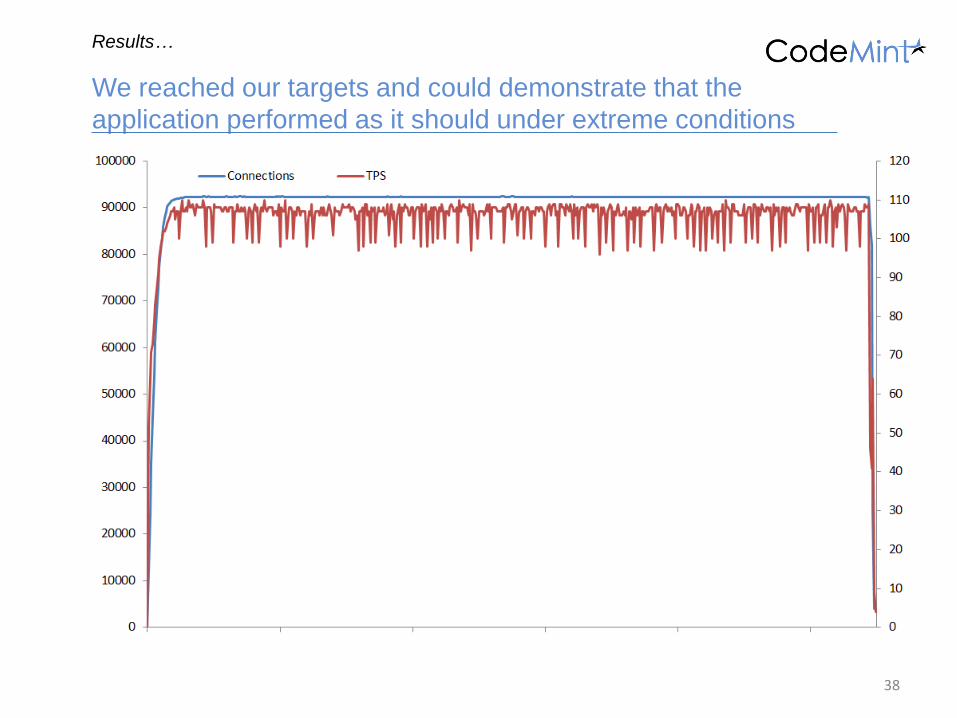
We reached our targets and could demonstrate that the
application performed as it should under extreme conditions
Results…
38

The Raspberry Wall works well as a load generator – it was
rewarding to build, and we intend to put it to good use
• There have been no real issues except for a hick-up with some
units that failed to boot with the soft float image and with the
OpenJDK Avian crashes
• The normal Java load test frameworks can be used, indeed our
existing Grinder tests worked without any changes
• The platform seems to get better all the time – updates are
released and there is a wealth of documentation on the Internet
• We do look forward to Oracle’s official Java 8 release, though –
in particular if they were to make it free…
Results…
39

Questions?
Erik WramnerCodeMint ABMässans gata 18412 51 GöteborgSwedenhttp://codemint.com