perforce 2006.2 defect tracking gateway guide
TRANSCRIPT

Perforce 2006.2Defect Tracking Gateway Guide
January 2007
This manual copyright 2006-2007 Perforce Software.
All rights reserved.
Perforce software and documentation is available from http://www.perforce.com. You may download and use Perforce programs, but you may not sell or redistribute them. You may download, print, copy, edit, and redistribute the documentation, but you may not sell it, or sell any documentation derived from it. You may not modify or attempt to reverse engineer the programs.
Perforce programs and documents are available from our Web site as is. No warranty or support is provided. Warran-ties and support, along with higher capacity servers, are sold by Perforce Software.
Perforce Software assumes no responsibility or liability for any errors or inaccuracies that may appear in this book.
By downloading and using our programs and documents you agree to these terms.
Perforce and Inter-File Branching are trademarks of Perforce Software. Perforce software includes software developed by the University of California, Berkeley and its contributors.
Mercury, Mercury QuickTest Professional, Mercury Quality Center, Mercury TestDirector, Mercury WinRunner, Mer-cury Optimization Center, Mercury Interactive and the Mercury logo are trademarks or registered trademarks of Mer-cury Interactive Corporation or its subsidiaries in the United States and/or other countries.
All other brands or product names are trademarks or registered trademarks of their respective companies or organi-zations.

Table of Contents
Preface About This Manual ....................................................... 5For More Information about Perforce..............................................................5Please Give Us Feedback ...................................................................................5
Chapter 1 Installing and Configuring the Defect Tracking Gateway.......................................................................... 7Overview .............................................................................................................7Installing the Defect Tracking Gateway ..........................................................8Adding Required Fields to the Perforce Job Specification ...........................9Configuring the Defect Tracking Gateway ...................................................10
Defining Defect Tracker Sources............................................................10Defining Perforce Server Sources ..........................................................12Mapping Data Between Perforce and Defect Trackers .......................14Mapping Fix Data ....................................................................................19
Configuring and Starting the Replication Engine .......................................20Checking for Replication Errors .....................................................................21
Index ............................................................................. 23
Perforce 2006.2 Defect Tracking Gateway Guide 3

Table of Contents
4 Perforce 2006.2 Defect Tracking Gateway Guide

Preface About This Manual
This is the Perforce 2006.2 Defect Tracking Gateway Guide. This guide tells you how to install and configure the gateway to replicate data between a Perforce server and a defect tracker. For details about this release, refer to the defect tracking gateway release notes.
For More Information about Perforce
All of our documentation is available from our web site at http://www.perforce.com.
Please Give Us Feedback
We are interested in receiving opinions on it from our users. In particular, we’d like to hear from users who have never used Perforce before. Does this guide teach the topic well? Please let us know what you think; we can be reached at [email protected].
Perforce 2006.2 Defect Tracking Gateway Guide 5
Preface: About This Manual
6 Perforce 2006.2 Defect Tracking Gateway Guide

Chapter 1 Installing and Configuring the Defect Tracking Gateway
Overview
Perforce Servers include a basic issue-tracking feature called jobs. Jobs can be associated with changelists, so that, for example, when you check in the files that fix a bug or implement a new feature, the associated job is closed.
The Perforce Defect Tracking Gateway enables you to integrate Perforce jobs with external defect trackers, so that changes to the status of defect tracker issues are replicated in Perforce jobs and vice versa. For example, when a programmer checks code into Perforce, thereby fixing a job, the fix information can be propagated to your defect tracker, to notify QA engineers that the fix is ready for testing. The gateway enables you to specify how data is propagated between the two systems and provides a program that replicates data according to your specification.
The following diagram provides an overview of the gateway components and shows how data is transferred.
The data stored for each job is defined by the Perforce job specification, which can be modified by a user with administrative privileges. For details about modifying the job specification, refer to the Perforce System Administrator’s Guide.
By default, Perforce does not maintain a history of changes to jobs. However, you can create a spec depot in which all changes to Perforce specifications are archived. For details about spec depots, refer to the Perforce System Administrator’s Guide.
DefectTrackingSource
PerforceServer
Defect TrackerPlug-In (DLL)
DefectTrackingGateway
Replication Engine
Perforce Client Software(P4V, p4, etc.)
Defect Tracking Software(Mercury, Bugzilla, etc.)
DTG Control Panel
PerforceJobs
DefectTracker
Data
FieldMappings
Perforce 2006.2 Defect Tracking Gateway Guide 7

Chapter 1: Installing and Configuring the Defect Tracking Gateway
For each type of defect tracker (for example, Mercury), a plug-in is required. The plug-in controls which defect tracker data is made available to the gateway. To propagate data between Perforce and defect trackers, you map Perforce job fields to defect tracker fields and specify how they are propagated.
To integrate your defect tracker with Perforce you must:
1. Install the gateway
2. Add required fields to the Perforce job specification
3. Configure the gateway
4. Start the replication engine
The following sections describe these tasks in detail.
Installing the Defect Tracking Gateway
To install the Defect Tracking Gateway, download the zip file from the Perforce web site and extract the files that it contains. The archive file contains the following files and folders:
To replicate with the Mercury defect tracker, you must install the Mercury Quality Center connectivity add-in. To install the Mercury Quality Center connectivity add-in:
1. Launch Internet Explorer.
2. Go to the start page of your Mercury Quality Center installation.
3. Click Add-Ins Page. The Add-Ins page is displayed.
4. Click Mercury Quality Center Connectivity. The Add-Ins page is displayed.
5. Click Download Add-in, and download and save TDConnect.exe.
6. Run TDConnect.exe.
Directory Contents
p4dtg/ Executables for the replication engine, configuration control panel, test tool, and any required libraries
p4dtg/config XML files containing field mappings, source definitions and replication settings
p4dtg/help Online help for configuration control panel
p4dtg/repl Status and error logs for the replication engine
8 Perforce 2006.2 Defect Tracking Gateway Guide

Chapter 1: Installing and Configuring the Defect Tracking Gateway
Adding Required Fields to the Perforce Job Specification
To edit the Perforce job specification, you must have Perforce admin privilege. To add the required fields:
1. At the command line, issue the p4 jobspec command. Perforce launches a text editor displaying the job specification.
2. Add the following fields (nnn indicates field numbers, which depend on what’s already defined in your job specification. For details, refer to the description of the p4 jobspec command in the Perforce Command Reference.)
nnn DTG_FIXES text 0 optional
nnn DTG_DTISSUE word 32 optional
nnn DTG_ERROR text 0 optional
3. If not already defined, add a date field that stores the date when the job was last modified and a word field that contains the name of the user who last modified the job. For example:
nnn ModDate date 20 always
nnn ModBy word 32 always
(The preceding field names are examples. You can assign any valid field name when you edit the job specification.)
4. Define the default value for the preceding fields as follows:ModDate $now
ModBy $user
5. Exit the editor, saving your changes.
The attributes you assign to fields in the Perforce job specification determine how the fields can be replicated in the defect tracker, as follows:
Job Specification Attribute Valid Replication Methods
always Copy to defect tracker
once Copy to defect tracker
optional Copy to defect tracker or
Mirror in defect tracker
required Copy to defect tracker or
Mirror in defect tracker
Perforce 2006.2 Defect Tracking Gateway Guide 9

Chapter 1: Installing and Configuring the Defect Tracking Gateway
Configuring the Defect Tracking Gateway
To specify how data is replicated between Perforce and the defect tracker, you use the DTG configuration control panel. To launch the configuration control panel, double-click p4dtg-config.exe. To configure replication, perform the following steps:
1. Define defect tracking sources (see “Defining Defect Tracker Sources” on page 10)
2. Define Perforce server sources (see “Defining Perforce Server Sources” on page 12)
3. Map job fields to defect fields (“Mapping Data Between Perforce and Defect Trackers” on page 14), optionally including replication of fixes (see “Mapping Fix Data” on page 19)
Defining Defect Tracker Sources
For defect trackers, the connection information depends on the requirements of the defect tracker server. For Mercury, the connection information is specified using the syntax host:port. In addition to specifying the connection information, some defect trackers (such as Mercury Quality Center) require you to specify the project to which you are mapping Perforce jobs.
Note The data you enter, change, or delete using the DTG configuration control panel is stored (to configuration files on disk) when you click Apply or OK on one of the main tabs. Clicking OK on the data entry dialogs stores your entries temporarily, but they are not stored permanently until you click Apply or OK on one of the main tabs.
10 Perforce 2006.2 Defect Tracking Gateway Guide

Chapter 1: Installing and Configuring the Defect Tracking Gateway
To add a defect tracking source:
1. Click New. The Add Defect Tracking Source dialog is displayed, as shown in the following figure.
2. Enter the required information as follows:
Field Description
Name An alias for the source and its associated information. Specify the defect tracker type by choosing the type from the drop-down list (if you have installed plug-ins for multiple defect trackers).
Server The information required by the defect tracker for client connections. The format is determined by the defect tracker. For Mercury Quality Center, specify host:port.
User name The user name to be used to connect to the defect tracking server.
Password The password for the specified user, if required.
Reference Fields The fields that are required to keep Perforce and the defect tracker synchronized.
Modified Date Field The date that the issue was last changed.
Modified By Field The user that last changed the issue (if supported by your defect tracker)
Perforce 2006.2 Defect Tracking Gateway Guide 11

Chapter 1: Installing and Configuring the Defect Tracking Gateway
3. Click Check connection and retrieve fields. If you have correctly specified valid values, the dialog displays a success message and the reference fields retrieved from the defect tracker.
If a connection error is displayed, correct your entries and click Check connection and retrieve fields again.
4. Choose the defect tracker project from the Project drop-down list.
5. Click OK to save your entries and dismiss the dialog.
Your newly-defined defect tracking source is now displayed in Defined Defect Tracking Sources.
To edit a defect tracking source, click the source in the Defined Defect Tracking Sources list, then click Edit. To delete a defect tracking source, click the source in the Defined Defect Tracking Sources list, then click Delete. The source is marked for deletion, as indicated in the Defined Defect Tracking Sources list. To finish deletion, click OK or Apply. To undo deletion, click the source marked for deletion, then click Undelete.
Defining Perforce Server Sources
To define Perforce Server sources, you specify the information required to connect to the server (the host machine and TCP/IP port) using the syntax host:port. The default host is localhost, and the default port is 1666.
To add a Perforce Server Source:
1. Click New. The Add Perforce Server Source dialog is displayed, as shown in the following figure.
12 Perforce 2006.2 Defect Tracking Gateway Guide

Chapter 1: Installing and Configuring the Defect Tracking Gateway
2. Enter the server connection details as follows:
3. Click Check connection and jobspec. If you have entered valid values, configuration control panel retrieves the job specification for the specified server and displays the names of the reference fields, which are the Perforce job data fields required for replication.
If a connection error is displayed, correct your entries and click Check connection and jobspec again.
If the Server status field says that the server is not configured, you must add the required fields to the Perforce job specification. For details, see “Adding Required Fields to the Perforce Job Specification” on page 9.
4. Click OK to save your entries and dismiss the dialog.
Your newly-defined Perforce server source is now displayed in Perforce server sources. Perforce server sources that have been edited and need to be saved are displayed in bold.
To edit a Perforce server source, click the source in the Perforce server sources list, then click Edit. To delete a Perforce server source, click the source in the Perforce server sources list, then click Delete. The source is displayed in bold, marked for deletion, but is not deleted until you click OK or Apply. To undo deletion, click the marked source, then click Undelete.
Field Description
Name An alias for the Perforce server and its associated connection information.
Server The name of the Perforce server host machine and the port on which it is running. Specify as host:port; for example p4host 1667. The server host defaults to localhost and the port defaults to 1666.
Admin user name The Perforce user name used by the replication engine to connect to the Perforce server.
Important: To ensure that you can distinguish jobs modified by the gateway, create a dedicated Perforce user to be used only by the gateway. The admin user name must be used only for defect replication. Do not use this user name for any other purpose.
Ensure that the user name is neither a prefix nor a suffix of any other user name. For example, if you have a user named admin-logger, do not use admin or logger as the admin user name.
Password The password for the specified user, if required.
Perforce 2006.2 Defect Tracking Gateway Guide 13

Chapter 1: Installing and Configuring the Defect Tracking Gateway
Mapping Data Between Perforce and Defect Trackers
After defining Perforce Server sources and defect tracker sources, you must specify how data is replicated between them when a job or issue is changed. In addition, you can configure the data that is transmitted to the defect tracker when a job is fixed in Perforce.
Before entering mappings, define the relationships between the data in Perforce jobs and the data stored by your defect tracker. To display the fields defined for Perforce jobs, issue the p4 jobspec command. (For details about modifying the job specification, see the Perforce System Administrators Guide.) For details about the data that is stored by your defect tracker, consult the documentation supplied by the defect tracker vendor.
Fields can be replicated in two ways:
• Copy: any change in the value is sent from the source system to the target system (one-way replication)
• Mirror: any change in the value in either system is replicated in the other system (two-way replication)
Every field has a data type, and mappings between fields must ensure that the data types are compatible, as described in the following table.
Data Type Description Valid Target Data Types
Copy Mirror
word A one-word entry word, line or text
word
line A single line of text line or text
For targets of type word, only the first word is copied.
line
text Multiple lines of text text or line
For targets of type line, only the first line is copied.
For targets of type word, only the first word is copied.
text
14 Perforce 2006.2 Defect Tracking Gateway Guide

Chapter 1: Installing and Configuring the Defect Tracking Gateway
To add a set of mappings:
1. On the Mappings tab, click New. The Add New Mapping dialog is displayed.
date A date and time date date
select A field that is assigned one of a specified set of values. The number of possible values much be identical for Perforce and the defect tracker.
select, word, line, text
For select fields, all possible values must be mapped.
select
All possible values must be mapped.
Warning! Perforce enables you to add fields to the basic job specification. Your defect tracker might also enable you to define the data that is tracked for defects. To avoid problems with replication, do not modify these definitions after you add mappings and start the replication engine.
Data Type Description Valid Target Data Types
Copy Mirror
Perforce 2006.2 Defect Tracking Gateway Guide 15

Chapter 1: Installing and Configuring the Defect Tracking Gateway
2. Enter a name for the mapping, and choose the Perforce Server source and the defect tracking source that you want to map. Click OK. The Edit Perforce-Defect Tracker Mapping dialog is displayed as shown in the following figure.
The Edit Mapping dialog contains the following fields:
• Defect tracker fields lists fields defined in the defect tracker that you can choose to replicate in Perforce jobs. Unmapped fields are displayed in bold.
• Perforce fields lists fields from the Perforce job specification that you can choose to replicate in the defect tracker. Unmapped fields are displayed in bold.
• Field mappings lists the mappings you have defined, categorized by the method and direction of replication. The mappings are displayed using a tree format, grouped by type.
These two fieldsare used for
replicatingPerforce fixinformation
16 Perforce 2006.2 Defect Tracking Gateway Guide

Chapter 1: Installing and Configuring the Defect Tracking Gateway
Read-only fields are indicated by an asterisk.
3. For each field you want to replicate, select the field and choose the method of replication, as follows:
• To replicate Perforce fields in the defect tracker, select the source field in the Perforce fields pane and click the Copy to Defect tracker or Mirror with Defect tracker button.
• To replicate defect tracker fields in Perforce, select the source field in the Defect tracker fields pane and click the Copy to Perforce or Mirror with Perforce button.
When you click a Copy or Mirror button, a list of available target fields is displayed, as shown in the following diagram.
If no valid target fields exist, the list is empty.
4. Choose the target field to which you want to map the selected source field and click OK.
Perforce 2006.2 Defect Tracking Gateway Guide 17

Chapter 1: Installing and Configuring the Defect Tracking Gateway
5. If the target field is a select field (meaning a field that can contain one of a defined set of values), the Define Select Value Mapping dialog is displayed, as shown in the following figure.
Bold type indicates unmapped fields.
6. Specify the correspondence between values in Perforce and those in the defect tracking system by selecting the Perforce value and its corresponding defect tracker value and clicking Map to. Your mappings are listed in the Current Select Value Mappings field.
All the values of the left-hand list must be mapped. You can save incomplete mappings and exit, but the replication engine cannot run until you have mapped all values. If you save incomplete mappings, the unmapped values are displayed with “(unmap)” in the Field Mappings pane, to indicate that you need to map them.
7. Click OK to save your entries and dismiss the dialog.
8. On the Gateway Mappings tab, click Apply to save your changes.
After you map select fields, the field pair is listed in the Field Mappings pane, indicated by “(map)”. To view the value mappings, place the cursor over the field pair—the mappings are displayed in a tooltip. To change the values mapped for a field, click the field in the Field Mappings pane and click Edit Value Mappings. To remove a mapping, click the mapping in the Field Mappings pane, then click Unmap.
18 Perforce 2006.2 Defect Tracking Gateway Guide

Chapter 1: Installing and Configuring the Defect Tracking Gateway
Mapping Fix Data
In Perforce, you can associate a job with a changelist. When the changelist is submitted, the job status is changed, usually to a “closed” status, to indicate that the changes being submitted fix the problem reported in the associated job.
The Defect Tracking gateway enables you to configure how data from fixes submitted in Perforce are transmitted to the defect tracker. To add fix mappings, click Fix Details in the Perforce Fields list.
To select the Perforce data that is to be transmitted to the defect tracker when a job is fixed:
1. On the Mappings tab, scroll to the bottom of the Field Mappings list and select the desired mapping under PERFORCE FIX DETAILS -> COPIED -> DEFECT TRACKER. The Select Fix Details to Map dialog is displayed, as shown in the following figure.
2. Check the fields that you want transmitted to the defect tracker, then click OK to save your changes and dismiss the dialog.
Perforce 2006.2 Defect Tracking Gateway Guide 19
Chapter 1: Installing and Configuring the Defect Tracking Gateway
Configuring and Starting the Replication Engine
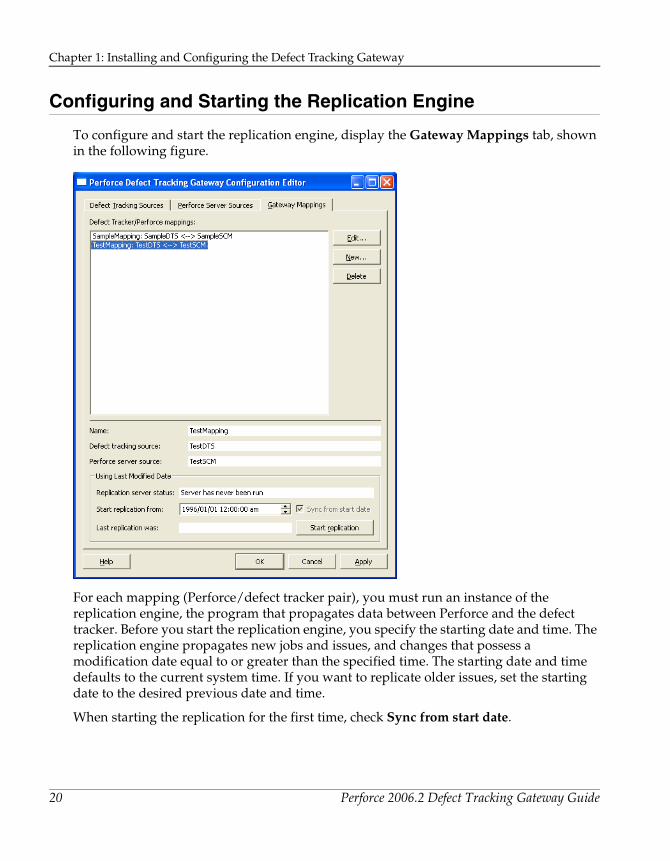
To configure and start the replication engine, display the Gateway Mappings tab, shown in the following figure.
For each mapping (Perforce/defect tracker pair), you must run an instance of the replication engine, the program that propagates data between Perforce and the defect tracker. Before you start the replication engine, you specify the starting date and time. The replication engine propagates new jobs and issues, and changes that possess a modification date equal to or greater than the specified time. The starting date and time defaults to the current system time. If you want to replicate older issues, set the starting date to the desired previous date and time.
When starting the replication for the first time, check Sync from start date.
20 Perforce 2006.2 Defect Tracking Gateway Guide
Chapter 1: Installing and Configuring the Defect Tracking Gateway
To start the replication engine:
1. Specify the start date and time.
2. If you have stopped the replication engine and changed mappings, check Sync from start date to ensure that previously replicated jobs and issues are replicated again using your new mappings.
3. Click Start replication.
Checking for Replication Errors
The replication engine logs errors and warnings in the p4dtg/repl folder. For each instance of the replication engine, one log file is created. The log file is named log-mapfile.log, where mapfile is the name of the corresponding mapping.
After you stop an instance of the replication engine, be sure to examine the log file. If you are experiencing problems, check the log file. If you delete the log file, it is recreated the next time the replication engine is started.
If an error occurs during job-defect replication, the replication engine writes an error message to the DTG_ERROR field in the Perforce job involved. Jobs containing entries in the DTG_ERROR field are not replicated. To reenable replication, you must clear the DTG_ERROR field.
To list all jobs that have entries in the DTG_ERROR field, issue the following command:p4 jobs -e "DTG_ERROR=*"
To detect replication problems on an ongoing basis, you can create a script that periodically issues the preceding command and reports any problems it detects.
If the replication engine encounters a problem that prevents it from successfully replicating data, it logs error information to a file named err-mapfile in the repl folder. The replication then exits and cannot be restarted until you resolve the problem and delete the error file.
Perforce 2006.2 Defect Tracking Gateway Guide 21

Chapter 1: Installing and Configuring the Defect Tracking Gateway
22 Perforce 2006.2 Defect Tracking Gateway Guide

Index
Cconnectivity add-in 8Ddata types for mappings 14default 12
Perforce host and port 12replication starting time and date 20values for ModDate and ModBy fields 9
diagram of gateway architecture 7Eerrors 21Ffixes
mapping 19Ggateway architecture diagram 7Jjob specification 7, 9Llog files 21Mmapping data types 14mapping fixes 19Mercury Quality Center connectivity add-in8mirroring data 14, 17modifying
job specification 7Rreplication errors 21Sselect fields 18
Perforce 2006.2 Defect Tracking Gateway Guide 23

Index
24 Perforce 2006.2 Defect Tracking Gateway Guide