pep: putting the fun in fitness yoga€¦ · 5 backbends - backbends are the poses that benefit the...
TRANSCRIPT
PEP:
Putting the Fun in Fitness
YOGA
The School District of Philadelphia
Office of Teaching and Learning
Health, Safety and Physical Education

School Reform Commission
Chairman
Robert L. Archie Jr., Esq.
Commissioners
Denise McGregor Armbrister
Amb. David F. Girard-diCarlo, (retired)
Joseph A. Dworetzky
Johnny Irizarry
The School District of Philadelphia
Superintendent
Arlene C. Ackerman, Ed.D.
Deputy Superintendent
Leroy D. Nunery III, Ed.D.
Associate Superintendent of Academics,
Curriculum and Accountability
David Weiner
Deputy of Teaching and Learning
Linda Chen
The School District of Philadelphia
The Office of Teaching and Learning 440 N. Broad Street, Suite 251
Philadelphia, PA 19130
Carol M. White, Physical Education for Progress
Cooperative Agreement # Q215F070064
1
THE SCHOOL DISTRICT OF PHILADELPHIA
OFFICE OF TEACHING AND LEARNING
DIVISION OF HEALTH, SAFETY AND PHYSICAL EDUCATION
440 NORTH BROAD STREET
PHILADELPHIA, PENNSYLVANIA 19130 Bettyann Creighton Telephone: 215.400.4210 Director FAX: 215.400.4212
Physical Education is an integral part of a school-wide, comprehensive, instructional
program, and contributes to mental alertness, academic achievement and social
development. A quality health-related fitness program, improves children’s muscular
strength, flexibility, muscular endurance, body composition and cardiovascular
endurance. Physical activity can also be an outlet for releasing tension and anxiety, and
facilitates emotional stability and resilience. Physical Education provides an opportunity
for team building, cooperation, leadership development and sportsmanship.
According to NASPE guidelines, a high quality physical education program includes the
following components:
• Opportunity to Learn, including qualified teachers and adequate resources
• Meaningful Content, including fitness education and assessment
• Appropriate Instruction, including full inclusion and well-designed lessons
The Office of Teaching and Learning, Division of Health, Safety and Physical Education
is pleased to provide you with the Yoga Unit of the Physical Education Core Curriculum.
This unit, made possible through a Department of Education, Carol M. White, Physical
Education for Progress (PEP) grant, was developed by a cadre of Philadelphia Health and
Physical Educators to meet the specific needs of our schools, teachers, students and
communities. It includes background information, guidelines for implementation,
equipment recommendations, additional resource identification, and core lessons. There
is a blank lesson plan template for you to use for additional lessons that you design.
Thank you for the outstanding job that you do. We will do everything that we can to
continue to provide professional updates, workshops and resources to support your
program.
2
Acknowledgments
The Division of Health, Safety and Physical Education would like to thank the following
individuals and organizations for their help and expertise in developing this unit.
Cardonick, Ellen
-School District of Philadelphia Health and Physical Education Teacher
-Certified Personal Trainer, Certified Group Fitness Instructor
Dan Drumm
-School District of Philadelphia Health and Physical Education Teacher
Robinson, Karin
-Communications Technology High School
Ray Rothbardt
-School District of Philadelphia Health and Physical Education Teacher
Christopher Theodore
-Meredith Elementary School

3
Table of Contents
PEP Letter..………………………………………….. 1
Acknowledgements....................................................... 2
Preface........................................................................... 4
Academic Standards 10.4.9………………………….. 7
Lessons
1. Introduction/ Seated Poses………………... 9
2. Additional Seated Poses/
Standing & Twisting..................................... 17
3. Bending and Stretching…………………… 24
4. Advanced Poses……………………………. 29
5. Advanced Poses 2………………………….. 35
Blank Lesson Template……………………………….. 41
Resources......................................................................... 42

4
Preface
Yoga is an ancient Indian body of knowledge that dates back more than 500 years. The word
"Yoga" came from the Sanskrit word "yuj" which means "to unite or integrate." Yoga then is
about the union of a person's own consciousness and the universal consciousness.
Ancient Yogis had a belief that in order for man to be in harmony with himself and his
environment, he has to integrate the body, the mind, and the spirit. For these three to be
integrated, emotion, action, and intelligence must be in balance. The Yogis formulated a way to
achieve and maintain this balance and it is done through exercise, breathing, and meditation - the
three main Yoga structures.
In Yoga, the body is treated with care and respect for it is the primary instrument in man's work
and growth. Yoga Exercises improve circulation, stimulate the abdominal organs, and put
pressure on the glandular system of the body, which can generally result in better health.
Breathing techniques were developed based on the concept that breath is the source of life. In
Yoga, students gain breathing control as they slowly increase their breathing. By focusing on
their breathing, they prepare their minds for the next step - meditation.
There is a general misconception that in meditation, your mind has to go blank. It doesn't have to
be so. In meditation, students bring the activities of the mind into focus resulting in a 'quiet'
mind. By designing physical poses and breathing techniques that develop awareness of our body,
Yoga helps us focus and relieves us from our everyday stress.
A Basic Yoga Session
A basic yoga session need not take too long. A basic session usually follows this order:
▪ Warm-up Exercises - conditions your body for safe transition into poses. For beginners, you
may just use the warm-up poses as your entire practice. Warm-up exercises open the
shoulder muscles, the spine, the hips, the lower back, and the groin.
▪ Standing Poses - for alignment of the feet and the body. Opens the hips, stretches the legs,
adds strength to your back and increases your range of movement. Standing poses
facilitate digestion, blood circulation and are good for those who want to lose weight.
▪ Sitting Poses - sitting poses allow you to infuse with the breath, and to revitalize from a pose
by giving you a calm and quiet feeling. These poses greatly contribute in shaping your
buttocks and legs, and in adding vitality and suppleness to the spine.
▪ Twists - twist exercises release the tension in your spine, relieve backaches and make your
shoulders more flexible. They also facilitate in the circulation of blood and nutrients in
the body making it necessary for the health of the inter-vertebral discs.
▪ Supine and Prone Poses - these poses release tension in your abdomen and increase the
mobility of your spine. They restore strength in your back, arms and legs, and release
your hips and groin.
▪ Inverted and Balance Poses - inverted and balance poses defy gravity and develop
coordination, increase stamina and strength, and improve grace, agility and poise. They
also improve your concentration and focus since being quiet is necessary to be able to do
these poses.

5
▪ Backbends - backbends are the poses that benefit the adrenal glands and the kidneys. They
also release tension in the front body and in your shoulders and pelvic girdle, and
improve the flexibility of your spine.
Finishing Poses - these are the cooling-down exercises for Yoga.
Benefits of Yoga
Physiological
▪ Balances the sympathetic and
parasympathetic nervous systems
▪ Pulse rate decreases
▪ Respiratory rate decreases
▪ Blood Pressure decreases
▪ Cardiovascular efficiency increases
▪ Respiratory efficiency increases
▪ Gastrointestinal function normalizes
▪ Endocrine function normalizes
▪ Excretory functions improve
▪ Musculoskeletal flexibility and joint range
of motion increase
▪ Breath-holding time increases
▪ Joint range of motion increases
▪ Grip strength increases
▪ Eye-hand coordination improves
▪ Dexterity skills improve
▪ Reaction time improves
▪ Posture improves
▪ Strength and resiliency increase
▪ Endurance increases
▪ Energy level increases
▪ Weight normalizes
▪ Sleep improves
▪ Immunity increases
▪ Pain decreases
▪ Steadiness improves
▪ Depth perception improves
▪ Balance improves
▪ Integrated functioning of body parts
improves
Psychological ▪ Somatic and kinesthetic awareness increase
▪ Mood improves and subjective well-being
increases
▪ Self-acceptance and self-actualization
increase
▪ Social adjustment increases
▪ Anxiety and Depression decrease
▪ Hostility decreases
▪ Concentration improves
▪ Memory improves
▪ Attention improves
▪ Learning efficiency improves
▪ Mood improves
▪ Self-actualization increases
▪ Social skills increase
▪ Well-being increases
▪ Somatic and kinesthetic awareness increase
▪ Self-acceptance increases
▪ Attention improves
▪ Concentration improves
▪ Memory improves
▪ Learning efficiency improves
▪ Depth perception improves
Biochemical ▪ Glucose decreases
▪ Sodium decreases
▪ Total cholesterol decreases
▪ Triglycerides decrease
▪ HDL cholesterol increases
▪ LDL cholesterol decreases
▪ Hemoglobin increases
▪ Total white blood cell count decreases
▪ Thyroxin increases
▪ Vitamin C increases
▪ Total serum protein increases
6
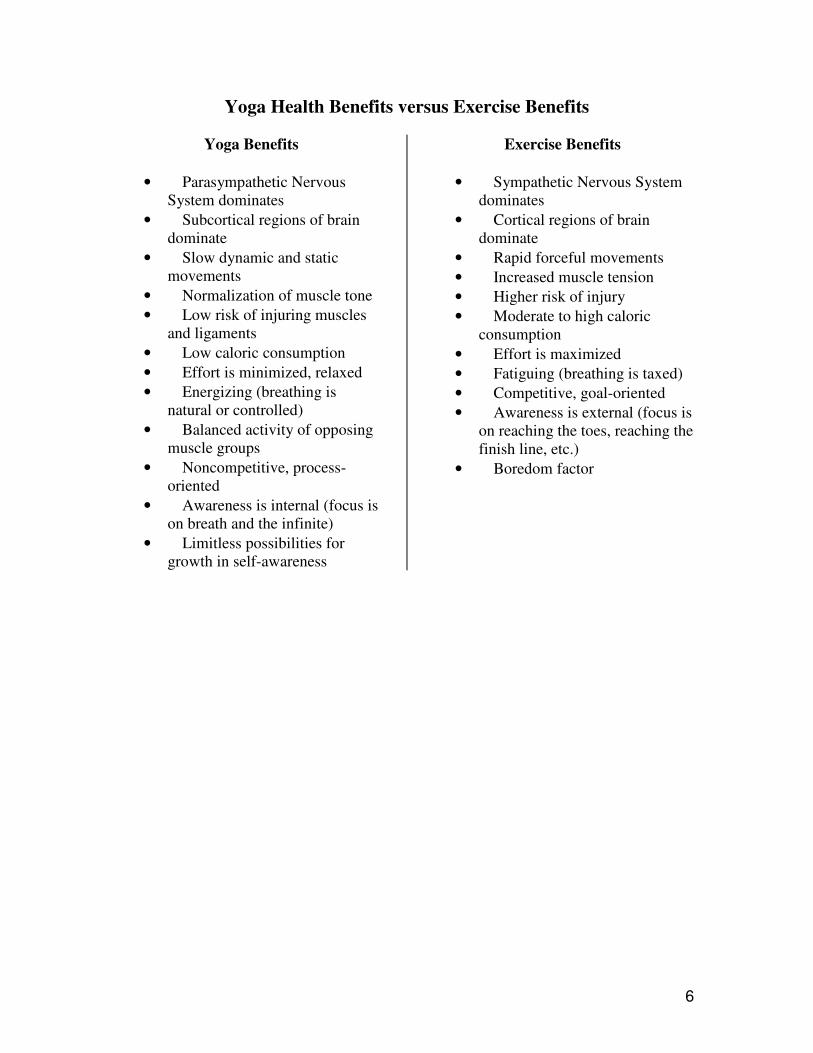
Yoga Health Benefits versus Exercise Benefits
Yoga Benefits
• Parasympathetic Nervous
System dominates
• Subcortical regions of brain
dominate
• Slow dynamic and static
movements
• Normalization of muscle tone
• Low risk of injuring muscles
and ligaments
• Low caloric consumption
• Effort is minimized, relaxed
• Energizing (breathing is
natural or controlled)
• Balanced activity of opposing
muscle groups
• Noncompetitive, process-
oriented
• Awareness is internal (focus is
on breath and the infinite)
• Limitless possibilities for
growth in self-awareness
Exercise Benefits
• Sympathetic Nervous System
dominates
• Cortical regions of brain
dominate
• Rapid forceful movements
• Increased muscle tension
• Higher risk of injury
• Moderate to high caloric
consumption
• Effort is maximized
• Fatiguing (breathing is taxed)
• Competitive, goal-oriented
• Awareness is external (focus is
on reaching the toes, reaching the
finish line, etc.)
• Boredom factor

7
Academic Standards for Health, Safety and Physical
Education Pennsylvania Department of Education
10.4.9 Grade 9
A. Analyze and engage in physical activities that are developmentally/individually
appropriate and support achievement of personal fitness and activity goals.
B. Analyze the effects of regular participation in moderate to vigorous physical
activities in relation to adolescent health improvement.
• stress management
• disease prevention
• weight management
C. Analyze factors that affect the responses of body systems during moderate to
vigorous physical activities.
• exercise (e.g., climate, altitude, location, temperature)
• healthy fitness zone
• individual fitness status (e.g. cardio/respiratory fitness, muscular endurance,
muscular strength, flexibility)
• drug/substance use/abuse
D. Analyze factors that affect physical activity preferences of adolescents.
• skill competence
• social benefits
• previous experience
• activity confidence
E. Analyze factors that impact on the relationship between regular participation in
physical activity and motor skill improvement.
• personal choice
• developmental differences
• amount of physical activity
• authentic practice
F. Analyze the effects of positive and negative interactions of adolescent group
members in physical activities.
• group dynamics
• social pressure

Yoga Lessons

9
YOGA
Lesson 1 (Seated Poses)
Objective: The students will be able to:
• Understand and perform yoga exercises
Standard: 10.4 - Physical Activity A/C/E
A. Analyze and engage in appropriate physical activities that support
achievement of personal fitness and activity goals
C. Analyze the factors the affect the responses of body systems during
moderate to vigorous physical activity
E. Analyze factors that impact the relationship between regular physical
activity and motor skill development
Equipment/Set up: Medicine Balls, Music, Mats
Instant Activity: Medicine Ball For All: Follow the leader moving in a clockwise
direction, switching to counter-clockwise on signal. Jog holding ball: near chest/straight
out in front of body/ catching ball/ moving ball side to side/pressing ball over head/
behind the back/ rolling ball with one hand/performing body circles/ tossing ball to the
right and left/intermediate squats
Fitness Activity: Breathing techniques, warm up exercises; introduce some seated
poses; Easy Pose, Seated Forward Bend, Sage Twist. Add the following poses Cobra
Pose, Cat Pose, Dog Pose, Hands and Knee Balance, Downward Facing Dog and Child’s
Pose.
Lesson (Unit Specific): Relaxing music playing softly in the background. Each
student will have a mat. Teacher will introduce yoga and discuss breathing techniques.
Teacher will demonstrate warm-up exercises and introduce seated poses. When possible
teacher will walk around the room and do corrections. Students are told if a pose is not
comfortable you can go into child’s pose. Class ends with relaxation.
Closure/Cool Down: What did you learn today? What physical fitness
components do you think yoga works on?

10
Breathing Techniques to Try
MOVE THE BELLY WITH THE BREATH. When we are at ease, the diaphragm is
the primary engine of the breath. As we inhale, this domelike muscle descends toward the
abdomen, displacing the abdominal muscles and gently swelling the belly. As we exhale,
the diaphragm releases back toward the heart, enabling the belly to release toward the
spine.
KEEP THE UPPER BODY QUIET. During high-stress times, it's common to heave
the upper chest and grip the muscles in the shoulders and throat. When we're at rest, the
muscles of the upper chest remain soft and relaxed as we breathe, and the real work
occurs in the lower rib cage. To promote this type of breathing pattern, consciously relax
the jaw, throat, neck, and shoulders, and envision the breath sweeping into the deepest
parts of the lungs as you breathe in and out.
BREATHE EASY. Although some breaths may be deeper or faster than others, when
we're relaxed, the alternating rhythm of the inhalations and exhalations feel like a
lullaby—smooth, soft, and uninterrupted by jerks and jags. Consciously relaxing into this
wavelike, oceanic quality of the breath deepens our sense of peace and ease.
LENGTHEN THE EXHALATIONS. When we feel stressed, our exhalations tend to
grow short and choppy. When we're relaxed, the exhalations extend so completely that
they are often longer than the inhalations. To facilitate this, try gently extending each
exhalation by one or two seconds.
PAUSE AFTER EACH EXHALATION. In our most relaxed state, the end of each
exhalation is punctuated by a short pause. Lingering in this “sweet spot” can be deeply
satisfying and can evoke feelings of profound quiet and stillness.
LET THE WHOLE BODY BREATHE. When we are at ease, the whole body
participates in the breathing process. Imagine a sleeping baby: When he/she breathes in
and out, the belly swells and releases, the hips rock to and fro, the shoulders bob, and the
spine gently undulates. This offers a mini-massage for the muscles and organs of the
whole body, and turns each breath into a soothing melody that further calms and quiets
every cell within.
11
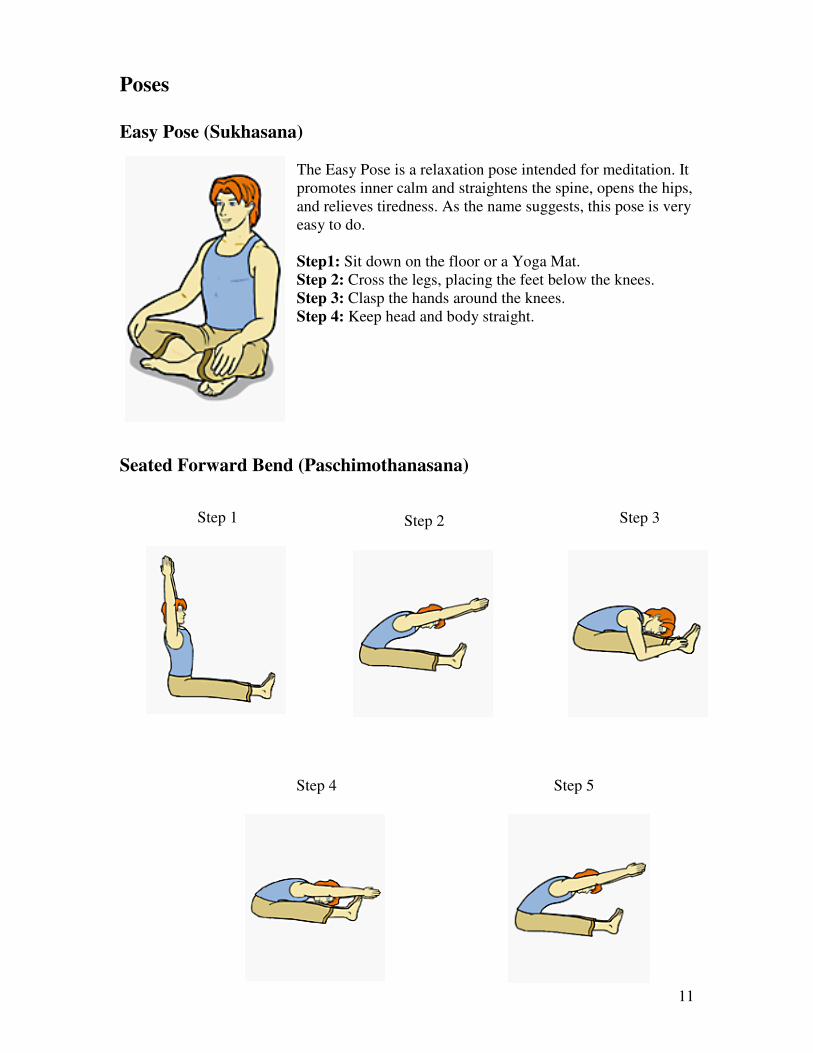
Poses
Easy Pose (Sukhasana)
The Easy Pose is a relaxation pose intended for meditation. It
promotes inner calm and straightens the spine, opens the hips,
and relieves tiredness. As the name suggests, this pose is very
easy to do.
Step1: Sit down on the floor or a Yoga Mat.
Step 2: Cross the legs, placing the feet below the knees.
Step 3: Clasp the hands around the knees.
Step 4: Keep head and body straight.
Seated Forward Bend (Paschimothanasana)
Step 1 Step 2 Step 3
Step 4 Step 5
12
STEP 1: Sit down with legs stretched. The legs lie side by side and the toes point
upwards. Stretch the lower back and raise the arms. Look forward, lengthen the back, and
keep the chest and breathing free.
STEP 2: Slowly bend forward, stretch the crown upward and try not to lose the
supporting dynamism of the lower back. See to it that the legs do not move or tilt.
STEP 3: The moment you notice that you can only bend further by bending the lower
back, move the hands to the lower legs, ankles or feet. Lightly pull the legs, ankles or feet
and continue stretching.
Keep the shoulders down. Breathe in and out across the entire length of the spinal column
deeply and in a relaxed way. Every time you exhale, you should bend further towards the
legs without losing the length in the back and the dynamism in the lower back. When
dynamism is lost in the lower back a major part of the stretching is lost and breathing
becomes difficult.
STEP 4: Stretch out the arms forward
STEP 5: Slowly raise the upper body. Keep the legs lying side by side and the toes
pointing upwards.
STEP 6: Sit straight up again, just like the original position.
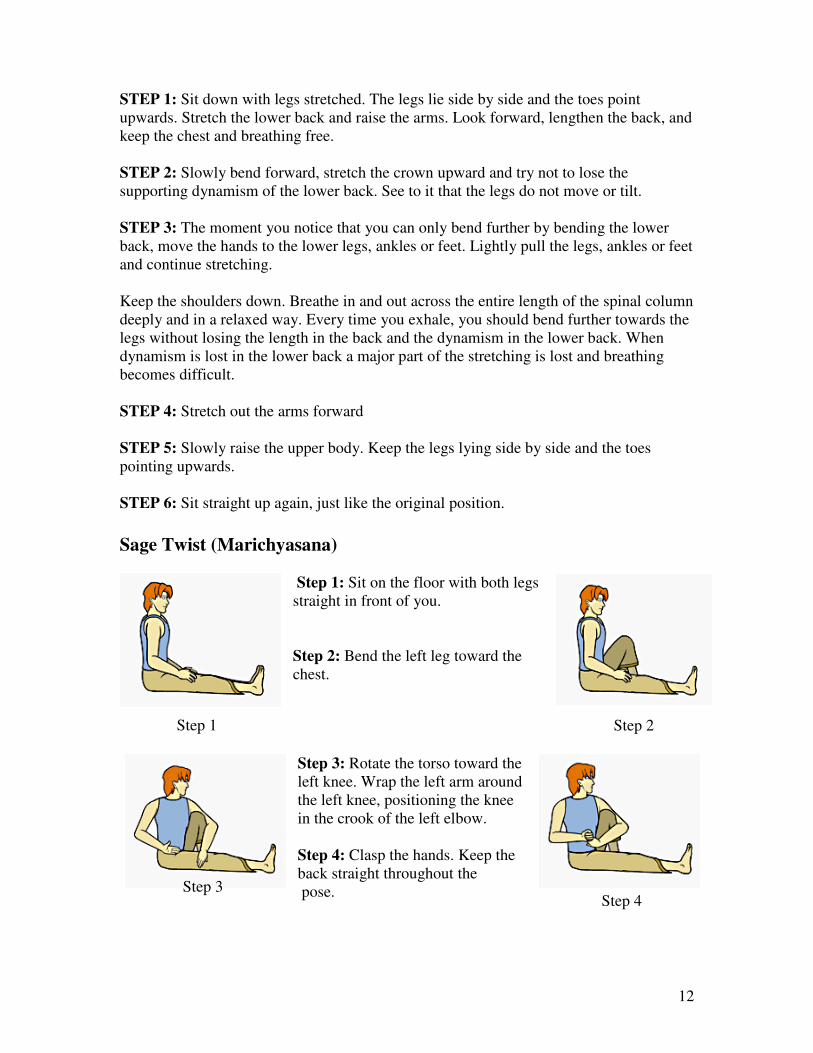
Sage Twist (Marichyasana)
Step 1: Sit on the floor with both legs
straight in front of you.
Step 2: Bend the left leg toward the
chest.
Step 3: Rotate the torso toward the
left knee. Wrap the left arm around
the left knee, positioning the knee
in the crook of the left elbow.
Step 4: Clasp the hands. Keep the
back straight throughout the
pose.
Step 1 Step 2
Step 3 Step 4
13
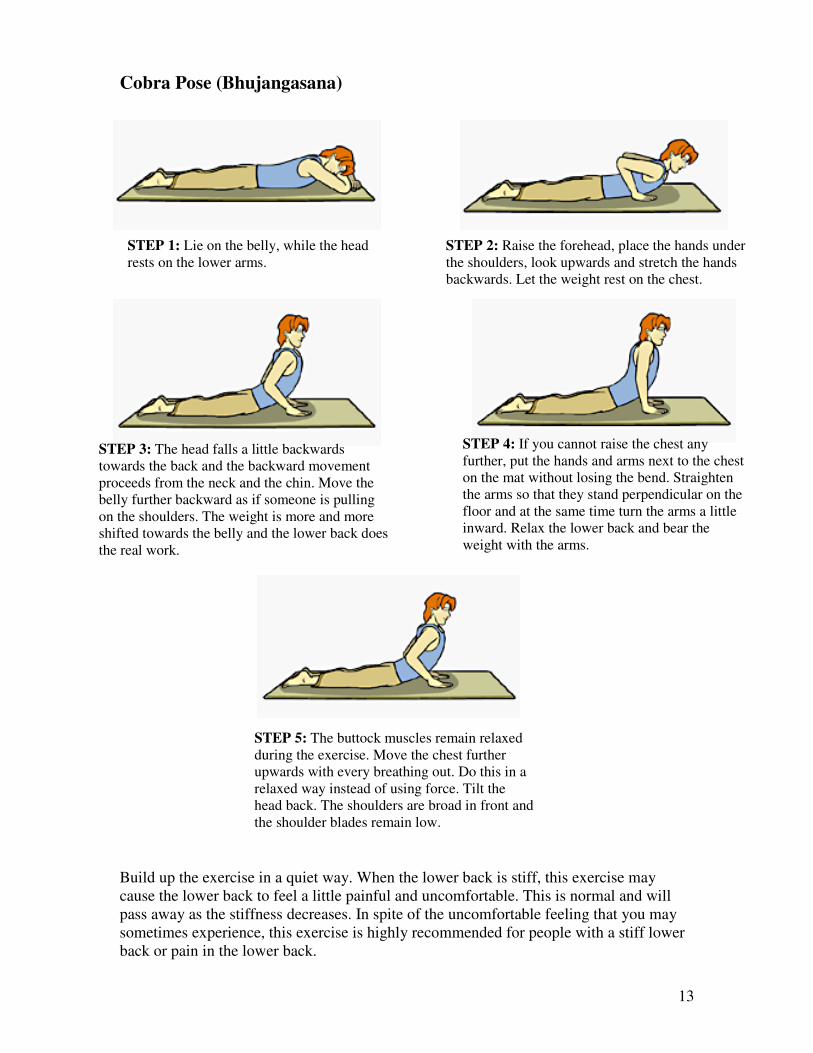
Cobra Pose (Bhujangasana)
Build up the exercise in a quiet way. When the lower back is stiff, this exercise may
cause the lower back to feel a little painful and uncomfortable. This is normal and will
pass away as the stiffness decreases. In spite of the uncomfortable feeling that you may
sometimes experience, this exercise is highly recommended for people with a stiff lower
back or pain in the lower back.
STEP 1: Lie on the belly, while the head
rests on the lower arms.
STEP 2: Raise the forehead, place the hands under
the shoulders, look upwards and stretch the hands
backwards. Let the weight rest on the chest.
STEP 3: The head falls a little backwards
towards the back and the backward movement
proceeds from the neck and the chin. Move the
belly further backward as if someone is pulling
on the shoulders. The weight is more and more
shifted towards the belly and the lower back does
the real work.
STEP 4: If you cannot raise the chest any
further, put the hands and arms next to the chest
on the mat without losing the bend. Straighten
the arms so that they stand perpendicular on the
floor and at the same time turn the arms a little
inward. Relax the lower back and bear the
weight with the arms.
STEP 5: The buttock muscles remain relaxed
during the exercise. Move the chest further
upwards with every breathing out. Do this in a
relaxed way instead of using force. Tilt the
head back. The shoulders are broad in front and
the shoulder blades remain low.
14
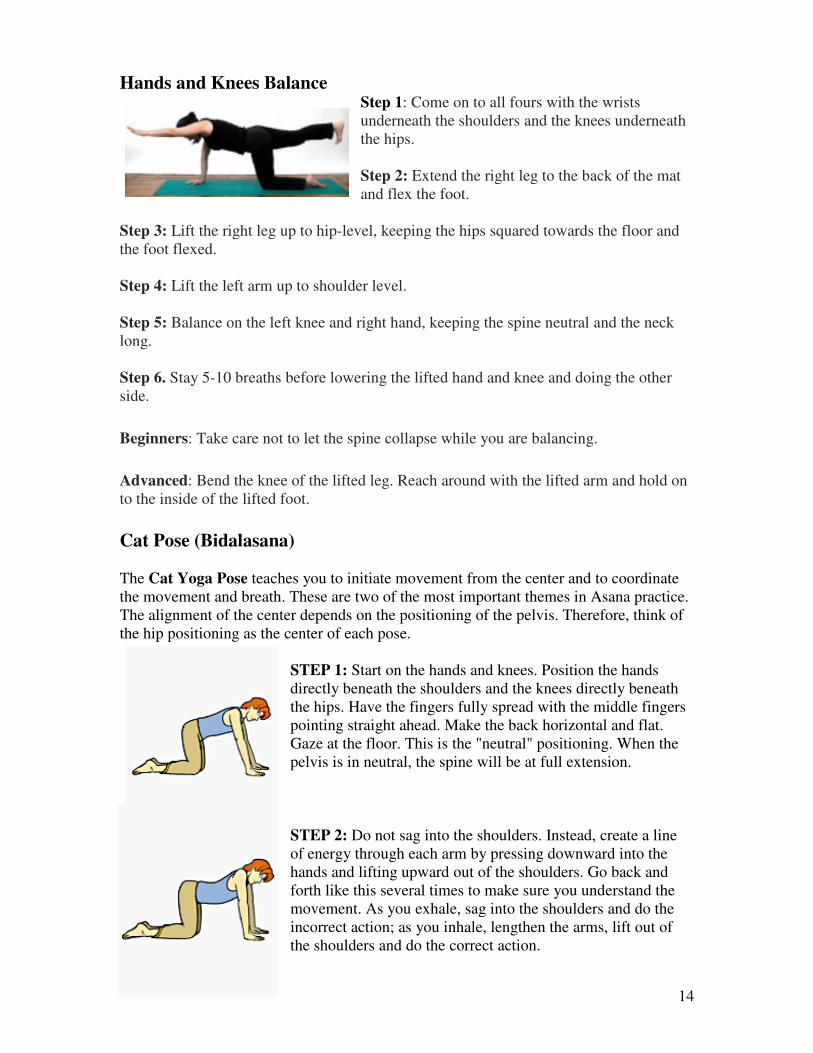
Hands and Knees Balance Step 1: Come on to all fours with the wrists
underneath the shoulders and the knees underneath
the hips.
Step 2: Extend the right leg to the back of the mat
and flex the foot.
Step 3: Lift the right leg up to hip-level, keeping the hips squared towards the floor and
the foot flexed.
Step 4: Lift the left arm up to shoulder level.
Step 5: Balance on the left knee and right hand, keeping the spine neutral and the neck
long.
Step 6. Stay 5-10 breaths before lowering the lifted hand and knee and doing the other
side.
Beginners: Take care not to let the spine collapse while you are balancing.
Advanced: Bend the knee of the lifted leg. Reach around with the lifted arm and hold on
to the inside of the lifted foot.
Cat Pose (Bidalasana)
The Cat Yoga Pose teaches you to initiate movement from the center and to coordinate
the movement and breath. These are two of the most important themes in Asana practice.
The alignment of the center depends on the positioning of the pelvis. Therefore, think of
the hip positioning as the center of each pose.
STEP 1: Start on the hands and knees. Position the hands
directly beneath the shoulders and the knees directly beneath
the hips. Have the fingers fully spread with the middle fingers
pointing straight ahead. Make the back horizontal and flat.
Gaze at the floor. This is the "neutral" positioning. When the
pelvis is in neutral, the spine will be at full extension.
STEP 2: Do not sag into the shoulders. Instead, create a line
of energy through each arm by pressing downward into the
hands and lifting upward out of the shoulders. Go back and
forth like this several times to make sure you understand the
movement. As you exhale, sag into the shoulders and do the
incorrect action; as you inhale, lengthen the arms, lift out of
the shoulders and do the correct action.
15
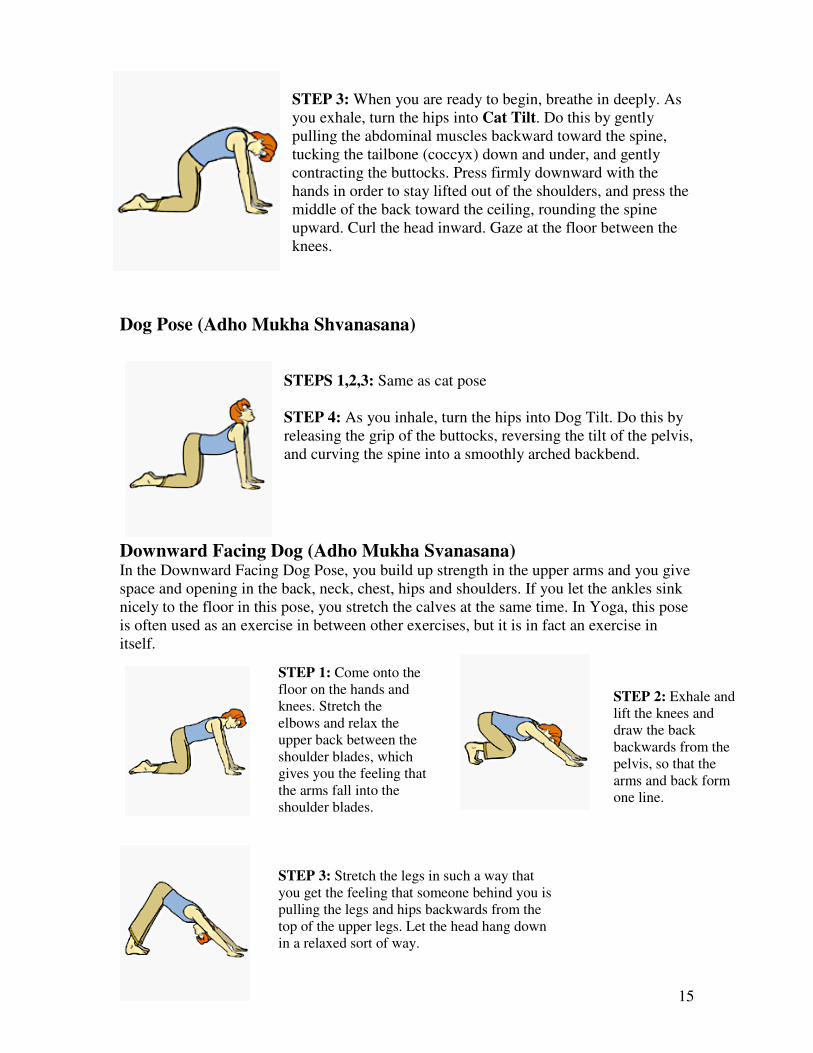
STEP 3: When you are ready to begin, breathe in deeply. As
you exhale, turn the hips into Cat Tilt. Do this by gently
pulling the abdominal muscles backward toward the spine,
tucking the tailbone (coccyx) down and under, and gently
contracting the buttocks. Press firmly downward with the
hands in order to stay lifted out of the shoulders, and press the
middle of the back toward the ceiling, rounding the spine
upward. Curl the head inward. Gaze at the floor between the
knees.
Dog Pose (Adho Mukha Shvanasana)
STEPS 1,2,3: Same as cat pose
STEP 4: As you inhale, turn the hips into Dog Tilt. Do this by
releasing the grip of the buttocks, reversing the tilt of the pelvis,
and curving the spine into a smoothly arched backbend.
Downward Facing Dog (Adho Mukha Svanasana) In the Downward Facing Dog Pose, you build up strength in the upper arms and you give
space and opening in the back, neck, chest, hips and shoulders. If you let the ankles sink
nicely to the floor in this pose, you stretch the calves at the same time. In Yoga, this pose
is often used as an exercise in between other exercises, but it is in fact an exercise in
itself.
STEP 1: Come onto the
floor on the hands and
knees. Stretch the
elbows and relax the
upper back between the
shoulder blades, which
gives you the feeling that
the arms fall into the
shoulder blades.
STEP 2: Exhale and
lift the knees and
draw the back
backwards from the
pelvis, so that the
arms and back form
one line.
STEP 3: Stretch the legs in such a way that
you get the feeling that someone behind you is
pulling the legs and hips backwards from the
top of the upper legs. Let the head hang down
in a relaxed sort of way.

16
Many people experience the Downward Facing Dog Pose as a moment of rest between
difficult Yoga exercises. However, when you are doing this, try to remain focused, both
physically and mentally, and continue working out the technique further to get the
maximum benefit from this exercise and from Yoga in general.
Child Pose
STEP 1: Kneel and sit on the feet with the heels pointing outward. The knees should be
separated, about the width of the hips.
STEP 2: Place the forehead on the floor, then swing the arms forward.
STEP 3: Rest the forehead on the floor, then bring the arms around and to the sides,
palms facing upward.
Graphics found at: http://yoga.about.com/od/yogaposes/tp/findposes.htm
http://www.abc-of-yoga.com/yogabeginnersguide.asp
STEP 4: When you have placed the back and the legs correctly, stretch
out the arms. This results in a stretching from two sides of the back: a
stretching from the pelvis and a stretching from the arms. When the
back and the chest are placed correctly, you will notice that you can
quietly breathe in and out through the belly. You should not let the
chest hang downwards or make the back extremely sunken. In this
Asana, the back should be lengthened along its entire length. Take the
time to work out the stretching further and further.
Step 1 Step 2 Step 3

17
YOGA
Lesson 2
(Seated Poses 2, Standing and Twisting)
Objective: The Students will be able to:
• Understand and perform yoga exercises
Standard: 10.4 Physical Activity A/C/E
A. Analyze and engage in appropriate physical activities that support
achievement of personal fitness and activity goals
C. Analyze the factors the affect the responses of body systems during
moderate to vigorous physical activity
E. Analyze factors that impact the relationship between regular physical
activity and motor skill development
Equipment/Set up: Music, Mats
Instant Activity: Alternate jog – walk to music
Fitness Activity: Review breathing techniques, warm-up exercises; easy pose,
seated forward bend, sage twist, cobra cat, dog, downward facing dog. Introduce more
seated poses; superman, bow and supine pigeon.
Lesson (Unit Specific) Relaxing music playing softly in the background. Each
student will have a mat. Teacher will review breathing techniques and seated poses.
Teacher will introduce additional poses (single leg raise, standing forward bend, tree
pose, half spiral twist, Warrior I) and walk around the room when possible. Students are
told if a pose is uncomfortable you can go into child’s pose. Class ends with relaxation.
(Corpse Pose)
Closure/Cool Down: What did you learn today? Did you enjoy the class?
18
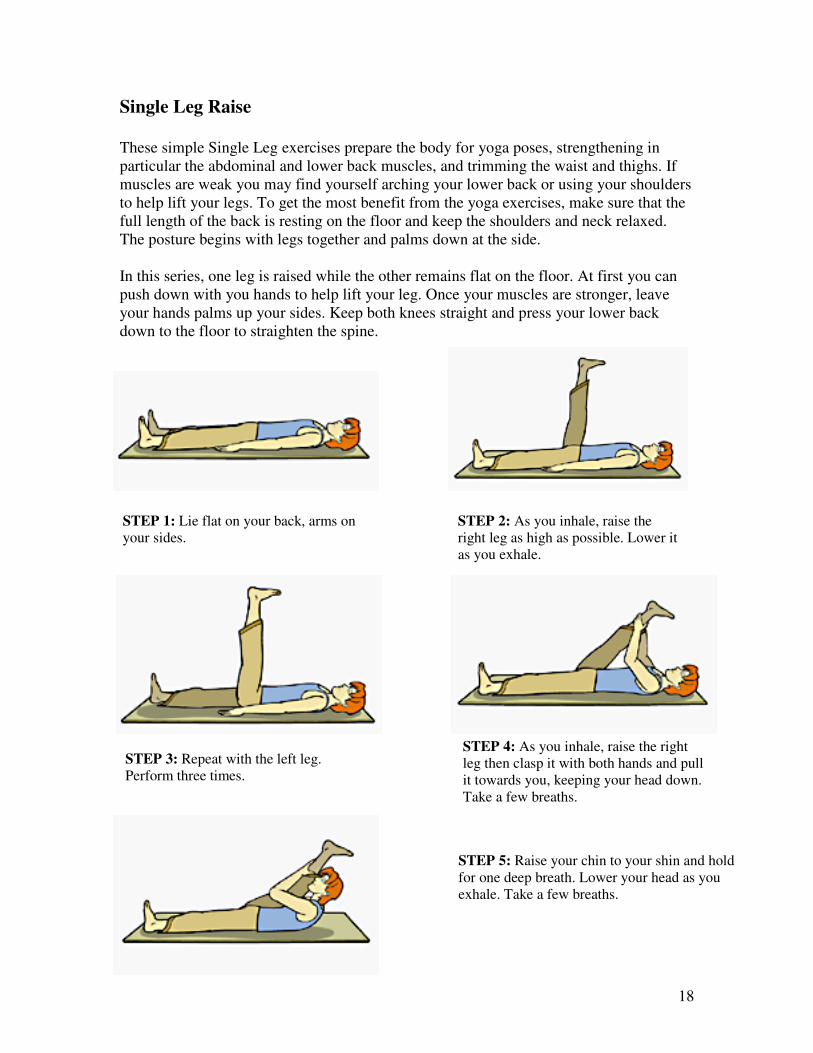
Single Leg Raise
These simple Single Leg exercises prepare the body for yoga poses, strengthening in
particular the abdominal and lower back muscles, and trimming the waist and thighs. If
muscles are weak you may find yourself arching your lower back or using your shoulders
to help lift your legs. To get the most benefit from the yoga exercises, make sure that the
full length of the back is resting on the floor and keep the shoulders and neck relaxed.
The posture begins with legs together and palms down at the side.
In this series, one leg is raised while the other remains flat on the floor. At first you can
push down with you hands to help lift your leg. Once your muscles are stronger, leave
your hands palms up your sides. Keep both knees straight and press your lower back
down to the floor to straighten the spine.
STEP 1: Lie flat on your back, arms on
your sides.
STEP 2: As you inhale, raise the
right leg as high as possible. Lower it
as you exhale.
STEP 3: Repeat with the left leg.
Perform three times.
STEP 4: As you inhale, raise the right
leg then clasp it with both hands and pull
it towards you, keeping your head down.
Take a few breaths.
STEP 5: Raise your chin to your shin and hold
for one deep breath. Lower your head as you
exhale. Take a few breaths.

19
Standing Forward Bend (Uttanasana)
This exercise provides a complete stretch of the upper back and lower back, as well as the
leg and calf muscles. In this exercise, you literally stretch stress, tiredness, and stiffness
from your body. At the same time, you learn how to rest and relax in case of discomfort
and effort. Uttanasana also increases the flow of blood to the brain.
STEP 1: Start with the Mountain Pose.
STEP 2: Bend your knees, support your upper body with a straight lower back, and
slowly bend forward so that your belly touches your upper legs. Maintain the position of
the lower back or else the chest will sink. Move the pelvis, taking the back as the starting
point, relax the groins, and keep the weight on the front parts of the heels.
STEP 3: Keep breathing correctly through the belly and slowly bring the chest to the
knees without losing the support of the lower back. Stretch the legs every time you
exhale. The pelvis moves upward until the legs are eventually straightened. Move your
hand to touch the ground or grab the ankles. Stretch downward from the crown and when
grabbing the ankles, use a slight stretching force to lengthen the body.
Important! If the supportive power of the lower back is lost during the exercise, a major
part of its effect is lost. As a result, the chest will sink, making the breathing irregular.
Also, stretching will not be effective.
Bear in mind that this forward bend is performed through relaxation and not through
force by pulling the feet with physical strength. When pulling too hard, the body stiffens,
thinking and breathing will be affected and worst of all, there is a risk of injury
Step 1 Step 2 Step 3

20
Tree Pose (Vrkasana)
The Tree Pose helps strengthen thighs, calves, ankles and back. It can also increase the
flexibility of hips and groin. Your balance and concentration can also be improved with
constant practice.
STEP 1: Start with the
Mountain Pose.
STEP 2: As you exhale,
place your left foot on the
inside part of your right
leg, close to the groin area,
with the toes pointing
downward.
STEP 3: As you inhale,
stretch your arms
sideways to form a T,
palms facing down.
STEP 4: As you exhale,
bring your palms together in
prayer position.
STEP 5: Raise your arms overhead,
keeping your palms in prayer position.
To maintain balance, it helps to focus
your eyes on one point in front of you
and keep on breathing through the
belly.

21
Half Spinal Twist (Ardha Matsyendrasana)
The Spinal Twist Yoga Pose, is one of the few Yoga Poses in the basic session that
rotates the spine. Most poses bend the spinal column either backward or forward, but to
become truly flexible it must be twisted laterally as well. The movement also tones the
spinal nerves and ligaments, and improves digestion. Keep the spine erect and shoulders
leveled in the position. Breathe steadily. Twist a little more each time you exhale. Twist
first to the left, as below, then repeat the sequence twisting to the right.
STEP 1: Kneel and sit
on the feet with the
heels pointing
outward.
STEP 2: Then sit to
the right of the feet, as
illustrated.
STEP 3: Lift the left leg over the
right, placing the foot against the
outside of the right knee. Bring the
left heel in close to the buttocks.
Keep the spine erect.
STEP 4: Stretch the arms out to the
sides at shoulder level, and twist to the
left.
STEP 5: Now bring the right arm down on
the outside of the left knee and hold your
left foot with your right hand, placing your
left hand on the floor behind you. As you
exhale, twist as far as possible to the left.
Look over the left shoulder.
22
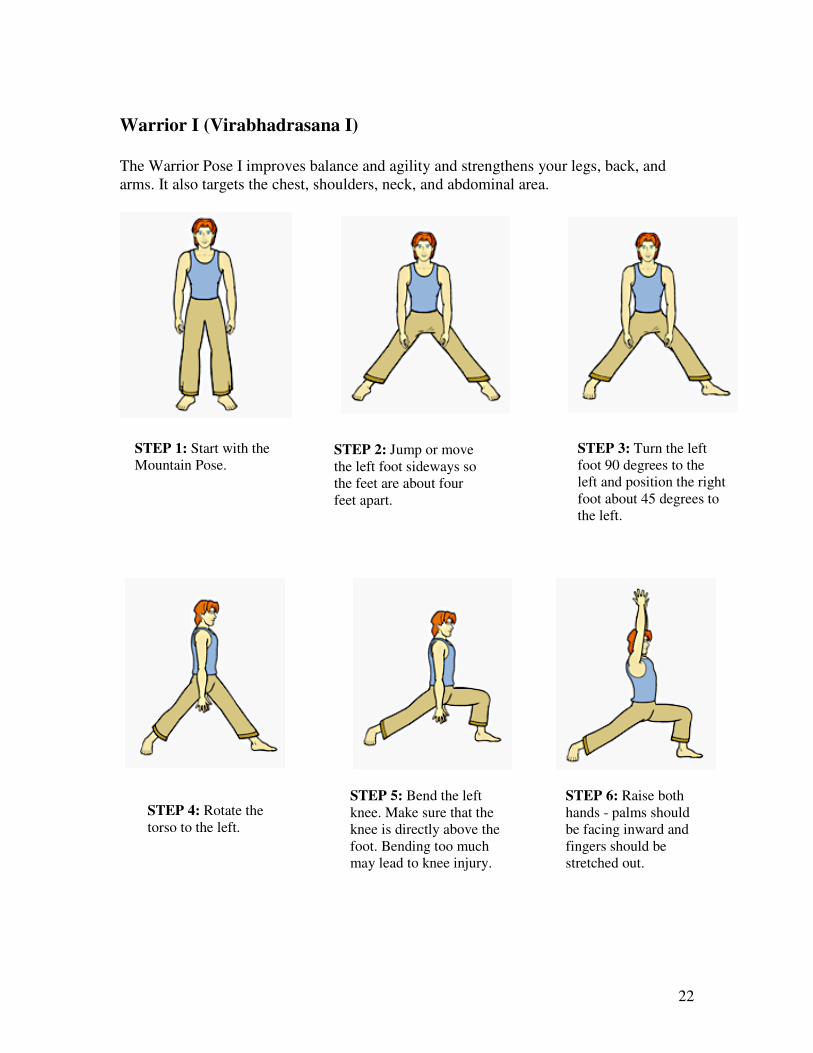
Warrior I (Virabhadrasana I)
The Warrior Pose I improves balance and agility and strengthens your legs, back, and
arms. It also targets the chest, shoulders, neck, and abdominal area.
STEP 1: Start with the
Mountain Pose.
STEP 2: Jump or move
the left foot sideways so
the feet are about four
feet apart.
STEP 3: Turn the left
foot 90 degrees to the
left and position the right
foot about 45 degrees to
the left.
STEP 4: Rotate the
torso to the left.
STEP 5: Bend the left
knee. Make sure that the
knee is directly above the
foot. Bending too much
may lead to knee injury.
STEP 6: Raise both
hands - palms should
be facing inward and
fingers should be
stretched out.

23
Corpse Pose (Savasana)
Even relaxation can bring out the best in yourself but make sure you do it properly. The
Corpse Pose may look like a simple relaxing pose, but this exercise requires a lot of
concentration and will develop through continued practice. This exercise, if done
correctly, will stimulate blood circulation and will lessen or relieve fatigue, nervousness,
asthma, constipation, diabetes, indigestion, and insomnia. It will also improve one’s
mental concentration.
1. Lay flat on the back, rotate the feet and legs in and out, then let them fall
gently out, toes pointing to the sides.
2. Let the arms fall alongside the body (slightly separated from the body) with
the palms facing upwards.
3. Rotate the spine by turning the head from side to side to find the center
position.
4. Then start stretching out, as though someone is pulling the head away from
the feet, shoulders down and away from the neck, legs down and away from
the pelvis.
5. Breathe deeply and slowly from the abdomen.
6. Hold the pose for several minutes. Make the mind still and concentrate on
breathing and the feel of the body
7. After doing the pose, bend the knees. Using the legs, push onto one side.
8. Push into a sitting position.
Graphics found at: http://yoga.about.com/od/yogaposes/tp/findposes.htm
http://www.abc-of-yoga.com/yogabeginnersguide.asp
24
YOGA
Lesson 3 (Bending and Stretching)
Objective: The students will be able to:
• Understand and perform yoga exercises.
Standard: 10.4 Physical Activity A/C/E
A. Analyze and engage in appropriate physical activities that support
achievement of personal fitness and activity goals
C. Analyze the factors the affect the responses of body systems during
moderate to vigorous physical activity
E. Analyze factors that impact the relationship between regular physical
activity and motor skill development
Equipment/Set up: Music, Mats
Instant Activity: Practice Jump Rope (e.g. run with rope, jump both feet turning
rope forward, both feet turning rope backwards, alternate feet, swing rope figure 8)
Fitness Activity: Review breathing techniques. Warm-up exercises; Easy Pose,
Seated Forward Bend, Standing Forward Bend, Cobra, Sage Twist. Seated poses; Cat
Pose, Dog Pose, Single Leg Raise (both legs).
Lesson (Unit Specific): Relaxing music playing softly in the background. Each
student will have a mat. Teacher will review breathing techniques and previously learned
poses. Introduce the following poses; Wide Leg Forward Bend, Leg Reclining Lunge,
Warrior III, Bow. Teacher will walk around the room when possible to assist. Students
are told if a pose is not comfortable go into the child’s pose. Class ends with Child’s Pose
then relaxation (Corpse Pose).
Closure/Cool Down: Did you like some on the standing poses and why? Do you
feel like you had a workout?
25
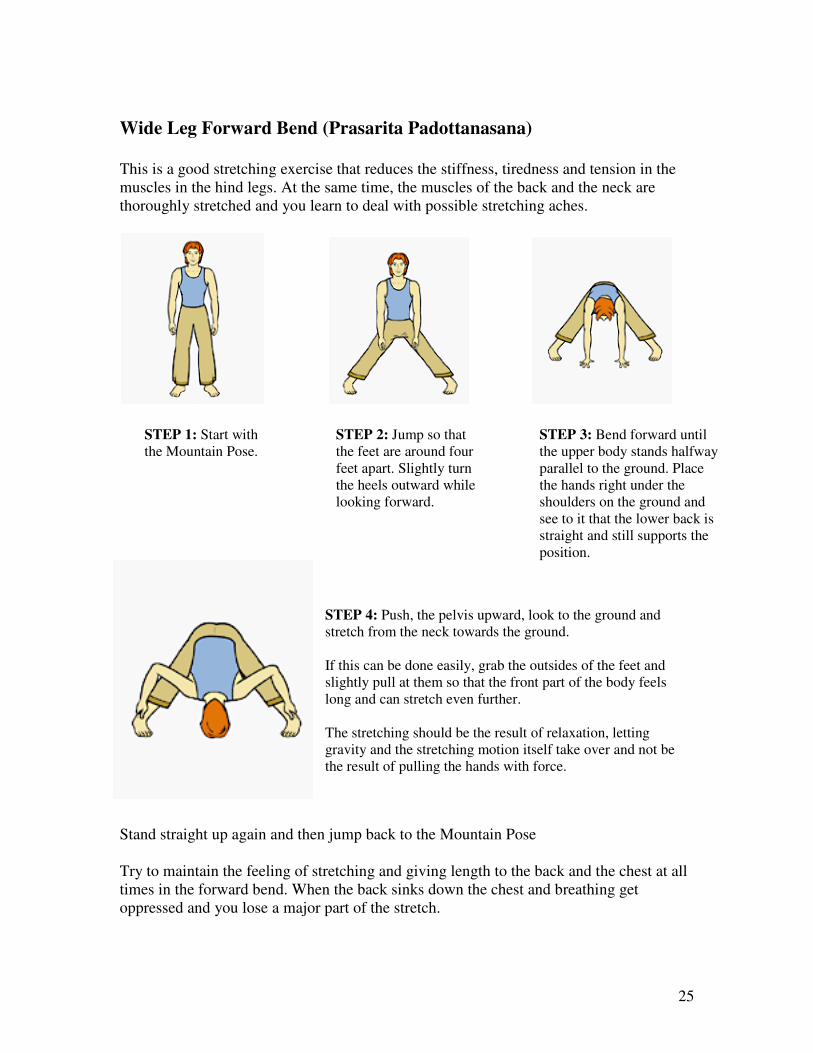
Wide Leg Forward Bend (Prasarita Padottanasana)
This is a good stretching exercise that reduces the stiffness, tiredness and tension in the
muscles in the hind legs. At the same time, the muscles of the back and the neck are
thoroughly stretched and you learn to deal with possible stretching aches.
STEP 4: Push, the pelvis upward, look to the ground and
stretch from the neck towards the ground.
If this can be done easily, grab the outsides of the feet and
slightly pull at them so that the front part of the body feels
long and can stretch even further.
The stretching should be the result of relaxation, letting
gravity and the stretching motion itself take over and not be
the result of pulling the hands with force.
Stand straight up again and then jump back to the Mountain Pose
Try to maintain the feeling of stretching and giving length to the back and the chest at all
times in the forward bend. When the back sinks down the chest and breathing get
oppressed and you lose a major part of the stretch.
STEP 1: Start with
the Mountain Pose.
STEP 2: Jump so that
the feet are around four
feet apart. Slightly turn
the heels outward while
looking forward.
STEP 3: Bend forward until
the upper body stands halfway
parallel to the ground. Place
the hands right under the
shoulders on the ground and
see to it that the lower back is
straight and still supports the
position.
26
This forward bend is done in a relaxed manner and never through pulling the feet with
force. When you pull too hard, the body stiffens, thinking and breathing become unquiet
and you run a risk of injuring yourself.
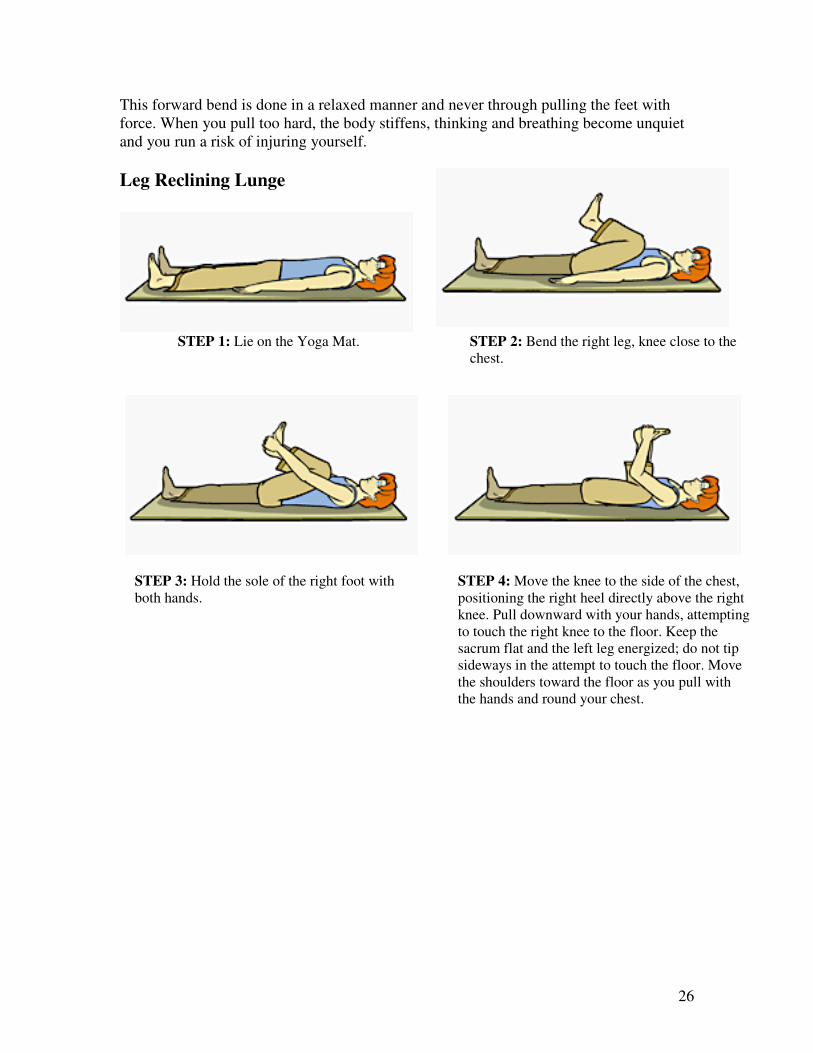
Leg Reclining Lunge
STEP 1: Lie on the Yoga Mat.
STEP 2: Bend the right leg, knee close to the
chest.
STEP 3: Hold the sole of the right foot with
both hands.
STEP 4: Move the knee to the side of the chest,
positioning the right heel directly above the right
knee. Pull downward with your hands, attempting
to touch the right knee to the floor. Keep the
sacrum flat and the left leg energized; do not tip
sideways in the attempt to touch the floor. Move
the shoulders toward the floor as you pull with
the hands and round your chest.
27
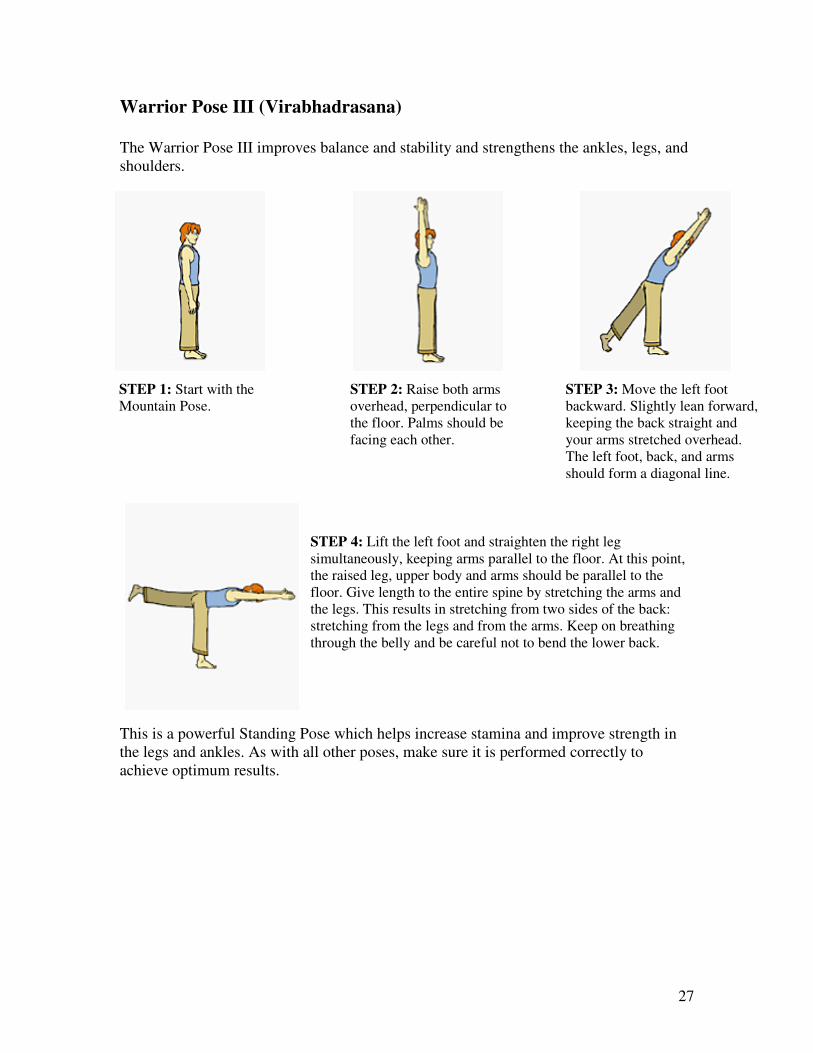
Warrior Pose III (Virabhadrasana)
The Warrior Pose III improves balance and stability and strengthens the ankles, legs, and
shoulders.
STEP 4: Lift the left foot and straighten the right leg
simultaneously, keeping arms parallel to the floor. At this point,
the raised leg, upper body and arms should be parallel to the
floor. Give length to the entire spine by stretching the arms and
the legs. This results in stretching from two sides of the back:
stretching from the legs and from the arms. Keep on breathing
through the belly and be careful not to bend the lower back.
This is a powerful Standing Pose which helps increase stamina and improve strength in
the legs and ankles. As with all other poses, make sure it is performed correctly to
achieve optimum results.
STEP 1: Start with the
Mountain Pose.
STEP 2: Raise both arms
overhead, perpendicular to
the floor. Palms should be
facing each other.
STEP 3: Move the left foot
backward. Slightly lean forward,
keeping the back straight and
your arms stretched overhead.
The left foot, back, and arms
should form a diagonal line.
28
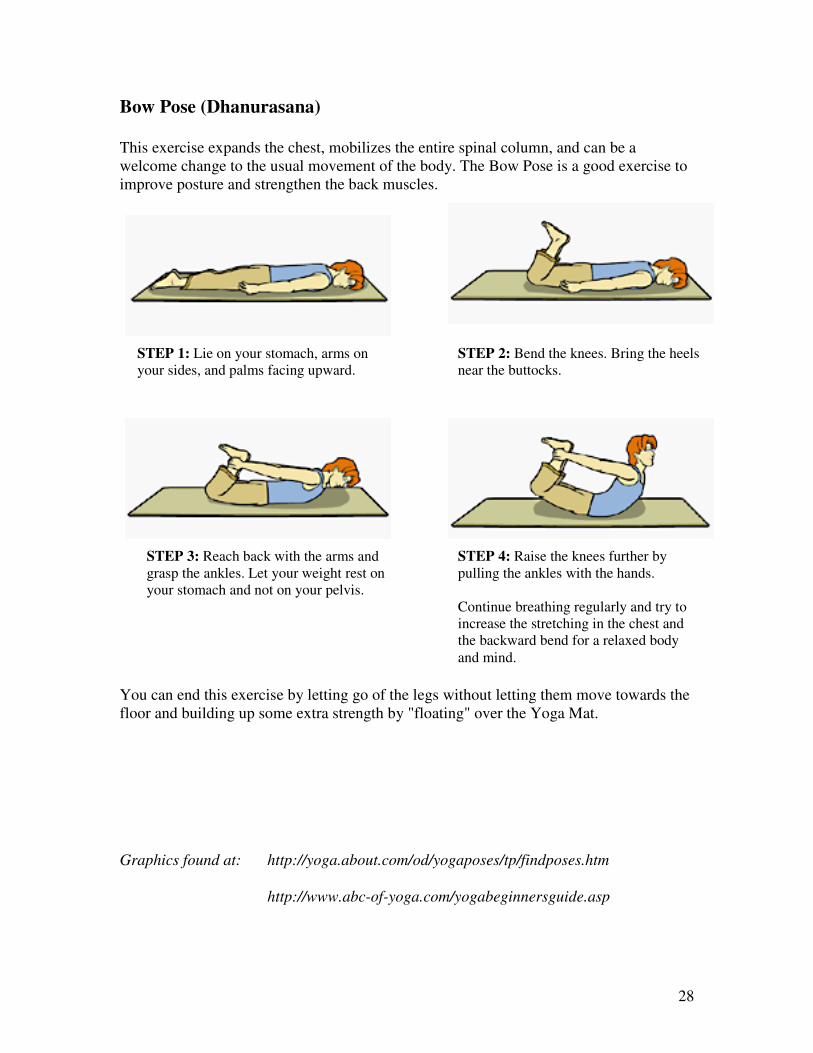
Bow Pose (Dhanurasana)
This exercise expands the chest, mobilizes the entire spinal column, and can be a
welcome change to the usual movement of the body. The Bow Pose is a good exercise to
improve posture and strengthen the back muscles.
You can end this exercise by letting go of the legs without letting them move towards the
floor and building up some extra strength by "floating" over the Yoga Mat.
Graphics found at: http://yoga.about.com/od/yogaposes/tp/findposes.htm
http://www.abc-of-yoga.com/yogabeginnersguide.asp
STEP 1: Lie on your stomach, arms on
your sides, and palms facing upward.
STEP 2: Bend the knees. Bring the heels
near the buttocks.
STEP 3: Reach back with the arms and
grasp the ankles. Let your weight rest on
your stomach and not on your pelvis.
STEP 4: Raise the knees further by
pulling the ankles with the hands.
Continue breathing regularly and try to
increase the stretching in the chest and
the backward bend for a relaxed body
and mind.
29
YOGA
Lesson 4 (Advanced Poses)
Objective: The students will be able to:
• Understand and perform yoga exercises
Standard: 10.4 Physical Activity A/C/E
A. Analyze and engage in appropriate physical activities that support
achievement of personal fitness and activity goals
C. Analyze the factors the affect the responses of body systems during
moderate to vigorous physical activity
E. Analyze factors that impact the relationship between regular physical
activity and motor skill development
Equipment/Set up: Music, Mats
Instant Activity: Interval training: run – jog – walk - skip
Fitness Activity: Warm-up exercises; Easy pose, Seated Forward Bend, Standing
Forward Bend, Bow and Sage Twist. Cat Pose, Dog Pose, Single Leg Raise (both legs)
Lesson (Unit Specific): Relaxing music playing softly in the background. Each
student will have a mat. Teacher will perform class warm-up exercises. Teacher will
review breathing techniques and previously learned poses. Introduce the following poses;
Bridge, Lotus, Triangle, Wind Relieving Pose. Teacher will walk around the room to
assist and/or a student leader doing the exercises may help to assist. Students are told if a
pose is not comfortable you can go into child’s pose. Class ends with relaxation (Corpse
Pose).
Closure/Cool Down: Did you like balancing poses? What did you enjoy
most/least about the workout?
30
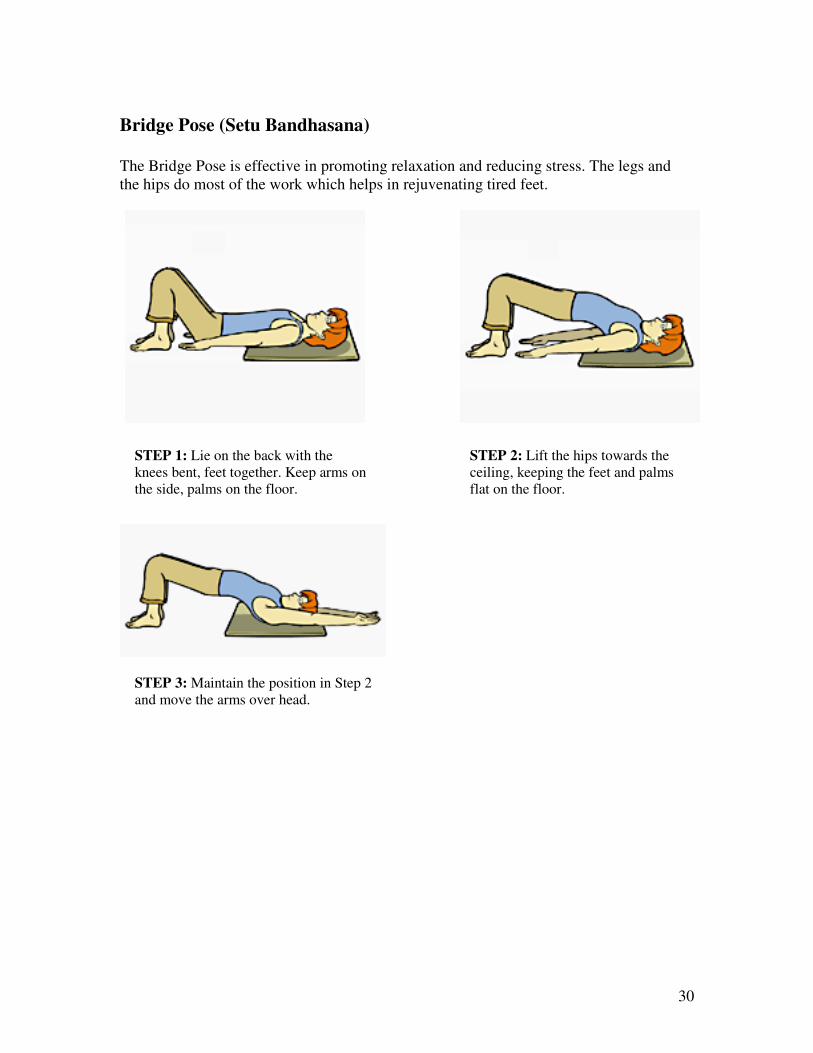
Bridge Pose (Setu Bandhasana)
The Bridge Pose is effective in promoting relaxation and reducing stress. The legs and
the hips do most of the work which helps in rejuvenating tired feet.
STEP 1: Lie on the back with the
knees bent, feet together. Keep arms on
the side, palms on the floor.
STEP 2: Lift the hips towards the
ceiling, keeping the feet and palms
flat on the floor.
STEP 3: Maintain the position in Step 2
and move the arms over head.
31
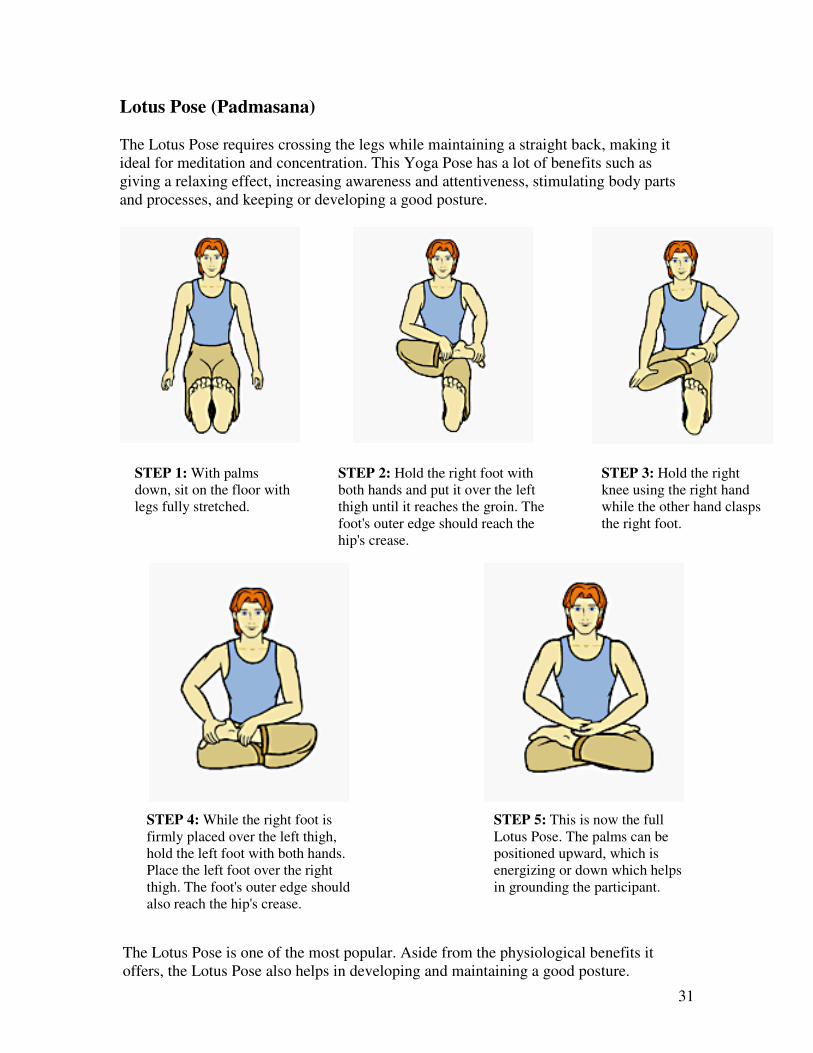
Lotus Pose (Padmasana)
The Lotus Pose requires crossing the legs while maintaining a straight back, making it
ideal for meditation and concentration. This Yoga Pose has a lot of benefits such as
giving a relaxing effect, increasing awareness and attentiveness, stimulating body parts
and processes, and keeping or developing a good posture.
STEP 1: With palms
down, sit on the floor with
legs fully stretched.
STEP 2: Hold the right foot with
both hands and put it over the left
thigh until it reaches the groin. The
foot's outer edge should reach the
hip's crease.
STEP 3: Hold the right
knee using the right hand
while the other hand clasps
the right foot.
STEP 4: While the right foot is
firmly placed over the left thigh,
hold the left foot with both hands.
Place the left foot over the right
thigh. The foot's outer edge should
also reach the hip's crease.
STEP 5: This is now the full
Lotus Pose. The palms can be
positioned upward, which is
energizing or down which helps
in grounding the participant.
The Lotus Pose is one of the most popular. Aside from the physiological benefits it
offers, the Lotus Pose also helps in developing and maintaining a good posture.

32
Triangle Pose (Trikonasana)
STEP 1: Start with the Downward Facing Dog Pose
STEP 2: Move the left foot forward for about 1 meter.
STEP 3: Put the left hand beside the foot and carry your weight with the lower back and
on the heels of the foot in front. Raise the upper part of the body until the lower back is
straight. You can recognize this by a groove in the middle of the lower back. The right
foot (the one at the back) rests on the floor.
STEP 4: Stretch the leg which is in front without bending the back or twisting
the body. With the back straight and the right hip stretched backward, look at a point on
the ground and breathe in and out quietly. At this point, press the left hand against the
heel and twist the chest to the right. Let the twisting motion involve only the upper back
while the hip, lower back, legs and head remain stationary. When you cannot twist any
further, stretch the right arm upward.
Step 1 Step 2 Step 3
Step 4 Step 5
33
STEP 5: Now turn the head to the right, look upward along the outstretched arm and
stretch out the neck.
Step back towards the Downward Facing Dog Pose and repeat the exercise with right leg
in front.
In this pose, it is important to keep the lower back straight. Aside from that, remember
that when you are twisting, the hips do not twist along. Otherwise, the right hand side
becomes active and the lower back gets "locked up" as it were which results in tension in
the lower back. Prevent this by actively tightening the left hand side and let it even help
carry the position so that you can keep the hip in its place when twisting. This dynamism
in the side also helps to keep the dynamism in the hip active through the right leg as a
result of which the hip is mobilized as much as possible.
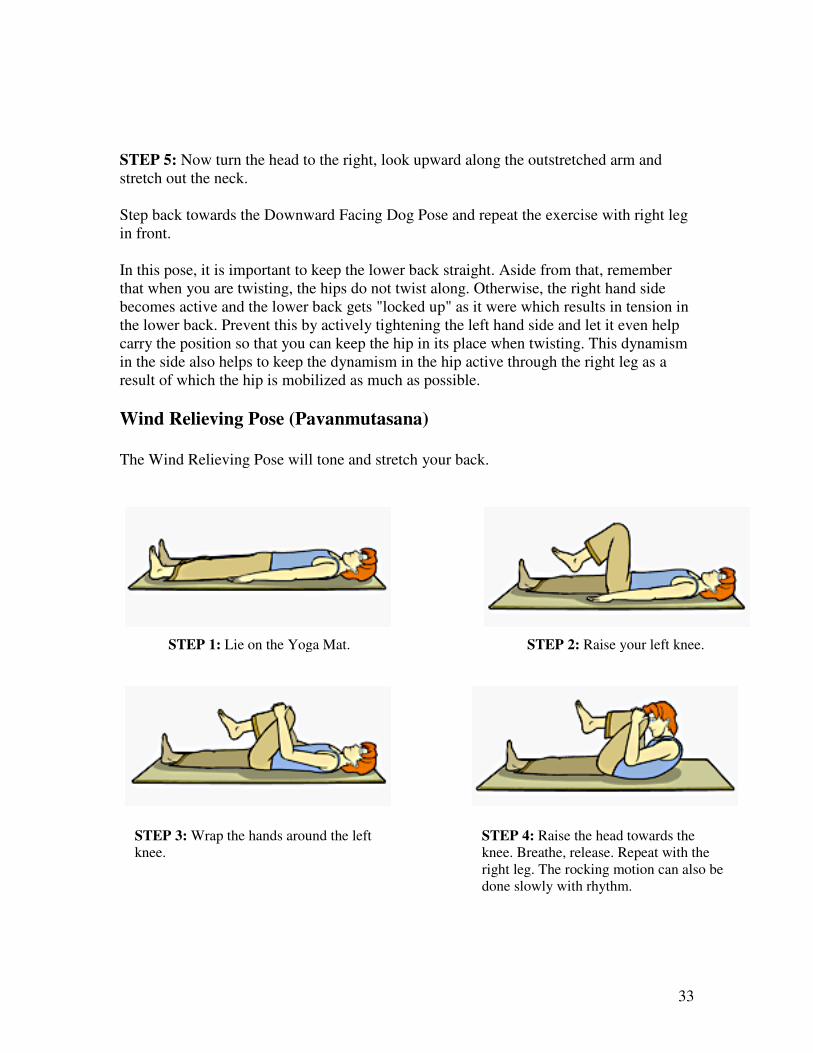
Wind Relieving Pose (Pavanmutasana)
The Wind Relieving Pose will tone and stretch your back.
STEP 1: Lie on the Yoga Mat. STEP 2: Raise your left knee.
STEP 3: Wrap the hands around the left
knee.
STEP 4: Raise the head towards the
knee. Breathe, release. Repeat with the
right leg. The rocking motion can also be
done slowly with rhythm.
34
While practicing the Wind Relieving Pose, resist the tendency to raise the lower back or
buttocks off the ground and try to keep the leg that is on the mat as straight as possible.
Aside from releasing unwanted gases from the intestines and stomach, the exercise will
also massage the abdominal organs and the rocking motion will get rid of the stiffness in
the spine.
Graphics found at: http://yoga.about.com/od/yogaposes/tp/findposes.htm
http://www.abc-of-yoga.com/yogabeginnersguide.asp

35
YOGA
Lesson 5 (Advanced Poses 2)
Objective: The students will be able to:
• Understand and perform yoga exercises
Standard: 10.4 Physical Activity A/C/E
A. Analyze and engage in appropriate physical activities that support
achievement of personal fitness and activity goals
C. Analyze the factors the affect the responses of body systems during
moderate to vigorous physical activity
E. Analyze factors that impact the relationship between regular physical
activity and motor skill development
Equipment/Set up: Music, Mats
Instant Activity: Practice partner jump rope.
Fitness Activity: Warm-up exercises; Easy pose, Standing Forward Bend, Bow,
Sage Twist, Cat Pose, Dog Pose, Bridge, Cobra, Child’s Pose.
Lesson (Unit Specific): Relaxing music playing softly in the background. Each
student will have a mat. Teacher will perform class warm-up exercises. Teacher will
review breathing techniques and previously learned poses. Introduce the following poses;
Full Boat, Revolved Triangle, Half Moon, Teacher will walk around the room to assist
and/or a student leader doing the exercises will help to assist. Students are told if a pose is
not comfortable you can go into Child’s Pose. Ending class with relaxation (Corpse
Pose).
Closure/Cool Down: Did you enjoy the supine poses? How did you feel right
after your workout? Are you interested in doing more yoga in the future?
36
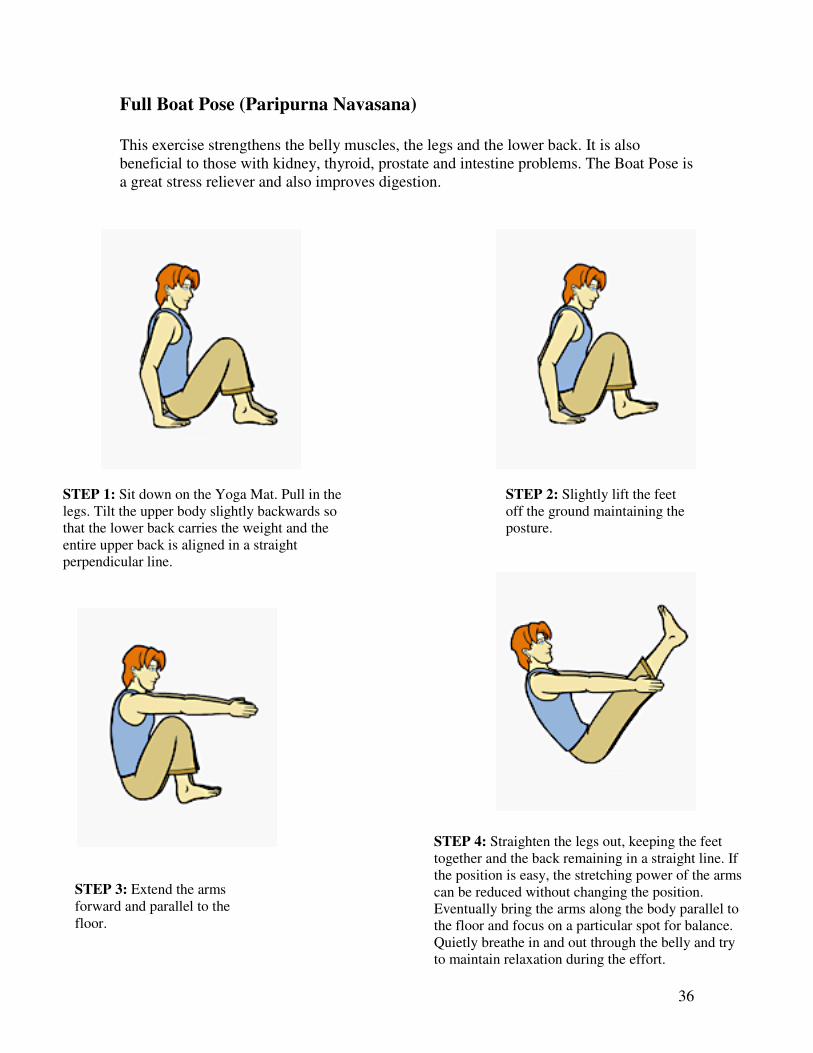
Full Boat Pose (Paripurna Navasana)
This exercise strengthens the belly muscles, the legs and the lower back. It is also
beneficial to those with kidney, thyroid, prostate and intestine problems. The Boat Pose is
a great stress reliever and also improves digestion.
STEP 1: Sit down on the Yoga Mat. Pull in the
legs. Tilt the upper body slightly backwards so
that the lower back carries the weight and the
entire upper back is aligned in a straight
perpendicular line.
STEP 2: Slightly lift the feet
off the ground maintaining the
posture.
STEP 3: Extend the arms
forward and parallel to the
floor.
STEP 4: Straighten the legs out, keeping the feet
together and the back remaining in a straight line. If
the position is easy, the stretching power of the arms
can be reduced without changing the position.
Eventually bring the arms along the body parallel to
the floor and focus on a particular spot for balance.
Quietly breathe in and out through the belly and try
to maintain relaxation during the effort.
37
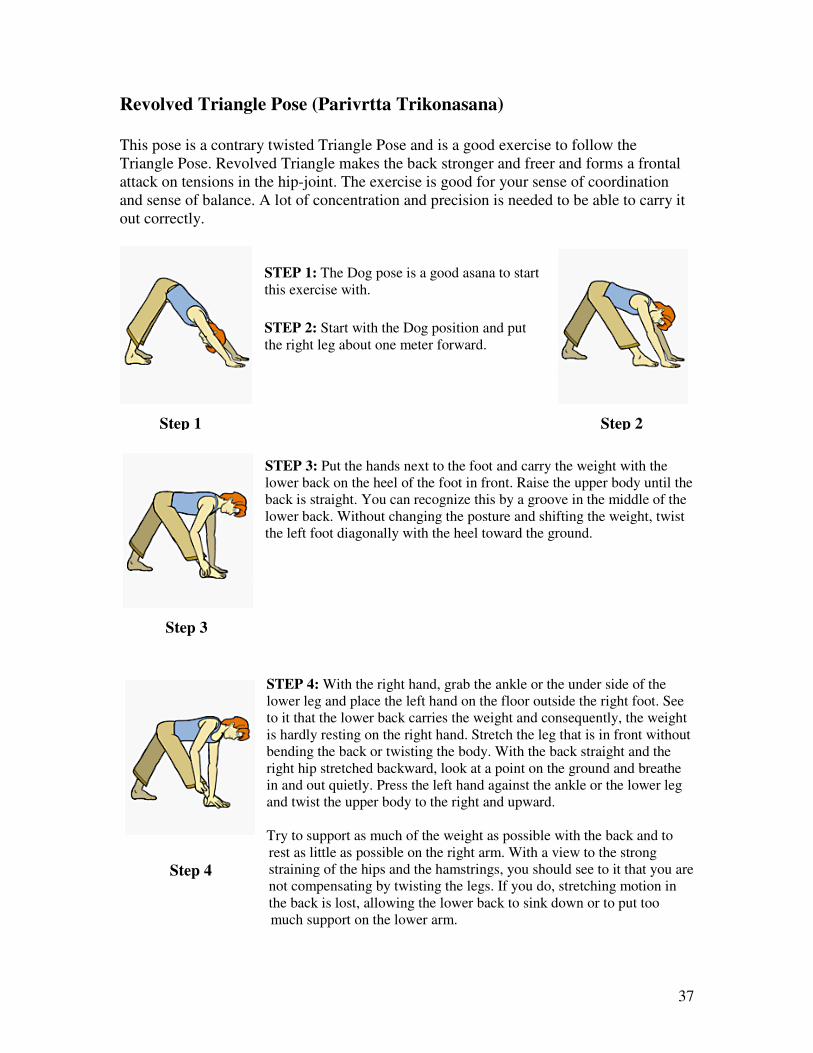
Revolved Triangle Pose (Parivrtta Trikonasana)
This pose is a contrary twisted Triangle Pose and is a good exercise to follow the
Triangle Pose. Revolved Triangle makes the back stronger and freer and forms a frontal
attack on tensions in the hip-joint. The exercise is good for your sense of coordination
and sense of balance. A lot of concentration and precision is needed to be able to carry it
out correctly.
STEP 1: The Dog pose is a good asana to start
this exercise with.
STEP 2: Start with the Dog position and put
the right leg about one meter forward.
STEP 3: Put the hands next to the foot and carry the weight with the
lower back on the heel of the foot in front. Raise the upper body until the
back is straight. You can recognize this by a groove in the middle of the
lower back. Without changing the posture and shifting the weight, twist
the left foot diagonally with the heel toward the ground.
STEP 4: With the right hand, grab the ankle or the under side of the
lower leg and place the left hand on the floor outside the right foot. See
to it that the lower back carries the weight and consequently, the weight
is hardly resting on the right hand. Stretch the leg that is in front without
bending the back or twisting the body. With the back straight and the
right hip stretched backward, look at a point on the ground and breathe
in and out quietly. Press the left hand against the ankle or the lower leg
and twist the upper body to the right and upward.
Try to support as much of the weight as possible with the back and to
rest as little as possible on the right arm. With a view to the strong
straining of the hips and the hamstrings, you should see to it that you are
not compensating by twisting the legs. If you do, stretching motion in
the back is lost, allowing the lower back to sink down or to put too
much support on the lower arm.
Step 1 Step 2
Step 3
Step 4
38
STEP 5: If you cannot twist any further, stretch your
right hand upward.
STEP 6: Then turn the head to the right and upward,
look upwards along the arm and stretch out the neck.
The better the exercise is done, the bigger will be the
triangle between the leg in front, the arm and the side.
When standing well aligned in this position, it will feel
light and spacious.
Step back towards the Dog and repeat the exercise with
your left leg in front.
The exercise often has a strong effect on the pelvis and this easily causes a feeling of an
inclination to wobble or look for a way to compensate it. Try to twist as much as possible
through relaxation and a good alignment. In the case of pain or discomfort, try to avoid
getting stressed and tense as much as possible. Only when you experience the exercise as
extremely difficult should you allow yourself to give the body a little extra support with
the lower arm. For balance, it might help to put the heel of the backward foot against the
baseboard of a wall.
Half Moon (Ardha Chandrasana)
The Half Moon Pose is a standing pose that targets the legs, buttocks, and hips, and
improves balance and strength.
Step 5 Step 6
STEP 1: Start with a
Triangle Pose with
the left hand resting
on the hip.
STEP 2: Slightly bend
the right knee then
move a bit forward.
STEP 3: Move the
right hand forward -
a few inches from
the toes of the right
foot, and raise the
left leg.

39
Graphics found at: http://yoga.about.com/od/yogaposes/tp/findposes.htm
http://www.abc-of-yoga.com/yogabeginnersguide.asp
STEP 4: Exhale and
press the right hand
and right heel into
the floor for balance.
Lift the left leg
parallel to the floor.
STEP 5: Raise the left
hand. It should be
aligned with the right
hand. Bear the weight
on the right leg.
STEP 6: Look up at
the fingers. Stay in
this pose for a few
seconds.
Support Materials
41
Physical Education Lesson Plan Objective:
Standard:
Equipment/Set up:
Lesson Related Instant Activity:
Fitness Activity:
Lesson (Unit Specific):
Closure/Cool Down:
42
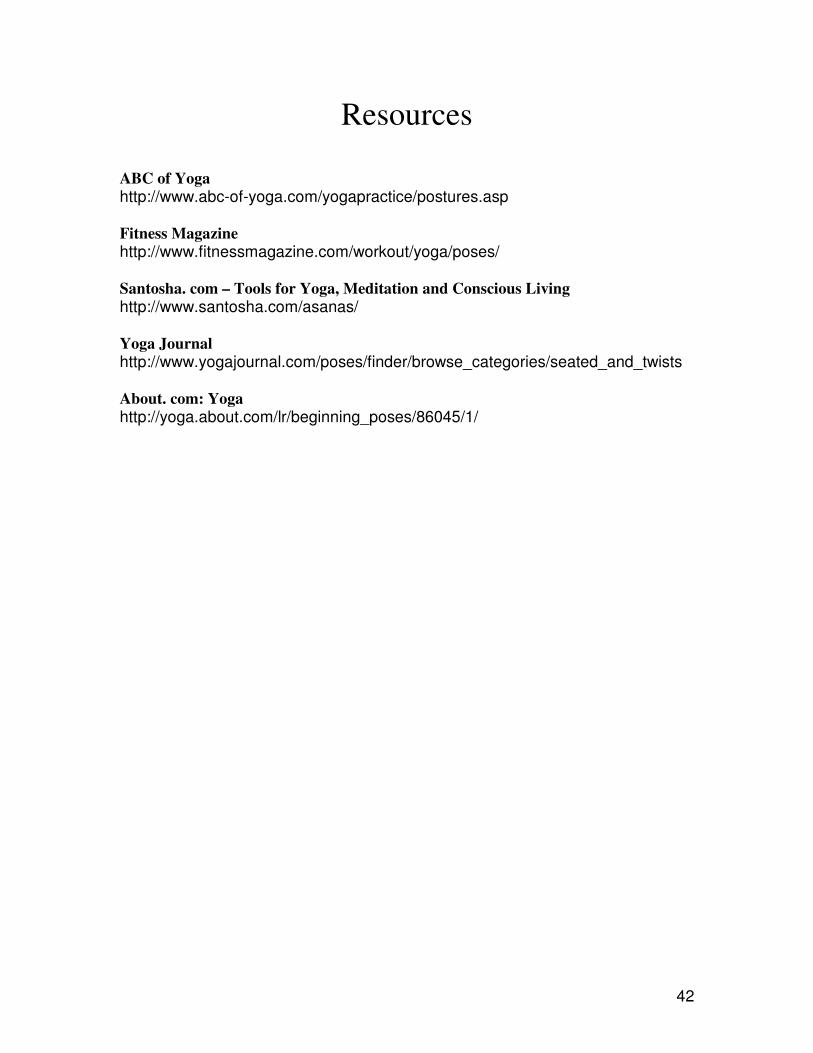
Resources
ABC of Yoga
http://www.abc-of-yoga.com/yogapractice/postures.asp
Fitness Magazine
http://www.fitnessmagazine.com/workout/yoga/poses/
Santosha. com – Tools for Yoga, Meditation and Conscious Living
http://www.santosha.com/asanas/
Yoga Journal
http://www.yogajournal.com/poses/finder/browse_categories/seated_and_twists
About. com: Yoga
http://yoga.about.com/lr/beginning_poses/86045/1/