peoplesoft 8.00.01 human resources peoplebook · travel cmpny dep page.....4-13 tracking dependent...
TRANSCRIPT

PeopleSoft 8.00.01 HumanResources PeopleBookTracking Global Assignments
PeopleSoft 8.00.01 Human Resources PeopleBook: Tracking Global Assignments
SKU MAHRAr8SP1B1200_3
PeopleBooks Contributors: Teams from PeopleSoft Product Documentation andDevelopment.
Copyright © 2001 by PeopleSoft, Inc. All rights reserved.
Printed in the United States of America.
All material contained in this documentation is proprietary and confidential to PeopleSoft,Inc. and is protected by copyright laws. No part of this documentation may be reproduced,stored in a retrieval system, or transmitted in any form or by any means, including, but notlimited to, electronic, graphic, mechanical, photocopying, recording, or otherwise without theprior written permission of PeopleSoft, Inc.
This documentation is subject to change without notice, and PeopleSoft, Inc. does not warrantthat the material contained in this documentation is free of errors. Any errors found in thisdocument should be reported to PeopleSoft, Inc. in writing.
The copyrighted software that accompanies this documentation is licensed for use only instrict accordance with the applicable license agreement which should be read carefully as itgoverns the terms of use of the software and this documentation, including the disclosurethereof.
PeopleSoft, the PeopleSoft logo, PeopleTools, PS/nVision, PeopleCode, PeopleBooks,Vantive, and Vantive Enterprise are registered trademarks, and PeopleTalk and "Peoplepower the internet." are trademarks of PeopleSoft, Inc. All other company and product namesmay be trademarks of their respective owners.

P E O P L E S O F T P R O P R I E T A R Y A N D C O N F I D E N T I A L C O N T E N T S i i i
C o n t e n t s
Tracking Global Assignments
Chapter 1
Overview of Tracking Global Assignments
Before You Begin ............................................................................................................ 1-3
Chapter 2
Setting Up Basic Assignment Information
Defining Global Assignment Types ................................................................................ 2-1
Assignment Type Table Page.................................................................................... 2-1
Defining German Assignment Types................................................................ 2-2
Identifying Reasons for Assignments .............................................................................. 2-2
Creating Checklists.......................................................................................................... 2-3
Defining Deductions and Earnings for Assignment Compensation ................................ 2-3
Deduction Table - Deduction Table Page ................................................................. 2-4
Deduction Table - Deduction Table 2 Page .............................................................. 2-5
Earnings Table Page.................................................................................................. 2-6
Classifying Types of Company-Paid Travel.................................................................... 2-8
Travel Type Table Page ............................................................................................ 2-8
Entering Educational Qualifications and Skills ............................................................... 2-9
Chapter 3
Starting New Assignments
Before You Begin ............................................................................................................ 3-1
Using Checklists to Process Assignments ....................................................................... 3-1
Setting Up the Home and Host Locations ....................................................................... 3-2
Setting Up the Home Location.................................................................................. 3-2
Home/Host Data – Home Host Page................................................................. 3-3
Home/Host Data – Benefits Page...................................................................... 3-5
Setting Up the Host Location .................................................................................... 3-7
Processing Assignments With Multiple Home or Host Data......................................... 3-11
Adding Assignments When an Employee Has Multiple Jobs at Home .................. 3-11
Adding Assignments When an Employee Has Multiple Host Locations................ 3-12

T R A C K I N G G L O B A L A S S I G N M E N T S J A N U A R Y 2 0 0 1
C O N T E N T S i v P E O P L E S O F T P R O P R I E T A R Y A N D C O N F I D E N T I A L
Tying Multiple Home or Host Data to an Assignment ........................................... 3-13
USF Assignment Data – Assignment Home/Host Page.................................. 3-14
Entering Passport and Visa Information........................................................................ 3-15
Setting Up Other Travel Data.................................................................................. 3-16
Working With Dependent Data ..................................................................................... 3-16
Adding Dependents ................................................................................................. 3-16
Dependent Data - Personal Profile Page ................................................................. 3-16
USF Setting Up Dependent Information................................................................. 3-18
Specifying Accompanying Dependents .................................................................. 3-18
Family at Host Page ........................................................................................ 3-18
Adding Dependents to the Host Location ....................................................... 3-20
Removing Dependents From the Host Location ............................................. 3-20
Viewing Data on the Immediate Family ................................................................. 3-20
Immediate Family Page................................................................................... 3-20
Entering Additional Data in the Assignment Data Component..................................... 3-21
Overview of the Assignment Data Component....................................................... 3-21
Entering Assignment Types and Dates ................................................................... 3-22
Assignment Data Page .................................................................................... 3-22
Viewing Summary Home and Host Data ................................................................ 3-23
Assignment Data - Assignment Home/Host Page........................................... 3-24
Entering Residence Information.............................................................................. 3-25
Assignment Data - Residence Home Page...................................................... 3-25
Entering Residence Information for the Host Location .......................................... 3-27
Assignment Data - Residence Host Page ........................................................ 3-27
Tracking Vehicle Information................................................................................. 3-28
Assignment Data - Vehicle Data Page ............................................................ 3-28
Tracking Supplemental Earnings and Deductions .................................................. 3-30
Assignment Compensation Page..................................................................... 3-31
Assignment Compensation Page for Host Locations...................................... 3-33
Handling Currency Fluctuations ............................................................................. 3-36
Implementing Employee Data Security for Global Assignments.................................. 3-36
Setting Up Security Access for Global Assignments .............................................. 3-36
Security for One Home and One Host .................................................................... 3-39
Security for One Home and Multiple, Concurrent Hosts ........................................ 3-40
Security for Permanent Transfers............................................................................ 3-41
Chapter 4
Maintaining Data During the Assignment
Tracking Company-Paid Travel....................................................................................... 4-1
Company Paid Travel Page ....................................................................................... 4-1

J A N U A R Y 2 0 0 1 T R A C K I N G G L O B A L A S S I G N M E N T S
P E O P L E S O F T P R O P R I E T A R Y A N D C O N F I D E N T I A L C O N T E N T S v
Cataloging International Schools and Programs.............................................................. 4-4
School/Program Table Page ...................................................................................... 4-4
School/Program Contact Table Page......................................................................... 4-5
Tracking Educational Reimbursements ........................................................................... 4-6
International School/Program Page........................................................................... 4-6
Maintaining Employee Assignment Data ................................................................. 4-8
Maintaining Assignment Data Related to Dependents .................................................... 4-9
Dependent Data- Personal Profile Page .................................................................... 4-9
USF Setting Up Dependent Information................................................................. 4-11
Depdnt Identification Data - Depdnt Citizenship/Passport Page ............................ 4-11
Tracking Dependent Company-Paid Travel............................................................ 4-12
Travel Cmpny Dep Page ................................................................................. 4-13
Tracking Dependent Educational Reimbursements ................................................ 4-14
Intl School Dep Page....................................................................................... 4-14
Chapter 5
Reviewing Assignment Information
Assignment Summary Page ............................................................................................. 5-1
Reviewing Employee Education, Language, and Driver’s License Data ........................ 5-2
Chapter 6
Processing Assignment Changes
Ending Assignments ........................................................................................................ 6-1
Sending Employees on New Assignments ...................................................................... 6-1
Home/Host Data – Home Host Page......................................................................... 6-2
Transferring Employees Permanently ............................................................................. 6-3
Chapter 7
Using Global Assignment Reports
List of Global Assignment Reports ................................................................................. 7-1
Generating the Passport/Visa Expiration Report ............................................................. 7-1
Passport/Visa Expiration Page .................................................................................. 7-2
Passport/Visa Expiration Report ............................................................................... 7-2
Generating the Employees on Assignment Report .......................................................... 7-3
Employees on Assignment - Run Control Page ........................................................ 7-3
Employees on Assignment Report ............................................................................ 7-3
Index


P E O P L E S O F T P R O P R I E T A R Y A N D C O N F I D E N T I A L P R E F A C E i
T R A C K I N G G L O B A L A S S I G N M E N T S
This book provides you with the information you will need for implementing and using the
Tracking Global Assignments module of PeopleSoft Human Resources. You can order the online
version by requesting SKU HRB8SP1R0, or the hardcopy version by requesting SKU
MAHRAr8SP1B 1200.
This book, Tracking Global Assignments, documents how you use your system to process large
amounts of information on employees as they move from project to project. International moves
require passport and visa tracking, relocation packages, and so forth. PeopleSoft Human
Resources makes it easy for you to track all the details and ensure smooth transitions for
employees going on global assignments.
Overview of Tracking Global Assignments describes the steps you follow to process global
assignments for your employees.
Setting Up Basic Assignment Information describes how you track information on employees as
they move from project to project. You learn how to classify types of assignments, organize
travel data and even store data regarding children’s schools.
Starting New Assignments describes how you track new assignment details, including additional
employee earnings and deductions, different benefits packages, and personal affairs such as the
disposition of housing, vehicles and furniture.
Maintaining Data During the Assignment describes additional features that include maintaining
detailed information on documents and paperwork required for visas and permits as well as
tracking company-paid travel information.
Reviewing Assignment Information describes how you view information about employees’
assignment dates, location, and other details including assignment type, department, company,
position number, business unit, and job code.
Processing Assignment Changes describes the process for sending employees on new
assignments, as well as how to end assignments, and transfer employees permanently.
Using Global Assignment Reports discusses how to generate PeopleSoft Tracking Global
Assignments reports and details the output results of those reports.


P E O P L E S O F T P R O P R I E T A R Y A N D C O N F I D E N T I A L O V E R V I E W O F T R A C K I N G G L O B A L A S S I G N M E N T S 1 - 1
C H A P T E R 1
Overview of Tracking Global
Assignments
If your organization has operations in more than one country, you often have to process large
amounts of information about employees as they move from project to project. International
moves require such things as passport and visa tracking and relocation packages. PeopleSoft
Human Resources makes it easy for you to track all the details and ensure smooth transitions for
employees going on global assignments.
Types of Global Assignments
With PeopleSoft Human Resources, you can process several types of temporary assignments:
• Expatriate. You send employees from their home base to other countries or locations.
• Inpatriate. You bring employees from other countries to work in your company’s home
country.
• Third country nationals. Employees who are citizens of one country but have a home base in a
second country go on assignment to a third country. For example, a Canadian citizen with a
home base in the U.S. may go on assignment to Saudi Arabia.
Although each of these situations is different, you process them all the same way in PeopleSoft
Human Resources.
Temporary Versus Permanent Assignments
Before you process a new assignment, you first need to determine whether the assignment is
temporary or permanent.
In a temporary assignment, you expect the employee to return to a home base when the
assignment ends. Before your employee leaves for a temporary global assignment, you must have
already established a home base for him or her, where you keep central employee, benefit, and
payroll data for that employee. You keep this information at the location where the employee is
permanently based, such as your corporate headquarters.
For temporary assignments, even those that last up to several years, you’ll keep information on an
employee at his or her current home base and create new records to track employee data for the
new location. The new location is referred to as the host location.
You’ll need to maintain simultaneously two sets of employee data: one set is home data and the
other is host data for the new assignment abroad.

T R A C K I N G G L O B A L A S S I G N M E N T S J A N U A R Y 2 0 0 1
1 - 2 O V E R V I E W O F T R A C K I N G G L O B A L A S S I G N M E N T S P E O P L E S O F T P R O P R I E T A R Y A N D C O N F I D E N T I A L
To keep two sets of current data for an employee, you create new employment record numbers,
which precludes you from overwriting existing home information.
For more information about employment record numbers, see Administering Your
Workforce: Working with Multiple Employment Record Numbers.
A permanent assignment is one where the host location becomes the employee’s new home base.
You don’t expect the employee to return to his or her previous home base. For permanent
assignments, all employee, benefit, and payroll data tracking should occur at the new location.
You no longer need to keep employee data at the previous home base. When employees change
to permanent assignments elsewhere, you transfer employee data using the Job Data pages in the
Administer Workforce menu.
For more information about transferring employees, see Administer Your Workforce:
Updating Workforce Information.
To Process Employees for a Global Assignment:
1. Ensure that employees have home data-standard, permanent personnel administration data in
PeopleSoft Human Resources, including employee IDs.
2. Set up data for dependents who are to accompany the employee on the assignment, including
dependents who aren’t members of the immediate family, such as nannies.
3. Use checklists, standard or modified, to help you remember all the specific tasks required to
process an assignment.
4. Establish host data for each assignment, such as location, job code, and department.
5. Enter assignment details, including the start and end date of the assignment, the disposition of
the employee residence, vehicle information, and furniture arrangements.
6. Enter payment instructions for supplemental earnings or deductions, such as cost-of-living
adjustments, school tuition reimbursements, hypothetical tax deductions, and housing
allowances.
7. When the assignment is completed, enter the end date.
PeopleSoft Human Resources also contains several supplemental pages to help you process
assignments. You can:
• Enter identification data, such as passport and citizenship information for employees and their
dependents.
• Track visas and permits required for employees and their dependents to work and live in the
host country (or, in the case of some dependents, to visit).
• Track company-paid travel for which employees and dependents are eligible.

J A N U A R Y 2 0 0 1 T R A C K I N G G L O B A L A S S I G N M E N T S
P E O P L E S O F T P R O P R I E T A R Y A N D C O N F I D E N T I A L O V E R V I E W O F T R A C K I N G G L O B A L A S S I G N M E N T S 1 - 3
• Provide information on international schools and programs, such as recommended schools for
children, and language and orientation classes for employees and their spouses.
• Review educational qualifications, competencies, accomplishments, and languages of
employees to help you choose the right employees for assignments.
Before You Begin
You’ll find all the core and local country setup tables, pages, and functionality described in this
section in the Track Global Assignments (GBL) menu. You'll also find the appropriate core and
local functionality in the applicable local country menus.
Use the Track Global Assignments menu that’s appropriate for your implementation of
PeopleSoft Human Resources. If you’re not sure which menu you should use, ask your human
resources project leader.
We discuss the system using the pages in the Global (GBL) menus as our examples. If these
discussions don’t cover the functionality of a page located in one of the local country menus,
we discuss the local country page separately in its entirety.
Most of the global assignment tables are effective-dated, which means you can track changes you
make to data chronologically. You won’t lose any data history, it’s all there for you to review.
When you set up standard assignment codes, be sure to enter effective dates that are before the
effective dates of any global assignments you process. Otherwise, the system doesn’t display all
the valid codes when you select from prompt lists in the Track Global Assignments pages. We
recommend that you use a date such as January 1, 1980, to ensure that the effective date accounts
for assignment history.
Before you start working with the tables described in this section, make sure both the global and
relevant local country setup tables and HRMS (human resource management system) control
tables have been established.
For more information about control tables and effective-dating, see PeopleSoft Application
Fundamentals for HRMS: Setting Up Control Tables.
With the Track Global Assignments business process, you work with international currencies, so
make sure you have set up all of the currencies you will use.
For more information about the Currency Code, Exchange Rate Type, and Currency Rate
Type tables, see PeopleSoft Application Fundamentals for HRMS: Working with Currencies.

T R A C K I N G G L O B A L A S S I G N M E N T S J A N U A R Y 2 0 0 1
1 - 4 O V E R V I E W O F T R A C K I N G G L O B A L A S S I G N M E N T S P E O P L E S O F T P R O P R I E T A R Y A N D C O N F I D E N T I A L
If you have implemented multiple business units and setIDs in your PeopleSoft Human Resources
system, the information that you use and create will be determined by how business unit and
setID functionality has been set up for your user ID.
For more information about how business unit and setID functionality impacts your HRMS
system and regulates control table and prompt table values, see PeopleSoft Application
Fundamentals for HRMS: Regulating HRMS System Data.

P E O P L E S O F T P R O P R I E T A R Y A N D C O N F I D E N T I A L S E T T I N G U P B A S I C A S S I G N M E N T I N F O R M A T I O N 2 - 1
C H A P T E R 2
Setting Up Basic Assignment
Information
If your organization has operations in more than one country, you often have to process large
quantities of information on employees as they move from project to project. International moves
encompass such issues as passport and visa tracking, and relocation packages. PeopleSoft
Human Resources makes it easy for you to track all the details and ensure smooth transitions for
employees going on global assignments.
Before you begin tracking global assignments, you set up a base of codes to streamline and
standardize data entry. You can classify types of assignments, organize travel data such as
passports and visas, and create standard checklists for reference. You can also store pertinent
data on children’s schools and orientation or language classes to help employees get settled more
quickly.
Defining Global Assignment Types
Because you may send employees on many types of global assignments, you’ll find it helpful to
categorize assignments by groups, such as extended business travel or foreign service.
Assignment Type Table Page
Usage Use the Assignment Type Table page to create new employee
assignments.
Object Name ASSGN_TYPE_TABLE
Navigation • Administer Workforce, Track Global Assignments (GBL), Setup,
Assignment Type Table, Assignment Type Table
• Administer Workforce, Track Global Assignments (USF), Setup,
Assignment Type Table, Assignment Type Table
Prerequisites None
Access
Requirements
Enter an Assignment Type.
T R A C K I N G G L O B A L A S S I G N M E N T S J A N U A R Y 2 0 0 1
2 - 2 S E T T I N G U P B A S I C A S S I G N M E N T I N F O R M A T I O N P E O P L E S O F T P R O P R I E T A R Y A N D C O N F I D E N T I A L
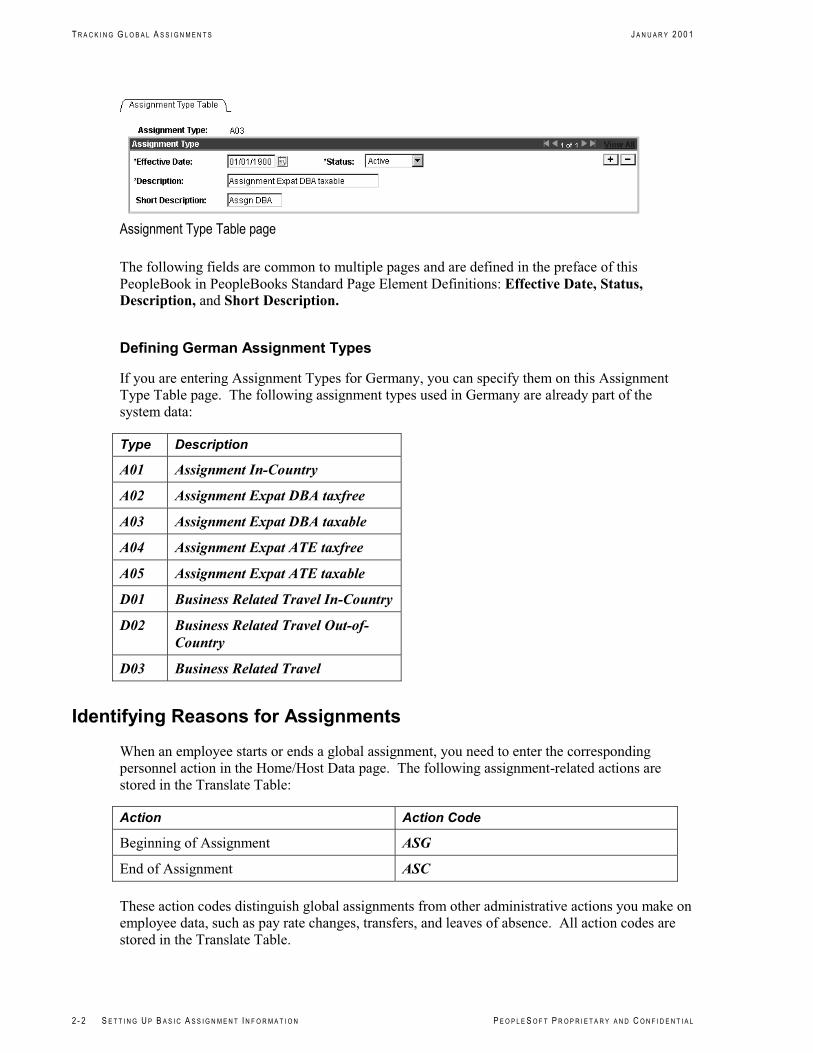
Assignment Type Table page
The following fields are common to multiple pages and are defined in the preface of this
PeopleBook in PeopleBooks Standard Page Element Definitions: Effective Date, Status,
Description, and Short Description.
Defining German Assignment Types
If you are entering Assignment Types for Germany, you can specify them on this Assignment
Type Table page. The following assignment types used in Germany are already part of the
system data:
Type Description
A01 Assignment In-Country
A02 Assignment Expat DBA taxfree
A03 Assignment Expat DBA taxable
A04 Assignment Expat ATE taxfree
A05 Assignment Expat ATE taxable
D01 Business Related Travel In-Country
D02 Business Related Travel Out-of-
Country
D03 Business Related Travel
Identifying Reasons for Assignments
When an employee starts or ends a global assignment, you need to enter the corresponding
personnel action in the Home/Host Data page. The following assignment-related actions are
stored in the Translate Table:
Action Action Code
Beginning of Assignment ASG
End of Assignment ASC
These action codes distinguish global assignments from other administrative actions you make on
employee data, such as pay rate changes, transfers, and leaves of absence. All action codes are
stored in the Translate Table.

J A N U A R Y 2 0 0 1 T R A C K I N G G L O B A L A S S I G N M E N T S
P E O P L E S O F T P R O P R I E T A R Y A N D C O N F I D E N T I A L S E T T I N G U P B A S I C A S S I G N M E N T I N F O R M A T I O N 2 - 3
You might also want to identify specific reasons for sending employees on assignments. For
example, you might process some assignments that are due to a transfer of skills and others due to
a shortage of skilled personnel locally. To track assignment types more easily, you’ll find it
helpful to specify reasons for them.
Use the Action Reason Table to set up reasons specific to global assignments. This table is in
both the Track Global Assignments and Administer Workforce menus. You can use the table
in either menu because it is the same table. Once you’ve defined the codes, you can enter them in
the Home/Host Data page.
For more information about the Action Reason Table, see Administering Your Workforce.
Creating Checklists
Much of the information you process for different assignment types and countries remains
constant. To save yourself work (not to mention data entry errors or omissions), you can create
standard checklists to help you speed through global assignment processing without forgetting
any details. For employees with special situations, you can use standard checklists as the basis
for creating modified checklists.
To help you set up checklists easily, we’ve included the Checklist Item Table and Checklist Table
in the Track Global Assignments menu. You can also use the tables in the Administer
Workforce menu because they are the same tables.
For more information about the Checklist tables, see Administering Your Workforce.
Defining Deductions and Earnings for Assignment Compensation
Global assignments may change an employee’s compensation at the permanent and assignment
locations. Use the Deduction and Earnings tables to enter any deduction and earnings codes
required for global assignment compensation.
If you’re planning to use the codes you set up exclusively to track assignment compensation, use
the Assignment Compensation pages in the Track Global Assignments menu. The system
displays only the first page for each table because that’s what you’ll need to set up codes and
descriptions for assignments only.
Setting Up Assignment Compensation for PeopleSoft North American Payroll
If your organization has implemented PeopleSoft North American Payroll, use the Earnings and
Deduction tables in the Define Payroll Process, Pay Process menu. Don’t use the Track
Global Assignments menu, because it includes only the first and you’ll need to set up
information in all the pages for each table.

T R A C K I N G G L O B A L A S S I G N M E N T S J A N U A R Y 2 0 0 1
2 - 4 S E T T I N G U P B A S I C A S S I G N M E N T I N F O R M A T I O N P E O P L E S O F T P R O P R I E T A R Y A N D C O N F I D E N T I A L
We recommend that you make the tables in the Track Global Assignments menu display-only
to ensure that all updates take place using the pages in the Pay Process menu.
For more information about the Earnings and Deductions tables, see PeopleSoft 8 Payroll for
North America PeopleBook. For more information about making pages display-only, see
PeopleSoft Application Designer.
Deduction Table - Deduction Table Page
Usage Use the Deduction Table - Deduction Table page to add deduction codes
and classification information. You may want to define special
deduction codes to use exclusively for global assignments.
Object Name DEDUCTION_TABLE1
Navigation • Define Business Rules, Define General Data (NLD), Setup,
Deduction Table, Deduction Table
• Define Business Rules, Define Payroll Interface, Setup, Deduction
Table, Deduction Table1
• Define Business Rules, Define Payroll Process, Setup 1, Deduction
Table, Deduction Table1
• Define Business Rules, Define Payroll Process (USF), Setup 1,
Deduction Table, Deduction Table1
• Administer Workforce, Track Global Assignments (GBL), Setup,
Deduction Table, Deduction Table
• Administer Workforce, Track Global Assignments (USF), Setup,
Deduction Table, Deduction Table
Prerequisites None
Access
Requirements
Enter a Plan Type and a Deduction Code. For deduction codes for global
assignments, enter a Plan Type of 00.

J A N U A R Y 2 0 0 1 T R A C K I N G G L O B A L A S S I G N M E N T S
P E O P L E S O F T P R O P R I E T A R Y A N D C O N F I D E N T I A L S E T T I N G U P B A S I C A S S I G N M E N T I N F O R M A T I O N 2 - 5
Deduction Table - Deduction Table page
The following fields are common to multiple pages and are defined in the preface of this
PeopleBook in PeopleBooks Standard Page Element Definitions: Effective Date, Description,
and Short Description.
Don’t enter information in any fields on this page except Effective Date, Deduction
Description, and Short Description. If you do, the system will assume the code you define
here is for payroll purposes when you enter the code in other assignment pages. You’ll also
get an error message because you didn’t fill in all the required fields on the other pages for
the table in the Pay Process menu.
Deduction Table - Deduction Table 2 Page
Usage Use the Deduction Table - Deduction Table 2 page to define what kind
of tax treatment to give to assignment deductions.
Object Name DEDUCTION_TABLE2
Navigation • Define Business Rules, Define General Data (NLD), Setup,
Deduction Table, Deduction Table2
• Define Business Rules, Define Payroll Interface, Setup, Deduction
Table, Deduction Table2
• Define Business Rules, Define Payroll Process, Setup 1, Deduction
Table, Deduction Table2
• Define Business Rules, Define Payroll Process (USF), Setup 1,
Deduction Table, Deduction Table2
• Administer Workforce, Track Global Assignments (GBL), Setup,
Deduction Table, Deduction Table2
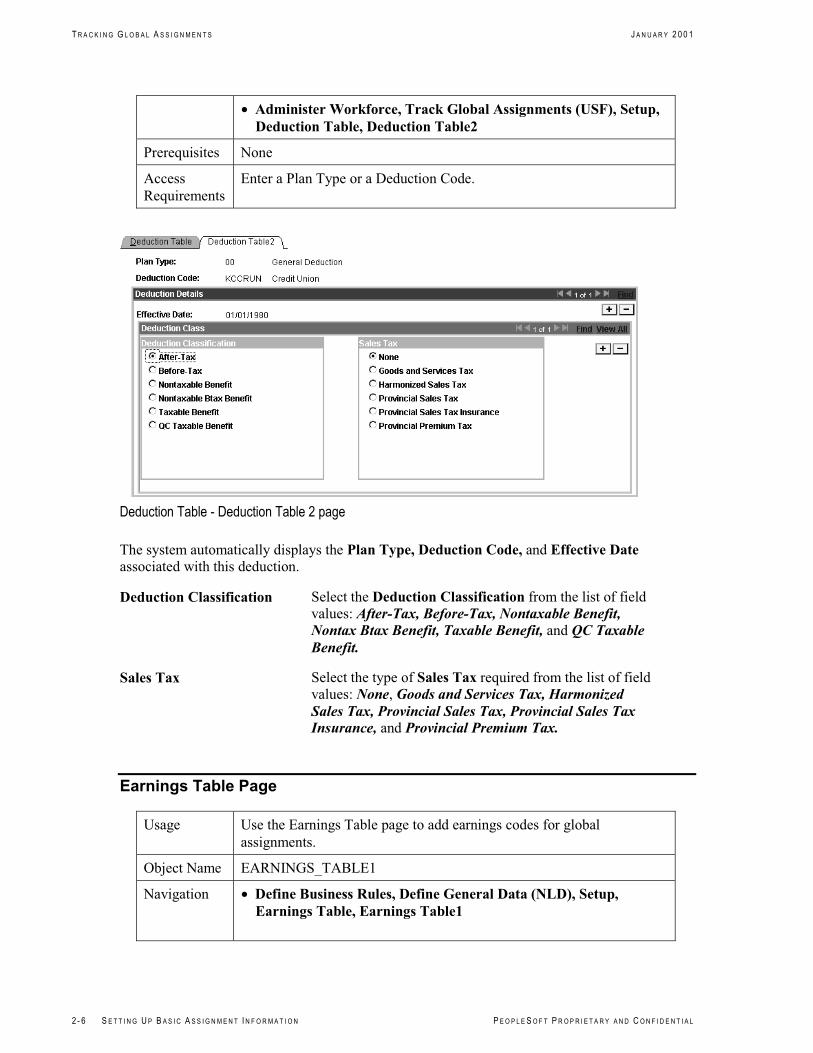
T R A C K I N G G L O B A L A S S I G N M E N T S J A N U A R Y 2 0 0 1
2 - 6 S E T T I N G U P B A S I C A S S I G N M E N T I N F O R M A T I O N P E O P L E S O F T P R O P R I E T A R Y A N D C O N F I D E N T I A L
• Administer Workforce, Track Global Assignments (USF), Setup,
Deduction Table, Deduction Table2
Prerequisites None
Access
Requirements
Enter a Plan Type or a Deduction Code.
Deduction Table - Deduction Table 2 page
The system automatically displays the Plan Type, Deduction Code, and Effective Date
associated with this deduction.
Deduction Classification Select the Deduction Classification from the list of field
values: After-Tax, Before-Tax, Nontaxable Benefit,
Nontax Btax Benefit, Taxable Benefit, and QC Taxable
Benefit.
Sales Tax Select the type of Sales Tax required from the list of field
values: None, Goods and Services Tax, Harmonized
Sales Tax, Provincial Sales Tax, Provincial Sales Tax
Insurance, and Provincial Premium Tax.
Earnings Table Page
Usage Use the Earnings Table page to add earnings codes for global
assignments.
Object Name EARNINGS_TABLE1
Navigation • Define Business Rules, Define General Data (NLD), Setup,
Earnings Table, Earnings Table1

J A N U A R Y 2 0 0 1 T R A C K I N G G L O B A L A S S I G N M E N T S
P E O P L E S O F T P R O P R I E T A R Y A N D C O N F I D E N T I A L S E T T I N G U P B A S I C A S S I G N M E N T I N F O R M A T I O N 2 - 7
• Define Business Rules, Define Payroll Interface, Setup, Earnings
Table, Earnings Table1
• Define Business Rules, Define Payroll Process, Setup 1, Earnings
Table, Earnings Table1
• Define Business Rules, Define Payroll Process (USF), Setup 1,
Earnings Table, Earnings Table1
• Administer Workforce, Track Global Assignments (GBL), Setup,
Earnings Table, Earnings Table
• Administer Workforce, Track Global Assignments (USF), Setup,
Earnings Table, Earnings Table
Prerequisites None
Access
Requirements
Enter an Earnings Code.
Earnings Table page
The following fields are common to multiple pages and are defined in the preface of this
PeopleBook in PeopleBooks Standard Page Element Definitions: Effective Date, Status,
Description, and Short Description.
Don’t enter information in any fields on this page except Effective Date, Earnings
Description, and Short Description. If you do, the system will assume the code you define
here is for payroll purposes when you enter the code in other assignment pages. You’ll also
get an error message because you didn’t fill in all the required fields on the other pages for
the table in the Pay Process menu.

T R A C K I N G G L O B A L A S S I G N M E N T S J A N U A R Y 2 0 0 1
2 - 8 S E T T I N G U P B A S I C A S S I G N M E N T I N F O R M A T I O N P E O P L E S O F T P R O P R I E T A R Y A N D C O N F I D E N T I A L
Classifying Types of Company-Paid Travel
Assignments can involve a number of different types of company-paid travel. You’ll need to
identify those situations where the company pays for travel, such as home leave, dependent visits,
or rest and recreation for employees in hardship locations.
Travel Type Table Page
Usage Use the Travel Type Table page to identify the situations where the
company pays for employee and dependent travel. Use the codes you
set up here to make travel arrangements for employees and their
dependents in the Company Paid Travel page.
Object Name TRAVEL_TYPE_TABLE
Navigation • Administer Workforce, Track Global Assignments (GBL), Setup,
Travel Type Table, Travel Type Table
• Administer Workforce, Track Global Assignments (USF), Setup,
Travel Type Table, Travel Type Table
Prerequisites None
Access
Requirements
Enter Type of Travel.
Travel Type Table page
The following fields are common to multiple pages and are defined in the preface of this
PeopleBook in PeopleBooks Standard Page Element Definitions: Effective Date, Status,
Description, and Short Description.
Home Leave Define the Home Leave for a travel type that indicates
employees are going on leave to their home (permanent)
location.
If you specify a Home Leave when you are using the
Company Paid Travel page to track employees on
company-paid travel, the system automatically sets the To
location of the travel to the employee home domicile
information you defined for the assignment.

J A N U A R Y 2 0 0 1 T R A C K I N G G L O B A L A S S I G N M E N T S
P E O P L E S O F T P R O P R I E T A R Y A N D C O N F I D E N T I A L S E T T I N G U P B A S I C A S S I G N M E N T I N F O R M A T I O N 2 - 9
Entering Educational Qualifications and Skills
To identify the best-qualified employees to send on assignments, you’ll want to review employee
educational qualifications and skills and keep them up-to-date with any additional education and
skills they have acquired during assignments.
To keep an accurate record of employee education and skills, you may need to enter assignment-
specific school codes, major codes, or skill codes. For example, you could enter new skills that
employees on temporary assignments have acquired as a result of the assignment.
To set up codes specific to global assignments, you will use the Major, School, and Competency
tables in the Track Global Assignments menu. You can also use these tables in the Manage
Competencies menu because they are the same tables.
For more information about the School Table, Major Table, and Competency Table, see
Managing Competency Training.


P E O P L E S O F T P R O P R I E T A R Y A N D C O N F I D E N T I A L S T A R T I N G N E W A S S I G N M E N T S 3 - 1
C H A P T E R 3
Starting New Assignments
When you send an employee on a global assignment, you need to track several types of
information in addition to standard Administering Your Workforce, payroll, and benefit data.
This special assignment data includes the following:
• New assignment details
• Additional employee earnings and deductions
• Different benefits packages
You might also be responsible for administering aspects of an employee’s personal affairs, such
as the disposition of housing, vehicles, and furniture.
With PeopleSoft Human Resources, it’s easy to track the many tasks involved in getting
employees and their dependents to their new locations. You’ll use several pages and tools to
process each global assignment quickly and smoothly. As you track the specifics of each
assignment, you can continue to maintain the employee’s permanent information.
Before You Begin
Before you can process a global assignment, you must have already hired the employee. In other
words, a human resources record and Employee ID must already exist in the PeopleSoft Human
Resources system for the employee.
You must also make sure the Multiple Jobs Allowed check box in the PeopleTools Options page
is turned on so that you can use multiple employment record numbers for employees. An
assignment is a type of concurrent job.
For more information about hiring employees, see Hiring Your Workforce. For more
information about enabling multiple jobs, see Working with Multiple Jobs.
Using Checklists to Process Assignments
Checklists make it easier to remember all the details involved in getting employees and their
accompanying dependents to their new locations. You can use one of the standard lists you
create in the Checklist table, or you can create a modified checklist for the particular employee
whose assignment you’re processing.

T R A C K I N G G L O B A L A S S I G N M E N T S J A N U A R Y 2 0 0 1
3 - 2 S T A R T I N G N E W A S S I G N M E N T S P E O P L E S O F T P R O P R I E T A R Y A N D C O N F I D E N T I A L
To tailor a checklist for an employee, use the Employee Checklist page. We’ve included this
page in the Track Global Assignments menu. You can also use the same page from the
Administer Workforce menu.
For more information about creating standard checklists in the Checklist table, see Creating
Checklists.
For more information about creating checklists for individual employees, see Setting Up
Employee Checklists.
Setting Up the Home and Host Locations
The first step in processing employee global assignments is to establish home and benefits data.
This is an employee’s permanent data. You’ll maintain this information at the employee’s home
base, such as corporate headquarters or your firm’s main office in Europe. You must set up home
and benefits data before you can set up data for the host location where the employee’s
assignment will take place.
Setting Up the Home Location
The home location is an employee’s permanent location. This is the place where the employee
returns once a temporary assignment has ended, or where he or she gets information about the
next global assignment.
Establishing home data requires the same steps as entering a newly hired employee into
PeopleSoft Human Resources. If the employee already has a record in the system, you don’t need
to do anything else. You should already have most of the required employee’s home data. If the
person is a new employee who doesn’t have a personnel record in PeopleSoft Human Resources,
you must enter the person into the system before you can process the assignment.
In some cases an employee may have more than one job at home, and as a result has more than
one home human resources record.
For more information about working with multiple home records, see Processing
Assignments With Multiple Home or Host Data.
For more information about hiring employees, see Hiring Your Workforce.

J A N U A R Y 2 0 0 1 T R A C K I N G G L O B A L A S S I G N M E N T S
P E O P L E S O F T P R O P R I E T A R Y A N D C O N F I D E N T I A L S T A R T I N G N E W A S S I G N M E N T S 3 - 3
Home/Host Data – Home Host Page
Usage Use the Home Host page to view and update data from the employee data
pages that is pertinent to global assignments.
Object Name HOME_HOST_DATA
Navigation • Administer Workforce, Track Global Assignments (GBL), Use,
Home/Host Data, Home/Host Data
• Administer Workforce, Track Global Assignments (USF), Use,
Home/Host Data, Home/Host Data
Prerequisites You must have previously hired the employee and entered him or her in
the Hire component of the Administer Workforce (GBL) menu.
Access
Requirements
Enter the EmplID.
Home/Host Data – Home Host page
The following elements are common to multiple pages in this application and are defined in the
preface of this PeopleBook in PeopleBooks Standard Page Element Definitions: EmplID,
EmplRcd#, Effective Date, Status, Business Unit, and Company.
The system displays much of the data you entered when you hired the employee. Most fields are
unavailable for new data. If you need to change any of the unavailable fields, use the Job Data,
pages in the Administer Workforce (GBL) menu. These fields are documented in the Hiring
Your Workforce Peoplebook.
Action Date The system displays the date when this transaction was
entered.

T R A C K I N G G L O B A L A S S I G N M E N T S J A N U A R Y 2 0 0 1
3 - 4 S T A R T I N G N E W A S S I G N M E N T S P E O P L E S O F T P R O P R I E T A R Y A N D C O N F I D E N T I A L
Action/Reason The system displays the Action/Reason for a change to an
employee’s record.
Job Indicator Use this field to indicate whether the employee’s job at the
home location is the primary job or a secondary job.
Select N/A (not applicable) if those choices don’t apply to
this employee. The system hides this field if your
organization doesn’t allow employees to have multiple
jobs.
Position Number The system displays a Position Number for this
employee. You define positions in the Position Data
pages.
Position Data Override The system displays whether exceptions to the default
position data for this employee may be made.
Position Management
Record
This box is selected when you’ve made changes to fields
in the Position Data pages that overlap with fields here.
For more information about hiring employees when
you’re using full or partial position management, see
Administering Your Workforce, “Hiring Your
Workforce”.
Reg Region (regulatory
region)
The system displays the employee’s regulatory region
defined in the Administer Workforce menus.
Department The system displays the code for the department into
which the employee was hired. The system stores valid
values in the Department Table - Department Profile Page.
Location The system displays the department Location, but only if
the Default Location SetID that you defined in the
Department Table matches the control Location SetID
defined for that Business Unit in the TableSet Control -
Record Group Page. You can change the Location code,
if necessary. You define Location codes in the Location
Table.
Job Code The system displays the employee’s Job Code. The
system stores valid Job Codes on the Job Code Table.
Payroll System Select a Payroll System. The default value is the Payroll
system you selected on the Job Data - Payroll Page.
Supervisor The system defaults the Supervisor you entered on the
Employment Data - Employment Information Page.
Pay Group The system displays the employee’s Pay Group.
Employee Type defaults from the Pay Group Table.
J A N U A R Y 2 0 0 1 T R A C K I N G G L O B A L A S S I G N M E N T S
P E O P L E S O F T P R O P R I E T A R Y A N D C O N F I D E N T I A L S T A R T I N G N E W A S S I G N M E N T S 3 - 5
Tax Location The system establishes federal, state, and local employee
tax data and tax distribution data according to the
information you establish on your Tax Location table.
Work Period The standard Work Period is the time period in which
employees must complete the Standard Hours. Valid
values are stored on Frequency table:
The system uses the annualization factor of the Standard
Work Period in combination with the Standard Hours to
calculate FTE (full-time equivalency).
For more information about Standard Work Period
defaulting, see PeopleSoft 8 Application Fundamentals for
HRMS, “Setting Up Control Tables”.
Employee Type This value depends on the Pay Group. The system fills in
the field with the default value from the Pay Group Table.
If an Employee Type doesn’t exist for this Pay Group,
you’ll need to establish one in the Pay Group Table.
Std Hours Std Hours defines how many hours the employee should
work in the job.
For more information about benefit programs, see PeopleSoft 8 Benefits Administration.
Home/Host Data – Benefits Page
Use the Home/Host Data-Benefits page to add or view benefits data from employee data pages
that are pertinent to global assignments.
Usage Use the Home/Host Data-Benefits page to add or view benefits data from
employee data pages that are pertinent to global assignments.
Object Name JOB_DATA_BENPRG
Navigation • Compensate Employees, Administer Pension Plan, Use, Payee Job
Data, Benefit Program Data
• Administer Workforce, Administer Workforce (GBL), Use, Add
Concurrent Job, Benefit Program Participation
• Administer Workforce, Administer Workforce (GBL), Use, Add
Non-Employee, Benefit Program Participation
• Administer Workforce, Administer Workforce (GBL), Use,
Current Job, Benefit Program Particiption

T R A C K I N G G L O B A L A S S I G N M E N T S J A N U A R Y 2 0 0 1
3 - 6 S T A R T I N G N E W A S S I G N M E N T S P E O P L E S O F T P R O P R I E T A R Y A N D C O N F I D E N T I A L
• Administer Workforce, Administer Workforce (GBL), Use, Hire,
Benefit Program Participation
• Administer Workforce, Administer Workforce (GBL), Use, Job
Data, Benefit Program Participation
• Administer Workforce, Administer Workforce (USF), Use, Current
Job, Benefit Program Particiption
• Develop Workforce, Recruit Workforce (GBL), Use, Hire
Applicant, Benefit Program Participation
• Administer Workforce, Track Global Assignments (GBL), Use,
Home/Host Data, Job Data Benprg
• Administer Workforce, Track Global Assignments (USF), Use,
Home/Host Data, Job Data Benprg
Prerequisites You must have previously hired the employee and entered him or her in
the Hire component of the Administer Workforce (GBL) menu.
Access
Requirements
Enter the EmplID.
Home/Host Data – Benefits page
The following elements are common to multiple pages in this application and are defined in the
preface of this PeopleBook in PeopleBooks Standard Page Element Definitions: EmplID,
EmplRcd#, and Effective Date.

J A N U A R Y 2 0 0 1 T R A C K I N G G L O B A L A S S I G N M E N T S
P E O P L E S O F T P R O P R I E T A R Y A N D C O N F I D E N T I A L S T A R T I N G N E W A S S I G N M E N T S 3 - 7
Benefit Program If necessary, you can select a different Benefit Program.
Changing this information doesn’t affect other employee
home data, so you can make changes on the Home Host
Benefits page, or in the Benefit Program Participation
Page in the Administer Workforce menu.
For more information about benefit programs and an explanation of the fields on the
Home/Host Data – Benefits Page, see PeopleSoft 8 Benefits Administration.
Setting Up the Host Location
Each time you send an employee on a temporary assignment, you create a separate set of host and
benefits data that pertains to that assignment. Host data consists of information such as job,
department, and location. Host benefits data consists of the employee’s benefits program
participation. By creating a separate set of data for the assignment, you can retain permanent
home and benefits data for the employee and still track pertinent data for the current assignment.
The first time you add host data for a new assignment, create a new employment record in the
Home/Host Data and Home/Host Benefits pages. When one global assignment ends, you can
reuse the same employment record for a new assignment. You don’t have to create a new
employment record for each assignment.
The system creates and displays the new employment record number when you add a new value
to the Home/Host Data page.
You generally use one host employment record to track all global assignments for an
employee, unless there are special circumstances, such as concurrent host assignments or
different sets of benefits for a particular assignment. For these cases you need to add another
employment record number so you can track the data separately.
For more information about multiple home or host data, see Processing Assignments With
Multiple Home or Host Data.
To set up data for the host location:
1. Open the Home/Host Data component using the Add action.
2. Complete the fields related to the host location on both pages. The following table shows the
fields you may need to complete:

T R A C K I N G G L O B A L A S S I G N M E N T S J A N U A R Y 2 0 0 1
3 - 8 S T A R T I N G N E W A S S I G N M E N T S P E O P L E S O F T P R O P R I E T A R Y A N D C O N F I D E N T I A L
Page Affected Fields Comments
Home/Host Data Ben Rcd # (benefit record
number)
If the employee receives the same
benefits on assignment as at the home
location, set this value to match the
employment record number of the home
data, usually 0. The system makes the
fields in the Benefit Program
Participation group box unavailable for
data entry, since you don’t need to
update the information.
If the employee receives different
benefits in the new assignment, enter a
new benefit record number. You must
enter the same number that you used as
the Employment Record number, in our
example, 1. The system then makes the
Effective Date and Benefit Program
fields available for data entry in the
Benefit Program Participation group
box on the Home/Host Benefits page.
For more information about working
with benefit record numbers, see
Administering Your Workforce:
Administering Your Workforce, “Hiring
Your Workforce”.
Home/Host The system populates this field with
Host and makes the field unavailable for
data entry.

J A N U A R Y 2 0 0 1 T R A C K I N G G L O B A L A S S I G N M E N T S
P E O P L E S O F T P R O P R I E T A R Y A N D C O N F I D E N T I A L S T A R T I N G N E W A S S I G N M E N T S 3 - 9
Page Affected Fields Comments
Supervisor's ID Leave this field blank until you select a
Department or Position.
Once you select the department or
position, the system populates this field
with the manager’s ID (if you selected a
manager ID in the Department table).
You can override this value, or, if no
manager ID exists in the Department
table, you can select one here.
If you’re using full or partial position
management, you won’t use this field at
all. Instead, once you've selected a
position number, the system enters data
in the Reports To Posn (reports to
position) and current Incumbent Supvr
(incumbent supervisor) fields, which you
select in the Position Data pages. The
Supervisor's ID field disappears.
Reports To Posn (reports
to position)
Leave this field blank for now. The
system makes the Reports To Posn field
unavailable because you don’t need it
unless you’re driving the system by
position.
Reason You can select a Reason for the
assignment from the table of valid
values.
Position Number If you’re driving part or all of your
organization by position, you can enter
the employee’s assignment position
number here. When you move out of
this field, the system populates the
Business Unit, Job Code, Department,
Company, Location, and Pay Group
fields and makes those fields unavailable
for entry. If you don't enter the Position
Number, if the system hasn't entered a
default value for the Business Unit,
enter the Business Unit.
For more information about position
data, see Managing Positions.

T R A C K I N G G L O B A L A S S I G N M E N T S J A N U A R Y 2 0 0 1
3 - 1 0 S T A R T I N G N E W A S S I G N M E N T S P E O P L E S O F T P R O P R I E T A R Y A N D C O N F I D E N T I A L
Page Affected Fields Comments
Posn Ovrd (position
override)
If you need to enter exceptions to any
default position data, select this check
box. The system makes other fields
available for data entry, and you can
select new values for them.
Posn Rcd (position
management record)
When you use the Position Data pages to
update position data that overlaps with
employee job data, the system
automatically inserts a new data row and
selects this check box.
Department Select the employee’s assignment
Department. This field is required. You
create departments in the Department
Table - Department Profile Page.
Location When you move out of the Department
field, the system populates the Location
field from the value you selected for this
department in the Department table.
You can override the value, if necessary,
by selecting another location code from
those stored in the Location Table.
Job Code After you move out of the Location
field, the system should enter a default
value for Job Code. If the system does
not, you must select a job code. You set
up job codes in the Job Code table.
Company If you assigned a company to the
department in the Department table, a
default company appears in the
Company field on this page. You can’t
change this entry. If no company
appears, select a company from the
values in the Company table.
Pay Group If you selected a Pay Group in the
Company table, the default pay group
appears here. You can override the
default, if necessary. If one doesn’t
appear, select a pay group from the
values in the Pay Group table. This is a
required field, even if you’re not using
PeopleSoft NA Payroll (North
American).

J A N U A R Y 2 0 0 1 T R A C K I N G G L O B A L A S S I G N M E N T S
P E O P L E S O F T P R O P R I E T A R Y A N D C O N F I D E N T I A L S T A R T I N G N E W A S S I G N M E N T S 3 - 1 1
Page Affected Fields Comments
Home/Host Data -
Benefits
Effective Date Enter the date when the employee’s
participation takes effect.
Benefit Program Select the Benefit Program from the
available options.
When you save the new host information, the system stores the data in the employee’s
employment, job, and benefit program participation tables. These are the same tables where all
standard employee data is stored.
Processing Assignments With Multiple Home or Host Data
Although for most global assignments, the employee has one home employment record and one
host employment record, you may encounter situations where an employee has more than one job
at home or more than one assignment.
Adding Assignments When an Employee Has Multiple Jobs at Home
Some employees already have more than one job record in the system before they go on a global
assignment. For example, an American university professor going to teach at Oxford for a year
might have two jobs in the U.S., one as a professor and another as a researcher. The employee
already has two employment records in the system for the home jobs, so you need to create a
third employment record for the host.
To track host data for an employee with multiple home records:
1. Create a new employment record for the host in the Home/Host Data page or in the Add
Concurrent Job component in the Administer Workforce (GBL) or (USF) menu.
You can also use the Add Concurrent Job component in the Administer Workforce (GBL) or
USF menu. The Add Concurrent Job action adds another employment record so that you
(and the system) can differentiate between the jobs. In both instances, hiring and adding
concurrent jobs, the system uses home as the default home/host class.
For more information about concurrent jobs, see Adding Concurrent Jobs
2. Enter assignment dates in Assignment Data.
Use the Assignment Data page to enter the beginning and ending dates of the host
assignment.
When you enter the assignment End Date, the system checks to see if other home records
have effective dates equal to or before the end date you entered. If more than one current

T R A C K I N G G L O B A L A S S I G N M E N T S J A N U A R Y 2 0 0 1
3 - 1 2 S T A R T I N G N E W A S S I G N M E N T S P E O P L E S O F T P R O P R I E T A R Y A N D C O N F I D E N T I A L
home data record exists, you’ll see a message similar to the one below:
There is more than one Home record for this person. Indicate the home record
for this assignment. (1060, 14)
Click OK to continue. Because you can track only one home data record with an assignment,
you need to associate one of the two home data records with the assignment.
3. Associate one of the two home records with the assignment in the Assignment Data -
Home/Host page.
See Tying Multiple Home/Host Data to an Assignment for detailed instructions on how to do
this.
Adding Assignments When an Employee Has Multiple Host Locations
Some employees must split their time between two or more locations during an assignment. For
example, a manager sent to Japan might also be assigned to work in Korea at the same time. You
might know this in advance, or the second job might begin after the employee has started the first
job. Either way, these jobs are treated as different, concurrent host records in the system.
To track the data associated with multiple host records:
1. Create a separate employment record for each host in the Home/Host Data page.
Use the Add action to open the page. When the system prompts you for an Employment Rcd
Nbr (employment record number), assign the next available employment record number, such
as 2 or 3.
2. Enter assignment dates and other details in the Assignment Data page.
If assignment data already exists for the first host, you don’t need to add new assignment data
in the Assignment Data page. Create only one assignment for both hosts. Be sure to verify
that the current assignment data has an end date that includes or extends beyond the ending
date of the second assignment.
If you’re creating both host records at the same time, you need to enter the details of the new
assignment in the Assignment Data page.
3. Associate both host records with the assignment in the Assignment Data - Home/Host page.
If you created assignment data for the first host earlier, Host 1 appears when you open the
page. Click the Insert Row button to insert a new data row and select Host 2 so that the
system can associate both records with the assignment.
If the assignment is new, insert two new data rows and designate the hosts as Host 1 and Host
2 so that the system can associate them both with the assignment.

J A N U A R Y 2 0 0 1 T R A C K I N G G L O B A L A S S I G N M E N T S
P E O P L E S O F T P R O P R I E T A R Y A N D C O N F I D E N T I A L S T A R T I N G N E W A S S I G N M E N T S 3 - 1 3
Tying Multiple Home or Host Data to an Assignment
If an employee has more than one home record, you’ll need to associate one record with the
assignment. And if the employee has multiple, concurrent host records, you’ll need to link both
host records with the assignment. You’ll do this because the information you enter in the
Assignment Data - Assignment Home/Host page controls the earnings and deductions you can
track for home and host data in the Assignment Compensation page.
To associate a home record with an assignment:
1. Open the Assignment Data - Home/Host page.
If the employee has only one home data record, it appears on this page. If the employee has
only one host data record, it also appears.
If no home data record appears at all, that means the employee has multiple concurrent home
records.
2. Insert a new data row.
3. In the Home or Host field, select Home.
4. Enter or select the Empl Rcd # (employment record number) for the home record you want to
associate with this assignment. When you move out of this field, the system fills in the
remaining fields.
5. Save your entries.
To associate multiple host records with an assignment:
1. Open the Host/Home Data page.
If the employee has only one host data record, it appears on this page. If you haven’t added
any host data in the Host/Home Data page, you’ll need to do so before you can continue here.
The system issues an error message if you try to save the information in this page when no
host data exists.
If no host data appears at all and you have already added host data in the Host/Home Data
page, it means the employee has multiple, concurrent host records.
2. Insert a new data row for each host location.
3. In the Home or Host field, select Host 1 for the first location and Host 2 for the second.
4. Enter or select the appropriate Employment Record Number for each location. When you
move out of the field, the system fills in the remaining fields.
If no entries automatically appear in the display-only fields, it means you’ve selected an
employment record number for a host record that is after the ending date of the assignment.

T R A C K I N G G L O B A L A S S I G N M E N T S J A N U A R Y 2 0 0 1
3 - 1 4 S T A R T I N G N E W A S S I G N M E N T S P E O P L E S O F T P R O P R I E T A R Y A N D C O N F I D E N T I A L
You’ll need to either update the effective date of the host job information or change the
ending date of the assignment.
5. Save your entries.
USF Assignment Data – Assignment Home/Host Page
Usage Use this page to associate one home or multiple, concurrent host data
records with an assignment.
Object Name ASSIGNMENT_HOMHST
Navigation • Administer Workforce, Track Global Assignments (GBL), Use,
Assignment Data, Assignment Home/Host
• Administer Workforce, Track Global Assignments (USF), Use,
Assignment Data, Assignment Home/Host
Access
Requirements
Enter an Employee ID.
USF Assignment Data - Assignment Home/Host page
The following fields are common to multiple pages and are defined in the preface of this
PeopleBook in PeopleBooks Standard Page Element Definitions: Begin Date, Empl Rcd#,
Company, and Country
Home or Host Select Home or the appropriate hosting location.
Business Unit The system displays the employee’s Business Unit.
Department The system displays the code for the department into
which the employee was hired. The system stores valid
values in the Department Table.
J A N U A R Y 2 0 0 1 T R A C K I N G G L O B A L A S S I G N M E N T S
P E O P L E S O F T P R O P R I E T A R Y A N D C O N F I D E N T I A L S T A R T I N G N E W A S S I G N M E N T S 3 - 1 5
Job Code The system displays the employee’s Job Code. The
system stores valid Job Codes on the Job Code Table.
Position Number The system displays a Position Number for this
employee. You define positions in the Position Data
pages.
Location Code The system displays the Location Code for the employee.
Currency Code The system displays the Currency Code associated with
the location.
Most of the fields are display-only because you enter the data for them in other pages, including
Home/Host Data and Assignment Data. You’ll see essential information pertaining to all active
home and host data for this employee, such as business unit, department, job code, position
number, location, and country.
If you don’t see information in these fields, it means that the home or host data takes effect after
the ending date you entered in the Assignment Data page for the current assignment. To see the
information here, you’ll need to adjust either the effective date of the home or host data, or the
ending date of this assignment in the Assignment Data page.
Entering Passport and Visa Information
Passport and citizenship data for both employees and their dependents are an important part of the
standard information you’ll track for global assignments. You may track multiple countries of
citizenship and passports for the same person. You’ll usually need this information when you
process visas and permits for host countries.
Each country has its own regulations governing foreign residents and workers, so you’ll probably
find it useful to track information about the visas and permits required for employees to live and
work in host countries. Use the Identification Data pages to record supporting documents for
such things as nationality verification and passports. You can use the Identification Data pages
from either the Track Global Assignments or the Administer Workforce (GBL) menu.
The Issuing Authority field in both the Citizen/Passport and Visa/Permit pages will aid in
tracking the government agencies that issue passports and visas for employees and their
dependents.
Before you process citizenship, passport, visa, and permit data for dependents, review Working
With Dependent Data later in this section.
For more information about recording employee identification data in the
Citizenship/Passport Data and Visa/Permit Data pages, see Entering Identification Data.

T R A C K I N G G L O B A L A S S I G N M E N T S J A N U A R Y 2 0 0 1
3 - 1 6 S T A R T I N G N E W A S S I G N M E N T S P E O P L E S O F T P R O P R I E T A R Y A N D C O N F I D E N T I A L
Setting Up Other Travel Data
Governments in every country have different requirements for allowing foreigners to live, visit,
or work there, but much of the paperwork you process for various permits and visas is the same.
You can use the Supporting Document table to set up codes for documents that employees and
their dependents must often submit to government agencies, such as birth certificates, letters of
employment, and marriage licenses. You can then use the codes to list all the paperwork
necessary to apply for permits and visas required for noncitizens to visit or work in other
countries. To set up visa and permit types by country, use the Visa/Permit table.
So that you can easily set up codes specific to global assignments, we’ve included the Supporting
Document table and Visa/Permit table in the Track Global Assignments menu. You can also use
the tables in the Administer Workforce menu; they are the same tables.
Working With Dependent Data
PeopleSoft Human Resources enables you to track important information about employee
dependents. For each dependent you enter in the system who is to accompany an employee on a
global assignment, you’ll create a Dependent/Beneficiary ID. This allows you to process
dependent data separately for information such as passport and travel details.
Adding Dependents
When you first hire an employee, you enter data about the employee’s dependents or
beneficiaries for benefit tracking. When an employee goes on assignment, you’ll need to make
sure that all the dependents who accompany the employee have records in the system. This
includes dependents who are unrelated to the employee, such as a nanny.
For more information about adding dependents, see PeopleSoft 8 Benefits Administration.
Dependent Data - Personal Profile Page
Usage Use the Dependent Data - Personal Profile page to enter information about
an employee’s dependents or beneficiaries.
Object Name DEPEND_BENEF2
Navigation • Compensate Employees, Administer Base Benefits, Use,
Dependent/Beneficiary, Personal Profile
• Administer Workforce, Administer Workforce (GBL), Use,
Dependent Data, Personal Profile

J A N U A R Y 2 0 0 1 T R A C K I N G G L O B A L A S S I G N M E N T S
P E O P L E S O F T P R O P R I E T A R Y A N D C O N F I D E N T I A L S T A R T I N G N E W A S S I G N M E N T S 3 - 1 7
• Define Business Rules, Define General Data (NLD), Use,
Dependent/Beneficiary, Personal Profile
• Administer Workforce, Track Global Assignments (GBL), Use,
Dependent Data, Personal Profile
• Administer Workforce, Track Global Assignments (USF), Use,
Dependent Data, Personal Profile
Access
Requirements
Enter the Employee ID.
Dependent Data - Personal Profile page (1 of 2)
Dependent Data - Personal Profile page (2 of 2)

T R A C K I N G G L O B A L A S S I G N M E N T S J A N U A R Y 2 0 0 1
3 - 1 8 S T A R T I N G N E W A S S I G N M E N T S P E O P L E S O F T P R O P R I E T A R Y A N D C O N F I D E N T I A L
All the fields on this page are identical to the ones on the Employee Data pages. These
fields are fully described in your Benefits documentation.
For more information about recording dependent identification data, see Maintaining
Assignment Data Related to Dependents. The fields for these pages are identical for
employees and dependents. For more information about recording employee and dependent
names, addresses, and personal profile data, see Hiring New Employees into Positions.
For more information about adding a dependent or beneficiary to the system, see PeopleSoft
8 Benefits Administration.
USF Setting Up Dependent Information
To enter dependent or beneficiary data, you can use the Dependent Data, Name/Address, and
Personal Profile pages in the Track Global Assignments menu or the Benefits menu; they are the
same pages.
Specifying Accompanying Dependents
Family at Host Page
Usage Use the Family at Host page to specify which dependents are to
accompany employees on assignment.
Object Name FAMILY_AT_HOST
Navigation • Administer Workforce, Track Global Assignments (GBL), Use,
Family at Host, Family at Host
• Administer Workforce, Track Global Assignments (USF), Use,
Family at Host, Family at Host
Prerequisites You must have already assigned a Dependent/Beneficiary ID in the
Dependent Data pages to each dependent you’ll include in this list.
Access
Requirements
Enter the EmplID.

J A N U A R Y 2 0 0 1 T R A C K I N G G L O B A L A S S I G N M E N T S
P E O P L E S O F T P R O P R I E T A R Y A N D C O N F I D E N T I A L S T A R T I N G N E W A S S I G N M E N T S 3 - 1 9
Family at Host page
The following fields are common to multiple pages and are defined in the preface of this
PeopleBook in PeopleBooks Standard Page Element Definitions: Effective Date and Begin/End
Date.
For more information about dependent data, see Adding Dependents.
Assignment Type The system displays the Assignment Type, Begin Date,
and End Date of the assignment based on the Effective
Date.
If you don’t see information in these fields, it means that
the information you’re about to enter takes effect after the
End Date you entered in Assignment Data. To see
assignment data, you’ll need to adjust either the Effective
Date here or the End Date in Assignment Data.
Family Size The system automatically determines the size of the
Immediate family, which is defined as dependents who
are the employee’s spouse, son, or daughter.
Dependent ID The system enters dependent information for all
dependents you’ve added using the Dependent Data pages.

T R A C K I N G G L O B A L A S S I G N M E N T S J A N U A R Y 2 0 0 1
3 - 2 0 S T A R T I N G N E W A S S I G N M E N T S P E O P L E S O F T P R O P R I E T A R Y A N D C O N F I D E N T I A L
At Host The system automatically selects each dependent who is
an immediate family member (spouse or child). For any
family dependents not accompanying the employee, clear
the At Host check box.
Select the At Host check box for any dependent who isn’t
a family member, such as a nanny, who is to accompany
the employee.
As you make changes to At Host information, the system
calculates and displays the number for Immediate Family
at Host and the Total at Host, which includes any
dependents who aren’t immediate family members
accompanying the employee on the assignment.
Adding Dependents to the Host Location
If you need to add another dependent to the Family at Host page, you first need to add the new
dependent using the Dependent/Beneficiary pages. Then in the Family at Host page, position
your cursor in the Effective Date field and click the Insert Row button to add a new data row.
When you enter the effective date of the change, the system refreshes the dependent list so that it
now includes the new child. You don’t need to check the At Host settings for the other
dependents, the system retains the settings you had in the previous data row.
Removing Dependents From the Host Location
If you need to reduce the number of dependents at host, position your cursor in the Effective
Date field and click the Insert Row button. Enter the effective date of the change, clear At Host
for that dependent, and save your changes.
Viewing Data on the Immediate Family
Use the Immediate Family Summary to view information about all dependents who are part of the
employee’s immediate family (defined as spouse or child).
This page is helpful for reviewing dependent data you use to determine eligibility for various
types of benefits your organization offers to employees, their spouses, and children. For example,
in the case of married dependents (except for the employee’s spouse), company policy might
exclude the dependent’s family from the employee relocation package.
Immediate Family Page
Usage Use the Immediate Family page to view information about the immediate
family of an employee. Immediate family members include the
employee’s spouse, son, or daughter.
Object Name IMMEDIATE_FAMILY

J A N U A R Y 2 0 0 1 T R A C K I N G G L O B A L A S S I G N M E N T S
P E O P L E S O F T P R O P R I E T A R Y A N D C O N F I D E N T I A L S T A R T I N G N E W A S S I G N M E N T S 3 - 2 1
Navigation • Develop Workforce, Plan Careers, Inquire, Immediate Family
Summary, Immediate Family Summary
• Administer Workforce, Track Global Assignments (GBL), Inquire,
Immediate Family, Immediate Family
• Administer Workforce, Track Global Assignments (USF), Inquire,
Immediate Family, Immediate Family
Prerequisites None
Access
Requirements
Enter the EmplID.
Immediate Family page
The system displays the employee’s name and Employee ID, along with the names and birth
information for all dependents in the employee’s immediate family, their relationship to the
employee, occupations (if any), marital statuses, and occupations.
Entering Additional Data in the Assignment Data Component
To process global assignments, you’ll enter a variety of information, not only on the assignment
itself but also on the disposition of employee residences and vehicles.
Overview of the Assignment Data Component
The Assignment Data component contains four pages. On the first, Assignment Data, you’ll
enter the assignment type and the dates when the assignment begins and ends. You can also track
departure and arrival dates.
You’ll use the Assignment Data - Home/Host page for a quick overview of essential employee
and assignment information. You can view important home and host data, such as department,
job, and location, on one page.

T R A C K I N G G L O B A L A S S I G N M E N T S J A N U A R Y 2 0 0 1
3 - 2 2 S T A R T I N G N E W A S S I G N M E N T S P E O P L E S O F T P R O P R I E T A R Y A N D C O N F I D E N T I A L
The Residence Home and Residence Host pages enable you to track the disposition and status of
employee homes and furniture. You can track multiple residences for both home and host
assignments, as well as changes to the information over time.
Use the Vehicle Data page to track the disposition and status of employee vehicles. You can
track multiple vehicles for both home and host assignments, as well as changes to the information
over time.
PeopleSoft Human Resources also includes an Company Car Administration module for
tracking all of your organization's car-specific benefits.
For more information about the Company Car Administration module, see Managing
Company Cars.
Entering Assignment Types and Dates
Assignment Data Page
Usage Use the Assignment Data page to enter information about assignment
types and dates.
Object Name ASSIGNMENT_DATA
Navigation • Administer Workforce, Track Global Assignments (GBL), Use,
Assignment Data, Assignment Data
• Administer Workforce, Track Global Assignments (USF), Use,
Assignment Data, Assignment Data
Prerequisites None
Access
Requirements
Enter the EmplID.

J A N U A R Y 2 0 0 1 T R A C K I N G G L O B A L A S S I G N M E N T S
P E O P L E S O F T P R O P R I E T A R Y A N D C O N F I D E N T I A L S T A R T I N G N E W A S S I G N M E N T S 3 - 2 3
Assignment Data page
The following fields are common to multiple pages and are defined in the preface of this
PeopleBook in PeopleBooks Standard Page Element Definitions: Begin Date, End Date, and
Comments.
Assgn Type (assignment
type)
Select an Assgn Type from the values that you created in
the Assignment Type table.
Departure Dt (departure
date)
Enter the estimated employee Departure Dt from the
home location.
Arrival Date Enter the Arrival Date that the employee is to arrive at
the new primary host location.
Home Domicile Group Box The system uses the Home Domicile values from the
employee personal data as defaults. You’ll use this
information to process home leave travel in the Company
Paid Travel page.
Host Contact Information Enter contact information in this section.
Contact ID Select a Contact ID for an employee (in the host country)
who can be contacted by the home supervisor for
assistance or in case of emergency. The employee’s name
and work telephone number are provided.
Comments Enter any comments here.
Viewing Summary Home and Host Data
Once you have entered and saved home and host data for an employee, you can view essential
information for both in the Assignment Home/Host page. When you change home or host data
for an employee, the system also displays the updated information in this page. You’ll find this

T R A C K I N G G L O B A L A S S I G N M E N T S J A N U A R Y 2 0 0 1
3 - 2 4 S T A R T I N G N E W A S S I G N M E N T S P E O P L E S O F T P R O P R I E T A R Y A N D C O N F I D E N T I A L
page convenient for getting a snapshot of current information about assignment details and
reviewing assignment beginning and ending dates.
To view current home and host data, go to the Assignment Data - Home/Host page.
Assignment Data - Assignment Home/Host Page
Usage Use the Assignment Data – Assignment Home/Host page to view essential
information for home and host employee data.
Object Name ASSIGNMENT_HOMHST
Navigation • Administer Workforce, Track Global Assignments (GBL), Use,
Assignment Data, Assignment Home/Host
• Administer Workforce, Track Global Assignments (USF), Use,
Assignment Data, Assignment Home/Host
Access
Requirements
Enter Employee ID.
Assignment Data - Assignment Home/Host page
The following fields are common to multiple pages and are defined in the preface of this
PeopleBook in PeopleBooks Standard Page Element Definitions: Begin Date, Empl Rcd#,
Company, and Country
Home or Host Select Home or the appropriate hosting location.
Business Unit The system displays the employee’s Business Unit.
Department The system displays the code for the department into
which the employee was hired. The system stores valid
values in the Department Table.
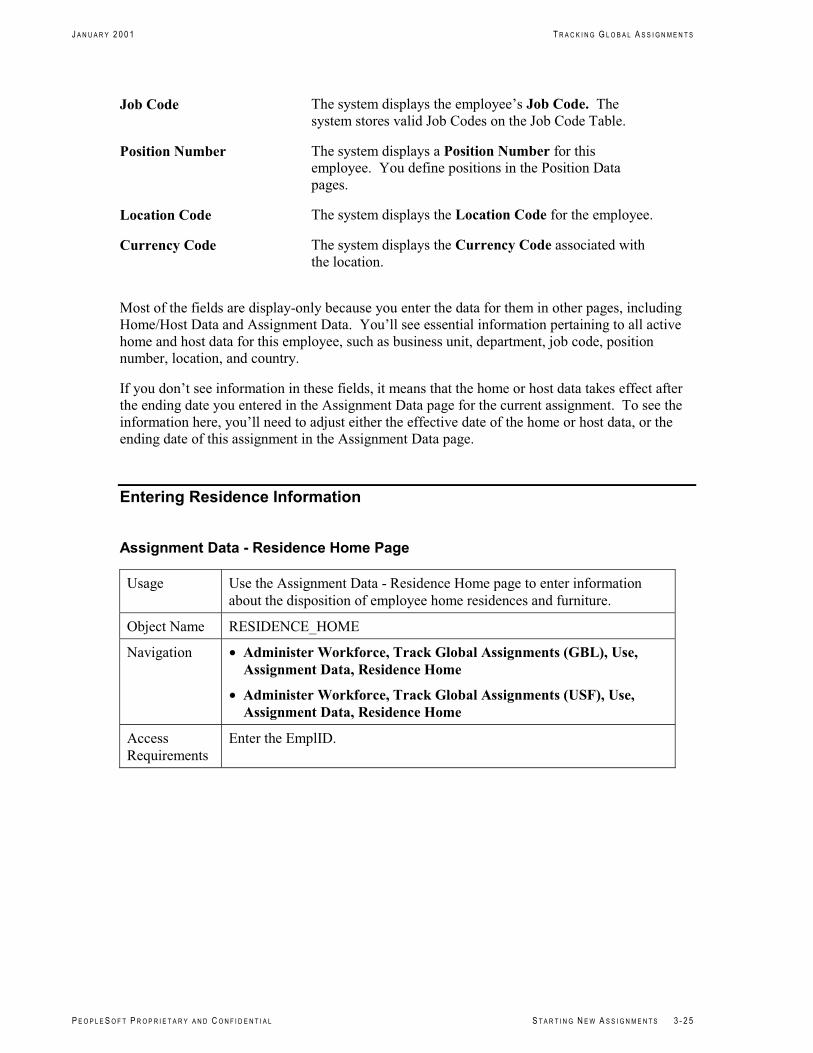
J A N U A R Y 2 0 0 1 T R A C K I N G G L O B A L A S S I G N M E N T S
P E O P L E S O F T P R O P R I E T A R Y A N D C O N F I D E N T I A L S T A R T I N G N E W A S S I G N M E N T S 3 - 2 5
Job Code The system displays the employee’s Job Code. The
system stores valid Job Codes on the Job Code Table.
Position Number The system displays a Position Number for this
employee. You define positions in the Position Data
pages.
Location Code The system displays the Location Code for the employee.
Currency Code The system displays the Currency Code associated with
the location.
Most of the fields are display-only because you enter the data for them in other pages, including
Home/Host Data and Assignment Data. You’ll see essential information pertaining to all active
home and host data for this employee, such as business unit, department, job code, position
number, location, and country.
If you don’t see information in these fields, it means that the home or host data takes effect after
the ending date you entered in the Assignment Data page for the current assignment. To see the
information here, you’ll need to adjust either the effective date of the home or host data, or the
ending date of this assignment in the Assignment Data page.
Entering Residence Information
Assignment Data - Residence Home Page
Usage Use the Assignment Data - Residence Home page to enter information
about the disposition of employee home residences and furniture.
Object Name RESIDENCE_HOME
Navigation • Administer Workforce, Track Global Assignments (GBL), Use,
Assignment Data, Residence Home
• Administer Workforce, Track Global Assignments (USF), Use,
Assignment Data, Residence Home
Access
Requirements
Enter the EmplID.

T R A C K I N G G L O B A L A S S I G N M E N T S J A N U A R Y 2 0 0 1
3 - 2 6 S T A R T I N G N E W A S S I G N M E N T S P E O P L E S O F T P R O P R I E T A R Y A N D C O N F I D E N T I A L
Assignment Data - Residence Home page
The following elements are common to multiple pages in this application and are defined in the
preface of this PeopleBook in PeopleBooks Standard Page Element Definitions: EmplID, Begin
Date, End Date and Effective Date.
Residence Number The home Residence Number defaults to 1, which you
should leave unless you are using a different numbering
sequence. Each time you insert a new data row for
another residence, the system assigns the next number in
the sequence, such as 2 or 3.
Description Enter a Description of each residence, up to 30
characters.
Effective Date The Effective Date defaults to the system date, usually
today’s date, which you can change if necessary.
Status Before Assignment Select the status of the employee’s residence before the
assignment. Valid values for these fields are in the
Translate table.
Status During Assignment Select the status of the employee’s residence during the
assignment. Valid values for these fields are in the
Translate table.
Home Furniture Select the disposition of the employee’s Home Furniture
associated with the residence.
Property Management Select the Property Management check box if your
company is using a property management company to
assist in administering residence details.
Comments Enter any Comments that you want.

J A N U A R Y 2 0 0 1 T R A C K I N G G L O B A L A S S I G N M E N T S
P E O P L E S O F T P R O P R I E T A R Y A N D C O N F I D E N T I A L S T A R T I N G N E W A S S I G N M E N T S 3 - 2 7
Entering Residence Information for the Host Location
Assignment Data - Residence Host Page
Usage Use the Assignment Data - Residence Host page to enter information
about the location of the employee host residences and furniture.
Object Name RESIDENCE_HOST
Navigation • Administer Workforce, Track Global Assignments (GBL), Use,
Assignment Data, Residence Host
• Administer Workforce, Track Global Assignments (USF), Use,
Assignment Data, Residence Host
Access
Requirements
Enter the EmplID.
Assignment Data - Residence Host page
The following elements are common to multiple pages in this application and are defined in the
preface of this PeopleBook in PeopleBooks Standard Page Element Definitions: EmplID, Begin
Date, End Date, Description and Effective Date.
Residence Number The host Residence Number defaults to 1, which you
should leave unless you are using a different numbering
sequence. Each time you insert a new data row for
another residence, the system assigns the next number in
the sequence, such as 2 or 3.
Description Enter a Description of each residence, up to 30
characters.
To edit the data for the host address, click the Edit Host
Address button. The Postal Address page appears.

T R A C K I N G G L O B A L A S S I G N M E N T S J A N U A R Y 2 0 0 1
3 - 2 8 S T A R T I N G N E W A S S I G N M E N T S P E O P L E S O F T P R O P R I E T A R Y A N D C O N F I D E N T I A L
Effective Date The Effective Date defaults to the system date, usually
today’s date, which you can change if necessary.
Host Residence Status Select the Host Residence Status from valid values in the
Translate table.
Host Furniture You indicate the disposition of Host Furniture associated
with the residence using a different set of values from
those available for home residences; these values are in
the Translate table.
Comments You can enter Comments longer than shown.
For more information about entering employee’s name and address information, see
Administering Your Workforce: Hiring Your Workforce: Personal Data Component.
Tracking Vehicle Information
Assignment Data - Vehicle Data Page
Usage Use the Assignment Data - Vehicle Data page to track the location and
status of vehicles assigned to employees.
Object Name VEHICLE_DATA
Navigation • Administer Workforce, Track Global Assignments (GBL), Use,
Assignment Data, Vehicle Data
• Administer Workforce, Track Global Assignments (USF), Use,
Assignment Data, Vehicle Data
Access
Requirements
Enter the EmplID.

J A N U A R Y 2 0 0 1 T R A C K I N G G L O B A L A S S I G N M E N T S
P E O P L E S O F T P R O P R I E T A R Y A N D C O N F I D E N T I A L S T A R T I N G N E W A S S I G N M E N T S 3 - 2 9
Assignment Data - Vehicle Data page
The following elements are common to multiple pages in this application and are defined in the
preface of this PeopleBook in PeopleBooks Standard Page Element Definitions: EmplID, Begin
Date, End Date and Effective Date.
Home Vehicle
Vehicle # (vehicle number) The Vehicle # defaults to 1, which you should leave
unless you are using a different numbering sequence.
Each time you insert a new data row for another vehicle,
the system assigns the next number in the sequence, such
as 2 or 3.
Description Enter a Description of each vehicle, up to 30 characters.
Effective Date The Effective Date defaults to the system date, usually
today’s date, which you can change if necessary.
Reason Enter the Reason or status of the employee’s vehicle.
Comment Enter a Comment about the vehicle, if applicable or
helpful.
Host Vehicle
Vehicle # The Vehicle # defaults to 1, which you should leave
unless you are using a different numbering sequence.
Each time you insert a new data row for another vehicle,
the system assigns the next number in the sequence, such
as 2 or 3.
Description Enter a Description of the vehicle, up to 30 characters.

T R A C K I N G G L O B A L A S S I G N M E N T S J A N U A R Y 2 0 0 1
3 - 3 0 S T A R T I N G N E W A S S I G N M E N T S P E O P L E S O F T P R O P R I E T A R Y A N D C O N F I D E N T I A L
Effective Date The Effective Date defaults to the system date, usually
today’s date, which you can change if necessary.
Reason Select a Reason for the status from the values in the
Translate table.
Vehicle Status You’ll select a Vehicle Status using a different set of
values from those available for Home vehicles; these
values are also in the Translate table.
Date Available Enter the Date the vehicle becomes Available to the
employee.
Cash in Lieu Select the Cash in Lieu check box if the employee
chooses to take cash in lieu of a company vehicle.
Comment Enter a Comment about the vehicle, if applicable or
helpful.
For more information about the process of administering company cars for your workforce,
see Managing Company Cars.
Tracking Supplemental Earnings and Deductions
Employees on global assignments often are entitled to supplemental earnings, such as cost-of-
living adjustments and hardship premiums. You might also need to take additional deductions
from the employee’s paycheck, perhaps because of estimated taxes. Use the Assignment
Compensation page to track any compensation earnings or deductions employees have as a result
of assignments.
You’ll enter earnings and deductions as they relate to home and host assignment data. For
example, an employee might receive a cost-of-living adjustment paid for by the host location and
a hardship premium absorbed by the home location. You can enter these components in multiple
currencies; the system automatically calculates the equivalent amounts in the home currency.
To help you identify recurring payments or isolated incidents of supplemental earnings or
deductions, you’ll track compensation data by employee and payment instruction type. We’ve
included two types of payment instructions with the system: global compensation and one-time
payments. You’ll probably find these sufficient for most compensation related to global
assignments.

J A N U A R Y 2 0 0 1 T R A C K I N G G L O B A L A S S I G N M E N T S
P E O P L E S O F T P R O P R I E T A R Y A N D C O N F I D E N T I A L S T A R T I N G N E W A S S I G N M E N T S 3 - 3 1
Before you can process employee supplemental earnings or deductions, you must define any
earnings and deduction codes that apply to global assignments using the Earnings table and
the Deductions table. For more information about these tables, see Setting Up Basic
Assignment Information in this PeopleBook. Or, if your organization has implemented
PeopleSoft Payroll for North America, see PeopleSoft 8 Payroll for North America
PeopleBook.
The Assignment Compensation page isn’t linked to payroll processing in PeopleSoft Payroll
for North America.
Assignment Compensation Page
Usage Use the Assignment Compensation page to add supplemental earnings and
deductions that the home location pays, such as hardship premiums and
relocation costs.
Object Name ASSGNMT_EARNS_DED
Navigation • Administer Workforce, Track Global Assignments (GBL), Use,
Assignment Compensation, Assignment Compensation
• Administer Workforce, Track Global Assignments (USF), Use,
Assignment Compensation, Assignment Compensation
Access
Requirements
Enter the EmplID and Payment Instruction Type. Select either
International Compensation or Onetime Payment values from the
Translate table.
Assignment Compensation page (1 of 2)

T R A C K I N G G L O B A L A S S I G N M E N T S J A N U A R Y 2 0 0 1
3 - 3 2 S T A R T I N G N E W A S S I G N M E N T S P E O P L E S O F T P R O P R I E T A R Y A N D C O N F I D E N T I A L
Assignment Compensation (2 of 2)
The following elements are common to multiple pages in this application and are defined in the
preface of this PeopleBook in PeopleBooks Standard Page Element Definitions:EmplID,
Effective Date, Begin Date and End Date.
Effective Date The Effective Date defaults to the system date, usually
today’s date, which you should change if the supplemental
earnings and deductions take effect on another date.
Amount Frequency Select the amount of compensation frequency from the
values in the Frequency table. The fields available for
selection are Annual, Hourly, or Monthly. All the
amounts you specify for both earnings and deductions
must be for the frequency you select in this field.
Assignment Type The system automatically displays the Assignment Type
based on the Effective Date in this page. If the
information isn’t displayed, it means the information that
you’re about to enter takes effect after the End Date you
entered in Assignment Data, and the system issues a
warning message.
If you’re making a onetime payment that occurs after the
ending date of the assignment, you can ignore the
message. Otherwise, to see assignment data, you’ll need
to adjust either the effective date here or the ending date in
Assignment Data.
Home or Host The Home or Host field defaults to Home (0), which you
should leave as it is.
Currency From/To If assignment data exists, the system sets the Currency
From field to the currency for the country designated in
the employee’s home data. In our example, Claudia
Gaston’s home data is in the United States, so the system
sets the currency to U.S. dollars (USD).
Because you’re entering compensation information related
to home data, the system also sets the Currency To field
to the home currency, in this case U.S. dollars. You can
override these defaults where necessary by selecting
another currency code from those in the Currency Code
table.

J A N U A R Y 2 0 0 1 T R A C K I N G G L O B A L A S S I G N M E N T S
P E O P L E S O F T P R O P R I E T A R Y A N D C O N F I D E N T I A L S T A R T I N G N E W A S S I G N M E N T S 3 - 3 3
Exchange Rate The system automatically sets the Exchange Rate to 1
when the To and From currencies are the same, and they
are the same for home data.
Rate Type The exchange Rate Type defaults to the rate specified in
the Installation Table. If you are entering information for
home data, leave the default.
Earnings Code To enter additional earnings charged to the home location,
select an Earnings Code. You create these codes in the
Earnings Table.
Home Amt (home amount) Enter the Home Amt. Because you’re entering
information related to home data, the Host Amt field
doesn’t appear.
Base Compensation The Base Compensation shows the amount the employee
earns at the home location, which you specify in Job Data
2.
Deduction Select a Deduction Code from the Deductions table to
enter deductions that should be taken from the employee
compensation specified for the home location.
Home Amt Enter the Home Amt for the Deduction Code.
The Home Amt shows the net amount of earnings and
deductions specified for the home location. The
Home/Host Net Amount displays the net amount of all
supplemental earnings and deductions for both home and
host. Both amounts are in the home currency.
Again, because you’re entering information related to
home data, the Host Amt field doesn’t appear.
For more information about the Currency Code, Exchange Rate Type, and Currency Rate
Type tables, see Working with Currencies.
To enter additional earnings charged to the home location, select an Earnings Code (you create
these codes in the Earnings Table) and enter the Home Amount. Because you're entering
information related to home data, the Host Amount field doesn’t appear. The Base
Compensation shows the amount the employee earns at the home location, which you specify in
Job Data, Compensation.
Assignment Compensation Page for Host Locations
Usage Use the Assignment Compensation page to enter supplemental earnings
and deductions an employee receives from the host location, such as

T R A C K I N G G L O B A L A S S I G N M E N T S J A N U A R Y 2 0 0 1
3 - 3 4 S T A R T I N G N E W A S S I G N M E N T S P E O P L E S O F T P R O P R I E T A R Y A N D C O N F I D E N T I A L
foreign housing or rent. Enter a new data row for Home or Host by
positioning your cursor in the Home or Host, Currency From/To, or Rate
Type field, and click the Insert Row button.
Navigation • Administer Workforce, Track Global Assignments (GBL), Use,
Assignment Compensation
• Administer Workforce, Track Global Assignments (USF), Use,
Assignment Compensation
Access
Requirements
Enter the Employee ID.
Assignment Compensation page (1 of 2)
Assignment Compensation page (2 of 2)
The following elements are common to multiple pages in this application and are defined in the
preface of this PeopleBook in PeopleBooks Standard Page Element Definitions: EmplID,
Effective Date, Begin Date and End Date.
Amount Frequency Select the compensation frequency from the values in the
Frequency table. The fields available for selection are
Annual, Hourly, or Monthly. All the amounts you
specify for both earnings and deductions must be for the
frequency you select in this field.
Assignment Type The system displays the Assignment Type.

J A N U A R Y 2 0 0 1 T R A C K I N G G L O B A L A S S I G N M E N T S
P E O P L E S O F T P R O P R I E T A R Y A N D C O N F I D E N T I A L S T A R T I N G N E W A S S I G N M E N T S 3 - 3 5
Employee Net Amount The Employee Net Amount field displays the net amount
of all supplemental earnings and deductions for both the
home and host.
Home or Host In the Home or Host field, select 1, or, if the employee
has multiple current assignments, the appropriate host
number.
Currency From/To The system sets the Currency From field to the currency
for the country designated in the employee host data. In
our example, Claudia Gaston’s assignment is in France, so
the system sets the currency to French francs (FRF).
To enable you to view host supplemental earnings and
deductions in the context of overall employee
compensation, the system sets the Currency To field to
the home currency, in this case U.S. dollars. You define
currency codes in the Multicurrency: Maintaining
Currency Tables.
Rate Type The Rate Type defaults to the rate type specified in
Installation table 3, which you can override if necessary.
Exchange Rate When you leave the Rate Type field, the system displays
the Exchange Rate associated with the rate type, which
you define in the Currency Exchange Rate table. If
necessary, you can override the exchange rate by entering
another rate in the field.
Home/Host Net Amount The Home/Host Net Amount field shows the net amount
of earnings and deductions related to employee host data,
in both the home and host currencies.
Earnings Code If applicable, select an Earnings Code; you create these
codes in the Earnings Table.
Host Amt (host amount) If you entered an Earnings Code, enter a Host Amt for
the earning. When you leave the field, the system
calculates the equivalent amount in the home currency.
Deduction Code If applicable, select a Deduction Code; you create these
codes in the Deduction table.
Host Amt If you entered a Deduction Code, enter a Host Amt for
the deduction. When you leave the field, the system
calculates the equivalent amount in the home currency.
For more information about the Currency Code, Exchange Rate Type, and Currency Rate
Type tables, see Working with Currencies.

T R A C K I N G G L O B A L A S S I G N M E N T S J A N U A R Y 2 0 0 1
3 - 3 6 S T A R T I N G N E W A S S I G N M E N T S P E O P L E S O F T P R O P R I E T A R Y A N D C O N F I D E N T I A L
Handling Currency Fluctuations
Typically, you’ll review employee compensation at least once a year and will want to use the
going currency rate for your updates. Although you can update the exchange rate manually in the
Assignment Compensation page, the best way to ensure that you use consistent exchange rates for
all employees is to update the exchange rate in the Currency Exchange Rate table. That way,
assignment data tracking, and therefore reports, will contain consistent, up-to-date information
about exchange amounts.
Once you’ve updated the exchange rate, open the Assignment Compensation page for each
employee affected by the change (all employees whose compensation is calculated using that
currency). Insert a new data row using a new effective date by positioning your cursor in the
Effective Date or Amount Frequency field and clicking the Insert Row button. The system
copies all the information in the previous row to the new data row. The effective date for the new
data row must be the same as or after the effective date you used for the new exchange rate in the
Exchange Rate table. The system automatically recalculates all the home and host deduction
amounts using the new exchange rate.
You can also make other adjustments to earnings and deductions, such as deleting an earning or
deduction the home or host location no longer pays or adding new ones for which the employee is
eligible.
For more information about the Currency Code, Exchange Rate Type, and Currency Rate
Type tables, see Working with Currencies.
Implementing Employee Data Security for Global Assignments
Security access to employee data assumes greater importance when you process global
assignments because Human resources administrators at multiple locations need access to data on
the same employee. With multiple current home or host data at various locations around the
world, the permutations of security access can appear to be a logistical nightmare.
However, the PeopleSoft Human Resources system eliminates this worry. Employees going on
global assignments have multiple employment records in the system: at least one home record,
which falls under the jurisdiction of the HR administrators at the home base, and at least one host
record, which falls under the jurisdiction of the HR administrators at the host location.
PeopleSoft Human Resources automatically checks the current record for each employment
record to identify all the primary permission list groups who should have security access to the
employee data. Security access is smooth and effortless. As employees move from one location
to another, users view the employee data they should, when they should.
Setting Up Security Access for Global Assignments
To set up data security to accommodate employees on global assignments, you’ll run a script,
SECVWITL, which loads SQL (structured query language) text into all security search views,
instructing the system to search the current data rows for all the employment records for the

J A N U A R Y 2 0 0 1 T R A C K I N G G L O B A L A S S I G N M E N T S
P E O P L E S O F T P R O P R I E T A R Y A N D C O N F I D E N T I A L S T A R T I N G N E W A S S I G N M E N T S 3 - 3 7
employee. If the department in one current data row matches the security access for a user, the
system allows the user access to all employee data for that employee.
For example, say Claudia Gaston has two employment records in the system. Her home
employment record contains a U.S. department ID, and her host employment record contains the
Paris department ID. Users in her home location in the U.S. have access to employee data for her
U.S. department. Users in France have access to employee data for the Paris department.
Between them (though not individually) the users in both groups have access to all of Claudia’s
employee data, in both employment records.
As delivered, PeopleSoft Human Resources implements employee data security with users
grouped into primary permission list classes and data grouped by department. You can also
modify your implementation of employee data security using user IDs, locations, or other
groupings, but for the purposes of our discussion here, we’ll assume you’re using primary
permission list classes and departments.
For more information about employee data security, see Administering Security. For more
information about User Security, see Security.
The global security script loads SQL text into all security search views in PeopleSoft Human
Resources, PeopleSoft FSA Administration, and PeopleSoft Benefits Administration.
Execute the script against your database using the command specific to your database
environment. If you’re not sure of your standard procedures, ask your system administrator. For
example, for SQLBase, enter the following command at the DOS prompt:
C:>SQLBAT SECVWITL
Next, you’ll need to recreate the security search views in the system. To do so, open the
Application Designer. Select File, SQL Create View. Highlight all the following security views,
or those that pertain to the PeopleSoft applications you’re using:

T R A C K I N G G L O B A L A S S I G N M E N T S J A N U A R Y 2 0 0 1
3 - 3 8 S T A R T I N G N E W A S S I G N M E N T S P E O P L E S O F T P R O P R I E T A R Y A N D C O N F I D E N T I A L
PeopleSoft Application Security View or SubRecord
PeopleSoft Human Resources APPRV_SRCH
ASGN_CMP_SRCH
CAR_PLAN_SRCH
DEPARTMENT_SRCH
DEPENDENT_SRCH
DEPT_INCR_SRCH
DISABLE_FRA_SR
EMPLMT_SGBL_SBR
EMPL_BEN_SRCH
EMPL_COMP_SRCH
EMPL_DEPT_SRCH
GRIEVANCE_SRCH
GRIEVANCEI_SRCH
IC_GRP_MEM_VW
INTERVW_SRCH
INTERVW_SRCH_CN
INTERVW_SRCH_US
KEY_POSN_SRCH
MILIT_SRC_FRA
PERS_SGBL_SBR
P11D_UK_SRCH
POSITION_SRCH
PeopleSoft NA Payroll (North
American)
EMPL_COMP_SRCH
EMPL_NAME_SRCH
COBRA CBR_ACTVTY_SRCH
CBR_BENEF_SRCH
CBR_EVENT_SRCH
CBR_NONEMP_SRCH
CBR_PAR_SRCH1
CBR_PAR_SRCH2

J A N U A R Y 2 0 0 1 T R A C K I N G G L O B A L A S S I G N M E N T S
P E O P L E S O F T P R O P R I E T A R Y A N D C O N F I D E N T I A L S T A R T I N G N E W A S S I G N M E N T S 3 - 3 9
PeopleSoft Application Security View or SubRecord
Benefits Billing BEN_BI_CSB_SRCH
BEN_BI_CSP_SRCH
BEN_BI_PYS_SRCH
BEN_BI_PY_SRCH
BEN_BI_SRCH_VW
PeopleSoft FSA Administration FSA_CLAIM_SRCH
FSA_DC_SRCH
FSA_HC_SRCH
FSA_PARTIC_SRCH
FSA_PAYMT_SRCH
Select Execute SQL Now and click OK.
For more information about the Application Designer, see PeopleSoft Application Designer.
To show you how organizational security works, in this section we’ll look at a few examples of
simple and complex global assignment situations involving Claudia Gaston, an employee
permanently based at CCB company headquarters in the United States, in department 0000001.
Security for One Home and One Host
The most common type of assignment processing is when employees have data pertaining to one
home and one host. In other words, they have one permanent job and go on one assignment after
another, sequentially. Here’s an example of how employee data security works in most cases.
Step 1. First Assignment
In 1990, Claudia went on a one-year temporary assignment to the Paris, France office, department
E000007. Her home data (in the U.S.) uses employment record 0 and her host data (for France)
uses employment record 1. To administer human resource tasks for Claudia, HR administrators
in both the U.S. and France need access to her data.
U.S. administrators belong to the USA primary permission list class, which allows them access to
data for U.S. departments in the company. The administrators in France belong to the EURO
primary permission list class, which allows them access to data for all departments in Europe.
PeopleSoft Human Resources checks to see if any future or current data rows for either
employment record number (0 and 1) match the departmental access available to primary
permission list classes for the human resources staff in the France and U.S. headquarters. A
match exists for both primary permission list classes, so users in both classes have access to
Claudia’s job data for both employment records:

T R A C K I N G G L O B A L A S S I G N M E N T S J A N U A R Y 2 0 0 1
3 - 4 0 S T A R T I N G N E W A S S I G N M E N T S P E O P L E S O F T P R O P R I E T A R Y A N D C O N F I D E N T I A L
Employment
Record
Department USA EURO
0 0000001 Access Access
1 E000007 Access Access
Step 2. Second Assignment - Consecutive
In 1991, Claudia completes her assignment in Paris and begins another temporary assignment in
Singapore, department A000004. HR administrators indicate that her temporary assignment in
France is over, which causes the data row containing data on this assignment (in employment
record 1) to become history because it’s no longer current. Thus, when Claudia’s assignment to
Singapore takes effect, the users in the EURO primary permission list class don’t have access to
Claudia’s data.
The HR administrators in Singapore belong to the primary permission list class ASIA, which
gives them access to data for all departments in Asia.
When Claudia begins her new assignment in Singapore, the assignment data uses employment
record 1, the same number used for her assignment in Paris. Because the data row containing
information about Singapore is current, the system now permits users in the ASIA primary
permission list class to access Claudia’s employee data:
Employment
Record
Department EURO ASIA
0 0000001 No Access Access
1 A000004 No Access Access
The system continues to permit U.S. users to access all of Claudia’s employee data, historical and
current.
Security for One Home and Multiple, Concurrent Hosts
How does security work with multiple, concurrent host assignments? The process is nearly the
same as with one host. The system checks all current data rows for employment record numbers
to determine which users and classes should have access to employee data. There are simply
more employment records and users.
Step 1. Second Assignment - Concurrent
Let’s change Claudia’s story a little. While she is working on temporary assignment in
Singapore, she gets a second, concurrent temporary assignment in Sydney, Australia, department
A000018. The HR administrators operating in the Sydney office belong to the AUS primary
permission list class, which allows them access to data for all departments in Australia.
Because Claudia has concurrent assignments, the Australian assignment uses employment record
2. Now, three primary permission list classes need access to her employee data: HR
administrators in the U.S., Singapore, and Australia.

J A N U A R Y 2 0 0 1 T R A C K I N G G L O B A L A S S I G N M E N T S
P E O P L E S O F T P R O P R I E T A R Y A N D C O N F I D E N T I A L S T A R T I N G N E W A S S I G N M E N T S 3 - 4 1
The system checks to see if any future or current data rows in the three employment record
numbers (0, 1 and 2) match the departmental access available to all three primary permission list
classes. A match exists in all cases, so Claudia’s job data is accessible to users in the three
classes:
Employment
Record
Department USA ASIA AUS
0 0000001 Access Access Access
1 A000004 Access Access Access
2 A000018 Access Access Access
Step 2. First Assignment Completed
In 1992, Claudia completes her assignment in Sydney but continues to work on a temporary
assignment in Singapore.
HR administrators indicate that her temporary assignment in Australia is over. However, because
the current row in Claudia’s employment record 2 still reflects an Australian department, the
users in Australia can continue to access Claudia’s data. Thus, the system permits U.S.,
Singapore, and Australian users access to all of Claudia’s employee data, historical and current:
Employment
Record
Department USA ASIA AUS
0 0000001 Access Access Access
1 A000004 Access Access Access
2 A000018 Access Access Access
Australian users continue to have access to Claudia’s information until another data row is
inserted in employment record 2 and another department is selected. At that point, the data row
containing the Australian department becomes a history row, so they no longer have access.
Security for Permanent Transfers
When an employee goes from a temporary assignment to permanent status, the system
automatically determines which primary permission list classes should continue to have access
and which no longer should.
Step 1. Second Assignment Completed
In 1993, Claudia Gaston completes her temporary assignment in Singapore and transfers back to
U.S. headquarters.
HR administrators indicate that her temporary assignment in Singapore is over. However, as with
the Australians, the Singapore users continue to have access to Claudia’s data because the current
row in Claudia’s employment record 1 still reflects a Singapore department:

T R A C K I N G G L O B A L A S S I G N M E N T S J A N U A R Y 2 0 0 1
3 - 4 2 S T A R T I N G N E W A S S I G N M E N T S P E O P L E S O F T P R O P R I E T A R Y A N D C O N F I D E N T I A L
Employment
Record
Department USA ASIA AUS
0 0000001 Access Access Access
1 A000004 Access Access Access
2 A000018 Access Access Access
The system continues to permit U.S., Singapore, and Australian users to access all of Claudia’s
employee data, historical and current.
Step 2. Permanent Transfer
In 1994, Claudia’s managers decide that things were running better in Singapore when Claudia
was on assignment there, so they transfer her back to Singapore, but this time permanently. That
means Claudia’s home data now belongs in Singapore.
Using the Job Data pages, administrators transfer Claudia back permanently for employment
record 0, which is where her permanent (home) data is stored. Because this causes the data row
containing her U.S. department to become a history row, the U.S. users no longer have access to
Claudia’s data:
Employment
Record
Department USA ASIA AUS
0 A000004 No Access Access Access
1 A000004 No Access Access Access
2 A000018 No Access Access Access
Employment records 1 and 2 contain data about temporary assignments Claudia went on in the
past, with the current data rows still reflecting departments in Australia and Singapore. Although
they are inactive data rows, they are still current rows, not history. Thus, Singapore users have
access to Claudia’s department because the department in both employment records 1 and 2 is
Singapore.
Australian administrators continue to have access because employment record 2 still contains a
current row with an Australian office. These users have access until another data row is inserted
in employment record 2 and another department is selected. At that point, the data row
containing the Australian department becomes a history row, so they no longer have access to
Claudia’s information.
If you are using Global and Local Country functionality with the Administering Your
Workforce program, you'll need to address additional security considerations.
For more information regarding security, see Setting Up Security Access for Global
Assignments.

P E O P L E S O F T P R O P R I E T A R Y A N D C O N F I D E N T I A L M A I N T A I N I N G D A T A D U R I N G T H E A S S I G N M E N T 4 - 1
C H A P T E R 4
Maintaining Data During the Assignment
Depending on the benefits your company offers employees on global assignments, you can use
various supplemental features in PeopleSoft Human Resources to process additional assignment
information for employees and their families.
Additional features in PeopleSoft Human Resources include maintaining detailed information on
documents and paperwork required for visas and permits and tracking company-paid travel
information. If your company assists in placing children in schools or offers language or
orientation classes, you can track tuition reimbursement arrangements. To help you select the
appropriate candidates for assignments, you can review employee data online.
Often, you’ll maintain data related specifically to a dependent, such as legal documents and travel
arrangements, and you may not have the associated Employee ID at hand. PeopleSoft Human
Resources gives you the flexibility to access information either by employee or by dependent.
Important! We discuss the system using the pages in the global menus as our examples. If
there is a page that is located in one of the local country menus whose functionality isn’t
covered in the discussions of the global menu pages, we'll discuss the local country page
separately and in its entirety.
Tracking Company-Paid Travel
Depending on its policies for global assignments, your company probably offers several types of
company-paid travel to employees. Use the Company Paid Travel page to track any travel for
which employees are eligible.
You can enter information on dependents accompanying either the employee or another
dependent. For example, Claudia Gaston is taking one child with her when she goes on home
leave, and her husband, Jules, is flying home one week earlier with their other child.
Before you process company-paid travel for dependents traveling separately or with another
dependent, you should first refer to Maintaining Assignment Data Related to Dependents.
Company Paid Travel Page
Usage Use the Company Paid Travel page to enter information about company-
paid travel.

T R A C K I N G G L O B A L A S S I G N M E N T S J A N U A R Y 2 0 0 1
4 - 2 M A I N T A I N I N G D A T A D U R I N G T H E A S S I G N M E N T P E O P L E S O F T P R O P R I E T A R Y A N D C O N F I D E N T I A L
Object Name TRAVEL_CMPNY_PAID
Navigation • Administer Workforce, Track Global Assignments (GBL), Use,
Company Paid Travel, Company Paid Travel
• Administer Workforce, Track Global Assignments (USF), Use,
Company Paid Travel, Company Paid Travel
Access
Requirements
Enter the Employee ID.
Company Paid Travel page
Date Eligible Enter the date the employee becomes eligible for travel.
The system usually defaults to today’s date, which you
can override if necessary.
Date Taken Enter the date of travel, if the information is available;
otherwise, you can enter this information later.
Assignment Type The system displays the Assignment Type.
Begin Date The system displays the Begin Date.
Note. If you don’t see any information in these fields, it
means that the Date Eligible (the date the employee is
eligible for travel) is after the End Date you entered in
Assignment Data for the current assignment. If the
employee should be eligible for this travel only before the
assignment ends, you’ll need to adjust either the Date
Eligible here or the End Date in Assignment Data.
Type of Travel Select a Type of Travel from the list of valid values
created in the Travel Type Table.

J A N U A R Y 2 0 0 1 T R A C K I N G G L O B A L A S S I G N M E N T S
P E O P L E S O F T P R O P R I E T A R Y A N D C O N F I D E N T I A L M A I N T A I N I N G D A T A D U R I N G T H E A S S I G N M E N T 4 - 3
Mode of Travel Select a Mode of Travel from the list of valid values from
the Translate Table. The Mode of Travel defaults to Air,
which you can change if necessary.
Amount/Currency Enter the Amount of the travel ticket, or the maximum
amount that the company authorizes for travel. The
Currency defaults to the currency designated in the
Installation Table - HRMS Options Page, which can be
changed if necessary. Valid values are in the Currency
Code Table.
Cash In Lieu Select Cash In Lieu if the employee opts for cash instead
of company-paid travel.
Alternate Location If you selected the Home Leave check box in the Travel
Type Table, the system displays the employee home
domicile information from Assignment Date in the To
group box, which becomes unavailable for data entry.
The Alternate Location check box then becomes
available for data entry; select this check box if the
employee chooses to travel to a location different from his
or her home domicile. If you select Alternate Location,
the To group box becomes available for alternate
information entry.
Country In the From group box, select the Country from which
the employee is traveling.
If you change the Country code in either the From or To
group box, the system clears the State and City fields so
that you can enter new information.
To track other instances of company-paid travel, enter a
new data row.
Department Select the Department from which the employee is
traveling.
City Select the City from which the employee is traveling.
State Select the State to which the employee is traveling.
Dependent If a dependent is to accompany the employee during the
travel, select the appropriate Dependent ID. To add more
dependents, position your cursor in the Dependent field
and click the Insert Row button.
Birthdate The system displays the dependent’s Birthdate.

T R A C K I N G G L O B A L A S S I G N M E N T S J A N U A R Y 2 0 0 1
4 - 4 M A I N T A I N I N G D A T A D U R I N G T H E A S S I G N M E N T P E O P L E S O F T P R O P R I E T A R Y A N D C O N F I D E N T I A L
Cataloging International Schools and Programs
Depending on the types of relocation packages your company provides employees who are going
on global assignments, you may offer information about schools for dependents to attend in the
new country and about orientation programs for learning local customs and language. You can
use the international School/Program Tables to track data on each school and keep contact
information up-to-date.
School/Program Table Page
Usage Use the School/Program Table page to enter pertinent information about
schools and orientation programs to help employees adjust to the new
culture. For example, you might give employees the names of
recommended schools for their children, and the names of language
schools or orientation classes they and their spouses might attend in
order to assimilate to the new culture more rapidly.
Object Name INTL_SCHPGM_TABLE
Navigation • Administer Workforce, Track Global Assignments (GBL), Setup,
School/Program Table, School/Program Table
• Administer Workforce, Track Global Assignments (USF), Setup,
School/Program Table, School/Program Table
Prerequisites None
Access
Requirements
Enter the School or Program Code.
School/Program Table page

J A N U A R Y 2 0 0 1 T R A C K I N G G L O B A L A S S I G N M E N T S
P E O P L E S O F T P R O P R I E T A R Y A N D C O N F I D E N T I A L M A I N T A I N I N G D A T A D U R I N G T H E A S S I G N M E N T 4 - 5
The following fields are common to multiple pages and are defined in the preface of this
PeopleBook in PeopleBooks Standard Page Element Definitions: Effective Date, Status,
Description, Short Description, Country, Address 1, Address 2, Address 3, City, and Postal.
Sch/Pgm Typ Select the school or program type. Examples include:
Language School, Private School, and Public School.
Int/Ext Select whether the school is:
Internal or External.
Department Select the Department.
For more information about the automatic address formatting feature, see Country Table -
Address Format Page.
School/Program Contact Table Page
Usage Use the School/Program Contact Table page to track contacts for
schools and programs. You can enter more than one contact for each
entry and specify the type of contact for each.
Object Name INTL_CONTACT_TABLE
Navigation • Administer Workforce, Track Global Assignments (GBL), Setup,
School/Program Contact Table, School/Program Contact Table
• Administer Workforce, Track Global Assignments (USF), Setup,
School/Program Contact Table, School/Program Contact Table
Prerequisites You must have previously set up information for international schools
and programs in the School/Program Table.
Access
Requirements
Enter the School or Program Code.

T R A C K I N G G L O B A L A S S I G N M E N T S J A N U A R Y 2 0 0 1
4 - 6 M A I N T A I N I N G D A T A D U R I N G T H E A S S I G N M E N T P E O P L E S O F T P R O P R I E T A R Y A N D C O N F I D E N T I A L
School/Program Contact Table page
Contact # (contact number) Enter the Contact # of the school or program. For
example, you might enter the headmistress of a school as
the first contact, and the assistant headmistress as the
second contact.
Name Enter the contact’s Name.
Title Enter the contact’s Title.
Contact Type Enter the type of contact.
Contact Phone Numbers Enter the Phone Type and Phone (number) for the
contact. You can list more than one Contact Phone
Number for each contact by simply adding new data
rows.
Tracking Educational Reimbursements
Your company may provide financial assistance to employees on global assignments, such as
school tuition for children and language and orientation classes for adults. PeopleSoft Human
Resources helps you pinpoint any educational assistance to which employees are entitled and
tracks multiple institutions. You can track beginning and ending dates and set up payment
schedules for reimbursement in the currency you designate.
International School/Program Page
Usage Use the International School/Program page to enter information about
payments for schools and other programs.
Object Name INTL_SCHOOL_PROGRM

J A N U A R Y 2 0 0 1 T R A C K I N G G L O B A L A S S I G N M E N T S
P E O P L E S O F T P R O P R I E T A R Y A N D C O N F I D E N T I A L M A I N T A I N I N G D A T A D U R I N G T H E A S S I G N M E N T 4 - 7
Navigation • Administer Workforce, Track Global Assignments (GBL), Use,
International School/Program, International School/Program
• Administer Workforce, Track Global Assignments (USF), Use,
International School/Program, International School/Program
Access
Requirements
Enter the Employee ID.
International School/Program page
School/Program Code Select a School/Program Code. When you leave this field,
the system will display the School/Program Type and
indicate whether the school is Internal or External. You
create all this information in the International
School/Program Table.
Begin/End Date Enter the Begin/End Date for the period during which the
employee attends the school or program.
Amount/Currency If you’re paying in a lump sum, enter the total Amount. If
you’re setting up a Payment Schedule, leave this field
blank. Once you’ve created the schedule, the system will
calculate and set the amount to the Total Scheduled Amt
(total scheduled amount).
The Currency defaults to the base currency designated in
Installation Table - HRMS Options Page, which you can
change if necessary. Valid currency codes are in the
Currency Code Table.
Payment Frequency If you’re setting up a payment schedule, select a Payment
Frequency. Valid values are in the Translate Table.
Due Date Enter the date that each payment is due.

T R A C K I N G G L O B A L A S S I G N M E N T S J A N U A R Y 2 0 0 1
4 - 8 M A I N T A I N I N G D A T A D U R I N G T H E A S S I G N M E N T P E O P L E S O F T P R O P R I E T A R Y A N D C O N F I D E N T I A L
School/Program Code Select a School/Program Code. When you leave this field,
the system will display the School/Program Type and
indicate whether the school is Internal or External. You
create all this information in the International
School/Program Table.
Total Amt (total amount) Enter the Total Amt of each payment.
Employer Amt (employer
amount)
Enter the amount of the payment that the company covers.
Employee Amt (employee
amount)
If the total and employer amounts are different, when you
leave the Employer Amt field, the system calculates and
displays the Employee Amt. This is the amount the
employee must pay.
Paid Select the Paid check box when you’ve paid the Total Amt
to the provider of the school or program.
Reimbursement Status Select the Reimbursement Status that reflects your
organization’s reimbursement policy for this particular
payment. After you have reimbursed the employee,
change this status to Reimbursed. If the amount the
employee has paid can’t be reimbursed, set the status to
Unreimb (unreimbursable).
As you enter the payment schedule, the system calculates the total and displays it in the Total
Scheduled Amt (total scheduled amount). When you save the information you’ve entered in the
page, the system sets the Amount to the Total Scheduled Amt.
To add more payments, position your cursor anywhere in the Payment Schedule group box and
click the Insert Row button.
Maintaining Employee Assignment Data
You’ll often need to add and update employee information, such as personal profile, citizenship,
passport, and visa data. PeopleSoft Human Resources enables you to access and track this
information for employees.
You can add this type of information in the Use menu for employees, in the Identification
component in the Citizenship/Passport and Visa/Permit Data pages. Before you can add or
change citizenship, passport, visa, and permit information for an employee, you must have
already created employee data in the system and assigned them Employee IDs in the Administer
Workforce menu.
You can also access these pages from the Administer Workforce menu. All fields on these
pages are described in Administering Your Workforce and in your Benefits documentation.

J A N U A R Y 2 0 0 1 T R A C K I N G G L O B A L A S S I G N M E N T S
P E O P L E S O F T P R O P R I E T A R Y A N D C O N F I D E N T I A L M A I N T A I N I N G D A T A D U R I N G T H E A S S I G N M E N T 4 - 9
For more information about tracking company-paid travel and entering international school
and program data, see Company Paid Travel Page and
For more information about entering employee and dependent name, addresses, and personal
profile data, see Hiring Employees into Positions.
For more information about adding a dependent or beneficiary to the system, see PeopleSoft
8 Base Benefits.
For more information about adding a dependent or beneficiary to the system, please see
Dependent/Beneficiary Enrollment Page.
Maintaining Assignment Data Related to Dependents
You’ll often need to add and update information about dependents and beneficiaries, such as
personal profile, citizenship, passport, visa, travel, and school data. PeopleSoft Human Resources
gives you the ability to access and track information separately from employees.
The Use menu has several pages for adding information for dependents:
• Dependent Data, Dependent Name/Address and Personal Profile
• Dependent Identification Data, Dependent Citizenship/Passport and Visa/Permit Data
• Dependent Company Paid Travel
• Dependent International Schools and Programs
These pages are similar to the ones in the Use menu for employees.
The fields in the Dependent Data and Dependent Identification Data pages are the same as those
in the Employee Data and Employee Identification Data pages. All fields on these pages are fully
described in your Benefits documentation.
Dependent Data- Personal Profile Page
Usage Use the Dependent Data - Personal Profile page to enter dependent or
beneficiary information.
Object Name DEPEND_BENEF2

T R A C K I N G G L O B A L A S S I G N M E N T S J A N U A R Y 2 0 0 1
4 - 1 0 M A I N T A I N I N G D A T A D U R I N G T H E A S S I G N M E N T P E O P L E S O F T P R O P R I E T A R Y A N D C O N F I D E N T I A L
Navigation • Compensate Employees, Administer Base Benefits, Use,
Dependent/Beneficiary, Personal Profile
• Administer Workforce, Administer Workforce (GBL), Use,
Dependent Data, Personal Profile
• Define Business Rules, Define General Data (NLD), Use,
Dependent/Beneficiary, Personal Profile
• Administer Workforce, Track Global Assignments (GBL), Use,
Dependent Data, Personal Profile
• Administer Workforce, Track Global Assignments (USF), Use,
Dependent Data, Personal Profile
Access
Requirements
Enter the Employee ID.
Dependent Data - Personal Profile page (1 of 2)
Dependent Data - Personal Profile page (2 of 2)
The fields on the Dependent Data pages are the same as those on the Employee Data pages.
All fields on these pages are fully described in your Benefits documentation.

J A N U A R Y 2 0 0 1 T R A C K I N G G L O B A L A S S I G N M E N T S
P E O P L E S O F T P R O P R I E T A R Y A N D C O N F I D E N T I A L M A I N T A I N I N G D A T A D U R I N G T H E A S S I G N M E N T 4 - 1 1
For more information about entering dependent identification data, see Maintaining
Assignment Data Related to Dependents. The fields for these pages are identical for
employees and dependents.
For more information about entering employee and dependent names, addresses, and
personal profile data, see Hiring Employees into Positions.
For more information about adding a dependent or beneficiary to the system, see PeopleSoft
8 Benefits Administration.
USF Setting Up Dependent Information
To enter dependent or beneficiary data, you can use the Dependent Data, Name/Address and
Personal Profile pages in the Track Global Assignments menu or the Benefits menu. They are
the same pages.
Depdnt Identification Data - Depdnt Citizenship/Passport Page
Usage Use the Depdnt Identification Data - Depdnt Citizenship/Passport page
to enter or update dependent identification data, including citizenship,
passport, visa, and permit data.
Object Name CITIZEN_PP_DEP
Navigation • Administer Workforce, Track Global Assignments (GBL), Use,
Depdnt Identification Data, Depdnt Citizenship/Passport
• Administer Workforce, Track Global Assignments (USF), Use,
Depdnt Identification Data, Depdnt Citizenship/Passport
Access
Requirements
Enter the Employee ID.

T R A C K I N G G L O B A L A S S I G N M E N T S J A N U A R Y 2 0 0 1
4 - 1 2 M A I N T A I N I N G D A T A D U R I N G T H E A S S I G N M E N T P E O P L E S O F T P R O P R I E T A R Y A N D C O N F I D E N T I A L
Depdnt Identification Data - Depdnt Citizenship/Passport page
For more information about entering dependent identification data, see Working With
Dependent Data. The fields for these pages are identical for employees and dependents.
All fields on these pages are fully described in your Benefits documentation.
For more information about adding a dependent or beneficiary to the system, see PeopleSoft
8 Base Benefits documentation.
If you’re administering a workforce in Germany, use the Visa/Permit Table to record OECD
work permits for OECD nationals who want to work in a protected industry. Because permit
types are keyed by country, if you’re tracking a German employee’s OECD work permit
information on the Identification, Visa/Permit Table in the Tracking Global Assignments
menu, select DEU as the Country Code from among your valid OECD permit types.
For more information about setting up OECD work permits, see Adding Visas and Work
Permits. For more information about OECD countries and tracking them by nationality, see
Entering German Nation Duvo Codes.
Tracking Dependent Company-Paid Travel
Depending on its policies for global assignments, your company probably offers several types of
company-paid travel to employees and their dependents. Use the Depdnt Company Paid Travel

J A N U A R Y 2 0 0 1 T R A C K I N G G L O B A L A S S I G N M E N T S
P E O P L E S O F T P R O P R I E T A R Y A N D C O N F I D E N T I A L M A I N T A I N I N G D A T A D U R I N G T H E A S S I G N M E N T 4 - 1 3
(dependent company paid travel) page to track any travel for which dependents of employees are
eligible.
Travel Cmpny Dep Page
Usage Use the Travel Cmpny Dep page to track any travel for which
dependents of employees are eligible.
Object Name TRAVEL_CMPNY_DEP
Navigation • Administer Workforce, Track Global Assignments (GBL), Use,
Depdnt Company Paid Travel, Travel Cmpny Dep
• Administer Workforce, Track Global Assignments (USF), Use,
Depdnt Company Paid Travel, Travel Cmpny Dep
Access
Requirements
Enter an Employee ID
Travel Cmpny Dep page
For more information about tracking company-paid travel for dependents, see Company Paid
Travel Page for employees. The fields for these pages are identical for employees and
dependents.

T R A C K I N G G L O B A L A S S I G N M E N T S J A N U A R Y 2 0 0 1
4 - 1 4 M A I N T A I N I N G D A T A D U R I N G T H E A S S I G N M E N T P E O P L E S O F T P R O P R I E T A R Y A N D C O N F I D E N T I A L
Tracking Dependent Educational Reimbursements
Your company may provide financial assistance to dependents of employees on global
assignments, such as school tuition and other educational assistance to which employees'
dependents are entitled. You can track beginning and ending dates and set up payment schedules
for reimbursement in the currency you designate.
Intl School Dep Page
Usage Use the Intl School Dep page to track beginning and ending dates and
set up payment schedules for reimbursement in the currency you
designate.
Object Name INTL_SCHOOL_DEP
Navigation • Administer Workforce, Track Global Assignments (GBL), Use,
Depdnt International School/P, Intl School Dep
• Administer Workforce, Track Global Assignments (USF), Use,
Depdnt International School/P, Intl School Dep
Access
Requirements
Enter an Employee ID.
Intl School Dep page
For more information about entering international school and program data for dependents,
refer to Tracking Educational Reimbursements, in this PeopleBook. The fields for these
pages are identical for employees and dependents.

P E O P L E S O F T P R O P R I E T A R Y A N D C O N F I D E N T I A L R E V I E W I N G A S S I G N M E N T I N F O R M A T I O N 5 - 1
C H A P T E R 5
Reviewing Assignment Information
Important! We discuss the system using the pages in the global menus as our examples. If
there is a page that is located in one of the local country menus whose functionality isn’t
covered in the global menu page discussions, we'll discuss the local country page separately
and in its entirety.
Assignment Summary Page
Usage Use the Assignment Summary page to view information on an
employee's assignment dates, location, and other details, including
assignment type, department, company, position number, business unit,
and job code.
Object Name ASSGNMT_SUMMARY
Navigation • Administer Workforce, Track Global Assignments (GBL),
Inquire, Assignment Summary, Assignment Summary
• Administer Workforce, Track Global Assignments (USF),
Inquire, Assignment Summary, Assignment Summary
Access
Requirements
Enter an Employee ID.

T R A C K I N G G L O B A L A S S I G N M E N T S J A N U A R Y 2 0 0 1
5 - 2 R E V I E W I N G A S S I G N M E N T I N F O R M A T I O N P E O P L E S O F T P R O P R I E T A R Y A N D C O N F I D E N T I A L
Assignment Summary page
The following elements are common to multiple pages in this application and are defined in the
preface of this PeopleBook in PeopleBooks Standard Page Element Definitions: EmplID,
EmplRcd# Country and Begin Date.
Assignment Type The system displays the Assignment Type.
Company The system displays the Company the employee is
associated with.
Business Unit The system displays the Business Unit the employee is
associated with.
Department The system displays the code for the department into
which the employee was hired. The system stores valid
values in the Department Table.
Job Code The system displays the employee’s Job Code. The
system stores valid Job Codes on the Job Code Table.
Position Number The system displays a Position Number for this
employee. You define positions in the Position Data
pages.
Location Code The system displays the employee’s Location Code.
Reviewing Employee Education, Language, and Driver’s License Data
To help you identify the right employees to send on assignments, you might find it useful to
review employee educational qualifications and competencies, such as the schools they’ve
attended, their majors, and language abilities. You may also want to update the data to include
any new languages or education employees have gained during their assignments. If you’re
assigning a company car to an employee on assignment, you’ll need driver’s license information
for them.

J A N U A R Y 2 0 0 1 T R A C K I N G G L O B A L A S S I G N M E N T S
P E O P L E S O F T P R O P R I E T A R Y A N D C O N F I D E N T I A L R E V I E W I N G A S S I G N M E N T I N F O R M A T I O N 5 - 3
You can use the Education, Languages, and Entering Driver’s License Data pages to review and
update this type of employee data. So that you can access the information more easily, we’ve
included all three pages in the Track Global Assignments menu. You can also use the pages in
the Administer Workforce or the Manage Competencies menu. They are the same pages.
For more information about the Driver’s License Data page, see Entering Additional Data in
Human Resources Records. For more information about tracking educational data, as well
as language and other skills, see Managing Competencies.


P E O P L E S O F T P R O P R I E T A R Y A N D C O N F I D E N T I A L P R O C E S S I N G A S S I G N M E N T C H A N G E S 6 - 1
C H A P T E R 6
Processing Assignment Changes
Depending on the benefits your company offers employees on global assignments, you can use
various supplemental features in PeopleSoft Human Resources to process additional assignment
information for employees and their families.
Additional features in PeopleSoft Human Resources include maintaining detailed information
about documents and paperwork required for visas and permits and tracking company-paid travel
information. If your company assists in placing children in schools or offers language or
orientation classes, you can track tuition reimbursement arrangements. To help you select the
appropriate candidates for assignments, you can review employee data online.
Often, you’ll maintain data related specifically to a dependent, such as legal documents and travel
arrangements, and you may not have the associated Employee ID at hand. PeopleSoft Human
Resources gives you the flexibility to access information either by employee or by dependent.
Important! We discuss the system using the pages in the global menus as our examples. If
there is a page that is located in one of the local country menus whose functionality isn’t
covered in the global menu page discussions, we'll discuss the local country page separately
and in its entirety.
Ending Assignments
If an employee has no lapse between assignments, meaning that as soon as this assignment is
over, he or she is off on another assignment, you can skip this step and move to the next section,
Sending Employees on New Assignments. If there is a lapse between assignments or the
employee isn’t going on another assignment, you’ll indicate in the system an ending date for this
assignment. You’ll use the Home/Host Data page to end a global assignment for an employee.
Sending Employees on New Assignments
When you send employees on new global assignments, you’ll follow the same steps outlined
earlier in this section, and you’ll use the Home/Host Data page too. However, you don’t need to
create a new employment record number for each sequential assignment. You can use the same
employment record again and again by inserting data rows with information about new
assignments.

T R A C K I N G G L O B A L A S S I G N M E N T S J A N U A R Y 2 0 0 1
6 - 2 P R O C E S S I N G A S S I G N M E N T C H A N G E S P E O P L E S O F T P R O P R I E T A R Y A N D C O N F I D E N T I A L
Home/Host Data – Home Host Page
Usage Use the Home/Host Data page to end a global assignment for an
employee or to send an employee on a new assignment.
Navigation Administer Workforce, Track Global Assignments (GBL), Use,
Home/Host Data
Administer Workforce, Track Global Assignments (USF), Use,
Home/Host Data
Access
Requirements
Enter the Employee ID or the Employment Record Number for the
employee host data.
Home/Host Data – Home Host Page
The following fields are common to multiple pages and are defined in the preface of this
PeopleBook in PeopleBooks Standard Page Element Definitions: Effective Date and Status.
To end an assignment, position your cursor anywhere in the Job Information group box and
insert a row. Be sure to save your work after entering data.
Action/Reason Select an Action of Assgn Comp (assignment completion)
from the values in the Translate Table.
The only Action values you can select in this page are
Assignment and Assgn Comp. For other administrative
actions affecting employee job data, use the Job Data
pages.

J A N U A R Y 2 0 0 1 T R A C K I N G G L O B A L A S S I G N M E N T S
P E O P L E S O F T P R O P R I E T A R Y A N D C O N F I D E N T I A L P R O C E S S I N G A S S I G N M E N T C H A N G E S 6 - 3
For more information about The Home/Host Data page, see Setting Up the Home Location.
Transferring Employees Permanently
At times, you’ll encounter a situation in which an employee on temporary assignment ends up
staying at an assignment location permanently. As a permanent employee, his or her status
becomes the same as that for a local employee, so you don’t need to process personnel
administration data for the employee at a different home location, as you do with temporary
assignments. All employee, benefit, and payroll data tracking for the employee should take place
at the new location because it is the employee’s new home base.
Before you transfer an employee permanently, you’ll first need to end all open temporary global
assignments, following the instructions in Ending Assignments. Then to make a permanent
transfer, go to the Job Data page, insert a row, and enter the department, location, and job code
for the host assignment that is becoming permanent.
For more information about transferring employees using the Job Data pages, see Updating
Workforce Information.


P E O P L E S O F T P R O P R I E T A R Y A N D C O N F I D E N T I A L U S I N G G L O B A L A S S I G N M E N T R E P O R T S 7 - 1
C H A P T E R 7
Using Global Assignment Reports
To help you process global assignments for employees and their dependents, we've included
reports in the Track Global Assignments menu to review lists of employees that are on
assignment and employees who have passports or visas.
In this section we’ve listed the reports by their ID number, and provided you with a description
and a sample of each.
For more information on generating these reports, see PeopleSoft Reporting Tools. For a
complete listing of all PeopleSoft Human Resources reports see List of Reports in
PeopleSoft Human Resources.
List of Global Assignment Reports
Report Name Report ID Location Global or
Local
Passport/Visa Expiration Report PER032 Administer Workforce, Track
Global Assignments, Report,
Passport Visa Expiration
GBL
Employees on Assignment
Report
PER717 Administer Workforce, Track
Global Assignments, Report,
Employees on Assignment
GBL
Generating the Passport/Visa Expiration Report
This report lists employees and dependents who have passports, visas, or work permits on file
that will expire in the next 90 days from the report run date. The first section of the report lists
passport information: Employee ID and name, Dependent ID and name, country, passport
number, issue date, and expiration date. The second section of the report lists visa/work permit
information: Employee ID and name, Dependent ID and name, country, visa/work permit
number, type of permit, issue date, and expiration date. There is a page break between the first
and second sections of the report.

T R A C K I N G G L O B A L A S S I G N M E N T S J A N U A R Y 2 0 0 1
7 - 2 U S I N G G L O B A L A S S I G N M E N T R E P O R T S P E O P L E S O F T P R O P R I E T A R Y A N D C O N F I D E N T I A L
Passport/Visa Expiration Page
Usage Use this report to list employees and dependents who have passports,
visas, or work permits on file that will expire in the next 90 days from
the report run date.
Navigation Administer Workforce, Track Global Assignments, Report,
Passport Visa Expiration
Access
Requirements
Enter a Run Control ID.
Passport/Visa Expiration page
The following elements are common to multiple pages in this application and are defined in the
preface of this PeopleBook in PeopleBooks Standard Page Element Definitions: Run Control
ID.
Click Run to run the report using Process Scheduler.
For more information about Process Scheduler, see Process Scheduler.
Passport/Visa Expiration Report
Description Use this report to list employees and dependents who have passports,
visas, or work permits on file that will expire in the next 90 days from
the report run date.
Report ID PER032
Type of
Report
SQR
Parameters Run Control ID
Source PRCSRUNCNTL
Source
Records
CITIZEN_PSSPRT, DEPENDENT_BENEF, PERSONAL_DATA,
VISA_PMT_DATA
Sorted By Employee ID, Dependent ID, Expiration Date
For samples of this and other reports in your application, see the PDF files published on CD-
ROM with your documentation.

J A N U A R Y 2 0 0 1 T R A C K I N G G L O B A L A S S I G N M E N T S
P E O P L E S O F T P R O P R I E T A R Y A N D C O N F I D E N T I A L U S I N G G L O B A L A S S I G N M E N T R E P O R T S 7 - 3
Generating the Employees on Assignment Report
This report lists employees who are on assignment. The report lists: the employee ID, employee
name, Host Contact ID, and the beginning and end dates of the assignment.
Employees on Assignment - Run Control Page
Usage Use this report to list employees on assignment.
Object Name RUNCTL_PER717
Navigation • Administer Workforce, Track Global Assignments (GBL), Report,
Employees on Assignment, Run Control
• Administer Workforce, Track Global Assignments (USF), Report,
Employees on Assignment, Run Control
Access
Requirements
Enter a run control ID.
Employees on Assignment - Run Control page
The following elements are common to multiple pages in this application and are defined in the
preface of this PeopleBook in PeopleBooks Standard Page Element Definitions: Run Control
ID, and As of Date.
Click Run to run the report using Process Scheduler.
For more information about Process Scheduler, see Process Scheduler.
Employees on Assignment Report
Description This report lists employees on assignment.
Report ID PER717
Type of
Report
Crystal
Parameters As of Date

T R A C K I N G G L O B A L A S S I G N M E N T S J A N U A R Y 2 0 0 1
7 - 4 U S I N G G L O B A L A S S I G N M E N T R E P O R T S P E O P L E S O F T P R O P R I E T A R Y A N D C O N F I D E N T I A L
Source RUNCTL_PER717
Source
Records
ASSIGNMENT, PERSONAL DATA
Sorted By Employee ID.
For samples of this and other reports in your application, see the PDF files published on CD-
ROM with your documentation.

P E O P L E S O F T P R O P R I E T A R Y A N D C O N F I D E N T I A L I N D E X 1
Index
A
Assignment Compensation page
using for home location 3-31
using for host location 3-33
assignment data
entering assignment types and dates 3-22
entering dependent identification data for global
assignments 4-11
entering residence information 3-25
maintaining for dependents only 4-9
maintaining for employees and dependents 4-1
overview of component page functions 3-21
tracking educational reimbursement data for
dependents 4-14
tracking employee vehicle data 3-28
viewing employee home/host data summaries
3-23
Assignment Data component 3-21
Assignment Data page 3-22
Assignment Home/Host page 3-24
Residence Home page 3-25
Residence Host page 3-27
Vehicle Data page 3-28
Assignment Type Table page 2-1
assignment types
defining for Germany 2-2
Expatriate 1-1
inpatriate 1-1
third country nationals 1-1
assignments
creating checklists 2-3, 3-1
ending 6-1
entering types and dates 3-22
establishing employee data for global assignments
3-1
establishing employee home and host data 3-2
establishing global category types 2-1
identifying reasons for action 2-2
linking to multiple home/host data 3-13
maintaining data for employees 4-8
maintaining temporary and permanent assignment
data 1-1
multiple jobs at home location 3-11
new 6-1
overview of setting up basic information for global
assignments 2-1
overview of temporary assignment types 1-1
prerequisites for setup process 1-3
processing changes for global assignments 6-1
processing with multiple home or host data 3-11
required personal data for employees and
dependents 3-16
reviewing assignment summary data 5-1
reviewing employee qualifications and
competencies 5-2
setting up home location compensation for global
assignments 3-31
setting up new data for global use 2-1
tracking global reports 7-1
transferring employees to permanent locations
6-3
C
cash in lieu
using for company-paid travel 4-3
using for vehicle data tracking 3-30
checklists 2-3
citizenship data
entering for employees and dependents on global
assignments 3-15
code
deduction 2-4
company-paid travel
entering data 4-1
maintaining employee and dependent assignment
information 4-1
tracking dependent data 4-12
tracking employee eligibility 4-1
company-paid travel classification 2-8
Company-paid Travel page 4-1
compensation
establishing deductions and earnings for global
assignments 2-3
using for home location 3-31
using for host location 3-31
currency rate fluctuations 3-36
D
Deduction Table - Deduction Table 2 page 2-5
Deduction Table page 2-4
deductions
establishing for assignment compensation 2-3
setting up classifications and tax data 2-5
setting up codes for global assignments 2-4
supplemental 3-30
Depdnt Identification Data -- Depdnt
Citizenship/Passport page 4-11

T R A C K I N G G L O B A L A S S I G N M E N T S J A N U A R Y 2 0 0 1
I N D E X 2 P E O P L E S O F T P R O P R I E T A R Y A N D C O N F I D E N T I A L
Dependent Data - Personal Profile page 3-16
Dependent Data -- Personal Profile page 4-9
dependents
adding to employee record for benefit tracking
3-16
adding to host location in Family at Host page
3-20
entering identification data 4-11
maintaining global assignment data 4-9
removing from host location in Family at Host page
3-20
selecting for employee travel 3-18
setting up data for global assignments 3-16, 4-9
setting up data for USF use 3-18, 4-11
tracking company-paid travel data 4-12
tracking educational reimbursements data 4-14
viewing data on immediate family for employee
3-20
E
earnings
establishing for assignment compensation 2-3
supplemental 3-30
educational qualifications
updating for employee 2-9
educational reimbursements
selecting status 4-8
tracking dependents data 4-14
tracking for global assignments 4-6
emergency contact
selecting contact phone numbers 3-23
employee data
entering residence information 3-25
implementing security for global assignments
3-36
maintaining for global assignments 4-8
setting up home locations 3-2
tracking personal vehicles 3-28
expatriate 1-1
F
Family at Host page 3-18
financial assistance See educational reimbursements
furniture 3-26, 3-28
G
Germany
defining assignment types 2-2
H
home data
entering residence information 3-25
setting up compensation data for global
assignments 3-31
viewing and updating for global assignments 3-3
viewing summary 3-23
Home Host page
viewing and updating home data for global
assignments 3-3
Home/Host Data page
used for ending assignments 6-2
host data
concurrent host assignment details 3-12
entering residence information 3-27
viewing summary 3-23
I
identification requirements
entering passport and visa information 3-15
immediate family 3-20
Immediate Family page 3-20
inpatriate 1-1
International School/Program page 4-6
L
locations
adding dependents to host 3-20
establishing employee home and host data for
global assignments 3-2
removing dependents from host 3-20
setting up for employee home 3-2
setting up host data for global assignments 3-7
viewing and updating home data for new global
assignments 3-3
M
multiple home/host data
assigning security 3-40
N
nanny See dependents, selecting for employee travel
P
passport
entering information for global assignments 3-15

J A N U A R Y 2 0 0 1 T R A C K I N G G L O B A L A S S I G N M E N T S
P E O P L E S O F T P R O P R I E T A R Y A N D C O N F I D E N T I A L I N D E X 3
R
reports
Employees on Assignment 7-3
Passport/Visa Expiration 7-1
tracking for global assignments 7-1
S
School/Program Contact table page 4-5
School/Program table page 4-4
schools and programs
entering contact data 4-5
setting up resource data 4-4
schools and programs, international 4-4
security
assigning for permanent transfers 3-41
assigning for single home and host 3-39
assigning for single home and multiple, concurrent
hosts 3-40
implementing for employees on global assignments
3-36
setting up access for global assignments 3-36
skills
updating for employee 2-9
T
tax data
recording for global assignments 2-5
third country national 1-1
transfer
entering data for permanent work assignments
6-3
security for permanent assignments 3-41
travel
company-paid classification 2-8
entering educational qualifications and skills
acquired during assignment 2-9
selecting accompanying employee dependents
3-18
setting up personal data for employees and
dependents 3-16
Travel Type Table page 2-8
V
vehicle data
tracking information 3-28
visa
entering information for global assignments 3-15
