peoplesoft-hcmtraining.ccsd.net/wp-content/uploads/2019/12/employee-self-service... · 2. a message...
TRANSCRIPT

Rev. December 2019
CLARK COUNTY SCHOOL DISTRICT OPERATIONAL SERVICES UNIT
TECHNOLOGY & INFORMATION SYSTEMS SERVICES DIVISION USER SUPPORT SERVICES
EMPLOYEE BUSINESS TRAINING DEPARTMENT
PeopleSoft-HCM: Employee Self-Service Essentials
Revised: December 31 2019
Rev. December 2019
Employee Self-Service Overview..................................... 4
Navigating in Employee Self-Service ............................... 5
Accessing the HCM system ......................................... 5
The Banner .................................................................. 6
Home Button .......................................................... 7
Notifications Button ............................................... 7
Actions List Button ................................................. 7
Tiles ............................................................................. 8
Personal Details Tile ........................................................ 9
Updating Addresses .................................................. 10
Contact Information Details ...................................... 11
Name Change ............................................................ 13
Emergency Contacts ................................................. 17
Additional Information .............................................. 19
Time/Absence Tile ......................................................... 20
Requesting Leave ...................................................... 21
Request an Absence ............................................. 21
Cancel an Absence ................................................ 25
View Requests ...................................................... 26
View Absence Balances ........................................ 27
Request and View an Extended Absence ............. 28
View Leave Transfer Request History................... 30
Entering Time ............................................................ 31
Entering Time on the Timesheet .......................... 31
Viewing the Time Summary ................................. 34
Viewing Exceptions ............................................... 36
Viewing Report Time ............................................ 37
Viewing the Weekly Time Summary .................... 37
Viewing Payable Time Details .............................. 38
Viewing Comp Time Balances .............................. 38
Employee Effort Certification .............................. 38
Payroll Tile .................................................................... 39
Viewing Paychecks .................................................... 40
Viewing Paychecks from Legacy ESS ......................... 41
Tax Withholding-W4 ................................................. 42
W-2/W-2c Consent ................................................... 44
Direct Deposit ........................................................... 45
Viewing W2 from Legacy ESS .................................... 46
Benefits Details Tile ...................................................... 47
Viewing the Benefits Summary ................................ 48
Viewing Covered Dependents for Benefit Plans .. 48
Viewing Covered Beneficiaries for Benefit Plans . 49
Adding/Editing the Dependents and Beneficiary Information ............................................................... 51
Life Events ................................................................. 55
Benefits Enrollment .................................................. 56
Benefits Statements ................................................. 57
Affordable Care Act .................................................. 58
New 403(b)/457 Deduction ...................................... 59
Changes to 403(b)/457 Deduction ........................... 61
Warrant & Benefits Designation ............................... 63
Taleo Internal Job Postings Tile .................................... 65
Open Enrollment Tile .................................................... 66
Password Reset Information Tile .................................. 66
Separation/LOA Request Tile ........................................ 67
Nevada PERS Tile .......................................................... 69
Onboarding Activities Tile ............................................. 69
Appendix A – Examples of Absence/Time Requests .... 70
Table of Contents

Rev. December 2019
Partial Day Absences ................................................. 70
Certified/Licensed Absence Examples ...................... 72
Support Professional Absence Examples .................. 74
Additional Time Examples ........................................ 76
Appendix B – Minutes Conversion to Decimal Matrix .. 82
This manual was created for the HCM Project in collaboration with the Human Resources Division and Business and Finance Unit.

TECHNOLOGY & INFORMATION SYSTEMS SERVICES DIVISION USER SUPPORT SERVICES: EMPLOYEE BUSINESS TRAINING
PEOPLESOFT-HCM: EMPLOYEE SELF-SERVICE ESSENTIALS Revision A 12/2019 4
Employee Self-Service Overview The HCM system provides an Employee Self Service (ESS) portal for all CCSD employees. ESS provides features such as:
• Ease of changing personal information
• Electronic submittal of time and absence
• Ability to view paychecks online as well as modify direct deposit information
• Ability to view and edit benefit details including dependent/beneficiary changes or additions and other life events
• View and apply for jobs online
• Universal accessibility using multiple browsers and devices
• And much more
IMPORTANT! PeopleSoft is a web-based program that can change. These updates might change the look of some of the images and/or directions in this document.

TECHNOLOGY & INFORMATION SYSTEMS SERVICES DIVISION USER SUPPORT SERVICES: EMPLOYEE BUSINESS TRAINING
PEOPLESOFT-HCM: EMPLOYEE SELF-SERVICE ESSENTIALS Revision A 12/2019 5
Navigating in Employee Self-Service
Accessing the HCM system The HCM system provides an Employee Self Service (ESS) portal for all CCSD employees. Employees can log into the system via the HCM icon on the desktop or by going to hcm.ccsd.net.
ESS is compatible with Mozilla Firefox, Google Chrome, and most mobile browsers. Employees use their Active Directory (AD) credentials to access ESS.
An important thing to remember when using ESS is that, when navigating throughout the system, employees should always use the navigation buttons provided within the system, not within the browser.
TECHNOLOGY & INFORMATION SYSTEMS SERVICES DIVISION USER SUPPORT SERVICES: EMPLOYEE BUSINESS TRAINING
PEOPLESOFT-HCM: EMPLOYEE SELF-SERVICE ESSENTIALS Revision A 12/2019 6
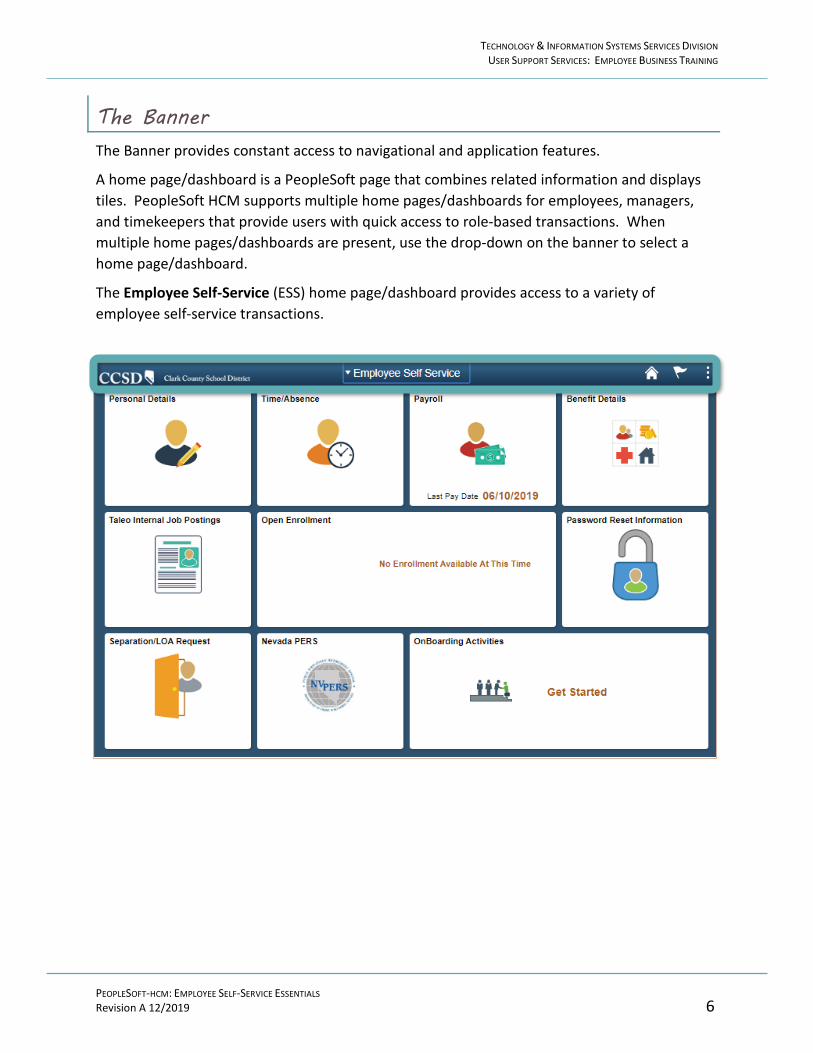
The Banner The Banner provides constant access to navigational and application features.
A home page/dashboard is a PeopleSoft page that combines related information and displays tiles. PeopleSoft HCM supports multiple home pages/dashboards for employees, managers, and timekeepers that provide users with quick access to role-based transactions. When multiple home pages/dashboards are present, use the drop-down on the banner to select a home page/dashboard.
The Employee Self-Service (ESS) home page/dashboard provides access to a variety of employee self-service transactions.

TECHNOLOGY & INFORMATION SYSTEMS SERVICES DIVISION USER SUPPORT SERVICES: EMPLOYEE BUSINESS TRAINING
PEOPLESOFT-HCM: EMPLOYEE SELF-SERVICE ESSENTIALS Revision A 12/2019 7
Home Button Click the Home button from any page/screen to return to the ESS Dashboard.
Notifications Button
Clicking the flag icon will display any notifications, such as information regarding absence/time approval.
Actions List Button
The Actions List (3 vertical dots) displays a list of actions the employee can perform. Help and Sign Out are standard actions in the list; however, other options may appear when visiting a transaction page. The Help option links to the CCSD Employee Business Training website (training.ccsd.net) where additional information and videos can be accessed. The Sign Out button should always be used instead of closing the entire browser window to ensure that the session is properly exited each time.
TECHNOLOGY & INFORMATION SYSTEMS SERVICES DIVISION USER SUPPORT SERVICES: EMPLOYEE BUSINESS TRAINING
PEOPLESOFT-HCM: EMPLOYEE SELF-SERVICE ESSENTIALS Revision A 12/2019 8
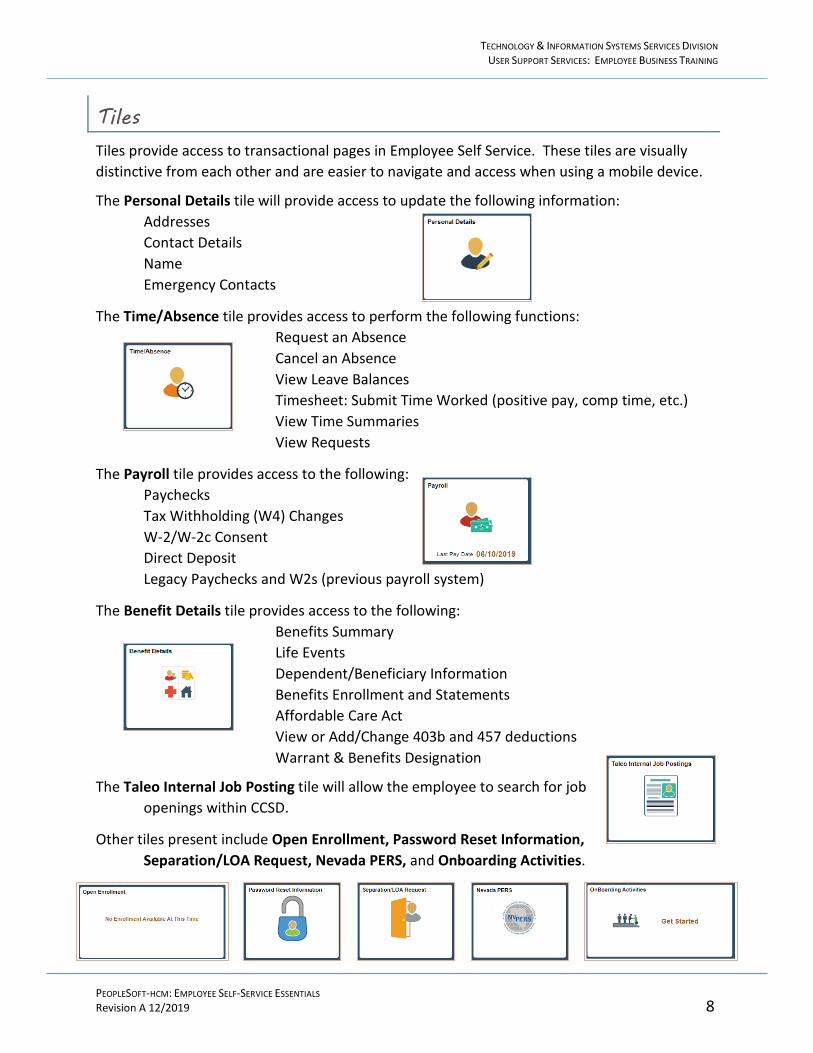
Tiles Tiles provide access to transactional pages in Employee Self Service. These tiles are visually distinctive from each other and are easier to navigate and access when using a mobile device.
The Personal Details tile will provide access to update the following information: Addresses Contact Details Name Emergency Contacts
The Time/Absence tile provides access to perform the following functions: Request an Absence Cancel an Absence View Leave Balances Timesheet: Submit Time Worked (positive pay, comp time, etc.) View Time Summaries View Requests
The Payroll tile provides access to the following: Paychecks Tax Withholding (W4) Changes W-2/W-2c Consent Direct Deposit Legacy Paychecks and W2s (previous payroll system)
The Benefit Details tile provides access to the following: Benefits Summary Life Events Dependent/Beneficiary Information Benefits Enrollment and Statements Affordable Care Act View or Add/Change 403b and 457 deductions Warrant & Benefits Designation
The Taleo Internal Job Posting tile will allow the employee to search for job openings within CCSD.
Other tiles present include Open Enrollment, Password Reset Information, Separation/LOA Request, Nevada PERS, and Onboarding Activities.
TECHNOLOGY & INFORMATION SYSTEMS SERVICES DIVISION USER SUPPORT SERVICES: EMPLOYEE BUSINESS TRAINING
PEOPLESOFT-HCM: EMPLOYEE SELF-SERVICE ESSENTIALS Revision A 12/2019 9
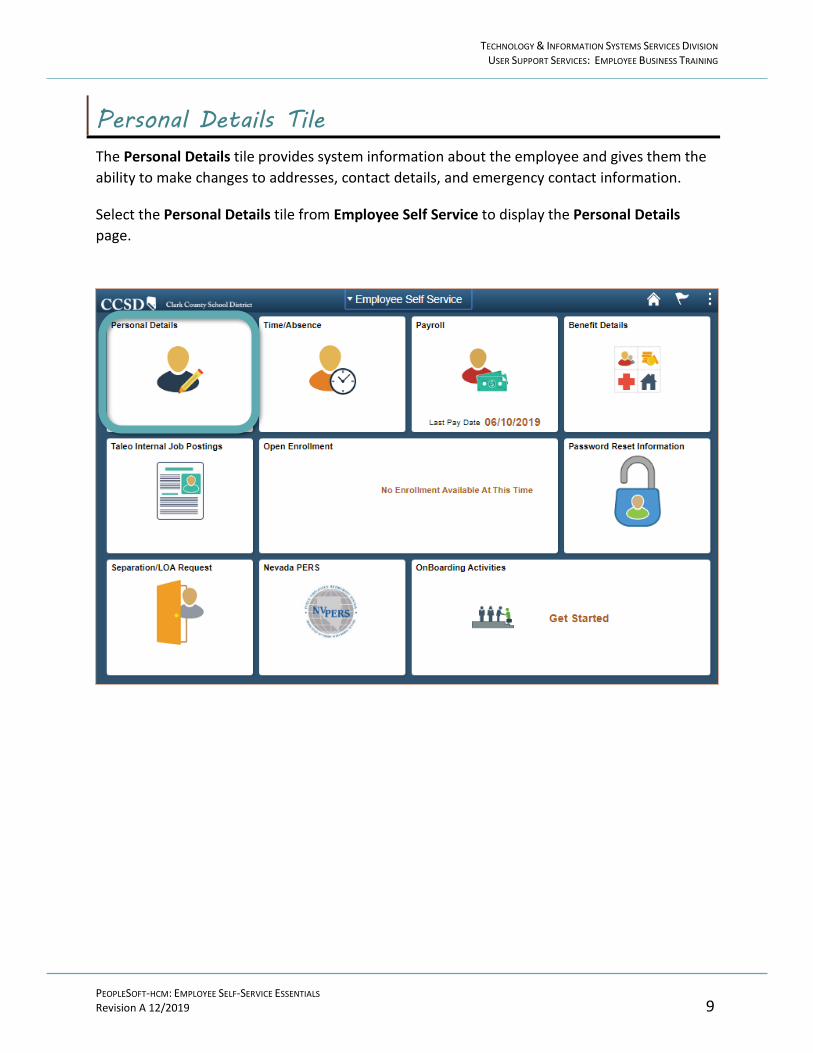
Personal Details Tile The Personal Details tile provides system information about the employee and gives them the ability to make changes to addresses, contact details, and emergency contact information.
Select the Personal Details tile from Employee Self Service to display the Personal Details page.

TECHNOLOGY & INFORMATION SYSTEMS SERVICES DIVISION USER SUPPORT SERVICES: EMPLOYEE BUSINESS TRAINING
PEOPLESOFT-HCM: EMPLOYEE SELF-SERVICE ESSENTIALS Revision A 12/2019 10
Updating Addresses After selecting the Personal Details tile, click the Addresses option from the left side panel to display the page. The employee’s current home address will appear. 1. To update the Address, click the > symbol on the right side of the current home address.
A new window will appear to update the address.
a. Enter the new address. b. Click the Save button.
2. If the mailing address is different from the home address, click the Add Mailing Address button, enter the information for the mailing address, and click the Save button.
b
a
2
1

TECHNOLOGY & INFORMATION SYSTEMS SERVICES DIVISION USER SUPPORT SERVICES: EMPLOYEE BUSINESS TRAINING
PEOPLESOFT-HCM: EMPLOYEE SELF-SERVICE ESSENTIALS Revision A 12/2019 11
Contact Information Details
After selecting the Personal Details tile, click the Contact Details option from the left side panel to display the page. The employee’s current contact information will appear.
1. To update the Phone Number, click the > symbol on the right side of the listed phone number. A new window will appear to update the phone number. a. Select the phone number Type from the drop-down
list. b. If the phone number that is entered is the
Preferred number, click the checkbox. If it is not, leave it unchecked. Only one phone number can be selected as the Preferred number.
c. Enter the new phone number in the Number field. d. Click the Save button.
2. To add an additional email, click the + symbol. A new window will appear to enter the additional email address information.
1
2
a
bc
d

TECHNOLOGY & INFORMATION SYSTEMS SERVICES DIVISION USER SUPPORT SERVICES: EMPLOYEE BUSINESS TRAINING
PEOPLESOFT-HCM: EMPLOYEE SELF-SERVICE ESSENTIALS Revision A 12/2019 12
a. Select the Email Type from the drop-down list. b. Do NOT click the Preferred checkbox. Only one email
address can be selected as the Preferred email, and it is strongly recommended to keep the CCSD email address as the preferred email to ensure the receipt of any communications through the HCM system.
c. Enter the new email address in the Email Address field. d. Click the Save button.
The default business email address ([email protected]) is set as the preferred email. It is strongly recommended NOT to change it.
a
b
c
d

TECHNOLOGY & INFORMATION SYSTEMS SERVICES DIVISION USER SUPPORT SERVICES: EMPLOYEE BUSINESS TRAINING
PEOPLESOFT-HCM: EMPLOYEE SELF-SERVICE ESSENTIALS Revision A 12/2019 13
Name Change After selecting the Personal Details tile, click the Name option from the left side panel to display the page.
1. To initiate a name change, click the > on the right side of the current name.
2. A message displays reminding the employee that supporting documentation needs to be attached to complete the Primary/Legal Name Change transaction. If supporting documents are not attached, the transaction will not be completed. Click the OK button to confirm the need to attach supporting documents for the name change.
3. Enter the following: a. Enter the Change As Of date. b. Confirm Name Format is English. c. Select Name Prefix (optional). d. Enter new First Name. e. Enter new Middle Name (optional). f. Enter new Last Name. g. Enter new Name Suffix (optional).
2
1
3
4
TECHNOLOGY & INFORMATION SYSTEMS SERVICES DIVISION USER SUPPORT SERVICES: EMPLOYEE BUSINESS TRAINING
PEOPLESOFT-HCM: EMPLOYEE SELF-SERVICE ESSENTIALS Revision A 12/2019 14
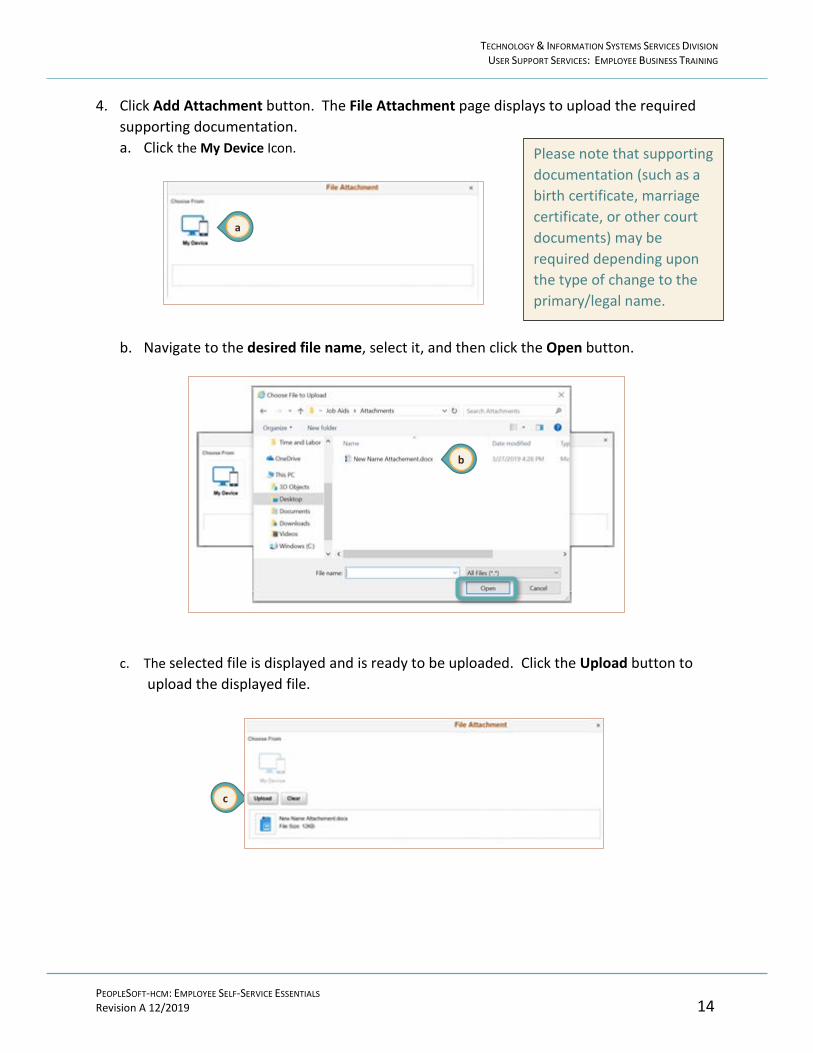
4. Click Add Attachment button. The File Attachment page displays to upload the required supporting documentation. a. Click the My Device Icon.
b. Navigate to the desired file name, select it, and then click the Open button.
c. The selected file is displayed and is ready to be uploaded. Click the Upload button to upload the displayed file.
a
b
Please note that supporting documentation (such as a birth certificate, marriage certificate, or other court documents) may be required depending upon the type of change to the primary/legal name.
c

TECHNOLOGY & INFORMATION SYSTEMS SERVICES DIVISION USER SUPPORT SERVICES: EMPLOYEE BUSINESS TRAINING
PEOPLESOFT-HCM: EMPLOYEE SELF-SERVICE ESSENTIALS Revision A 12/2019 15
d. When the File Attachment page shows Upload Complete. Click the Done button to attach file.
e. A message appears to confirm a successful uploading of the attachment. Click the OK button to confirm the attachment message.
5. The Name page appears with the attachment. Choose either View Attachment or Delete Attachment by clicking on the corresponding button. Click the Save button to submit the name change transaction for approval.
d
e
5
TECHNOLOGY & INFORMATION SYSTEMS SERVICES DIVISION USER SUPPORT SERVICES: EMPLOYEE BUSINESS TRAINING
PEOPLESOFT-HCM: EMPLOYEE SELF-SERVICE ESSENTIALS Revision A 12/2019 16
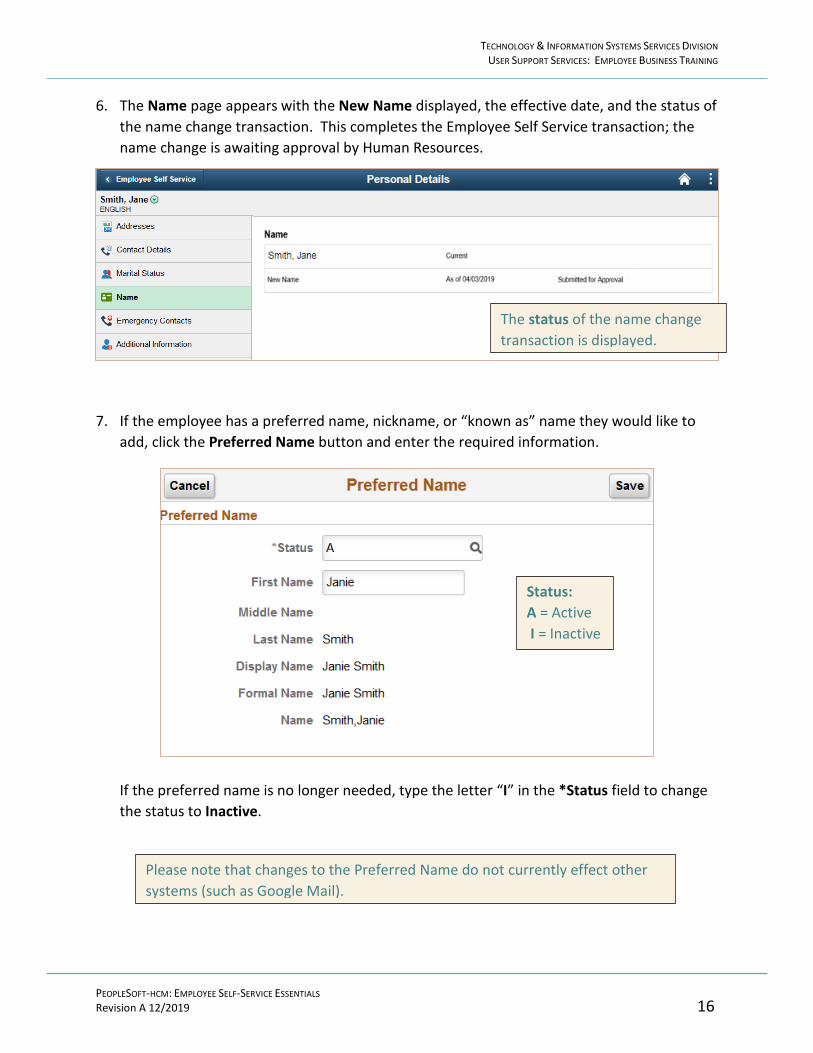
6. The Name page appears with the New Name displayed, the effective date, and the status of the name change transaction. This completes the Employee Self Service transaction; the name change is awaiting approval by Human Resources.
7. If the employee has a preferred name, nickname, or “known as” name they would like to add, click the Preferred Name button and enter the required information.
If the preferred name is no longer needed, type the letter “I” in the *Status field to change the status to Inactive.
The status of the name change transaction is displayed.
Status: A = Active I = Inactive
Please note that changes to the Preferred Name do not currently effect other systems (such as Google Mail).
TECHNOLOGY & INFORMATION SYSTEMS SERVICES DIVISION USER SUPPORT SERVICES: EMPLOYEE BUSINESS TRAINING
PEOPLESOFT-HCM: EMPLOYEE SELF-SERVICE ESSENTIALS Revision A 12/2019 17
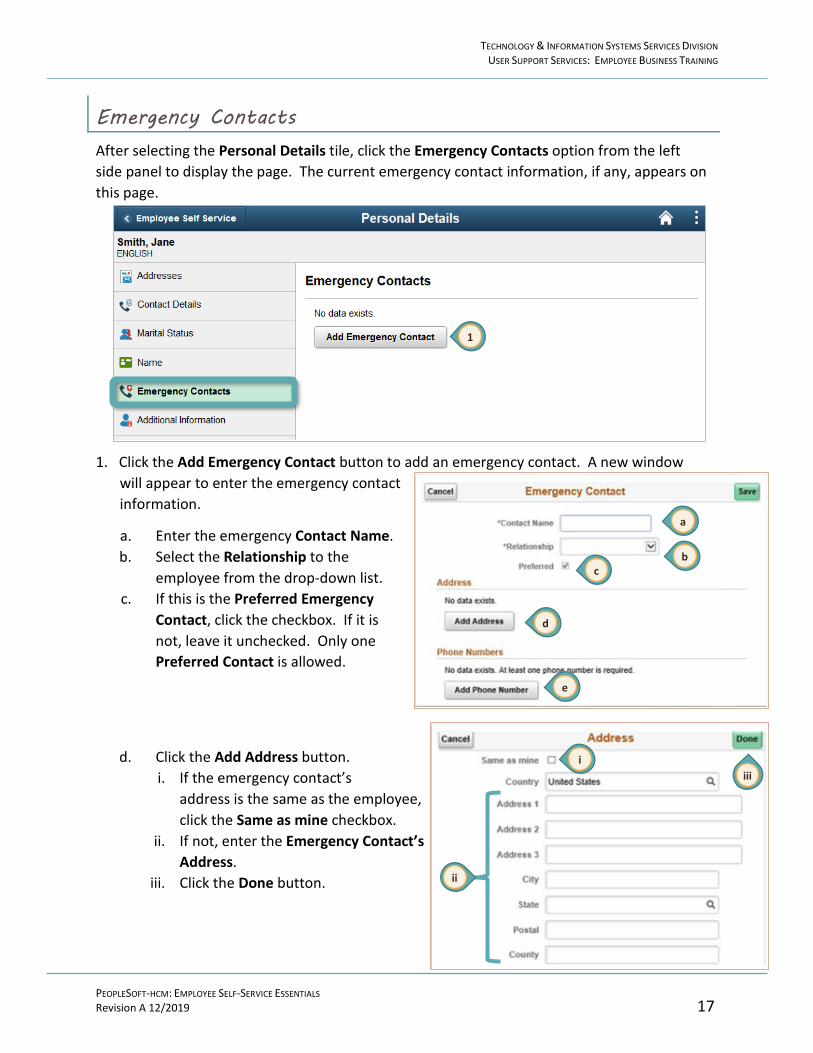
Emergency Contacts After selecting the Personal Details tile, click the Emergency Contacts option from the left side panel to display the page. The current emergency contact information, if any, appears on this page.
1. Click the Add Emergency Contact button to add an emergency contact. A new window will appear to enter the emergency contact information.
a. Enter the emergency Contact Name. b. Select the Relationship to the
employee from the drop-down list. c. If this is the Preferred Emergency
Contact, click the checkbox. If it is not, leave it unchecked. Only one Preferred Contact is allowed.
d. Click the Add Address button. i. If the emergency contact’s
address is the same as the employee, click the Same as mine checkbox.
ii. If not, enter the Emergency Contact’s Address.
iii. Click the Done button.
d
a
b c
e
1
ii
i iii
TECHNOLOGY & INFORMATION SYSTEMS SERVICES DIVISION USER SUPPORT SERVICES: EMPLOYEE BUSINESS TRAINING
PEOPLESOFT-HCM: EMPLOYEE SELF-SERVICE ESSENTIALS Revision A 12/2019 18
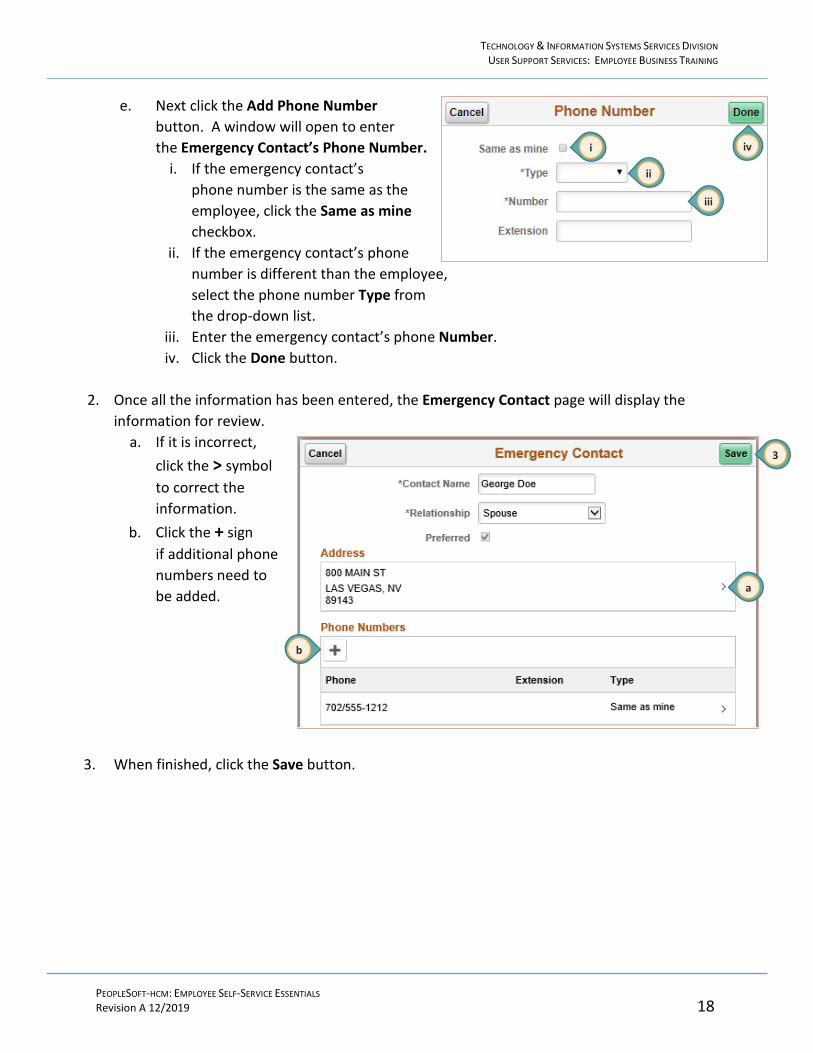
e. Next click the Add Phone Number button. A window will open to enter the Emergency Contact’s Phone Number.
i. If the emergency contact’s phone number is the same as the employee, click the Same as mine checkbox.
ii. If the emergency contact’s phone number is different than the employee, select the phone number Type from the drop-down list.
iii. Enter the emergency contact’s phone Number. iv. Click the Done button.
2. Once all the information has been entered, the Emergency Contact page will display the
information for review. a. If it is incorrect,
click the > symbol to correct the information.
b. Click the + sign if additional phone numbers need to be added.
3. When finished, click the Save button.
3
a
b
ii
iii
i iv
TECHNOLOGY & INFORMATION SYSTEMS SERVICES DIVISION USER SUPPORT SERVICES: EMPLOYEE BUSINESS TRAINING
PEOPLESOFT-HCM: EMPLOYEE SELF-SERVICE ESSENTIALS Revision A 12/2019 19
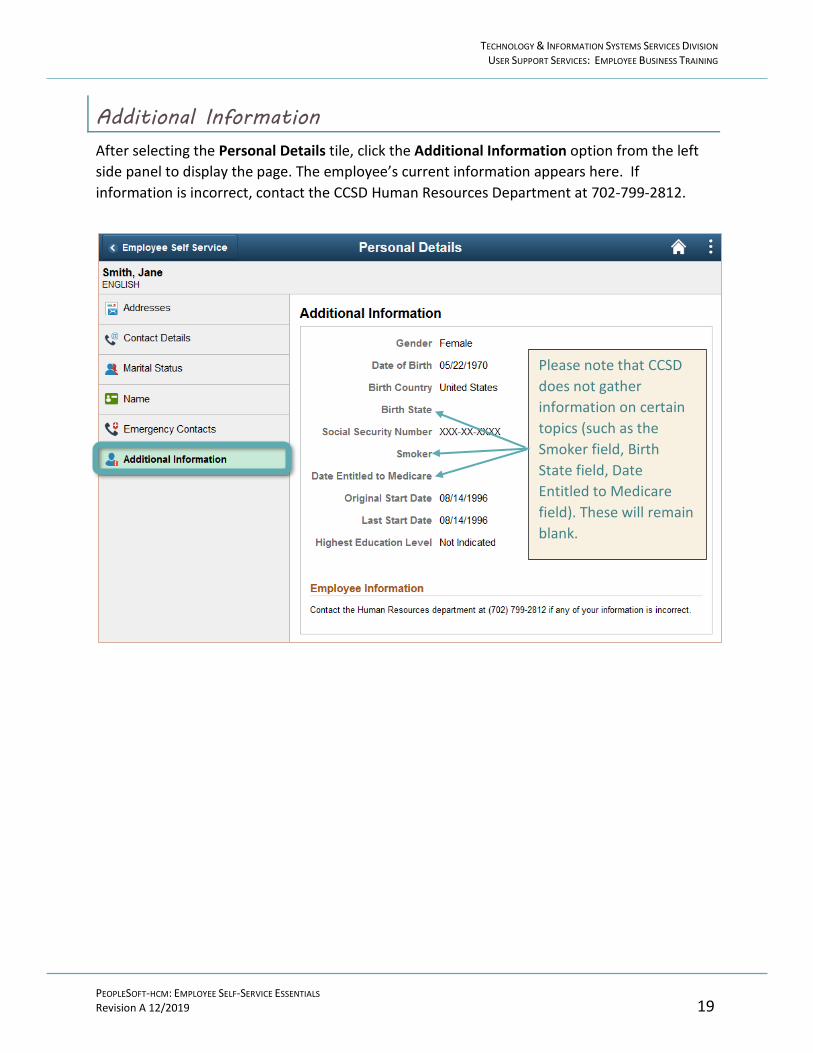
Additional Information After selecting the Personal Details tile, click the Additional Information option from the left side panel to display the page. The employee’s current information appears here. If information is incorrect, contact the CCSD Human Resources Department at 702-799-2812.
Please note that CCSD does not gather information on certain topics (such as the Smoker field, Birth State field, Date Entitled to Medicare field). These will remain blank.

TECHNOLOGY & INFORMATION SYSTEMS SERVICES DIVISION USER SUPPORT SERVICES: EMPLOYEE BUSINESS TRAINING
PEOPLESOFT-HCM: EMPLOYEE SELF-SERVICE ESSENTIALS Revision A 12/2019 20
Time/Absence Tile The Time/Absence tile used to manage an employee’s time and absences. Time is the accumulation of time, which is the employee’s regularly scheduled work day as well as any additional time, and Absence which is earned or deducted based on employee negotiated agreements.
Examples of Time include Overtime, Extra Pay, etc.
Examples of Absence include Sick, Vacation, Personal Leave, etc.
Comp Time is unique in that both Comp Time Earned and Comp Time Taken qualify as Time. This is because comp time cannot be taken without having first been earned. In short, comp time is not contractual.
Select the Time/Absence tile from Employee Self Service to display the Time/Absence page.

TECHNOLOGY & INFORMATION SYSTEMS SERVICES DIVISION USER SUPPORT SERVICES: EMPLOYEE BUSINESS TRAINING
PEOPLESOFT-HCM: EMPLOYEE SELF-SERVICE ESSENTIALS Revision A 12/2019 21
Requesting Leave
Request an Absence After selecting the Time/Absence tile, click the Request Absence option from the left side panel to display the page.
Select the Absence Name from the drop-down field. Absence types vary by employee group. (Depending on the option chosen, the additional required fields displayed will change.)
Note: If Authorized Absence, District Business, or School Business has been selected, the employee must also select the Reason from the drop-down box.
Absence Types per Employee Group:
Support Professional School Police
If the employee has more than one job, absences may need to be entered for each one. To switch between jobs, select the job from the drop-down menu in the *Job Title box.

TECHNOLOGY & INFORMATION SYSTEMS SERVICES DIVISION USER SUPPORT SERVICES: EMPLOYEE BUSINESS TRAINING
PEOPLESOFT-HCM: EMPLOYEE SELF-SERVICE ESSENTIALS Revision A 12/2019 22
Certified (Licensed) Unified (Administrator)
Below is a list of commonly used Absence Names and their descriptions:
• Authorized Absence - Activity without students – sub required • District Business - Activity without students – no sub required [conferences, state
meetings, recruitment, etc.] • No Pay/No PERS - Use of this absence type will affect your PERS adjusted hire date &
benefits • School Business - Activity with students – no sub required [field trips, concerts, etc.] • Sick Transfer from Job to Job - Use to transfer sick leave balances between jobs for
employees with more than one job • Sick -Worker’s Comp - Use for absences while Worker’s Comp claim is processed • Vacation Payout - Used by employees to request pay off for vacation hours during
specific pay periods • Worker’s Comp - Use for absences after Worker’s Comp claim has been approved
If employees are unsure of which absence type to select, they should contact their Timekeeper, Office Manager, Administrative School Secretary, Department Secretary, or call the CCSD Payroll Department at 702-799-5351.

TECHNOLOGY & INFORMATION SYSTEMS SERVICES DIVISION USER SUPPORT SERVICES: EMPLOYEE BUSINESS TRAINING
PEOPLESOFT-HCM: EMPLOYEE SELF-SERVICE ESSENTIALS Revision A 12/2019 23
1. The following example shows a Sick-Personal Illness full single day absence:
2. Enter the Start Date (first day of the leave) of the absence.
3. Enter the End Date of the absence. (If the absence is one day, the start date and the end date will be the same date.)
4. If the absence is for a partial day, click the > symbol on the right side of the Partial Days box. A new window will appear.
The Partial Days drop-down has several options. Here is a brief explanation of each:
• To take a half-day for multiple days in a row, use All Days. • To leave early or arrive later on the last day of the date range, use End Day Only. • To leave early or arrive later on the first day of the date range, use Start Day Only. • To take partial days on both the start and end dates in the date range, use Start and
End Days.
Select the appropriate option from the drop-down list, and then click the Done button.
1
2
3
5
4
11
6
7
9
10
8

TECHNOLOGY & INFORMATION SYSTEMS SERVICES DIVISION USER SUPPORT SERVICES: EMPLOYEE BUSINESS TRAINING
PEOPLESOFT-HCM: EMPLOYEE SELF-SERVICE ESSENTIALS Revision A 12/2019 24
5. The Duration will display based upon the length of the absence using the start and the end dates and the position type. (i.e.: Certified/Unified in days, Support Professionals/School Police in hours, etc.)
6. Next, click the Check Eligibility button. During this step the system will check to ensure the employee has sufficient leave to request the time off. A message will appear stating the eligibility check was successfully completed, or it will state errors exist that need to be corrected. If the eligibility check states that there is not enough of the requested leave type, the employee will need to select another leave type before it can be submitted, or the employee may cancel the current absence request. If the absence name or dates change, the check eligibility procedure will need to be re-run before submitting again.
7. Enter FMLA Information about the requested leave, if required.
8. Enter Comments about the requested leave, if required. Note: Once a comment has been entered, it cannot be deleted or modified.
9. Optional: Click the View Balance link to view Absence Balances by category. The Balances may be different based upon the absences for which the employee is eligible.
10. Optional: Click the View Requests link to display absences that have been requested. If the employee has not requested additional absences, the system will inform the employee.
11. Click the Submit button to complete the absence request and route it for approval.
If the Submit button is clicked before the Check Eligibility button, a warning message will appear stating, “You must forecast [check eligibility] this absence before submitting.”
See Appendix A for examples of other absence types.
Note: Not all absence names require an eligibility check. Some examples would be jury duty or district business since these do not affect leave balances.

TECHNOLOGY & INFORMATION SYSTEMS SERVICES DIVISION USER SUPPORT SERVICES: EMPLOYEE BUSINESS TRAINING
PEOPLESOFT-HCM: EMPLOYEE SELF-SERVICE ESSENTIALS Revision A 12/2019 25
Cancel an Absence
After selecting the Time/Absence tile, click the Cancel Absence option from the left side panel to display the page.
1. Next, click the > symbol next to the absence being cancelled. The Cancel Absence page will display showing the absence details.
2. Enter the reason why the absence is being cancelled in the Comments field, if needed. Note: Once a comment has been entered, it cannot be deleted or modified.
3. Click the Cancel Absence button. Note: Cancelled absences also go through the approval workflow.
1
3
2
TECHNOLOGY & INFORMATION SYSTEMS SERVICES DIVISION USER SUPPORT SERVICES: EMPLOYEE BUSINESS TRAINING
PEOPLESOFT-HCM: EMPLOYEE SELF-SERVICE ESSENTIALS Revision A 12/2019 26
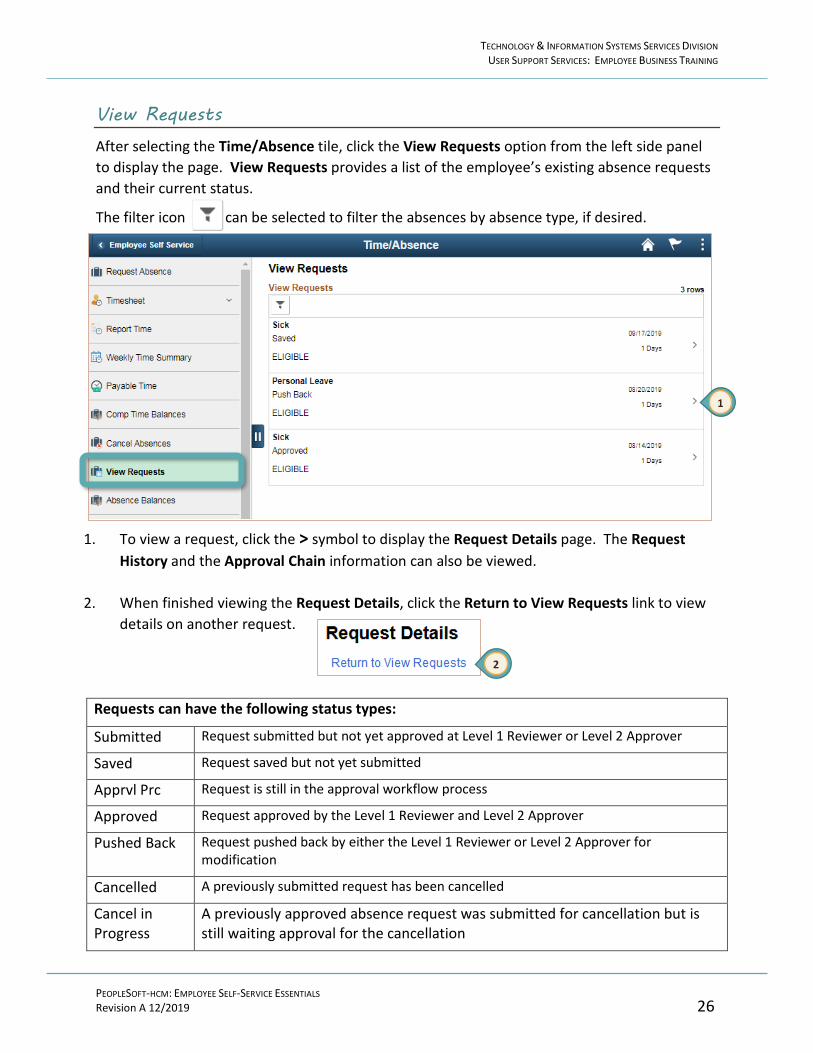
View Requests
After selecting the Time/Absence tile, click the View Requests option from the left side panel to display the page. View Requests provides a list of the employee’s existing absence requests and their current status.
The filter icon can be selected to filter the absences by absence type, if desired.
1. To view a request, click the > symbol to display the Request Details page. The Request History and the Approval Chain information can also be viewed.
2. When finished viewing the Request Details, click the Return to View Requests link to view
details on another request.
Requests can have the following status types:
Submitted Request submitted but not yet approved at Level 1 Reviewer or Level 2 Approver
Saved Request saved but not yet submitted
Apprvl Prc Request is still in the approval workflow process
Approved Request approved by the Level 1 Reviewer and Level 2 Approver
Pushed Back Request pushed back by either the Level 1 Reviewer or Level 2 Approver for modification
Cancelled A previously submitted request has been cancelled
Cancel in Progress
A previously approved absence request was submitted for cancellation but is still waiting approval for the cancellation
1
2

TECHNOLOGY & INFORMATION SYSTEMS SERVICES DIVISION USER SUPPORT SERVICES: EMPLOYEE BUSINESS TRAINING
PEOPLESOFT-HCM: EMPLOYEE SELF-SERVICE ESSENTIALS Revision A 12/2019 27
View Absence Balances
After selecting the Time/Absence tile, click the Absence Balances option from the left side panel to display the page.
The employee’s current available absence balances are displayed by type (sick, vacation, etc.) Employees have the ability to forecast absence balances. Click the drop-down arrow in front of Forecast Balance to expand the section.
1. In the As of Date field, enter the future date to forecast the absence balance. 2. In the Filter by Type field, select the type of absence to forecast. 3. In the Absence Name field, select the absence name. 4. Click the Forecast Balance button to determine the absence balance the employee will have
accrued as of the future date entered.
BAL = Balance TAKE = Taken ENT = Entitled ADJ = Adjusted (within current fiscal year)
1
3
2
4

TECHNOLOGY & INFORMATION SYSTEMS SERVICES DIVISION USER SUPPORT SERVICES: EMPLOYEE BUSINESS TRAINING
PEOPLESOFT-HCM: EMPLOYEE SELF-SERVICE ESSENTIALS Revision A 12/2019 28
Request and View an Extended Absence
After selecting the Time/Absence tile, click the Extended Absence Request option from the left side panel to display the page. This is used to initiate FMLA requests or Worker’s Comp claims.
1. Enter the Start Date of the extended absence. 2. Enter the Expected Return Date of the extended absence. (The Actual Return Date will be
updated when the employee returns from leave.) 3. From the Absence Type field, select the type of absence. 4. From the Absence Name field, select the absence name. (The window will expand once a
selection has been made.)
1
2
3
4
TECHNOLOGY & INFORMATION SYSTEMS SERVICES DIVISION USER SUPPORT SERVICES: EMPLOYEE BUSINESS TRAINING
PEOPLESOFT-HCM: EMPLOYEE SELF-SERVICE ESSENTIALS Revision A 12/2019 29
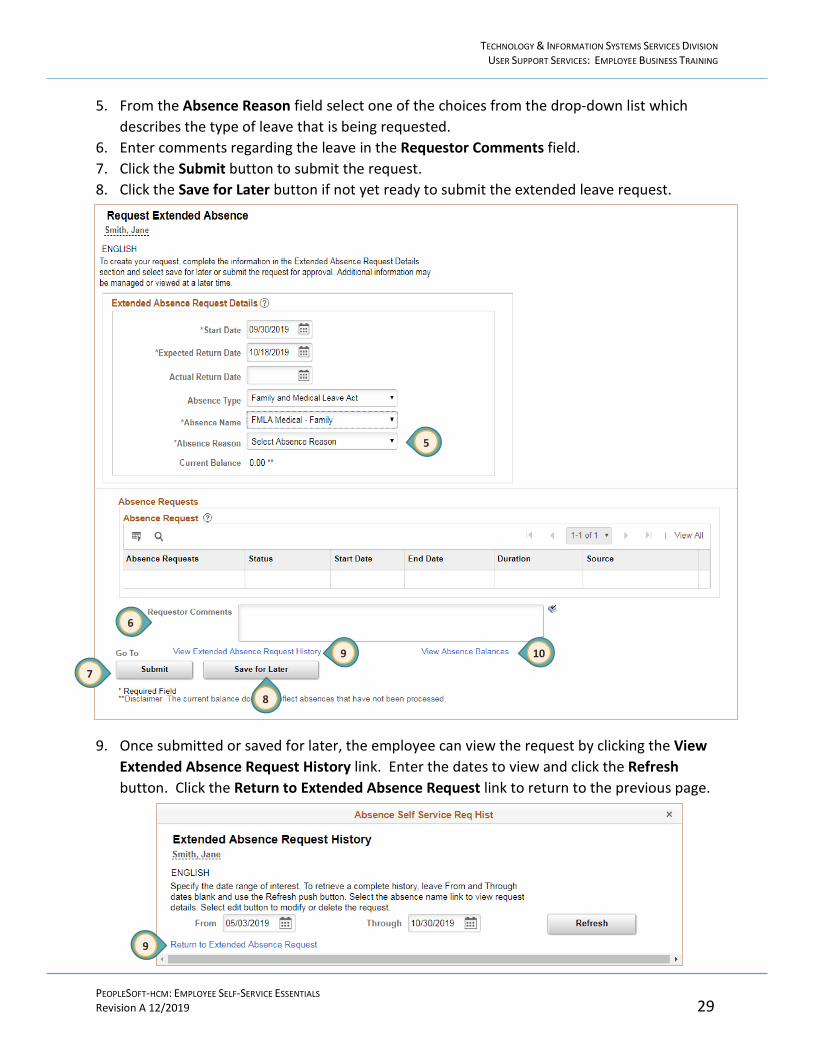
5. From the Absence Reason field select one of the choices from the drop-down list which describes the type of leave that is being requested.
6. Enter comments regarding the leave in the Requestor Comments field. 7. Click the Submit button to submit the request. 8. Click the Save for Later button if not yet ready to submit the extended leave request.
9. Once submitted or saved for later, the employee can view the request by clicking the View Extended Absence Request History link. Enter the dates to view and click the Refresh button. Click the Return to Extended Absence Request link to return to the previous page.
5
6
7
9
8
10
9

TECHNOLOGY & INFORMATION SYSTEMS SERVICES DIVISION USER SUPPORT SERVICES: EMPLOYEE BUSINESS TRAINING
PEOPLESOFT-HCM: EMPLOYEE SELF-SERVICE ESSENTIALS Revision A 12/2019 30
10. Click the View Absence Balances link to view the leave balances by absence type. Click the Forecast Balance link to forecast the absence balances as of a specific date. Click the Return to Extended Absence Request link to return to the previous page.
View Leave Transfer Request History After selecting the Time/Absence tile, click the Leave Transfer Request History option from the left side panel to display the page. This page provides the employee with a historical view of any leave that was donated to the CCSD Sick Pool. Note: Only time donated after January 1, 2020, the implementation of the HCM System, will be viewable.
Note: This is a view only page. Leave cannot be donated through this tool.
For questions concerning donating leave, contact the Payroll Department at 702-799-2666.

TECHNOLOGY & INFORMATION SYSTEMS SERVICES DIVISION USER SUPPORT SERVICES: EMPLOYEE BUSINESS TRAINING
PEOPLESOFT-HCM: EMPLOYEE SELF-SERVICE ESSENTIALS Revision A 12/2019 31
Entering Time The majority of employees in CCSD have a predetermined schedule. For example, many Support Professional employees work an 8-hour day, teachers work 7 hours and 11 minutes per day, and so on. Employees with a predetermined schedule are considered to be exception-based, meaning they do not need to report their scheduled time every day. Information from their contract or negotiated agreement is already known and pre-loaded into the HCM system.
Exception-based employees only need to enter time in the timesheet when it is outside of their regularly scheduled day. Examples include Overtime, Comp Time Earned or Taken, and Extra or Add-On Time.
A positive pay employee, such as a temporary employee or student worker, is only paid for the time worked. Positive pay employees are required to report all of their time worked.
Entering Time on the Timesheet
After selecting the Time/Absence tile, click the Timesheet>Enter Time option from the left side panel to display the Enter Time page.
1. The current Pay Period displays at the top of the page. Use the left and right arrow buttons to navigate to previous and future pay periods, or click the dates to open a calendar to navigate to a specific pay period.
2. The Pay Period Frequency is determined by the employee group and will be displayed as bi-weekly, semi-monthly, or monthly.
3. The Scheduled hours for the pay period appear below the pay period and frequency information. If time has already been submitted, it will be specified in the Reported field.
1
2
8
5
3
4
7
6

TECHNOLOGY & INFORMATION SYSTEMS SERVICES DIVISION USER SUPPORT SERVICES: EMPLOYEE BUSINESS TRAINING
PEOPLESOFT-HCM: EMPLOYEE SELF-SERVICE ESSENTIALS Revision A 12/2019 32
4. Select a Time Reporting Code from the drop-down list. (Options vary by employee type.) Time reporting codes (TRC) for Support Professionals:
Time reporting codes (TRC) for Certified (Licensed):
Time reporting codes (TRC) for School Police Officers:
Time reporting codes (TRC) for Unified/ Admin & School Police Captains:
5. Enter the daily time for the week. Notice the system has identified those days the employee is scheduled to work. Prior to submitting the time, the system has highlighted the work days with a red ribbon. Once time has been submitted, the ribbon changes color to green.
Note: Minutes need to be converted to two-digit decimals when entering time. For example, 15 minutes is entered as 0.25 in the timesheet. (See Appendix B for a more complete time conversion matrix.)
IMPORTANT! Support Professionals and School Police Officers need to enter one line showing their regular hours and an additional line(s) showing additional time and/or TRCs because any entry for a particular day in the Timesheet overrides the employee’s pre-loaded schedule for that day. Therefore, it is imperative that the regularly scheduled hours be accounted for, as well as including the entry of any additional time. (Certified and Unified employees only need to enter their extra time.)
TECHNOLOGY & INFORMATION SYSTEMS SERVICES DIVISION USER SUPPORT SERVICES: EMPLOYEE BUSINESS TRAINING
PEOPLESOFT-HCM: EMPLOYEE SELF-SERVICE ESSENTIALS Revision A 12/2019 33
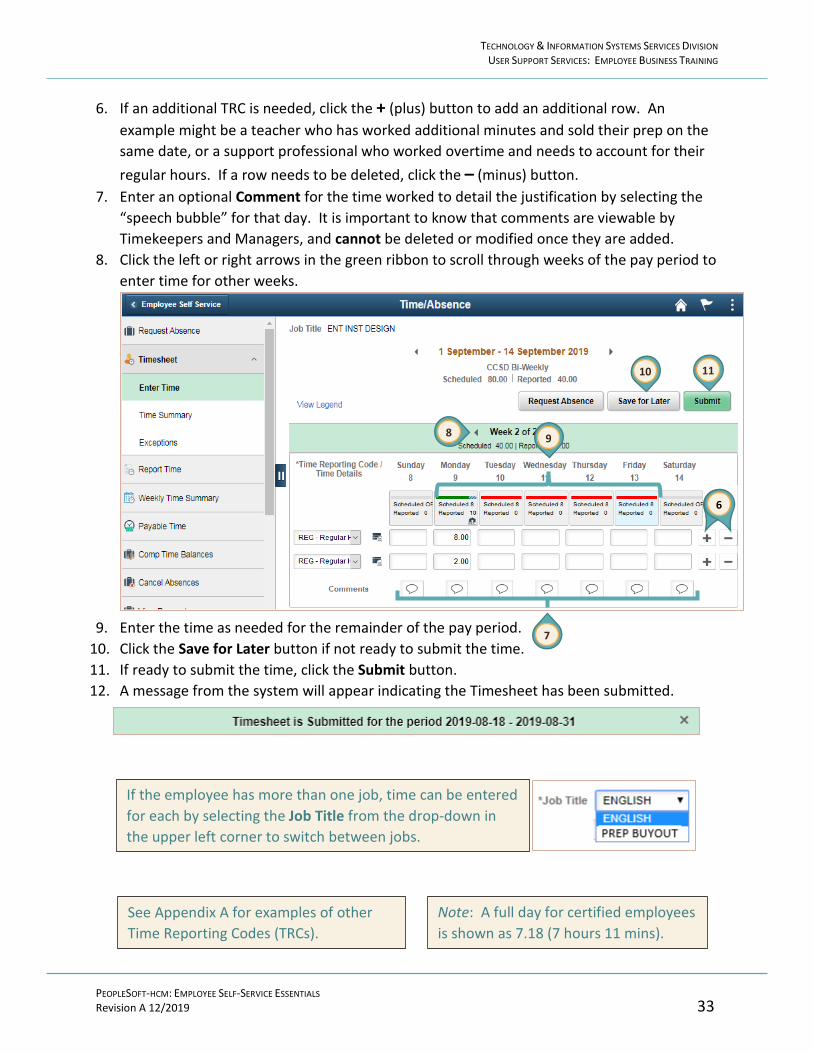
6. If an additional TRC is needed, click the + (plus) button to add an additional row. An example might be a teacher who has worked additional minutes and sold their prep on the same date, or a support professional who worked overtime and needs to account for their regular hours. If a row needs to be deleted, click the – (minus) button.
7. Enter an optional Comment for the time worked to detail the justification by selecting the “speech bubble” for that day. It is important to know that comments are viewable by Timekeepers and Managers, and cannot be deleted or modified once they are added.
8. Click the left or right arrows in the green ribbon to scroll through weeks of the pay period to enter time for other weeks.
9. Enter the time as needed for the remainder of the pay period. 10. Click the Save for Later button if not ready to submit the time. 11. If ready to submit the time, click the Submit button. 12. A message from the system will appear indicating the Timesheet has been submitted.
See Appendix A for examples of other Time Reporting Codes (TRCs).
Note: A full day for certified employees is shown as 7.18 (7 hours 11 mins).
10 11
9
6
7
8
If the employee has more than one job, time can be entered for each by selecting the Job Title from the drop-down in the upper left corner to switch between jobs.

TECHNOLOGY & INFORMATION SYSTEMS SERVICES DIVISION USER SUPPORT SERVICES: EMPLOYEE BUSINESS TRAINING
PEOPLESOFT-HCM: EMPLOYEE SELF-SERVICE ESSENTIALS Revision A 12/2019 34
Viewing the Time Summary
After selecting the Time/Absence tile, click the Timesheet>Time Summary option from the left side panel to display the Time Summary page. This option provides a calendar view of the pay period and any reported time activity.
Use the left and right arrow buttons to navigate to previous and future pay periods or click the dates to open a calendar to navigate to a specific pay period.
There is also a *View By drop-down menu to change how the Time Summary is viewed.
TECHNOLOGY & INFORMATION SYSTEMS SERVICES DIVISION USER SUPPORT SERVICES: EMPLOYEE BUSINESS TRAINING
PEOPLESOFT-HCM: EMPLOYEE SELF-SERVICE ESSENTIALS Revision A 12/2019 35

TECHNOLOGY & INFORMATION SYSTEMS SERVICES DIVISION USER SUPPORT SERVICES: EMPLOYEE BUSINESS TRAINING
PEOPLESOFT-HCM: EMPLOYEE SELF-SERVICE ESSENTIALS Revision A 12/2019 36
Viewing Exceptions
After selecting the Time/Absence tile, click the Timesheet> Exceptions option from the left side panel to display the Exceptions page.
An Exception occurs when the time entered may not be valid. For example, entering a negative number or reporting less than the regularly scheduled hours in the timesheet would create an exception and would appear in the Exceptions menu. When an exception is selected, it displays the timesheet so that corrections can be made to the entered time.
1. A list of the Exceptions is shown in this section of the page.
2. Click the > right arrow to view the details of the Exception. The timesheet for the reported period will be displayed.
1
2

TECHNOLOGY & INFORMATION SYSTEMS SERVICES DIVISION USER SUPPORT SERVICES: EMPLOYEE BUSINESS TRAINING
PEOPLESOFT-HCM: EMPLOYEE SELF-SERVICE ESSENTIALS Revision A 12/2019 37
3. A message regarding the time exception is displayed. 4. Make the necessary corrections and remember to click Submit.
Viewing Report Time After selecting the Time/Absence tile, click the Report Time option from the left side panel to display the page.
This tool functions the same as Timesheet > Enter Time, but instead of a weekly view, time is entered in a daily view.
Viewing the Weekly Time Summary After selecting the Time/Absence tile, click the Weekly Time Summary option from the left side panel to display the page.
This tool provides a detailed weekly view of any time the employee may have entered in the timesheet. Selecting a day displays the Report Time page.
3
4

TECHNOLOGY & INFORMATION SYSTEMS SERVICES DIVISION USER SUPPORT SERVICES: EMPLOYEE BUSINESS TRAINING
PEOPLESOFT-HCM: EMPLOYEE SELF-SERVICE ESSENTIALS Revision A 12/2019 38
Viewing Payable Time Details
After selecting the Time/Absence tile, click the Payable Time option from the left side panel to display the page. Once the payroll process is complete, any time that was entered and approved will display under Payable Time.
1. Select the *From date from the calendar for the desired date range. 2. Select the *Through date from the calendar of the time period to view. 3. The Payable Time Summary will be displayed for the dates entered once the payroll process
is complete.
Viewing Comp Time Balances
After selecting the Time/Absence tile, click the Comp Time Balances option from the left side panel to display the page. This tool will display any comp time earned.
Employee Effort Certification After selecting the Time/Absence tile, click the Employee Effort Certification option from the left side panel to display the page.
This area is required for use by federally-funded CCSD employees to review their payroll distribution records and report their actual efforts toward projects.
1
2
3

TECHNOLOGY & INFORMATION SYSTEMS SERVICES DIVISION USER SUPPORT SERVICES: EMPLOYEE BUSINESS TRAINING
PEOPLESOFT-HCM: EMPLOYEE SELF-SERVICE ESSENTIALS Revision A 12/2019 39
Payroll Tile The Payroll tile allows employees to see paychecks, tax withholding, and W2 information. It also allows them to view and set up direct deposit, with options for percentage and set amounts in multiple accounts.
Select the Payroll tile from Employee Self Service to display the Payroll page.

TECHNOLOGY & INFORMATION SYSTEMS SERVICES DIVISION USER SUPPORT SERVICES: EMPLOYEE BUSINESS TRAINING
PEOPLESOFT-HCM: EMPLOYEE SELF-SERVICE ESSENTIALS Revision A 12/2019 40
Viewing Paychecks After selecting the Payroll tile, click the Paychecks option from the left side panel to display the page.
Click on the > right arrow to view the paycheck for the pay period. The pay stub will be displayed as a PDF document with the following key information:
1. Summary of the Gross Earnings. 2. Summary of the Federal Taxable Gross. 3. Total of all of the deductions. 4. Summary of the Net Pay. 5. A breakdown of the Earnings paid to the employee by earnings type. 6. The detail on the taxes that were withheld from the paycheck. 7. All Before-Tax Deductions. 8. All After-Tax Deductions. 9. Employer Paid Benefits that are the costs of the benefits paid on the employee’s behalf by
the Clark County School District. 10. The Net Pay Distribution. In this example, the funds were sent by direct deposit to the
financial institution designated by the employee.

TECHNOLOGY & INFORMATION SYSTEMS SERVICES DIVISION USER SUPPORT SERVICES: EMPLOYEE BUSINESS TRAINING
PEOPLESOFT-HCM: EMPLOYEE SELF-SERVICE ESSENTIALS Revision A 12/2019 41
Viewing Paychecks from Legacy ESS After selecting the Payroll tile, click the Paychecks from Legacy ESS option from the left side panel. Select View File to download a complete PDF file of all paychecks from the previous ESS system from January 1, 2014 through December 31, 2019.
1 2 3
5 6
7 8 9
10
4
111111111.pdf

TECHNOLOGY & INFORMATION SYSTEMS SERVICES DIVISION USER SUPPORT SERVICES: EMPLOYEE BUSINESS TRAINING
PEOPLESOFT-HCM: EMPLOYEE SELF-SERVICE ESSENTIALS Revision A 12/2019 42
Tax Withholding-W4 After selecting the Payroll tile, click the Tax Withholding option from the left side panel to display the page.
1. Select the > aligned to the federal tax withholding. The Federal Tax Withholding Forms page displays.
2. Select the > aligned with the Federal Withholding Allowance Certificate. A warning message displays regarding the download of personal information. This should not be done on a public or shared computer.
2
1

TECHNOLOGY & INFORMATION SYSTEMS SERVICES DIVISION USER SUPPORT SERVICES: EMPLOYEE BUSINESS TRAINING
PEOPLESOFT-HCM: EMPLOYEE SELF-SERVICE ESSENTIALS Revision A 12/2019 43
3. Click OK to continue with the download. The Federal Tax Withholding Form W-4 will download as a PDF document. Depending on the browser and computer settings, the form may open automatically or may need to be selected.
4. Enter updated information on the W-4 tax withholding form, then submit when finished.
Note: The Adobe Acrobat Professional software may allow employees the ability to submit forms electronically.

TECHNOLOGY & INFORMATION SYSTEMS SERVICES DIVISION USER SUPPORT SERVICES: EMPLOYEE BUSINESS TRAINING
PEOPLESOFT-HCM: EMPLOYEE SELF-SERVICE ESSENTIALS Revision A 12/2019 44
W-2/W-2c Consent After selecting the Payroll tile, click the W-2/W-2c option from the left side panel to display the page.
To change how this form is received, click the box next to the statement, “I consent to receive W-2 or W-2c forms electronically,” and then click the Submit button.
(The employee can also withdraw their consent to receive W-2 or W-2c forms electroncially using this tool.)

TECHNOLOGY & INFORMATION SYSTEMS SERVICES DIVISION USER SUPPORT SERVICES: EMPLOYEE BUSINESS TRAINING
PEOPLESOFT-HCM: EMPLOYEE SELF-SERVICE ESSENTIALS Revision A 12/2019 45
Direct Deposit After selecting the Payroll tile, click the Direct Deposit option from the left side panel to display the page. This option allows employees to add/change/remove Direct Deposit accounts. A maximum of five accounts may be set up. As an example, the employee might have a current direct deposit checking account set up in the system, but wants to add a savings account. The employee could plan to automatically deposit 80% of the paycheck in the checking account and the remaining 20% in the savings account. 1. Click the + sign to add a new bank account. 2. Click the > symbol to edit the bank information shown.
[See graphic on next page] 3. To remove the existing bank information, click the Remove button. 4. To edit the existing direct deposit Nickname, click in the field and update the name. 5. Select the Payment Method from the drop-down. Choose Check or Direct Deposit. 6. Enter the Routing Number for the bank. 7. Click the Information Icon (“i”) to view instructions on where to find the Routing Number
and the Account Number on a personal check. 8. The existing Account Number is shown. Click the pencil icon to edit it. 9. If the Account Number has been edited, the system will require the employee to Re-type
the Account Number. 10. Select the Account Type from the drop-down. Choose Checking or Savings. 11. Select the Deposit Type. Choose Percent, Amount or Remaining Balance. 12. Click the Save button before leaving this window.
2
1

TECHNOLOGY & INFORMATION SYSTEMS SERVICES DIVISION USER SUPPORT SERVICES: EMPLOYEE BUSINESS TRAINING
PEOPLESOFT-HCM: EMPLOYEE SELF-SERVICE ESSENTIALS Revision A 12/2019 46
Viewing W2 from Legacy ESS After selecting the Payroll tile, click the W2 from Legacy ESS option from the left side panel. Select View File to download a complete PDF file of all W2s from the previous ESS system from 2014 through 2018.
W2-111111.pdf
3
4
5
6 7
8
9
10
11
12

TECHNOLOGY & INFORMATION SYSTEMS SERVICES DIVISION USER SUPPORT SERVICES: EMPLOYEE BUSINESS TRAINING
PEOPLESOFT-HCM: EMPLOYEE SELF-SERVICE ESSENTIALS Revision A 12/2019 47
Benefits Details Tile Using the Benefit Details tile, employees can electronically submit life events, add or update dependent/beneficiary information, make annual benefit enrollment changes, and access benefit statements. They may also initiate or change payroll deductions for 403(b) or 457 accounts, as well as submit warrant and benefits designees.
Select the Benefits Details tile from Employee Self Service to display the Benefits Details page.

TECHNOLOGY & INFORMATION SYSTEMS SERVICES DIVISION USER SUPPORT SERVICES: EMPLOYEE BUSINESS TRAINING
PEOPLESOFT-HCM: EMPLOYEE SELF-SERVICE ESSENTIALS Revision A 12/2019 48
Viewing the Benefits Summary After selecting the Benefits Details tile, click the Benefits Summary option from the left side panel to display the employee’s current benefits plans. To view additional information about the enrollments, including covered dependents and beneficiaries, click the > icon.
Viewing Covered Dependents for Benefit Plans
1. The Benefit Plan Name the employee participates in, the Plan Provider, and the Coverage will be displayed.
2. If the employee is covering dependents in the benefit plan, the names of the covered dependents will be displayed. (If the employee has selected employee only coverage, no dependent information is displayed on the page.)
1
2
111111

TECHNOLOGY & INFORMATION SYSTEMS SERVICES DIVISION USER SUPPORT SERVICES: EMPLOYEE BUSINESS TRAINING
PEOPLESOFT-HCM: EMPLOYEE SELF-SERVICE ESSENTIALS Revision A 12/2019 49
Viewing Covered Beneficiaries for Benefit Plans
1. The name of the Benefit Plan the employee participates in is displayed; in this case, it is Life Insurance THT and the Plan Provider name is the Clark County School District. The coverage amount of life insurance is displayed under the Coverage Level.
2. If the employee has designated a beneficiary for the life insurance plan, it is displayed in the Covered Beneficiaries section. To add or change the beneficiary, click the Edit button.
To edit/add the beneficiary information:
A. Select either percent or flat amount for both the Primary Allocation and the Secondary Allocation. (The Primary Allocation is an allocation for the primary beneficiary. The Secondary Allocation is an allocation for the contingent beneficiary.)
B. Enter the Percentage allocated to the primary beneficiary. The total allocated to the primary beneficiaries should equal 100%.
C. Enter the Percentage allocated to the secondary beneficiary. The total allocated to the secondary beneficiaries should equal 100%. Click the Update Totals button to confirm the primary allocation and secondary allocation total 100%.
B
A
C
D
1
2

TECHNOLOGY & INFORMATION SYSTEMS SERVICES DIVISION USER SUPPORT SERVICES: EMPLOYEE BUSINESS TRAINING
PEOPLESOFT-HCM: EMPLOYEE SELF-SERVICE ESSENTIALS Revision A 12/2019 50
D. To add a new beneficiary, click the Add a New Beneficiary button.
i. Enter the beneficiary’s personal information in the space provided. ii. Select the marital status of the beneficiary from the drop-down list.
iii. Click the checkbox Same Address as Employee if the beneficiary has the same address. The system will populate the fields with the employee’s address.
iv. Click the Edit checkbox if the beneficiary’s address is different from the employee’s address. A new window will open to enter the address for the beneficiary.
v. Click OK to save the entry. vi. Click the checkbox Same Phone as Employee or enter a different phone number in
the space provided. vii. After entering the required information on the page, click the Save button.
viii. Click the Return to Change Current Beneficiaries and Allocations link.
Old pic
i
ii
iii
iv
v
vi
vii
viii

TECHNOLOGY & INFORMATION SYSTEMS SERVICES DIVISION USER SUPPORT SERVICES: EMPLOYEE BUSINESS TRAINING
PEOPLESOFT-HCM: EMPLOYEE SELF-SERVICE ESSENTIALS Revision A 12/2019 51
Adding/Editing the Dependents and Beneficiary Information After selecting the Benefits Details tile, click the Dependent/Beneficiary Info option from the left side panel to display this page, which shows a list of all previous and/or current dependents covered under the employee’s CCSD health care benefit and beneficiary designation.
1. Eligible dependents and beneficiaries are displayed on this page and additional individuals can be added. Once added, they will be available if and when modifying a benefits package.
2. All eligible beneficiaries or dependents are indicated by a checkmark under the appropriate column. This does not necessarily mean that they are currently covered by one of the benefits plans. (Please note that inactive dependents or beneficiaries will NOT be removed.)
A beneficiary is someone who the employee designates as a person who will be eligible to receive the proceeds from the life insurance plan in the event of their death. A dependent is a family member who meets the IRS definition of someone who can be covered under the employee’s medical, dental, and vision plans.
To determine which dependents or beneficiaries are currently covered by any of the benefits plans, click Benefits Summary option from the left side panel and select the appropriate plan to view the Covered Beneficiaries or Dependents. It is essential that employees review the Life benefit to designate beneficiaries for the group life coverage offered by CCSD.
3. To view or update the dependent/beneficiary information, click the > icon.
1
3
2
TECHNOLOGY & INFORMATION SYSTEMS SERVICES DIVISION USER SUPPORT SERVICES: EMPLOYEE BUSINESS TRAINING
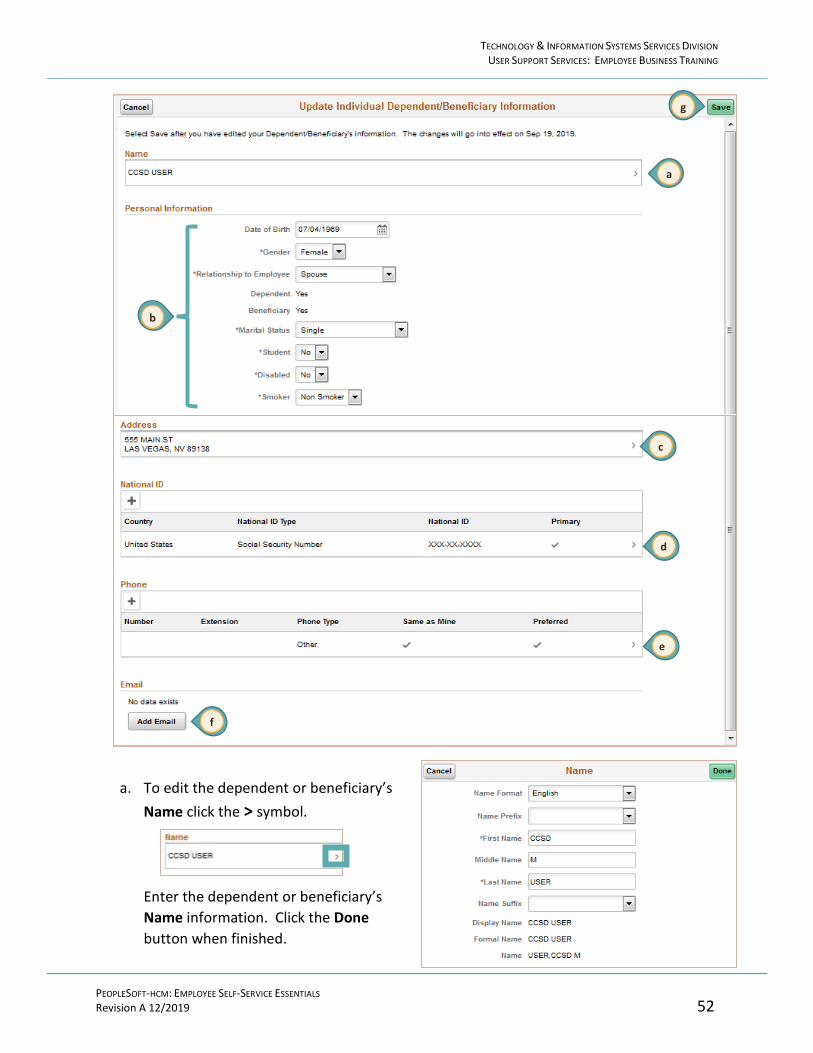
PEOPLESOFT-HCM: EMPLOYEE SELF-SERVICE ESSENTIALS Revision A 12/2019 52
a. To edit the dependent or beneficiary’s Name click the > symbol. Enter the dependent or beneficiary’s Name information. Click the Done button when finished.
c
d
e
f
a
b
g

TECHNOLOGY & INFORMATION SYSTEMS SERVICES DIVISION USER SUPPORT SERVICES: EMPLOYEE BUSINESS TRAINING
PEOPLESOFT-HCM: EMPLOYEE SELF-SERVICE ESSENTIALS Revision A 12/2019 53
b. Enter their Personal Information. Mandatory fields are marked with an asterisk (*).
c. To edit the dependent or beneficiary’s Address click the > symbol. Enter the updated dependent or beneficiary’s Address.
Click the Done button when finished.
d. If the National ID (Social Security Number) is missing, add their National ID by clicking the + sign. If the National ID exists but needs to be updated, click the > symbol.

TECHNOLOGY & INFORMATION SYSTEMS SERVICES DIVISION USER SUPPORT SERVICES: EMPLOYEE BUSINESS TRAINING
PEOPLESOFT-HCM: EMPLOYEE SELF-SERVICE ESSENTIALS Revision A 12/2019 54
Click the Done button after entering the information.
e. Add a Phone number by clicking the + sign to add the information. If a Phone number exists but it needs to be updated, click the > symbol to edit the number. Click the Done button when finished.
f. To add an Email address, click the Add Email button. A window will appear to enter the Email address. Click the Done button when finished.
g. Save the entry by clicking the Save button (top right corner).

TECHNOLOGY & INFORMATION SYSTEMS SERVICES DIVISION USER SUPPORT SERVICES: EMPLOYEE BUSINESS TRAINING
PEOPLESOFT-HCM: EMPLOYEE SELF-SERVICE ESSENTIALS Revision A 12/2019 55
Life Events Life Events permit employees to initiate changes to benefits which involve themselves and their dependents.
After selecting the Benefits Details tile, click the Life Events option from the left side panel to display the page.
Select the type of Life Event to process from the list. The life event must be completed within 31 days of the event. If more than 31 days has passed, the employee will not be allowed to enter a Life Event, and will need to wait until the next Open Enrollment period to make changes to their benefits.
After selecting the Life Event, enter the *As Of date and click the Start Life Event button. A list of steps to be completed will appear on the left, and Previous and Next buttons will appear in the top right corner for navigation. (Please note that all supporting documents must be available for upload prior to completion of the Life Event.) The event may be exited and the progress saved so it can be completed at a later time. However, the employee will not be able to begin another Life Event until the current event, which will show as being in progress, is completed.
Note: Only one Life Event at a time is allowed. To cancel a Life Event, click the Continue Life Event button, then click the Action List (3 vertical dots - upper right corner), and select Cancel.

TECHNOLOGY & INFORMATION SYSTEMS SERVICES DIVISION USER SUPPORT SERVICES: EMPLOYEE BUSINESS TRAINING
PEOPLESOFT-HCM: EMPLOYEE SELF-SERVICE ESSENTIALS Revision A 12/2019 56
Benefits Enrollment The Benefits Enrollment option is only available to new employees of CCSD, or to existing employees during the Open Enrollment window. The Open Enrollment period is dependent upon the designated employee group, such as Administrative, Licensed, Support Professional, et cetera.
After selecting the Benefits Details tile, click the Benefits Enrollment option from the left side panel to display the page.
Click the Select button next to an event that is currently open for enrollment or click the Resume button to continue an enrollment event. The Benefits Enrollment page is displayed, which contains the required actions in the left side panel for the benefits enrollment process to be completed. The < Previous and Next > buttons can be used to scroll though the required actions. Use the x Exit button in the upper left corner to return to the Benefits Enrollment page.
111111
TECHNOLOGY & INFORMATION SYSTEMS SERVICES DIVISION USER SUPPORT SERVICES: EMPLOYEE BUSINESS TRAINING
PEOPLESOFT-HCM: EMPLOYEE SELF-SERVICE ESSENTIALS Revision A 12/2019 57
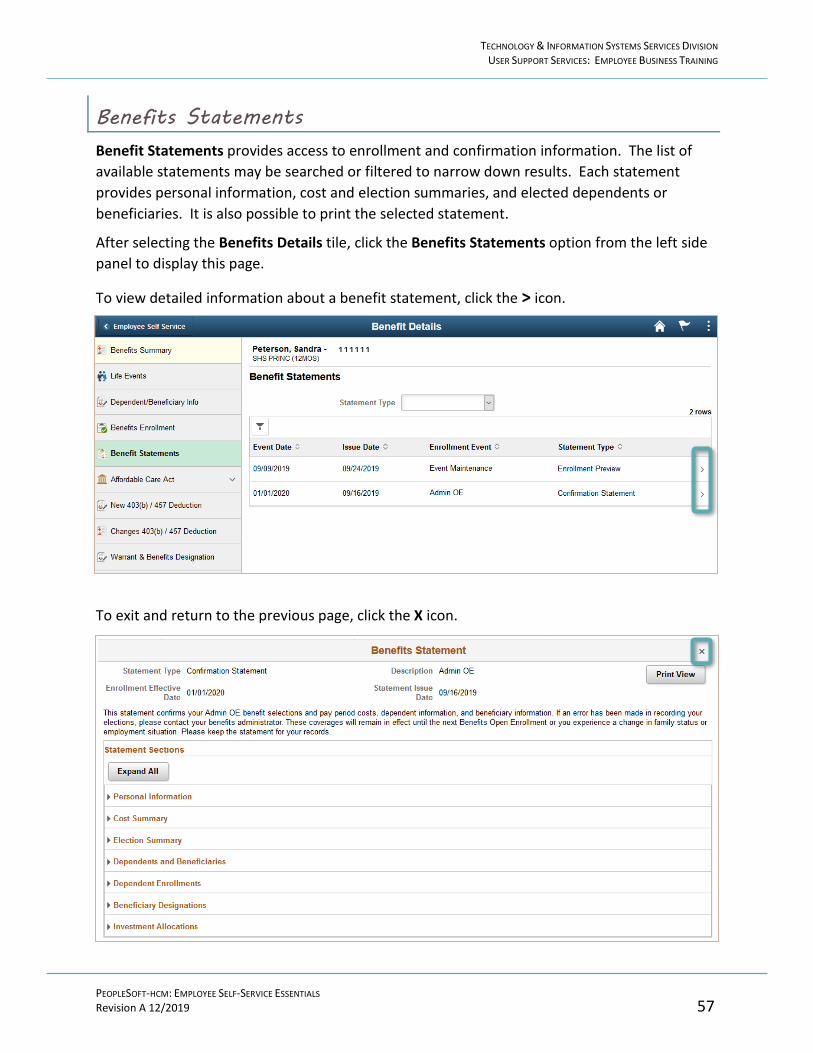
Benefits Statements Benefit Statements provides access to enrollment and confirmation information. The list of available statements may be searched or filtered to narrow down results. Each statement provides personal information, cost and election summaries, and elected dependents or beneficiaries. It is also possible to print the selected statement.
After selecting the Benefits Details tile, click the Benefits Statements option from the left side panel to display this page.
To view detailed information about a benefit statement, click the > icon.
To exit and return to the previous page, click the X icon.
111111

TECHNOLOGY & INFORMATION SYSTEMS SERVICES DIVISION USER SUPPORT SERVICES: EMPLOYEE BUSINESS TRAINING
PEOPLESOFT-HCM: EMPLOYEE SELF-SERVICE ESSENTIALS Revision A 12/2019 58
Affordable Care Act After selecting the Benefits Details tile, click the Affordable Care Act option from the left side panel to display the Affordable Care Act page, and choose either the Form 1095-C Consent or View Form 1095-C. The Form 1095-C Consent allows employees the opportunity to elect to receive the 1095-C forms electronically. It is also possible to view the Form 1095-C from Benefit Details.
1. Read the current information displayed and, if desired, select the “I consent to receive Form 1095-C electronically” box.
2. Click the Submit button. 3. For the password, enter the employee Active Directory (AD) password. Click the Continue
button. The employee will receive a message from the system indicating the request has been processed and the Form 1095-C statements will now be received electronically. (The employee can also withdraw their consent to receive Form 1095-C electroncially using this tool.)

TECHNOLOGY & INFORMATION SYSTEMS SERVICES DIVISION USER SUPPORT SERVICES: EMPLOYEE BUSINESS TRAINING
PEOPLESOFT-HCM: EMPLOYEE SELF-SERVICE ESSENTIALS Revision A 12/2019 59
New 403(b)/457 Deduction The New 403(b)/457 Deduction option allows employees to add new accounts and deduction amounts to their benefits. These plans are pre-tax contributions to individual retirement/ deferred compensation savings accounts.
After selecting the Benefits Details tile, click the New 403(b)/457 Deduction option from the left side panel to display the page.
1. The Empl ID (employee id number) will be displayed in this field. 2. Select the Vendor Code for the new 403(b)/457(b) plan by clicking on the magnifying glass. 3. Click the Add button.
[See graphic on next page] 4. If the employee will be contributing an Amount instead of a percentage, enter the amount in
this field. 5. If the employee will be contributing a percentage of their pay, enter the Percentage in this
field. 6. Select the date the deduction should start in the beginning field.
Please note: When completing this form, the information indicates the dates of the pay period (not the pay date) to apply the new deduction.
7. Click the Submit button. The authentication page will be displayed.
2
3
1 NOTE: A 403(b) or 457 account must be established with the vendor prior to using this tool option.

TECHNOLOGY & INFORMATION SYSTEMS SERVICES DIVISION USER SUPPORT SERVICES: EMPLOYEE BUSINESS TRAINING
PEOPLESOFT-HCM: EMPLOYEE SELF-SERVICE ESSENTIALS Revision A 12/2019 60
8. For the passcode, enter the employee’s Birth Year and the Last 4 digits of their social security number.
9. Click the OK button.
4 5 6
7
8
9

TECHNOLOGY & INFORMATION SYSTEMS SERVICES DIVISION USER SUPPORT SERVICES: EMPLOYEE BUSINESS TRAINING
PEOPLESOFT-HCM: EMPLOYEE SELF-SERVICE ESSENTIALS Revision A 12/2019 61
Changes to 403(b)/457 Deduction The Changes 403(b) / 457 Deduction option gives employees the ability to adjust the voluntary benefit deduction amounts for 403(b) and/or 457 accounts. Any current accounts will be listed with the option to edit the existing information. Such changes can include amounts or percentages to be deducted, and when these changes should take effect.
After selecting the Benefits Details tile, click the Changes 403(b)/457 Deduction option from the left side panel to display the page.
1. In this example, the 403(b) Aspire contribution amount is changing from $160 to $200. Click the Edit button. The following page will be displayed.
[See graphic on next page] 2. For this example, a Flat Amount was selected. 3. Enter an amount to be withheld. 4. To stop the deduction after the employee has contributed a set amount, enter that amount in
this field. 5. Select the Deduction Start Date from the drop-down list. Again, the dates given indicate an
effective pay period, not a specific pay date. 6. Enter the date to request the deduction end in the Deduction Stop Date field, otherwise
leave the field blank. 7. Click the Verify Identify button. The authentication page will be displayed.
1

TECHNOLOGY & INFORMATION SYSTEMS SERVICES DIVISION USER SUPPORT SERVICES: EMPLOYEE BUSINESS TRAINING
PEOPLESOFT-HCM: EMPLOYEE SELF-SERVICE ESSENTIALS Revision A 12/2019 62
8. For the passcode, enter the employee’s birth year and the last 4 digits of their social security number.
9. Click the OK button.
2
3
4
5
6
7
8
9

TECHNOLOGY & INFORMATION SYSTEMS SERVICES DIVISION USER SUPPORT SERVICES: EMPLOYEE BUSINESS TRAINING
PEOPLESOFT-HCM: EMPLOYEE SELF-SERVICE ESSENTIALS Revision A 12/2019 63
Warrant & Benefits Designation The Warrant and Benefit Designation allows the employee to provide designees to receive all warrant of other benefits payable to them by CCSD, in the event of their death. This designation is in effect until the employee submits a new designation. The designee will only receive these warrants or benefits in the event of the employee’s death prior to retirement or separation from CCSD. The distribution may include final compensation for any eligible vacation leave, sick leave, and final paycheck.
After selecting the Benefits Details tile, click the Warrant & Benefits Designation option from the left side panel to display the Warrant & Benefits Designation page.
[See graphic on next page] 1. If there is an existing row, click the + (plus sign) to add a new effective date row. 2. Select the Effective Date that the change takes place from the calendar. 3. Select the desired Dependent/Beneficiary ID from the drop-down list by clicking on the
magnifying glass. If the designee does not show in the drop-down list, the employee will need to add the person in the Dependent/Beneficiary Info option from the left side panel.
4. Enter the Percent of Benefit in the space provided. If there is more than one Dependent/Beneficiary, the total of the percentages should equal 100%.
5. If the Dependent/Beneficiary is a Primary Beneficiary, click the checkbox. 6. If the Dependent/Beneficiary is a Contingent Beneficiary, click the checkbox. 7. To add an additional person, click the + (plus sign). To remove a record, click the
– (minus sign). 8. Click the Update Total button to update the percentages. 9. Click the Submit button. The following page will be displayed.
Please note that this does not affect the PERS designation information.

TECHNOLOGY & INFORMATION SYSTEMS SERVICES DIVISION USER SUPPORT SERVICES: EMPLOYEE BUSINESS TRAINING
PEOPLESOFT-HCM: EMPLOYEE SELF-SERVICE ESSENTIALS Revision A 12/2019 64
10. For the passcode, enter the employee’s birth year and the last 4 digits of their social security number.
11. Click the OK button.
12
3
4 5 6
7
8
9
10
11
IMPORTANT! It is imperative that all employees update their Warrant and Benefit Designation information as soon as possible since prior information was NOT populated in the HCM system.
TECHNOLOGY & INFORMATION SYSTEMS SERVICES DIVISION USER SUPPORT SERVICES: EMPLOYEE BUSINESS TRAINING
PEOPLESOFT-HCM: EMPLOYEE SELF-SERVICE ESSENTIALS Revision A 12/2019 65
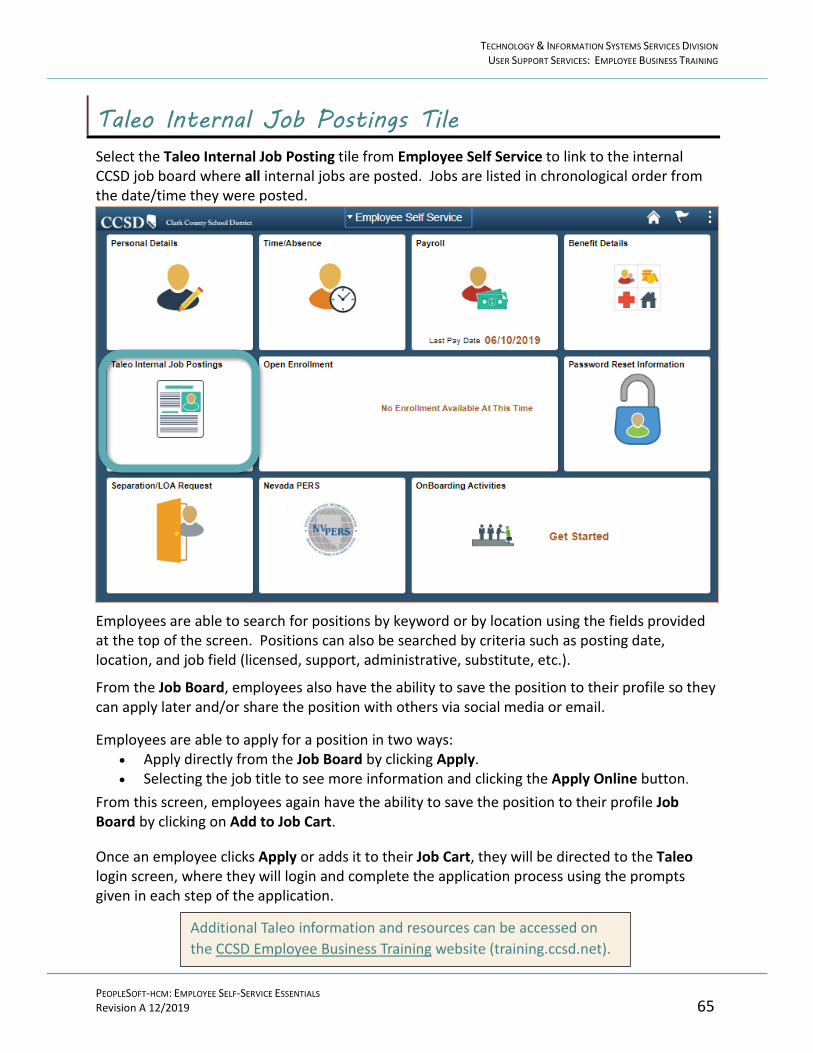
Taleo Internal Job Postings Tile Select the Taleo Internal Job Posting tile from Employee Self Service to link to the internal CCSD job board where all internal jobs are posted. Jobs are listed in chronological order from the date/time they were posted.
Employees are able to search for positions by keyword or by location using the fields provided at the top of the screen. Positions can also be searched by criteria such as posting date, location, and job field (licensed, support, administrative, substitute, etc.).
From the Job Board, employees also have the ability to save the position to their profile so they can apply later and/or share the position with others via social media or email.
Employees are able to apply for a position in two ways: • Apply directly from the Job Board by clicking Apply. • Selecting the job title to see more information and clicking the Apply Online button.
From this screen, employees again have the ability to save the position to their profile Job Board by clicking on Add to Job Cart.
Once an employee clicks Apply or adds it to their Job Cart, they will be directed to the Taleo login screen, where they will login and complete the application process using the prompts given in each step of the application.
Additional Taleo information and resources can be accessed on the CCSD Employee Business Training website (training.ccsd.net).
TECHNOLOGY & INFORMATION SYSTEMS SERVICES DIVISION USER SUPPORT SERVICES: EMPLOYEE BUSINESS TRAINING
PEOPLESOFT-HCM: EMPLOYEE SELF-SERVICE ESSENTIALS Revision A 12/2019 66
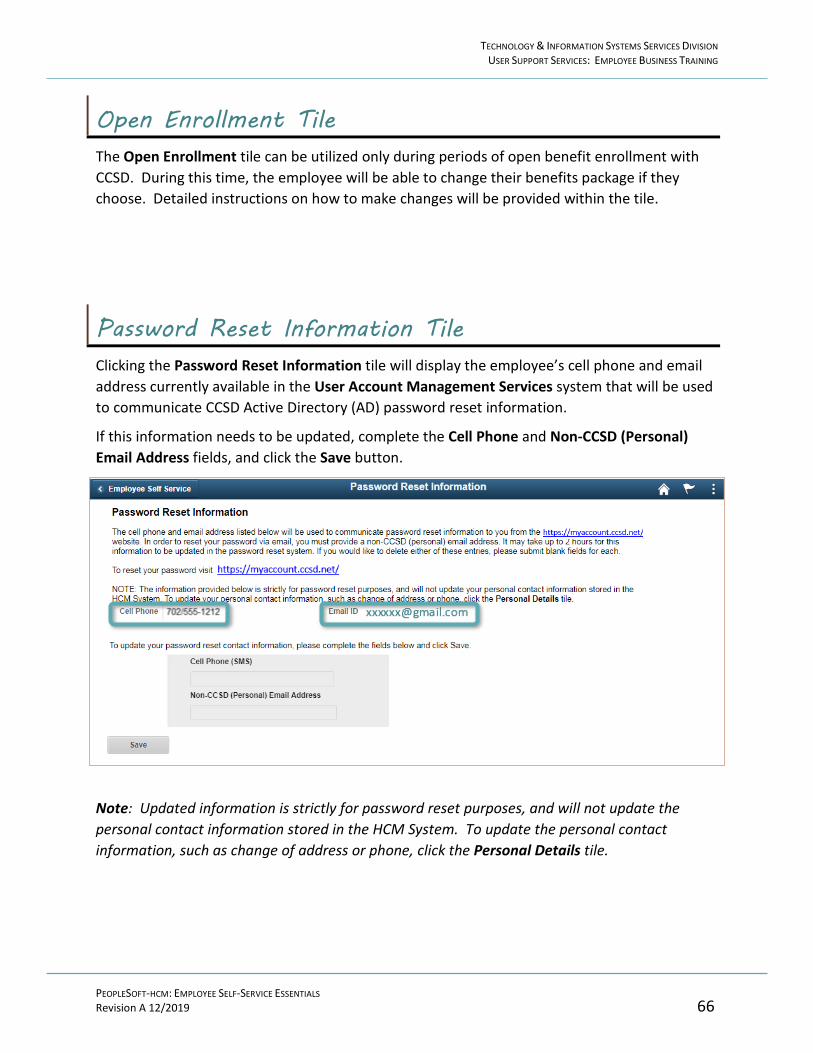
Open Enrollment Tile The Open Enrollment tile can be utilized only during periods of open benefit enrollment with CCSD. During this time, the employee will be able to change their benefits package if they choose. Detailed instructions on how to make changes will be provided within the tile.
Password Reset Information Tile Clicking the Password Reset Information tile will display the employee’s cell phone and email address currently available in the User Account Management Services system that will be used to communicate CCSD Active Directory (AD) password reset information.
If this information needs to be updated, complete the Cell Phone and Non-CCSD (Personal) Email Address fields, and click the Save button.
Note: Updated information is strictly for password reset purposes, and will not update the personal contact information stored in the HCM System. To update the personal contact information, such as change of address or phone, click the Personal Details tile.

TECHNOLOGY & INFORMATION SYSTEMS SERVICES DIVISION USER SUPPORT SERVICES: EMPLOYEE BUSINESS TRAINING
PEOPLESOFT-HCM: EMPLOYEE SELF-SERVICE ESSENTIALS Revision A 12/2019 67
Separation/LOA Request Tile The Separation/LOA Request tile is to be used if the employee is leaving the Clark County School District. Reasons for separation include Leave of Absence, Termination, and Retirement.
Select the Separation/LOA Request tile from Employee Self Service to display the page.
1. Select the New Request button.
2. Select the *Action for the separation request from the drop-down list. 3. Enter the *Effective Date or select it from the calendar. [If Leave of Absence (LOA), the
Request Return Date can also be entered.] 4. Select the Reason for the separation request from the drop-down list. 5. Select the Position # from which the employee is separating from the drop-down list.
2
3
45
1

TECHNOLOGY & INFORMATION SYSTEMS SERVICES DIVISION USER SUPPORT SERVICES: EMPLOYEE BUSINESS TRAINING
PEOPLESOFT-HCM: EMPLOYEE SELF-SERVICE ESSENTIALS Revision A 12/2019 68
6. To attach supporting documentation files, click the Attach button. When clicking the link, the
following page will be displayed.
7. Click the Choose File button to select the file. Navigate to the desired file. 8. Once the file has been selected, click the Upload button.
9. View the file that was uploaded. If the wrong file was uploaded in error, click the - icon to delete the file. To attach additional files, click the + icon to add additional rows if needed.
10. Click the Save for Later button to store the entry to submit the form later. 11. Click the Submit for Approval button to send the request.
7
8
10 11
9
6

TECHNOLOGY & INFORMATION SYSTEMS SERVICES DIVISION USER SUPPORT SERVICES: EMPLOYEE BUSINESS TRAINING
PEOPLESOFT-HCM: EMPLOYEE SELF-SERVICE ESSENTIALS Revision A 12/2019 69
Nevada PERS Tile Clicking the Nevada PERS tile will give the employee links to the Nevada PERS website and the Nevada PERS Survivor Designation Form. It is highly recommended that all employees review or edit the Nevada PERS Survivor Designation form as soon as possible.
Onboarding Activities Tile The Onboarding Activities tile is only utilized by employees who are new to CCSD, or employees who have taken a second job. It provides a step-by-step process for completing onboarding activities with the District. This process includes detailed instructions as well as any documentation that may be required.
Clicking the Onboarding Activities tile will link the employee to the Onboarding page to complete the required actions from the list in the left side panel.

TECHNOLOGY & INFORMATION SYSTEMS SERVICES DIVISION USER SUPPORT SERVICES: EMPLOYEE BUSINESS TRAINING
PEOPLESOFT-HCM: EMPLOYEE SELF-SERVICE ESSENTIALS Revision A 12/2019 70
Appendix A – Examples of Absence/Time Requests
Partial Day Absences To submit an absence for less than a full day, the employee will need to use the Partial Days selection bar to access the Partial Days options in order to submit the absence request.
Certified/Unified Example:
In this example, the Absence Name - “Sick - Personal Illness” was selected and dates were chosen so that the Duration field was populated to account for three full days. However the employee left early on the first day. To change this, click the Partial Days selection bar.
In the window that appears, click the Partial Days drop-down and select Start Day Only since that is the day that the employee left early. Verify Start Day is Half Day and indicates “Yes.”
Once finished, click the Done button. Verify the Duration has populated correctly based on the information entered in Partial Days, in this case it shows 2.5 days (12/4 for 0.5 days + 12/5 for 1.0 days + 12/6 for 1.0 days). Finish filling out the absence request, and remember to click Check Eligibility before submitting.
TECHNOLOGY & INFORMATION SYSTEMS SERVICES DIVISION USER SUPPORT SERVICES: EMPLOYEE BUSINESS TRAINING
PEOPLESOFT-HCM: EMPLOYEE SELF-SERVICE ESSENTIALS Revision A 12/2019 71
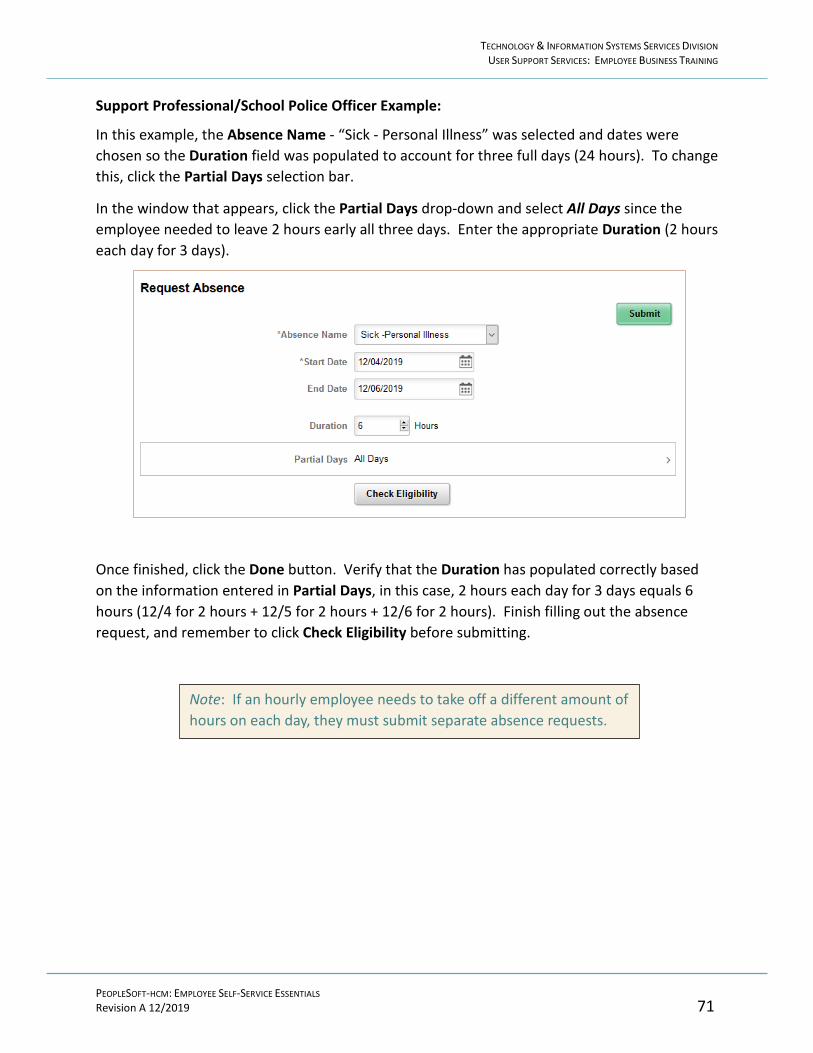
Support Professional/School Police Officer Example:
In this example, the Absence Name - “Sick - Personal Illness” was selected and dates were chosen so the Duration field was populated to account for three full days (24 hours). To change this, click the Partial Days selection bar.
In the window that appears, click the Partial Days drop-down and select All Days since the employee needed to leave 2 hours early all three days. Enter the appropriate Duration (2 hours each day for 3 days).
Once finished, click the Done button. Verify that the Duration has populated correctly based on the information entered in Partial Days, in this case, 2 hours each day for 3 days equals 6 hours (12/4 for 2 hours + 12/5 for 2 hours + 12/6 for 2 hours). Finish filling out the absence request, and remember to click Check Eligibility before submitting.
Note: If an hourly employee needs to take off a different amount of hours on each day, they must submit separate absence requests.

TECHNOLOGY & INFORMATION SYSTEMS SERVICES DIVISION USER SUPPORT SERVICES: EMPLOYEE BUSINESS TRAINING
PEOPLESOFT-HCM: EMPLOYEE SELF-SERVICE ESSENTIALS Revision A 12/2019 72
Certified/Licensed Absence Examples Authorized Absence:
School Business:

TECHNOLOGY & INFORMATION SYSTEMS SERVICES DIVISION USER SUPPORT SERVICES: EMPLOYEE BUSINESS TRAINING
PEOPLESOFT-HCM: EMPLOYEE SELF-SERVICE ESSENTIALS Revision A 12/2019 73
Sick – Worker’s Comp:
Worker’s Comp:
Select Sick-Worker’s Comp when the claim has not yet been approved.
Select Worker’s Comp after the claim has been approved.
Enter the date of the injury.
Once claim has been approved, enter Y or N for Use Sick and Use Vacation.

TECHNOLOGY & INFORMATION SYSTEMS SERVICES DIVISION USER SUPPORT SERVICES: EMPLOYEE BUSINESS TRAINING
PEOPLESOFT-HCM: EMPLOYEE SELF-SERVICE ESSENTIALS Revision A 12/2019 74
Support Professional Absence Examples Authorized Absence:
School Business:

TECHNOLOGY & INFORMATION SYSTEMS SERVICES DIVISION USER SUPPORT SERVICES: EMPLOYEE BUSINESS TRAINING
PEOPLESOFT-HCM: EMPLOYEE SELF-SERVICE ESSENTIALS Revision A 12/2019 75
Sick Transfer from Job to Job:
Vacation Payout:

TECHNOLOGY & INFORMATION SYSTEMS SERVICES DIVISION USER SUPPORT SERVICES: EMPLOYEE BUSINESS TRAINING
PEOPLESOFT-HCM: EMPLOYEE SELF-SERVICE ESSENTIALS Revision A 12/2019 76
Additional Time Examples Certified/Licensed employee working Additional Minutes - 15 minutes daily. (Remember Certified/ Licensed employees do not need to enter their regular time.)
Certified employee entering time for Preparation Time Buyout – Substitute Coverage. (Remember Certified/ Licensed employees do not need to enter their regular time.)
TECHNOLOGY & INFORMATION SYSTEMS SERVICES DIVISION USER SUPPORT SERVICES: EMPLOYEE BUSINESS TRAINING
PEOPLESOFT-HCM: EMPLOYEE SELF-SERVICE ESSENTIALS Revision A 12/2019 77
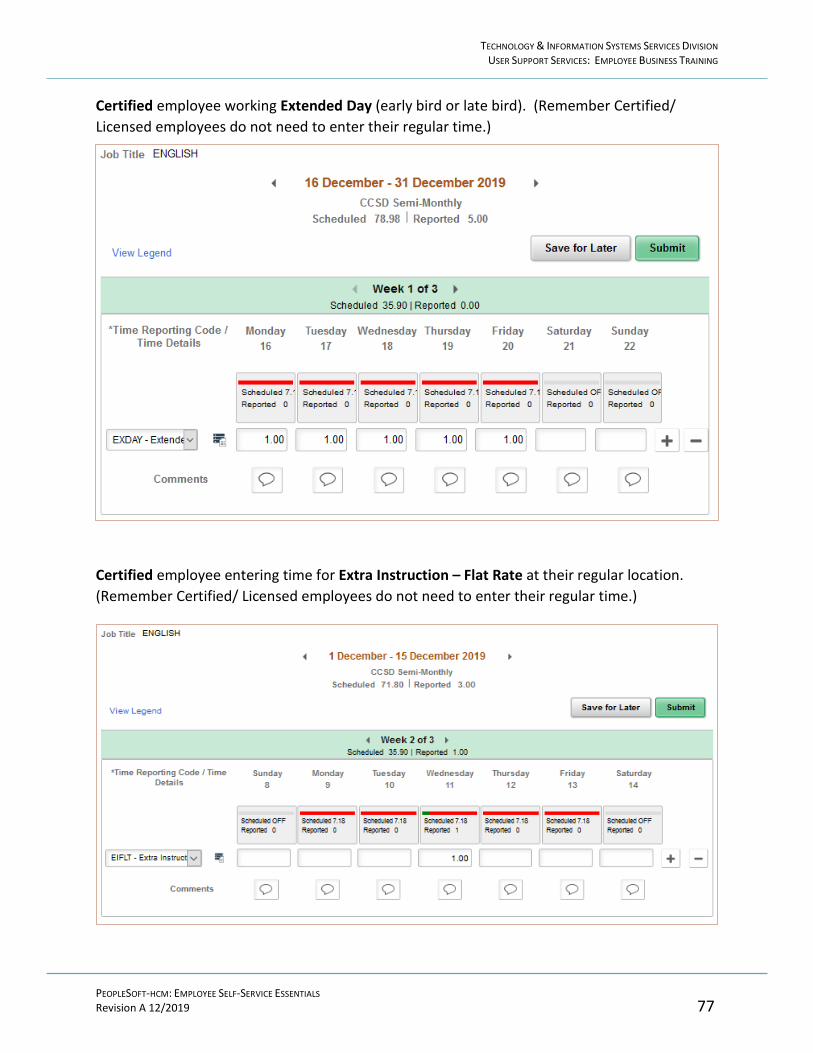
Certified employee working Extended Day (early bird or late bird). (Remember Certified/ Licensed employees do not need to enter their regular time.)
Certified employee entering time for Extra Instruction – Flat Rate at their regular location. (Remember Certified/ Licensed employees do not need to enter their regular time.)

TECHNOLOGY & INFORMATION SYSTEMS SERVICES DIVISION USER SUPPORT SERVICES: EMPLOYEE BUSINESS TRAINING
PEOPLESOFT-HCM: EMPLOYEE SELF-SERVICE ESSENTIALS Revision A 12/2019 78
Support Professional entering Comp Time Earned. (Remember - Support Professionals must enter regular time as well.)
As an example, this employee worked 10 hours on Friday: 8 Regular Hours, and 2 hours of Comp Time Earned. The employee records their Comp Time Earned by selecting the appropriate TRC and entering the number of comp time hours worked for the day. It is important to add the additional row for the Regular Hours to ensure that all hours worked are accounted for. (If the employee entered only 2 hours on that day, their regular 8 hours would not be recorded.)
Support Professional entering Comp Time Taken. (Must enter regular time as well.)

TECHNOLOGY & INFORMATION SYSTEMS SERVICES DIVISION USER SUPPORT SERVICES: EMPLOYEE BUSINESS TRAINING
PEOPLESOFT-HCM: EMPLOYEE SELF-SERVICE ESSENTIALS Revision A 12/2019 79
Support Professional entering Overtime. (Must enter regular time as well.)
In this example, the employee worked 8 Regular Hours and 1 hous of Overtime on Monday, Tuesday, and Wednesday. The employee records their Regular Hours by selecting it from the TRC drop-down list. Click the + (plus) button to add the additional row for the Overtime Hours. (Overtime uses the same Regular Hours TRC code.) This ensures that all hours worked are accounted for. The system will calculate the appropriate overtime pay. (If the employee entered only 1 hour on each day, their regular 8 hours would not be recorded.)
Support Professional with two jobs. Select the Job Title for which additional time is being entered from the drop-down menu. (Must enter regular time as well.) Select the appropriate TRC code for the additional time worked.

TECHNOLOGY & INFORMATION SYSTEMS SERVICES DIVISION USER SUPPORT SERVICES: EMPLOYEE BUSINESS TRAINING
PEOPLESOFT-HCM: EMPLOYEE SELF-SERVICE ESSENTIALS Revision A 12/2019 80
Support Professional entering time for work competed at a different location. (Must enter regular time at the regular location in addition to the second location.)
In this example, the employee worked 8 Regular Hours at their regular location on Monday. This information is entered on the first line, and then the + (plus) button is clicked to add an additional row. In the additional row, the employee selects the TRC for Regular Hours, enters the time worked, and then clicks the calendar icon to open the Time Details window. (Overtime uses the same Regular Hours TRC code since the system calculates the appropriate overtime pay.) The employee then enters the location code where they worked the additional overtime hours and clicks the Done button. After all time is entered, the employee would click the Submit button. This ensures that all hours worked are accounted for, and the extra time recorded is routed to the appropriate approval workflow location.

TECHNOLOGY & INFORMATION SYSTEMS SERVICES DIVISION USER SUPPORT SERVICES: EMPLOYEE BUSINESS TRAINING
PEOPLESOFT-HCM: EMPLOYEE SELF-SERVICE ESSENTIALS Revision A 12/2019 81
Para Professional, Student Worker, or Temporary Employee (positive pay employees) entering Regular Time (non PERS). These employees do not have a schedule and must enter time worked daily.

TECHNOLOGY & INFORMATION SYSTEMS SERVICES DIVISION USER SUPPORT SERVICES: EMPLOYEE BUSINESS TRAINING
PEOPLESOFT-HCM: EMPLOYEE SELF-SERVICE ESSENTIALS Revision A 12/2019 82
Appendix B – Minutes Conversion to Decimal Matrix
Minutes Hour
Decimal Minutes Hour
Decimal 1 0.02 31 0.52 2 0.03 32 0.53 3 0.05 33 0.55 4 0.07 34 0.57 5 0.08 35 0.58 6 0.10 36 0.60 7 0.12 37 0.62 8 0.13 38 0.63 9 0.15 39 0.65
10 0.17 40 0.67 11 0.18 41 0.68 12 0.20 42 0.70 13 0.22 43 0.72 14 0.23 44 0.73 15 0.25 45 0.75 16 0.27 46 0.77 17 0.28 47 0.78 18 0.30 48 0.80 19 0.32 49 0.82 20 0.33 50 0.83 21 0.35 51 0.85 22 0.37 52 0.87 23 0.38 53 0.88 24 0.40 54 0.90 25 0.42 55 0.92 26 0.43 56 0.93 27 0.45 57 0.95 28 0.47 58 0.97 29 0.48 59 0.98 30 0.50 60 1.00