pentt.weebly.compentt.weebly.com/uploads/4/7/8/7/4787634/ncse_manual_digital_li… · web...
TRANSCRIPT
NESC
MOE
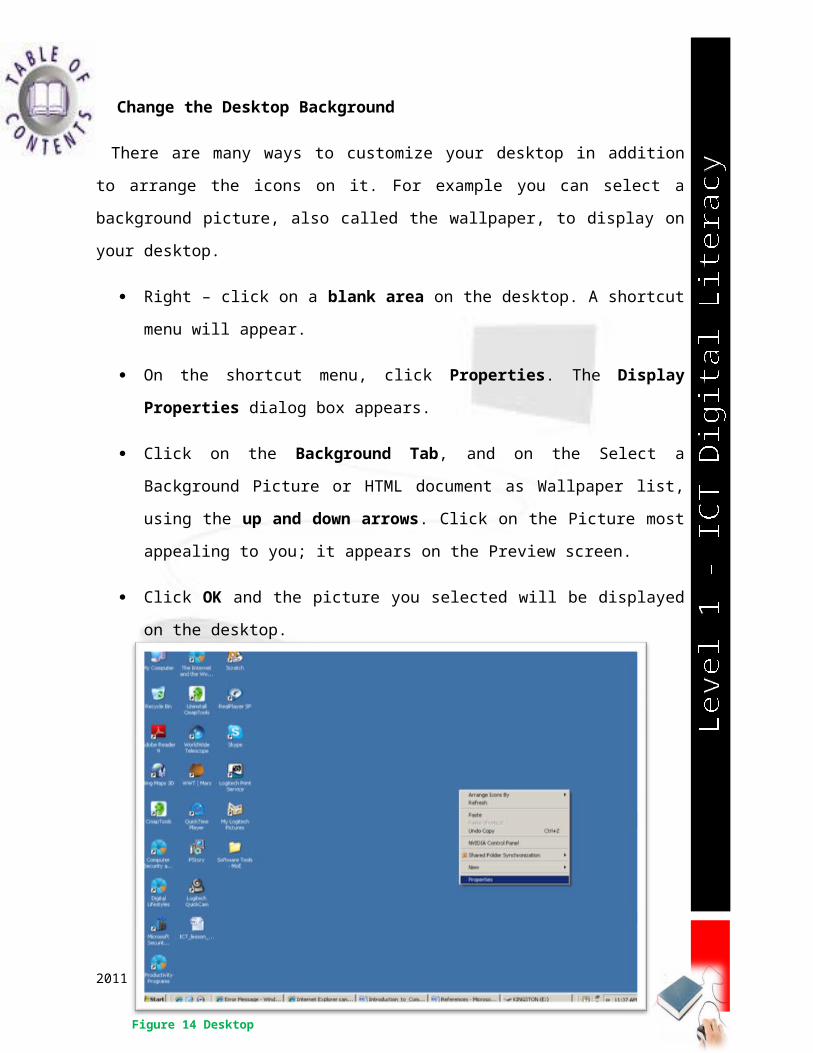
Change the Desktop Background
There are many ways to customize your desktop in addition to arrange the icons on it. For
example you can select a background picture, also called the wallpaper, to display on your
desktop.
Right – click on a blank area on the desktop. A shortcut menu will appear.
On the shortcut menu, click Properties. The Display Properties dialog box
appears.
Click on the Background Tab, and on the Select a Background Picture or HTML
document as Wallpaper list, using the up and down arrows. Click on the Picture
most appealing to you; it appears on the Preview screen.
Click OK and the picture you selected will be displayed on the desktop.
2011 SOFTCOPY VERSION 1
Figure 14 Desktop

NESC
MOE
Applying the Screen Saver
A screen saver displays an animated image on the screen after the computer has
remained idles for a set number of minutes. Screen Savers continue to be popular for two
main reasons. First, because they are fun! Second, and more importantly they can be used to
provide an additional measure of security, by locking an idle computer preventing passers-
by from tampering with opened documents or from snooping at whatever is left on display.
Only someone who knows the password can access the desktop again once the screensaver
has started.
Right – click on a blank area on the desktop. A shortcut menu will appear.
On the shortcut menu, click Properties. The Display Properties dialog box appears.
Click on the Screen Saver Tab.
Click the
Screen
Saver
arrow.
The
Screen
Saver list
appears.
(None) is the
default setting.
The remaining
options appear
in alphabetical
order.
For example, click 3D Text (Open GL)
2011 SOFTCOPY VERSION 2
Figure 25 Dialog Box –Display Properties
NESC
MOE
Click the Settings button. The 3D Text Setup Dialog box appears.
If the speed of the text is too fast for your taste, drag the Speed slider left to decrease or
right to increase the speed of the animated text.
In the Display section, select the text in the Text box, type your name and click OK.
Click the preview button and take your hand away from the mouse. The screen
saver will run until you move the mouse or press on the keyboard. You should be
seeing your name swirl and move across the screen.
Move the mouse and the desktop appears just as you left it.
Select the Password Protected check box. A checkmark appears in the Password
Protected check box.
Select the number of minutes in the Wait box and type 10. You can also use the
arrows to increase or decrease the Wait Time.
Click the Apply button and wait until the screen saver appears.
Move the mouse. The Unlock Computer dialog box appears.
Type your password, and press Enter. The computer is unlocked, and the windows
desktop appears just as you left it.
The Internet & the World Wide Web
What is the Internet?
2011 SOFTCOPY VERSION 3
VIDEOPRESENTATION Self test

NESC
MOE
The Internet is the Inter-Networking of computers internationally linked to share and trade information, music, pictures, personal data, and everything else that exists in the world.
The World Wide Web [www]
Also known as the Web, it is a system that
lets you access information on the Internet.
People often use the term Web to refer to the
Internet, but they are not exactly the same
thing. The World Wide Web operates over
the Internet, and it is the most widely used
part of the Internet.
Search Engine
A program that searches documents for specified keywords and returns a list of the
documents where the keywords were found. Although search engine is really a general
class of programs, the term is often used to specifically describe systems like Google, Alta
Vista and Excite that enable users to search for documents on the World Wide Web and
USENET newsgroups.
Communicating on the Internet
Two most popular means of communicating online are E-mail and Instant Messaging. Funny
thing is, they are not one and the same but they are still very closely linked.
What is Email?
Electronic Mail or E-mail is the process of sending messages electronically using your computer.
The E-mail Address
Research additional information @ www.webopedia.com
2011 SOFTCOPY VERSION 4
Figure 3 6 Search engines
NESC
MOE
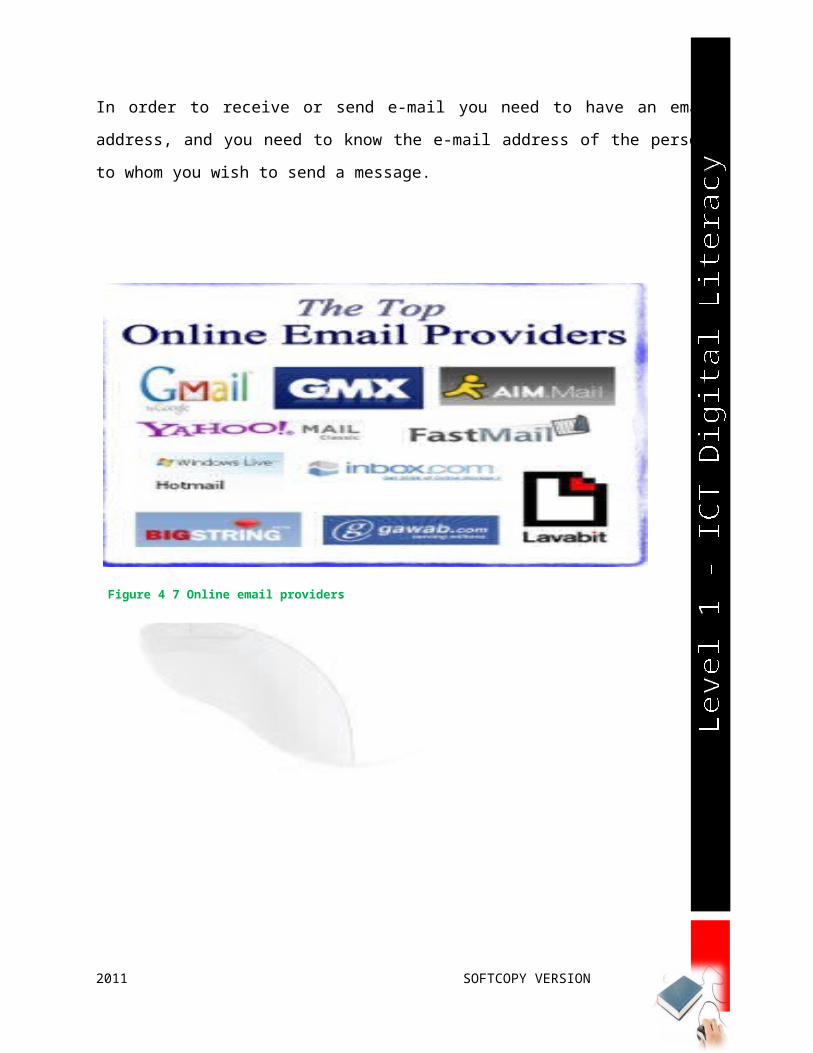
In order to receive or send e-mail you need to have an email address, and you need to know the
e-mail address of the persons to whom you wish to send a message.
2011 SOFTCOPY VERSION 5
Figure 4 7 Online email providers
NESC
MOE
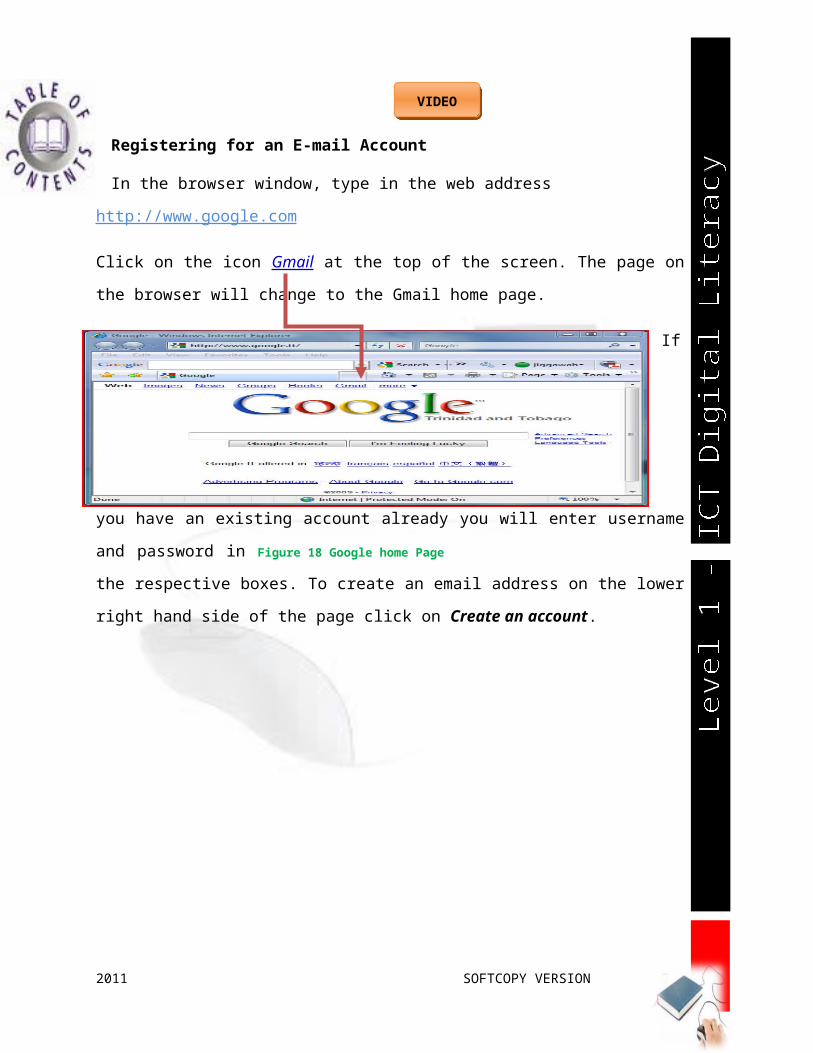
Registering for an E-mail Account
In the browser window, type in the web address http:// www.google.com
Click on the icon Gmail at the top of the screen. The page on the browser will change to the
Gmail home page.
If
you have an existing account already you will enter username and password in the
respective boxes. To
create an email address on the lower right hand side of the page click on Create an
account.
Begin creating an e-mail account so you will have your own e-mail address.
Guideline when completing the form required:
2011 SOFTCOPY VERSION 6
Figure 18 Google home Page
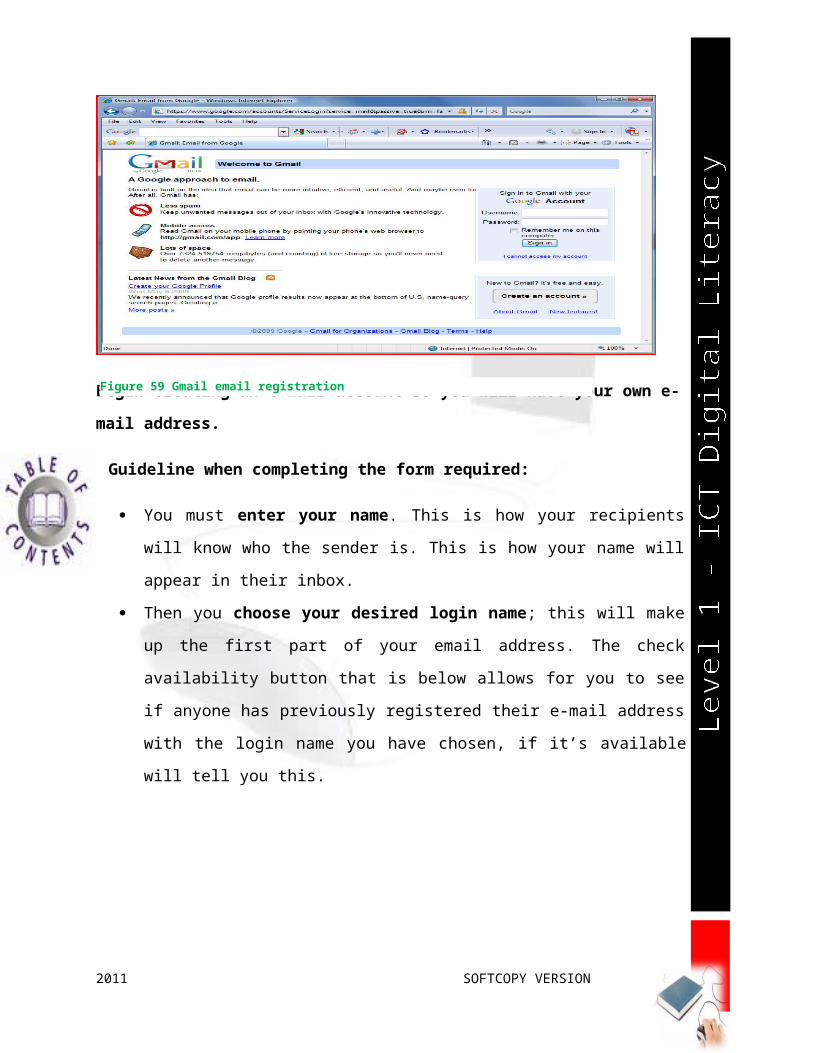
Figure 59 Gmail email registration
VIDEO
NESC
MOE
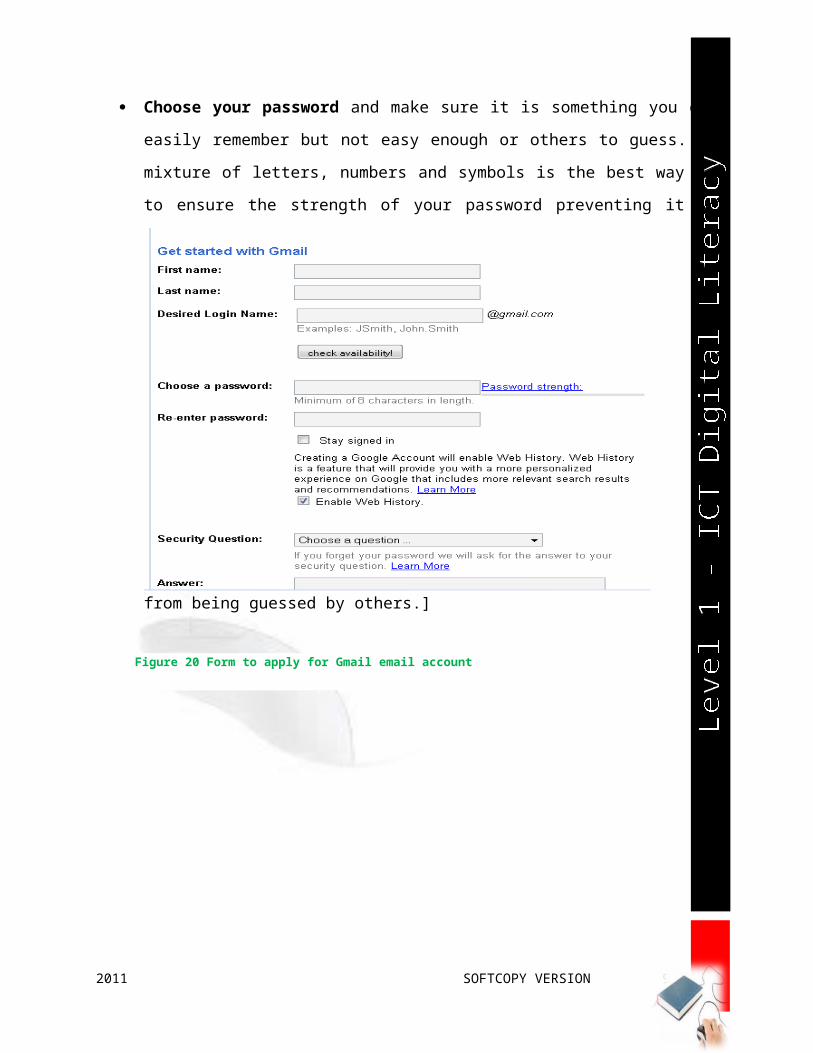
You must enter your name. This is how your recipients will know who the sender is.
This is how your name will appear in their inbox.
Then you choose your desired login name; this will make up the first part of your
email address. The check availability button that is below allows for you to see if
anyone has previously registered their e-mail address with the login name you have
chosen, if it’s available it will tell you this.
Choose your password and make sure it is something you can easily remember but
not easy enough or others to guess. [A mixture of letters, numbers and symbols is
the best way to ensure the strength of your password preventing it from being
guessed by others.]
2011 SOFTCOPY VERSION 7
Figure 20 Form to apply for Gmail email account
NESC
MOE
The secret question is a security measure in place for incase your password is forgotten. It will
be asked if you click Forgot Password. [Your password will be reset and you will gain access
to your account once the question is answered correctly. However, if the answer cannot
be provided you may lose access to your account for good. If you provide a second email
address your password will be emailed there to you.]
Choose your location and type in the Word Verification.
Clicking “I accept create My Account”, the Terms & Conditions for using the
email account. You have Created you email address.
For example, [email protected] is your e-mail address.
Your user name will be computer.genius2009
Your account password is what you will use to login in the future.
Login and send your first e-mail.
Sending E-mails
2011 SOFTCOPY VERSION 8
Figure 21 Gmail security page
NESC
MOE
There are only four components involved in sending E-mail. These are:
The To box,
The Subject box,
The Body Text of the Message,
The Send Button
The “To” Box
This is where you enter the recipients’ e-mail address. Alternately you can use the CC or
BCC boxes as well. The CC or “Carbon Copy” allows you to send copies of the same email
to alternate recipients. In the business world the main recipient goes into the “To” box, and
the CC box is used to formally inform other recipients of the same information that was
sent to the main recipient. The “BCC” or “Blind Carbon Copy” allows the same process
but allows for you to hide the recipients so that they will not be able to see each other.
The “Subject” Box
This is where you give a brief explanation of the message’s details.
Example 1- “ HI”
Example 2- “PICTURES FROM MY VACATION”
Example 3- “DIRECTIONS TO THE RECEPTION”
Example 4- “DETAILS OF THE LAST CLASS ASSIGNMENTS”
The Body Text
This is where the entire messages to the recipient are entered.
The “Send” Button
To send the message to the recipient press this button and it will leave you the sender and go
on its way to the intended recipient. You will notice a message display that states: “Message
sent”.
Receiving the E-mails
2011 SOFTCOPY VERSION 9

NESC
MOE
The inbox is where you can see how much new e-mails you have received. To view the mail
received it is as simple as clicking on the mail list and it will reveal the received message.
When you get to the inbox there are many options you can take to check your e-mails:
Next – while reading the currently open e-mail you can click on Next to view the
following e-mail.
Previous –to get to the previously received email.
Reply – to send a message back to person that originally sent the message to you.
Forward – to send the message you currently have opened to additional recipients.
Block Address - to block your inbox from receiving messages from a specific e-
mail address.
Add Address to Contacts – When you have contacts in your address book it’s a
lot easier to address emails to them in the future. Instead of having to remember
everyone you want to send an e-mail’s address, you can go to your address book.
Move to Folder – you can group e-mails by recipient, or by subject and store
them in folders.
Instant MessagingMessenger gives you the opportunity to engage in multi-party messaging that is,
communicating with more than one person at a time. All messengers want you to submit a
personal profile in which you describe your interests and give your address, phone number,
gender, and other private information (it’s not recommended).
2011 SOFTCOPY VERSION 10
NESC
MOE
MSN Messenger
To trade instant messages with MSN Messenger, you need an email address from
hotmail, msn and live. To download the MSN Messenger software, go to this address:
http://messenger.msn.com/download. Then click the Go button under Registered MSN User
(click this Go button regardless of whether you are registered with the Microsoft Network).
To sign on to MSN Messenger, use your .NET passport ID and password.
The basics of using MSN Messenger are as follows:
Adding friends to your Contact list: Click the Add a Contact link (in the I Want
To section at the bottom of the window). In the wizard dialog boxes that appear,
either select a name from your MSN Messenger dialog box or enter an e-mail
address.
Engaging someone in a message exchange: Double-click a name on your Contact
list. The Conversation window appears. Enter a message and click the Send button.
Do the following to maintain your privacy while you are traveling aboard the
flagship MSN Messenger:
Making yourself invisible: Choose File➪MyStatus➪Appear Offline.
Ignore somebody: Right-click a name on your Contact list and choose Block. To
see a list of the people you have blocked, choose Tools➪Options and select the
Privacy tab in the Options dialog box.
Control whether the program starts when you start your computer:
Choose Tools➪Options and select the General tab in the Options dialog box. Then
deselect the Automatically Run Messenger When I Log on to Windows check box if you
do not want Messenger to start when you boot your computer.
Change your profile: Choose Tools➪Options and select the Personal tab in the Options
dialog box. Then click the Edit Profile button.
2011 SOFTCOPY VERSION 11
VIDEO
NESC
MOE
Computer Security& Privacy
An Overview of Computer Security and Privacy
Computer security is the process of preventing and detecting unauthorized use of your
computer. Prevention measures help you to stop unauthorized users (also known as
"intruders") from accessing any part of your computer system. Detection helps you to
determine whether or not someone attempted to break into your system, if they were
successful, and what they may have done.
Beware of Computer Crimes or Cybercrimes and NetcrimesScams
Don’t respond to any emails that ask you for your bank details. This scam is known
as ‘phishing’, where criminals try to get your details and steal your money. Also,
don’t open any emails or attachments from people you don’t know.
Online advertising and communication networks
Think twice before you click on anything and ensure the website is secure before
entering any personal information.
Online predators
Talk to your children about online risks and the dangers of online predators. Keep
your child protection software up to date. Teach your family about the importance
of staying safe online.
Identity theft
Use strong passwords (eight or more characters which include numbers).
Do not keep account details and pin numbers together.
Do not enter personal, identifiable information into online profiles.
Immediately delete any emails asking for personal details.
Research additional information @ http://netforbeginners.about.com/od/scamsandidentitytheft/ss/top10inetscams.htm
2011 SOFTCOPY VERSION 12
VIDEOPRESENTATION

NESC
MOE
Making a transaction online
Make sure your online banking is secure.
Type in the web address yourself and never follow a link, such as to your bank.
Shopping online
Only shop from places you have heard about or you know are reputable.
Protecting Your Computer and Your Data Use a firewall
We strongly recommend the use of some type of firewall product, such as a network
appliance or a personal firewall software package.
Even if you have a computer connected to the Internet only to play the latest games or to
send email to friends and family, your computer may be a target. A firewall is "a system
or group of systems that enforces an access control policy between two networks." Use
virus protection software
Be sure to keep your anti-virus software up-to-date. Many anti-virus packages
support automatic updates of virus definitions.
Don't open unknown email attachments
Before opening any email attachments, be sure you know the source of the
attachment. It is not enough that the mail originated from an address you recognize.
Turn off your computer or disconnect from the network when not in use
Turn off your computer or disconnect its Ethernet interface when you are not using it. An intruder cannot attack your computer if it is powered off or otherwise completely disconnected from the network. Make regular backups of critical data
Keep a copy of important files on portable media such as recordable CD-ROM disks
(CD-R or CD-RW disks or commonly used flashdrive). Use software backup tools if
available, and store the backup disks somewhere away from the computer.
Make a boot disk in case your computer is damaged or compromised
2011 SOFTCOPY VERSION 13

NESC
MOE
To aid in recovering from a security breach or hard disk failure, create a boot disk on a
floppy disk which will help when recovering a computer after such an event has
occurred. Remember, however, you must create this disk before you have a security
event.
Remember to change your password regularly.
If you have other accounts that required password access, it’s highly recommended
that you use different password for each account to ensure your privacy is not
compromised.
Keeping Your Computer Secure and Updated - Recommendations
Productivity ProgramsCommon Features of Microsoft Office 2007
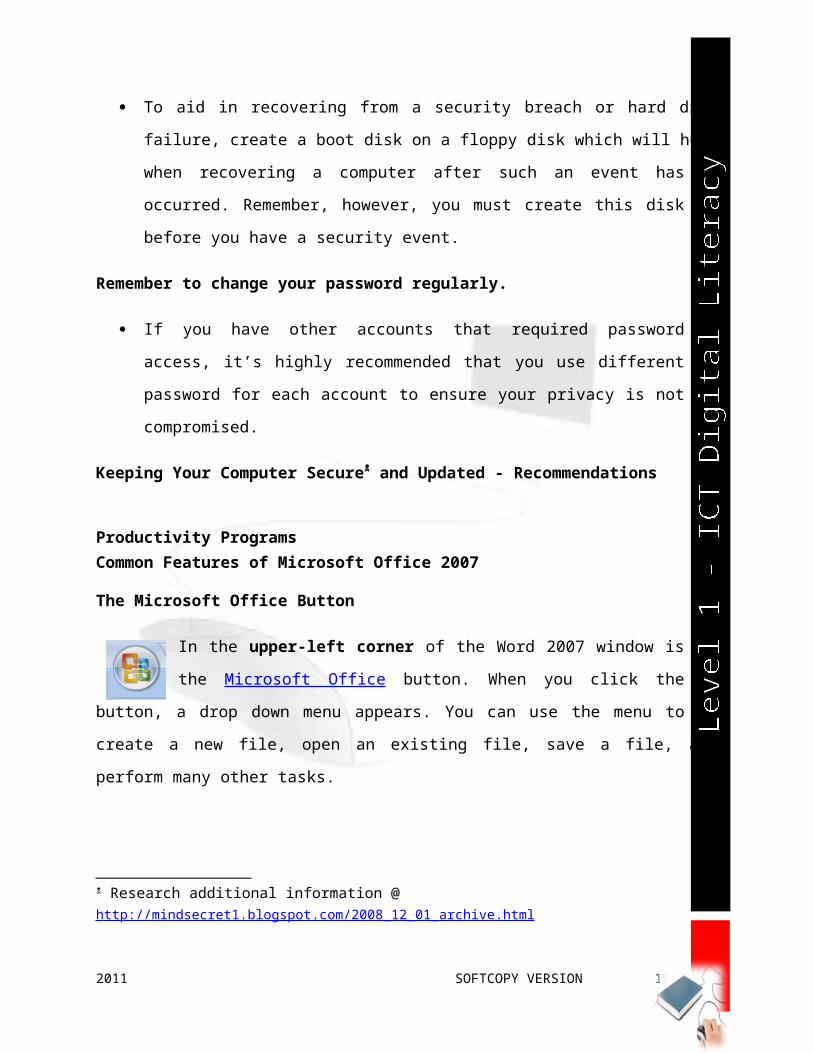
The Microsoft Office Button
In the upper-left corner of the Word 2007 window is the Microsoft Office
button. When you click the button, a drop down menu appears. You can use
the menu to create a new file, open an existing file, save a file, and perform
many other tasks.
The Quick Access Toolbar
Next to the Microsoft Office button is the Quick Access toolbar. The Quick Access toolbar provides you with access to commands you frequently use. By default Save, Undo, and Redo appear on the Quick
Access toolbar. You can use Save to save your file, Undo to rollback an action you have taken, and Redo to reapply an action you have rolled back.
The Title Bar
Research additional information @ h ttp://mindsecret1.blogspot.com/2008_12_01_archive.html
2011 SOFTCOPY VERSION 14

NESC
MOE
Next to the Quick Access toolbar is the Title bar. The Title bar displays the title of the program
and document on which you are currently working on. Word names the first new document you
open Document1. As you open additional new documents, Word names them sequentially.
When you save your document, it’s highly recommend that you assign the document a new
name.
Figure 1 Title Bar
The Ribbon
In Microsoft Word 2007, you use the Ribbon to issue commands. The Ribbon is located
near the top of the screen, below the Quick Access toolbar. At the top of the Ribbon are
several tabs; clicking a tab displays several related command groups. Within each group
are related command buttons. You click buttons to issue commands or to access menus and
dialog boxes.
You may also find a dialog box launcher in the bottom-right corner of a group. Clicking the
dialog box launcher gives you access to additional commands via a dialog box.
Figure 6 Ribbon
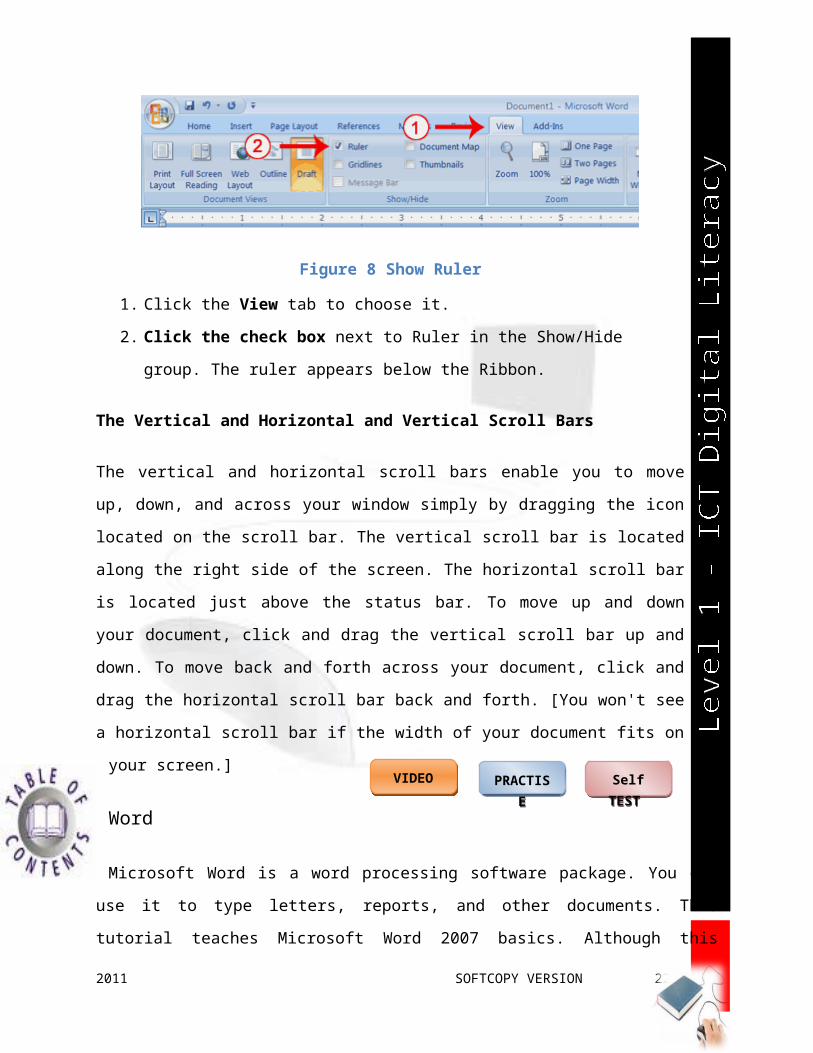
The Ruler
The ruler is found below the Ribbon.
2011 SOFTCOPY VERSION 15
NESC
MOE
Figure 7 Ruler
You can use the ruler to change the format of your document quickly. If your ruler is not
visible, follow the steps listed here:
Figure 8 Show Ruler
1. Click the View tab to choose it.
2. Click the check box next to Ruler in the Show/Hide group. The ruler appears below
the Ribbon.
The Vertical and Horizontal and Vertical Scroll Bars
The vertical and horizontal scroll bars enable you to move up, down, and across your
window simply by dragging the icon located on the scroll bar. The vertical scroll bar is
located along the right side of the screen. The horizontal scroll bar is located just above the
status bar. To move up and down your document, click and drag the vertical scroll bar up
and down. To move back and forth across your document, click and drag the horizontal
scroll bar back and forth. [You won't see a horizontal scroll bar if the width of your document
fits on your screen.]
Word
Microsoft Word is a word processing software package. You can use it to type letters, reports,
and other documents. This tutorial teaches Microsoft Word 2007 basics. Although this tutorial
2011 SOFTCOPY VERSION 16
VIDEO PRACTISE Self TEST

NESC
MOE
was created for the computer novice [Newbie], because Microsoft Word 2007 version is so
different from previous versions, even experienced users may find it useful.
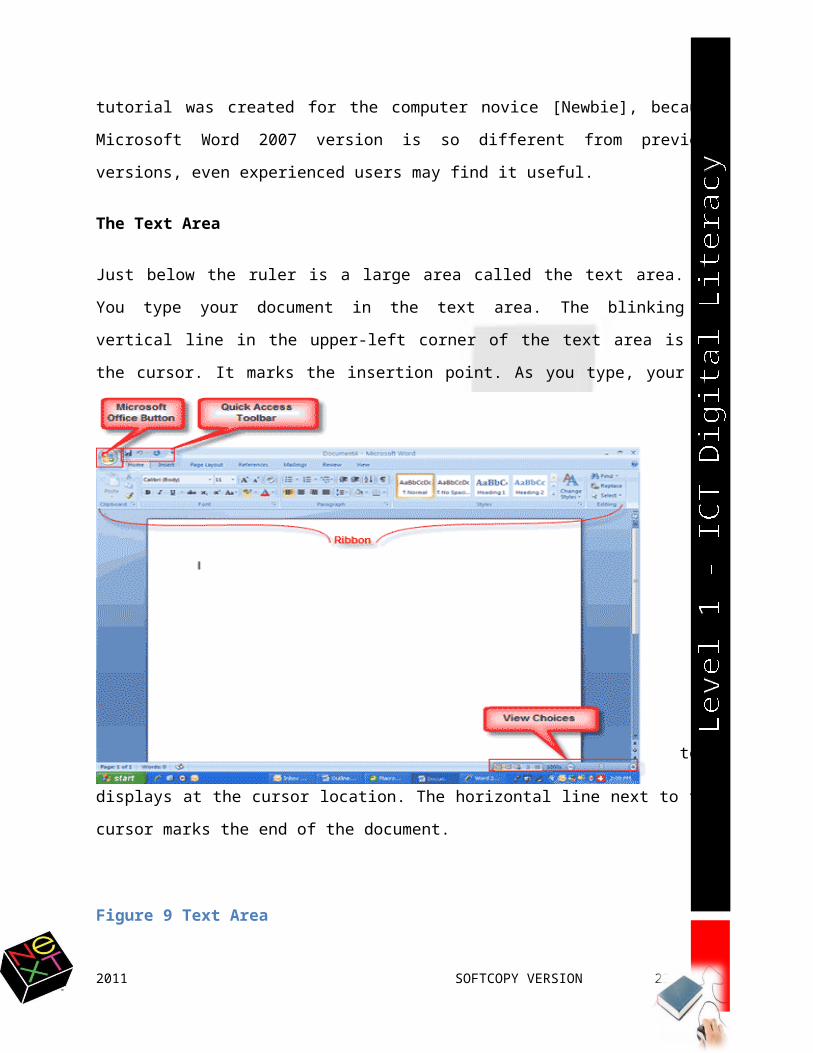
The Text Area
Just below the ruler is a large area called the text area. You type your document in the text
area. The blinking vertical line in the upper-left corner of the text area is the cursor. It
marks the insertion point. As you type, your text displays at the cursor location. The
horizontal line next to the cursor marks the end of the document.
Figure 9 Text Area
The Status Bar
The Status bar appears at the very bottom of your window and provides such information as
the current page and the number of words in your document. You can change what displays on
the Status bar by right-clicking on the Status bar and selecting the options you want from the
Customize Status Bar menu. You click a menu item to select it. You click it again to deselect it.
A check mark next to an item means it is selected.
2011 SOFTCOPY VERSION 17
NESC
MOE
Figure 10 Status Bar
2011 SOFTCOPY VERSION 18
Zoom Out Zoom In
NESC
MOE
Create Sample Data and Select Text
If you type =rand () in your Word document and then press Enter, Word creates three
paragraphs. You can use these paragraphs to practice what you learn. EXERCISE
Create Sample Data
1. Type =rand ().
2. Press Enter. Three paragraphs appear in your document.
Select with the Shift and Arrow Keys
1. Place your cursor before the word "On" in the first paragraph.
2. Press and hold down the Shift key, which serves as an "anchor" showing where
text you wish to select begins or ends.
3. Press the right arrow key until the first line of text is highlighted.
4. Press the down arrow key until the first paragraph is highlighted.
Click anywhere outside the highlighted area to remove the highlighting.
Select with the Mouse
1. Place your cursor before the word "You" in the second paragraph.
2. Press and hold down the left mouse button.
3. Drag the mouse until you have highlighted the second paragraph.
EXERCISE
Execute Commands with Keyboard Shortcuts
2011 SOFTCOPY VERSION 19

NESC
MOE
There are many methods you can use to accomplish tasks when using Word. Generally, you
choose an option by clicking the option on the Ribbon. However, you can also use shortcut
keys. A key name followed by a plus and a letter means to hold down the key while
pressing the letter. For example, Ctrl + B means you should hold down the Ctrl key while
pressing "b."
Press Ctrl + B – bold text Ctrl + I – Italic Ctrl + U - underline
Typists who are slowed down by using a mouse usually prefer using keys.
Start a New Paragraph
When you type in Microsoft Word, you do not need to press a key to move to a new line.
The word wrap feature is automatically applied. [You may need to check to see if the
default setting is setup.]
To start a new paragraph, press the Enter key.
EXERCISE
Close and Save
1. Click the Microsoft Office
button. A menu appears.
2. Click Exit Word, which you
can find in the bottom-right corner.
2011 SOFTCOPY VERSION 20
Figure 11Close

NESC
MOE
3. You are prompted: "Do you want to save changes to Document1?" To save your
changes, click Yes. Otherwise, click No. If you click Yes, the Save As dialog box
appears.
Figure 12 Save
Figure 9 Save location
4. Move to the correct folder.
5. Name your file by typing Lesson One in the File Name field.
6. Click Save. Word saves your file.
EDITTING YOUR DOCUMENT
Backspace key
1. Delete key Highlight and press
the Delete key.
2011 SOFTCOPY VERSION 21
Figure 10 Underline
NESC
MOE
Open a File
1. Click the Microsoft Office button. A menu appears.
2. Click Open. The Open dialog box appears.
3. Click your filename
Click Open. There are various methods to apply formatting to your document:
Ribbon
Keyboard shortcuts
Dialog Box Launcher
Right click the mouse
2011 SOFTCOPY VERSION 22
NESC
MOE
Cut with the ribbon
1. Type the following:
I
want to move. I am content where I am.
2. Select "I want to move. "
3. Choose the Home tab.
4. Click the Cut button in the Clipboard group. Word cuts the text you selected and
places it on the Clipboard. Your text should now read:
"I am content where I am."
2011 SOFTCOPY VERSION 23
Figure 11 Cut with the ribbon