pearsonaccess next testnav 8 infrastructure...
TRANSCRIPT

PearsonAccess Next TestNav 8
Infrastructure Readiness Guide
Updated January 7, 2016

Infrastructure Readiness Guide (Updated 1/7/2016) 2
Table of Contents Updates ........................................................................................................................................... 3 Infrastructure Trial Overview ......................................................................................................... 4 1.0 Contacting Pearson Customer Support ..................................................................................... 6 2.0 Configuring the Infrastructure Trial Environment .................................................................... 7 3.0 PearsonAccess Next Training Center ....................................................................................... 7
3.1 Logging in to the PearsonAccess Next Training Center ....................................................... 7 4.0 Sample Students ........................................................................................................................ 8
4.1 Creating Sample Students ..................................................................................................... 9 5.0 Session Management .............................................................................................................. 11
5.1 Creating a Sample Test Session .......................................................................................... 11 5.2 Adding Additional Sample Students to a Session............................................................... 13 5.3 Printing Authorization Tickets ............................................................................................ 15 5.4 Configuring Browser Settings for Caching Content and Caching Test Content ................ 16 5.5 Starting a Session ................................................................................................................ 16 5.6 Conducting an Infrastructure Trial at a School ................................................................... 17 5.7 Script for the Infrastructure Trial ........................................................................................ 17 5.8 Monitoring Sessions............................................................................................................ 19 5.9 After the Infrastructure Trial ............................................................................................... 20 5.10 Stopping a Session ............................................................................................................ 20 5.11 Purging Test Content ........................................................................................................ 22
6.0 Follow-Up ............................................................................................................................... 22

Infrastructure Readiness Guide (Updated 1/7/2016) 3
Updates
1. November 10, 2010: Original version published. 2. September 2, 2011: The guide was revised to allow for the removal of the statewide
Infrastructure Trial and to replace specific technical setup instructions (which may become outdated) with a reference to use the most recent test administration manual. More specifically, the following revisions were made:
• General: Language updated from referring to an annual statewide Infrastructure Trial (for 2010-2011 only) to a more generic local trial that can be conducted at any time.
• Configuring the Infrastructure Trial Environment: This section was replaced with a reference to access the most recent test administration manual.
3. December 5, 2011: The guide was revised to include instructions for using the accommodated TestHear version of the Infrastructure Trial to test out workstations using the TestHear software.
4. September 10, 2012: The guide was revised to include: • The latest version of the TestHear software • References to the Technology Coordinator Guide instead of the Test
Administration Manual • Additional edits for clarification of instructions
5. February 6, 2013: The guide was revised to include instructions for a two-session TestNav Infrastructure Trial form, including seal codes.
6. March 4, 2014: The guide was revised for Spring 2014 to update references to the Technology Coordinator Guide location and other minor edits.
7. March 14, 2014: The guide was revised to include the “TestHear Math/EOC” form available in the Training Center to test screen reader capability.
8. October 20, 2014: The guide was revised to address conducting an Infrastructure Trial with TestNav 8.
9. September 14, 2015: The guide was revised to: • Remove references to FCAT • Include proctor caching machine selection • Update screenshots and tool descriptions
10. October 1, 2015: The guide was revised to include instructions for utilizing the Installable TestNav – Laptop and Desktop app.
11. January 7, 2016: The guide was revised to include the transition to PearsonAccessNext.

Infrastructure Readiness Guide (Updated 1/7/2016) 4
Infrastructure Trial Overview
The Infrastructure Trial is an opportunity for districts and schools to prepare for the operational computer-based test administrations by simulating test-day network utilization, determining any school or district issues, and confirming that all workstations that will be used for testing can run the appropriate software.
• Schools will prepare by reading preparation materials and downloading and installing Proctor Caching software (if it has not already been installed) and necessary applications for mobile devices or computers using the Installable TestNav – Laptop and Desktop app.
• Districts may create an environment that matches expected school bandwidth utilization that will be used during testing.
• Schools may create the same testing environment (e.g., testing rooms, number of computers, appropriate switches and hubs, power supplies) that will be used for testing.
• Schools will manage the test sessions in the PearsonAccess Next Training Center and will use the tools (e.g., TestNav SystemCheck) provided by Pearson to determine network user capacity and bandwidth requirements.
• Prior to the largest computer-based administration of the year, or as directed by the district, schools will run a trial which simulates the appropriate number of student logins based on the total number of computers that they intend to use concurrently for testing.
• Infrastructure Trial logins can be used by adults or students who may or may not be participating in a computer-based administration (i.e., it is not necessary to use computer-based testing students).
• The Trial should take approximately thirty minutes. During this time users will log in, supply random answers, and submit the test.
• Schools are encouraged to run the Trial in their testing rooms on their testing workstations and troubleshoot any local issues prior to a district-wide Infrastructure Trial.
The Infrastructure Trial should only be used to test the school and district infrastructure; the content used for the Infrastructure Trial is not appropriate for student practice. To create a Trial that is slightly larger than the tests used by Florida, items from Florida’s practice tests are repeated throughout the Infrastructure Trial. Content-specific practice tests for students, called Electronic Practice Assessment Tools (ePATs), are posted to www.FLAssessments.com/ePATs. The ePATS are intended to familiarize students with the types of items that will make up the tests and with the tools that will be available to them in TestNav.
Infrastructure Readiness Guide Overview
The purpose of this guide is to provide district and school assessment and technology personnel with necessary information and instructions to complete critical tasks related to infrastructure readiness for computer-based testing. This guide will define important terms, walk you through tasks required before, during, and after a Trial, and familiarize you with the PearsonAccess Next Training Center and technical requirements. It is recommended that you read through the entire guide before installing software and completing the setup for an Infrastructure Trial.

Infrastructure Readiness Guide (Updated 1/7/2016) 5
The major topics covered in this guide are:
1.0 Contacting Pearson Customer Support. This section will provide instructions and information on contacting Pearson Customer Support with questions or technical issues.
2.0 Configuring the Infrastructure Trial Environment. See updated instructions available at www.FLAssessments.com/TestNav8.
3.0 PearsonAccess Next Training Center. This section discusses the PearsonAccess Next Training Center account you will receive, and it describes the website you will be working with as you prepare for an Infrastructure Trial. Because most of the setup for computer-based testing occurs at a school level, these instructions are directed to the school assessment coordinator.
4.0 Sample Students. This section describes how to create sample students in the PearsonAccess Next Training Center for an Infrastructure Trial.
5.0 Session Management. This section provides all the necessary information and steps for setting up sessions for an Infrastructure Trial, managing student assignments for sessions, and printing Student Authorization Tickets and Seal Codes. You will then find instructions on how to start, monitor, and stop sessions in the Training Center, as well as how to resume students.
6.0 Follow-Up. The final section will include instructions for providing the district and Pearson with feedback regarding your Infrastructure Trial.
Glossary of Important Terms
ePAT is the Electronic Practice Assessment Tool that provides students an opportunity to practice using the computer-based platform prior to testing. The ePATs are provided at www.FLAssessments.com/ePAT.
PearsonAccess Next (https://fl.pearsonaccessnext.com) is a website used for almost all test preparation (e.g., PreID), setup, administration, and reporting tasks. The correct test administration should be verified every time you log in. PearsonAccess Next requires username and password setup.
PearsonAccess Next Training Center provides an opportunity to practice PearsonAccess Next tasks and is the means of managing the Infrastructure Trial in preparation for testing. The Training Center requires username and password setup. It can be accessed at https://trng-fl.pearsonaccessnext.com.
Proctor Caching is the process of loading or “caching” test content locally on a computer at a school level. It does not require a separate caching server, and can run on any workstation on the network that meets the minimum requirements. Proctor Caching software is provided by Pearson. Proctor Caching is used to reduce test delays due to network congestion and provides students with a more seamless testing experience. Proctor Caching is required for all FCAT 2.0/NGSSS EOC computer-based testing in Florida.
TestNav 8 (TestNav) is the student testing platform that Florida uses for computer-based FCAT 2.0/NGSSS EOC assessments.

Infrastructure Readiness Guide (Updated 1/7/2016) 6
1.0 Contacting Pearson Customer Support
If technical assistance is needed at any point during your Infrastructure Trial, contact Pearson Customer Support at 877-847-3043 or [email protected]. Make sure that you know the answers to all relevant questions below so that Pearson can assist you effectively and efficiently.
• PearsonAccess Next o Are you using a PC or a Mac? o What is your role (district assessment coordinator, district technology coordinator,
school assessment coordinator, school technology coordinator, or test administrator)?
o What screen are you on? Provide the path if possible. See screenshot below.
o What task were you trying to complete when you encountered an error? o What was the error message? If there wasn’t an error message, what are you
unable to do? o If you were working from the guide, what page were you on?
• TestNav o Is the student using a PC, Mac, or mobile device? o What step of the Infrastructure Trial was the student/volunteer trying to complete
in TestNav when he/she encountered an error? o Did an error code or message appear? o What is the IP address of the Proctor Caching computer? o Do you use a proxy server, and if so, what is the IP address? o Have the TestNav URLs been allowed through your Firewall/Content filter?
• Proctor Caching o Are you using a PC or a Mac? o Were you setting up Proctor Caching on a workstation or a server? o Have you installed the Proctor Caching software? o Did you start the Proctor Caching software prior to attempting to Proctor Cache? o Did you add an IP address to your Proctor Caching server locations? This needs to
be the IP address of the Proctor Caching computer. Did you add the appropriate port? This is typically port 4480 but could vary depending on your district/school firewall or content filtering software.
o Have you updated to the latest Java version (1.8 or higher)? o Did you add the whitelist URLs to your firewall and content filtering software?
The whitelist URLs that need to be added can be found at www.FLAssessments.com/TestNav8.

Infrastructure Readiness Guide (Updated 1/7/2016) 7
2.0 Configuring the Infrastructure Trial Environment
In order to configure the Infrastructure Trial environment (e.g., conduct SystemCheck, download and install appropriate software), see www.FLAssessments.com/TestNav8. Disregard any references to completing tasks in PearsonAccess Next; the Infrastructure Trial is managed via the Training Center.
Follow all instructions for the activities below:
Before the Infrastructure Trial • Downloading and installing the Proctor Caching software, if necessary • Downloading and installing the TestNav app for mobile devices or computers (optional
for computers) • Verifying that Proctor Caching and TestNav are communicating • Completing any additional configuration requirements • Conducting the SystemCheck Tool • Configuring browser settings to cache test content • Caching test content
During the Infrastructure Trial • Starting proctor caching software
After the Infrastructure Trial • Purging test content
3.0 PearsonAccess Next Training Center
The PearsonAccess Next Training Center is the site used to administer an Infrastructure Trial. Within the Training Center, users can create sample students, assign the Infrastructure Trial to sample students, create sample sessions, and add students to these sessions. The Training Center is also used to monitor sessions during the Infrastructure Trial. Sessions and sample students are deleted from the PearsonAccess Next Training Center on a yearly basis, after the conclusion of the summer test administration. For more information about the Pearson Access Next layout and overview, access the user guide available at: https://support.assessment.pearson.com/display/PAsup/Understand+the+System+Layout.
Because most of the setup for computer-based testing occurs at a school-level, these instructions are directed to the school assessment coordinator.
3.1 Logging in to the PearsonAccess Next Training Center
Pearson created the initial user accounts for the Training Center. You should receive an email with your username and instructions for creating your password. If you have not received these instructions or if you need an account set up for you, contact your district assessment coordinator. If you are responsible for creating other school user accounts, your district assessment coordinator will provide you with instructions for how to do this.

Infrastructure Readiness Guide (Updated 1/7/2016) 8
Logging in for the first time
After you receive the email providing your username, complete the following steps:
1. Click on the link within the email.
2. Create a password; you will be prompted to enter it twice, and then click Set Password.
3. Click OK.
4. To return to the Training Center, go to https://trng-fl.pearsonaccessnext.com. Then click Sign In.
5. Read the Privacy Policy and Terms and Conditions of Use and click Accept.
You have only five chances to enter the correct username and password on the login screen. If the fifth attempt is unsuccessful, your account will be locked.
To reset your password 1. Go to https://trng-fl.pearsonaccessnext.com. 2. Under the Sign In button, click Forgot Password to go to the Reset Password screen.
3. Enter your username and email address, and then click Request Password Reset. You must enter your exact username and email address. If you do not know your username, contact your district assessment coordinator. If either your username or email does not match the name and email associated with your user account, you will not be able to reset the password.
Log in again
The second time that you log in, use the following login procedure:
1. Go to https://trng-fl.pearsonaccessnext.com. Then click Sign In.
2. Enter your username and password, and then click Sign In.
4.0 Sample Students
Because the purpose of an Infrastructure Trial is to test district and school infrastructure, it is not necessary to use real student data. The Training Center provides a simple means of creating sample students that can be used for a Trial. This section will go over the process by which sample students will be created and managed for an Infrastructure Trial.
Note: Disable pop-up blocking software for the PearsonAccess Next website. A pop-up blocker will block screens from opening on administrative workstations.
Infrastructure Readiness Guide (Updated 1/7/2016) 9
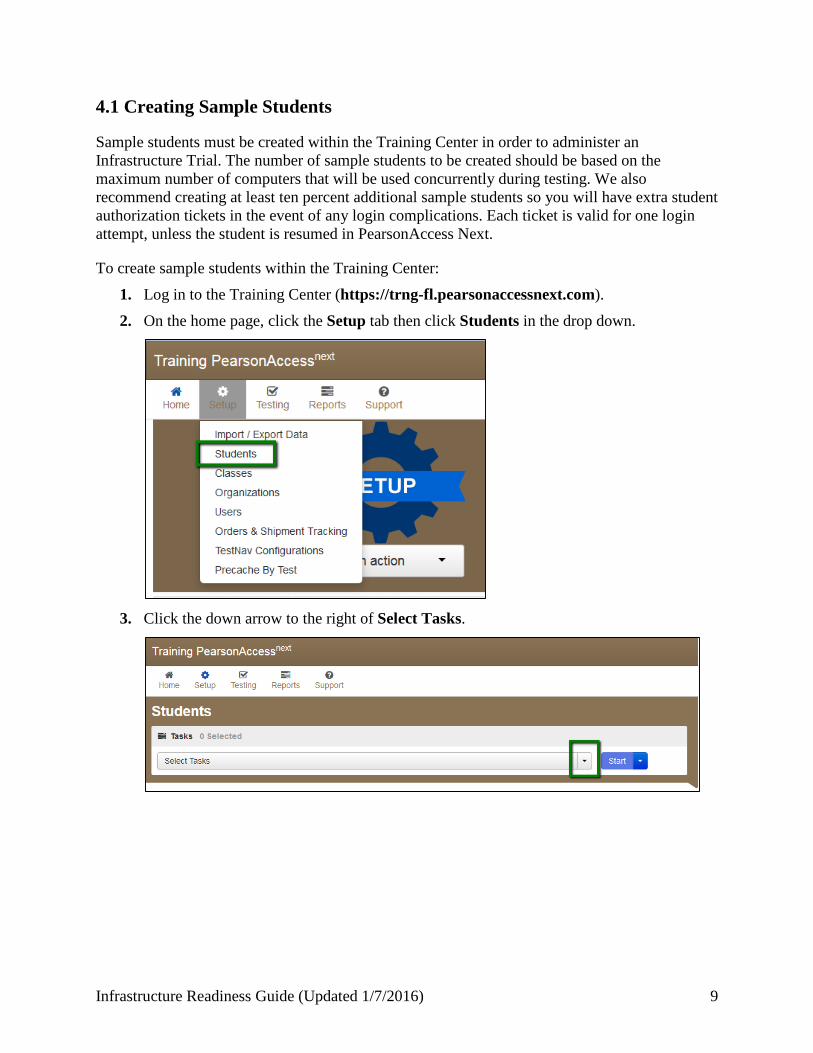
4.1 Creating Sample Students
Sample students must be created within the Training Center in order to administer an Infrastructure Trial. The number of sample students to be created should be based on the maximum number of computers that will be used concurrently during testing. We also recommend creating at least ten percent additional sample students so you will have extra student authorization tickets in the event of any login complications. Each ticket is valid for one login attempt, unless the student is resumed in PearsonAccess Next.
To create sample students within the Training Center:
1. Log in to the Training Center (https://trng-fl.pearsonaccessnext.com).
2. On the home page, click the Setup tab then click Students in the drop down.
3. Click the down arrow to the right of Select Tasks.

Infrastructure Readiness Guide (Updated 1/7/2016) 10
4. Mark the checkbox by the Generate Sample Students task.
5. Click Start.
The Generate Sample Students screen opens.

Infrastructure Readiness Guide (Updated 1/7/2016) 11
6. Select your school from the Organization dropdown.
7. Next, you must designate a class name (create a new class or select an existing class from the drop-down list).
8. Enter a Grade.
9. Select “Infrastructure Trial” as the Test. 10. Set the Type to “Online.”
11. Enter the number of students you would like to create (between 1 and 99).
12. Click Generate. 13. Repeat the steps above until you have created sample students for the number of
computers that will be tested concurrently, plus at least 10% additional sample students.
5.0 Session Management
5.1 Creating a Sample Test Session
Once sample students are available, a sample session must be created in order to administer an Infrastructure Trial. For an Infrastructure Trial, only one session is necessary. For operational administrations, the test administration manuals will include guidance on determining the most appropriate method of setting up sessions for your school.
To create a sample test session:
1. From the home page, go to the Testing tab and click Sessions.

Infrastructure Readiness Guide (Updated 1/7/2016) 12
2. Select Create/Edit Sessions from the Select Tasks dropdown and select Start.
3. Enter the Session Name, Organization, Test Assigned (“Infrastructure Trial”), Form
Group Type (Main), Scheduled Start Date, Scheduled Start Time, Lab Location, and Precaching Computer.
Infrastructure Readiness Guide (Updated 1/7/2016) 13
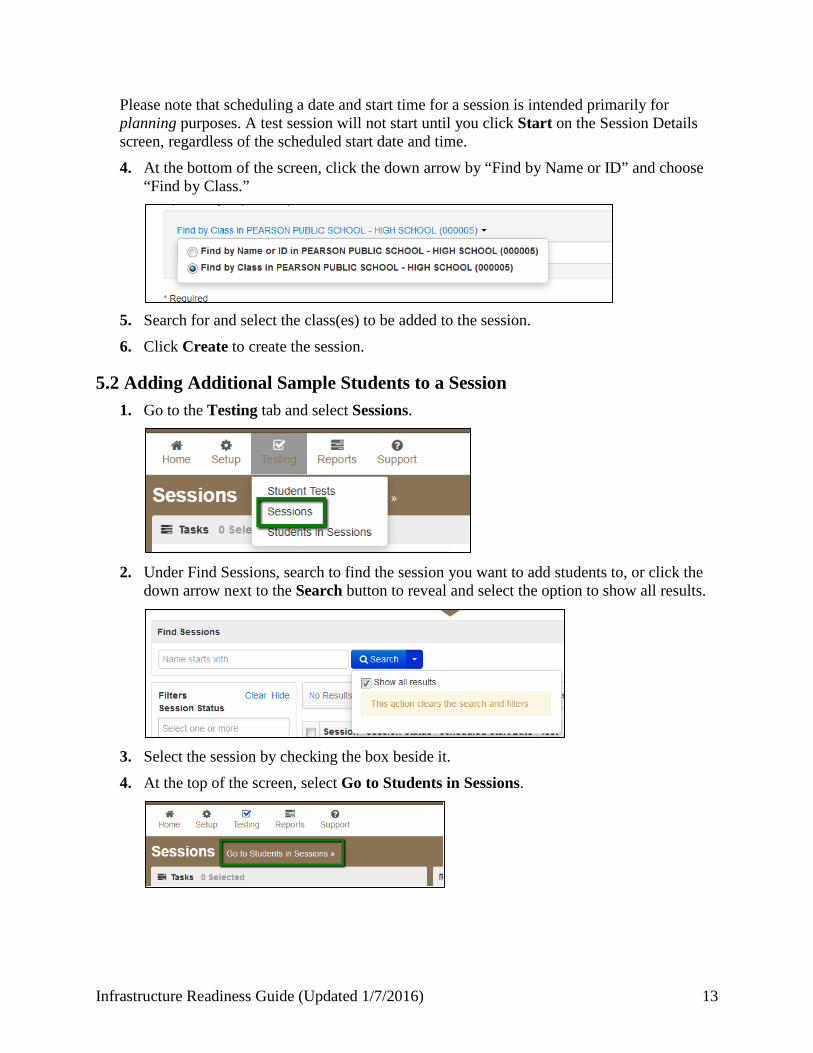
Please note that scheduling a date and start time for a session is intended primarily for planning purposes. A test session will not start until you click Start on the Session Details screen, regardless of the scheduled start date and time.
4. At the bottom of the screen, click the down arrow by “Find by Name or ID” and choose “Find by Class.”
5. Search for and select the class(es) to be added to the session.
6. Click Create to create the session.
5.2 Adding Additional Sample Students to a Session 1. Go to the Testing tab and select Sessions.
2. Under Find Sessions, search to find the session you want to add students to, or click the
down arrow next to the Search button to reveal and select the option to show all results.
3. Select the session by checking the box beside it.
4. At the top of the screen, select Go to Students in Sessions.

Infrastructure Readiness Guide (Updated 1/7/2016) 14
5. Select the Add Students to Sessions task, then click Start.
6. Select the session name.
7. Enter search criteria into the “Find available students” box and select Search.

Infrastructure Readiness Guide (Updated 1/7/2016) 15
8. Students can be added by selecting an entire class at once or selecting individual students. To add students by class, select by Class. Then click Add.
5.3 Printing Authorization Tickets
Authorization tickets include a Username and Password for each individual sample student. This information is necessary in order to log in to the Infrastructure Trial.
1. Under the Testing tab, go to the Students in Sessions page, add test session(s) to the Sessions list on the left side of the page. Click Refresh to update the data being displayed.
2. Click a session to select it from the list.
If you have trouble finding your session, go to Testing > Sessions and select the test session that contains the student(s) whose status you wish to view. Return to Students in Sessions and the session will already be listed.
3. Open the Download Resources drop-down menu and select the layout of authorization tickets you wish to print.
Infrastructure Readiness Guide (Updated 1/7/2016) 16
The authorization tickets can be downloaded in four different layouts:
• Grid View (6 per page) • List View (3 per page) • Detail View - 4 per page • Detail View - 1 per page
It is strongly recommended that you select one format and use it consistently at your school.
4. Once the PDF opens, print the authorization tickets.
5.4 Configuring Browser Settings for Caching Content and Caching Test Content
Once the sessions have been created, the test content has to be cached. In order to configure the browser settings for caching test content and then to cache test content, go to www.FLAssessments.com/TestNav8. Disregard any references to completing tasks in PearsonAccess Next; the Infrastructure Trial is managed via the Training Center.
Follow all instructions for the activities below:
• Configuring browser settings to cache test content • Caching test content
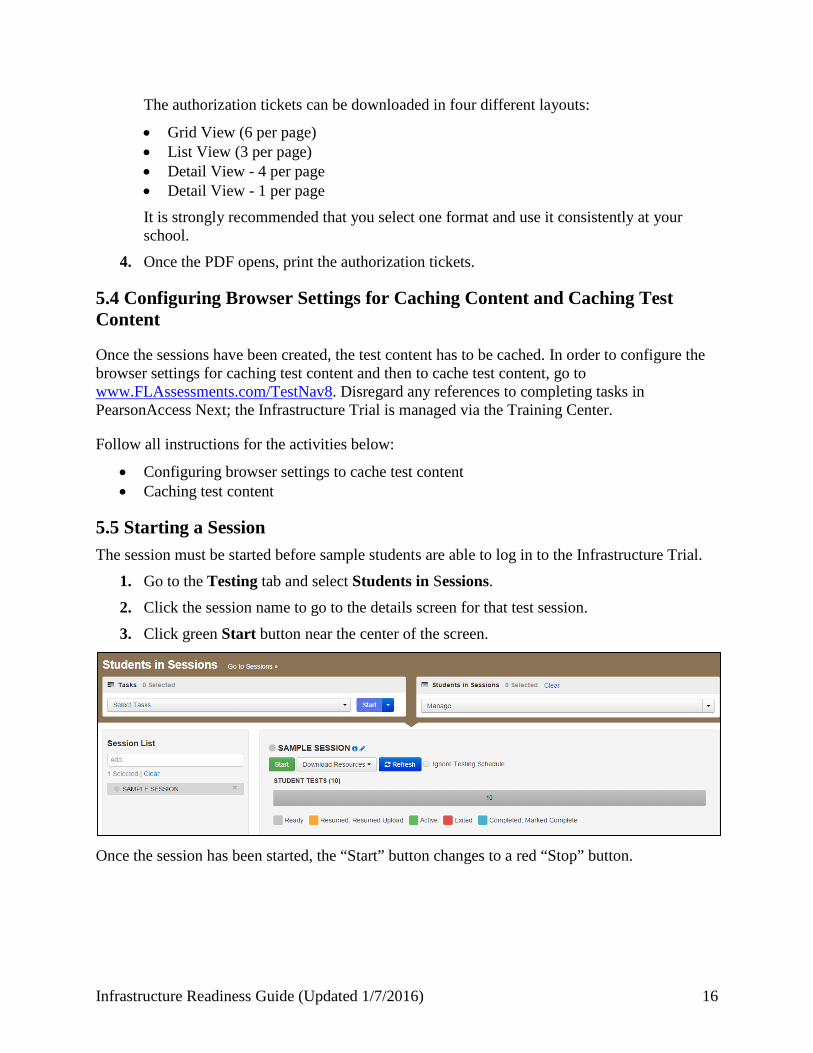
5.5 Starting a Session The session must be started before sample students are able to log in to the Infrastructure Trial.
1. Go to the Testing tab and select Students in Sessions.
2. Click the session name to go to the details screen for that test session.
3. Click green Start button near the center of the screen.
Once the session has been started, the “Start” button changes to a red “Stop” button.
Infrastructure Readiness Guide (Updated 1/7/2016) 17
5.6 Conducting an Infrastructure Trial at a School
On the day of your Infrastructure Trial, volunteers will be needed to simulate the testing process. A volunteer is not necessary for each computer, because one person can log in and navigate through the trial on multiple computers.
Volunteers should be provided with authorization tickets so they may log in on multiple computers (5–8 tickets per volunteer is recommended). Once authorization tickets have been designated for each volunteer, call the volunteers into the room.
Once the Infrastructure Trial session has been started, a volunteer must be logged in to each computer to be used for testing.
5.7 Script for the Infrastructure Trial
Note: The Infrastructure Trial is not to be used for student practice. The Infrastructure Trial uses mock content to allow districts and schools to simulate a computer-based administration for testing hardware and network connectivity prior to the operational administration.
1. Distribute the designated authorization tickets to each volunteer. Each volunteer should be provided a pen or pencil and should log any issues on the back of his or her student authorization ticket.
SAY
Thank you for participating in the Infrastructure Trial. I have provided you with a student authorization ticket and a pen or pencil. If you encounter any problems during the Infrastructure Trial, please describe the problem and state the number of times it occurred on your student authorization ticket. If the problem prohibits you from proceeding with the test, please raise your hand and I or someone else will assist you. Are there any questions? (Pause).
2. If students are used to conduct the Trial, please say the following:
SAY Please remember that the Infrastructure Trial is only for the purpose of testing our school’s infrastructure. It is not meant to introduce you to the test items or format. Practice tests called ePATs are provided to introduce you to the tools and the format of the computer-based test questions. After testing today, I can provide you with a website you can use to access a practice test. Are there any questions?
Answer any questions.
SAY
On web browsers, enter the URL in the address line exactly as shown on the authorization ticket. For tablets, mobile devices (e.g., Chromebooks, iPads), or computers with the TestNav app installed, launch the TestNav app and follow the prompts to reach the Student Sign In screen. A Sign In screen should be displayed after a few seconds. Raise your hand if you do not see the Sign In screen.

Infrastructure Readiness Guide (Updated 1/7/2016) 18
3. Assist volunteers as needed and make sure everyone is able to get to the Sign In screen.
SAY Now enter the Username and Password as shown on the authorization ticket and click Sign In.
4. The Infrastructure Trial will take a few seconds to load. Note any error messages or pop-ups that occur on student devices.
SAY Select Start Test Now, then select Start Section. You should now see the first item on your screen.
5. Assist volunteers as needed and make sure everyone is able to see the first item.
SAY Now that the Infrastructure Trial has loaded, take about 10 seconds on each item before proceeding to the next question by clicking the forward arrow at the top of the screen. Don’t bother taking time to work the questions, just mark a random answer and move on. You will see questions repeated in each section. For the purposes of this Trial, do not pay attention to the content of the questions. During the course of the Infrastructure Trial, take some time to use each tool. These include the Answer Eliminator, Bookmark, Calculator, Highlighter, Color Contrast, Magnifier, Line Reader, and Exhibits window tools. Does anyone have any questions about how to use the tools or how to navigate between questions?
6. Answer any questions.
SAY
When you reach the end of Section 1, click Submit Section, then Yes. Continue completing the items and using the tools in all the sections. When you reach the last question of Section 5, click the forward arrow. Then click Submit Final Answers and then select Yes, Submit Final Answers. Use your Student Authorization Ticket to record any additional comments about your experience and turn in your ticket. Now begin working.
7. Walk around the room and assist volunteers as needed in order to complete the Infrastructure Trial.
8. If students were used for the Trial and they are interested in accessing practice tests, direct them to www.FLAssessments.com/ePATs.
9. See the Follow-Up section for how to provide your district and Pearson with feedback on your experience in the Infrastructure Trial.

Infrastructure Readiness Guide (Updated 1/7/2016) 19
5.8 Monitoring Sessions
The following table lists the statuses that may appear for a student in the Students in Sessions page and a description of what each status indicates.
If a student logs out of the session at any point before the test is completed, the student will need to be resumed before the student can log in again. Another option is to provide the student a new, unused ticket instead of being resumed. This can be left up to the discretion of the school assessment coordinator running the Trial. A student will show as “Exited” if they have exited the session before the test is submitted. Before a session can be stopped, “Ready” students must be removed and remaining students must be either in “Completed” or “Marked Complete” status.

Infrastructure Readiness Guide (Updated 1/7/2016) 20
To Resume a Student 1. To resume a sample student, click the arrow next to the student's status and select
Resume. Only students in “Active” or “Exited” status can be resumed.
2. Once resumed, a student can login with their ticket to complete the test. The student’s
status will update in the Students in Sessions screen to an orange indicator showing they have been resumed.
5.9 After the Infrastructure Trial
Once an Infrastructure Trial has been completed, the Infrastructure Trial session can be stopped and test content can be purged from the Proctor Caching computer(s).
5.10 Stopping a Session Before a session can be stopped, remove all “Ready” students from the session. Remaining students must be either in “Completed” or “Marked Complete” status.
To remove “Ready” students from a test session: 1. Go to the Students in Sessions screen and open the Select Tasks list. Select Remove
Students from Sessions and click Start.

Infrastructure Readiness Guide (Updated 1/7/2016) 21
2. Check the box next to the student name(s).
3. Click Remove.
To mark a student's test complete (students in a status other than “Ready” or “Completed”):
1. Go to the Students in Sessions screen and open the Select Tasks list. Select Mark Student Tests Complete and click Start.
2. Check the box next to the student’s name.
3. Enter comments in the Reason text box.
4. Click Mark Complete.

Infrastructure Readiness Guide (Updated 1/7/2016) 22
Once all “Ready” students have been removed and all students are in “Completed” or “Marked Complete” status, the session can be stopped. To stop the session, click Stop at the top of the session page.
5.11 Purging Test Content
Once the Infrastructure Trial has been conducted, the test content should be purged from the proctor cache.
6.0 Follow-Up
Once your Infrastructure Trial has been completed, the computer-based testing team at the school should review all notes from the Infrastructure Trial. Follow up with Pearson Customer Support on any specific technology issues. The school should also share these notes with the district computer-based testing team. The district may also request additional confirmation that the trial has been completed successfully. Report to the district any issues that cannot be resolved with assistance from Pearson, or any comments that will help in designing future Infrastructure Trials.