tmp006evm user guide (rev. a) - アナログ, 半導体, デ … that communicates with the...
TRANSCRIPT

User's GuideSBOU109A–May 2011–Revised October 2011
TMP006EVM User Guide and Software Tutorial
This user's guide describes the characteristics, operation, and use of the TMP006EVM evaluation board. Itdiscusses how to set up and configure the software and hardware, and reviews various aspects of theprogram operation. Throughout this document, the terms evaluation board, evaluation module, and EVMare synonymous with the TMP006EVM. This document also includes an electrical schematic, printedcircuit board (PCB) layout drawings, and a parts list for the EVM.
Contents1 Overview ..................................................................................................................... 22 TMP006EVM Hardware Setup ............................................................................................ 33 TMP006EVM Hardware Overview ........................................................................................ 74 TMP006EVM Software Overview ......................................................................................... 85 TMP006EVM Software Use .............................................................................................. 11
List of Figures
1 Hardware Included with TMP006EVM Kit ............................................................................... 2
2 TMP006EVM Hardware Setup ............................................................................................ 3
3 TMP006EVM Board Block Diagram ...................................................................................... 4
4 TMP006 Test Board Schematic........................................................................................... 5
5 Typical Hardware Connection ............................................................................................. 7
6 Typical PC Behavior After Connecting TMP006EVM .................................................................. 8
7 TMP006EVM Software Installation Files................................................................................. 8
8 TMP006EVM Software Installation Launch.............................................................................. 9
9 TMP006EVM GUI Software Installation Prompts....................................................................... 9
10 TMP006EVM GUI Software Default Configuration.................................................................... 10
11 Hardware Error Message................................................................................................. 11
12 Read All Registers to Update Temperature............................................................................ 12
13 Make Changes to TMP006 Registers .................................................................................. 13
14 Write Changes to TMP006 Registers................................................................................... 14
15 TMP006EVM GUI Software Registers Tab ............................................................................ 15
16 Read Registers Continuously to Update Graphs...................................................................... 16
17 Enable Transient Correction Algorithm ................................................................................. 17
18 Start Data Logging ........................................................................................................ 18
19 Example .CSV Output File (Formatted and Displayed in Microsoft Excel®) ....................................... 19
List of Tables
1 TMP006EVM Kit Contents ................................................................................................. 2
2 TMP006 Test Board Parts List ........................................................................................... 6
3 Signal Definitions for H1 (10-Pin Female Socket) on TMP006EVM Board ......................................... 6
4 Signal Definition for H2 (10-Pin FFC Connector) on TMP006EVM Board .......................................... 7
Excel, Microsoft, Windows are registered trademarks of Microsoft Corporation.SPI is a trademark of Motorola Inc.I2C is a trademark of NXP Semiconductors.All other trademarks are the property of their respective owners.
1SBOU109A–May 2011–Revised October 2011 TMP006EVM User Guide and Software TutorialSubmit Documentation Feedback
Copyright © 2011, Texas Instruments Incorporated

Overview www.ti.com
1 Overview
The TMP006 is an infrared thermopile sensor with digital output integrated circuit. This device measuresthe temperature of an object without making contact, making it ideal for many types of applications. TheTMP006EVM is a platform for evaluating the performance of the TMP006 under various conditions. TheTMP006EVM consists of two PCBs. One board, the SM-USB-DIG, communicates with the user’scomputer, provides power, and sends and receives appropriate digital signals to communicate with theTMP006. The second PCB, the TMP006_Test_Board, contains the TMP006 as well as support andconfiguration circuitry. This document gives a general overview of the TMP006EVM, and provides ageneral description of the features and functions to be considered while using this evaluation module.
1.1 TMP006EVM Kit Contents
Table 1 summarizes the contents of the TMP006EVM kit. Figure 1 shows all of the included hardware.Contact the Texas Instruments Product Information Center nearest you if any component is missing. It ishighly recommended that you also check the TMP006 product folder on the TI web site at www.ti.com toverify that you have the latest versions of the related software.
Table 1. TMP006EVM Kit Contents
Item Quantity
TMP006_Test_Board 1
SM-USB-DIG Board 1
USB Cable 1
CR-ROM with TMP006EVM GUI Software (not shown) 1
Figure 1. Hardware Included with TMP006EVM Kit
2 TMP006EVM User Guide and Software Tutorial SBOU109A–May 2011–Revised October 2011Submit Documentation Feedback
Copyright © 2011, Texas Instruments Incorporated
www.ti.com TMP006EVM Hardware Setup
1.2 Related Documentation from Texas Instruments
The following documents provide information regarding Texas Instruments' integrated circuits used in theassembly of the TMP006EVM. This user's guide is available from the TI web site under literature numberSBOU109A. Any letter appended to the literature number corresponds to the document revision that iscurrent at the time of the writing of this document. Newer revisions may be available from the TI web site,or call the Texas Instruments' Literature Response Center at (800) 477-8924 or the Product InformationCenter at (972) 644-5580. When ordering, identify the document by both title and literature number.
Related Documentation
Document Literature Number
TMP006 Product Data Sheet SBOS518
SM-USB-DIG_Platform User Guide SBOU0958
TMP006 Layout and Assembly SBOU108Guidelines
2 TMP006EVM Hardware Setup
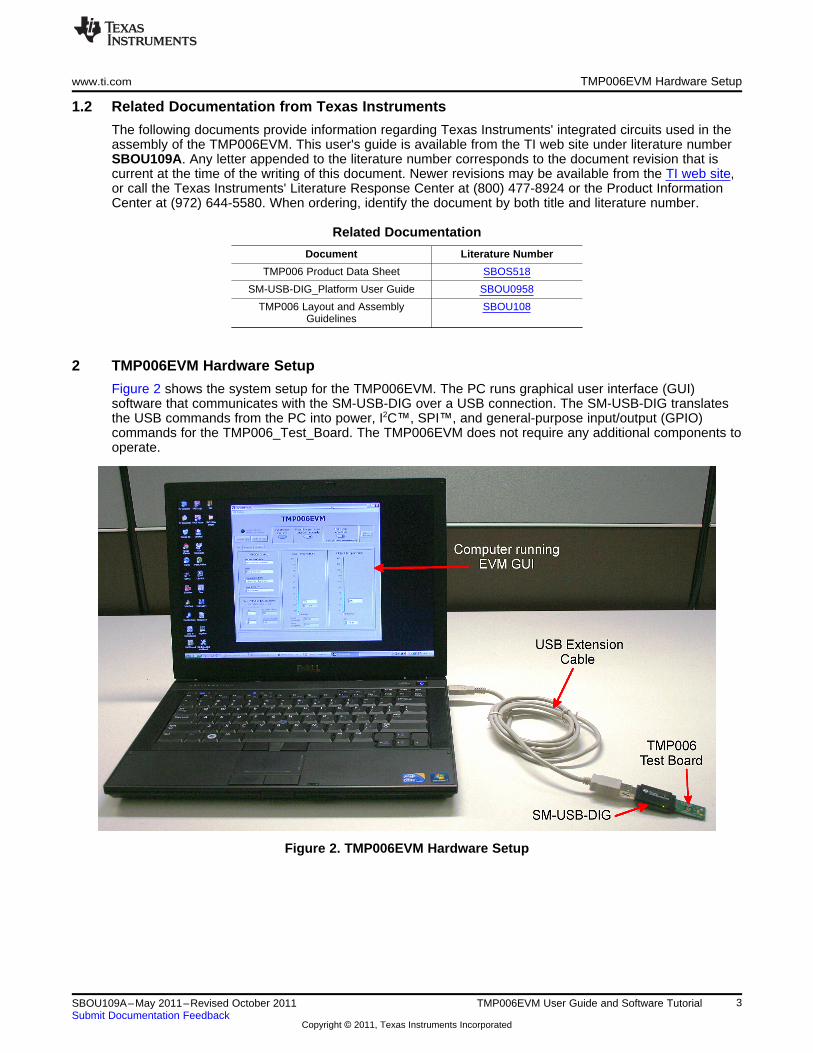
Figure 2 shows the system setup for the TMP006EVM. The PC runs graphical user interface (GUI)software that communicates with the SM-USB-DIG over a USB connection. The SM-USB-DIG translatesthe USB commands from the PC into power, I2C™, SPI™, and general-purpose input/output (GPIO)commands for the TMP006_Test_Board. The TMP006EVM does not require any additional components tooperate.
Figure 2. TMP006EVM Hardware Setup
3SBOU109A–May 2011–Revised October 2011 TMP006EVM User Guide and Software TutorialSubmit Documentation Feedback
Copyright © 2011, Texas Instruments Incorporated

TMP006
V Supply
(Switched +3.3-V Power)DUT
I C Interface2
Serial Interface (SPI)
10-Pin Female
SM-USB-DIG
Connector
DRDY
LED
Circuitry
10-Pin FFC
Cable
Connector
TMP006EVM Hardware Setup www.ti.com
2.1 Theory of Operation for the TMP006 Test Board
A block diagram of the TMP006 test board hardware setup is shown in Figure 3. The TMP006 Test Boardcontains connections for the power, I2C, SPI, and GPIO signals from the SM-USB-DIG. It also has aconnector that allows other boards to be connected to the TMP006 Test Board to assist with calibratingthe TMP006.
Figure 3. TMP006EVM Board Block Diagram
4 TMP006EVM User Guide and Software Tutorial SBOU109A–May 2011–Revised October 2011Submit Documentation Feedback
Copyright © 2011, Texas Instruments Incorporated

www.ti.com TMP006EVM Hardware Setup
Figure 4 shows the complete schematic of the TMP006 Test Board. The ferrite bead and input capacitor,FB1 and C1 respectively, filter the power coming into the TMP006 test board from the SM-USB-DIG. TheI2C pull-up resistors, R3 and R4, and the DRDY pull-up, R5, are required for the open-drain outputs tooperate correctly. The Q1 and R6 components drive the LED (D1) so current is not provided from theTMP006 that would cause the device to self-heat. Power, I2C, and SPI signals are provided to thecalibration header, H2, for use with the TMP006 calibration tools.
Figure 4. TMP006 Test Board Schematic
5SBOU109A–May 2011–Revised October 2011 TMP006EVM User Guide and Software TutorialSubmit Documentation Feedback
Copyright © 2011, Texas Instruments Incorporated

TMP006EVM Hardware Setup www.ti.com
2.2 Bill of Materials for the TMP006 Test Board
Table 2 lists the bill of materials for the TMP006EVM board.
Table 2. TMP006 Test Board Parts List
Qty RefDes Value Description Part Number MFR
1 C1 1μF Capacitor, Ceramic 1.0μF 16V X7R 10% 0603 C1608X7R1C105K TDK
1 C2 0.01μF Capacitor, Ceramic 10000pF 25V X7R 10% 0402 C1005X7R1E103K TDK
1 D1 LED Alingap Grn Wht Diff 0603SMD SML-LX0603SUGW- LumexTR
1 FB1 Ferrite Bead 300Ω .2A 0402 74279272 Wurth
1 H1 Connector, Socket 50-Pl .050 R/A Sngl 851-43-050-20- Mill-Max001000
1 H2 Connector, FPC/FFC 10-Pos .5mm Horz SMD FH12-10S-0.5SH(55) Hirose
1 Q1 MOSFET P-CH 50V 130mA SC70-3 BSS84W-7-F Diodes Inc
2 R1, R2 0Ω Resistor, 0.0Ω 1/16W 0402 SMD MCR01MZPJ000 Rohm
3 R3, R4, R5 47k Resistor, 47.0kΩ 1/16W 1% 0402 SMD MCR01MZPF4702 Rohm
1 R6 160Ω Resistor, 160Ω 1/16W 1% 0402 SMD MCR01MZPF1600 Rohm
1 U1 Infrared Sensor with Digital Interface TMP006 Texas Instruments
2.3 Signal Definition of H1 (10-Pin Female Socket)
Table 3 identifies the signals connected to the H1 connector on the TMP006 Test Board. This summaryalso identifies the signals that are used with the TMP006EVM along with the respective signal names.
Table 3. Signal Definitions for H1 (10-Pin Female Socket) on TMP006EVM Board
Used on the TMP006 Test BoardPin No. Signal TMP006EVM? Signal
1 I2C_SCL Yes SCL
2 CTRL/MEAS4 Yes DRDY
3 I2C_SDA1 Yes SDA
4 CTRL/MEAS5 No —5 SPI_DOUT1 Yes SDO
6 VDUT Yes VCC
7 SPI_CLK Yes SCLK
8 GND Yes GND
9 SPI_CS1 Yes CS
10 SPI_DIN1 Yes SDI
6 TMP006EVM User Guide and Software Tutorial SBOU109A–May 2011–Revised October 2011Submit Documentation Feedback
Copyright © 2011, Texas Instruments Incorporated

www.ti.com TMP006EVM Hardware Overview
2.4 Signal Definition of H2 (10-Pin FFC Connector)
Table 4 shows the signals connected to the H2 connector on the TMP006 Test Board.
Table 4. Signal Definition for H2 (10-Pin FFCConnector) on TMP006EVM Board
Pin No. Signal
1 SCL
2 VCC
3 SDA
4 VCC
5 SDO
6 GND
7 SCLK
8 GND
9 CS
10 SDI
3 TMP006EVM Hardware Overview
If not already assembled, the basic hardware setup for the TMP006EVM involves connecting the TMP006Test Board to the SM-USB-DIG and then connecting the USB cable. This section presents the details ofthis procedure.
3.1 Electrostatic Discharge Warning
CAUTION
Many of the components on the TMP006EVM are susceptible to damage byelectrostatic discharge (ESD). Customers are advised to observe proper ESDhandling precautions when unpacking and handling the EVM, including the useof a grounded wrist strap at an approved ESD workstation.
3.2 Typical TMP006EVM Hardware Setup
Connect the right-angle female socket (H1) on the TMP006 Test Board to the right-angle male header(H2) on the SM-USB-DIG. Take special care to ensure that the two 10-pin sockets directly align with eachother. Plug the female USB-A cable to the SM-USB-DIG and then plug the male USB-A cable into thecomputer.
Always connect the two boards together before connecting the USB cable to avoid any issues if theconnectors are misaligned.
Figure 5. Typical Hardware Connection
7SBOU109A–May 2011–Revised October 2011 TMP006EVM User Guide and Software TutorialSubmit Documentation Feedback
Copyright © 2011, Texas Instruments Incorporated

TMP006EVM Software Overview www.ti.com
Figure 6 shows the typical behavior when the SM-USB-DIG is plugged into the USB port of a PC for thefirst time. Typically, the computer will respond with a Found New Hardware, USB Device pop-up dialog.The pop-up window then typically changes to Found New Hardware, USB Human Interface Device. Thispop-up indicates that the device is ready to be used. The SM-USB-DIG uses the human interface devicedrivers that are part of the Microsoft® Windows® operating system.
Figure 6. Typical PC Behavior After Connecting TMP006EVM
In some cases, the Windows Add Hardware wizard appears. If this installation prompt occurs, allow theDevice Manager to install the human interface drivers by clicking Yes at each request to install the drivers.
4 TMP006EVM Software Overview
This section describes the installation and use of the TMP006EVM software.
4.1 Hardware Requirements
The TMP006EVM software has been tested on the Microsoft Windows XP operating system (OS) withUnited States and European regional settings. The software should function correctly on otherWindows-based OSs.
4.2 GUI Software Installation
The TMP006EVM software is included on the CD that is shipped with the EVM kit. It is also availablethrough the TMP006EVM product folder on the TI web site. To install the software to a computer, insertthe disc into an available CD-ROM drive. Navigate to the drive contents and open the TMP006EVMsoftware folder. Locate and launch the TMP006EVM installation file, setup.exe, as shown in Figure 7. It isin the Installer directory.
Figure 7. TMP006EVM Software Installation Files
8 TMP006EVM User Guide and Software Tutorial SBOU109A–May 2011–Revised October 2011Submit Documentation Feedback
Copyright © 2011, Texas Instruments Incorporated
www.ti.com TMP006EVM Software Overview
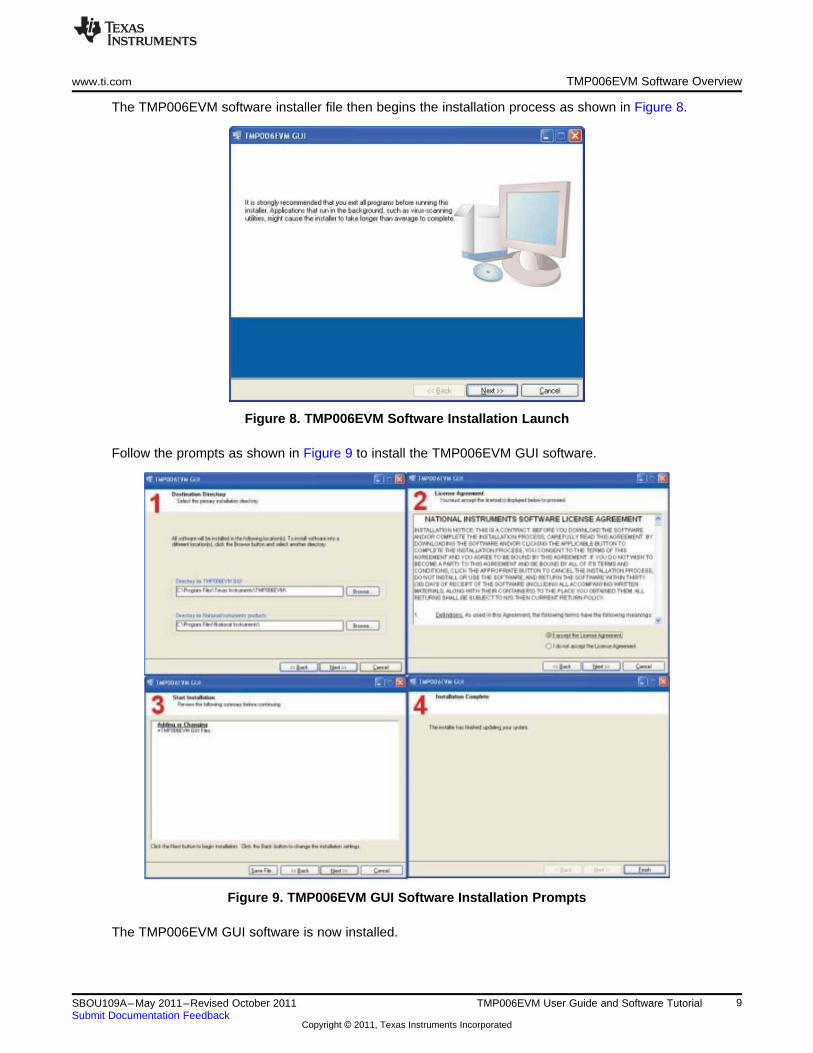
The TMP006EVM software installer file then begins the installation process as shown in Figure 8.
Figure 8. TMP006EVM Software Installation Launch
Follow the prompts as shown in Figure 9 to install the TMP006EVM GUI software.
Figure 9. TMP006EVM GUI Software Installation Prompts
The TMP006EVM GUI software is now installed.
9SBOU109A–May 2011–Revised October 2011 TMP006EVM User Guide and Software TutorialSubmit Documentation Feedback
Copyright © 2011, Texas Instruments Incorporated

TMP006EVM Software Overview www.ti.com
4.3 Launching the TMP006EVM GUI Software
With the TMP006EVM properly connected (see Figure 5), launch the EVM GUI software from the Startmenu. It is located in a folder titled, TMP006EVM GUI Installer. The software should launch with a screensimilar to that shown in Figure 10.
Figure 10. TMP006EVM GUI Software Default Configuration
10 TMP006EVM User Guide and Software Tutorial SBOU109A–May 2011–Revised October 2011Submit Documentation Feedback
Copyright © 2011, Texas Instruments Incorporated

www.ti.com TMP006EVM Software Use
If the message shown in Figure 11 appears when the TMP006EVM GUI software is launched, disconnectall components of the TMP006EVM kit, and repeat the hardware assembly instructions in Section 3.2.
Figure 11. Hardware Error Message
5 TMP006EVM Software Use
This section discusses how to use the TMP006EVM software. The TMP006EVM GUI software has aprimary window that is used to configure and read from the TMP006, along with two other windows thatare used to access different features of the TMP006. Basic GUI functionality and a description of the tabsare also presented in this section.
11SBOU109A–May 2011–Revised October 2011 TMP006EVM User Guide and Software TutorialSubmit Documentation Feedback
Copyright © 2011, Texas Instruments Incorporated

TMP006EVM Software Use www.ti.com
5.1 Reading from the TMP006
On the primary GUI window (see Figure 10), press the Read All Reg button to read the TMP006 registersand begin collecting temperature measurement data. Figure 12 illustrates this action. Raw temperatureand configuration register values can be found in the Registers tab (refer to Section 5.3).
Figure 12. Read All Registers to Update Temperature
12 TMP006EVM User Guide and Software Tutorial SBOU109A–May 2011–Revised October 2011Submit Documentation Feedback
Copyright © 2011, Texas Instruments Incorporated

www.ti.com TMP006EVM Software Use
5.2 Writing to the TMP006
To modify the TMP006 configuration register, make any desired changes on the Block Diagram tab andthen press the Write All Reg button, as shown in Figure 13.
Figure 13. Make Changes to TMP006 Registers
13SBOU109A–May 2011–Revised October 2011 TMP006EVM User Guide and Software TutorialSubmit Documentation Feedback
Copyright © 2011, Texas Instruments Incorporated

TMP006EVM Software Use www.ti.com
The Pending changes need to be written LED illuminates when there are changes that have not beenwritten to the TMP006, as shown in Figure 14.
Figure 14. Write Changes to TMP006 Registers
14 TMP006EVM User Guide and Software Tutorial SBOU109A–May 2011–Revised October 2011Submit Documentation Feedback
Copyright © 2011, Texas Instruments Incorporated

www.ti.com TMP006EVM Software Use
5.3 Registers Tab
In this tab, you can select any row in the Register table by clicking on it with your mouse. When a row isselected, it becomes highlighted in blue in the table. The individual 16 bits in the selected register aredisplayed below the Register table. Note that each bit has descriptive text above the bit that identifies thefunction of the bit. You can edit the bit value using the up (↑) or down (↓) arrow to the left of the bit. Anychanges on the bit are displayed in the table and in the block diagram. Additionally, any changes in theblock diagram are reflected in the table.
The Help w Reg button can be pressed to see detailed help about the register that is currently selected.This feature gives detailed information regarding the meaning of each bit. The Registers tab on theTMP006EVM GUI software is illustrated in Figure 15.
Figure 15. TMP006EVM GUI Software Registers Tab
15SBOU109A–May 2011–Revised October 2011 TMP006EVM User Guide and Software TutorialSubmit Documentation Feedback
Copyright © 2011, Texas Instruments Incorporated

TMP006EVM Software Use www.ti.com
5.4 Graphing Tab
The Graphing tab allows you to graph the temperature sensor results. To start the graphing process, youmust press the Read Continuous button. After pressing this button, it turns green and the graph starts toupdate. Press the Read Continuous button again to turn off this function. Figure 16 shows this process.
Figure 16. Read Registers Continuously to Update Graphs
16 TMP006EVM User Guide and Software Tutorial SBOU109A–May 2011–Revised October 2011Submit Documentation Feedback
Copyright © 2011, Texas Instruments Incorporated

www.ti.com TMP006EVM Software Use
5.5 Transient Correction Algorithm
The accurate performance of the TMP006EVM is highly dependent on a stable local temperature.Degraded performance can be observed when local temperature transients are introduced into thesystem, because the infrared (IR) thermopile in the TMP006 is sensitive to conducted and radiated IRenergy from below the sensor as well as radiated IR energy that comes from above the sensor.
When the TMP006EVM experiences a local temperature transient event, the PCB temperature and theTMP006 die temperature drift apart from each other as a result of the thermal time constant of theTMP006 thermopile. This difference in temperatures causes a heat transfer between the IR sensor andthe PCB to occur. Because of the small distance between the PCB and the bottom of the sensor, this heatenergy is conducted (as opposed to radiated) through the thin layer of air between the IR sensor and thePCB below it. This conducted heat energy causes an offset in the IR sensor voltage reading, andultimately leads to unwanted temperature calculation error.
The additional error that results from local temperature transient events can be suppressed in the softwareby using a transient correction algorithm. This algorithm monitors the TMP006 die temperature over afour-second interval and uses the die temperature data to calculate a local temperature slope, as shown inEquation 1.
TSLOPE = – (0.3 × TDIE1) – (0.1 × TDIE2) + (0.1 × TDIE3) + (0.3 × TDIE4) (1)
The local temperature slope and the known thermal resistance and capacitance of the TMP006 thermopileare then applied to Equation 2 to correct the sensor voltage reading.
VOBJ_CORRECTED = VOBJ + TSLOPE × 2.96 × 10⁻⁴ (2)
The corrected sensor voltage value is then substituted for the raw sensor voltage, and the objecttemperature is calculated using the normal methods.
To enable the transient correction algorithm, simply click the Transient Correction button in theTMP006EVM GUI as shown in Figure 17. When transient correction is first enabled, a delay of fourconversions will be observed while the local temperature slope is being calculated.
Figure 17. Enable Transient Correction Algorithm
17SBOU109A–May 2011–Revised October 2011 TMP006EVM User Guide and Software TutorialSubmit Documentation Feedback
Copyright © 2011, Texas Instruments Incorporated

TMP006EVM Software Use www.ti.com
5.6 Logging Data from the TMP006EVM
The TMP006EVM software has the ability to save data collected by the TMP006 into a comma-separatedvalue (.CSV) format file. To save data in this format, select Save Temperature Data from the USBControls drop-down menu. Figure 18 shows the steps required to begin logging temperature data with theTMP006EVM.
Figure 18. Start Data Logging
18 TMP006EVM User Guide and Software Tutorial SBOU109A–May 2011–Revised October 2011Submit Documentation Feedback
Copyright © 2011, Texas Instruments Incorporated

www.ti.com TMP006EVM Software Use
Figure 19 displays an example of how the output file can appear after minimal formatting by the user.
Figure 19. Example .CSV Output File (Formatted and Displayed in Microsoft Excel®)
19SBOU109A–May 2011–Revised October 2011 TMP006EVM User Guide and Software TutorialSubmit Documentation Feedback
Copyright © 2011, Texas Instruments Incorporated

Revision History www.ti.com
Revision History
Changes from Original (May, 2011) to A Revision .......................................................................................................... Page
• Updated document to reflect new software functionality ............................................................................ 1• Revised Figure 2 for improved clarity .................................................................................................. 3• Updated Figure 4 to reflect unpopulated connector H2 ............................................................................. 5• Changed Figure 5 to reflect new SM-USB-DIG casing .............................................................................. 7• Corrected typos and updated Figure 10 through Figure 16 to reflect new software functionality ............................. 8• Added Transient Correction Algorithm section ...................................................................................... 17• Updated Figure 18 to reflect new software functionality ........................................................................... 18• Revised Figure 19 for improved clarity ............................................................................................... 19
NOTE: Page numbers for previous revisions may differ from page numbers in the current version.
20 Revision History SBOU109A–May 2011–Revised October 2011Submit Documentation Feedback
Copyright © 2011, Texas Instruments Incorporated

Evaluation Board/Kit Important Notice
Texas Instruments (TI) provides the enclosed product(s) under the following conditions:
This evaluation board/kit is intended for use for ENGINEERING DEVELOPMENT, DEMONSTRATION, OR EVALUATIONPURPOSES ONLY and is not considered by TI to be a finished end-product fit for general consumer use. Persons handling theproduct(s) must have electronics training and observe good engineering practice standards. As such, the goods being provided arenot intended to be complete in terms of required design-, marketing-, and/or manufacturing-related protective considerations,including product safety and environmental measures typically found in end products that incorporate such semiconductorcomponents or circuit boards. This evaluation board/kit does not fall within the scope of the European Union directives regardingelectromagnetic compatibility, restricted substances (RoHS), recycling (WEEE), FCC, CE or UL, and therefore may not meet thetechnical requirements of these directives or other related directives.
Should this evaluation board/kit not meet the specifications indicated in the User’s Guide, the board/kit may be returned within 30days from the date of delivery for a full refund. THE FOREGOING WARRANTY IS THE EXCLUSIVE WARRANTY MADE BYSELLER TO BUYER AND IS IN LIEU OF ALL OTHER WARRANTIES, EXPRESSED, IMPLIED, OR STATUTORY, INCLUDINGANY WARRANTY OF MERCHANTABILITY OR FITNESS FOR ANY PARTICULAR PURPOSE.
The user assumes all responsibility and liability for proper and safe handling of the goods. Further, the user indemnifies TI from allclaims arising from the handling or use of the goods. Due to the open construction of the product, it is the user’s responsibility totake any and all appropriate precautions with regard to electrostatic discharge.
EXCEPT TO THE EXTENT OF THE INDEMNITY SET FORTH ABOVE, NEITHER PARTY SHALL BE LIABLE TO THE OTHERFOR ANY INDIRECT, SPECIAL, INCIDENTAL, OR CONSEQUENTIAL DAMAGES.
TI currently deals with a variety of customers for products, and therefore our arrangement with the user is not exclusive.
TI assumes no liability for applications assistance, customer product design, software performance, or infringement ofpatents or services described herein.
Please read the User’s Guide and, specifically, the Warnings and Restrictions notice in the User’s Guide prior to handling theproduct. This notice contains important safety information about temperatures and voltages. For additional information on TI’senvironmental and/or safety programs, please contact the TI application engineer or visit www.ti.com/esh.
No license is granted under any patent right or other intellectual property right of TI covering or relating to any machine, process, orcombination in which such TI products or services might be or are used.
FCC Warning
This evaluation board/kit is intended for use for ENGINEERING DEVELOPMENT, DEMONSTRATION, OR EVALUATIONPURPOSES ONLY and is not considered by TI to be a finished end-product fit for general consumer use. It generates, uses, andcan radiate radio frequency energy and has not been tested for compliance with the limits of computing devices pursuant to part 15of FCC rules, which are designed to provide reasonable protection against radio frequency interference. Operation of thisequipment in other environments may cause interference with radio communications, in which case the user at his own expensewill be required to take whatever measures may be required to correct this interference.
EVM Warnings and Restrictions
It is important to operate this EVM within the input voltage range of 2.7V (min) to 5.5V (max) and the output voltage range of 2.7V(min) to 5.5V (max).
Exceeding the specified input range may cause unexpected operation and/or irreversible damage to the EVM. If there arequestions concerning the input range, please contact a TI field representative prior to connecting the input power.
Applying loads outside of the specified output range may result in unintended operation and/or possible permanent damage to theEVM. Please consult the EVM User's Guide prior to connecting any load to the EVM output. If there is uncertainty as to the loadspecification, please contact a TI field representative.
During normal operation, some circuit components may have case temperatures greater than +25°C. The EVM is designed tooperate properly with certain components above +25°C as long as the input and output ranges are maintained. These componentsinclude but are not limited to linear regulators, switching transistors, pass transistors, and current sense resistors. These types ofdevices can be identified using the EVM schematic located in the EVM User's Guide. When placing measurement probes nearthese devices during operation, please be aware that these devices may be very warm to the touch.
Mailing Address: Texas Instruments, Post Office Box 655303, Dallas, Texas 75265Copyright © 2011, Texas Instruments Incorporated

IMPORTANT NOTICE
Texas Instruments Incorporated and its subsidiaries (TI) reserve the right to make corrections, modifications, enhancements, improvements,and other changes to its products and services at any time and to discontinue any product or service without notice. Customers shouldobtain the latest relevant information before placing orders and should verify that such information is current and complete. All products aresold subject to TI’s terms and conditions of sale supplied at the time of order acknowledgment.
TI warrants performance of its hardware products to the specifications applicable at the time of sale in accordance with TI’s standardwarranty. Testing and other quality control techniques are used to the extent TI deems necessary to support this warranty. Except wheremandated by government requirements, testing of all parameters of each product is not necessarily performed.
TI assumes no liability for applications assistance or customer product design. Customers are responsible for their products andapplications using TI components. To minimize the risks associated with customer products and applications, customers should provideadequate design and operating safeguards.
TI does not warrant or represent that any license, either express or implied, is granted under any TI patent right, copyright, mask work right,or other TI intellectual property right relating to any combination, machine, or process in which TI products or services are used. Informationpublished by TI regarding third-party products or services does not constitute a license from TI to use such products or services or awarranty or endorsement thereof. Use of such information may require a license from a third party under the patents or other intellectualproperty of the third party, or a license from TI under the patents or other intellectual property of TI.
Reproduction of TI information in TI data books or data sheets is permissible only if reproduction is without alteration and is accompaniedby all associated warranties, conditions, limitations, and notices. Reproduction of this information with alteration is an unfair and deceptivebusiness practice. TI is not responsible or liable for such altered documentation. Information of third parties may be subject to additionalrestrictions.
Resale of TI products or services with statements different from or beyond the parameters stated by TI for that product or service voids allexpress and any implied warranties for the associated TI product or service and is an unfair and deceptive business practice. TI is notresponsible or liable for any such statements.
TI products are not authorized for use in safety-critical applications (such as life support) where a failure of the TI product would reasonablybe expected to cause severe personal injury or death, unless officers of the parties have executed an agreement specifically governingsuch use. Buyers represent that they have all necessary expertise in the safety and regulatory ramifications of their applications, andacknowledge and agree that they are solely responsible for all legal, regulatory and safety-related requirements concerning their productsand any use of TI products in such safety-critical applications, notwithstanding any applications-related information or support that may beprovided by TI. Further, Buyers must fully indemnify TI and its representatives against any damages arising out of the use of TI products insuch safety-critical applications.
TI products are neither designed nor intended for use in military/aerospace applications or environments unless the TI products arespecifically designated by TI as military-grade or "enhanced plastic." Only products designated by TI as military-grade meet militaryspecifications. Buyers acknowledge and agree that any such use of TI products which TI has not designated as military-grade is solely atthe Buyer's risk, and that they are solely responsible for compliance with all legal and regulatory requirements in connection with such use.
TI products are neither designed nor intended for use in automotive applications or environments unless the specific TI products aredesignated by TI as compliant with ISO/TS 16949 requirements. Buyers acknowledge and agree that, if they use any non-designatedproducts in automotive applications, TI will not be responsible for any failure to meet such requirements.
Following are URLs where you can obtain information on other Texas Instruments products and application solutions:
Products Applications
Audio www.ti.com/audio Communications and Telecom www.ti.com/communications
Amplifiers amplifier.ti.com Computers and Peripherals www.ti.com/computers
Data Converters dataconverter.ti.com Consumer Electronics www.ti.com/consumer-apps
DLP® Products www.dlp.com Energy and Lighting www.ti.com/energy
DSP dsp.ti.com Industrial www.ti.com/industrial
Clocks and Timers www.ti.com/clocks Medical www.ti.com/medical
Interface interface.ti.com Security www.ti.com/security
Logic logic.ti.com Space, Avionics and Defense www.ti.com/space-avionics-defense
Power Mgmt power.ti.com Transportation and Automotive www.ti.com/automotive
Microcontrollers microcontroller.ti.com Video and Imaging www.ti.com/video
RFID www.ti-rfid.com
OMAP Mobile Processors www.ti.com/omap
Wireless Connectivity www.ti.com/wirelessconnectivity
TI E2E Community Home Page e2e.ti.com
Mailing Address: Texas Instruments, Post Office Box 655303, Dallas, Texas 75265Copyright © 2011, Texas Instruments Incorporated