pdf book en v3 1 - swiftpoint · english - quick start guide. product disposal please dispose of...
TRANSCRIPT

INSTRUCTION BOOKLET
English - Quick Start Guide

Product Disposal
Please dispose of this product and packaging in a responsible manner and in accordance with any applicable local or national disposal regulations, including those governing the recovery and recycling of waste electrical and electronic equipment (WEEE).

Federal Communication Commission Interference Statement:This device complies with Part 15 of the FCC Rules. Operation is subject to the following two conditions: (1) This device may not cause harmful interference, and (2) this device must accept any interference received, including interference that may cause undesired operation.
This equipment has been tested and found to comply with the limits for a Class B digital device, pursuant to Part 15 of the FCC Rules. These limits are designed to provide reasonable protection against harmful interference in a residential installation. This equipment generates, uses and can radiate radio frequency energy and, if not installed and used in accordance with the instructions, may cause harmful interference to radio communications. However, there is no guarantee that interference will not occur in a particular installation. If this equipment does cause harmful interference to radio or television reception, which can be determined by turning the equipment off and on, the user is encouraged to try to correct the interference by one of the following measures:
- Reorient or relocate the receiving antenna - Increase the separation between the equipment and receiver - Connect the equipment into an outlet on a circuit different from that to which the receiver is connected - Consult the dealer or an experienced radio/TV technician for help
FCC Caution: Any changes or modifications not expressly approved by the party responsible for compliance could void the user’s authority to operate this equipment. This transmitter must not be co-located or operating in conjunction with any other antenna or transmitter.
Radiation Exposure Statement: The product complies with the FCC portable RF exposure limit set forth for an uncontrolled environment and is safe for intended operation as described in this manual.

Industry Canada statement:This device complies with RSS-210 of the Industry Canada Rules. Operation is subject to the following two conditions: (1) This device may not cause harmful interference, and (2) this device must accept any interference received, including interference that may cause undesired operation.
Radiation Exposure Statement:The product comply with the Canada portable RF exposure limit set forth for an uncontrolled environment and are safe for intended operation as described in this manual. Europe EU Declaration of Conformity.

0560 - Europe - EU Declaration of ConformityThis device complies with the essential requirements and other relevant provisions of the R&TTE Directive 1999/5/EC. The following test methods have been applied in order to prove presumption of conformity with the essential requirements of the R&TTE Directive 1999/5/EC:
EN 60950-1: 2006/A2:2013Information technology equipment - Safety - Part 1: General requirements
EN 62479: 2010Assessment of the compliance of low power electronic and electrical equipment with the basic restrictions related to human exposure to electromagnetic fields (10 MHz to 300 GHz)
EN 300 440-1 V1.6.1 (2010-08)Electromagnetic compatibility and Radio spectrum Matters (ERM); Short range devices; Radio equipment to be used in the 1 GHz to 40 GHz frequency range; Part 1: Technical characteristics and test methods
EN 300 440-2 V1.4.1 (2010-08)Electromagnetic compatibility and Radio spectrum Matters (ERM); Short range devices; Radio equipment to be used in the 1 GHz to 40 GHz frequency range; Part 2: Harmonized EN covering the essential requirements of article 3.2 of the R&TTE Directive
EN 301 489-1 V1.9.2: 2011Electromagnetic compatibility and Radio Spectrum Matters (ERM); ElectroMagnetic Compatibility (EMC) standard for radio equipment and services; Part 1: Common technical requirements
EN 301 489-3 V1.6.1: 2013Electromagnetic compatibility and Radio spectrum Matters (ERM); ElectroMagnetic Compatibility (EMC) standard for radio equipment and services; Part 3: Specific conditions for Short-Range Devices (SRD) operating on frequencies between 9 kHz and 246 GHz
The technical documentation as required by the Conformity assessment procedure is kept at the following address:
Swiftpoint Limited, 77 Montreal Street, Christchurch 8023, New Zealand

Gesture MouseModel: 500
0560 0560
FCC ID X8Y500IC: 9094A-500
Rating: 5V , 130mADesigned in New Zealand
Made in Chinawww.swiftpoint.com
DongleModel: 501
FCC ID X8Y501IC: 9094A-501
Rating: 5V , 130mADesigned in New Zealand
Made in Chinawww.swiftpoint.com
201-150172R 201-150190R

Quick Start Guide
USB charger/receiver
OFF
CO
NFI
G
ON
Stylus
Scroll wheelDockingpoint
Switch
Left-click (front)
Right-click(rear)
Tilt mouse upwardto engage stylus
Thumb grip
LED
Middle fingergrip (hidden)

Charging the Mouse
Connecting the Mouse via USB Receiver
1.
2.
The battery LED will flash while charging and turn off once fully charged. A full charge can take up to 90 minutes.
To begin using the mouse, move the switch on the underside to the ON position
To charge your Swiftpoint GT:
Plug the USB charger into a USB port on your computer or into a USB charging accessory
Dock the mouse onto the charger
To connect via the USB charger/receiver, plug the USB charger/receiver into a port on your computer and move the switch on the underside of the mouse from the OFF to the ON position. The mouse will automatically connect to your computer.

Connecting the Mouse via Bluetooth 4.0
Once the mouse is fully charged, you can pair it to your computer via Bluetooth 4.0.Remove the USB charger/receiver. Leave the mouse OFF for the first steps.
1. Go to Bluetooth device menu in your system settings
- Windows: Settings > Devices > Bluetooth
- MacOS: System Preferences > Bluetooth
2. Ensure Bluetooth is switched on
3. Remove any existing “Swiftpoint GT” in the list by selecting it, then selecting Remove 4. While holding down either mouse button, move the switch on the underside of the mouse to ON. The LED will flash to indicate pairing mode

Recharging
5.
If "SwiftpointGT" does not appear make sure your system supports Bluetooth 4 and it is switched on.Please note that Windows 7 does not support Bluetooth 4.0
Note: If you connect your Swiftpoint GT via Bluetooth, you can plug the USB charger/reciev-er into a USB charging accessory rather than using one of your computers USB ports.
When not using the mouse for brief periods, dock the mouse on the USB charger so it maintains a charge. The first 30 seconds of charging will give you up to one hour of use. ht gniruDof use.When not using the mouse for extended periods, move the switch on the underside of the mouse to OFF.
When “Swiftpoint GT” appears in the list of searched devices, click on the device name to install and pair with the device

Using the MouseRight click (rear)
Left click(front)
Tilt to gesture
Hold the mouse with your thumb on the thumb grip and your middle finger on the finger grip. Rest your index finger on the front button.
•
•
To middle-click, hold the front button, then click the rear button.
To go back in your browser, hold the rear button, then click the front button.
To gesture, tilt the mouse as shown to engage the stylus, then drag the stylus on the mousing surface to swipe and scroll.
To right-click, move your index finger to the rear button Use your index finger to roll the scroll wheel

To perform edge gestures, tilt the mouse to the rightto engage the stylus, and move the mouse:
Left Gesture - Drag from right to left
Right Gesture - Drag from left to Right
Up Gesture - Drag mouse forward
Down Gesture - Drag mouse backwards For the application switch
gesture, lift the stylusor release rear buttonto launch an application
*go to System Preferences | Keyboard | Shortcuts, and assign F4 to the desired application such as launchpad.
Win - Zoom inMac - Mission Control
Win - Zoom outMac - F4 Function*
Win - Application SwitchMac - Next Window
Win - Task ViewMac - Previous Window
Press andtilt mouse
Configuring the Swiftpoint GT
For OSX Users without a Mac Ready GT: First configure the mouse to operate in OS X mode:
1. Hold the stylus down, and move the mouse switch to CONFIG
2. Select Set Operating System by using the on-screen instructions
1. Open browser, click in URL box and type: www.gtconfig.swiftpoint.com
2. Move the switch on the underside of the mouse to CONFIG and follow the on-screen instructions
For Windows Users: Move the switch on the underside of the mouse to CONFIG and follow the on-screen instructions.
If the above does not open the configurator webpage:
Gesture Technology Driver (Windows 8 or above only)The Gesture Technology Driver provides inertia and spring-back behaviours, andenables additional Gestures.

Accessories Guide
Parking Spot
Dock the mouse to the parking spot when you’re not using your laptop, and it will be held in place by the magnet. You can apply the parking spot to any convenient location, including on top of the laptop. This allows you to easily carry your laptop with your mouse attached.
Peel off the adhesive backing and press the parking spot where you want to rest the mouse. The parking spot does not use an aggressive adhesive, which means you can apply it with confidence knowing that it can be removed without damaging the surface.
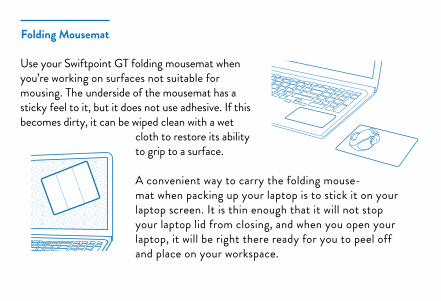
Folding Mousemat
Use your Swiftpoint GT folding mousemat when you’re working on surfaces not suitable for mousing. The underside of the mousemat has a sticky feel to it, but it does not use adhesive. If this becomes dirty, it can be wiped clean with a wet
cloth to restore its ability to grip to a surface.
A convenient way to carry the folding mouse-mat when packing up your laptop is to stick it on your laptop screen. It is thin enough that it will not stop your laptop lid from closing, and when you open your laptop, it will be right there ready for you to peel off and place on your workspace.

Shift
EnterPg Up
Pg Dn
EnterDel
Ins
End
Ctrl
Alt4
1
0
8
56
9
23
Home
Palm-Rest Mat
Travel Pouch
Use the travel pouch to store your mouse while travelling.
Remove the backing layer and apply the palm-rest mat to the area of your laptop below the keyboard. The marked on the palm-rest mat identifies a small strip of
metal hidden in the mat. The mouse will be loosely held in place here by its magnet. This is very handy when using your laptop on your lap and tilted. Instead of sliding off, the mouse is held in place near your hand when you are typing.If you turn off the laptop’s touchpad to use the Swiftpoint GT, you can put the palm-rest mat right on the touchpad so that the mouse rests between your hands when typing. Some people prefer to place the palm-rest mat to the right of their touchpad.
P

Spare Stylus Nibs
The Swiftpoint GT comes with two spare stylus nibs. You won’t be needing these for a long time, so we have put them next to a paper-clip to make it easier to find them
when you finally decide you need to replace the stylus nib. The paper-clip can also be used as a tool when replacing the stylus nib. Use the end of the paper-clip to lever out the old stylus nib. Press a replacement stylus nib into position.
Systems RequirementsHardware: Bluetooth 4 or USBOperating Systems: Windows® 7 or higher / Mac OS® 10.4 or higher / iOS 7 or higher + GT remote desktop App / Android 4.4 or higher
Ergonomic InformationRepetitive use of computers and computer peripherals such as mice and keyboards over prolonged periods may result in physical discomfort and/or injury to muscles, tendons and nerves. Such outcomes may also be due to an incorrect body posture, an unergonomic work setup, or poor work habits. If you experience any pain, swelling, stiffness, numbness or other discomfort of these in your hands, wrists, arms, neck, shoulders, back or other parts of your body while using a computer, you should immediately contact a qualified medical professional.

WarrantySwiftpoint warrants this product to be free from defects in material and workmanship for a period of five (5) years from the date of purchase. In the event that this product is found to be defective in material and workmanship, Swiftpoint shall, at its sole election, either (1) repair or replace the product, or (2) refund the purchase price, provided that the product is returned to Swiftpoint with a copy of the sales receipt or invoice. Postage charges shall be to the cost of the purchaser, unless applicable law requires otherwise. Refer to the support page at www.swiftpoint.com for product return addresses.
This warranty does not cover accidental damage, wear and tear, or use of the product in a manner other than in accordance with the instructions.
UNDER NO CIRCUMSTANCES SHALL SWIFTPOINT BE LIABLE FOR ANY CONSEQUENTIAL, INDIRECT OR INCIDENTAL LOSS OR DAMAGES INCLUDING, BUT NOT LIMITED TO, LOSS OF REVENUES, PROFITS, DATA, OR RECORDS, EVEN IF SWIFTPOINT HAS BEEN MADE AWARE OF THIS POSSIBILITY.
This warranty does not affect your statutory rights.
Patent InformationPatents pending in the United States and other countries.Features and specifications of the product and this user guide are subject to change without notice.
Microsoft and Windows 8 are either registered trademarks or trademarks of Microsoft Corporation in the United States and/or other countries. Mac OS is either a registered trademark or trademark of Apple Corporation in the United States and/or other countries. All trademarks and registered trademarks are the property of their respective owners.
User Guide version v3.1 © 2016 Swiftpoint Limited. All rights reserved.