pbcs reporting & encumbrance training guide · pbcs encumbrance tracking there are three forms...
TRANSCRIPT

Copyright University of Pittsburgh. All rights reserved.
Planning 18.06.55 PBCS Training Guide 4/29/2019 9:23:00 AM Page 1
PBCS Reporting &
Encumbrance
Training Guide

Copyright University of Pittsburgh. All rights reserved.
Planning 18.06.55 PBCS Training Guide 4/29/2019 9:23:00 AM Page 2
Table of Contents
Overview ............................................................................................................................... 3
PBCS Reporting ................................................................................................................. 3
PBCS Encumbrance Tracking ............................................................................................ 3
Navigation ............................................................................................................................. 4
Logging into PBCS ............................................................................................................ 4
Adding a Favorite or Bookmark ......................................................................................... 5
Logging out of PBCS ......................................................................................................... 5
PBCS Home Page ............................................................................................................... 6
Running Reports .................................................................................................................. 7
Reporting Hierarchy ........................................................................................................... 7
Selecting Reports ................................................................................................................ 8
Entering Report Parameters Directly.................................................................................. 8
Entering Fiscal Year and Period Parameters ...................................................................... 9
Entering Senior Officer and Responsibility Center Parameters ......................................... 10
Selecting Report Parameters from Lists ............................................................................. 11
Submitting Reports with Multiple Parameter Values ......................................................... 13
Using Drilldown Feature .................................................................................................... 14
PBCS Reports ....................................................................................................................... 17
Income Statement Reports .................................................................................................. 17
Monthly Activity Reports ................................................................................................... 19
Other Reports ..................................................................................................................... 21
Managing Encumbrance Entry Forms .............................................................................. 24
Supporting Detail ............................................................................................................... 27
Comments ........................................................................................................................... 27
Attachments ........................................................................................................................ 28
Automatic Calculation of Fringe Benefits .......................................................................... 29
Export to Excel ................................................................................................................... 29
Copyright University of Pittsburgh. All rights reserved.
Planning 18.06.55 PBCS Training Guide 4/29/2019 9:23:00 AM Page 3
Overview
The Oracle Planning and Budgeting Cloud Solution (PBCS) module is a flexible planning
application that supports enterprise-wide planning, budgeting, and forecasting in a cloud-based
deployment model. The initial phase of the implementation focused on standard reporting and
manual encumbrance tracking.
Beginning April 1, 2019, PBCS receives automated encumbrances via a daily export of purchase
order data from the PantherExpress System into PRISM. Both General Ledger (GL) data and total
encumbrances from the prior day’s activity are loaded to PBCS on a nightly basis. Please note the
timing of these processes as it may take 24 hours for PBCS to reflect the purchasing activity.
As a reminder, GL month-end closing generally happens three business days into the following
month. When running reports on the first day of the month for the prior month, not all transactions
will be posted for month-end. For example, Payroll Costing is not posted until the last day of the
closing cycle.
PBCS Reporting
There are currently three categories of reports available in PBCS: Income Statements, Monthly
Activity and Other. Income statement reports are available by entity and are designed to provide
current YTD budget, actuals, dollar and percentage variance, combined manual and automated
encumbrances and FY Total Budget. Values may be queried at the highest level (i.e., Senior Officer
or RC) or at lower levels such as department and purpose/project with drill options available for
additional details. Monthly activity reports provide queried month and prior year same month
actuals, encumbrances, and BMR activity, which are all drillable to transaction detail with one click
except for encumbrance detail. Other reports include entity 02 and 03 budget rollforwards, monthly
and YTD net asset rollforwards, and a financial aid (purpose 07xxx) report with a summary Senior
Officer version available.
Spreading annual budgets among the 12-month fiscal year has been introduced in PBCS. Income
statement reports show both the YTD Budget and FY Total Budget. YTD budget equals the
cumulative pro-rated budget (according to user’s budget spread) through report month queried. For
example, if a report is run after the March close, the YTD Budget column will equal monthly
budgets from July through March plus BMRs processed through March. The FY Total Budget will
equal the loaded budget and year-to-date BMRs. Drilling on the FY Total Budget column results in
the detail of the monthly spread. For the initial introduction of this concept, all budgets have been
spread evenly across the twelve months of the fiscal year.
PBCS Encumbrance Tracking
There are three forms available for manual entry and monitoring of automated encumbrances: Entry
(02 & 03), Entry (04 & 06) and Entry (05). The functionality of each form is separated by entity for
security and reporting purposes. The forms allow departments to manually enter and release non-PO
planned encumbrances by month for the fiscal year and provide a rollup of manual and automated
encumbrances for reporting and budget monitoring. The forms also include prior year actuals,
current year actuals, and current year-to-date budget. The total encumbrance value maintained in
these forms feeds to the Income Statement reports in PBCS.

Copyright University of Pittsburgh. All rights reserved.
Planning 18.06.55 PBCS Training Guide 4/29/2019 9:23:00 AM Page 4
Navigation
Oracle automatically sends an email from Oracle Cloud [email protected] when
your user access has been established in PBCS. However, security roles need to be assigned by
Budget & Financial Reporting (BFR) before you can log in. Please wait until BFR sends a
confirmation that your access setup has been completed. When that is received, click the Access
your Cloud Services link within the Oracle Cloud email.
Logging into PBCS
Log into PBCS using your University credentials. Select the Company Sign In button. If you are
already logged into Pitt Passport, PBCS will automatically open or you will be directed to the Pitt
Passport login.
When using the link from the Oracle Cloud email, you will be directed to the My Cloud Home page.
From there, click the planning service.

Copyright University of Pittsburgh. All rights reserved.
Planning 18.06.55 PBCS Training Guide 4/29/2019 9:23:00 AM Page 5
Navigation
Adding a Favorite or Bookmark
Once you have logged in to the Planning and Budgeting Cloud: PittPlan home page, you can create
a favorite or bookmark within your browser to save the link. By adding the favorite at this point,
you will be logged into the home page directly rather than going through the My Cloud Home page.
The favorite will appear with “EPM Cloud,” however, you can edit the name.
The following link can also be used to create a bookmark that will redirect to the PBCS home page.
https://planning-a536919.pbcs.us2.oraclecloud.com/HyperionPlanning
Logging out of PBCS
Log out of PBCS by selecting the drop down arrow next to your name in the upper right corner of
the window, then select Sign Out.
A second Sign Out window will appear, click Cancel to remain logged in to PBCS. Click OK to
continue logging out. You will then be returned to a Sign out of Oracle Cloud window, click Ok.
You must complete this to completely log out of PBCS.

Copyright University of Pittsburgh. All rights reserved.
Planning 18.06.55 PBCS Training Guide 4/29/2019 9:23:00 AM Page 6
Navigation
PBCS Home Page
Navigator
Use the Navigator menu to access functions, applications settings and preferences. Under the
Preferences link, you can manage several personal preferences such as email options, display
options and printing options. For example, in display options you can change the number formatting
such as negative number display and thousand separator.
Home
Use the Home button to quickly return to the home screen from any window.
Accessibility Settings
Use the Accessibility Settings button to apply the screen reader mode or high contrast.
Settings/Actions
Use the Settings and Actions drop down link to sign out, view the Oracle-provided help
documentation and access the Oracle Cloud Customer community.
Function Icons
Use the various function icons to access functions assigned to your role in PBCS.
Announcements
Announcement regarding the overall system will be posted in the Activity/Recent/Favorites section.

Copyright University of Pittsburgh. All rights reserved.
Planning 18.06.55 PBCS Training Guide 4/29/2019 9:23:00 AM Page 7
Running Reports
Reporting Hierarchy
In PBCS, a reporting hierarchy has been established for department values, which is called Total
Department. Total Department is the complete listing of all University departments with financial
activity since FY16. Total Department has a hierarchy of Senior Officer (SO), Responsibility Center
(RC), Reporting Group and department, with department being the lowest level. Reporting Groups
have been created based on feedback from each RC.
Reporting Groups are maintained by BFR and are only in PBCS. The department, purpose and
project values are automatically updated each evening in PBCS based on new or changed values in
PRISM. Thus, if a change is made to a department value in PRISM, when the change is loaded to
PBCS in the nightly processes, the department will be dropped from the group and be added to the
bottom of the hierarchical list. BFR monitors the changes and updates groups as required by any
PRISM changes.
If a changed department value is not in a group, it will still be moved to the bottom of the list when
the PRISM update process occurs. The system does not automatically sort the values in numeric or
alphabetic order. BFR re-sorts the departments numerically as part of its maintenance of accounts,
but it is possible that you may have to search for your department if you recently made a PRISM
change.
When using the hierarchy to select values, you will always see all departments regardless of your
assigned security. If you select a value that you do not have security access to, no data will be
returned, and you may receive an error message if all accounts selected are outside of your security
access.
If you have issues with reporting groups, would like to request a new reporting group or request
changes to an existing group in PBCS, please contact BFR via the PBCS support email,

Copyright University of Pittsburgh. All rights reserved.
Planning 18.06.55 PBCS Training Guide 4/29/2019 9:23:00 AM Page 8
Running Reports
Selecting Reports
Click the Reports icon from the home page, then select Pitt Reports. All available reports will be
displayed with three action icons for running the report: HTML, PDF and XLS.
HTML – This will create an on-line HTML version of the report that supports the
drilldown functionality.
PDF – This will create a PDF version of the report and is best for printing reports.
XLS – This will create an Excel version of the report.
When selecting the desired report version, a message window will appear stating that the report has
no POV (Point of View). This means that the report requires selection of report parameters such as
Department, Purpose, Project or Period. Click Continue to open the selection window or Back to
return to the report list.
Entering Report Parameters Directly
Each report will require selection of Members or segment values. Each report has default
parameters associated with it. For example, Entity may default to 02 – Operating and Department to
Total University. In order to select values, you must check the Edit Member Names box below the
desired parameter.
Once Edit Member Names has been selected, you can type the values directly in the box. When
entering values directly in the box, you must have the exact value of the member. For example, each
account segment member has a specified prefix as shown below. Prefix values are case sensitive.
E – Entity D – Department P – Purpose G – Project FY – Fiscal Year
E02 D01010 P24987 G704857 FY18

Copyright University of Pittsburgh. All rights reserved.
Planning 18.06.55 PBCS Training Guide 4/29/2019 9:23:00 AM Page 9
Running Reports
Below is an example of selecting a specific Entity and multiple Department numbers. If you would
like to run the report for more than one segment value, enter the exact values separated by a comma.
For example, to run a report for departments 02025 and 02024, enter ‘D02025, D02024’ in the Enter
Department box.
Entering Fiscal Year and Period Parameters
The Years parameter has been added to allow users to select prior Fiscal Years. The default value is
the current fiscal year ($CurrYr) as shown below. To select a prior fiscal year, type it directly
(FY18) as shown above, or click the Search icon to the right of the field.
To select a prior fiscal year, click the Search icon to the right of the field and select the desired FY.
Copyright University of Pittsburgh. All rights reserved.
Planning 18.06.55 PBCS Training Guide 4/29/2019 9:23:00 AM Page 10
Running Reports
When running for prior Fiscal Years, note that the Period value defaults to the current month. Thus
if the Current Month in PBCS is July, the report will show details for the selected FY JUL period
(i.e. if FY18 is selected, JUL-18 data is displayed). Update the period by directly typing it using the
format described below (e.g., MAR) if you wish to view a period other than the current.
For Period, the value is always the three digit month in capital letters and the default is always
current month ($CurrMth). This is a variable maintained by Budget & Financial Reporting. The
current month variable will be updated after the close of the month, thus on July 1, the current month
variable will still be JUN.
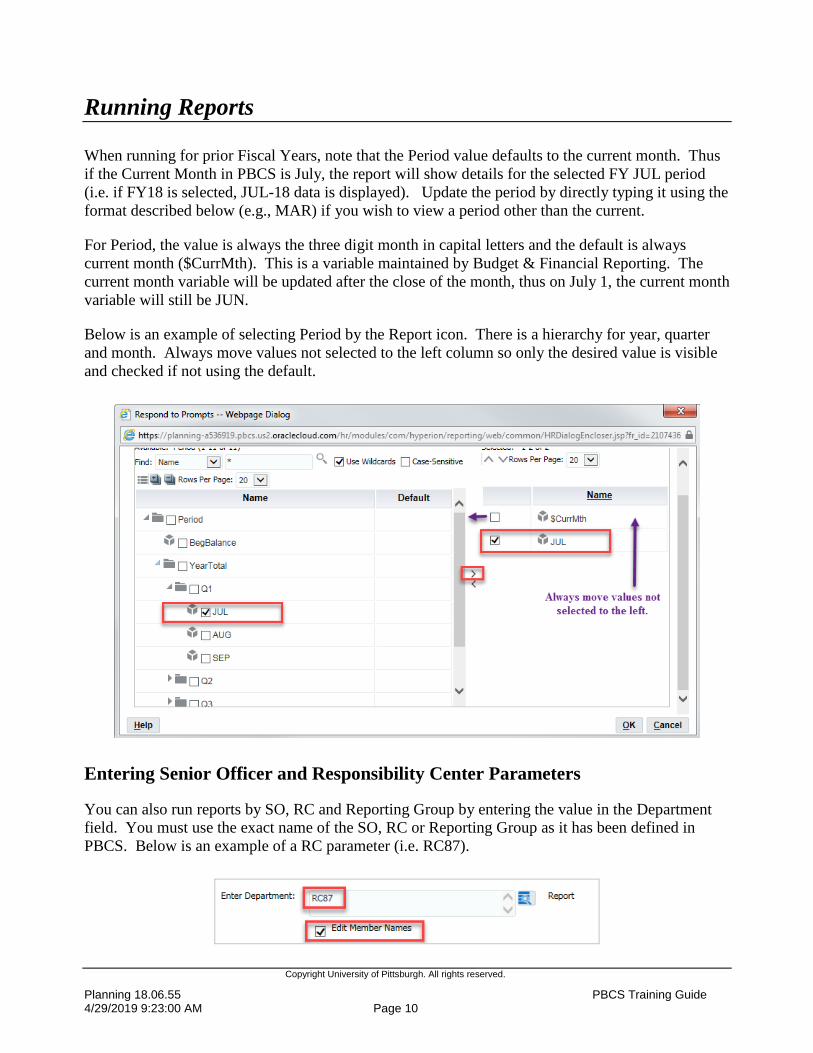
Below is an example of selecting Period by the Report icon. There is a hierarchy for year, quarter
and month. Always move values not selected to the left column so only the desired value is visible
and checked if not using the default.
Entering Senior Officer and Responsibility Center Parameters
You can also run reports by SO, RC and Reporting Group by entering the value in the Department
field. You must use the exact name of the SO, RC or Reporting Group as it has been defined in
PBCS. Below is an example of a RC parameter (i.e. RC87).
Copyright University of Pittsburgh. All rights reserved.
Planning 18.06.55 PBCS Training Guide 4/29/2019 9:23:00 AM Page 11
Running Reports
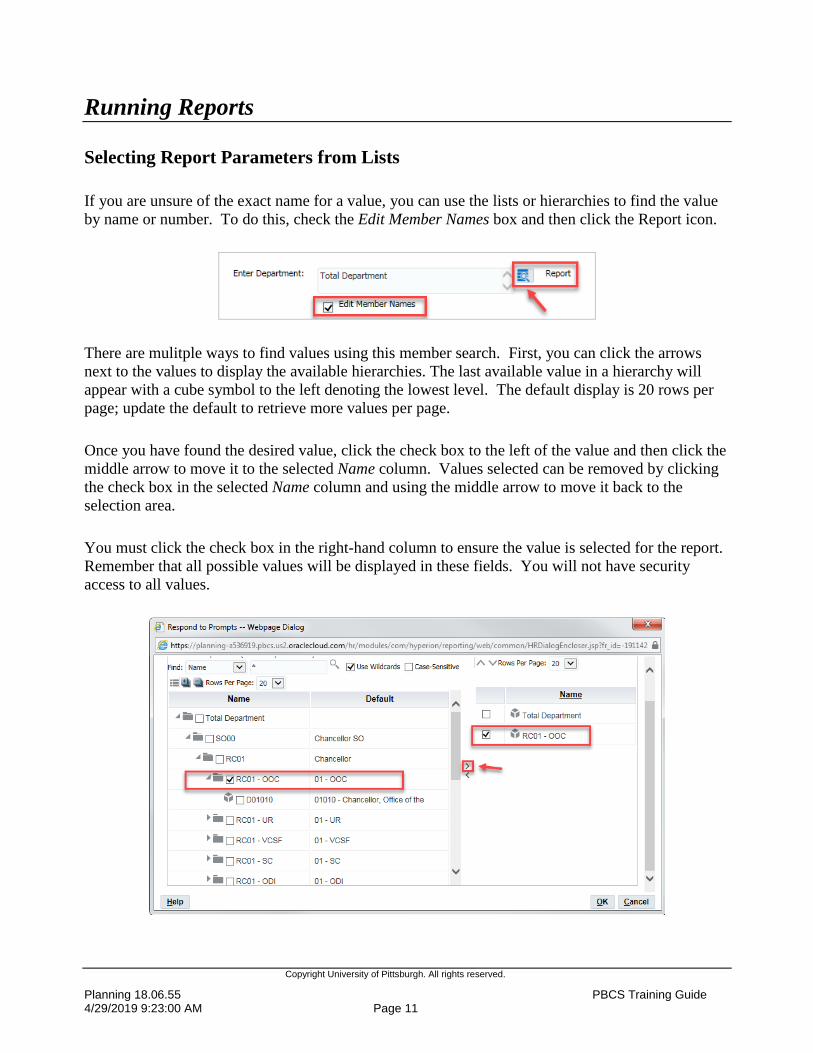
Selecting Report Parameters from Lists
If you are unsure of the exact name for a value, you can use the lists or hierarchies to find the value
by name or number. To do this, check the Edit Member Names box and then click the Report icon.
There are mulitple ways to find values using this member search. First, you can click the arrows
next to the values to display the available hierarchies. The last available value in a hierarchy will
appear with a cube symbol to the left denoting the lowest level. The default display is 20 rows per
page; update the default to retrieve more values per page.
Once you have found the desired value, click the check box to the left of the value and then click the
middle arrow to move it to the selected Name column. Values selected can be removed by clicking
the check box in the selected Name column and using the middle arrow to move it back to the
selection area.
You must click the check box in the right-hand column to ensure the value is selected for the report.
Remember that all possible values will be displayed in these fields. You will not have security
access to all values.

Copyright University of Pittsburgh. All rights reserved.
Planning 18.06.55 PBCS Training Guide 4/29/2019 9:23:00 AM Page 12
Running Reports
You can also search for values using the Find drop down box. The wildcard symbol for PBCS is *.
To search by description, select Default in the Find drop down, enter criteria using wildcards and
then click the search icon (magnifying glass). You can optionally select the Case-Sensitive check
box to make your search case sensitive. The default is not case sensitive.
The search will return all values based on your criteria. For example, if you use ‘Fin*’ to search by
Default, the results will display all description values beginning with ‘Fin’, however if you use
‘*Fin*’, the results will display all values containing ‘Fin’ anywhere in the description.
Select the desired values and click OK to return to the selection window.
Copyright University of Pittsburgh. All rights reserved.
Planning 18.06.55 PBCS Training Guide 4/29/2019 9:23:00 AM Page 13
Running Reports
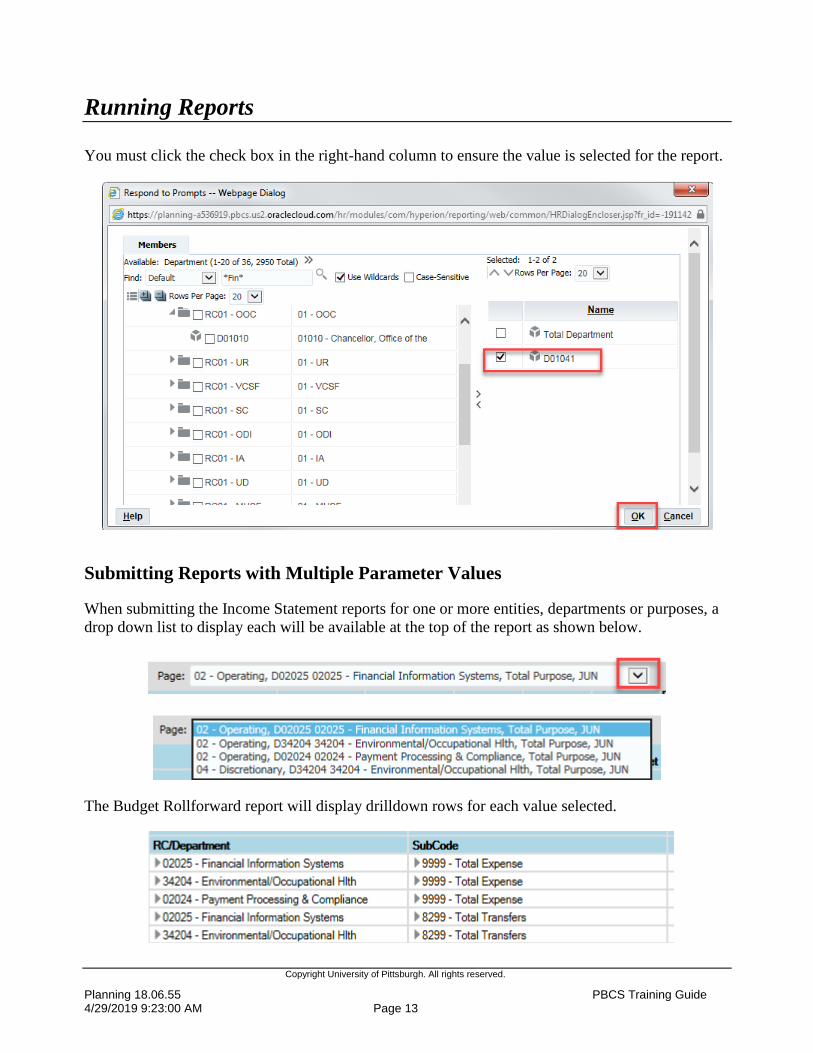
You must click the check box in the right-hand column to ensure the value is selected for the report.
Submitting Reports with Multiple Parameter Values
When submitting the Income Statement reports for one or more entities, departments or purposes, a
drop down list to display each will be available at the top of the report as shown below.
The Budget Rollforward report will display drilldown rows for each value selected.

Copyright University of Pittsburgh. All rights reserved.
Planning 18.06.55 PBCS Training Guide 4/29/2019 9:23:00 AM Page 14
Running Reports
Using Drilldown Feature
When running reports using the HTML option, drilldown functions are available. You must be at
the lowest level of the report value in order to use the drilldown capabilities. The amount will
appear with an underline indicating a drilldown is available. Remember to work from left to right
when using drilldown.
Below is an example of a report showing the lowest level and the values that are drillable. The
lowest level will not have the drilldown (triangle) symbol to the left of the value. Click on the
underlined value to initiate the drilldown.
A new window will appear with a hyperlink for the report to continue the drilldown. Click on the
report name. Depending on the report, you may continue the drilldown process through several
windows to get to GL Detail. Verify you are at the lowest level of the report when clicking the
drilldown option.

Copyright University of Pittsburgh. All rights reserved.
Planning 18.06.55 PBCS Training Guide 4/29/2019 9:23:00 AM Page 15
Running Reports
When you have drilled to the lowest level, the GL Amount Details window will be displayed. PBCS
automatically formats the data as shown below. The display cannot be modified as a default
however you can display additional details by clicking the View drop down box.
Select View – Columns – Manage Columns to select specific columns to display. Alternatively, you
can select Show All and scroll to the right to see all columns.

Copyright University of Pittsburgh. All rights reserved.
Planning 18.06.55 PBCS Training Guide 4/29/2019 9:23:00 AM Page 16
Running Reports
When in the Manage Columns window, it is recommended to use the middle arrows and Remove
All values in Visible Columns. Then use the Hidden Columns field to select the desired values by
checking the box to the left for each value and clicking Move.
Once values are in Visible Columns, they can be reordered by checking the box to the left and
selecting the arrow icons to the right of the column. Once all values have been selected, click OK.
For BMR data, be sure to show Line Description and Batch Name.
Fields with more detail than displayed will appear with … at the end. Hover over the field to see the
full description in the field.

Copyright University of Pittsburgh. All rights reserved.
Planning 18.06.55 PBCS Training Guide 4/29/2019 9:23:00 AM Page 17
PBCS Reports
Below is a summary of the standard reports we have developed in PBCS. Please refer to the
Running Reports section for specific instruction on submitting reports and navigating output.
Income Statement Reports
Income Statement (excluding 05)
Income Statement Entity 03 Auxiliary and Cost Center
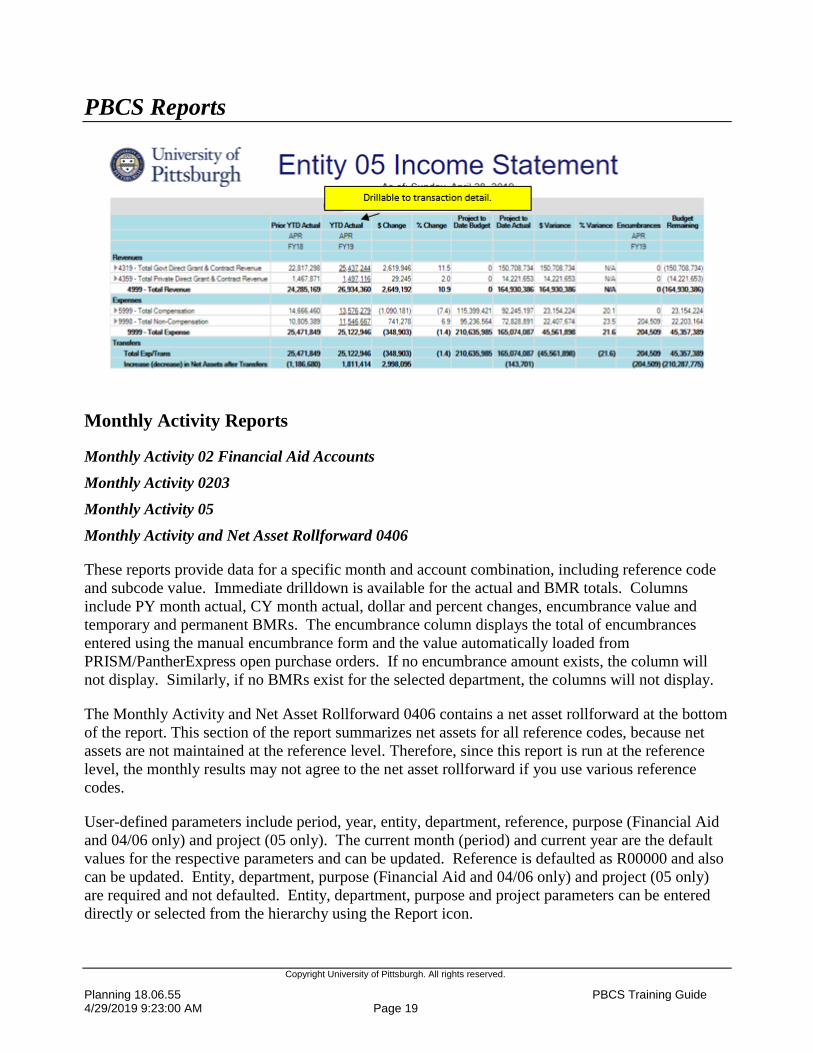
Entity 05 Income Statement
These reports include budget, actual and encumbrance totals summarized by subcode categories.
There are multiple drilldowns available within the report. Columns include current and prior YTD
actuals with dollar and percent changes, YTD budget and variance in dollars and percentage, YTD
encumbrance total, a subtotal of YTD actual and encumbrances, and the FY Total Budget. The
encumbrance column displays the total of encumbrances entered using the manual encumbrance
form plus the value automatically loaded from PRISM/PantherExpress open purchase orders. If no
encumbrance amount exists, the column will not display.
As discussed in the Overview, annual budgets have been spread evenly across the 12-month Fiscal
Year. Thus, each month is calculated as 1/12th of the loaded annual budget. Beginning with the FY
2020 budget load process, each RC may select their spread methodology from a number of options.
The YTD Budget column in the income statement reports will display this calculated value, and the
FY Total Budget column reports the annual budget. Users can drill on the FY Total Budget amount
to see the monthly spread and combined with BMRs processed in each month. The monthly budget
spread does not apply to entity 05 reports.
User-defined parameters include period, year, entity, department, purpose and project. The current
period, current year and entity (determined by report type; 02 for Income Statement - excluding 05)
are the default values for the respective parameters. To select specific parameters, click the Edit
Members box to directly enter values or click the report icon to select from the hierarchy.

Copyright University of Pittsburgh. All rights reserved.
Planning 18.06.55 PBCS Training Guide 4/29/2019 9:23:00 AM Page 18
PBCS Reports
Copyright University of Pittsburgh. All rights reserved.
Planning 18.06.55 PBCS Training Guide 4/29/2019 9:23:00 AM Page 19
PBCS Reports
Monthly Activity Reports
Monthly Activity 02 Financial Aid Accounts
Monthly Activity 0203
Monthly Activity 05
Monthly Activity and Net Asset Rollforward 0406
These reports provide data for a specific month and account combination, including reference code
and subcode value. Immediate drilldown is available for the actual and BMR totals. Columns
include PY month actual, CY month actual, dollar and percent changes, encumbrance value and
temporary and permanent BMRs. The encumbrance column displays the total of encumbrances
entered using the manual encumbrance form and the value automatically loaded from
PRISM/PantherExpress open purchase orders. If no encumbrance amount exists, the column will
not display. Similarly, if no BMRs exist for the selected department, the columns will not display.
The Monthly Activity and Net Asset Rollforward 0406 contains a net asset rollforward at the bottom
of the report. This section of the report summarizes net assets for all reference codes, because net
assets are not maintained at the reference level. Therefore, since this report is run at the reference
level, the monthly results may not agree to the net asset rollforward if you use various reference
codes.
User-defined parameters include period, year, entity, department, reference, purpose (Financial Aid
and 04/06 only) and project (05 only). The current month (period) and current year are the default
values for the respective parameters and can be updated. Reference is defaulted as R00000 and also
can be updated. Entity, department, purpose (Financial Aid and 04/06 only) and project (05 only)
are required and not defaulted. Entity, department, purpose and project parameters can be entered
directly or selected from the hierarchy using the Report icon.

Copyright University of Pittsburgh. All rights reserved.
Planning 18.06.55 PBCS Training Guide 4/29/2019 9:23:00 AM Page 20
PBCS Reports
\

Copyright University of Pittsburgh. All rights reserved.
Planning 18.06.55 PBCS Training Guide 4/29/2019 9:23:00 AM Page 21
PBCS Reports
Other Reports
Budget Rollforward Entities 02-03 – This report defaults to current FY and shows loaded budget
and YTD temporary BMRs, permanent BMRs, and ending permanent budget, and FY Total Budget.
This report has drilldown capabilities to BMR detail. If no BMRs exist for the selected
department(s), the columns will not display.
User-defined parameters include department and year. The current year is defaulted and can be
updated. To select specific department values, be sure to click the Edit Members box to directly
enter department values or click the Report icon to select from the hierarchy.
Entity 02 Financial Aid Accounts (07xxx) – This report summarizes FY Total Budget, YTD actual
and $ variance by purpose and subcode. There is no drilldown available in this report.

Copyright University of Pittsburgh. All rights reserved.
Planning 18.06.55 PBCS Training Guide 4/29/2019 9:23:00 AM Page 22
PBCS Reports
User-defined parameters include purpose, period, year, and department. Purpose is limited to
Financial Aid accounts only: they can be entered directly or selected from the hierarchy using the
Report icon. The current period and year are the default values and can be updated. The department
can be entered directly by clicking Edit Members or selecting from the hierarchy using the Report
icon.
Entity 02 SO Financial Aid Accounts (07xxx) – This report was designed for Senior Officers. If
you do not have access at an SO level, the report will not display results. This report summarizes
YTD actual, YTD budget, variances, FY Total Budget and budget remaining by RC, purpose and
subcode. There is no drilldown available in this report. This report takes several minutes to process.
User-defined parameters include department (SO level only), year and period. Department (SO) is
required and not defaulted. Enter the SO value directly or use the Report icon to select from the
hierarchy. The current year and period are defaulted and can be updated.
YTD Net Asset Rollforward 04-06 – This report summaries Net Assets at the purpose/project level.
The report includes Prior Year Ending Net Assets as of June 30th, YTD Total Revenues, YTD Total
Expenses and Transfers and Ending YTD Net Assets. There is no drilldown available in this report.
User-defined parameters include period, year, department, purpose, project and entity. The current
year and period are defaulted and can be updated. The entity, department, purpose and project
parameters can be entered directly or selected from the hierarchy using the Report icon. Entity is not
defaulted and is required.

Copyright University of Pittsburgh. All rights reserved.
Planning 18.06.55 PBCS Training Guide 4/29/2019 9:23:00 AM Page 23
PBCS Reports

Copyright University of Pittsburgh. All rights reserved.
Planning 18.06.55 PBCS Training Guide 4/29/2019 9:23:00 AM Page 24
Managing Encumbrance Entry Forms
The Encumbrance Entry forms are available for users to monitor and manage encumbrances. The
forms include non-updateable columns for prior year actuals, current year actuals, current year-to-
date budget and loaded encumbrances. Loaded encumbrances are the calculated encumbrances from
purchase orders in PRISM and PantherExpress. These are for purchase orders created after April 1,
2019. Detailed information on the POs that comprise the total can be found in the PRISM report -
FGAE138 Extract of Calculated Encumbrances By Entity and Department.
The encumbrance entry fields can support various levels of detail and supporting documents. Values
calculated in the total encumbrance fields feed to the Income Statement reports. If no encumbrances
exist in these forms, the encumbrance columns will not display in the Income Statement reports.
1. Select the Tasks icon from the home page.
2. Select the Planner drop down.
3. Select the desired encumbrance entry form. Functionality within the forms is the same, security
is applied to each by entity as designated.
Encumbrance Entry (02 & 03) – selection is available for entities 02 and 03 and any
department within your assigned security. Totals are listed by subcode, reference and
purpose.
Encumbrance Entry (04 & 06) – selection is available for entities 04 and 06 and any
purpose within your assigned department security. Totals are listed by subcode,
reference and department.
Encumbrance Entry (05) – selection is available for entity 05 and any project within your
assigned department security. Totals are listed by subcode, reference and department.
4. Once a form has been selected, the Entity and Department will be displayed in the upper left.
When entering for the first time, the department will default to the first department
number that is within your security access. After a department is selected and
encumbrances saved, the form will open the last saved department on entry.
5. To change the Department (or Entity, Purpose, Project depending on the form selected), click on
the displayed account segment value. The print is in blue indicating a hyperlink.

Copyright University of Pittsburgh. All rights reserved.
Planning 18.06.55 PBCS Training Guide 4/29/2019 9:23:00 AM Page 25
Managing Encumbrance Entry Forms
6. The Select a Member window will open. There are multiple ways to search and select the new
segment value. A blue check mark must appear to the left of the value before clicking OK.
In the Search field, you can enter the value directly with the defined prefix. For example,
to find department number 02025, type D02025 and enter to search.
Prefix values are as follows: E – Entity, D – Department, P – Purpose, G – Project
Prefix values are case sensitive.
In the Search field, you can also partially type the name or number of the segment. For
example, if you type ‘Finan’ and enter, the Results will display all matching values. You
may need to continue to drill through the account hierachies to find the desired value as
shown below.
All possible values are displayed even though you do not have security access to all
values. If an account outside your security is selected, no data will be returned.

Copyright University of Pittsburgh. All rights reserved.
Planning 18.06.55 PBCS Training Guide 4/29/2019 9:23:00 AM Page 26
Managing Encumbrance Entry Forms
7. Click OK after verifying that the blue check mark to the left of the desired account segment is
displayed and the value name is displayed beneath the Select a Member title.
8. Once the new value is selected, click the Go icon (arrow icon) to process the results for the select
segment value. This must be selected when changing values in order to update the results and
ensure data is accurate.
9. Encumbrance data can be entered and maintained in the monthly Encumbrance Input columns.
10. A numeric value can simply be added to a monthly column. When the encumbrance becomes an
actual charge to the account, the form must be manually adjusted to remove/relieve the
manually-entered encumbrance.
11. Click Save and acknowledge the save message.
Once the input is saved, the Encumbrances YearTotal value will be updated. This field is
the sum of all values manually entered in the monthly input columns (shown in the
YearTotal field) and the Encumbrance Loaded column.
The Encumbrance Loaded field is the calculated encumbrance value for POs created
since April 1, 2019. Detailed information for this total can be found in the PRISM report
- FGAE138 Extract of Calculated Encumbrances by Entity and Department
https://pre.prism.pitt.edu/wp-content/uploads/FGAE138.pdf. .
12. There are several additional methods to enter encumbrances. When in the desired field, right-
click on the field to display the options or click the Actions button. Options include Edit,
Comments, Supporting Detail, Change History and Lock/Unlock Cells.

Copyright University of Pittsburgh. All rights reserved.
Planning 18.06.55 PBCS Training Guide 4/29/2019 9:23:00 AM Page 27
Managing Encumbrance Entry Forms
Supporting Detail
13. To keep a detailed log of the manual encumbrances, use the Supporting Detail option (right –
click or Actions).
14. In the Supporting Detail window, add line details with descriptions using the Actions drop down.
The Operator column defaults to addition but can be changed to subtraction, multiplication and
division.
Add Child records to roll-up to a total for one encumbrance event.
Add Sibling records to record multiple encumbrance events
When the encumbrance is relieved, the encumbrance line can either be deleted or a new
line for subtracting the amount can be added.
15. Once all details have been added, click Save. This will close the Supporting Details window and
the field will now appear highlighted, which indicates that Supporting Detail has been created.
You must open the Supporting Detail window to edit the amount.
Comments
16. Comments can be added to any field (right –click or Actions).
17. In the Comments window, enter the desired text and click Post.

Copyright University of Pittsburgh. All rights reserved.
Planning 18.06.55 PBCS Training Guide 4/29/2019 9:23:00 AM Page 28
Managing Encumbrance Entry Forms
The Comments will be stamped with the name of the user entering the Comments and the
time that the comments were added.
Once all comments have been added, click Close. The field will now appear with a
triangle in the upper right corner indicating Comments are attached.
Attachments
18. File Attachments can be added to any field (right-click or Actions).
19. In the Attachments window, Browse to find the desired file and click Upload.
The Attachments screen will be stamped with the name of the user uploading the
attachment and the time the attachment was created.
Once all attachments have been added, click Close. The field will now appear with a box
in the upper right corner indicating attachments are loaded.
20. Always remember to save the form when changes have been made. Save will automatically
recalculate the YearTotal fields and ensure changes are not lost.

Copyright University of Pittsburgh. All rights reserved.
Planning 18.06.55 PBCS Training Guide 4/29/2019 9:23:00 AM Page 29
Managing Encumbrance Entry Forms
Automatic Calculation of Fringe Benefits
21. When entering encumbrances for salary subcodes in the 02 & 03 and 04 & 06 forms, the system
will automatically calculate the corresponding fringe benefits based on the approved non-federal
rates.
NOTE: The 05 form will not automatically calculate fringe, this must be done manually.
Export to Excel
22. Select Actions – Spreadsheet Export, to send the form data to Excel.
23. The Spreadsheet Export window will open, select Export.
24. This will open a dialog box to open the HspWbGrid.xls file.
Chose the Open with Microsoft Excel option or Save File.
Depending on your version of Excel, you may receive a warning message regarding the
format and extension, select Yes to open the file.