pawz away indoor pet barrier - o.b5z.net
TRANSCRIPT

®
www.petsafe.net
pawz away® indoor pet barrier
operating and training guide
Model Number
ZND-1200
Please reaD this eNtire guiDe before begiNNiNg

2 Customer Care Center 1-800-732-2677
Important Safety InformationExplanation of Attention Words and Symbols used in this guide
This is the safety alert symbol. It is used to alert you to potential personal injury hazards. Obey all safety messages that follow this symbol to avoid possible injury or death.
WARNING indicates a hazardous situation which, if not avoided, could result in death or serious injury.
CAUTION, used without the safety alert symbol, indicates a hazardous situation which, if not avoided, could result in harm to your pet.
NOTICE is used to address safe use practices not related to personal injury.
Not for use with aggressive dogs. Do not use this product if your dog is prone to aggressive behavior. Aggressive dogs can cause severe injury or death to their owners and others. If you are not sure that this product is right for your dog, please talk to your veterinarian or a certified trainer.
This System is NOT a solid barrier. The system is designed to act as a deterrent, using Static Correction to condition pets to remain outside of the established barrier area. It is important that you reinforce training with your pet on a regular basis. Since the tolerance level to Static Correction varies from pet to pet, Radio Systems® Corporation CANNOT guarantee that the system will in all cases keep a pet outside of the established barrier area. Not all pets can be trained to avoid entering the barrier area. Therefore, if you have reason to believe that your pet may harm himself or pose a danger to others if he is not kept from entering the barrier area, you should NOT rely solely upon this system to restrict your pet. Radio Systems® Corporation shall NOT be liable for any personal injuries, property damage, injury to or death of your pet, economic loss or any consequential damages sustained as a result of any animal entering the barrier area.

2 Customer Care Center 1-800-732-2677 www.petsafe.net 3
Proper fit of the collar is important. A collar worn for too long or made too tight on the pet’s neck may cause skin damage. Ranging from redness to pressure ulcers; this condition is commonly known as bed sores.
- Avoid leaving the collar on the dog for more than 12 hours per day.
- When possible reposition the collar on the pet’s neck every 1 to 2 hours.
- Check the fit to prevent excessive pressure; follow the instructions in this manual.
- Never connect a lead to the electronic collar; it will cause excessive pressure on the contacts.
- When using a separate collar for a lead, don’t put pressure on the electronic collar.
- Wash the dog’s neck area and the contacts of the collar weekly with a damp cloth.
- Examine the contact area daily for signs of a rash or a sore.- If a rash or sore is found, discontinue use of the collar until the
skin has healed.- If the condition persists beyond 48 hours, see your veterinarian.- For additional information on bed sores and pressure necrosis,
please visit our website.
These steps will help keep your pet safe and comfortable. Millions of pets are comfortable while they wear stainless steel contacts. Some pets are sensitive to contact pressure. You may find after some time that your pet is very tolerant of the collar. If so, you may relax some of these precautions. It is important to continue daily checks of the contact area. If redness or sores are found, discontinue use until the skin has fully healed.
You may need to trim the hair in the area of the Contact Points. Never shave the dog’s neck; this may lead to a rash or infection.
• To prevent an unintended correction, do not perform set up procedures while the Receiver Collar is on your pet.
• If you are using a collar and leash for training, be sure the extra collar does not put pressure on the Contact Points of the Receiver Collar.
To avoid damage to the transmitter do not use on wet surfaces, in damp or wet locations or around swimming pools. This product is designed for indoor use only. Do not expose to rain or snow.

4 Customer Care Center 1-800-732-2677
Thank you for choosing PetSafe® brand. You and your pet deserve a companionship that includes memorable moments and a shared understanding together. Our products and training tools promote a lifestyle of protection, teaching, and love — essentials that influence memories for a lifetime. If you have any questions about our products or training your pet, please visit our website at www.petsafe.net or contact our Customer Care Center at 1-800-732-2677.
To get the most protection out of your warranty, please register your product within 30 days at www.petsafe.net. By registering and keeping your receipt, you will enjoy the product’s full warranty and should you ever need to call the Customer Care Center, we will be able to help you faster. Most importantly, PetSafe® will never give or sell your valuable information to anyone. Complete warranty information is available online at www.petsafe.net.
Table of ContentsComponents ..................................................................................................................................5Other Items You May Need ..........................................................................................................5How the System Works .................................................................................................................6Key Definitions ..............................................................................................................................6Operating Guide .........................................................................................................................7
Install the Barrier Transmitter ....................................................................................................7Set Up the Barrier Transmitter ..................................................................................................7Test the Barrier Area .................................................................................................................8Fit the Receiver Collar on Your Pet ...........................................................................................9To Re-Thread the Collar ..........................................................................................................10Receiver Collar Batteries .........................................................................................................11
Additional Features .................................................................................................................11Time Out Feature ....................................................................................................................11Mode A, B, and AB Feature ....................................................................................................11Programming the Mode Settings............................................................................................13
Training Guide ..........................................................................................................................14Begin Your Pet’s First Session .................................................................................................14Further Training .......................................................................................................................14
Additional Information ................................................................................................................14Accessories ..................................................................................................................................15Troubleshooting .......................................................................................................................15Terms of Use and Limitation of Liability ......................................................................................16Compliance .................................................................................................................................17Customer Care International .......................................................................................................18Perchlorate Battery .....................................................................................................................18

4 Customer Care Center 1-800-732-2677 www.petsafe.net 5
Components
Barrier Transmitter(3 AA Batteries not included)
Operating andTraining Guide
(4) Barrier TransmitterGrip Pads
Test Light Tool
Receiver Collar
(2) 3-V LithiumBatteries for
Receiver Collar
®
www.petsafe.net
®
www.petsafe.net
pawz away ®
indoor pet barrier
operating and training guide
Model NumberZND-1200
PLEASE READ THIS ENTIRE GUIDE BEFORE BEGINNING
Other Items You May Need• Drill and mounting hardware• Non-metallic collar and leash• Scissors• Lighter

6 Customer Care Center 1-800-732-2677
How the System WorksThe PetSafe® Pawz Away® Indoor Pet Barrier keeps your pet away from a certain room, away from trash, off of furniture, etc. Just place the Barrier Transmitter near the area your pet should avoid. The Barrier Transmitter sends a spherical radio signal, reaching up to 12 feet in diameter or a 6 foot radius. Your pet wears a Receiver Collar with Contact Points that touch his neck. When your pet enters the Barrier Area, he’ll hear a series of audible tones from the Receiver Collar and he will feel a safe Progressive Static Correction, delivered through the Contact Points on his neck. The Progressive Static Correction will get his attention, but will not cause harm. The correction continues until your pet leaves the Barrier Area. The PetSafe® Pawz Away® Indoor Pet Barrier has been proven safe, comfortable, and effective for pets at least 6 months old and 5 pounds or more.
Key DefinitionsBarrier Transmitter: Transmits the wireless radio signal.Barrier Area: Area that you want to prevent your pet from gaining access to.Receiver Collar: Receives the radio signal from the Barrier Transmitter.Contact Points: Deliver the safe Progressive Static Correction when your pet enters the Barrier Area.Progressive Static Correction: Static correction begins at the lowest level and automatically increases to maximum within 3 seconds of first detection in the Barrier Area.
Barrier Transmitter
BarrierArea
Receiver Collar
LCDDisplayWindow Up Button
Down Button
®
www.petsafe.net
ONOFF
OPEN
Contact Points
On/Off Dial
Open Battery

6 Customer Care Center 1-800-732-2677 www.petsafe.net 7
Operating GuideInstall the Barrier TransmitterThe Barrier Transmitter emits a radio signal from all sides in a spherical pattern. The signal may transmit through a wall or the ceiling/floor. The Barrier Transmitter can be placed laying flat on a surface or hung on a wall. If you choose to hang the Barrier Transmitter, note that the signal becomes very directional—the signal will be strongest directly in front of and behind the unit. The signal is weakest to the side of the unit.
Do not:• Hang unit on a metal wall• Place Barrier Transmitter on metal surfaces• Place Barrier Transmitter near large metal objects such as refrigerators, washers, etc.• Place Barrier Transmitter near audio speakers
To keep the Barrier Transmitter in place on smooth surfaces, place the four grip pads to the bottom of the unit.
To avoid damage to the transmitter do not use on wet surfaces, in damp or wet locations or around swimming pools. This product is designed for indoor use only. Do not expose to rain or snow.
Set Up the Barrier Transmitter To prevent an unintended correction, never perform set-up procedures while
your pet is wearing the Receiver Collar.
1. Turn over the Barrier Transmitter and slide open the battery door. Install three AA alkaline batteries and replace the battery door.
2. Turn the Barrier Transmitter right side up and press the UP (+) arrow button once to turn ON the Barrier Transmitter. A black bar in the upper right hand corner of the LCD display window indicates that the Barrier Transmitter is set to mode A* (2A). A second black bar in the bottom of the LCD display indicates the range is set to one segment.
3. Each segment represents approximately two feet of diameter. You can create a Barrier Area of 2 feet in diameter up to 12 feet in diameter. Using the UP (+) and DOWN (-) arrow buttons, adjust the range to fit the desired pet Barrier Area.
2A
*All Indoor Barriers and Receiver Collars are preset to mode A. The A and B mode feature is designed to be used in multiple pet households where you may want one pet to be able to access an area while preventing access by another pet. For single pet households, you will not need to operate the Barrier Transmitter in any mode other than A. Please see the Additional Features section of this operating and training guide (beginning on page 11) for instructions on how to utilize mode A and B.
Step
1
Step
2

8 Customer Care Center 1-800-732-2677
Test the Barrier Area1. Keeping your hands away from the Contact Points,
use the edge of the Test Light Tool to turn the receiver battery door to the ON position.
2. Hold the Receiver Collar with the Contact Points facing up. Place the Test Light Tool on the Contact Points so that the wire in the Test Light Tool touches the Contact Points (3A). The PetSafe® logo on the Receiver Collar should face the Transmitter.
3. Hold the Receiver Collar at the approximate height of your dog’s neck (3B). Start outside of the range and walk slowly toward the Barrier Transmitter. As you reach the Barrier Area, the Receiver Collar emits a series of high-pitched tones. For each tone you hear, you should notice the Test Light flashing which indicates that a Progressive Static Correction is being delivered. The Receiver Collar’s tone is easily heard by dogs but may be at a volume level difficult for some humans to hear.
4. Check the range of the Barrier Area from multiple angles to ensure you are getting the desired coverage.
Note: Should you find that you are not getting the desired range at the maximum setting, move the Barrier Transmitter a few feet, or change from its standing-on-end position to laying flat. Metal objects can alter the magnetic field and change the transmitting signal range. The effect on the range depends on the size and shape of the objects. Signal range can be reduced if the Barrier Transmitter is placed on a concrete floor, due to steel reinforcement in the
3A
3B
concrete. For best range results, place the Barrier Transmitter on a nonconductive surface, i.e., wood floor or table. Placing the Barrier Transmitter beneath sofas and beds can reduce the range due to the metal springs altering the magnetic field.
Step
3

8 Customer Care Center 1-800-732-2677 www.petsafe.net 9
Fit the Receiver Collar on Your PetImportant: Proper fit and placement of your Receiver Collar is necessary for effective operation. The Contact Points must have direct contact with your pet’s skin on the underside of his neck.
Proper fit of the collar is important. A collar worn for too long or made too tight on the pet’s neck may cause skin damage. Ranging from redness to pressure ulcers; this condition is commonly known as bed sores.
• Avoid leaving the collar on the dog for more than 12 hours per day.• When possible reposition the collar on the pet’s neck every 1 to 2 hours.• Check the fit to prevent excessive pressure; follow the instructions in this manual.• Never connect a lead to the electronic collar; it will cause excessive pressure on the
contacts.• When using a separate collar for a lead, don’t put pressure on the electronic collar.• Wash the dog’s neck area and the contacts of the collar weekly with a damp cloth.• Examine the contact area daily for signs of a rash or a sore.• If a rash or sore is found, discontinue use of the collar until the skin has healed.• If the condition persists beyond 48 hours, see your veterinarian.• For additional information on bed sores and pressure necrosis, please visit our website.
These steps will help keep your pet safe and comfortable. Millions of pets are comfortable while they wear stainless steel contacts. Some pets are sensitive to contact pressure. You may find after some time that your pet is very tolerant of the collar. If so, you may relax some of these precautions. It is important to continue daily checks of the contact area. If redness or sores are found, discontinue use until the skin has fully healed.
You may need to trim the hair in the area of the Contact Points. Never shave the dog’s neck; this may lead to a rash or infection.
To assure a proper fit, please follow these steps:1. Using the edge of the Test Light Tool, turn the battery door to the
OFF position.2. Start with your pet standing comfortably (4A).3. Place the Receiver collar on your pet so that the PetSafe® logo
is facing your pet’s chin. Center the Contact Points underneath your pet’s neck, touching the skin. If your pet has a long or thick coat then it may be necessary to trim the hair around the Contact Points to make sure that contact is consistent.
4A
Note: The Receiver Collar comes with Short Contact Points. Long Contact Points are available and can be purchased through the Customer Care Center. Please see the Accessories section of this Operating and Training Guide for more information.
Step
4

10 Customer Care Center 1-800-732-2677
4. Adjust the tightness of the Receiver Collar to fit your pet’s neck. Check the tightness of the Receiver Collar by inserting one finger between the end of a Contact Point and your pet’s neck. The fit should be snug but not constricting (4B).
5. Allow your pet to wear the Receiver Collar for several minutes then recheck the fit. Check the fit again as your pet becomes more comfortable with the Receiver Collar.
6. Once you are satisfied with the fit of the Receiver Collar then you may trim any excess collar strap as follows (4C):
a. Mark the desired length of the Receiver Collar with a pen. Allow for growth if your pet is young or grows a thick winter coat.
b. Remove the Receiver Collar from your pet and cut off the excess.
c. Before placing the Receiver Collar back onto your pet, seal the edge of the cut collar by applying a flame along the frayed edge.
4B
4C
To Re-Thread the CollarSlide Buckle
Ridges
The slide buckle prevents the collar from becoming loose around your pet’s neck.
The ridges must be facing up; the collar will slip if it is not properly threaded.

10 Customer Care Center 1-800-732-2677 www.petsafe.net 11
Receiver Collar BatteriesThe PetSafe® Pawz Away® Receiver Collar uses two 3-volt Lithium coin cell batteries, size CR2032. Replacement batteries can be found at many retailers or through the Customer Care Center. Contact the Customer Care Center at 1-800-732-2677 or visit our website at www.petsafe.net to locate a retailer near you.
To replace the batteries:1. Using the edge of the Test Light Tool, turn the battery door
to the OPEN position. 2. Lift the battery door out and turn the door over. The two
3-volt Lithium coin cell batteries are stored inside the door. 3. Remove the old batteries and insert new batteries with the
positive (+) side facing the battery door lid. 4. Insert battery door back into the Receiver Collar and turn to
either the OFF or ON position to lock the door in place.
Battery life will vary depending on how often your pet tests the system and receives a Static Correction. Check the Receiver Collar and Barrier Transmitter every month to ensure the system is working properly. To prolong battery life, it is recommended that you turn the Receiver Collar and Barrier Transmitter OFF when not in use.
ONOFF OPEN
ONOFF
OPEN
OpenBattery
Additional FeaturesTime Out FeatureFor your pet’s safety, the Receiver Collar has a built in Time Out feature. If your pet stays in the Barrier Area for longer than 15 seconds the Receiver Collar will stop delivering the Progressive Static Correction. The Receiver Collar will then administer a random single Static Correction every 5 to 10 seconds at the maximum level until the pet leaves the Barrier Area. Once your pet leaves the Barrier Area, the Receiver Collar resets itself and will deliver a Progressive Static Correction the next time your pet enters the Barrier Area.
Mode A, B, and AB FeatureFor multiple pet households, additional PetSafe® Pawz Away® Receiver Collars can be purchased to work with one or more PetSafe® Pawz Away® Indoor Barrier Transmitters. You can set up an unlimited number of Barrier Transmitters in your home and an unlimited number of Receiver Collars can be used with one or more Barrier Transmitters. If you have multiple pets, you may want to allow one pet access to an area while denying access to another pet. With the purchase of additional Receiver Collars and Barrier Transmitters, you can accomplish this by using the Mode A and Mode B functions.
All PetSafe® Pawz Away® Indoor Barrier Transmitters and Receiver Collars come preset to mode A. Each Receiver Collar can operate in one of two different modes—A or B. Each Barrier Transmitter may be set to either A, B or AB mode to allow for multiple configurations.

12 Customer Care Center 1-800-732-2677
Barrier Transmitter
Barrier Transmitter
Barrier Transmitter
When the Barrier Transmitter and Receiver Collar are set to mode A, the Barrier Transmitter denies access to pets wearing a Receiver Collar programmed to mode A. Receiver Collars set to mode B will not pick up the signal from a Barrier Transmitter set to mode A.
When the Barrier Transmitter and Receiver Collar are set to mode B, the Barrier Transmitter denies access to pets wearing a Receiver Collar programmed to mode B. Receiver Collars set to mode A will not pick up the signal from a Barrier Transmitter set to mode B.
When the Barrier Transmitter is set to mode AB, the Barrier Transmitter denies access to all pets wearing the Receiver Collar, no matter which mode the receiver is programmed to.
12 Customer Care Center 1-800-732-2677 www.petsafe.net 13
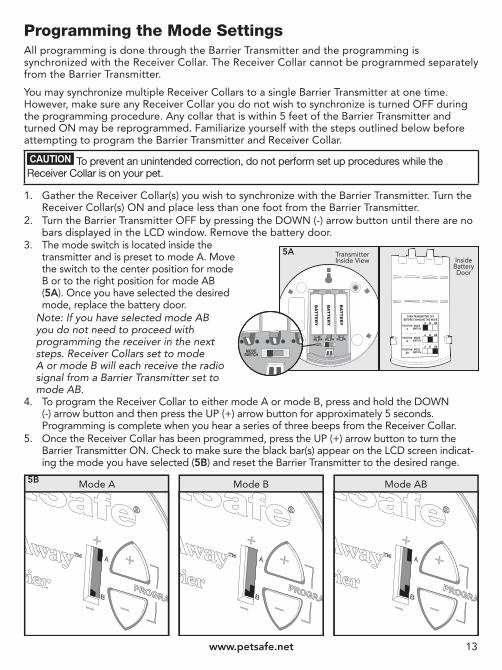
Programming the Mode SettingsAll programming is done through the Barrier Transmitter and the programming is synchronized with the Receiver Collar. The Receiver Collar cannot be programmed separately from the Barrier Transmitter.
You may synchronize multiple Receiver Collars to a single Barrier Transmitter at one time. However, make sure any Receiver Collar you do not wish to synchronize is turned OFF during the programming procedure. Any collar that is within 5 feet of the Barrier Transmitter and turned ON may be reprogrammed. Familiarize yourself with the steps outlined below before attempting to program the Barrier Transmitter and Receiver Collar.
To prevent an unintended correction, do not perform set up procedures while the Receiver Collar is on your pet.
1. Gather the Receiver Collar(s) you wish to synchronize with the Barrier Transmitter. Turn the Receiver Collar(s) ON and place less than one foot from the Barrier Transmitter.
2. Turn the Barrier Transmitter OFF by pressing the DOWN (-) arrow button until there are no bars displayed in the LCD window. Remove the battery door.
3. The mode switch is located inside the transmitter and is preset to mode A. Move the switch to the center position for mode B or to the right position for mode AB (5A). Once you have selected the desired mode, replace the battery door.
Note: If you have selected mode AB you do not need to proceed with programming the receiver in the next steps. Receiver Collars set to mode A or mode B will each receive the radio signal from a Barrier Transmitter set to mode AB.
Inside Battery Door
Transmitter Inside View
5A
4. To program the Receiver Collar to either mode A or mode B, press and hold the DOWN (-) arrow button and then press the UP (+) arrow button for approximately 5 seconds. Programming is complete when you hear a series of three beeps from the Receiver Collar.
5. Once the Receiver Collar has been programmed, press the UP (+) arrow button to turn the Barrier Transmitter ON. Check to make sure the black bar(s) appear on the LCD screen indicat-ing the mode you have selected (5B) and reset the Barrier Transmitter to the desired range.
Mode A Mode B Mode AB5B

14 Customer Care Center 1-800-732-2677
Training GuideThe PetSafe® Pawz Away® Indoor Pet Barrier operates on the principle of positive and negative reinforcement. Your pet will learn to avoid the Barrier Areas you have set after receiving a Progressive Static Correction (negative reinforcement) and your pet will learn that he is more comfortable when he avoids the Barrier Areas (positive reinforcement).
In some cases, it may not be necessary to train your pet. You can let your pet wander freely to determine the new boundaries. Monitor your pet during his first session. Pets learn at different rates and it may take several times for your pet to successfully understand and honor the Barrier Areas.
Begin Your Pet’s First Session1. Move your pet away from the Barrier Area. 2. Activate the Receiver Collar by turning the battery door to the ON position. Place the
Receiver Collar around your pet’s neck. Be sure that the Receiver is directly under your pet’s neck.
3. Allow your pet to wander freely to learn the new boundaries.
Further TrainingIf your pet is confused or unsure how to avoid the Barrier Areas then you may need to teach your pet how to do so by following these easy training steps:
1. Place a second non metallic collar on your pet ABOVE the Receiver Collar and attach a long leash.
Be sure the extra collar does not put pressure on the Contact Points of the Receiver Collar.
2. Walk your pet toward the Barrier Area. As soon as you hear the tone or you see that your pet is receiving a Static Correction, gently pull him away from the Barrier Area and back into the safe zone.
3. Reward your pet with praise each time he leaves the Barrier Area.4. Practice this technique a few times until you feel that your pet is mastering avoidance of
the Barrier Areas.
Be sure to never force or entice your pet to enter the Barrier Areas.
Additional Information• The system should only be used with healthy pets. Contact your veterinarian if you have
concerns about the medical condition of your pet (medication, pregnant, heart conditions, etc).• This system is not for vicious or aggressive pets. If your pet may pose a threat to others, DO
NOT USE THIS SYSTEM. If you are unsure if your dog is aggressive, please consult your veterinarian or a certified trainer.

14 Customer Care Center 1-800-732-2677 www.petsafe.net 15
AccessoriesTo purchase additional accessories for your PetSafe® Pawz Away® Indoor Pet Barrier, contact the Customer Care Center at 1-800-732-2677 or visit our website at www.petsafe.net to locate a retailer near you.
Component Part Number
Battery – 3 Volt Lithium (two pack - size CR2032) RFA-35-11
Replacement Strap RFA-308
Extra Receiver Collar RFA-377
Extra Barrier Transmitter ZND-1000
Replacement Short and Long Contact Points RK-17
Receiver Collar Battery Door RFA-394
TroubleshootingBarrier Transmitter does not appear to work.
•Check segment indicator on Barrier Transmitter.•Check/replace batteries in Barrier Transmitter.•Increase the Barrier Area range on the Barrier
Transmitter.•Check that the Barrier Transmitter setting corresponds
to the Receiver Collar setting. (i.e. Barrier Transmitter is set to mode A and Receiver Collar is synchronized to pick up mode A)—refer to Additional Features section beginning on page 11 for instructions.
Barrier Area range is too low. •Check/replace batteries in Receiver Collar.•Adjust Barrier Transmitter range to increase Barrier
Area size.
Barrier Area range is too high. •Adjust Barrier Transmitter range to decrease Barrier Area size.
Pet seems to receive no stimulation.
•Check/replace batteries in Receiver Collar.•Use Test Light Tool to check for static correction.•Check Receiver Collar fit to ensure Contact Points
have direct skin contact.•Check the setting on the Barrier Transmitter.
Unable to hear Receiver Collar tone.
•Check/Replace batteries in Receiver Collar.•Pets easily hear tone but it may be a volume level that
is difficult for you to hear.•Use the Test Light Tool to check Receiver Collar for
static correction.
No segments on Barrier Transmitter.
•Press the UP (+) arrow button.•Check/replace batteries in Barrier Transmitter.

16 Customer Care Center 1-800-732-2677
Terms of Use and Limitation of Liability1. Terms of Use
This Product is offered to you conditioned upon your acceptance without modification of the terms, conditions and notices contained herein. Usage of this Product implies acceptance of all such terms, conditions, and notices.
2. Proper Use This Product is designed for use with pets where training is desired. The specific temperament of your pet may not work with this Product. We recommend that you not use this Product if your pet is less than 8 pounds or if your pet is aggressive. If you are unsure whether this is appropriate for your pet, please consult your veterinarian or certified trainer.
Proper use includes reviewing the entire Guide provided with your Product and any specific Caution statements.
3. No Unlawful or Prohibited Use This Product is designed for use with pets only. This pet training device is not intended to harm, injure or provoke. Using this Product in a way that is not intended could result in violation of Federal, State or local laws.
4. Limitation of Liability In no event shall Radio Systems Corporation® be liable for any direct, indirect, punitive, incidental, special or consequential damages, or any damages whatsoever arising out of or connected with the use or misuse of this Product. Buyer assumes all risks and liability from the use of this Product.
5. Modification of Terms and Conditions Radio Systems Corporation® reserves the right to change the terms, conditions and notices under which this Product is offered.

16 Customer Care Center 1-800-732-2677 www.petsafe.net 17
ComplianceFCC/CanadaThis Class B digital apparatus complies with Canadian ICES-003. This equipment has been tested and found to comply with the limits for a Class B digital device, pursuant to Part 15 of the FCC Rules. These limits are designed to provide reasonable protection against harmful interference when the equipment is operated in a residential environment. This equipment generates, uses, and can radiate radio frequency energy and, if not installed and used in accordance with the instruction guide, may cause harmful interference to radio communications. However, there is no guarantee that interference will not occur in a practical installation. If this equipment causes harmful interference to radio or television reception, which can be determined by turning the equipment off and on, the user is encouraged to try to correct the interference by one or more of the following measures:• Relocate the interfered receiving antenna.• Increase the separation between the equipment and receiver.• Connect the equipment into an outlet on a circuit different to that to which the receiver is
connected.• Contact the Customer Care Center at 1-800-732-2677.This device complies with Industry Canada Rules. This device complies with part 15 of the FCC Rules. Operation is subject to the following two conditions: (1) This device may not cause harmful interference, and (2) this device must accept any interference received, including interference that may cause undesired operation.
Unauthorized changes or modifications to the equipment, not approved by Radio Systems® Corporation, could result in not meeting compliance with FCC regulations and could void the user’s authority to operate the equipment.
AustraliaThis device complies with the applicable EMC requirements specified by the ACMA (Australian Communications and Media Authority).

18 Customer Care Center 1-800-732-2677
Customer Care InternationalUSA & Canada - Tel: 800-732-2677Monday - Friday 8 AM - 8 PM / Saturday 9 AM – 5 PM
Australia - Tel: 1800 786 608Monday - Friday 7:30 AM - 5 PM
New Zealand - Tel: 0800 543 054Monday - Friday 10:30 AM - 7 PM
This product has the benefit of a limited manufacturer’s warranty. Details of the warranty applicable to this product and its terms can be found at www.petsafe.net and/or are available by sending a stamped addressed envelope to PetSafe® Ltd. Redthorn House, Unit 9, Chorley West Business Park, Ackhurst Road, Chorley, Lancashire PR7 1NL, United Kingdom.
Perchlorate BatteryPerchlorate Material – special handling may apply. See www.dtsc.ca.gov/hazardouswaste/perchlorate.

18 Customer Care Center 1-800-732-2677 www.petsafe.net 19

Radio Systems® Corporation10427 PetSafe WayKnoxville, TN 37932
1-800-732-2677www.petsafe.net
Protected by US Patents 7,046,152; 7,068,174; 7,117,822; 7,204,204; 7,278,376; 7,495,570.
400-1425
©2008 Radio Systems Corporation