particle size analyzer - sequoia scientific · welcome to the lisst-st particle size analyzer using...
TRANSCRIPT

User’s Manual
Version 3.0
For LISST-ST based on LISST-100X
2700 Richards Rd, Suite 107 Bellevue, WA 98005-4200 Tel: (425) 641-0944 Fax: (425) 643-0595
LISST-ST Particle Size Analyzer
This document is copyrighted by SEQUOIA SCIENTIFIC, INC. It shall not be reproduced, disclosed, or used in whole or part for any purpose other than for learning to use the LISST-ST without the specific written authorization of SEQUOIA SCIENTIFIC, INC.

Welcome to the LISST-ST Particle Size Analyzer
Using this manual This manual is divided into four sections. Section 1 contains a basic introduction to the LISST- ST instrument and the theory behind its operation. Section 2 provides a detailed set of instructions for using and caring for the instrument. Section 3 presents technical description of the method employed for estimation of settling velocity . Technical assistance To obtain technical assistance please contact your local distributor or a Sequoia Technical Service Representative listed below. Please be sure to include the serial number with any correspondence.
Factory Technical Service Representatives Chuck Pottsmith [email protected]; (425) 641-0944 ext. 107 Doug Keir [email protected]; (425) 641-0944 ext. 104
WARNING
The LISST-ST contains a laser diode emitting a maximum of 3 MW of visible (red) light at a wavelength of 670nm. The laser beam is not a threat under normal circumstances. However, if objects are placed in the path of the laser beam, light could be
reflected into the eye, causing permanent damage.

LISST - ST User’s Guide 1
Table of Contents SECTION 1: INTRODUCTION............................................................................................................ 2
SECTION 2: OPERATION ................................................................................................................... 5 2.1 INTRODUCTION............................................................................................................................. 5 2.2 GETTING STARTED ....................................................................................................................... 6 2.3 DETAILED STEP-BY-STEP PROCEDURES ..................................................................................... 14
2.3.1 Step by Step Procedure: Processing raw data files ............................................................. 15 2.3.2 Step by Step Procedure: Viewing a processed data file........................................................ 17
2.4 INSTRUMENT STORAGE & MAINTENANCE .................................................................................. 19 2.4.1 Step by Step Procedure: Replacing the Single-use alkaline Battery.................................... 20 2.4.2 Step by Step Procedure: Recharging the LEAD-ACID Motors operating Battery .............. 22 2.4.3 Step by Step Procedure: Cleaning of Optics......................................................................... 24
SECTION 3: DETAILED TECHNICAL DISCUSSIONS ................................................................ 25
SECTION 4: SIZE RANGES, AND DATA STORAGE FORMAT................................................. 27
SECTION 5: UNDERWATER CONNECTOR PINOUTS FOR LISST-ST................................... 28
SECTION 6: WARRANTY.................................................................................................................. 30
SECTION 7: APPENDIX A ................................................................................................................. 32 7.1 USING THE LISST-ST IN THE LABORATORY OR AS A LISST-100: ............................................. 32

LISST - ST User’s Guide 2
Section 1: Introduction
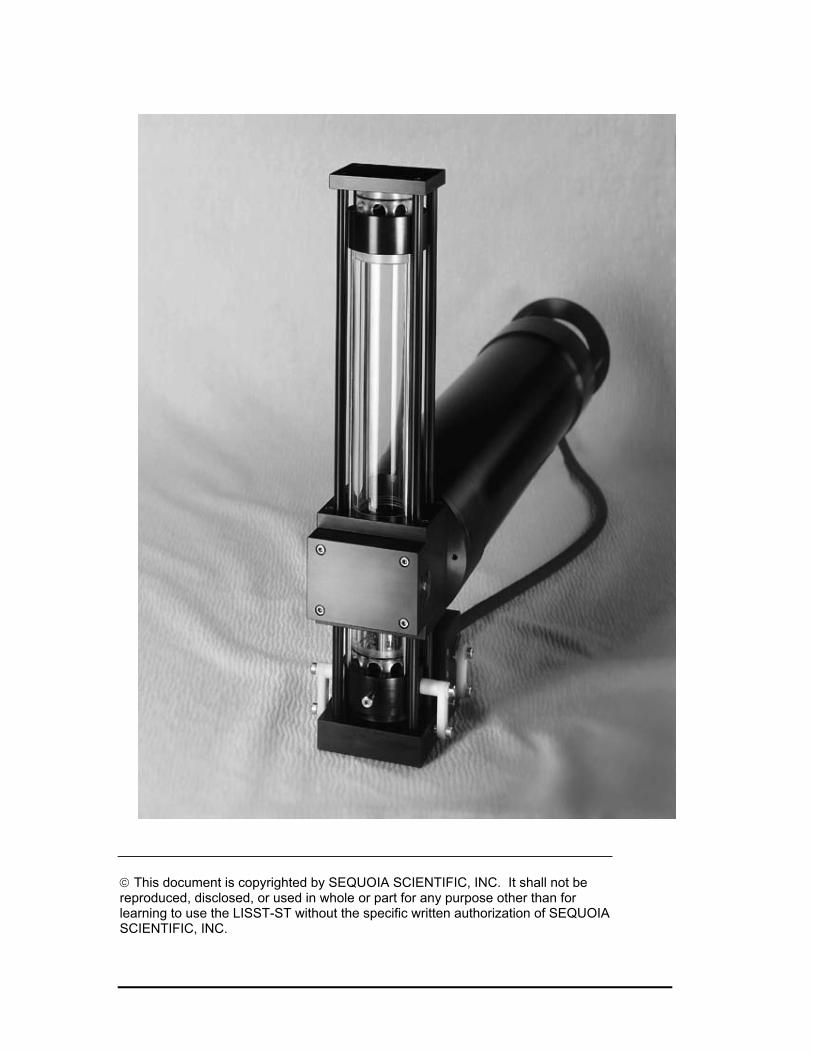
Congratulations and thank you on your purchase of the LISST-ST instrument. The LISST-ST is based on the LISST-100X particle size instrument. The addition of a settling tube allows for measurement of the settling velocity of particles in-situ. Because the instrument is very similar to the LISST-100X it can also be used for obtaining detailed size distributions in the field or in the lab when the settling tubes are removed. This instrument delivers the settling velocity for 8 size classes. Software for programming the instrument and for data analysis is provided. The LISST-ST is submersible to 200 meters. It is equipped with a data-logger and two batteries. One of the batteries is a rechargeable lead-acid type, for operating the doors of the settling column and a propeller in the column. The second is a single-use alkaline battery pack for data acquisition. The –ST is provided with cables for connecting the instrument to a computer, and also with plugs for underwater connectors, to be installed before each field use. The instrument should be used from a fixed platform, e.g. a tripod. It is important that the settling column remain within a few degrees of vertical during data acquisition. The –ST is a ruggedized precision optical instrument; users should avoid shock to the instrument in handling. In addition to its use for settling velocity measurements, upon removing the settling column, the LISST-ST can be used in the field as a LISST-100X for simply measuring the size distribution of particles. You may also use this instrument in the laboratory as a stand-alone particle analyzer, after just removing the top of the settling column. We have provided software that lets you choose to operate the instrument in any of these 3 modes: as an – ST, -100, or in the laboratory. Actual instructions for converting the LISST-ST into a LISST-100X or a laboratory use device are included in Appendix A. The LISST-100X manual is also provided for those using the –ST instrument as a –100X or laboratory particle size analyzer. For all of these applications, we have also provided software for collecting and downloading data to a PC, and for subsequent analysis. In some applications, upon request by a user, a Path Reduction Module (PRM) is provided. This device permits operations in higher turbidity environments. After each deployment, this Plug should be removed and cleaned. Please refer to section 2.4.3. The LISST-ST, due to its enclosed Settling Column is susceptible to fouling of the optical windows. The procedure for cleaning the PRM and windows is presented in section 2.4.3. We strongly recommend that you do a quick scan of the manual before attempting to use the instrument.

LISST - ST User’s Guide 3
Background: In sediment transport studies, the main parameters of interest are: size distribution of suspended sediments, concentration, and the settling velocity of the different size classes present in the water column. The LISST-ST instrument measures the size distribution, concentration and settling velocity distribution (also called settling velocity spectrum). The instrument covers a 200:1 size dynamic range, from 1.25-250 microns (Type B), or 2.5-500 microns (Type C). Settling velocity is estimated for 8 log-spaced size classes in the same size range. See Section 4 for size class definitions. The measurement is made by trapping a sample of water and observing the time evolution of the suspended particle size distribution near the bottom of a settling column. The time after which a size class is no longer present in the settling column is used to estimate the settling velocity of that size class. The measurement of size distribution is done with laser diffraction (also called laser multi-angle scattering), as in the LISST-100X manufactured by Sequoia Scientific, Inc. Briefly, laser diffraction works as follows: a collimated laser beam illuminates suspended particles. Scattering at multiple angles is measured by a specially made silicon detector, stored in a computer, and later inverted on a PC to obtain size distribution. The scattering is inverted mathematically to obtain the size distribution. In the modern LISST series instruments, scattering is measured over a 200:1 dynamic range of angles, from 0.1 to 20 degrees (Type B) or from 0.05 to 10 degrees (Type C). In addition to measuring the scattered light, optical transmission of the laser beam is also recorded. Thus, the LISST-ST has a built-in transmissometer. The settling column on the LISST-ST has two moving parts: a pair of coupled sliding doors at the top and bottom of the settling column, and an internal propeller (these are operated by the rechargeable battery). To obtain a new sample in-situ, the doors are opened and the propeller is powered. As the flow velocity is established, the propeller is stopped after 5 seconds of operation. For a brief period of a few seconds, flow continues due to inertia. Four more seconds after the propeller is stopped and the doors are closed. The actual closing of the doors takes about 100 msec. At this time, the settling experiment begins. The largest particles fall through the column quickly, followed by successively smaller size classes. The multi-angle scattering is recorded throughout, on a quasi-logarithmic time schedule. As the smallest (1-micron) particles fall very slowly a settling experiment should allow ~24 hours to complete. This is the default duration of each settling experiment. Other durations are possible. However, shorter experiments will lose some information about the smallest sizes. At the end of a settling experiment, the propeller is turned on. This produces vigorous turbulence to re-suspend the settled particles. After a few more seconds, the doors are then opened and the old sample water is flushed out. A new sample is then drawn in and another experiment begins. The data-logger in the instrument not only records the multi-angle scattering data, it also controls the autonomous operation of the settling

LISST - ST User’s Guide 4
experiments. It is programmable. The start condition, length of a settling experiment, delay between settling experiments, can all be changed. Software is provided for communicating with the instrument and for processing raw data into size and settling velocity information. Technical specification of the LISST-ST. • Parameters measured/derived size distribution settling velocity optical transmission pressure temperature • Optical path length: 5 cm standard, 2.5 cm optional with Path
Reduction Module (PRM) • Optical transmission: 12 bit resolution • Particle size range: 1.2 - 250 micron diameter (Type B), 2.5-500
micron for Type C. • Resolution (for settling velocity): 8 size classes, log-spaced • Maximum sample speed: 1 size distribution per second (standard) • Temperature-sensor range: -10 to 45oC resolution: 0.01o C • Pressure-sensor range: 0 to 300 m of H2O, resolution: 8 cm of H2O • Dimensions: 13 cm (5") dia x 81 cm (32") • Weight in air: 12 Kg (25 lb) • Weight in water: 4 Kg (8.5 lb) • Depth rating: 200 m (standard)

LISST - ST User’s Guide 5
Section 2: Operation 2.1 Introduction
This section is organized into four major sub-sections: Getting Started, Field Deployment, Detailed Step-by-Step Procedures and Troubleshooting. The Getting Started and Field Deployment Procedures sections provide a tutorial to learning the operation of the LISST-ST. Detailed instruction for specific operations and maintenance are also provided.
Handling and Field Use: 1. Whenever not in the shipping box, the instrument should be
stored on a shelf using the provided white plastic blocks.
2. The LISST-ST must be mounted on a fixed platform such as a tripod. Motion may disturb the settling experiments. The instrument must be mounted with the settling column in a vertical orientation. The longest part of the column assembly should be on top.
3. Do not lift the instrument by the settling column assembly. The assembly is mounted to the optics block of the instrument. Severe handling can cause misalignment of the optics. Lift the instrument by the ring protecting connectors on the back endcap, or by the pressure case only.
4. Always rinse the instruments with clean fresh water after each deployment. Also, after each long-term deployment, it is likely that sediment will adhere to the inside of the settling column. Clean inside of settling tube thoroughly after each deployment.

LISST - ST User’s Guide 6
2.2 Getting Started
Contents of shipping case A Note before starting
This section includes step by step instructions to unpack, load software, and acquire test data in the lab.
Following this section are detailed instructions for preparing the instrument for a field deployment.
When opening the LISST-ST shipping cases for the first time, you will find the following inside:
1. LISST-ST main instrument housing in gray box. 2. LISST-ST Settling Column in black box. 3. LISST-ST and LISST-100X User’s Manual 4. Software CD 5. Plastic Instrument stands 6. Communications cable 7. Allen wrench set 8. Spare alkaline battery 9. Battery Charger
The LISST-ST is at its core a LISST-100X. Much of the basic operation such as establishing communication and downloading save data are exactly the same as the LISST-100X. The Getting Started section below will refer to procedures covered in detail in the LISST-100X Getting Started Section. Therefore it is recommended that the user read through the LISST-100X Users Guide first before reading the LISST-ST Getting Started section.
Step 1: Remove Instrument from shipping case.
Start by removing the white plastic instrument stands and set them on a flat working surface. Remove the LISST-ST from its case and set it on the stands. The LISST-ST has two distinct ends that we will refer to as the Optics endcap and the Connector endcap. The connector endcap has three underwater connectors that are used for communication, external power, and connection of the door and mixing motors (Section 5 shows pinouts). The battery pack is mounted to the inside of this endcap. The optics block contains the transmission optics, and provides a firm base for mounting the settling column. The optics endcap contains an optical window through which the laser beam and scattered light enters the receiving optics. The internal optics and electronics are mounted to the inside of this endcap.

LISST - ST User’s Guide 7
Step 2: Install settling tube assembly onto LISST-ST
The LISST-ST is shipped with the settling tube assembly removed from the main body of the instrument. This reduces the size of the shipping box required and reduces the chance of damaging the instrument during shipping. To install the settling tubes follow the detailed instructions in Appendix B.
Step 3: Attach the Communications Cable and Motor Cable
Remove the Communications cable from the shipping crate. It is the cable with the 9-pin DB-9 connector on one end and a 5-pin underwater connector on the other. Remove the underwater cap from the Communications connector. The connectors will all look similar. The Communication connector is the only 5-pin connector. If the unit is rotated so that the metal zinc anode is located at the top (or North), the Communications connector will be on the left (or West). After removing the cap, connect the comm. cable making sure that the proper alignment of pins is maintained during mating. The instrument is shipped with a 6-pin cable for connecting the endcap to the motor assembly on the optics block. This cable must also be connected at this time.
Step 4: Install the provided LISST-100X and LISST-ST software
At this point the instrument is ready to go. Next, prepare the PC. A software disk is included with each instrument. In addition to the communication and processing programs, the disk also contains calibration files specific for your instrument. Follow the installation instructions on the README.TXT file to install all of the software on your PC.
Step 5: Start LISST.EXE program
Two different programs are used on the PC with the LISST-ST. They are LISST.EXE and LISST-ST.EXE. LISST.EXE is the standard LISST-100X program that allows you to communicate with the data-logger inside the LISST-ST. It has a terminal window for communicating with the data-logger and is also used to download data. The LISST-ST.EXE program is used to process downloaded data files, and display the particle size and settling velocity results. First, you will use the LISST.EXE program. Start this program by double clicking its icon or starting it from the Start menu. Note: It is recommended that LISST-ST users become familiar with the basic operation of the LISST-100X through the LISST.EXE program before working with the LISST-ST. A basic understanding of the general procedures are assumed for the purposes of this Getting Started section.

LISST - ST User’s Guide 8
Step 6: Wake up instrument from low power Sleep mode
The LISST-ST is shipped in a low power sleep mode to reduce the drain on the internal battery pack. To wake the instrument from this low power mode, press the Wake Up Instrument button or the “Wake UP LISST” option of the LISST menu. See the LISST-100X User’s guide for more details on this procedure.
Step 7: Running the Door operating motor with TM command
Beginning in July 2005, all new LISST-ST instrument are based on the LISST-100X. A special firmware is loaded on the LISST-ST that allows the operation of both the LISST-100X and LISST-ST functions. In addition to all the standard LISST-100X two letter command, two new LISST-ST commands have been added. They are TM and SE. TM is short for Test Motors and the SE is short for Settling Experiment. The SE command is discussed later. The TM command is discussed below.
The Test Motors (TM) two letter command can be used to test the operation of the sliding doors and mixing propeller.
WARNING: A high torque motor drives the sliding doors of the settling tube. KEEP FINGERS AND OTHER OBJECTS AWAY FROM THE DOORS AND LINKAGE WHILE OPERATING THE DOOR MECHANISM. The settling tube assembly should only be operated with the instrument in a vertical orientation with the settling tube installed on the LISST-ST.
The TM command is used to test the door and mixing motor functions. To transmit the two letter command open the terminal window of the LISST-100X software, LISST.EXE. The instrument should respond with a L100X> prompt. Type TM in the command box and press enter. A prompt will appear asking which operation to do. Entering 0 will cause the doors to close. Entering 1 will cause the doors to open. Entering 2 will cause the mixer to run for 5 seconds. The TM command can also be issued with the desired operation as one command such as TM 2. Note that there must be a space between the TM and command number. After executing the operation the L100X> prompt will be displayed. Execute multiple operations as desired. For the purpose of this demonstration stop the program with the doors in the shut position.

LISST - ST User’s Guide 9
Step 8: Fill the settling tube with clean water
Before the background data can be obtained the settling tube must be filled with water. The easiest method for doing this is by removing the top cover plate of the settling tube. Use the provided Allen wrenches to remove the four screws holding the plate. After removing the four screws the plate can be lifted off the settling column. There is an o-ring sealing the tube to the plate.
Carefully fill the tube with clean filtered water, minimizing production of bubbles. A small funnel with a short piece of tubing may be helpful to fill the settling tube from the bottom so as to not generate bubbles.
Under normal operating conditions there is very little pressure differential between the inside and the outside of the settling tube. To minimize the required torque required to open the doors the o-ring seal has been designed with minimum o-ring squeeze. Because of this the lower door may leak slightly when the settling tube is full of water while on the bench. Try pulling up on the upper door slightly to obtain a better seal. If at a later time, the doors do not operate under command, remember to push the door back down.
Step 9: Acquiring Background Scatter Data
After filling the tube, collect a clean water background using the “Collect Background” button of the LISST-100X program. A comparison between the current background and the factory background will be displayed on the screen. Refer to the LISST-100X manual for more details on this procedure and for interpreting the results. If the background is acceptable select a file name to save the background to. This file will be later used when processing the raw data to obtain settling velocities.

LISST - ST User’s Guide 10
Step 10: Start Settling experiment
After recording a clean water background we are now ready to start a series of settling experiments. The LISST-ST is designed to acquire settling velocity of particles while fully submerged. A new two letter command has been added to start the collection of data. The SE command, short for Settling Experiment, is used to setup and start the collection of data. Enter SE at the terminal window and you will be asked “Do you want to start the settling experiment?”. Type Y and press enter to continue. You will then be asked “Enter number of samples per settling experiment”. The default is 82 samples. These 82 samples are approximately log spaced in time. The fewer the number of samples the shorter the settling experiment. However, because the smallest particles take almost 24 hours to settle the 30 cm length of the settling column it is highly recommend to select the default number of samples, 82.
Next you will be prompted for the hour to start the first settling experiment. Since each settling experiment is about 24 hours it is desirable to start the experiments on the hour. Enter the hour, in 24 hour format, to start the first settling experiment. For example, if 16 were entered the first experiment would start at 4pm. If the current hour is already 4pm the experiment will start immediately. However, if it is 5:01pm, or any other hour other than 4pm, it will wait until 4:00pm the next day before starting. If you enter a value of -1 the experiments will start immediately after setup information is entered.
Following the start hour selection is the prompt for the amount of delay after the end one settling experiment before the next one is started. Enter the amount of delay desired in minutes. If you want the next experiment to start on the same start hour as the first experiment, enter a value of -1.
After entering the delay value the instrument will beginning waiting for the start hour. At this point the communications cable can be removed and the connector cap can be installed such that the instrument can be deployed.
Upon reaching the start hour the propeller will turn on for 5 seconds, the settling tube doors will open, the propeller will turn on for another 5 seconds, and after a wait of 4 seconds for undisturbed particles to enter the settling column the doors will close. Immediately, samples will be recorded at fixed intervals. Information will be displayed on the screen as the samples are recorded.

LISST - ST User’s Guide 11
The data is stored to a file on the Compact Flash Memory Module. The filename starts with S and has a DAT extension. The file name is automatically generated using the following format. Sdddhhmm.DAT where ddd = day of the year, hh = current hour, and mm = current minute at the time the file was created.
After recovery of the instrument the settling experiment can be stopped by connecting the communications cable, start the terminal window of the LISST-100X software and press the Stop button. A L100X prompt should then appear.
Step 11: Download Raw Data
After stopping the settling experiment the saved data can be downloaded from the Compact Flash Memory Module to the PC. Select the Offload button on the LISST-100X software and select the file or files to offload. See the LISST-100X User’s manual for more details on this procedure.
Once the files have been offloaded they are ready to be processed using the LISST-ST.EXE program.
Step 12: Preparing for Raw Data Processing
Included on the software disk are some example raw and processed datafiles. You can use these files to see a demonstration of the raw data processing procedures. The first step in processing the raw data is selecting the type of output files to be created. Select the Output button and check the boxes for creating two ASCII files: raw data file (.log) and time history file (.asv).
Step 13: Process example raw data
You can now select the “Open Raw Data File” option from the File menu. Note 3 choices in the lower box: instrument type, frames per experiment (default: 83) and type of header (default 80 bytes). Enter the name of the file to process, use DEMO.DAT. Enter the background scatter file to use. Select DEMO_BG.ASC. Select a name for the output data. Enter DEMO. The binary data will have the extension of PST and the ASCII file will have an ASC extension. A graphical display of the raw data set will be displayed to the screen.

LISST - ST User’s Guide 12
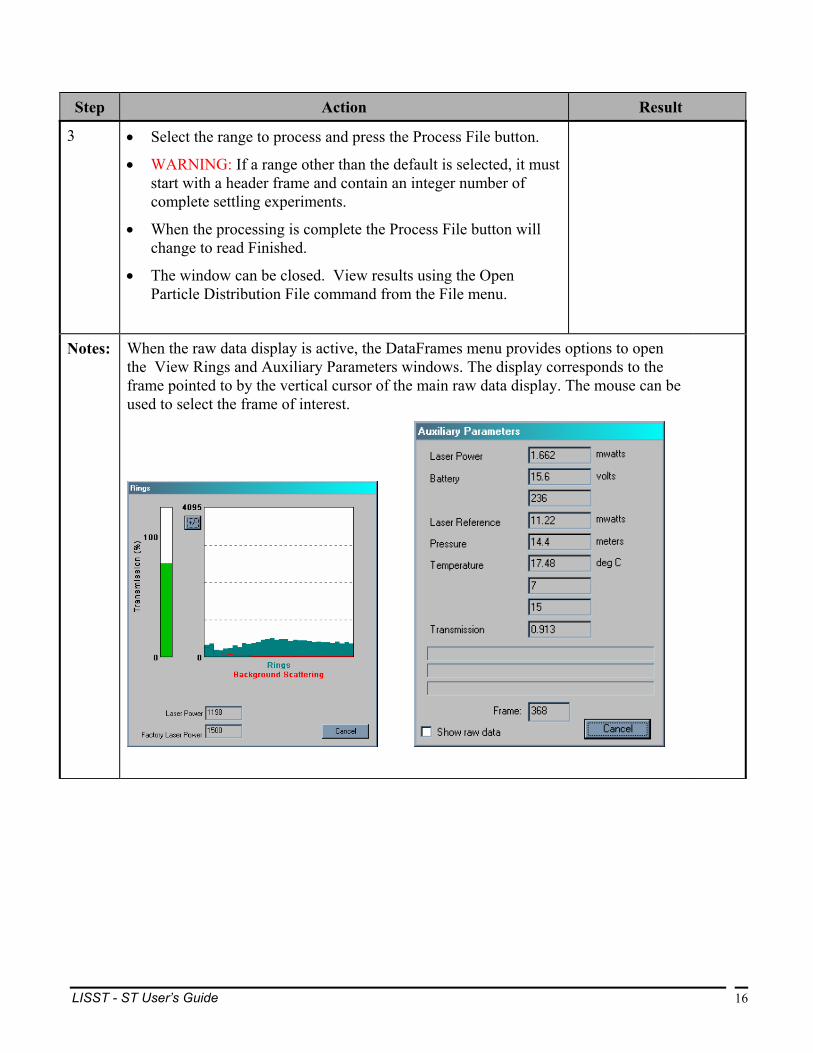
Step 14: Open View Ring and Auxiliary Parameters
More detailed information on the raw scattering and auxiliary parameters can be viewed at this time. Select View Rings from the DataFrames menu, to view the multi-angle scattering sensed by the detector rings. A display appears that shows the current values of the 32 rings and the background scatter file (red line). Then select Show Auxiliary Parameters Frame from the DataFrames menu. This window shows the current values for the eight auxiliary parameters such as pressure and temperature. The computed value of optical transmission is also shown. The vertical line cursor can be moved using the mouse. The View Rings and Auxiliary Parameters windows will display the data from the sample at the current position of the cursor.
Step 15: Select range to process
On the lower portion of the display is the range of samples to be processed. The default range is the complete data file. If desired a sub-sample of the file can be processed by choosing a starting frame and ending frame. After selecting the range to process press the Process File button. The name on the button will change to Finished when the processing is complete. The window can then be closed.
WARNING: The current version of the LISST-ST program does not automatically find the size and starting location of each settling experiment. If a custom range is selected it is very important that the starting record be a header record. You can use the Auxiliary parameter window to select this frame. To be certain that the correct structure is maintained, select the whole file to process.
Step 16: View processed data
To view the processed data on the screen select “Open Particle Distribution File” from the File menu. Select the file named DEMO.PST. A display showing the time histories of concentration for the 8 size classes will appear. The concentration history in each size class shows a constant segment until all of the particles have fallen passed the sample chamber. The plots show this decline after the constant segment. The location of this “knee” gives the settling time for that size class of particles. The settling velocities for these plots will be stored in the ASCII output file (.asv).

LISST - ST User’s Guide 13
Step 17: Put the instrument back to sleep
After finishing the test close all the windows and exit LISST-ST.EXE. To put the instrument back into its low power mode you must run the LISST.EXE program and select the “Put LISST to Sleep” button on the tool bar or option in the LISST menu.
The instrument is now in its low power mode. Under this Deep Sleep, the instrument draws around 100 µA current, thus prolonging battery shelf life. Be sure to disconnect the communications cable for maximum power conservation, otherwise the current drain will be ~10mA.
The above steps are meant to give a brief introduction to most of the procedures that are required to operate the LISST-ST. Further details of the procedures used in the above steps are covered in Section 2.4 Step-by-Step Procedures.

LISST - ST User’s Guide 14
2.3 Detailed Step-by-Step Procedures
In addition to the Getting Started and Deployment Procedures sections individual tasks have been chosen and documented with detailed step by step instructions. The following topics are covered with Step by Step instructions.
• Processing a Raw Data file • Viewing a Processed Data file

LISST - ST User’s Guide 15
2.3.1 STEP BY STEP PROCEDURE: PROCESSING RAW DATA FILES Step Action Result
1 • If you are provided a Path Reduction Module (PRM), you have
two files: RingArea_xxxx.asc and RingArea_xxxx_PRM.asc for use when no PRM is used, or when the PRM is used. Copy the appropriate one to RingArea_b.asc for type B instrument. The Windows program will automatically use this file.
• Start LISST-ST.EXE program from the WINDOWS screen.
• Select Output from the Options menu. The window below will appear, prompting for the desired output to use for future data processing. Note: this selection must be made BEFORE starting the processing command.
• Select Open Raw Datafile from the File menu.
• Choose (i) the Instrument Model to use, (ii) type of header saved, and (iii) the number of scans saved in each settling experiment (default is 83).
• Select the raw data file, then the background file to process.
• Enter a filename for the output file and choose Save.
Correct RingArea file identified for use by theWindows program.
Program started.
An ASCII raw data file (*.log) and/or an ASCII file containing time history of concentrations of 8 size classes (*.asc) and estimates of settling velocity (*.asv) will be created upon processing raw data.
The window on left appears. Top color plate shows multi-angle scattering over time.
Lower traces show transmitted laser power, battery voltage and pressure.
LISST - ST User’s Guide 16
Step Action Result
3 • Select the range to process and press the Process File button.
• WARNING: If a range other than the default is selected, it must start with a header frame and contain an integer number of complete settling experiments.
• When the processing is complete the Process File button will change to read Finished.
• The window can be closed. View results using the Open Particle Distribution File command from the File menu.
Notes: When the raw data display is active, the DataFrames menu provides options to open the View Rings and Auxiliary Parameters windows. The display corresponds to the frame pointed to by the vertical cursor of the main raw data display. The mouse can be used to select the frame of interest.

LISST - ST User’s Guide 17
2.3.2 STEP BY STEP PROCEDURE: VIEWING A PROCESSED DATA FILE Step Action Result
1 • Start LISST-ST.EXE program from Windows screen.
• Select Open Particle Distribution File from the File menu.
• Choose the file to view.
Program started.
Particle Distribution File selected.
2 • After selecting the file a widow similar to the one shown below will appear. There are 8 plots of the concentration time histories, and the fit to find the ‘knee’ (red line). One for each of the size classes. Also displayed below these 8 frames is an estimate of the settling velocity distribution.
• Use the buttons at bottom of the window to display additional settling experiments.
Settling histories of 8 size classes and the fit is displayed.
Also displayed is the settling velocity distribution in the lowest frame.
View on left shows the settling histories of 8 size classes and the estimates of settling velocities.
Step Action Result

LISST - ST User’s Guide 18
3 • Select the Display button to bring up the Display Parameters window.
• Change the scale for each plot as desired. The scales can be saved as the default for future processed files.
Notes: This software processes the raw data all the way through to estimating settling velocity spectra. The settling velocity estimates are saved in an .asv file. The time histories of concentrations are saved in an ascii file of type .pst.

LISST - ST User’s Guide 19
2.4 Instrument Storage & Maintenance
General Maintenance Notes
Between deployments the LISST-ST should be stored in the provided padded shipping container. If the instrument is not going to be used within the next few days the main battery pack should be disconnected or removed. If you do not wish to remove the battery, battery life can be prolonged with the use of the low power sleep mode. This mode will use no more than 10% of a typical battery life over a 6 month duration if the communications cable is also disconnected from the instrument. However, it is recommended that the main battery be disconnected if the instrument is not going to be used in the next 60 days. As has been noted earlier, the condition of the windows is critical to the performance of the LISST-ST. Care must be taken when cleaning the windows. The windows and the instrument should be rinsed thoroughly with fresh water after each deployment. The windows should be cleaned with a soft cloth or lens tissue. Liquid detergent/soap and water may be used. For removing grease spots, finger prints etc. alcohol may be used. We recommend against the use of stronger solvents such as Acetone or Toluene.
Battery Power and Access
The main battery is mounted to the connector endcap. SEQUOIA supplies batteries for use with the LISST-ST instrument. The use of batteries other than these may void your warranty. When using laboratory power supplies, the user must exercise extreme caution in using correct polarities on the external power connections. Reverse polarities or misconnection may damage the electronics, the repair of which would not be covered under the warranty.
The step-by-step procedure for accessing and replacing the battery pack is described in Section 2.4.1 below.
A step-by-step procedure for charging the lead-acid battery for the door and propeller motors is described in Section 2.4.2 below.

LISST - ST User’s Guide 20
2.4.1 STEP BY STEP PROCEDURE: REPLACING THE SINGLE-USE ALKALINE BATTERY
Step Action Result
1
• Mount the LISST-ST in a horizontal position.
U-blocks have been provided for this purpose.
• Disconnect all external cables from the end cap.
• Install caps on connectors to protect pins.
The lead-acid battery should be charged with the endcap open for venting see below. Procedure for charging is described in a separate section.
Caps installed on the connectors.
2 • Remove the three recessed bolts from end cap.
Use the provided Allen wrench. The threads of the bolts have been coated with an anti-seize compound. Spare bolts are included with the LISST-ST.
The recessed bolts removed from the end cap.
3
• Next, remove the endcap by grasping the ring attached to the end cap with standoffs and pull away from the case. Slight rotation will sometimes be helpful.
The end cap has an o-ring seal on the inside diameter of the case. The compression of the o-ring seal contributes to the effort required to remove the end cap.
While pulling, the end cap should remain parallel to the end of the case. Tipping of the end cap can cause binding.
Do Not Pry the End Cap Off with screwdrivers.
When the o-ring on the end cap clears the case, the end cap and battery combination should slide easily from the case.
End cap and battery removed from the case.
4 • Connect the white female 2-pin connector of the battery to the white male 2-pin connector of the instrument. Connecting these connectors will apply power to the electronics module.
The main power connector is located on the side of the battery pack. The white female 2-pin connector is connected to the battery pack. The white male 2-pin connector is attached to the electronics module located inside the case. Cables connecting the battery and underwater connectors to the electronics will limit its travel.
Power on.

LISST - ST User’s Guide 21
Step Action Result
5
• To remove the battery, release the Velcro wrap and loosen the nuts
on the threaded rods.
Before removing the battery, make note of its orientation so that the replacement battery can be positioned similarly.
• With the new battery in place, tighten the nuts on the threaded rods to finger tightness. Re-apply wrap allowing for access to the power connectors.
Note: Make sure that the battery does not overhang the edge of the end cap diameter. If the battery is offset, the end cap may not seat properly, making installation difficult.
Battery removed and replaced.
6 • Before installing the end cap into the case, thoroughly clean and lightly grease the o-ring.
• Remove the o-ring and inspect for any cuts or defects. Use clean fingers to apply o-ring grease. Paper or cloth can leave fibers on the o-ring which can cause the o-ring to leak. The inside diameter of the case should be similarly cleaned and greased.
O-ring greased and inspected for any defects.
7
• Install the end cap into the case by first lining up the holes in the end
cap with the threaded holes in the case.
• Applying uniform force, push the end cap into the case. After the end cap is inserted, slightly rotate the end cap.
A slight twisting motion will help the o-ring obtain a good seal. This will also allow the bolt holes to be lined up.
• Install the bolts, tightening by turn a little each time evenly, until they are snug but not tight.
Warning: Do not over tighten. The stainless steel screws can damage the threads of the aluminum case if over tightened.
The end cap installed into the case and the case is now sealed.

LISST - ST User’s Guide 22
2.4.2 STEP BY STEP PROCEDURE: RECHARGING THE LEAD-ACID MOTORS OPERATING BATTERY
Step Action Result
1 The lead-acid battery is used to provide the high current required by the door and propeller motors. This battery will need to be charged after each deployment or after substantial lab testing. A Battery Charger compatible with the system is provided with the instrument. Please read the manual for the charger that has been included with the unit. Please note that the LISST-ST motor battery is a small unit (0.8 Amp-Hour) and the Battery Charger (Model 150-12/100) is configured to limit charge current to 0.1mA.
The instrument Connector Endcap must be removed to connect the charger and the endcap must remain off during charging to vent any gases that may be generated during the charging process. Any gases generated will be of very small concentration and present no safety hazard. See section 2.4.1 for details on removing the Connector Endcap.
2 WARNING: Do not plug in the Battery Charger to AC power yet. Inside the Connector Endcap are two four-pin cable connectors connected together to facilitate connection of the Battery Charger. Disconnect the two four-pin connectors. This disconnects the lead-acid battery voltage from the Connector Endcap circuitry. The female-pin connector of the pair is labeled “ST Battery”. The lead-acid battery voltage may be measured at this connector using a multimeter. The red wire is positive and the black wire is negative. Connect the Battery Charger Connector to the connector labeled “ST Battery”. With the Battery Charger connected (this connection must be made before plugging the charger in to AC for the charger’s computer to function properly), plug in the Battery Charger. If the battery voltage is quite low, the Red indicator light on the charger will light indicating maximum charging (this is not a trouble alert or danger signal). The Red indicator should go off within the first few minutes of charging. The charger is current-limited to a maximum of 100 mA to protect the battery and automatically reduces charging current as the battery voltage increases. After some time the Yellow indicator will light indicating that the battery has charged to a higher voltage and the charge current has correspondingly decreased. At some later time the Green indicator will light indicating full charge (approximately 14 volts). To achieve full charge on a battery that was very low may require 12 hours. However, the battery may be used after it has charged to over 12 volts. As above, the battery voltage may be monitored by measuring at the connector labeled “ST Battery”.

LISST - ST User’s Guide 23
Step Action Result
3 • The Battery Charger is designed to protect the battery and may remain connected and charging for prolonged periods.
• When the battery has reached full charge or a satisfactory voltage, unplug the Battery Charger from AC and then disconnect it from the connector labeled “ST Battery”. Reconnect that connector to the mating internal four-pin connector. This reconnects the lead-acid battery voltage to the Connector Endcap circuitry. The Connector Endcap may now be installed.
Notes: LISST-ST Battery Charger US Model InteliTender Battery Charger Model 150-12/100 Input 120VAC/60Hz Output 12VDC @ 0.1A International Model InteliTender Battery Charger Model 150-12/100 Input 230VAC/50Hz Output 12VDC @ 0.1A

LISST - ST User’s Guide 24
2.4.3 STEP BY STEP PROCEDURE: CLEANING OF OPTICS
Step Action Result
1 Disassemble the Settling Column, See Appendix A Path Reduction Module, PRM (if installed) will be exposed
2. Remove the Path Reduction Module if one is installed. Windows accessible
3. Clean the PRM with liquid-soap and clean water, do not use abrasives
4. Reach inside the Optics Block of the –ST and clean the windows with solvents or soap and water; again, do not use abrasives. Insert the PRM if desired.
All surfaces cleaned
5. Take a new background file and save it for subsequent use. Cleaning complete.

LISST - ST User’s Guide 25
Section 3: Detailed Technical Discussions
This instrument for measurement of the size-dependent settling velocity distribution without assumption of particle density is similar to the LISST-100. The optics end of the instrument is enclosed in a settling tube of 30cm length. The settling column, which is enclosed in this 5 cm diameter settling tube, consists of a 5cm x 1 cm wide x 30 cm tall rectangular volume. The rectangular column reduces flow Reynolds number significantly from the round tube for the draw-in velocities. This feature is incorporated for faster suppression of turbulence at fill-up. The settling tube has openings at the top and bottom. Two motors are incorporated in the system. One motor operates the doors and the second powers a propeller in the settling tube, placed just below the laser beam. Vertically sliding doors with radial ‘O’-ring seals are used to open and close the doors. The cycle of operation is as follows: before closing the doors, the motorized propeller in the settling tube is powered up. Its function is to draw in a new sample. The sample enters the settling tube at the top, and is blown out at the bottom. A short-time ( 4 sec.) is allowed to elapse after the propeller power is turned off. This ensures filling the tube with new fluid, unaffected by propeller motion. At this time, the sliding doors are closed quickly, in about 50 msec. This begins the settling experiment. Data are taken at logarithmically scheduled sampling intervals. In all, 83 scans are saved over a 24 hour period. At the end of the settling experiment, the propeller is powered so that its vigorous turbulence cleans the settling column and the optics windows. The doors are opened, so that the propeller blows out the stirred water, and at the same time draws in a new sample. This begins the next cycle of data acquisition. Consider now the evolution of size distribution at the optics block in the lower part of the settling column where the laser senses size distribution. In the case of a homogeneous suspension, i.e. all particles having the same mass density, each particle size class will traverse the 30cm settling tube at its own unique settling velocity, determined solely by diameter. Assuming that the settling column was filled with a well-mixed sample of water, the concentration history of any single size class of particles can be expected as follows. As particles of this size class settle, at some point in time, those particles that were at the top of the settling column reach the laser beam. Until this time, the concentration observed at the laser beam can be expected to be constant, equal to the fill-up concentration. Any apparent variations in concentration prior to this time can arise due to imperfect mixing in the sample and small number statistics of the particles. Further settling causes the particles to fall through the 6-mm diameter laser beam leaving no more particles of this size to produce laser scattering. Thus, over a duration corresponding to the time to fall through the laser beam, the concentration for any size class of particles will go from its natural value at fill-up, to zero. Thus both the onset of the decline in the idealized constant concentration history, and the length of duration of the sloping region will be uniquely related to a particular particle size. This is the idealized expectation. In reality a few effects complicate observations. First, natural particles are seldom of a homogeneous composition, so that a variation in particle density will cause a smearing of the concentration profile. Second, the existence of residual turbulence from the fill-in period smears the measurement of settling velocity for the largest particles. A third factor is particularly frustrating, but only in the laboratory: convection currents caused

LISST - ST User’s Guide 26
by temperature changes with the cycling of ventilation systems. It is worth noting that turbulence or convective motions must be weaker than the smallest settling velocity of interest, in order to make a correct measurement. Such conditions are difficult to achieve in the laboratory for the smallest particles, whose settling velocities may be a small fraction of a mm/sec, in effect setting the limit of measurable small-particle settling-velocity. The requirement that turbulence or convection be much weaker than the smallest settling velocity of interest is fundamental, not specific to any instrument or technique. The thin settling column of the LISST-ST is a couple of orders of magnitude thinner than typical other settling tubes, which results in better estimates of settling velocity than in earlier research devices. In order for the settling histories to be employed for estimation of settling velocity, it is necessary that the concentration measurements for each size class be totally independent of any other. For this reason, typically, with a 100:1 range of scattering angles, only about 8 truly independent size classes can be obtained. Each of these size classes contains particles spanning a size range 1.78:1 (for type A; 1.94 for types B and C). According to Stokes law, this implies that the settling time for particles in any single size class will vary over a range TB to 3.2 TB for type A instruments (TB to 3.8 TB for type B&C ). One now finds a TB which minimizes the mean-square difference between the idealized and normalized history of any size class. Mathematically, this is expressed as follows. Let the time history of concentration in size class n be called Cn(t), then one defines an idealized history by the function Φ(t) such that it is constant for time TB equal to 30cm/wf,n-1, gradually decreases to zero over the time it takes particles of sizes in a size-class to fall through 6 mm, i.e. 2.2 TB and is zero thereafter: Φ(t) = 1/TB∫0T Cn(t)dt for 0<t<TB; = Φ(TB) – (t-TB)/2.2TB for TB<t<3.2TB ; and = 0 for t>=TB The best estimate of settling time TB is found by minimizing the least square difference of the history with the idealized history Φ(t), i.e. : d/dTB {[Cn(t) - Φ(t)]2} = 0; The procedure is implemented numerically. The solutions TB for each size class are used separately to estimate the settling velocity for that size class. The settling velocities and concentration histories are output from the Windows program that processes LISST-ST raw binary datafiles.

LISST - ST User’s Guide 27
Section 4: Size Ranges, and Data Storage Format Size Ranges
There are 8 size ranges logarithmically placed from 1.25 - 250 microns in diameter in Type B instruments and 2.5 – 500 microns for Type C instruments. T The table below shows the median size of each size class in microns for each type.
Type B Instruments 1 2 3 4 5 6 7 8
1.74 3.38 6.56 12.74 24.70 47.91 92.91 180.17 Type C Instruments
1 2 3 4 5 6 7 8 3.48 6.76 13.12 25.48 49.40 95.82 185.82 360.34
Processed Data Storage Format
There is one *.log raw data file (if created by choosing from the Output options), and two processed ASCII files, type .asc and .asv. The .log file contains the raw data, in digital counts, in order: *.log: Raw Data: 32 scattering variables, transm. laser power, battery, external analog input, reference laser power, pressure, temperature, date, time. The .asc file contains the concentration histories in the 8 size classes, whereas the .asv file contains the settling velocities. The format for the two files are: *.asc Concentration History: sample no. 8 variables Concentration in 8 size classes, 8 aux. Variables, followed by Optical Transmission. *.asv Settling Velocities: Expt. no. Date(YRMMDD) TIME(HRMMSS) 8 settling velocities 8 dummy variables.
Standard Sample Times
The time from the start for each sample is provide in a file on the software disk. The file is named ST_TIME.TXT.

LISST - ST User’s Guide 28
Section 5: Underwater Connector Pinouts for LISST-ST
The LISST-ST has 3 separate underwater connectors, a 5-pin, a 6-pin, and a 3-pin connector. The text below describes detailed wiring for each connector. Communications and Power Connector (5 pin connector) Connector Manufacturer: Impulse Enterprise, Inc. San Diego, CA, USA Connector Part Number (Bulkhead): MCBH-5-MP Stainless Steel Mating Cable Part Number: MCIL-5-FS
Connector Pin # Use 1 Power/Serial Ground 2 External Power In (+9V nom. 6-12V) 3 Power/Serial Ground 4 Serial Out (to DB-9 Pin 2) 5 Serial In (to DB-9 Pin 2)

LISST - ST User’s Guide 29
ST Motor Control Connector (6 pin connector)
Connector Manufacturer: Impulse Enterprise, Inc. San Diego, CA, USA Connector Part Number (Bulkhead): MCBH-6-MP Stainless Steel Mating Cable Part Number: MCIL-6-FS
Connector Pin # Use 1 Motor Power 2 Mixer Motor Control 3 Door Motor Control 4 Switch Common 5 Door Closed Sense 6 Door Open Sense
BioBlock Connector (3 pin connector) Connector Manufacturer: Impulse Enterprise, Inc. San Diego, CA, USA Connector Part Number (Bulkhead): MCBH-3-MP Stainless Steel Mating Cable Part Number: MCIL-3-FS
Connector Pin # Use 1 Signal Ground 2 Signal (Open/Closed) 3 Battery Sense

LISST - ST User’s Guide 30
Section 6: Warranty STATEMENT OF LIMITED, EXTENDED WARRANTY
This Statement of Limited, Extended Warranty applies to the products ("Products") being purchased by _____________________
("Customer") from Sequoia Scientific, Inc. ("SEQUOIA") pursuant to ___________ (the "Order"). The Products include, but are not necessarily limited to, the following:
LISST-ST Serial Number #
SEQUOIA and Customer agree as follows:
1. Limited Warranty
SEQUOIA warrants that upon delivery by SEQUOIA (a) the Products will be free from defects in materials and workmanship, (b) the Products will perform substantially in accordance with SEQUOIA's applicable specifications, and (c) any Products (or components or parts thereof) that are manufactured by SEQUOIA do not infringe any U.S. patent or copyright.
2. Correction of Non-Compliances
If any Product does not comply with the warranties set forth in 1(a) and 1(b) above, SEQUOIA will, at its option, either (a) repair the Product, (b) replace the Product, or (c) refund the purchase price paid by Customer to SEQUOIA for the Product; provided that Customer gives SEQUOIA written notice of the noncompliance within one (1) year after SEQUOIA's delivery of the Product (as the same may be extended for repaired or replacement Products as provided for herein, the "Warranty Period"). If Customer does not give SEQUOIA such written notice within the Warranty Period, then such warranties will be satisfied in full. Customer will cooperate with SEQUOIA's efforts to repair or replace any noncomplying Product. Without limiting the generality of the foregoing, Customer will comply with SEQUOIA's request for return of any such Product to SEQUOIA (in which event SEQUOIA will pay for round-trip shipment within the United States) or for access to accomplish the repair or replacement on Customer's premises. As to any Product repaired or replaced by SEQUOIA, the Warranty Period will end upon the later of one (1) year after SEQUOIA's delivery of the original Product or 90 days after SEQUOIA's delivery of the repaired or replacement Product. Any Product, component, part or other item replaced by SEQUOIA becomes the property of SEQUOIA.
3. Infringement Indemnification
If any Product does not comply with the warranty set forth in 1(c) above, SEQUOIA will defend and indemnify Customer against any third-party claim asserted in any proceeding against Customer based on this noncompliance; provided that Customer gives SEQUOIA prompt written notice of the claim, SEQUOIA has exclusive control over the defense and settlement of the claim, Customer provides such assistance as SEQUOIA may request in connection with the defense and settlement of the claim (in which event SEQUOIA will reimburse the reasonable out-of-pocket costs incurred by Customer to provide such assistance), Customer does not settle the claim without the prior written consent of SEQUOIA and, upon SEQUOIA's request, Customer returns the Non-Complying Product to SEQUOIA for modification, replacement or a refund of the purchase price paid by Customer to SEQUOIA for the Non-Complying Product, less a reasonable allowance for Customer's use prior to return.
4. Exclusive Warranties
THE WARRANTIES SET FORTH IN PARAGRAPH 1 ABOVE ARE EXCLUSIVE AND IN LIEU OF ALL OTHER WARRANTIES, EXPRESS OR IMPLIED. SEQUOIA DISCLAIMS ANY AND ALL WARRANTIES, EXPRESS OR IMPLIED (INCLUDING, BUT NOT LIMITED TO, ANY IMPLIED WARRANTY OF MERCHANTABILITY OR FITNESS FOR A PARTICULAR PURPOSE, AND ANY IMPLIED WARRANTY ARISING FROM COURSE OF PERFORMANCE, COURSE OF DEALING, OR USAGE OF TRADE) OTHER THAN THOSE SPECIFICALLY SET FORTH IN PARAGRAPH 1.
5. Exclusive Remedies
CUSTOMER'S RIGHTS AND REMEDIES SET FORTH IN PARAGRAPHS 2 AND 3 ABOVE ARE EXCLUSIVE AND IN LIEU OF ANY AND ALL OTHER RIGHTS AND REMEDIES FOR ANY BREACH OF OR OTHER FAILURE TO COMPLY WITH ANY WARRANTY WITH REGARD TO ANY PRODUCT.
6. No Consequential Damages SEQUOIA will not be liable for any indirect, incidental, special or consequential damages, any cover, or any loss of revenue, profit, data or use.
7. Limitations of Liability

LISST - ST User’s Guide 31
SEQUOIA's liability (whether in contract, tort, or otherwise; and notwithstanding any fault, negligence, strict liability or product liability) with regard to any Product (including, but not limited to, any breach of or default under the Order by SEQUOIA) will in no event exceed the purchase price paid by Customer to SEQUOIA for such Product. Further, SEQUOIA will not be liable for, or be in breach of or default under the Order on account of, any delay or failure to perform as a result of any cause, condition or circumstance beyond SEQUOIA's reasonable control.
8. Statute of Limitations
Customer will not commence any action based on breach of warranty with respect to any Product more than 18 months after SEQUOIA's delivery of such Product.
9. Software
The Products may include or be delivered with certain computer programs, databases or other software that is proprietary to SEQUOIA. SEQUOIA hereby grants Customer a nonexclusive license to use such software solely for the purpose of operating Products. Customer will not: use any such software for any other purpose; modify, adapt, translate, or create derivative works based on any such software; or disassemble, decompile or reverse engineer any such software. No title to or ownership of any software or intellectual property rights are transferred to Customer.
10. U.S. Government Restricted Rights Notice
All software, data, technical information, and written materials provided by SEQUOIA are provided with restricted rights. Use, duplication, or disclosure by the government is subject to restrictions as set forth in subparagraph (c)(1)(ii) of the Rights in Technical Data and Computer Software clause at 48 C.F.R. § 252.227-7013 or in subparagraph (c)(2) of the Commercial Computer Software-Restricted Rights clause at 48 C.F.R. § 52.227-19, as applicable. Portions of these items may be unpublished. SEQUOIA reserves all rights under applicable copyright laws.
11. Controlling Document
In the event of any conflict or inconsistency between any provision of this Statement of Limited Warranty and any other provision of the Order, the provision of this Statement of Limited Warranty will control.
12. Controlling Law
This Statement of Limited Warranty will be governed by the laws of the State of Washington without reference to its rules relating to choice of law, except to the extent preempted by the laws of the United States. The U.N. Convention on Contracts for the International Sale of Goods will not apply.
CUSTOMER:
By: Title:____________________________________
SEQUOIA: Sequoia Scientific Inc. By:_____________________________________ Title:____________________________________

LISST - ST User’s Guide 32
Section 7: APPENDIX A
7.1 Using The LISST-ST in the Laboratory or as a LISST-100:
The two figures above show how to remove the Settling Column. First remove the 4 screws labeled A on left figure; then remove 4 screws on the sliding door shown on right. Finally, remove screws labeled C on left. Gently lift off the top settling column. This exposes the Path Reduction Module shown in figure below, marked D. To operate the instrument as a laboratory particle size analyzer, manually pull up the bottom door (not visible). This will seal the lower settling column. Samples can now be filled from the top and analyzed using LISST-100 type software (e.g. REALTIME.TTB). Use the zinc plug as a drain. To use as LISST-100, also remove the lower settling column and motor block. Disconnect the power cable from the instrument connector endcap. Put a cap on the connector. When reinstalling the settling column, you may have to manually depress the doors once, to loosen the doors. Otherwise, the motor may not be able to operate the doors.
A
C
B
D

LISST - ST User’s Guide 33
Using The LISST-ST Chamber Plate Step Action Result
1 Remove the Settling Column, See Appendix A
2. Remove the Motor Block.
3. Install the Chamber Plate with o-ring on the side of the Optics Block that the Motor Block would normally fasten, using four 10-24 screws.
4. Now the LISST-ST sample volume may be filled.