part 1: mashup introduction - web mapping applications at...
TRANSCRIPT

Eastern Lake Erie MapBuilder Demo GLOS Mapping Workshop Buffalo, New York April 8, 2010 Background The purpose of this exercise is to build a web mapping site that integrates different sources/formats of spatial and observation data for part of Lake Erie in order to support recreational boating. In comparison with the use of a desktop software client like Google Earth to integrate spatial data from distributed sources, this exercise utilizes a graphical user interface to a commercial web mapping application programming interface (Google Maps API) to develop a web mapping application placed on a server. Process Needs:
Account on MapBuilder
Text editor (Notepad, Wordpad,…)
Account on Google Maps to obtain a GMaps API key
File transfer protocol client software (Filezilla)
A web server (HostGIS) to host a web page
Part 1: Mashup Introduction
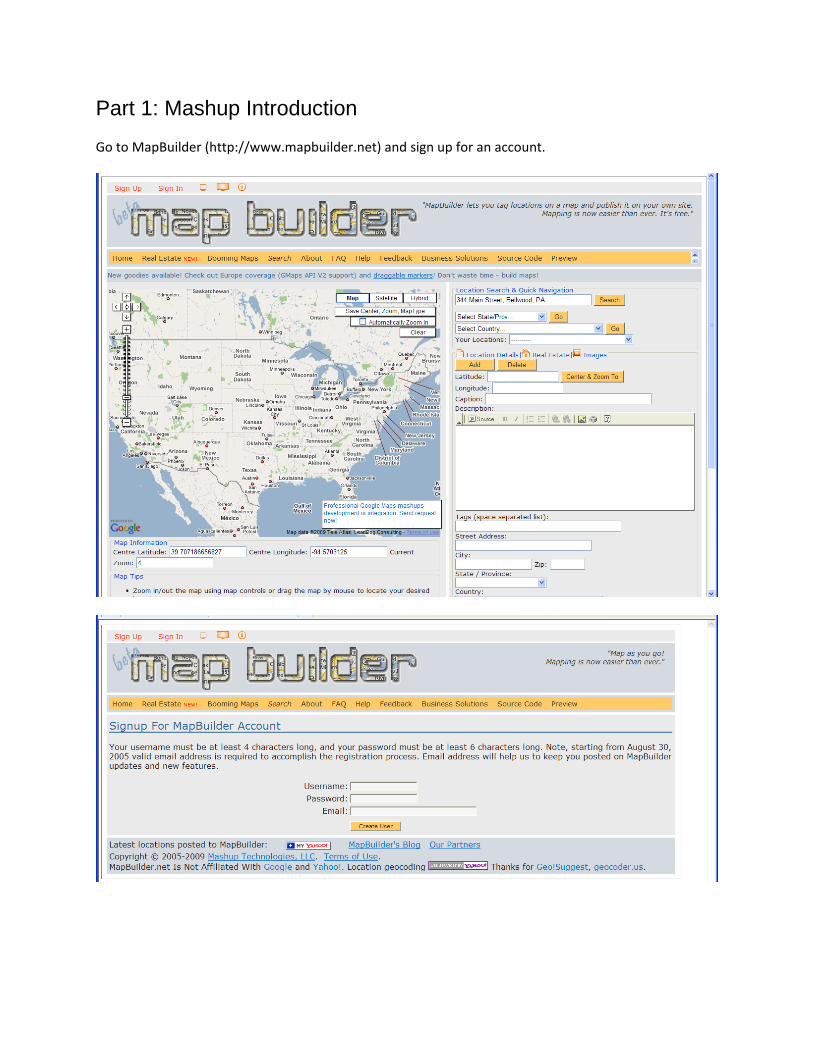
Go to MapBuilder (http://www.mapbuilder.net) and sign up for an account.

Click on New Map. Enter a new Map Name, Description, and Map Tags. Click on Create Map.

Navigate to your preferred extent of the map.
Add a marker for a marina. For example, Erie Basin Marina 329 Erie Street Buffalo, NY 14202 (716) 842‐4141 http://www.eriebasinmarina.org/ Include the address, city, and state in the Location Search & Quick Navigation box.
Click Search. Type the marina name in the caption. Copy and paste the information for the marina described above in the Description box.

Click Add. Note that a marker has been added for the marina.

To add a marker for another marina, again include the address in the Location Search & Quick Navigation box. Click Search. Type the marina name in the caption. Copy and paste the information for the marina described above in the Description box. Click Add. Sturgeon Point Marina 618 Sturgeon Point Road Derby, NY 14047‐9758 (716) 947‐4452 http://www.townofevans.org/toedepartments/toemarina.html
Here are some websites with more info for Lake Erie marinas and boat access: Great Lakes Marina Guides http://www.greatlakesmarinas.com/ http://www.lakelandboating.com/cruise_guide_erie.cfm http://boatingontheweb.com/lake_erie.asp http://www.greatlakesdestinations.com/lake‐erie/marinas.html Boat Launch Sites for Erie County, NY http://www.dec.ny.gov/outdoor/23898.html Boat Launch Sites for Chautauqua County, NY http://www.dec.ny.gov/outdoor/23907.html

Next, we need to get the map source code and create an html document to display the map. Click “Source Code” in the orange menu bar.

Copy and paste the code into Notepad and save as (YourLastName)Buffalo.html

Paste the Google Maps API key into the code generated by MapBuilder (replace YOURGMAPKEY). Below is the key needed for the HostGIS server. You can obtain a Google Maps API key at http://code.google.com/apis/maps/
ABQIAAAAVhF79OUvD_fJs7tpUuurCBSVjO2brJolJxk2HQesrdIKgONAhRR93RZxRi04Fx2w364L9jmsxXzjcQ Use Filezilla (or another ftp client) to upload the MapBuilder code onto the HostGIS server. Use the parameters provided by the instructor in a separate document.

Here is a link to view the demo mashup from part 1 of this tutorial http://www.greatlakesmashups.net/HartBuffalo1.html [Note: If at this point in the activity, your code does not work: 1) open the URL above, 2) view the source code; and 3) save it as a new html file on your local computer. In Internet Explorer you can view and save the source code by clicking on the View pull‐down menu, selecting Source near the bottom of the list, and then clicking on the File pull‐down menu and selecting Save As in the new window that pops up with the source code]
***END OF PART ONE ***

Part 2: Integrating KML and GeoRSS to your mashup
Find the line in your HTML that looks something like this: map.setCenter(new GLatLng(39.707186656827, -94.5703125), 4, map.getMapTypes()[0]);
This defines the latitude and longitude for the center of your map and the zoom level (a value of 1 would be the whole world and 19 would be zoomed to the level of a city block). Let's recenter the map on Alpena and zoom out a bit. Replace that line with this: map.setCenter(new GLatLng(42.9, -78.9), 9, map.getMapTypes()[0]);

Great Lakes Web Cams via KML Here is the code to add a KML file of Lake Erie Web Cams. To add this to your mashup, simply add the following lines directly after the “map.setCenter” line: var webcam = new GGeoXml("http://aqua.wisc.edu/glct/maps/kml/lake-erie-webcams-6Apr10.kmz"); map.addOverlay(webcam);

GLOS Observations via GeoRSS feed To query the latest observations from GLOS, go to the “Get Latest Observations” page at http://glos.us/getObs/index.php. Here is the code to add a GeoRSS feed of observations from the GLOS to your mashup. To add this to your mashup, simply add the following lines directly after the “map.setCenter” line: var glosobs = new GGeoXml("http://beta.glos.us/get_obs2.php?format=georss&observation=all&obs_type=all&units=english&time=&bbox=-78,42,-80,44");
map.addOverlay(glosobs);
Here is a link to view the demo mashup from part 2 of this tutorial http://www.greatlakesmashups.net/HartBuffalo2.html
***END PART 2 ***
Part 3: Adding a Web Mapping Service (WMS) to your mashup
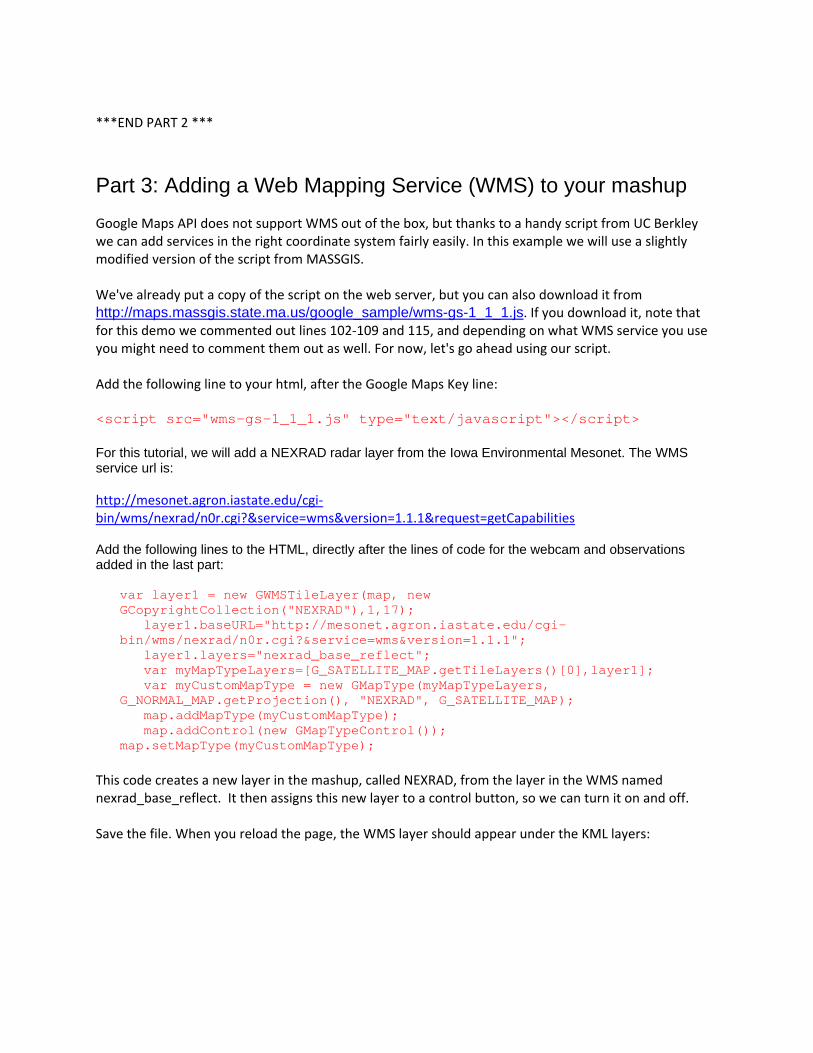
Google Maps API does not support WMS out of the box, but thanks to a handy script from UC Berkley we can add services in the right coordinate system fairly easily. In this example we will use a slightly modified version of the script from MASSGIS. We've already put a copy of the script on the web server, but you can also download it from http://maps.massgis.state.ma.us/google_sample/wms-gs-1_1_1.js. If you download it, note that for this demo we commented out lines 102‐109 and 115, and depending on what WMS service you use you might need to comment them out as well. For now, let's go ahead using our script. Add the following line to your html, after the Google Maps Key line: <script src="wms-gs-1_1_1.js" type="text/javascript"></script> For this tutorial, we will add a NEXRAD radar layer from the Iowa Environmental Mesonet. The WMS service url is: http://mesonet.agron.iastate.edu/cgi‐bin/wms/nexrad/n0r.cgi?&service=wms&version=1.1.1&request=getCapabilities
Add the following lines to the HTML, directly after the lines of code for the webcam and observations added in the last part:
var layer1 = new GWMSTileLayer(map, new GCopyrightCollection("NEXRAD"),1,17); layer1.baseURL="http://mesonet.agron.iastate.edu/cgi-bin/wms/nexrad/n0r.cgi?&service=wms&version=1.1.1"; layer1.layers="nexrad_base_reflect"; var myMapTypeLayers=[G_SATELLITE_MAP.getTileLayers()[0],layer1]; var myCustomMapType = new GMapType(myMapTypeLayers, G_NORMAL_MAP.getProjection(), "NEXRAD", G_SATELLITE_MAP); map.addMapType(myCustomMapType); map.addControl(new GMapTypeControl()); map.setMapType(myCustomMapType);
This code creates a new layer in the mashup, called NEXRAD, from the layer in the WMS named nexrad_base_reflect. It then assigns this new layer to a control button, so we can turn it on and off. Save the file. When you reload the page, the WMS layer should appear under the KML layers:

Here is a link to view the demo mashup from part 3 of this tutorial http://www.greatlakesmashups.net/HartBuffalo3.html ***END PART 3 ***