pala easy scan user guide - kulzerus.com · the status listed below the table will change from...
TRANSCRIPT

1
PALA® Easy Scan Ordering Tool
User Guide

2
Content I. Welcome to PALA Easy Scan – Teeth Order Platform ..................................................................... 3
II. Online WebShop – New User Registration………………………………………………………………………………….4
III. Teeth Barcode Scanning ................................................................................................................. 8
IV. Transferring Order to Dealer with the Webshop .......................................................................... 11
V. Entering Teeth Orders Manually ................................................................................................... 14
VI. Generating a Barcode .................................................................................................................... 16
VII. Transferring Products to the Barcode Sheet ................................................................................. 18
VIII. Customizing and Printing Barcodes ............................................................................................... 20
1. Loading specifications ........................................................................................................... 20
2. Deleting tooth lines ............................................................................................................... 20
3. Adding tooth lines ................................................................................................................. 21
4. Rearranging the product lines ............................................................................................... 21
5. Selecting a drawer ................................................................................................................. 22
6. Saving changes to specifications ........................................................................................... 22
7. Printing barcodes .................................................................................................................. 24
IX. FAQs ............................................................................................................................................... 27
X. Notes ............................................................................................................................................... 29

3
I. Welcome to the PALA Easy Scan – Teeth Order Platform
Thank you for choosing to use PALA® Denture Teeth and the updated PALA Easy Scan for
placing your teeth orders. The new teeth ordering platform is designed to make the order and
reorder process as easy and seamless as possible. This user guide will show you how to
navigate every step – from registering online to using barcodes.
If you have any questions regarding the system, please do not hesitate to contact your
Kulzer Sales Representative or Kulzer at 1-800-431-1785.
We look forward to your PALA Easy Scan orders!
Your Kulzer Team

4
II. Online WebShop – New User Registration
Note: You may need to perform a one-time registration on the new Kulzer Webshop
even if you were previously registered on the former platform and currently have a
PALA Easy Scan device.
1. Visit https://shop.kulzer-dental.com for direct access to the Login page of the Pala Easy
Scan WebShop.
2. Select “Login” on the upper right corner of the page

5
Current Users
If you are a previous user of PALA Easy Scan, but new to the online Kulzer Webshop,
Enter your email address and select “Forgot Password”.
a.
b.
c.

6
Your temporary password will be immediately sent to your registered email address and
can be changed at any time under “My Account”.
Once you have completed the one-time registration on the Kulzer Webshop please
go to Section III – Teeth Barcode Scanning
If you are a current user and the system does not recognize your email address, you will
need to register as a new customer using the instructions below for new users.
New Users
3. If you are a brand new customer to PALA Easy Scan and the Kulzer Webshop without an
account, click on "here" to register.

7
4. Enter your personal data in the registration form and submit by clicking "Send".
5. Following successful registration, within 24 hours, you will receive an e-mail confirmation
and link to change your password.

8
III. Teeth Barcode Scanning
• Note that with the updated PALA Easy Scan, orders are now transmitted from the
OPN 2001 scanner to the online Kulzer WebShop.
• You will need to download the Kulzer Data Transfer exe file (found here:
www.kulzerus.com/palaeasyscan) in order to transfer your order data from the
scanner to the WebShop.
• This Kulzer Data Transfer will appear as an icon on your desktop that you will need
to run (click on) after connecting your scanner to the USB port with every use.
• Please note for the first download, you may need to change the language.
1. Scan the barcodes for the teeth you would like to order.
2. Click on the Kulzer Data Transfer icon.
3. Plug scanner into your computer’s USB port to transfer data from the scanner.
a. When the scanner is attached, the Kulzer Data Transfer application will recognize
it and automatically read the data.
b. The status listed below the table will change from "Waiting for device connection"
to "Device detected".
c. Additionally the "Send" and "Cancel" buttons will be activated
4. After the application has started, enter your user name under "User".
a. This can be the e-mail address you used to register in the Webshop.

9
5. Under "Password", enter the same password you used to register in the WebShop .
6. The application then reads all scanned barcodes and arranges them in a table.

10
7. One row is added to the table per product. Orders are marked with a green arrow pointing
to the right.
8. The second column shows the amount ordered.
a. If a product code is recorded several times, the amounts will be added together and
presented on a single line.
9. Click the "Send" button to transfer data to the WebShop.
10. If the transfer is successful, the data is deleted from the device, the table is cleared and the buttons are deactivated until a device is attached again.
11. If the WebShop sends an error notification, it will be shown in a message box. The data will remain on the device and the table.
12. By clicking on the “Cancel" button, the data will be deleted from the device after confirmation, and the application will again wait for a device to be connected.
13. On the bottom left-hand side of the Kulzer Data Transfer Screen, Click on the URL for the
online WebShop (https://shop.kulzer-dental.com). You must be connected to the internet.
Note: It is not possible to connect more than one device at the same time.

11
IV. Transferring Order to Dealer with the Webshop
Once you have completed the transfer of data from the Kulzer Data Transfer to the WebShop,
your order should be accessible.
1. Go to Shopping Cart to view ordered items
Note: The number of items in your Shopping Cart equals the number of line items and not the number of teeth. Also note that if you modify the quantity for a given item in your cart, you will need to select the refresh button after every change to save the updated quantity.

12
2. Select Dealer/Retailer and Send by clicking on “Order now”.

13
3. You will receive an onscreen notification thanking you for your order. For order details such
as order number, please visit “My Account” and “My Orders”
4. You will also receive an email confirmation with the order number and details.

14
V. Entering Teeth Orders Manually If you would like to order manually and enter teeth orders without a scanner see steps below.
1. From Home Page go to the Dental Orders Tab
2. Select the desired tooth line and fill in the matrix with the corresponding values.

15
3. After manually entering teeth orders, you have two options:
a. Select “Continue”, add your order to the shopping cart and select your dealer /
retailer to place your order.
OR
b. Select the “Transfer” button to generate barcodes and save as Custom
Specification.
Note: The matrix is used to fill your shopping cart. Once items are put in the shopping cart,
they no longer appear in the matrix view. Any changes to your quantities can be done in the
shopping cart.
16
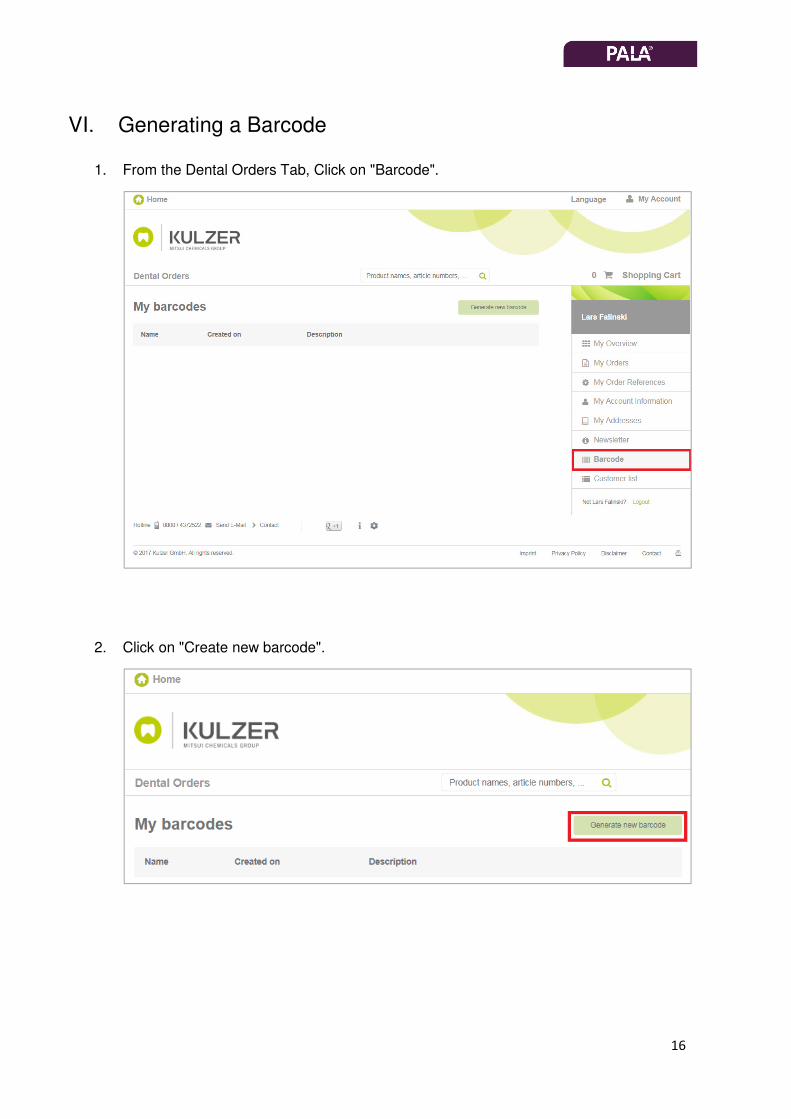
VI. Generating a Barcode
1. From the Dental Orders Tab, Click on "Barcode".
2. Click on "Create new barcode".
17

18
VII. Transferring Products to the Barcode Sheet
1. Enter products in the product matrix.
2. Click on "Transfer" to transfer your order to the barcode sheet.
Note: The Transfer icon is for transferring barcodes and not data to the shopping cart.

19
3. Now you can edit the barcode sheet and print it. You can also order directly or save the
specification.

20
VIII. Customizing and Printing Barcodes
1. Loading specifications Select a specification and click on the "Load" button.
2. Deleting tooth lines Click on a tooth line and drag it off to the side.
After releasing the mouse, the line will be deleted.
21
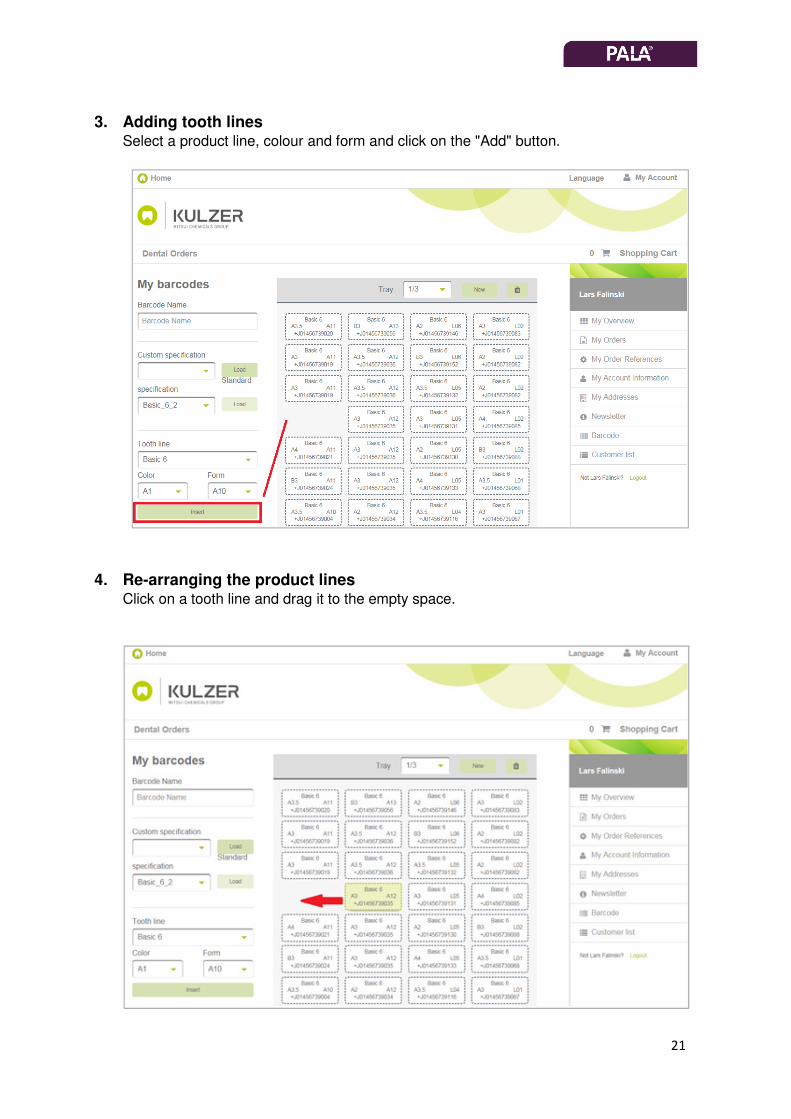
3. Adding tooth lines Select a product line, colour and form and click on the "Add" button.
4. Re-arranging the product lines Click on a tooth line and drag it to the empty space.

22
5. Selecting a drawer Click on the drop-down menu and select the next drawer.
6. Saving changes to specifications
a. Give the specification a name and click on "Save".

23
b. A notification will appear to confirm that the data has been saved.
c. Saved specifications can be found in the menu under “Barcodes”.

24
7. Printing barcodes
1. Click on the button "Print this specification".
2. A PDF will be created.
You can either print this PDF yourself or send it to our corporate office in South Bend to
have it printed there: [email protected]

25
Print:
1. Right click on the PDF and click “Print”.
2. Your print screen will appear. Click "Print" again.

26
Sending to South Bend:
1. Click on the “Save” symbol at the lower corner of your screen.
2. Select a file name and click "Save".
Open an e-mail. Add the file as an attachment and send it to:

27
IX. FAQs
1. What are the system requirements for PALA Easy Scan?
There are no minimum requirements for the computer, aside from an internet
connection, an up-to-date browser and the Kulzer Data Transfer File.
2. Where can I find PALA Easy Scan?
The PALA Easy Scan landing page at www.kulzerus.com/palaeasyscan will have all
information related to PALA Easy Scan including the User Guide, Kulzer Data
Transfer File and drivers if needed.
For direct access to the Webshop visit: https://shop.kulzer-dental.com
3. Where can I find the Kulzer Data Transfer exe file?
www.kulzerus.com/palaeasyscan
4. How do I uninstall the old PALA Easy Scan software?
1. Start Windows explorer
2. Choose “Programs and Features“
3. Click on “Heraeus Order Tool“ or “Pala Easy Scan“ – button
4. In dialog box click on “Yes“

28
5. To make sure that all documents and files are deleted please check your local
device:
5. How do I change my Login Information?
Once logged in from the home page, go to “My Account”.

29
X. Notes

30
Do you have questions?
Please contact 1-800-431-1785
Kulzer, LLC
4315 S. Lafayette Blvd.
South Bend, IN, 46614
www.KulzerUS.com
www.kulzerus.com/palaeasyscan
https://shop.kulzer-dental.com
66056371 R11/17