pagemaker 6.5 - the university of north carolina at pembroke
TRANSCRIPT

PLUS
University Computing and Information Services
Training Guide
For additional help, contact the UCIS Help Desk at (910) 521-6260 or [email protected],
or visit www.uncp.edu/ucis
Copyright © 2000 UNC Pembroke

PLUS .........................................................................................................................................................................................................1
ABOUT PAGEMAKER 6.5....................................................................................................................................................................2
HELP WITH PAGEMAKER 6.5 ...........................................................................................................................................................2 HELP TOPCIS.......................................................................................................................................................................................2 SHORTCUTS ........................................................................................................................................................................................2
CREATING A NEW PUBLICATION...................................................................................................................................................3 START PAGEMAKER 6.5 ...................................................................................................................................................................3 TO CREATE A NEW PUBLICATION.................................................................................................................................................3
PAGEMAKER 6.5 SCREEN..................................................................................................................................................................5 THE PAGEMAKER WINDOW............................................................................................................................................................5 TOOLBOX ............................................................................................................................................................................................6 COLORS AND STYLES PALETTE.....................................................................................................................................................7 STYLE...................................................................................................................................................................................................7 COLORS................................................................................................................................................................................................7 CONTROL PALETTE...........................................................................................................................................................................8
GETTING AROUND IN PAGEMAKER..............................................................................................................................................9 CHANGING THE VIEW ......................................................................................................................................................................9 WORKING WITH PAGES....................................................................................................................................................................9 MOVING BETWEEN PAGES..............................................................................................................................................................9 MOVING AROUND THE DESKTOP..................................................................................................................................................9
SAVING A PUBLICATION...................................................................................................................................................................9
WORKING WITH OBJECTS .............................................................................................................................................................10 DRAWING AND MODIFYING LINES, SHAPES AND OBJECTS..................................................................................................10 SELECTING AN OBJECT..................................................................................................................................................................11 CHANGING STROKES AND FILLS.................................................................................................................................................11 MOVING AND RESIZING AN OBJECT...........................................................................................................................................12 ROTATING AN OBJECT ...................................................................................................................................................................12 ARRANGE AN OBJECT ....................................................................................................................................................................13 PLACING TEXT DOCUMENTS OR IMPORTING AN OBJECT.....................................................................................................13
WORKING WITH TEXT.....................................................................................................................................................................13 CREATING TEXT OBJECTS.............................................................................................................................................................14 CREATE A TEXT FRAME .......................................................................................................................................................................15 UNDERSTANDING TEXT BLOCKS................................................................................................................................................15 WORKING WITH WINDOWSHADES........................................................................................................................................................15 EDITING TEXT ..................................................................................................................................................................................15 EDITING TEXT IN PAGE LAYOUT.................................................................................................................................................15 TWO METHODS OF FORMATTING TEXT ................................................................................................................................................16 EDITING TEXT IN THE STORY EDITOR........................................................................................................................................16 PLACING A TEXT FILE AND CREATING THREADED TEXT BLOCKS ....................................................................................17 USING PARAGRAPH STYLES.........................................................................................................................................................17 WRAP TEXT AROUND A GRAPHIC ...............................................................................................................................................17
MASTER PAGE ....................................................................................................................................................................................18 INSERT PAGE NUMBERING ...........................................................................................................................................................18
RULER GUIDES ...................................................................................................................................................................................18 DRAW A HORIZONTAL RULER..............................................................................................................................................................18 DRAW A VERTICAL RULER...................................................................................................................................................................19
University Computing and Information Services PageMaker 6.5 Plus UNC Pembroke Revised January 2001

University Computing and Information Services PageMaker 6.5 Plus UNC Pembroke Revised January 2001
REPOSITION A RULER...........................................................................................................................................................................19 REMOVE A RULER................................................................................................................................................................................19 LOCK GUIDES INTO PLACE ...................................................................................................................................................................19
COLUMN GUIDES...............................................................................................................................................................................19 REMOVE COLUMN GUIDES ...................................................................................................................................................................20
PRACTICE EXERCISE .......................................................................................................................................................................20
CREATING A LETTERHEAD TEMPLATE ....................................................................................................................................20
START A NEW PUBLICATION.........................................................................................................................................20
WEB SITES OF INTEREST ................................................................................................................................................................24
ADDITIONAL HELP............................................................................................................................................................................24

University Computing and Information Services Page 2 of 26 PageMaker 6.5 Plus UNC Pembroke Revised January 2001
ABOUT PAGEMAKER 6.5
Adobe PageMaker 6.5 is the award-winning page layout software of choice for business professionals who need to create and print high-quality documents simply and reliably. Professional publishing tools give you precise control over document look and feel, so you can produce visual communications that are both powerfully effective and highly creative.
HELP WITH PAGEMAKER 6.5 For help with PageMaker 6.5, from the menu select Help.
HELP TOPCIS 1. From the menu, select Help, Help Topics.
The Help Topics box opens. 2. In the Contents tab, double click the book
icon to see the topics in this category. 3. Click the Index tab to switch to the Help
Index. Click in the first textbox and type the first few letters of the word for which you are looking. Click the Display button. OR, click the entry you want from box two and press the Display button.
4. Click the Find tab to begin the Find Setup
Wizard. 5. When finished, click the Cancel button.
SHORTCUTS From the menu, select Help, Shortcuts to view PageMaker 6.5 shortcuts. Click Comprehensive List, Changed Shortcuts, or New Shortcuts tab to view the different tabs. Also click the buttons at the bottom of the box for more detailed shortcuts.

CREATING A NEW PUBLICATION
When you create a new blank publication you must make decisions about page layout options such as paper size, page orientation, number of pages, etc... START PAGEMAKER 6.5
From the desktop, click on the PageMaker 6.5 icon. OR
Click on the Windows Start button. Choose Programs, Adobe PageMaker 6.5, Adobe PageMaker 6.5. TO CREATE A NEW PUBLICATION 1. Start PageMaker. The Adobe PageMaker 6.5 box opens.
University Computing and Information Services Page 3 of 26 PageMaker 6.5 Plus UNC Pembroke Revised January 2001

2. From the menu, select File, New. The Document Setup box opens.
You can enter custom settings in the Document Setup box or click OK to begin laying out your publication using the default, or standard, settings that come with PageMaker.
A Options: When Double-sided is selected, side margins are labeled Inside and Outside. Otherwise, side margins become Left and Right.
B Number Of Pages: If you know how many pages the publication will have, you can create them now. If
you don’t know, you can easily add and remove pages later. C Adjust Layout: Select this option when you change the page settings of existing layout and want
PageMaker to automatically move and scale text and graphic objects. D Restart Page Numbering: Select this option only if the publication is part of a larger book (a linked set
of publications) but will not be numbered sequentially. For example, you may want appendixes numbered separately from the other chapters in a book.
University Computing and Information Services Page 4 of 26 PageMaker 6.5 Plus UNC Pembroke Revised January 2001

E Target Output Resolution: Select or enter the number of dots per inch (dpi) of your final output device. F Compose To Printer: In Windows, specify the printer yo will use to print the final version of your
publication. Do this as you start your publication, so that PageMaker displays the correct fonts and page sizes available for your printer.
3. You can select the desired page size, orientation, margins, choose the printer, and so on by clicking in the
appropriate boxes and drop-down list boxes or use the default page settings.
Note: It is important that you specify the printer you will use to print the final version of your publication so that PageMaker can display the correct fonts for your printer. This setting determines your font choices and the printable area of the page.
PAGEMAKER 6.5 SCREEN When you create a publication, PageMaker opens a publication window, which contains a blank page centered on the pasteboard. The page and pasteboard are where you lay out text and graphics.
THE PAGEMAKER WINDOW A The Toolbox displays tools you can select to create or edit objects and view a
publication. B Margins appear as dotted pink and purple lines.
University Computing and Information Services Page 5 of 26 PageMaker 6.5 Plus UNC Pembroke Revised January 2001

C Page icons show the master pages (L for left, and R for Right) and the regular pages in the publication. The open page is highlighted. Scroll arrows appear if there are more page icons to view than can be displayed at one time.
D Rulers help you align objects on the page. E The Color and Styles palettes are used to add, delete, and edit colors and styles. F The Pasteboard stores items for later use. Items on the pasteboard are visible from any page but do not
print. G The Publication Page is at the center of the pasteboard. H The Control Palette lets you make precise changes to text and graphics without switching to the toolbox
or choosing menu commands. TOOLBOX The icons in the toolbox represent the tools you use in PageMaker. To select a tool, click it. If the toolbox restricts your view of your work, drag its title bar to move it or choose Window, Hide Tools to close the toolbox.
A Use the Pointer tool to select, move, and resize text objects and graphics. B Use the Rotating tool to select and rotate objects. C Use the Line tool to draw straight lines in any direction. D Use the Rectangle tool to draw squares and rectangles. E Use the Ellipse tool to draw circles and ellipses. H Use the Polygon tool to draw polygons. G Use the Hand tool to scroll the page, or to preview and test hyperlinks. H Use the Text tool to type, select and edit text. I Use the Cropping tool to trim imported graphics J Use the Constrained line tool to draw vertical or horizontal lines. University Computing and Information Services Page 6 of 26 PageMaker 6.5 Plus UNC Pembroke Revised January 2001

K Use the Rectangle frame tool to create a rectangle placeholder for text and graphics. Use the Ellipse frame tool to create a circular or oval placeholder for text and graphics.
Use the Polygon frame tool to create a polygonal placeholder for text and graphics. L Use the Zoom tool to magnify or reduce an area of the page. COLORS AND STYLES PALETTE
STYLE
1. Click the Styles tab to select a style for the text.
2. To create a new style, click the button along the bottom of the Colors and Styles Palette. 3. The Style Options box opens. 4. Enter the name and click the Char.. button to set formatting for the style. Click OK.
5. To remove a style, select the style and click the trashcan along the bottom of the Colors and Styles Palette.
COLORS
1. Click the Colors tab to select a color.
2. To change line color, click the button.
3. To change fill color, click the button.
University Computing and Information Services Page 7 of 26 PageMaker 6.5 Plus UNC Pembroke Revised January 2001

4. To change line and fill color, click the button. 5. Selecting None makes the object transparent. 6. Select Paper applies the color white to the object.
7. To change the Tint, click the down arrow at the end of the Tint button.
8. To create a color, click button along bottom. 9. Name the color. Click the down arrow next to Model and select RGB. Enter the RGB (Red, Green and Blue)
value. For gold, enter Red 255, Green 204 and Blue 0. Click OK.
10. To remove a color, select the color and click the trashcan . CONTROL PALETTE
A Apply button: Click to apply formatting to selected text. B Character-view and paragraph view buttons: Toggle between to kinds of type settings. C Font D Font Size E Expert Tracking option: Type or select the amount of space between letters and words. F Kerning (Rotation) option: Increase, decrease, or view kerning increments. G Type-Style Buttons: Apply Normal, Bold, Italic, Underline, Reverse or Strikethru. H Case buttons: Specify small caps or all caps, or deselect both buttons for normal case. I Position buttons: Specify Superscript or Subscript type, or deselect both buttons for normal position. J Leading option: Specify the number of spaces between lines. K Horizontal Scale option: Type values from 5% to 250% in increments of a tenth of 1% (Normal equals
100%, or the character width in the original font design). L Baseline-Shift option: Specify the vertical position of text relative to the baseline.
University Computing and Information Services Page 8 of 26 PageMaker 6.5 Plus UNC Pembroke Revised January 2001

University Computing and Information Services Page 9 of 26 PageMaker 6.5 Plus UNC Pembroke Revised January 2001
GETTING AROUND IN PAGEMAKER CHANGING THE VIEW 1. Select the View menu and click on the desired viewing size from the list. 2. You can use the keyboard strokes listed next to the menu commands in the View menu. 3. You can zoom in and out of a particular area on the desktop using the mouse. From the "Fit in window"
view, position your pointer to the area of the page you would like to zoom-in on and press the right mouse button, then choose an appropriate viewing size.
4. To specify a custom view area with the mouse, press and hold <Ctrl> + <Spacebar> and click on the area
of the page to magnify. Press and hold <Ctrl> + <Alt> + <Spacebar> and click to reduce.
WORKING WITH PAGES 1. You can add or delete pages from the Page setup dialog box. Choose File, Document Setup. Type the
number of pages you want in your publication and click OK. PageMaker will add or delete pages to create the desired number of pages.
2. To remove pages, choose Layout, Remove Pages... Type the page range you want to remove, and click
OK. OR, right click on the page number. From the menu, choose Remove Pages. Set the page range. Click OK.
3. To add pages to the publication, choose Layout, Insert pages... Type the number of pages you want to
add, select a location for the new pages, and click Insert. OR, right click on the page number. From the menu, choose Add One Page or Insert Pages. If choose Insert Pages, set number of pages to insert, and choose before or after current page. From Master Page, choose Document Master if wish for pages to be like master or None if don’t want pages to be like master.
MOVING BETWEEN PAGES From the menu, select Layout, Go to Page... OR
Click a page icon on the bottom left of the screen to go to that page. MOVING AROUND THE DESKTOP Click on the scroll bars and arrows to scroll around the desktop.
SAVING A PUBLICATION
1. From the menu, choose File, Save. 2. The Save Publication box opens.

3. Choose the Save In location, File Name and Save As Type. Click Save.
Note: When saving a publication, if saved as a publication, PageMaker 6.5 adds the file extension ".p65.” If saved as a template, PageMaker 6.5 adds the extension “.t65.”
WORKING WITH OBJECTS
DRAWING AND MODIFYING LINES, SHAPES AND OBJECTS 1 Select a drawing tool from the toolbox by clicking once on the desired tool. Use the drawing tool to draw
lines, ellipses, rectangles, and polygons (or frames to hold text or imported graphics) to which you can apply a stroke and fill.
2. Click-and-drag the crossbar on the page to create an object. When you release the mouse button your
new object is selected. You can tell this because it is surrounded by black square handles . While the object is selected you can change the attributes or the look of the lines and interior of the object.
University Computing and Information Services Page 10 of 26 PageMaker 6.5 Plus UNC Pembroke Revised January 2001
DRAWING IRREGULAR
POLYGONS DRAWING BASIC SHAPES
TOOL
UNCONSTRAINED Press and drag the
cursor
CONSTRAINED Press <Shift> as you drag cursor
TOOL
To draw, point and click with left mouse button
Line
Polygon or Frame Polygon

Constrained Line
Not applicable
Rectangle or Frame Rectangle
Ellipse or Frame ellipse
Polygon or Frame Polygon
Open-path polygon
Double-click last point to anchor line segments. Closed-path polygon
Press any key other than Backspace, Delete, or Esc; or click on first anchor point to anchor and join line segments. Note: As you create a polygon, you can press Backspace or Delete to remove the last anchor you positioned.
SELECTING AN OBJECT 1. Select an object by clicking once on it with the pointer tool. 2. To duplicate an object: Select the object by clicking once on it with the pointer tool. Square handles
around an object indicate that the object has been selected. Click on Edit, Copy to copy the image to the clipboard, choose Edit then Paste.
3. You can select multiple objects by holding down the <Shift> key. 4. Another way to select multiple objects is to drag the Pointer tool around the objects you want to select. 4. Deselect an object by clicking on any empty area on the publication or the pasteboard surrounding the
publication. 5. To clear the screen, click on Edit, Select all then press the <Delete> key. CHANGING STROKES AND FILLS You can modify objects a number of ways in PageMaker. For example, you can resize, rotate, and add color to objects. For objects drawn with PageMaker drawing tools, you can also change stroke (the width of lines drawn with the drawing tools, and the width of borders around rectangles, ellipses, and polygons), as well as fill patterns. 1. To change only the stroke attributes, using the pointer tool, select the object. From the menu, choose
Element, Stroke, and choose a line style. 2. To change only the fill attributes, using the pointer tool, select the object. From the menu, choose Element,
Fill, and select a filling for your object (if the object is a rectangle, circle, or ellipse).
University Computing and Information Services Page 11 of 26 PageMaker 6.5 Plus UNC Pembroke Revised January 2001

3. To set both the fill pattern and stroke attributes for the selection, using the pointer tool, select the object. From the menu, choose Element Fill and Stroke and select attributes from the Fill and Stroke pop-up menus.
Note: If you select stroke or fill attributes when no object is selected, those attributes become the new default settings. Objects you subsequently draw adopt those attributes until you change them.
Note: You can double-click on the drawing tools in the toolbox to change default drawing attributes for the active publication.
MOVING AND RESIZING AN OBJECT You need to be able to position text and graphics precisely in order to create effective publications. You can move or reposition all PageMaker objects including both text and graphics by dragging them.
1. Select the Pointer tool from the toolbox. 2. Click anywhere on an object to select it. You may have to click on a line of an object if there is
no filling or if the object itself is a line. 3. To move an object, click and drag the object to a new location and release.
To view the object as you move it you will need to pause for a second after you click on an object. If you do not pause you will only see an outline of the object you are moving.
4. You can resize any object by dragging one of the square handles. To retain the object’s true proportion
while resizing, you must hold down the <Shift> key as you drag. Release the mouse button first and then release the <Shift> key for this to work.
5. You can trim a graphic file by selecting the Cropping tool and dragging the graphic handles. Cropping
does not remove parts of images; just covers selected edges. You can restore a cropped graphic by dragging the handle to the original position with the cropping tool. Cropping does not work with textholders.
ROTATING AN OBJECT
1. Using the Pointer tool from the toolbox, select the object.
2. From the toolbox, select the Rotating tool.
3. Click the black handle (black box) along the edge of the object and drag the starburst to rotate the object.
OR
University Computing and Information Services Page 12 of 26 PageMaker 6.5 Plus UNC Pembroke Revised January 2001

2. From the Control Palette, click in the Rotate option. Set the degree to rotate and press <Enter>.
3. Set the number displayed in the Rotate option to 0 to return the object to its original
setting. ARRANGE AN OBJECT
Arranging allows you to change the stacking order of objects 1. Select object. 2. From the menu, select Element, Arrange. Select Bring to Front, Bring Forward, Send
Backward or Send to Back. PLACING TEXT DOCUMENTS OR IMPORTING AN OBJECT The Place command is PageMaker’s primary importing method. When you place text or a graphic, PageMaker establishes a link to the source file on your disk (unless the file is an HTML document). The link allows PageMaker to update the version of the document that is in your publication, and can minimize the size of your publication by allowing you to store an imported graphic outside the publication. 1. From the toolbox, select the Pointer tool. 2. From the menu, select File, Place. 3. Locate the file to place and click OK.
Note: If graphic is larger than 256K, PageMaker displays an alert message asking if you want to store a complete copy of the graphic in the publication. If you don’t want to store the complete graphic, PageMaker imports a low resolution version of it for display only, which reduces the size of your publication file and establishes a link to the original file. This original file must be available and linked when you print the publication; otherwise PageMaker prints only the low resolution version of the graphic. You can increase or decrease the file size that PageMaker stores in your publication.
Choose Yes to place a complete copy in the publication
4. Position the icon anywhere on the page and click to place the object.
University Computing and Information Services Page 13 of 26 PageMaker 6.5 Plus UNC Pembroke Revised January 2001
WORKING WITH TEXT

You can type or format text directly in layout view, or take advantage of PageMaker’s story editor, a built-in word processor that makes it easy to create and edit text. In layout view, text is contained in text objects- either a text block (which is created with the text tool) or a text frame (which is created with a frame tool). CREATING TEXT OBJECTS
A text block must be rectangular; it cannot have a stroke or fill, and it cannot be empty.
A text frame can be any shape; it can have a stroke or fill, and it can be empty, serving as a placeholder for text to come.
Create A Text Block With The Text Tool
1. Select the Text tool from the toolbox. The text tool turns into an I-beam when you move it onto the page.
2. Click the I-beam where you want to insert text. By default, the insertion point jumps to the left side of the
text block. 3. Unlike with a text frame, you do not see the borders of a text block until you click the text with the pointer
tool.
University Computing and Information Services Page 14 of 26 PageMaker 6.5 Plus UNC Pembroke Revised January 2001
Create A Text Frame
1. Select the Rectangle frame tool and draw a rectangle on the page. 2. The shape is ready to receive content. An empty frame displays with a nonprinting cyan
marker, but otherwise behaves and prints like any other PageMaker-drawn shape. 3. To add text to the frame, click the text tool, click in the frame, and then type or paste text
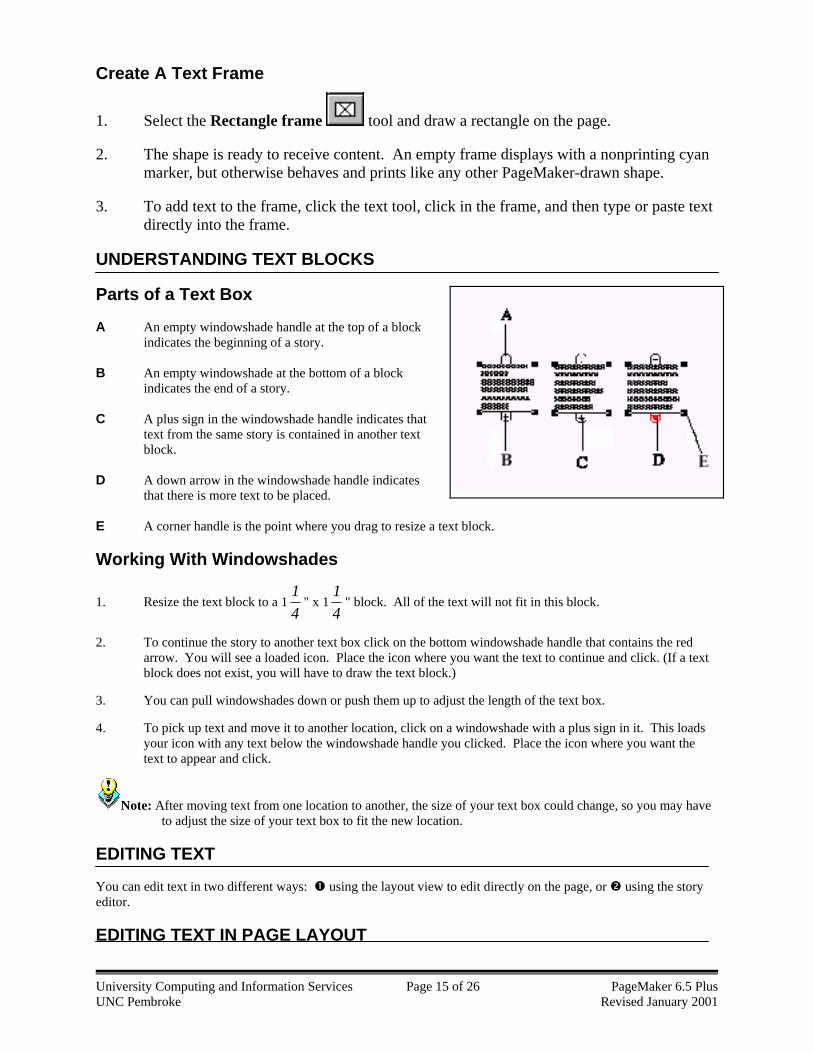
directly into the frame. UNDERSTANDING TEXT BLOCKS Parts of a Text Box
A An empty windowshade handle at the top of a block
indicates the beginning of a story. B An empty windowshade at the bottom of a block
indicates the end of a story. C A plus sign in the windowshade handle indicates that
text from the same story is contained in another text block.
D A down arrow in the windowshade handle indicates
that there is more text to be placed. E A corner handle is the point where you drag to resize a text block. Working With Windowshades
1. Resize the text block to a 141
" x 141
" block. All of the text will not fit in this block.
2. To continue the story to another text box click on the bottom windowshade handle that contains the red
arrow. You will see a loaded icon. Place the icon where you want the text to continue and click. (If a text block does not exist, you will have to draw the text block.)
3. You can pull windowshades down or push them up to adjust the length of the text box. 4. To pick up text and move it to another location, click on a windowshade with a plus sign in it. This loads
your icon with any text below the windowshade handle you clicked. Place the icon where you want the text to appear and click.
Note: After moving text from one location to another, the size of your text box could change, so you may have to adjust the size of your text box to fit the new location.
EDITING TEXT You can edit text in two different ways: using the layout view to edit directly on the page, or using the story editor. EDITING TEXT IN PAGE LAYOUT University Computing and Information Services Page 15 of 26 PageMaker 6.5 Plus UNC Pembroke Revised January 2001

1. Select the Text tool from the toolbox and click in the text box you want to edit. This positions your cursor within the pre-existing text so you may insert, delete, bold, italicize, etc...
2. You can select text that you want to format using several different techniques:
University Computing and Information Services Page 16 of 26 PageMaker 6.5 Plus UNC Pembroke Revised January 2001
FOR THIS TO HAPPEN DO THIS
Select a word
Double-click on the word
Select a paragraph
Triple-click on the paragraph
Select a range
Drag the I-beam
Select all text in a story
From the menu, choose Edit, Select All
Two Methods of Formatting Text
The TYPE MENU allows you to set normal word processing styles such as Font, Size, Leading, Alignment, Style, Tabs and Indents, as well as more specialized desktop publication formatting. OR The CONTROL PALETTE is an easy and effective way to be able to format text and graphics on your page. The Control Palette remains visible until you turn it off, just like the Toolbox. To display the Control Palette, select Window, Control palette. The Control Palette will display a different set of options depending on the tool you are using. The following is a picture of the text editing control palette:
Character View of Control Palette
Paragraph View of Control Palette
Change Default Formatting Settings De-select any text and select the desired formatting options. EDITING TEXT IN THE STORY EDITOR In story editor, you work only with text, not the layout, so revising text is fast and easy. Working in story editor is a convenient way to type or edit lengthy blocks of text. 1. Select the story you want to edit with either the pointer tool or the text tool. 2. Select Edit, Edit Story to open the text in PageMaker's word-processing facility. 3. Edit the story as desired. 4. Select Story, Close story, to close the story and return to layout view.

PLACING A TEXT FILE AND CREATING THREADED TEXT BLOCKS Text files can be placed in PageMaker. Text objects in PageMaker are very flexible. They can be broken apart and you can change their shapes as the page layout and graphic images in the publication dictate. You can create separate text blocks in the same story to accommodate any page design. These are called threaded text blocks. 1. Make sure there is not a checkmark next to the Autoflow command under the Layout menu,
If there is, choose Autoflow to deselect it. 2. From the menu, select File, Place. 3. Locate the text file you wish to place and click Open.
4. The mouse pointer changes to . (Pointer changes to if Autoflow is checked) 5. Click where you wish to place the text. 6. The text, inside a text block, appears. 7. When the text block appears, (if text is long) a red + appears at the bottom of the
windowshade.
8. Click the red +. The mouse pointer changes to . 9. Click to where you wish to insert the threaded text block. USING PARAGRAPH STYLES A paragraph style is a set of attributes that define the look of a paragraph: its font, type style and size, alignment and so on. Styles let you change the formatting of many paragraphs at once by simply changing the definition of the style that has been applied to those paragraphs.
1. From the Colors and Styles Palette, click the Styles tab.
2. Using the Text tool from the toolbox, highlight the desired text. Click the style from the Styles palette to apply the style.
WRAP TEXT AROUND A GRAPHIC 1. Place the graphic in the publication. Click on the graphic. 2. From the menu, select Element, Text Wrap. The Text Wrap box opens. 3. Select the Wrap option and Text flow. Click OK.
University Computing and Information Services Page 17 of 26 PageMaker 6.5 Plus UNC Pembroke Revised January 2001

4. A dotted box appears around the graphic. Click and drag the handles on the box to customize the text wrap.
MASTER PAGE
Changes made to the master page will be reflected throughout the publication. Text holders or graphics added to the master page will be added to all pages in the publication.
Click on the master page or icon, in the lower left corner of the window, to move to the master page. INSERT PAGE NUMBERING In PageMaker you add page-number markers to the pages you want to be numbered. PageMaker automatically updates the page number when repagination occurs (such as when you add, remove, or insert pages). You can type the page-number marker on a publication page or you can place page-number markers on the master pages to automatically number all pages in a publication. 1. Turn to a master page in the publication. 2. Click and insertion point with the text tool. 3. Press <Ctrl> + <Alt> + P. Format the text as necessary. Page-number markers appear as RM (right master) or LM (left master) on the master pages but display the page number on publication pages.
University Computing and Information Services Page 18 of 26 PageMaker 6.5 Plus UNC Pembroke Revised January 2001
RULER GUIDES Guides help you align and position object on the page. Make sure there is a check beside Snap to Rulers in the View menu. Rulers guides do not print. Draw A Horizontal Ruler Position the mouse pointer in the horizontal ruler. Click and drag down to the desired location for the horizontal ruler. A light blue horizontal ruler guide appears.

Draw A Vertical Ruler
Position the mouse pointer in the vertical ruler. Click and drag down to the desired location for the vertical ruler. A light blue vertical ruler guide appears.
Reposition A Ruler Click and drag the ruler to the desired location. Remove A Ruler Click and drag the ruler to the Pasteboard (the area around the publication). Lock Guides Into Place From the menu, select View, Lock Guides. This locks the guides into place so that you don’t accidentally reposition them with the pointer.
To unlock guides, from the menu, select View. Uncheck Lock Guides.
COLUMN GUIDES
Column guides are non-printing vertical lines that let you align text and graphics within the publication. When you create column guides on the master page, it ensures that the columns will be identical throughout the publication. 1. From the menu, select Layout, Column Guides. The Column Guides box opens. 2. Set the Number of columns and the Space between columns. Click Adjust Layout to
change the layout to fit the number of columns. Click Ok. Column guides appear.
University Computing and Information Services Page 19 of 26 PageMaker 6.5 Plus UNC Pembroke Revised January 2001

Remove Column Guides From the menu, select Layout, Column Guides. Set the Number of columns to 1 and check or uncheck Adjust Layout. The column guides disappear.
University Computing and Information Services Page 20 of 26 PageMaker 6.5 Plus UNC Pembroke Revised January 2001
PRACTICE EXERCISE CREATING A LETTERHEAD TEMPLATE
START A NEW PUBLICATION 1. Start PageMaker by double-clicking the Adobe PageMaker 6.5 icon. 2. Choose File, New. 3. Uncheck the "Double-sided" option. 4. Click in the Margins boxes and set the following margins:
Left: 2.25 inches Right: 1 inch Top: 2.75 inches Bottom: 2 inches
5. Select the printer you plan to use for the final version of your publication in the "Compose to Printer" box. 6. Click OK. POSITIONING RULER GUIDES You will see a blank screen with a picture of a vertical, letter-sized page. The pink lines on the page are guide lines that form a rectangular shape to display the margins you set. You can add guides to the page to help you align and position objects neatly on the page. Guides DO NOT print out. 1. By default the Rulers and Guides are turned on as well as the Snap to guides option. 2. Move your pointer to the upper-left corner of the page, click once with the right mouse button and choose
Actual Size.

This will zoom your view in the upper-left corner of the page and change the page display to the actual size of the page, so you can place the ruler guides precisely. 3. Position the pointer on the horizontal rule, click and drag down to the 1 1/4" mark on the vertical ruler. A
horizontal ruler guide appears. 4. Use the scroll bars to move the view to the lower-left corner of the page. 5. Create three more ruler guides as described below:
a. Drag a vertical guide right to the 1 1/8” mark on the horizontal ruler.
b. Drag a vertical guide right to the 2 1/4" mark on the horizontal ruler.
c. Drag a horizontal guide down to the 9 1/4" mark on the vertical ruler. 6. Choose View, Lock guides. This locks the ruler guides in place so that you don't accidentally move them
with the Pointer tool.
SAVING YOUR WORK 1. Choose File, Save. The "Save publication" dialog box appears. 2. In the Save as type box, click and choose Template to save this document as a template and not an
ordinary publication. 3. Double-click the directory location where you want to store the file in the Directories box. 4. In the File name: box type letterhead and then click Save. PageMaker will automatically insert the
extension .T65 to the end of your filename to indicate that this file is a template file. So far your letterhead template only contains a blank page with the layout grid you created. In the next section you will add text and graphics to your template.
University Computing and Information Services Page 21 of 26 PageMaker 6.5 Plus UNC Pembroke Revised January 2001

TYPING TEXT 1. Choose the Type menu and change the default text options to the match the ones listed below:
Font: Arial Size: 7 Leave all other settings as they appear. Leading: 12 Leading is the amount of space between two lines of text Alignment: Center
Note: Position your pointer on the lower left-hand corner of the page. Hold down the <Shift> key and click the right mouse button. This zooms you in to Actual Size to make it easier to see the text you are about to type.
2. Select the Text tool from the toolbox. 3. Position the tiny horizontal tick mark on the
I-beam at the intersection of the leftmost vertical guide and the horizontal guide at the bottom of the page. (See Figure A)
4. Click-and-drag the I-beam down and to the
right until you intersect the next vertical ruler guide. This creates a text block that controls the width of the text.
5. Type your name and address as you would
when addressing an envelope, pressing the <Shift> key after each line.
DRAWING A BOX To draw a box around the address for visual effect: 1. Select the Rectangle tool from the toolbox. 2. Choose Element, Stroke and set the line thickness to
"2pt". 3. To draw the box, click the crossbar on the intersection
of the ruler guides at the upper-left corner of the text block, and then drag to the lower-right corner of the text block.
DRAWING LINES To draw two horizontal lines in the box you just created to separate the lines of the address: 1. Select the Constrained-line tool in the toolbox. 2. Click the crossbar on the left side of the box beneath
your name, and then drag it to the right side of the box. Repeat to draw a line under the sixth line of the address (under Pembroke).
University Computing and Information Services Page 22 of 26 PageMaker 6.5 Plus UNC Pembroke Revised January 2001

PLACING A GRAPHIC You will now insert a copy of the UNCP logo into your template. 1. Select the Pointer tool from the toolbox. 2. Choose View, Actual Size. 3. Use the scroll bars or the right mouse button to move to the upper-left corner of the page. 4. Choose File, Place. 5. Choose the file logo.gif and click Open.
6. Position your pointer so that the upper-left corner of the icon fits in the intersection of the outer-most guides in that corner. Then click to place the logo.
RESIZING A GRAPHIC It may be necessary to resize the logo. 1. Using the Pointer tool, select the graphic if it is
not already selected. 2. Hold down the <Shift> key, click the lower-
right handle of the logo, and drag it to the right most vertical ruler guide. (Pressing the <Shift> key ensures that PageMaker maintains the proportions of the original graphic as you resize it.)
3. Choose File, Save. Your template is now complete. You can now use this template to write memos, letters, or other kinds of correspondence. The next exercise will demonstrate how to do this.
University Computing and Information Services Page 23 of 26 PageMaker 6.5 Plus UNC Pembroke Revised January 2001

PLACING A LETTER ON THE LETTERHEAD TEMPLATE You will place some text on your letterhead template in this exercise and save the letter as a publication instead of a template. 1. Your letterhead.T65 template should still be open. At this point we could start typing a letter on the page using the Text tool but for classroom purposes we will use some pre-existing text to fill the body of the letter. 2. Click on the page with the right mouse button to change the view to "Fit in Window" view. 3. Choose Place... from the File menu. 4. Choose the file Internet and click Open. 5. In the “Import-filter” dialog box, click OK. 6. Position the loaded text icon in the upper-left corner of the box formed by the pink margin guidelines and
click to place the text. 7. Choose File, Save as... and choose "Publication" in the Save as type box so the letter will be saved as a
normal publication. 8. Name the file letter1 and click on Save. You have successfully added body text to the template!
WEB SITES OF INTEREST Faculty and Staff Computing Services www.uncp.edu/ucis/facultyandstaff
Online Computer Guides www.uncp.edu/ucis/guide
ADDITIONAL HELP
For additional help, please contact the UCIS Help Desk:
Phone: (910) 521-6260 Email: [email protected] Internet: www.uncp.edu/ucis
University Computing and Information Services Page 24 of 26 PageMaker 6.5 Plus UNC Pembroke Revised January 2001