page #1 telorvek ii tp-50a tpi fuel injection … #1 telorvek ii tp-50a tpi fuel injection systems...
TRANSCRIPT

Page #1
TELORVEK IITP-50A
TPI Fuel Injection Systems
The Detail Zone fuel injection wire harnesses are ALL designed to follow the electronic circuitry of the vehicle
your engine was removed from! Following this simple procedure allows our fuel injection harness customers to
have their vehicles diagnosed by “ANY” GM dealer or reputable repair facility familiar with diagnosing fuel
injection electronic systems.
The Detail Zone does not re-engineer electronic circuitry that a vehicle manufacturer has spent millions of dollars
on testing and designing. Our goal is to allow an “easy”, “neat”, “pain free” installation through quality
installation instructions and a state of the art wiring kit.
If your vehicle experiences starting or runability problems, 99% of the time, it is some sort of mechanical, NOT A
WIRING PROBLEM. Fuel injection engines still run similar to carbureted engines, the difference being that the
engine computer receives “inputs” from various sensors throughout the engine. The computer then uses this
information to calibrate fuel delivery and engine timing.
Diagnosing a NO SPARK situation is the same on a computer controlled fuel injection engine as it is on a
carbureted engine. Spark control, even though it may be done slightly different depending on engine year and
make, is still essentially the same. A rotor is turned allowing spark to be provided to the plugs, the same as in a
carbureted engine.
Thank you for purchasing our products!
The Detail Zone877-968-7842
Page #2
This wiring system is compatible with 1985 through 1992 GM 5.0 & 5.7 tuned port engines. The system operates using
the 1990 through 1992 Camaro engine control computer. GM has updated this computer 1227730 twice since 1990. Any
one of the three computer numbers listed below can be used with this system. If you purchase a new computer through
GM, the 16198262 computer will be supplied. New computers are not supplied with proms. One must be installed or the
engine W ILL fail to operate. These computers are also used in other GM vehicle model applications. If you have
purchased your computer used, be sure it came from a 90-92 Camaro. If it came from another vehicle model, a new
factory stock Camaro prom must be installed in the computer. All other engine sensors are compatible with this wire
system and do not need to be upgraded! 1990-1992 GM Camaro Computer (ECM) #’s 1227730, 16196344 or
16198262 are to be used with this system.
Knock Sensor Notice: 1985-1989 engines will require updating the knock sensor to one of the 1990 through 1992 sensor
numbers listed below. W hile the 1985-1989 sensor looks identical to the sensor numbers listed below, it is not compatible
with the 1990 through 1992 computer.
Our Part # Description Engine Year GM Part #
KS-53 Knock Sensor 305 Engine 1990 10456019
KS-54 Knock Sensor 305 Engine 1991-1992 10456126
KS-63 Knock Sensor 350 Engine 1990-1992 10456031
WIRING INSTRUCTIONSThank you for purchasing the absolute finest of wiring kits for the General Motors fuel injection. W e have taken
considerable time to work out the circuitry so that you will understand at least some of what this is all about. W e ask that
you follow our instructions closely. W e recommend a high pressure in-tank fuel pump. Custom installations are available
from Tanks, Inc. (phone # 320-558-6882) and Rock Valley (phone #800-344-1934). There are some valuable HOW -TO’s
on our website (www.thedetailzone.com) under PROJECTS that can help you with your install.
Should you eliminate a sensor, your injection system will not work at its peak and will probably be in some variation of back
up mode. There are many factors that will keep you from a trouble free start up that you must consider.
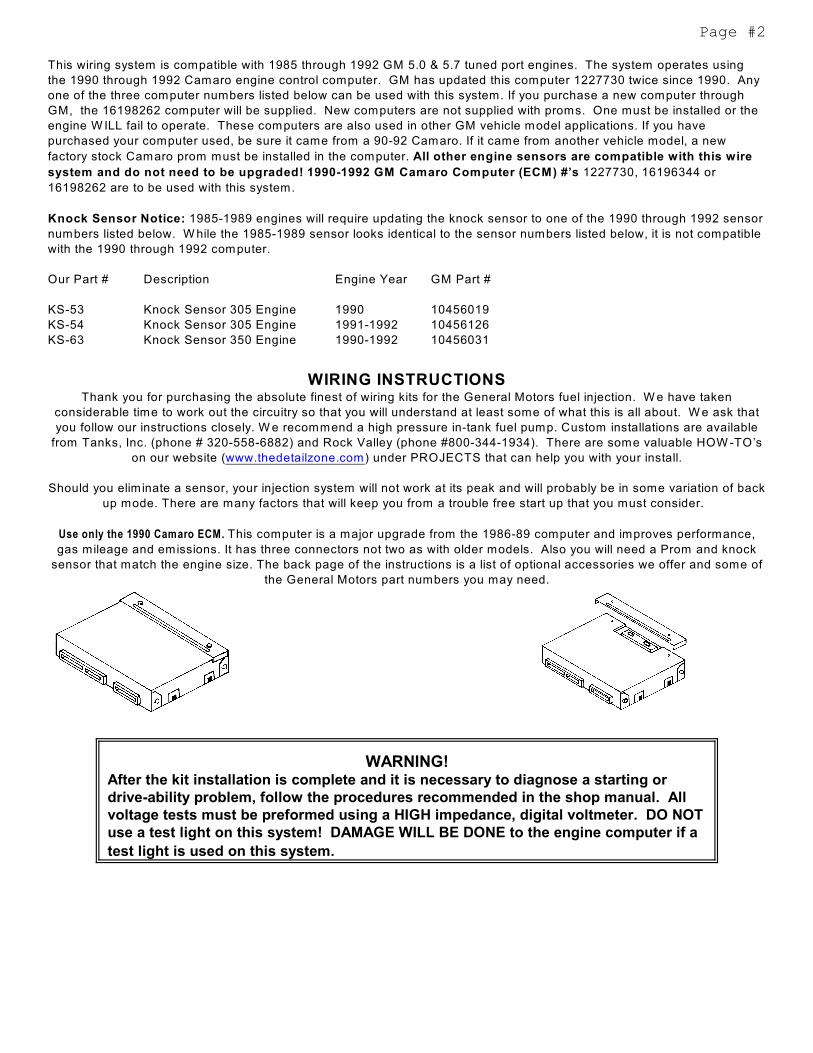
Use only the 1990 Camaro ECM. This computer is a major upgrade from the 1986-89 computer and improves performance,
gas mileage and emissions. It has three connectors not two as with older models. Also you will need a Prom and knock
sensor that match the engine size. The back page of the instructions is a list of optional accessories we offer and some of
the General Motors part numbers you may need.
WARNING!After the kit installation is complete and it is necessary to diagnose a starting ordrive-ability problem, follow the procedures recommended in the shop manual. Allvoltage tests must be preformed using a HIGH impedance, digital voltmeter. DO NOTuse a test light on this system! DAMAGE WILL BE DONE to the engine computer if a
test light is used on this system.
Page #3
STARTING INSTALLATION
Since there are so many individual circuits to complete, we recommend that you connect them in the order that we
prescribe. Disconnect the battery before starting and do not reconnect until instructed.
Plug in the computer (ECM) to the wires running from the TELORVEK II panel and mount them in an ACCESSIBLE
LOCATION. Under the dash, under the seat or in the trunk are good. There are a lot of wires so allow room to work. For
safety, after choosing a location, disconnect the ECM connectors until you are finished the installation. A poor
installation will result in a poor running car. The number referred to from this point on will be the location on one of the
terminal blocks located on the TELORVEK II panel.
For appearance, all wires can be fed through the center of the TPI unit itself. After all wires are in place, wire tie them
together or use zip loom to protect them. This can be done before any connections are made to the panel. Since all wires
are marked, running the entire group to the panel at one time is fine. Some terminals on the panel will not be used!
Any sensor that is difficult to hook-up should not be eliminated. All sensors are important if you desire your conversion to
run as good as a factory engine. Eliminating any part of this kit W ILL cause some portion of the EFI to work improperly.
Important! W e have supplied three sizes of terminals for your use on the panels itself. The yellow, used for 10-12 gauge
wire, Blue, used for 14-16 gauge wire and red for the bulk of the smaller wires. Each individual bag instructions will be
marked as to when to use the yellow and blue terminals. All others will use the red terminals.
The Detail Zone has made every effort to assure a quality product and can assure you that this system works well in your
application. Once you have confirmed proper installation and set the timing, any trouble you experience will be a defective
part or seat of the pants repair. Your unit can be tested at any General Motors Dealership with no difficulty.
Bag #21 COOLANT TEMPERATURE SENSOR After attaching the plug to the sensor, run the two wires to the panel and connect
the wire to #43 and the wire to #44. The sensor is located on the front of the manifold in theYELLOW BLACK
water jacket.
Bag #22 MANIFOLD AIR TEMPERATURE SENSOR which is located under the plenum, on the engine near the distributor and has
two wires. Plug in the sensor and run the wire to #8 and the wire to #9. This sensor looksBLACK TAN
physically like the coolant temp sensor except it is located in the air plenum in the rear of the manifold.
Bag #23 THROTTLE POSITION SENSOR Since there are many different physical shapes for these units, it is important that the
model used is matched to your computer. Plug into the sensor located near the throttle linkage and run the BLACK
to #10, to #11 and to #12. No adjustment is required.DK BLUE GRAY
Bag #24 KNOCK SENSOR WIRING is a single wire hookup to the knock sensor. This will inform the computer of detonation and
readjust the timing accordingly. If your engine is not equipped, the sensor may be installed in the drain plug hole just
above the oil pan on either side. Connect the plug to the sensor and run the wire to #13.DK BLUE
Bag #25. ELECTRONIC SPARK TIMING (Distributor) & IGNITION, TACH. At this time connect the EST wiring to the distributor and
run wire to #14, wire to #15, wire to #16 and wire to #17. TheBLACK TAN PURPLE WHITE
distributor must be from the engine that the injection came from not an older model with vacuum advance. Depending on
which type of distributor (internal or external coil) the correct ignition and tach connection have been supplied. Follow the
instructions below for the type of distributor you have:
INTERNAL COIL DISTRIBUTOR: The wire (HEI DIST->4) plugs into the BAT connection on the distributor capORANGE
and using the yellow terminal connects to #4 on the Telorvek panel. The wire (HEI DIST->TACH) connectsPURPLE
to the tach connection of the distributor cap and then run to the tach.
EXTERNAL COIL DISTRIBUTOR: Plug the gray connector into the coil. Using the yellow terminal run the wireORANGE
(COIL->4) to #4 on the Telorvek panel. The wire (COIL->TACH) runs to the tach.PURPLE
NOTE: External coil distributors must use the factory harness that connects the coil to the distributor. If needed
it may be ordered direct from GM under part # 12048976.
Page #4
Bag #26. ASSEMBLY LINE DATA LINK (ALDL) and SERVICE ENGINE LIGHT (Check Engine Light) The ALDL is the diagnostic link for
computerized testing at your local GM dealer or a hand held scanner. Please consider a very accessible location for this
important part. Connect the wire to #19, wire to #20, wire (ALDL G->26) to #26,ORANGE WHITE TAN
wire (ALDL->F->42) to #42, wire to #39 and the wire to #21. There are twoTAN BROWN BLACK
wires in the ALDL connector. Read the printing on the wires carefully before connecting them to the panel. TAN
The Check Engine light can be any low amperage 12 volt lamp located on the dash board or where ever desired. The
wire from #18 and the (positive) wire from #33 make these connections. Using an L.E.D lightBROWN PINK
requires connecting the positive wire from the light to the pink and the negative from the light to the brown wire. The
computer controls the light by internally grounding the brown wire. The yellow light on top of the TELORVEK II Panel has
the same function.
Bag #27. IDLE AIR CONTROL: The IAC is located on the throttle linkage and after plugging in the connector, run
to #47, to #48, to #49 and to #50. CAUTION! WATCH THELT GREEN LT GREEN LT BLUE LT BLUE
NUMBERS PRINTED ON THE WIRES against the terminal blocks since these wire colors are duplicated. There are
several different, yet similar appearing models of this unit and care should be taken to replace with the correct model if
necessary.
Bag #28. OIL PRESSURE SWITCH and WIRING (two wire unit) (GM Part #25036553): The oil switch is located in the rear of the
engine block near the distributor. Plug the black connectors onto the oil pressure switch (does not matter which terminal
they connect to). Using blue terminals, run to #27 and to #2. TAN RED
Bag #28 FUEL PUMP: The fuel pump relay connector is located in the cover of the TELORVEK panel and is pre-wired. A
relay must be installed in the connector (GM part #14100455) or the pump W ILL NOT operate. Using the blue terminals
connect the wire to #26 on the panel and run it to the fuel pump. The tan wire then connects to the positiveTAN
terminal on the pump. and the black FUEL PUMP GRND wire connects to the negative side of the pump and then to a
good ground. A pump that is capable of producing a minimum of 45 PSI must be used.
Bag #29. INJECTORS: The injector wiring is in two sections, one for the left side injectors and one for the right side injectors.
Note the color of wires running from the injector connectors. The left injector harness has pink and blue wires and the
right injector harness has pink and green wires. Follow the paragraphs below on their connections:
LEFT INJECTOR CONNECTIONS (drivers side): Starting from the front of the engine and working towards the fire wall, plug in
the injector connectors.
RIGHT INJECTOR CONNECTIONS: Starting from the front of the engine and working towards the fire wall, plug in the injector
connectors.
Now run all the wires to the panel. Connect the wire from the left injector harness to #28 and thePINK
wire form the right injector harness to #30. Connect the wire to #29PINK LT BLUE
and the wire to #31.LT GREEN
Bag #30. OXYGEN SENSOR: This area of the vehicle is hot so keep the wires away from the exhaust. Only one sensor is
required for this engine. Install as close to the block as possible. O2 Sensors have a 25,000 mile life. Replace used O2
Sensors with new. If you must install an adapter, use The Detail Zone part #OS-30. It works. You must also hookup a
ground wire to the exhaust pipe itself so weld a stud for this at the same time. The wire goes to #6 and thePURPLE
(ground) goes to #24.BLACK
Bag #31. MAP SENSOR: After installing the MAP (Manifold Air Pressure) sensor higher than the engine with the vacuum line
facing down, connect the vacuum line to a good source. Plug in the connector and run the toBLACK
#44, to #45 and the wire to #46. CRITICAL! The vacuum connection for thisLT GREEN GRAY
sensor MUST be from the rear of the plenum not from the front near the throttle plates/butterfly .... Bag #32 EGR VALVE: Plug connector into the EGR Solenoid and run the wire to #34 and the GRAY PINK
wire to #33. It is important that this be working properly as the idle speed, detonation and overheating can be effected by
this.
Page #5
Bag #33 ENGINE GROUNDS. Although some of these wires are marked ground they actually complete individual circuits that
happen to be grounded. For this reason these are important wires in the kit and must be connected properly. The
wire marked FRT ENG GRD is connected to a bolt in the front of the intake manifold and run to the numberBLACK
#22 on the panel. The wire marked REAR ENG GRD is run from a rear manifold bolt to number #24 on theBLACK
panel.
Bag #34. PARK/NEUTRAL RELAY: This system was developed to allow a regular park / neutral switch to tell the computer
when the vehicle is in park, neutral or drive. Since the signals are different, we have made this small circuit that will plug
into a stock GM neutral switch or splice to just about any two wire neutral switch. The signal input controls the idle air
control (IAC), vehicle speed sensor diagnostics (VSS) and exhaust gas recirculation (EGR).
In order to wire this circuit as easily as possible, follow the box below that pertains to the waythe rest of your vehicle "is" or "is going to be" wired.
PARK NEUTRAL SWITCH Installation instructions using a Ron Francis Wire Works Wiring kit.
This is a simple, color coded plug-in to GM Neutral Safety Switches. The regular car wiring that normally runs to
the neutral safety now plugs into the P/N relay kit with the with the blue and purple wires in the black connector. The
plug with the blue and black wires is connected to the original neutral safety switch.
T Run the wire with the ring terminal to a good ground. BLACK
T The wire running from the relay is run to #25 on the Telorvek panel. ORANGE
T Don't forget to install a relay (GM part #14100455).
PARK NEUTRAL SWITCH Installation instructions not using a Ron Francis Wire Works Wiring Kitor installing unit using a neutral safety that the connectors supplied on the park/neutral relay wiresis not correct for your application.
NOTE: Using any other standard neutral switch requires only removing the plug and splicing.
Either color wire can be used on either terminal. The black plug with the light blue and black
wires is connected into your neutral safety switch. If the connector on the wires doesn't fit your application then remove
it and connect the wires to the switch.
T The in the plug must be connected to the 12 volt supply from the ignitionDK BLUE
switch. This wire becomes hot (12 Volts) when you turn the key to crank.
T The is connected to the wire that runs to the starter solenoid. PURPLE
T Run the to #25 on the Telorvek panel. Don't forget to install a relayORANGE
(GM part #14100455).
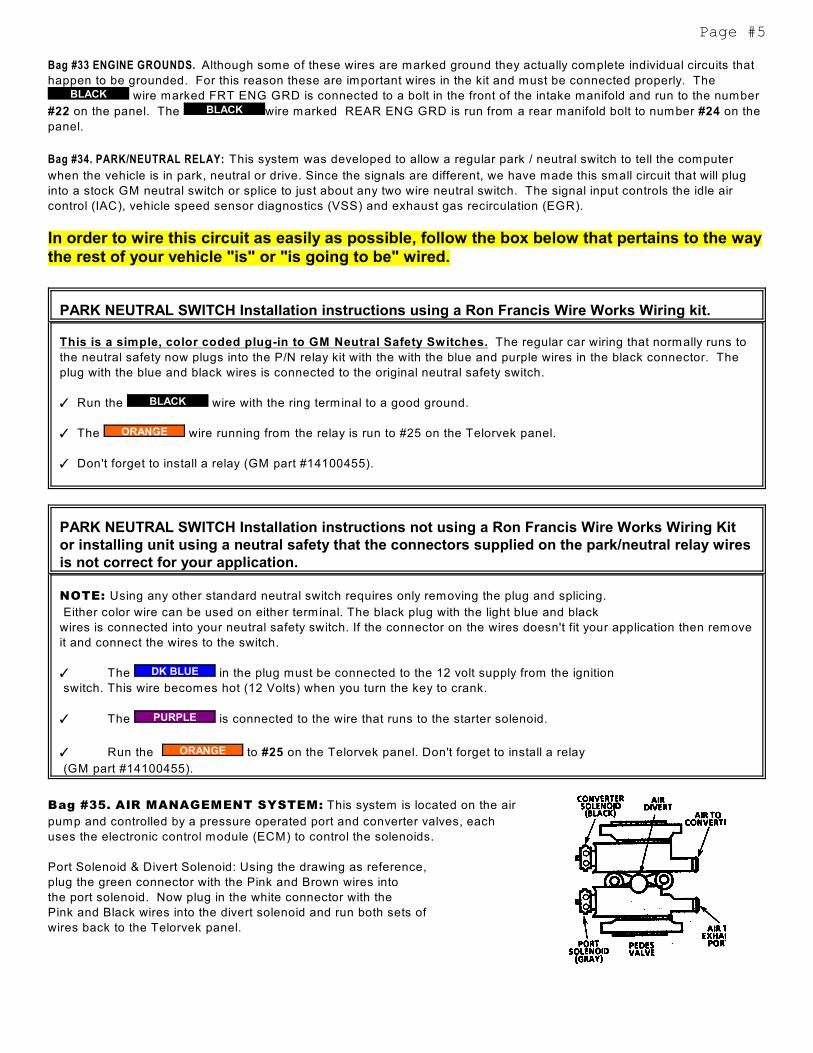
Bag #35. AIR MANAGEMENT SYSTEM: This system is located on the air
pump and controlled by a pressure operated port and converter valves, each
uses the electronic control module (ECM) to control the solenoids.
Port Solenoid & Divert Solenoid: Using the drawing as reference,
plug the green connector with the Pink and Brown wires into
the port solenoid. Now plug in the white connector with the
Pink and Black wires into the divert solenoid and run both sets of
wires back to the Telorvek panel.
Page #6
CANISTER PURGE: The purge solenoid is controlled by the ECM and allows ported manifold vacuum to purge the
vaporsfrom the canister. Canister Purge: Plug in the red connector with the & wires into thePINK DK GREEN
canister purgesolenoid and run the wires back to the Telorvek panel.
Connect the three wires to the Telorvek panel as follows:(PURGE SOL A->3) to #3, (DIVERT SOL A->5)PINK
and(AIR PORT SOL A->5) both wires connect to #5. Connect the wire (PURGE SOL B->38) toDK GREEN
#38, (DIVERT SOL B->40) to #40 and (AIR PORT B->39) to #39. BLACK BROWN
VEHICLE SPEED SENSOR (VSS): A VSS signal input is needed on all General Motors TPI engines. If the ECM does not see
that input a CODE 24 WILL SET The VSS input helps control some of the EGR and IAC functions. You need to provide
this input and prevent this code one of two ways.
Using a 700 R4 Transmission The first is most 700 R4 transmissions have the factory pulse generator located in them.
This can be connected into the computer to provide this signal. For the 700 R4 transmission that has a speedometer cable
connector we have developed a pulse generator (part #PG-6A) that installs in line on the cable to provide the speed signal
into the computer. This transmission also requires a torque converter lock-up signal which is given by the ECM from the
input it receives from the pulse generator. The Detail Zone TC-60 wiring kit includes the wiring for the TCC lock-up and the
correct connectors to plug into the factory pulse generator to make this connection easy.
Other Transmissions A speed signal into the computer can done simply by purchasing the PG-6A pulse generator. It
installs into the speedometer cable and following the instructions will wire into the harness. If you would like to wire the
VSS circuit yourself, terminal #35 is the VSS low (ground side), #36 is the VSS high (signal) and if you have an electric
speedometer terminal #37 is for that connection.
700R4 Transmission Panel Connections The Detail Zone offers a wiring kit (TC-60) for the 700R4 transmission which
allows the computer to control torque converter lock-up. If you would like to wire in this circuit yourself, terminal #41 is the
high gear switch and terminal #42 is the torque converter lock-up control.
Cold Start Injectors Some GM fuel injection engines have a ninth injector used for cold starting. W iring your vehicle as a
1990 does not require this injector to be connected. The 1990 engine computer allows more fuel to the engine during cold
starts. The injector as well as the sensor for the ninth injector mounted on the front of the engine can be removed and
plugged or left in place un-connected.
Final Hookups
Connect the large prewired wire to the ignition circuit of your ignition switch. This is an ignition feed that isORANGE
controlled by the ignition switch. This is not an accessory feed and must remain hot even when the engine is
cranking. Connect the large prewired battery feed wire to a battery feed. This is a battery feed that mustRED
remain hot even with the key off. Make sure this is a good connection. If you have a Master Disconnect switch, install
this wire on the battery side of the switch so it will remain hot with the Master Disconnect turned off. The
ground wire from the TELORVEK II Panel runs direct to the battery. Do not consider grounding the batteryBLACK
to the frame and then the engine to the frame. Run the battery ground directly to the engine.
If you turn the key on but do not crank engine, you will hear the fuel pump for about 2 to 4 seconds before it stops.
This will indicate the pump is ready. During normal operating it is best if you do not wait till the pump stops as this is not
an indication that the pressure is up. There is no need to "pump" the throttle on fuel injection cars.
You have now completed the kit installation. You may have noted empty terminals on the Telorvek panel that do not
have any wire connections to them. The Detail Zone runs all computer connections out of the computer plug(s) even if
they are not used in aftermarket applications.
Other Harness Connections: The Detail Zone offers a CF-29 cooling fan and A/C request wiring kit for connecting into
an electric radiator cooling fan as well as into the A/C circuit to raise the engine idle when the A/C compressor is on. If you
would like to wire these items yourself, the necessary wires have been run out of the computer plug to terminals on the
Telorvek panel.

Page #7
A/C Request: If your vehicle has air conditioning, splice a wire into the wire that runs from the A/C on/off switch to the A/C
thermostat. This wire will become hot when the A/C is turned on. After completing the splice run the wire to the Telorvek
panel and connect it to #7.
Electric Cooling Fan Relay Control: This circuit requires a relay which the computer controls through terminal #32.
POSSIBLE PROBLEMS ARE:
W rong Prom, ECM or Vacuum leaks. No fuel or Timing incorrectly set, IAC adjustment, Dirty injectors or fouled plugs if
engine runs rich too long. Clogged injectors may need cleaning for proper operation. This can be accomplished with
several methods with commercially available cleaners. Less than 45 PSI fuel pressure. Less than 194N thermostat.
TROUBLE CODES
Listed below are trouble codes the ECM will store in the event of a sensor failure. Inserting the code key attached to the
ALDL connector into terminal A to terminal B (white and black wires) will allow the computer to "flash" trouble codes in the
"CODES" light mounted on the TELORVEK II panel and (or) on the dash mounted light.
Each code will flash 3 times. Each number is flashed separate. Example: Thirteen is flashed as a single flash followed by
three flashes. This will repeat three times before moving on to any addition codes. Not all that can go wrong on an EFI
computer controlled system will set a service code. If no codes are present and there is a drive-abilty problem it may be
necessary to connect a scan tool to the system or have it serviced at a qualified repair facility. The fuel pump can be
tested by temporarily connecting a 12 volt source to the 'G' terminal of the ALDL.
12 Distributor not turning
13 Oxygen Sensor
14 High temp
15 Very low temp
21 TPS high voltage
22 TPS low voltage
23 MAT low temp
24 Speed Sensor
25 MAT high temp
32 EGR
33 MAP
34 MAP
41 Replace Prom
42 VSS Cirkt
43 Excessive Knock
44 Oxygen Lean
45 Oxygen Rich
46 VATS
51 Replace Prom
52 Replace prom
53 Vehicle over voltage
54 Fuel pump low
voltage
RESETTING IAC VALVE PINTLE POSITION: If the IAC was completely out of the manifold for any reason like polishing,
replacement or whatever, resetting will be necessary. Carefully follow the following instructions.
(1) Slightly depress accelerator pedal.
(2) Start and run the engine for five seconds.
(3) Shut engine off for ten seconds.
(4) Start the engine and check for proper idle.
TIMING ADJUSTMENT: To set base timing at 5 or 6 degrees, you must disconnect the special timing plug in the tan wire
at the distributor first. Pull this apart for tim ing purposes and then reconnect to run. This may cause code 42 to be stored in
the ECM memory. This must be cleared after setting timing or distributor will not advance properly. This is best
done with a scanner but disconnecting the battery for 30 seconds will accomplish the same task. After
disconnecting the battery to clear codes etc, the engine will run poorly at least until it is in closed loop and approximately
another 10-15 minutes. If there are any defective sensors or other parts, this will take much longer.
Computer controlled timing cannot be tricked by setting it higher without causing problems in other settings. The computer
will readjust to a stock setting. set the timing at recommended point only. After setting timing, turn off engine and reconnect
the special timing disconnect plug. This is important that you use this procedure as too high a timing will case some
headaches you don't need.

Page #8
The harness has a total of eight fuses. Shown below is a diagram of what each fuseprotects.
Fuse Row #1 Fuse Row #2
Fuse Designation Fuse Size Fuse Designation Fuse Size
(BATTERY FEED)
Oil SW , ECM
15 AMP (IGNITION FEED)
Air Port, Air DivertSolenoids
10 AMP
(BATTERY FEED)
Fuel Pump Relay
10 AMP (IGNITION FEED)
Left Injectors
5 AMP
(IGNITION FEED)
Canister Purge Solenoid
10 AMP (IGNITION FEED)
Right Injectors
5 AMP
(IGNITION FEED)
Ignition Coil, ECM
20 AMP (IGNITION FEED)
EGR Solenoid, S.E.S LT.
10 AMP
Telorvek II Options
CF-69 Map Sensor, Oil Switch, Fuel Pump & Park Neutral Relay
PG-6A Speed Generator (Pulse Generator)
CF-29 Radiator Cooling Fan & AC Request
OS-30 Oxygen Sensor Adapter (Weld In)
OS-53 1 wire Oxygen Sensor for TPI
TC-70 Torque Convertor Lock-Up (Stand Alone)
TC-60 Torque Converter Lock-up Computer Controlled
(Square Four Pin Connector) Pulse Generator Required
TC-62 Torque Convertor Lock-Up Computer Controlled
(Round Five Pin Connector) Pulse Generator Required
PR-64 Prom 305 Auto Transmission (1990) GM #16163062
PR-67 Prom 305 Auto Transmission (1991-1992) GM #16163062
PR-65 Prom 350 Auto Transmission (1990-1992 GM #16151348
PR-66 Prom 305 Manual Transmission (1990-1992) GM #16163138
KS-53 Knock Sensor 305 Engine (1990) GM #10456019
KS-54 Knock Sensor 305 Engine (1991-1992) GM #10456126
KS-63 Knock Sensor 350 Engine (1990-1992) GM #10456031
EC-51 Engine Control Module (ECM) With Approved Core
Return
General Motors Part Numbers
Oil Switch (Two W ire Unit) 25036553
M.A.P. Sensor 16137039
Fuel Pump & Park Neutral Relays 14100455
Computer (ECM) 1227730 or 16196344 or 16198262
Note:
If you are in need of the clips with studs and nuts to used properly bolt down the computer, The clips are available from a
GM dealer in packs of 10 under part number 12337892 and the nuts are available individually under part number 11502702.
Page #9
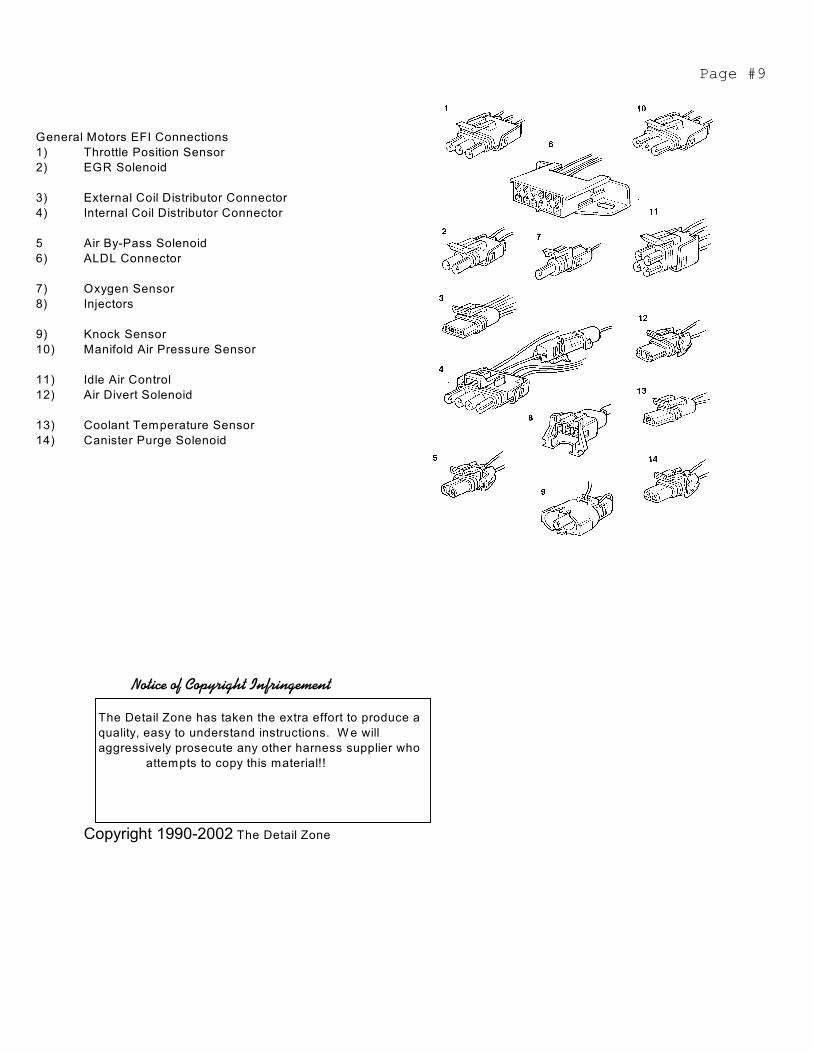
General Motors EFI Connections
1) Throttle Position Sensor
2) EGR Solenoid
3) External Coil Distributor Connector
4) Internal Coil Distributor Connector
5 Air By-Pass Solenoid
6) ALDL Connector
7) Oxygen Sensor
8) Injectors
9) Knock Sensor
10) Manifold Air Pressure Sensor
11) Idle Air Control
12) Air Divert Solenoid
13) Coolant Temperature Sensor
14) Canister Purge Solenoid
Notice of Copyright Infringement
The Detail Zone has taken the extra effort to produce a
quality, easy to understand instructions. W e will
aggressively prosecute any other harness supplier who
attempts to copy this material!!
Copyright 1990-2002 The Detail Zone