pablito's playground documentation
TRANSCRIPT

Pablito’s playground Documentation
Pablo Baudin
Jan 13, 2021

Cheat codes
1 Useful commands 31.1 Bash and general commands . . . . . . . . . . . . . . . . . . . . . . . . . . . . . . . . . . . . . . . 31.2 Set up new computer cluster . . . . . . . . . . . . . . . . . . . . . . . . . . . . . . . . . . . . . . . 41.3 Git set up . . . . . . . . . . . . . . . . . . . . . . . . . . . . . . . . . . . . . . . . . . . . . . . . . 51.4 Git commands . . . . . . . . . . . . . . . . . . . . . . . . . . . . . . . . . . . . . . . . . . . . . . 61.5 Vim commands . . . . . . . . . . . . . . . . . . . . . . . . . . . . . . . . . . . . . . . . . . . . . . 61.6 Create hotspot on linux mint . . . . . . . . . . . . . . . . . . . . . . . . . . . . . . . . . . . . . . . 7
2 Things to do after installing Linux Mint 92.1 During the installation . . . . . . . . . . . . . . . . . . . . . . . . . . . . . . . . . . . . . . . . . . 92.2 Setting up Linux Mint . . . . . . . . . . . . . . . . . . . . . . . . . . . . . . . . . . . . . . . . . . 92.3 Copy important files and folders . . . . . . . . . . . . . . . . . . . . . . . . . . . . . . . . . . . . . 102.4 Add SSH key to git . . . . . . . . . . . . . . . . . . . . . . . . . . . . . . . . . . . . . . . . . . . . 102.5 Package installations . . . . . . . . . . . . . . . . . . . . . . . . . . . . . . . . . . . . . . . . . . . 10
3 Install printers 15
4 Compile CPMD 174.1 Cloning CPMD . . . . . . . . . . . . . . . . . . . . . . . . . . . . . . . . . . . . . . . . . . . . . . 174.2 On the LCBC cluster at EPFL . . . . . . . . . . . . . . . . . . . . . . . . . . . . . . . . . . . . . . 174.3 On my laptop . . . . . . . . . . . . . . . . . . . . . . . . . . . . . . . . . . . . . . . . . . . . . . . 18
5 Formating strings in Python 195.1 Basic formatting . . . . . . . . . . . . . . . . . . . . . . . . . . . . . . . . . . . . . . . . . . . . . 195.2 Table summary . . . . . . . . . . . . . . . . . . . . . . . . . . . . . . . . . . . . . . . . . . . . . . 195.3 Useful examples . . . . . . . . . . . . . . . . . . . . . . . . . . . . . . . . . . . . . . . . . . . . . 20
6 Add and run CPMD regtests 21
7 LSDalton memo 23
8 GIMP 258.1 Autocrop all layers . . . . . . . . . . . . . . . . . . . . . . . . . . . . . . . . . . . . . . . . . . . . 25
9 Equilibration at MM and QMMM level using Amber and CPMD 279.1 Generate RESP charges with Gaussian . . . . . . . . . . . . . . . . . . . . . . . . . . . . . . . . . 279.2 Generate .mol2 file for leap and Amber . . . . . . . . . . . . . . . . . . . . . . . . . . . . . . . . . 299.3 Leap (Amber): solvate molecule in TIP3P water . . . . . . . . . . . . . . . . . . . . . . . . . . . . 30
i
9.4 Generate custom box with packmol . . . . . . . . . . . . . . . . . . . . . . . . . . . . . . . . . . . 309.5 Leap (Amber): set up a non-standard system from a .pdb file . . . . . . . . . . . . . . . . . . . . . . 319.6 Leap (Amber): custom solvent box . . . . . . . . . . . . . . . . . . . . . . . . . . . . . . . . . . . 329.7 Amber: equilibrate system . . . . . . . . . . . . . . . . . . . . . . . . . . . . . . . . . . . . . . . . 349.8 Run QM/MM calculations with CPMD . . . . . . . . . . . . . . . . . . . . . . . . . . . . . . . . . 36
10 Visualize canonical orbitals from CPMD 3910.1 Step 1: Get the CPMD files for the orbitals to plot . . . . . . . . . . . . . . . . . . . . . . . . . . . 3910.2 Step 2: Generate cube files . . . . . . . . . . . . . . . . . . . . . . . . . . . . . . . . . . . . . . . . 39
11 Links 41
12 Publications 4312.1 Le complot de la connaissance . . . . . . . . . . . . . . . . . . . . . . . . . . . . . . . . . . . . . . 43
13 Contact 45
ii

Pablito’s playground Documentation
Cheat codes 1

Pablito’s playground Documentation
2 Cheat codes

CHAPTER 1
Useful commands
This section contains a collection of useful commands that I don’t use enough to remember.
1.1 Bash and general commands
• On Fujitsu LIFEBOOK E Series use the <F2> key to enter the bios.
• Find command:
# Find files or directory with specific name:find [path] -name [\*part_of_filename*] -type f/d -print
# Find file with specific name **and** which contains a specific string:find [path] -name [\*part_of_filename*] -type f -exec grep [string] '{}' \; -print
# Remove all files except the ones matching a specific string:find . ! -name [\*part_of_filename*] -exec rm -rf {} +
• Merge different pdf files into a single one:
pdftk in1.pdf in2.pdf cat output out1.pdf
• Create symbolic link:
ln -s source_file myfile
• Tar compression and extraction:
tar -czvf name-of-archive.tar.gz /path/to/directory-or-filetar -xzvf name-of-archive.tar.gz
• Managing packages:
3

Pablito’s playground Documentation
# update package list:sudo apt-get update
# upgrade installed package:sudo apt-get upgrade
# remove unused package:sudo apt-get autoremove
# install package:sudo dpkg -i filename.deb
• Print the total disk space used inside the current directory:
du -sh *
• Shutdown from command line:
sudo /sbin/shutdown -r now
• To get ID of running jobs (on background):
jobs -l# or betterps -u pbaudin
• To produce a diff file between two directories, for example a patch for CPMD:
diff -ruN -x '.svn' -x '.git' cpmd_new/ cpmd_ref/ > patch
Description of options: -r is for recursive, -u is to add 3 lines of context arround diffs, and -N is to treat absent filesas empty. The -x allows to exclude files from the diff and should be repeated as many times as required.
• To print fortran code in a pretty format:
a2ps --pretty-print=fortran --pro=color -Ppdf print.F90
• Open a file (e.g. .doc or .png) from command line using default application:
gnome-open myfile# orxdg-open myfile
It can be convenient to put the following alias in the .bashrc file:
alias open='xdg-open'
Setting the cell dimension in vmd (usefull when plotting g(r)):
pbc set {30.0 30.0 30.0} -all
1.2 Set up new computer cluster
1. Copy rc and other configuration files from laptop to cluster:
4 Chapter 1. Useful commands

Pablito’s playground Documentation
scp -r ~/.bashrc \~/.git-completion.bash \~/.gitignore_global \~/.gitconfig \~/.vimrc \~/.vim/ \~/.ssh/config \cluster:~
Where cluster is the ssh label of the cluster from the ~/.ssh/config file.
2. Generate ssh key for git:
ssh-keygen -t rsa -C "[email protected]" -b 4096
3. Go to https://gitlab.com/profile/keys to add the key.
1.3 Git set up
Note: This is not needed if the gitconfig and other git files have been copied above
• Global settings when using git on new station:
# general settingsgit config --global user.name "Pablo Baudin"git config --global user.email "[email protected]"git config --global core.editor vimgit config --global color.branch autogit config --global color.diff autogit config --global color.status autogit config --global core.excludesfile ~/.gitignore_global
# Tools for merge and diff:git config --global diff.tool vimdiffgit config --global diff.merge vimdiffgit config --global difftool.prompt false
# Alias (maybe too much?):git config --global alias.st statusgit config --global alias.d difftool
• Set the default mode for git push (current, matching or tracking):
git config --global push.default current
• Disable fast-forward merges:
git config branch.master.mergeoptions "--no-ff"
• Add the .git-completion.bash file to your home.
1.3. Git set up 5

Pablito’s playground Documentation
1.4 Git commands
• Create new branch:
git checkout -b <local-branch-name>git push -u origin <local-branch-name>
If push.default = current is set then the -u option will track remote branch of same name.
• Delete branch:
git push origin --delete <remote-branch-name>git branch -d <local-branch-name>
• Show all branches:
git branch -a
1.5 Vim commands
In the root directory of a fortran code, run
ctags --fortran-kinds=+i -R *# or with the bash alias (inside the .bashrc file)ct
For a python code, run
ctags --exclude=*.pyc --python-kinds=-i -R *# or with the bash alias (inside the .bashrc file)ctpy
This will create a tag file that can be used by vim. In your .vimrc file, insert the following lines:
set tags=./tags;/map <C-h> :split <CR>:exec("tag ".expand("<cword>"))<CR>map <C-g> :vsp <CR>:exec("tag ".expand("<cword>"))<CR>
It is then possible to navigate inside the code from vim and to use auto-completion of functions and variables whenwriting code.
• For opening the file containing the definition of the function or variable under the cursor use <Ctrl-G>(vertical split) or <Ctrl-H> (horizontal split).
• For auto-completion, use either <Ctrl-N> or <Ctrl-P>.
When pasting already indented code press <F8> to enter paste mode and avoid extra indentation. It works with theline
set pastetoggle=<F8>
in .vimrc.
For spell checking, I have set the following
6 Chapter 1. Useful commands

Pablito’s playground Documentation
map <silent> <F7> "<Esc>:silent setlocal spell! spelllang=en<CR>"map <silent> <F6> "<Esc>:silent setlocal spell! spelllang=fr<CR>"
when spell checl is set, correction suggestions are available by typing z= in command mode.
1.6 Create hotspot on linux mint
If you have wired connection, then do this:
1. Go to “Network Connections” from bottom-corner networking icon.
2. Click on “Add” and choose “Wi-Fi” option.
3. Give the connection name (to adapter not SSID).
4. Provide a name of your hotspot in SSID field.
5. Set mode to Hotspot.
6. Select the (only?) availeble option under “Device”. wlp2s0 (48:51:B7:71:D4:37)
7. Go to “Wi-Fi Security” and choose “WPA & WPA2 personal” or any type of security of your preference and setup a good password.
8. Now, go to “IPv4 Settings” and set the “Mode” to “Shared to other computers”.
9. Save your settings and connect your hotspot from “Connect to Hidden Network. . . ” and you’re done.
1.6. Create hotspot on linux mint 7

Pablito’s playground Documentation
8 Chapter 1. Useful commands

CHAPTER 2
Things to do after installing Linux Mint
Todo: Set up back up for files and system
Here is a collection of things I have done after installing Linux Mint 19 – Cinnamon edition.
2.1 During the installation
I followed this tutorial, https://linuxmint-installation-guide.readthedocs.io/en/latest/index.html
I wanted to have the root / and home /home/ installed on different partitions so I selected the option Somethingelse when asked about installation type. However, I faced issues when installing the grub (GRUB Installation Failed.The ‘grub-efi-amd64-signed’ package failed to install into /target/. Without the GRUB boot loader, the installed systemwill not boot)
The solution that I used was to create an extra fat32 partition of 512 MB and attach to it the boot and esp flags.During the linux mint installation process I then add to select this partition for booting linux mint as showed in thisvideo https://www.youtube.com/watch?v=lbJ7NFw6cG4.
Note: This time I choose to encrypt the home folder. Lets see if it becomes handy or not. . .
2.2 Setting up Linux Mint
Some simple modifications of the default settings:
• Disable any sounds in Settings –> Sound.
• Add an extra US keyboard: Settings –> Sound –> Layout, select English (US euro on 5).
9

Pablito’s playground Documentation
• Add compose key to make special characters by combining different keys (e.g. e + ' gives é): Settings –>Sound –> Layout, select Options. . . (Bottom right) and for Position of compose key I selected the Pause key.
• Add shortcut to maximize windows: Settings –> Sound –> Shortcuts, select Windows and Maximize windowadd the shortcut Super+m (Super is the Windows key).
• Set Redshift to Maintain Healthy Eyes: This function helps filter blue light which in turn, decreases the strainon your eyes. All that you need to do is launch the Redshift application (it is installed by default,) and set it toautostart (little lightbulb in the lower-right corner of the screen).
2.3 Copy important files and folders
• .bashrc (check for updates in new linux mint bashrc file)
• .vimrc and .vim/
• .ssh/config
• .git-completion.bash .gitignore_global and .gitconfig
• password.kdbx
• The Work and Document folders
2.4 Add SSH key to git
Generate a new ssh key with:
ssh-keygen -t rsa -C "[email protected]" -b 4096
and go to https://gitlab.com/profile/keys to add the key.
2.5 Package installations
I install spotify directly from the Software Manager of Linux Mint.
2.5.1 With apt-get
The following packages have been installed using the command line sudo apt-get install<package-name>:
• keepassx
• chromium-browser
• vim
• exuberant-ctags
• cmake
• python-pip
• git
” texlive-full
10 Chapter 2. Things to do after installing Linux Mint

Pablito’s playground Documentation
• For some reason I didn’t manage to install those packages with pip. . . python-numpy python-scipy python-matplotlib python-tk
• libpangox-1.0-0 (for vpn connection with AnyConnect)
• python-dev (required to install psutil with pip)
2.5.2 Python packages with pip
The following packages have been installed usinge the command line sudo -H pip install -U<package-name>. The -H option avoids warnings with sudo and the -U option upgrades to the latest version.
• setuptools
• sphinx
• sphinx_rtd_theme
• h5py (for pyscf)
• bibtexparser
• psutil
2.5.3 Installing and set up of Mendeley
Apparently the latest version of Mendeley had to be installed by following the instruction in their website https://www.mendeley.com.
1. Once Mendeley is installed, the first thing to do is a sync with my online account.
2. Then I like to have all the pdf of the article organized in some place. I made a copy of my previous folder in/home/pablo/Work/scientific_docs/articles with all the PDFs. Then I told Mendeley to putnew PDF files there. On Mendeley click the Tools tab then Options. In the File Organizer tab of the newwindow I chose the following settings:
2.5. Package installations 11

Pablito’s playground Documentation
3. Finally, I want to have a folder being watched for new PDF files to be included in my Library. To do that I goto the Watched Folders tab of the Options window (openned in the previous step) and I selected the folder/home/pablo/Downloads/download_papers.
2.5.4 Installing MKL library
1. Go to https://software.intel.com/en-us/mkl
2. Follow instructions, this time I downloaded a tar file l_mkl_2019.1.144.tar for linux OS 64 architectures.
3. Unzip tar file and execute the bash script with:
sudo ./install.sh
4. Follow the instructions. The Linux mint OS was not recognized, I just ignored it. Everything was properlyinstalled under /opt/intel.
12 Chapter 2. Things to do after installing Linux Mint

Pablito’s playground Documentation
5. Then I added the following line to my .bashrc file to enable the environment variables:
source /opt/intel/mkl/bin/mklvars.sh intel64
2.5.5 Installing AnyConnect VPN client
I followed instructions from https://epnet.epfl.ch/Remote-Internet-Access, where I ended up downloading and in-stalling AnyConnect. For it to work, I had to install a missing library (libpangox-1.0-0) as described above.
2.5.6 Clean up
• Remove packages that didn’t install completely:
sudo apt-get autoclean
• Remove your apt-cache:
sudo apt-get clean
• Remove software dependencies that you don’t need:
sudo apt-get autoremove
2.5. Package installations 13

Pablito’s playground Documentation
14 Chapter 2. Things to do after installing Linux Mint

CHAPTER 3
Install printers
For the installation of the two LCBC printers I executed the following steps
1. Get the name and IP addresses of the printers. For that I needed to go to the printers and use the navigationsystem to get the IP addresses. I got the following:
• Black and White Printer: HP LaserJet p4015x, IP:128.178.54.91
• Color Printer: HP Color LaserJet M553, IP:128.178.54.90
2. Then, in System Settings, Printers, I first clicked on Add. Which opens a new window.
3. Click on Network Printer followed by Find Network Printer.
4. In front of Host: enter: http://128.178.54.91 for the Black and White printer.
5. Finally I just followed the steps and use the printer name above to select the appropriate driver.
15

Pablito’s playground Documentation
16 Chapter 3. Install printers
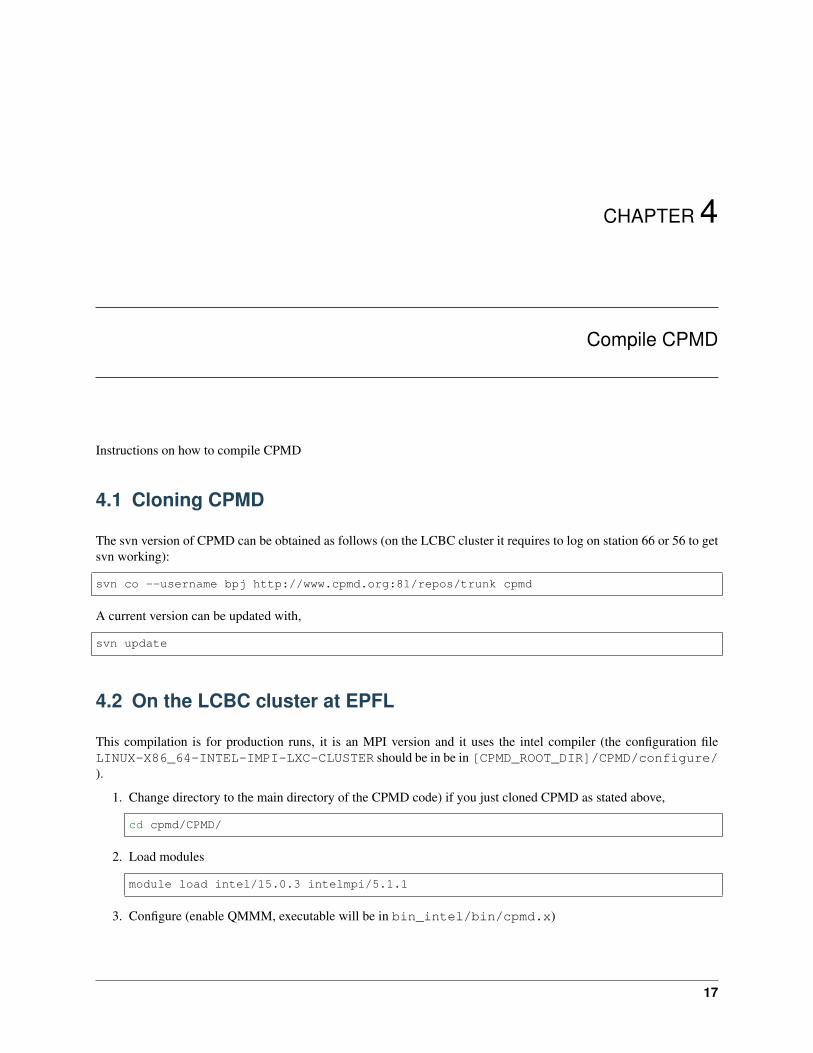
CHAPTER 4
Compile CPMD
Instructions on how to compile CPMD
4.1 Cloning CPMD
The svn version of CPMD can be obtained as follows (on the LCBC cluster it requires to log on station 66 or 56 to getsvn working):
svn co --username bpj http://www.cpmd.org:81/repos/trunk cpmd
A current version can be updated with,
svn update
4.2 On the LCBC cluster at EPFL
This compilation is for production runs, it is an MPI version and it uses the intel compiler (the configuration fileLINUX-X86_64-INTEL-IMPI-LXC-CLUSTER should be in be in [CPMD_ROOT_DIR]/CPMD/configure/).
1. Change directory to the main directory of the CPMD code) if you just cloned CPMD as stated above,
cd cpmd/CPMD/
2. Load modules
module load intel/15.0.3 intelmpi/5.1.1
3. Configure (enable QMMM, executable will be in bin_intel/bin/cpmd.x)
17

Pablito’s playground Documentation
./configure.sh -qmmm -DEST=bin_intel LINUX-X86_64-INTEL-IMPI-LXC-CLUSTER
With new versions of CPMD it can be needed to set the maximum stack size to unlimited:
ulimit -s unlimited
4. Finally, compile CPMD (here with 16 cores):
cd bin_intelmake -j16
4.3 On my laptop
This compilation is for debugging, it is a serial version and it uses the gfortan-7 compiler (the configuration fileLINUX-X86_64-GFORTRAN-LAPTOP should be in [CPMD_ROOT_DIR]/CPMD/configure/).
1. Make sure that the mkl library is available (should be in .bashrc file):
source /opt/intel/composer_xe_2015.2.164/mkl/bin/mklvars.sh intel64
2. From the CPMD main directory, configure and compile:
./configure.sh -debug -DEST=bin_gfortan LINUX-X86_64-GFORTRAN-LAPTOPcd bin_gfortranmake -j8
18 Chapter 4. Compile CPMD

CHAPTER 5
Formating strings in Python
I always forget how to use the format() method for str objects in Python, so here is a summary and a set of usefulexamples.
For more details, look at those two pages:
• Official Python doc
• Nice examples of the format method
5.1 Basic formatting
The method basically works like this:
>>> '{} {}'.format('one', 'two')one two>>> '{} {}'.format(1, 2)1 2>>> '{1} {0} {1}'.format(1, 2)2 1 2
5.2 Table summary
The general form of a standard format specifier is:
format_spec ::= [[fill]align][sign][#][0][width][,][.precision][type]fill ::= <any character>align ::= "<" | ">" | "=" | "^"sign ::= "+" | "-" | " "width ::= integer
19
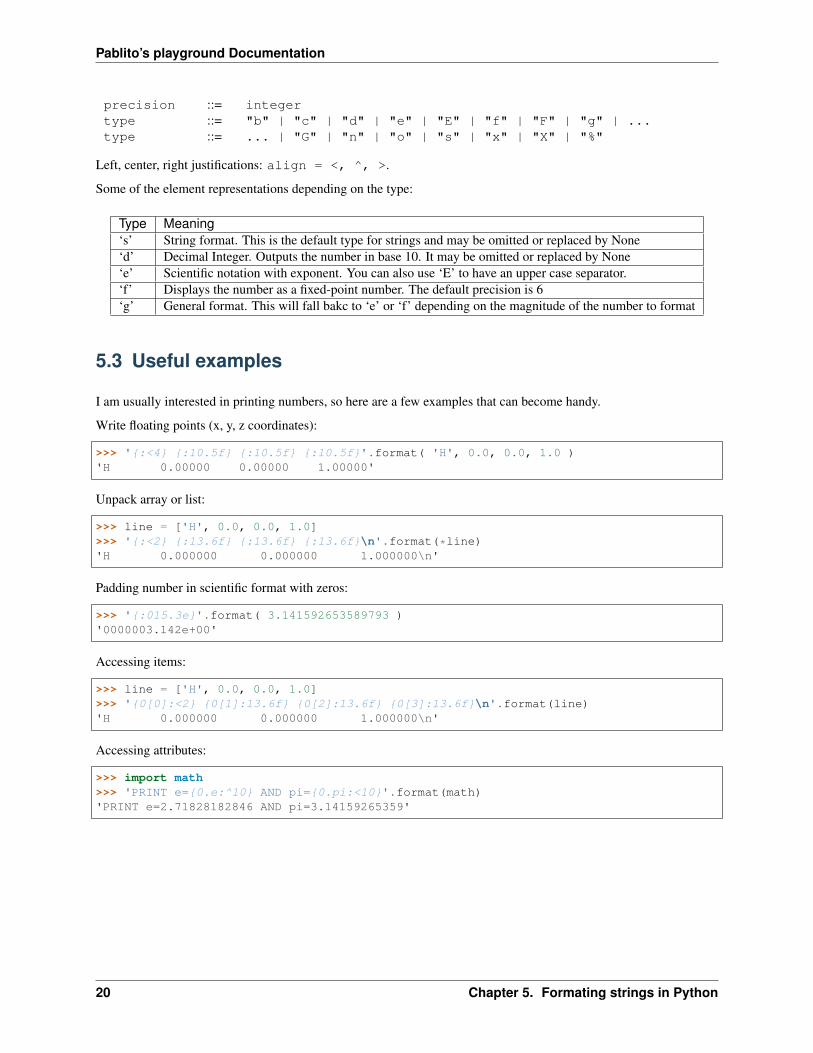
Pablito’s playground Documentation
precision ::= integertype ::= "b" | "c" | "d" | "e" | "E" | "f" | "F" | "g" | ...type ::= ... | "G" | "n" | "o" | "s" | "x" | "X" | "%"
Left, center, right justifications: align = <, ^, >.
Some of the element representations depending on the type:
Type Meaning‘s’ String format. This is the default type for strings and may be omitted or replaced by None‘d’ Decimal Integer. Outputs the number in base 10. It may be omitted or replaced by None‘e’ Scientific notation with exponent. You can also use ‘E’ to have an upper case separator.‘f’ Displays the number as a fixed-point number. The default precision is 6‘g’ General format. This will fall bakc to ‘e’ or ‘f’ depending on the magnitude of the number to format
5.3 Useful examples
I am usually interested in printing numbers, so here are a few examples that can become handy.
Write floating points (x, y, z coordinates):
>>> '{:<4} {:10.5f} {:10.5f} {:10.5f}'.format( 'H', 0.0, 0.0, 1.0 )'H 0.00000 0.00000 1.00000'
Unpack array or list:
>>> line = ['H', 0.0, 0.0, 1.0]>>> '{:<2} {:13.6f} {:13.6f} {:13.6f}\n'.format(*line)'H 0.000000 0.000000 1.000000\n'
Padding number in scientific format with zeros:
>>> '{:015.3e}'.format( 3.141592653589793 )'0000003.142e+00'
Accessing items:
>>> line = ['H', 0.0, 0.0, 1.0]>>> '{0[0]:<2} {0[1]:13.6f} {0[2]:13.6f} {0[3]:13.6f}\n'.format(line)'H 0.000000 0.000000 1.000000\n'
Accessing attributes:
>>> import math>>> 'PRINT e={0.e:^10} AND pi={0.pi:<10}'.format(math)'PRINT e=2.71828182846 AND pi=3.14159265359'
20 Chapter 5. Formating strings in Python

CHAPTER 6
Add and run CPMD regtests
This is an adaptation of the README file in [CPMD_ROOT_DIR]/regtests/cpqa.
When cloning the source code from the svn version, the lowest level directory should contain a sub-directory namedregtests.
In the regtests folder or in a new directory, create a config.py file with the following settings:
# full path to CPMD root directory!root='/home/pbaudin/Work/MTS_CPMD/cpmd_porting/CPMD'arch='master'version='x'nproc=16## path to executablebin='${root}/bin_master/bin/cpmd.${version}'## path to regteststestsrc='${root}/../regtests/tests'## path to PP libraryppdir='${root}/../regtests/tests/PP_LIBRARY/'## Make commandmake='make -j${nproc}'## path to make directorymakedir='${root}/bin_master/'## MPI detailsnproc_mpi=16mpi_prefix='mpirun -np %i'
Change the settings to suit your purposes.
CPQA first tries to compile the source code, we thus need to export the correct settings for the compilation (theMakefile and the $makedir folder should already exists, see Compile CPMD section for details). For example:
21
Pablito’s playground Documentation
module load intel/15.0.3 intelmpi/5.1.1
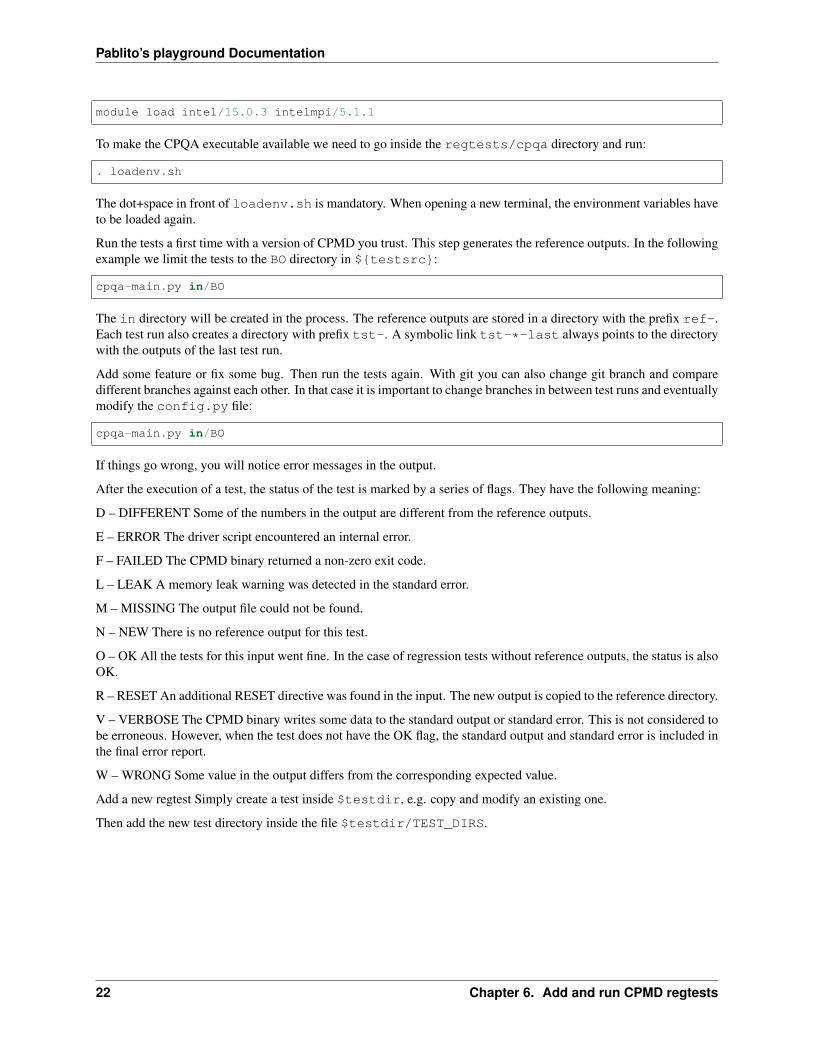
To make the CPQA executable available we need to go inside the regtests/cpqa directory and run:
. loadenv.sh
The dot+space in front of loadenv.sh is mandatory. When opening a new terminal, the environment variables haveto be loaded again.
Run the tests a first time with a version of CPMD you trust. This step generates the reference outputs. In the followingexample we limit the tests to the BO directory in ${testsrc}:
cpqa-main.py in/BO
The in directory will be created in the process. The reference outputs are stored in a directory with the prefix ref-.Each test run also creates a directory with prefix tst-. A symbolic link tst-*-last always points to the directorywith the outputs of the last test run.
Add some feature or fix some bug. Then run the tests again. With git you can also change git branch and comparedifferent branches against each other. In that case it is important to change branches in between test runs and eventuallymodify the config.py file:
cpqa-main.py in/BO
If things go wrong, you will notice error messages in the output.
After the execution of a test, the status of the test is marked by a series of flags. They have the following meaning:
D – DIFFERENT Some of the numbers in the output are different from the reference outputs.
E – ERROR The driver script encountered an internal error.
F – FAILED The CPMD binary returned a non-zero exit code.
L – LEAK A memory leak warning was detected in the standard error.
M – MISSING The output file could not be found.
N – NEW There is no reference output for this test.
O – OK All the tests for this input went fine. In the case of regression tests without reference outputs, the status is alsoOK.
R – RESET An additional RESET directive was found in the input. The new output is copied to the reference directory.
V – VERBOSE The CPMD binary writes some data to the standard output or standard error. This is not considered tobe erroneous. However, when the test does not have the OK flag, the standard output and standard error is included inthe final error report.
W – WRONG Some value in the output differs from the corresponding expected value.
Add a new regtest Simply create a test inside $testdir, e.g. copy and modify an existing one.
Then add the new test directory inside the file $testdir/TEST_DIRS.
22 Chapter 6. Add and run CPMD regtests

CHAPTER 7
LSDalton memo
• Insert new test cases in:
${LSDALTON_ROOT}/cmake/TestsLSDALTON.cmake
• When Adding new source files:
1. Add newfile.o in the Makefile present in the directory containing the new file.
2. Add path/to/file.f90 to ${LSDALTON_ROOT}/cmake/SourcesLSDALTON.cmake.
For more information or to add directories see: ${LSDALTON_ROOT}/src/README_AddDirectory.
For debugging memory issues with valgrind:
valgrind --leak-check=yes prog.exe > valgrind.out 2>&1 &
For other information go to: http://daltonprogram.org/
23

Pablito’s playground Documentation
24 Chapter 7. LSDalton memo

CHAPTER 8
GIMP
This section contains litle tricks useful with the illustration software GIMP.
8.1 Autocrop all layers
Open a bunch of images as layers in gimp, then open the Python-Fu console, Filters -> Python-Fu ->Console. Finally paste the following lines:
img = gimp.image_list()[0]for layer in img.layers:
pdb.gimp_image_set_active_layer(img, layer)pdb.plug_in_autocrop_layer(img, layer)
25

Pablito’s playground Documentation
26 Chapter 8. GIMP

CHAPTER 9
Equilibration at MM and QMMM level using Amber and CPMD
This is a collection of tutorials that I wrote for myself. I find it convenient to go back here and read and update myworkflow on the way. In this way I also keep track of what I did in the past and how I can improve it.
Note: Use at your own risk!
I am not an expert in everything written here! Some of the tutorials might contain commands and workflows thatare not optimal at all or not recommended. If you have better ways of doing what I present here, or if you want tocomment or share your own tricks, fell free to contact me.
Thanks!
For now the tutorials describe very short workflows that can be used to equilibrate systems with the Amber and CPMDpackages. The material presented here is an adaptation and decomposition of a QM/MM tutorial by E. Ippoliti and J.Dreyer (Tutorial: QM/MM MD by CPMD).
9.1 Generate RESP charges with Gaussian
In case one uses molecules unrecognized by Amber, a restrained electrostatic potential (RESP) charges calculationmight be needed. Here is how to do it with the Gaussian package.
First optimize the structure of the desired molecules. Here we use n-hexane and optimize it at the DFT/B3LYP/6-31G(d,p) level using 16 cores and 4000MB of memory per core.
geo_opt.com:
%NProcShared=16%chk=./geo_opt.chk%mem=4000MB#p opt b3lyp/6-31G(d,p) nosymm iop(6/7=3) gfinputn-hexane geometry optimization
(continues on next page)
27

Pablito’s playground Documentation
(continued from previous page)
0 1C 0.7746 -0.0257 0.0000C -0.7746 0.0257 0.0000C 1.3570 -1.4627 0.0000C -1.3570 1.4627 0.0000C 2.9005 -1.5027 -0.0000C -2.9005 1.5027 -0.0000H 1.1449 0.5037 0.8825H 1.1449 0.5037 -0.8825H -1.1449 -0.5037 -0.8825H -1.1449 -0.5037 0.8825H 0.9985 -2.0010 0.8818H 0.9985 -2.0010 -0.8818H -0.9985 2.0010 0.8818H -0.9985 2.0010 -0.8818H 3.2506 -2.5369 0.0000H 3.2996 -1.0073 -0.8871H 3.2996 -1.0073 0.8871H -3.2506 2.5369 0.0000H -3.2996 1.0073 -0.8871H -3.2996 1.0073 0.8871
Run Gaussian as follows:
module load g09nohup g09 < geo_opt.com > geo_opt.log &
Once the geometry has been optimized we can calculate the RESP charges with the following input.
electrostatic_grid.com:
%NProcShared=16%chk=./electrostatic_grid.chk%mem=4000MB#p b3lyp/6-31G(d,p) nosymm iop(6/33=2) pop(chelpg,regular)
n-hexane electrostatic grid calculation
0 1C 0.766190 -0.024729 0.000000C -0.766190 0.024729 0.000000C 1.335815 -1.448705 0.000000C -1.335815 1.448705 0.000000C 2.866858 -1.488377 0.000000C -2.866858 1.488377 0.000000H 1.147135 0.517440 0.877538H 1.147135 0.517440 -0.877538H -1.147135 -0.517440 -0.877538H -1.147135 -0.517440 0.877538H 0.955507 -1.990023 0.877033H 0.955507 -1.990023 -0.877033H -0.955507 1.990023 0.877033H -0.955507 1.990023 -0.877033H 3.241978 -2.516956 0.000000H 3.275854 -0.985176 -0.883579H 3.275854 -0.985176 0.883579H -3.241978 2.516956 0.000000
(continues on next page)
28 Chapter 9. Equilibration at MM and QMMM level using Amber and CPMD

Pablito’s playground Documentation
(continued from previous page)
H -3.275854 0.985176 -0.883579H -3.275854 0.985176 0.883579
And the following command:
nohup g09 < electrostatic_grid.com > electrostatic_grid.log &
Where we have copied the geometry from the previous calculation. The electrostatic_grid.log output filecan then be used, e.g. to generate a .mol2 file for leap and Amber.
9.2 Generate .mol2 file for leap and Amber
This tutorial explains how to generate a .mol2 file and eventually a .frcmod file that can be used by leap to createinput files for molecular dynamics with Amber.
Note: When setting up files for Amber calculations, the residue names can be of great importance. Try to be asconsistent as possible during those steps with the name of the residues (in the original .pdb file also use the -rnoption of antechamber).
9.2.1 Method 1: directly from a .pdb file
You can use the antechamber program to generate a .mol2 file from a molecule.pdb file. Just run antechamberas follows:
module load amber/14antechamber -i molecule.pdb -fi pdb -o molecule.mol2 -fo mol2 -c bcc -nc 0 -m 1
9.2.2 Method 2: Use RESP charges from Gaussian
It might be better to use RESP charges obtained from a Gaussian calculations to generate the .mol2 file (see thistutorial for the generation of RESP charges). In this case the .mol2 file is obtained by calling antechamber in thefollowing way:
antechamber -i electrostatic_grid.log -fi gout -o solute.mol2 -fo mol2 -c resp -nc 0 -→˓m 1 -rn MOL
9.2.3 Extra parameters
Some extra parameters might be required. They can be obtained in a .frcmod file with parmchk as:
parmchk -i solute.mol2 -f mol2 -o solute.frcmod
9.2.4 Antechamber options
It might be convenient to look at the options from antechamber:
9.2. Generate .mol2 file for leap and Amber 29
Pablito’s playground Documentation
antechamber -h
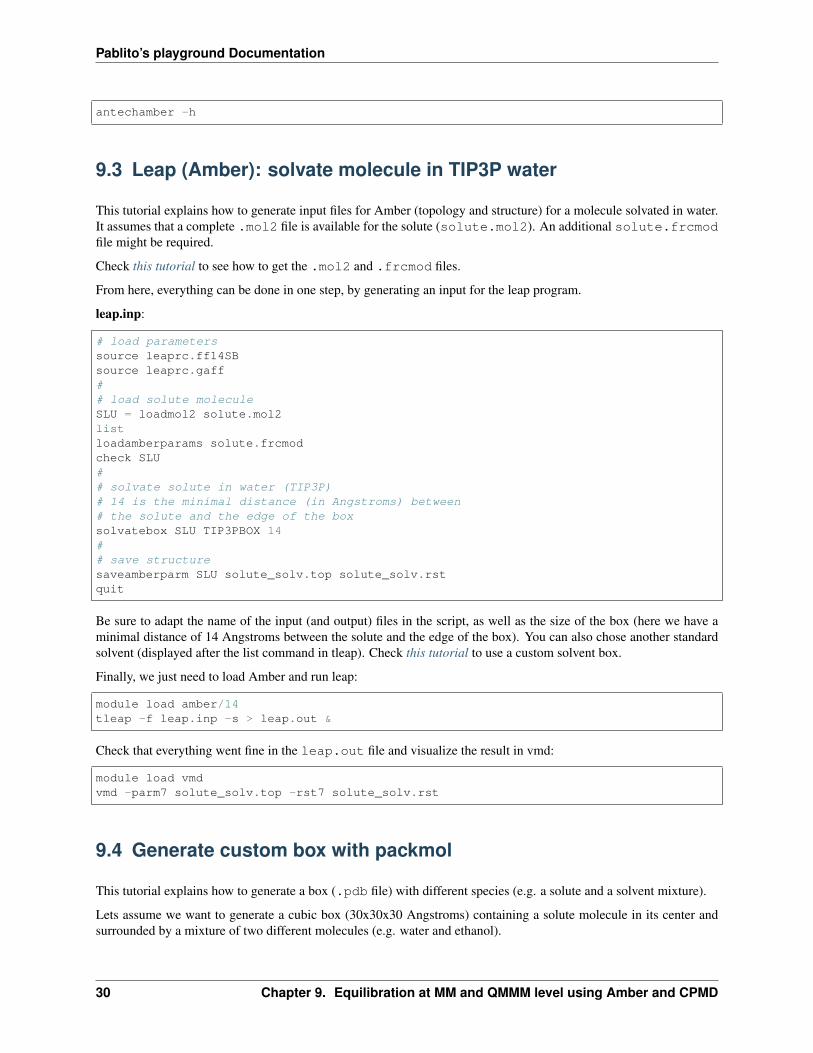
9.3 Leap (Amber): solvate molecule in TIP3P water
This tutorial explains how to generate input files for Amber (topology and structure) for a molecule solvated in water.It assumes that a complete .mol2 file is available for the solute (solute.mol2). An additional solute.frcmodfile might be required.
Check this tutorial to see how to get the .mol2 and .frcmod files.
From here, everything can be done in one step, by generating an input for the leap program.
leap.inp:
# load parameterssource leaprc.ff14SBsource leaprc.gaff## load solute moleculeSLU = loadmol2 solute.mol2listloadamberparams solute.frcmodcheck SLU## solvate solute in water (TIP3P)# 14 is the minimal distance (in Angstroms) between# the solute and the edge of the boxsolvatebox SLU TIP3PBOX 14## save structuresaveamberparm SLU solute_solv.top solute_solv.rstquit
Be sure to adapt the name of the input (and output) files in the script, as well as the size of the box (here we have aminimal distance of 14 Angstroms between the solute and the edge of the box). You can also chose another standardsolvent (displayed after the list command in tleap). Check this tutorial to use a custom solvent box.
Finally, we just need to load Amber and run leap:
module load amber/14tleap -f leap.inp -s > leap.out &
Check that everything went fine in the leap.out file and visualize the result in vmd:
module load vmdvmd -parm7 solute_solv.top -rst7 solute_solv.rst
9.4 Generate custom box with packmol
This tutorial explains how to generate a box (.pdb file) with different species (e.g. a solute and a solvent mixture).
Lets assume we want to generate a cubic box (30x30x30 Angstroms) containing a solute molecule in its center andsurrounded by a mixture of two different molecules (e.g. water and ethanol).
30 Chapter 9. Equilibration at MM and QMMM level using Amber and CPMD
Pablito’s playground Documentation
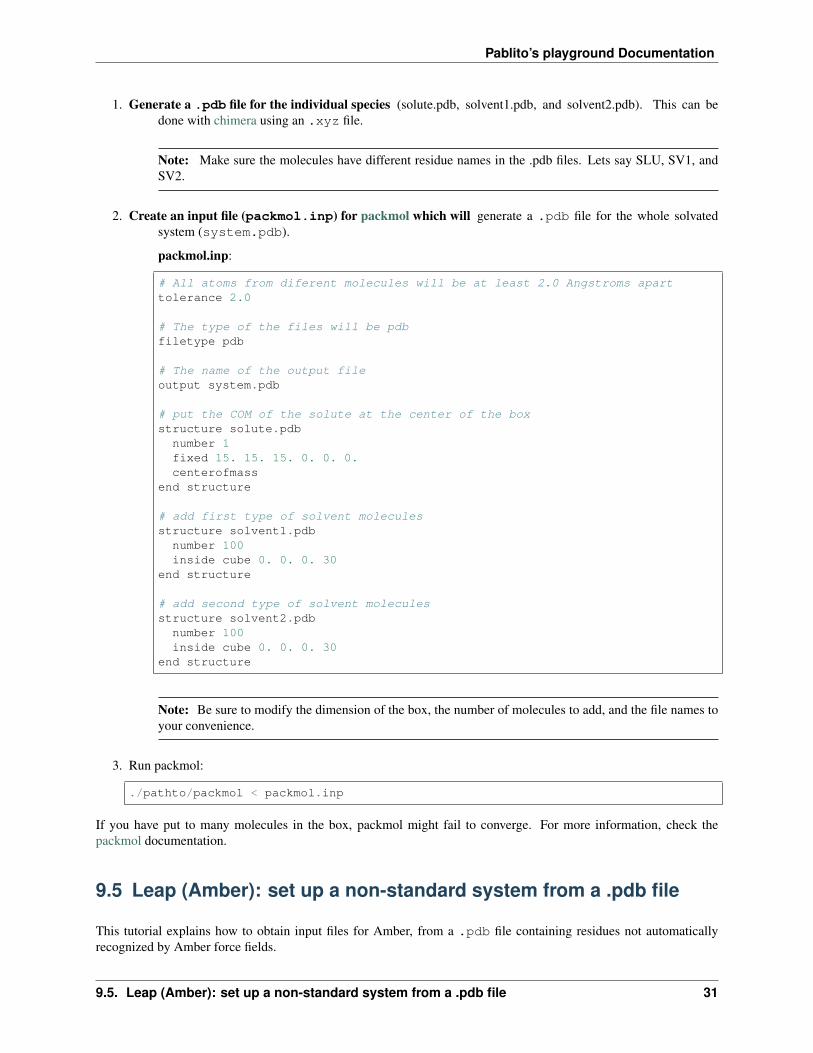
1. Generate a .pdb file for the individual species (solute.pdb, solvent1.pdb, and solvent2.pdb). This can bedone with chimera using an .xyz file.
Note: Make sure the molecules have different residue names in the .pdb files. Lets say SLU, SV1, andSV2.
2. Create an input file (packmol.inp) for packmol which will generate a .pdb file for the whole solvatedsystem (system.pdb).
packmol.inp:
# All atoms from diferent molecules will be at least 2.0 Angstroms aparttolerance 2.0
# The type of the files will be pdbfiletype pdb
# The name of the output fileoutput system.pdb
# put the COM of the solute at the center of the boxstructure solute.pdb
number 1fixed 15. 15. 15. 0. 0. 0.centerofmass
end structure
# add first type of solvent moleculesstructure solvent1.pdb
number 100inside cube 0. 0. 0. 30
end structure
# add second type of solvent moleculesstructure solvent2.pdb
number 100inside cube 0. 0. 0. 30
end structure
Note: Be sure to modify the dimension of the box, the number of molecules to add, and the file names toyour convenience.
3. Run packmol:
./pathto/packmol < packmol.inp
If you have put to many molecules in the box, packmol might fail to converge. For more information, check thepackmol documentation.
9.5 Leap (Amber): set up a non-standard system from a .pdb file
This tutorial explains how to obtain input files for Amber, from a .pdb file containing residues not automaticallyrecognized by Amber force fields.
9.5. Leap (Amber): set up a non-standard system from a .pdb file 31

Pablito’s playground Documentation
An example of this might be when you generate a .pdb file from packmol as described in this tutorial.
We will therefore assume that we have a system.pdb which contains three types of molecules, with the structuredescribed into solute.pdb, solvent1.pdb, and solvent2.pdb, and residue names SLU, SV1, and SV2, respectively.
In addition, we will need the .mol2 and .frcmod files for all three species. These can be obtained as described inthis tutorial.
Once all the required files have been produced, a simple input file for leap can be written and executed to generateinputs for Amber.
leap.inp:
source leaprc.ff14SBsource leaprc.gaff## load soluteSLU = loadmol2 solute.mol2loadamberparams solute.frcmodcheck SLU## load solvent1SV1 = loadmol2 solvent1.mol2loadamberparams solvent1.frcmodcheck SV1## load solvent2SV1 = loadmol2 solvent2.mol2loadamberparams solvent2.frcmodcheck SV2## load systemSYS = loadpdb system.pdb# The dimension of the box should match those used to create system.pdb with packmolset SYS box {30,30,30}saveamberparm SYS system.top system.rstquit
Be sure to adapt the name of the input (and output) files in the script, as well as the size of the box (it should matchthe box size used in packmol).
Finally, we just need to load Amber and run leap:
module load amber/14tleap -f leap.inp -s > leap.out &
Check that everything went fine in the leap.out file and visualize the result in vmd:
module load vmdvmd -parm7 system.top -rst7 system.rst
9.6 Leap (Amber): custom solvent box
This tutorial explains how to generate and use a custom solvent box to solvate a molecule for an MD simulation withAmber.
32 Chapter 9. Equilibration at MM and QMMM level using Amber and CPMD

Pablito’s playground Documentation
Note: Instead of creating a custom solvent box, it might be better to directly set up the whole system (solute + solvent)as described in this tutorial and that one. It is therefore not recommended to follow this tutorial!
1. Generate the box with packmol
In this step we want to generate a .pdb file for the (non-optimized) solvent box.
This can be done by following this tutorial and using only one species in packmol (e.g. solvent1).
2. Creating input files for Amber
Now that we have a first structure of the solvent box, we need to equilibrate it. For that we will usethe Amber package. We thus need to create input files for Amber.
This can be done by following this tutorial with a single type of molecules (the solvent).
3. Equilibrate the custom box
In this step we use the input files generated in the previous step to equilibrate the box.
This can be done by following this tutorial.
4. Save custom box in library file
Now that we have equilibrated our box. We will use leap to generate a library file for the box. Thisstep requires to have a .pdb file of the equilibrated structure as well as a .mol2 file of the solventmolecule.
Note: The residue name of the solvent molecule must be the same in the two files and in the scriptbelow (SLV).
leap.inp:
# load parameterssource leaprc.ff14SBsource leaprc.gaff## load solvent molecule parametersSLV = loadmol2 solvent.mol2loadamberparams solvent.frcmodcheck SLV## load equilibrated pdb fileMYBOX = loadpdb system.pdb## set the dimensions of the box (check in pdb file)set MYBOX box {30,30,30}## save box as library filesaveoff MYBOX .my_box.libquit
Just load Amber and run leap:
module load amber/14tleap -f leap.inp -s > leap.out &
5. Use a custom box
9.6. Leap (Amber): custom solvent box 33

Pablito’s playground Documentation
Now that our box has been equilibrated, we can use it to solvate a molecule. Create an input file forleap (adapt it if needed). For this step you need to have a .mol2 and a .frcmod file for the solute(see this tutorial to generate those files).
leap.inp:
# load parameterssource leaprc.ff14SBsource leaprc.gaff## load solute moleculeSLU = loadmol2 solute.mol2loadamberparams solute.frcmodcheck SLU## load the custom box library.# The box has been generated with the name MYBOX (see below)loadoff my_box.lib## solvate solute in custom solvent# 14 is the minimal distance (in Angstroms) between# the solute and the edge of the boxsolvatebox SLU MYBOX 14## save structuresaveamberparm SLU solute_solv.top solute_solv.rstquit
Just load Amber and run leap:
module load amber/14tleap -f leap.inp -s > leap.out &
Check that everything went fine and visualize:
vmd -parm7 solute_solv.top -rst7 solute_solv.rst
9.7 Amber: equilibrate system
This tutorial explains how to equilibrate a system using the Amber package. It assumes that the input files describingthe system (topology system.top a nd coordinates system.rst) have already been generated.
• This tutorial explains how to generate the system files for a molecule in TIP3P water.
• This tutorial explains how to generate the system files for a system with non-standard residues (using packmol).
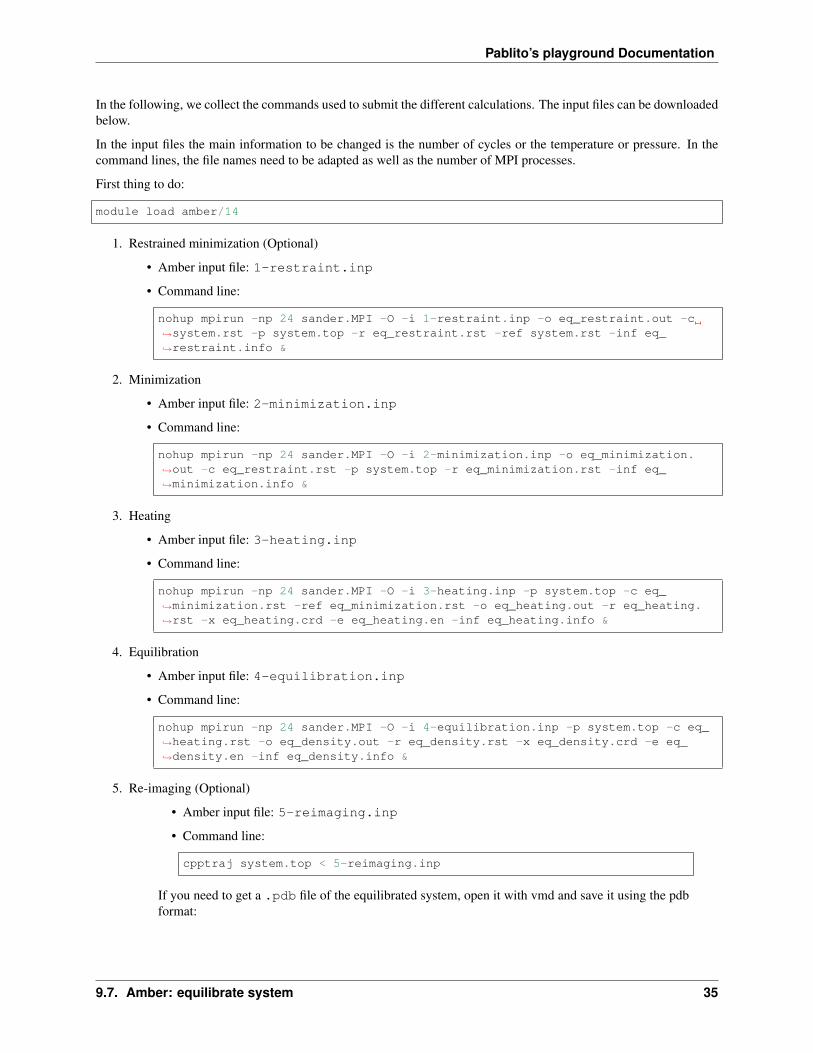
The equilibration of the system will be done in four main steps:
1. In case of a solvated system: a restrained minimization (Optional).
2. A global minimization.
3. Heating the system to the desired temperature.
4. Equilibration with Thermostat and Barostat (NPT simulation).
5. Re-imaging: to use the equilibrated system with other programs (Optional).
34 Chapter 9. Equilibration at MM and QMMM level using Amber and CPMD
Pablito’s playground Documentation
In the following, we collect the commands used to submit the different calculations. The input files can be downloadedbelow.
In the input files the main information to be changed is the number of cycles or the temperature or pressure. In thecommand lines, the file names need to be adapted as well as the number of MPI processes.
First thing to do:
module load amber/14
1. Restrained minimization (Optional)
• Amber input file: 1-restraint.inp
• Command line:
nohup mpirun -np 24 sander.MPI -O -i 1-restraint.inp -o eq_restraint.out -c→˓system.rst -p system.top -r eq_restraint.rst -ref system.rst -inf eq_→˓restraint.info &
2. Minimization
• Amber input file: 2-minimization.inp
• Command line:
nohup mpirun -np 24 sander.MPI -O -i 2-minimization.inp -o eq_minimization.→˓out -c eq_restraint.rst -p system.top -r eq_minimization.rst -inf eq_→˓minimization.info &
3. Heating
• Amber input file: 3-heating.inp
• Command line:
nohup mpirun -np 24 sander.MPI -O -i 3-heating.inp -p system.top -c eq_→˓minimization.rst -ref eq_minimization.rst -o eq_heating.out -r eq_heating.→˓rst -x eq_heating.crd -e eq_heating.en -inf eq_heating.info &
4. Equilibration
• Amber input file: 4-equilibration.inp
• Command line:
nohup mpirun -np 24 sander.MPI -O -i 4-equilibration.inp -p system.top -c eq_→˓heating.rst -o eq_density.out -r eq_density.rst -x eq_density.crd -e eq_→˓density.en -inf eq_density.info &
5. Re-imaging (Optional)
• Amber input file: 5-reimaging.inp
• Command line:
cpptraj system.top < 5-reimaging.inp
If you need to get a .pdb file of the equilibrated system, open it with vmd and save it using the pdbformat:
9.7. Amber: equilibrate system 35
Pablito’s playground Documentation
vmd -parm7 system.top -rst7 eq_density_reimaged.rst
9.8 Run QM/MM calculations with CPMD
This tutorial explains how to run QM/MM calculations with CPMD starting from Amber system files (topology andcoordinates).
9.8.1 Conversion from Amber to Gromos format
CPMD is making use of files in the Gromos format. We therefore have to convert the Amber files (system.top andsystem.rst) to the Gromos format.
The CPMD package comes with scripts that can be used to do that. They can be found in the following directory:
$CPMD_ROOT/modules/MM_Interface/Util_QMMM/
In particular we need the amber2gromos.x and estimate_gromos_size scripts. As first step:
ambertogromos.x system.top system.rst
This operation should produce three files:
• gromos.crd
• gromos.inp
• gromos.top
Some modifications are required.
In gromos.inp, the sections SYSTEM, SUBMOLECULES and FORCES, need to be checked and maybe modified ac-cording to the solute/solvent and QM/MM separation. Here everything is not clear yet, especially when using nonrigid solvent!
In the section ATOMTYPENAME of gromos.top, replace the names of the types of the atoms from the standard genericforce field library gaff:
$AMBERHOME/dat/leap/parm/gaff.dat
to atom names from the Amber force field library:
$AMBERHOME/dat/leap/parm/parm99.dat
9.8.2 Create a CPMD input file for a QM/MM run
We now need to create an input file for CPMD. You can download a template here.
This input will perform a standard NVE Born-Oppenheimer molecular dynamics (BOMD). Places with XXX need tobe updated. The rest of the file needs to be very carefully check and changed according to your system and the type ofsimulation you want to run.
First we need to update the array size at the end if the &QMMM section. for that run the following command and pastethe results:
36 Chapter 9. Equilibration at MM and QMMM level using Amber and CPMD

Pablito’s playground Documentation
estimate_gromos_size gromos.top
We also need to determine the dimension of the cell. For that you can use the cell_size script from thecomp_chem_py library:
cell_size XXX YYY
where XXX and YYY are the residue names of the QM part.
Alternatively, you can run the following commands:
grep XXX gromos.crd > QM.coor # XXX is the residue name of the QM partsort -k 5 -n QM.coor # order x coordinates (-k 5)echo "(D + 0.7)*10/0.529" | bc -l # where D is the max difference in x coordinates
The result should be taken as the dimension of the box in the x axis. repeat with -k 6 and -k 7 for the y and z axis.You can then take the maximum value of the three axis and paste it in place of the XXX after the CELL keyword in the&SYSTEM section of CPMD input.
Finally, in the &ATOMS section, add the number of QM atoms of a given type under the value for LMAX and on thenext line all the indices of the QM atoms as given in the gromos.crd file.
Then run CPMD as usual. Just make sure CPMD has been compiled with the -qmmm option (see compile cpmd).
9.8. Run QM/MM calculations with CPMD 37

Pablito’s playground Documentation
38 Chapter 9. Equilibration at MM and QMMM level using Amber and CPMD

CHAPTER 10
Visualize canonical orbitals from CPMD
For different reasons, one might be interested in looking at the Kohn-Sham canonical orbitals. In my case it was toidentify the main orbitals involved TDDFT electronic transitions.
10.1 Step 1: Get the CPMD files for the orbitals to plot
The CPMD keyword used to generate the required file is RHOOUT BANDS in the &CPMD section.
I have written a script that reads a CPMD TDDFT output file and extract information regarding the orbital involved inthe TDDFT electronic transitions. The script is called read_orbs_info and is part of the comp_chem_py package.The script prints some of the required lines to plot orbitals with CPMD. For example:
RESTART WAVEFUNCTION COORDINATES LINRES LATESTKOHN-SHAM ENERGIES
20RHOOUT BANDS
4-138 -139 -140 -141
Those lines have to be pasted in the &CPMD section of a CPMD input file. The restart information and number ofKohn-Sham energies is set to match the TDDFT output file that is read by the script.
Finally, the lines after RHOOUT BANDS are set such that a grid file will be generated for all the orbitals involved inthe TDDFT electronic transitions.
Of course all the information can be modified to suit your purpose.
10.2 Step 2: Generate cube files
After the first step we should have a bunch of WAVEFUNCTION.index files available. 8 in our case. Those files haveto be converted to the Gaussian cube format. This can be done using the cpmd2cube.x utility. This script is providedwith the CPMD package and is located at:
39

Pablito’s playground Documentation
/share/lcbcpc35/software/cpmd2cube/cpmd2cube.x
On the LCBC cluster.
To use it just run:
cpmd2cube.x WAVEFUNCTION.*
Or use the -h option for help. This operation should produce a cube file and a pdb file for each input, e.g.WAVEFUNCTION.8 leads to WAVEFUNCTION.8.cube and WAVEFUNCTION.8.pdb.
The cube files can then be visualized using e.g. the VMD package:
module load vmdvmd WAVEFUNCTION.8.pdb
Then in the VMD terminal window:
vmd > mol addfile WAVEFUNCTION.8.cubevmd > mol addrep 0vmd > mol modmaterial 1 0 Opaquevmd > mol modstyle 1 0 Isosurface 0.01 0 0 0 1 1vmd > mol modcolor 1 0 ColorID 0vmd > mol addrep 0vmd > mol modstyle 2 0 Isosurface -0.01 0 0 0 1 1
Or using the vmd_plot_cube script from the comp_chem_py package:
vmd_plot_cube GEOMETRY.xyz -c WAVEFUNCTION.*.cube
40 Chapter 10. Visualize canonical orbitals from CPMD

CHAPTER 11
Links
• Documentation of the comp_chem_py library: https://comp-chem-py.readthedocs.io
• Introduction to Coupled Cluster Theory: https://cc-lecture.readthedocs.io
• VMD Quick help page (very useful when writing vmd scripts): http://www.ks.uiuc.edu/Research/vmd/vmd_help.html
41

Pablito’s playground Documentation
42 Chapter 11. Links

CHAPTER 12
Publications
A complete list of my scientific publications can be found on:
• My google-scholar account: https://scholar.google.com/citations?user=ZKpbiOUAAAAJ
• My ORCID account: https://orcid.org/0000-0001-7233-645X
• My PhD thesis: “Coupled Cluster theory for large molecules”.
12.1 Le complot de la connaissance
Sur ces pages j’aimerais constituer une bibliothèque des médias que je consulte au quotidien (vidéos, podcasts, articles,livres. . . ) et qui me plaise particulièrement.
Je voudrais me concentrer sur certains sujet aussi divers que la mécanique quantique, l’économie, la philosophiemorale, la permaculture ou le féminisme.
Ce qui m’intéresse particulièrement c’est de pouvoir garder une trace des contenus qui me plaisent et de créer du lienentre tout ces domaines à la manière d’une théorie du complot.
12.1.1 Mon univers de la connaissance
43

Pablito’s playground Documentation
44 Chapter 12. Publications

CHAPTER 13
Contact
• Pablo Baudin
• Scientific collaborator at LCBC, EPFL: https://lcbc.epfl.ch
• email: [email protected]
45