p6 basic user guide
DESCRIPTION
Primavera Project Management TutorialBasic Usage. EPS Enterprise Project StructureCreate the ProjectCalculating the Critical PathAssign Resources to ActivitiesUpdating the progressEarned Value Method – Tables and DiagramsReports and Printing LayoutsTRANSCRIPT

Primavera
Project Management
Tutorial
Basic
Usage
Project management software usage 101 Part I Primavera Project Management
© D. Fotopoulou for Train the Trainer IPMA LD, Athens, Greece 2009 Page | 2
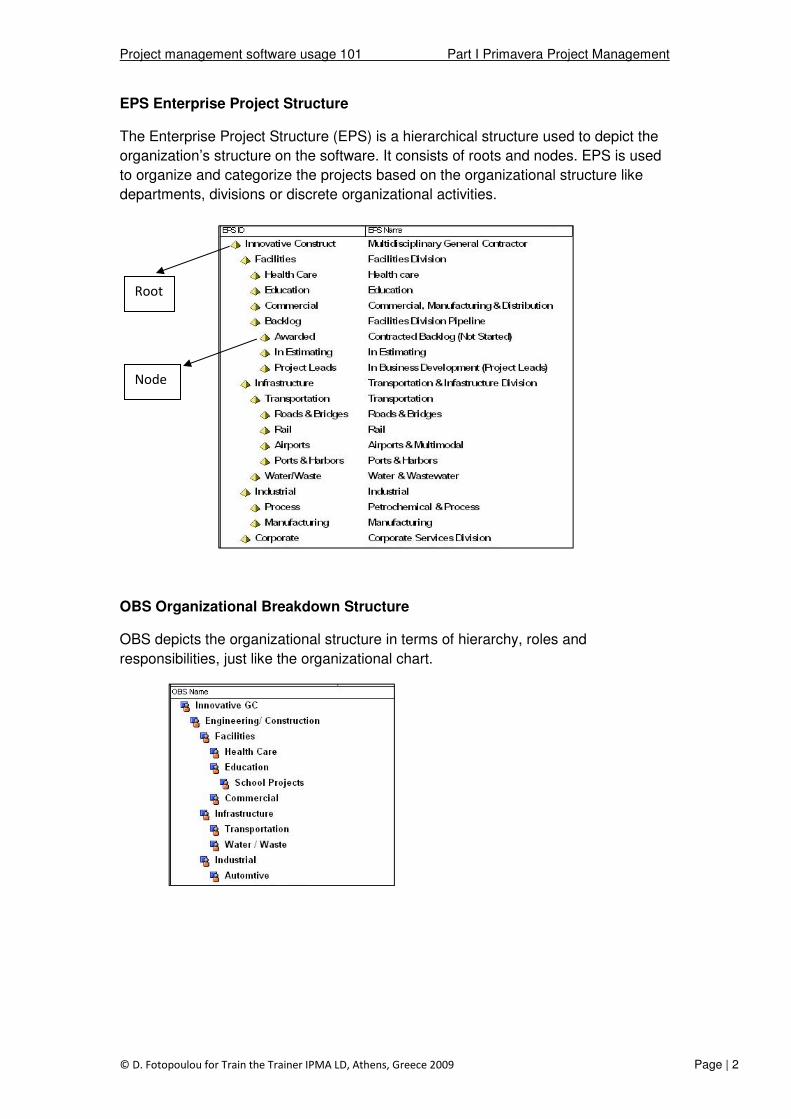
EPS Enterprise Project Structure
The Enterprise Project Structure (EPS) is a hierarchical structure used to depict the
organization’s structure on the software. It consists of roots and nodes. EPS is used
to organize and categorize the projects based on the organizational structure like
departments, divisions or discrete organizational activities.
OBS Organizational Breakdown Structure
OBS depicts the organizational structure in terms of hierarchy, roles and
responsibilities, just like the organizational chart.
Root
Node

Project management software usage 101
© D. Fotopoulou for Train the Trainer
1.1. Create the Project
To create a new project select from the main menu:
File > New > Create New Project Wizard
Follow the wizard’s instructions to add all the initial information like
Name, Responsible Manager
Finish By.
• The must finish by date is not obligatory to add from the beginning
On Projects view, select the
selected on the table above. You can the initial information from this tab as well like
the Planned Start and Must
Planned Start – the date agreed to start the project
Must Finish By – the date the project must be delivered
Data Date – the date you update the project’s data (changes during the project’s life
cycle)
Project management software usage 101 Part I Primavera Project Management
rain the Trainer IPMA LD, Athens, Greece 2009
Project
ect select from the main menu:
Create New Project Wizard
Follow the wizard’s instructions to add all the initial information like Project
Manager, and the starting and ending project dates
must finish by date is not obligatory to add from the beginning
the ‘Dates’ Tab to modify the information of the project
selected on the table above. You can the initial information from this tab as well like
Must Finish By dates.
the date agreed to start the project
the date the project must be delivered
the date you update the project’s data (changes during the project’s life
Part I Primavera Project Management
Page | 3
Project ID and
and the starting and ending project dates Start & Must
must finish by date is not obligatory to add from the beginning
to modify the information of the project
selected on the table above. You can the initial information from this tab as well like
the date you update the project’s data (changes during the project’s life
Project management software usage 101
© D. Fotopoulou for Train the Trainer
Finish – for better understanding of the Finish cell you can come back later after the
end of the planning phase. The cell is not editable and contains the project’s earliest
finish date calculated by the software.
Actual Start and Actual Finish
and finish project dates once updated by the person that uses the software.
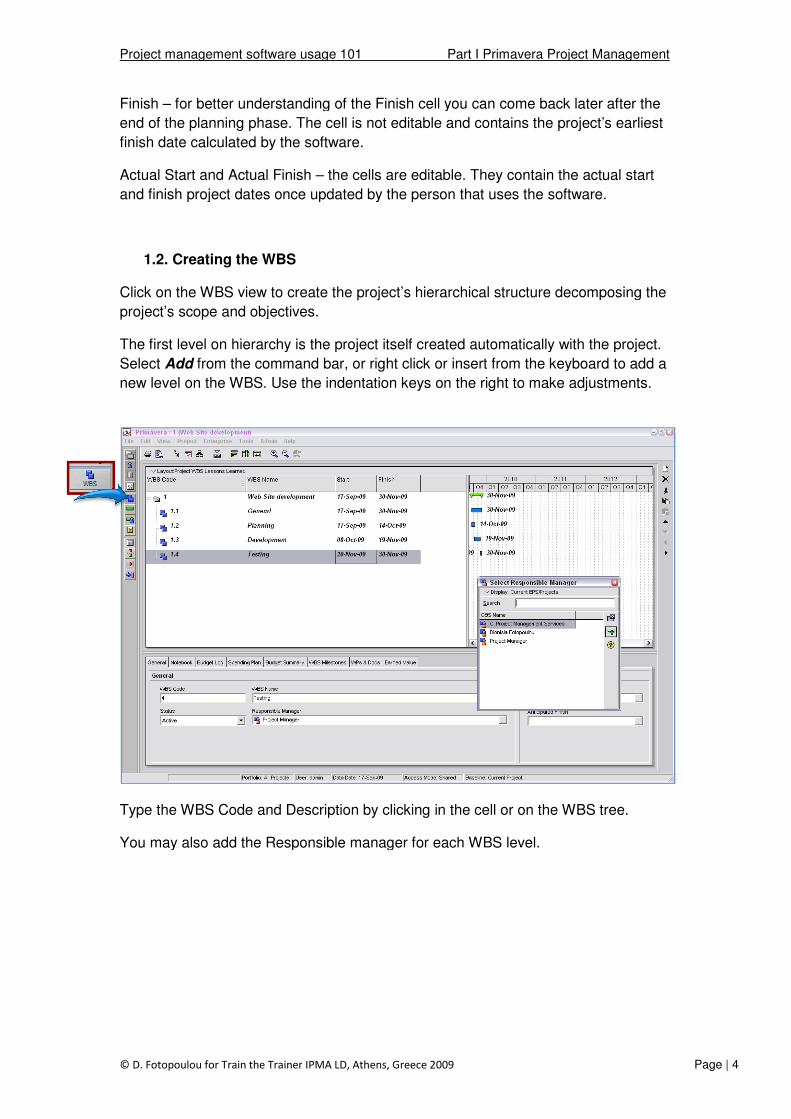
1.2. Creating the WBS
Click on the WBS view to
project’s scope and objectives
The first level on hierarchy is the project itself created automatically with the project.
Select Add from the command
new level on the WBS. Use
Type the WBS Code and Description
You may also add the Responsible manager for each WBS level.
Project management software usage 101 Part I Primavera Project Management
rain the Trainer IPMA LD, Athens, Greece 2009
erstanding of the Finish cell you can come back later after the
end of the planning phase. The cell is not editable and contains the project’s earliest
finish date calculated by the software.
Finish – the cells are editable. They contain the actual start
and finish project dates once updated by the person that uses the software.
WBS
create the project’s hierarchical structure decomposing
objectives.
erarchy is the project itself created automatically with the project.
command bar, or right click or insert from the keyboard to add a
new level on the WBS. Use the indentation keys on the right to make adjustments.
Description by clicking in the cell or on the WBS
You may also add the Responsible manager for each WBS level.
Part I Primavera Project Management
Page | 4
erstanding of the Finish cell you can come back later after the
end of the planning phase. The cell is not editable and contains the project’s earliest
ntain the actual start
and finish project dates once updated by the person that uses the software.
decomposing the
erarchy is the project itself created automatically with the project.
from the keyboard to add a
on the right to make adjustments.
WBS tree.
Project management software usage 101
© D. Fotopoulou for Train the Trainer
1.3. Adding Activities
Select the Activities view and before adding any activities, you can modify the current
view to show the WBS you just created.
Click on Group & Sort icon and select
column’s cell. You will see a variety of selections to group the activities from drop
down menu. Select the WBS.
To add an activity click Insert
command bar at the right.
Activity
Project management software usage 101 Part I Primavera Project Management
rain the Trainer IPMA LD, Athens, Greece 2009
Activities
view and before adding any activities, you can modify the current
S you just created.
icon and select Group by WBS by clicking inside the first
You will see a variety of selections to group the activities from drop
down menu. Select the WBS.
Insert from the clipboard, or right click Add, ή Add
command bar at the right.
Activity type
Calendar
Part I Primavera Project Management
Page | 5
view and before adding any activities, you can modify the current
by clicking inside the first
You will see a variety of selections to group the activities from drop
Add from the
Add
Project management software usage 101 Part I Primavera Project Management
© D. Fotopoulou for Train the Trainer IPMA LD, Athens, Greece 2009 Page | 6
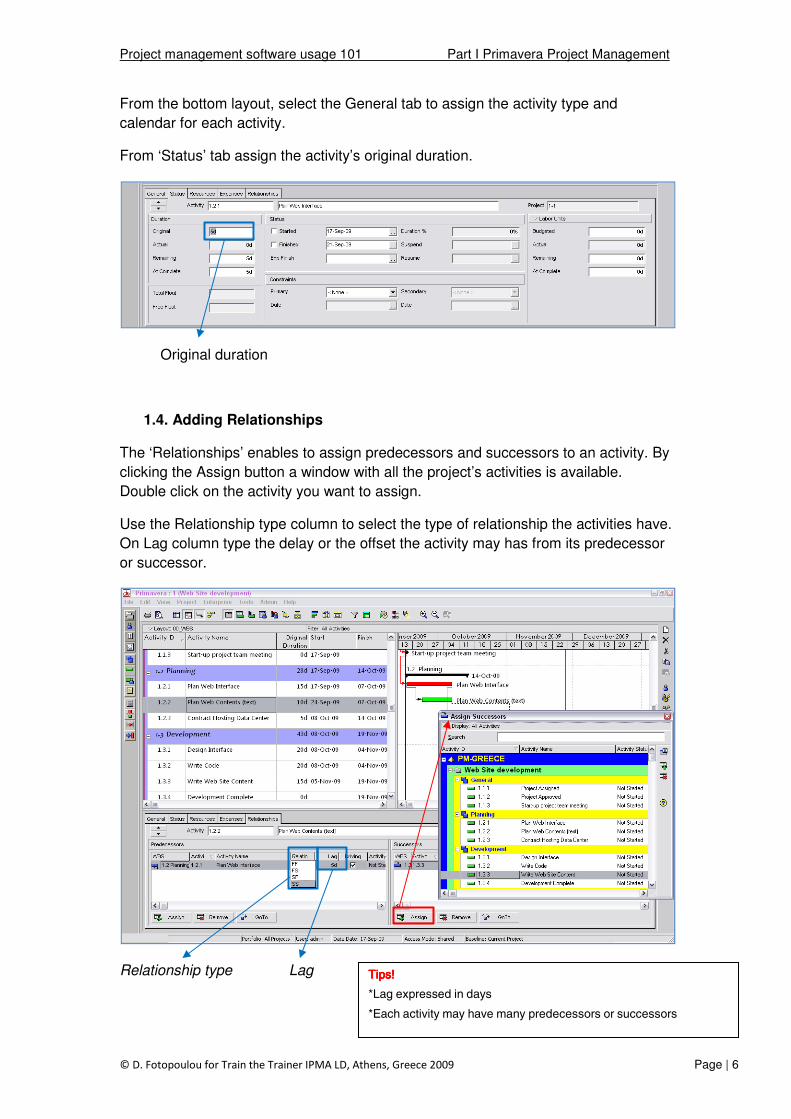
From the bottom layout, select the General tab to assign the activity type and
calendar for each activity.
From ‘Status’ tab assign the activity’s original duration.
Original duration
1.4. Adding Relationships
The ‘Relationships’ enables to assign predecessors and successors to an activity. By
clicking the Assign button a window with all the project’s activities is available.
Double click on the activity you want to assign.
Use the Relationship type column to select the type of relationship the activities have.
On Lag column type the delay or the offset the activity may has from its predecessor
or successor.
Relationship type Lag
TipsTipsTipsTips!!!!
*Lag expressed in days
*Each activity may have many predecessors or successors
Project management software usage 101 Part I Primavera Project Management
© D. Fotopoulou for Train the Trainer IPMA LD, Athens, Greece 2009 Page | 7
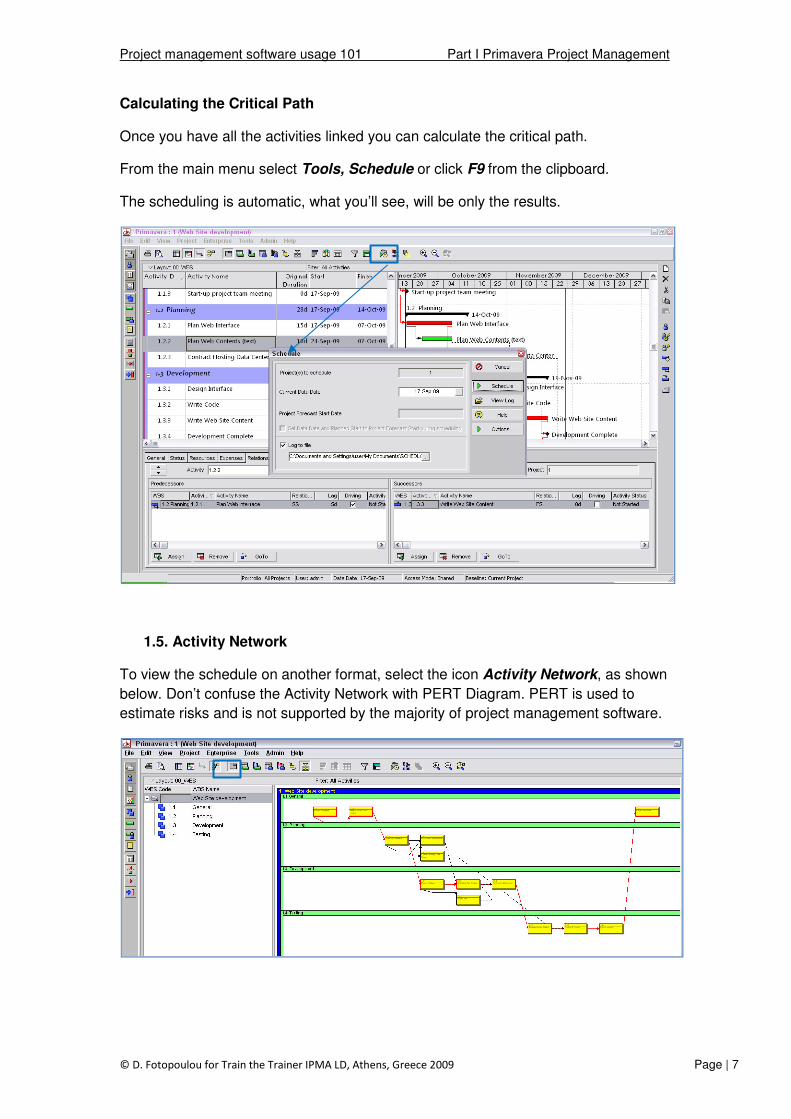
Calculating the Critical Path
Once you have all the activities linked you can calculate the critical path.
From the main menu select Tools, Schedule or click F9 from the clipboard.
The scheduling is automatic, what you’ll see, will be only the results.
1.5. Activity Network
To view the schedule on another format, select the icon Activity Network, as shown
below. Don’t confuse the Activity Network with PERT Diagram. PERT is used to
estimate risks and is not supported by the majority of project management software.

Project management software usage 101
© D. Fotopoulou for Train the Trainer
1.6. Create and Assign Resources
Select the Resources view
the organization’s resources available to work for the projects.
Select Add from the command
Primavera P6 supports 3 different type of resources
Resource Type
Labor Human Resources
Non Labor Equipment and Machinery
Material
Once the resource is created click on
Default Units / Time is used to define the standard resource’s availability (e.g. 8h/d)
Marking on the checkbox
assign the resource to an activit
calculated based on the
The Units & Prices tab is used
unit ($25/h), the maximum
to the cost during time.
Project management software usage 101 Part I Primavera Project Management
rain the Trainer IPMA LD, Athens, Greece 2009
Create and Assign Resources
view to access the library (the pool) where you can create
resources available to work for the projects.
command bar, or right click and Add, to create a new resource.
Primavera P6 supports 3 different type of resources
Unit of Measure Price / Unit
Units / Time hr/d, d/m e.t.c.
Price (€,$) / Unit of Time e.g. 50 €/hr
Equipment and Machinery Units / Time hr/d, d/m e.t.c.
Price (€,$) / Unit of Time e.g. 180 €/d
User Defined Units of Measure
Price (€,$) / Unit of Measure e.g. 70 €/m3
created click on Details tab to define the resource type. The
is used to define the standard resource’s availability (e.g. 8h/d)
checkbox ‘Calculate costs from units’ then every time you
assign the resource to an activity the budgeted cost will be automatically
calculated based on the Units/Time.
used to assign the standard resource’s cost per
maximum limit of working time (10h/d) and to add raises or changes
Part I Primavera Project Management
Page | 8
(the pool) where you can create all
to create a new resource.
€,$) / Unit of Time
€,$) / Unit of Time €/d
€,$) / Unit of
3
tab to define the resource type. The
is used to define the standard resource’s availability (e.g. 8h/d)
then every time you
y the budgeted cost will be automatically
per working
to add raises or changes
Add

Project management software usage 101 Part I Primavera Project Management
© D. Fotopoulou for Train the Trainer IPMA LD, Athens, Greece 2009 Page | 9
The Resources view is the library where you create resources. The resources
assigned to activities via the Activities view.
Assign Resources to Activities
From the Activities view, click on the activity you want to assign a resource and from
the bottom layout select on Resources tab. Clicking on Add Resource button from
the bottom left, select the resource you want to assign by double clicking on its
name.
Project management software usage 101 Part I Primavera Project Management
© D. Fotopoulou for Train the Trainer IPMA LD, Athens, Greece 2009 Page | 10
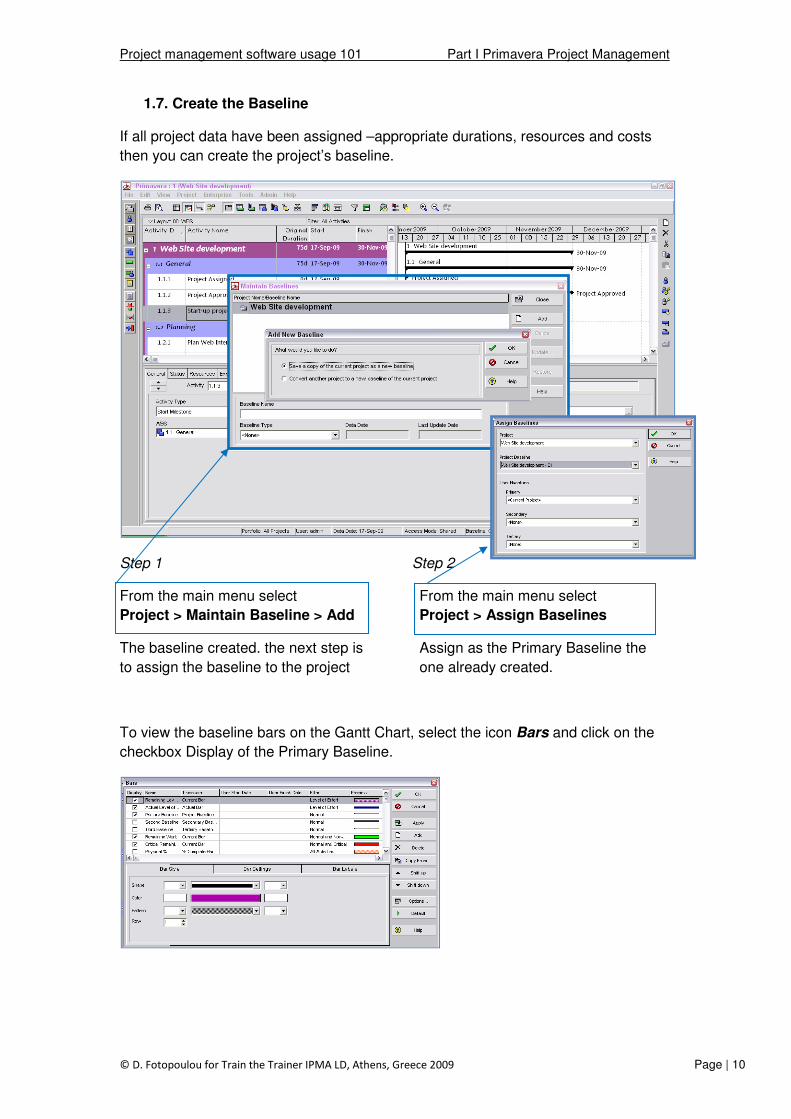
1.7. Create the Baseline
If all project data have been assigned –appropriate durations, resources and costs
then you can create the project’s baseline.
Step 1 Step 2
From the main menu select
Project > Maintain Baseline > Add
The baseline created. the next step is
to assign the baseline to the project
From the main menu select
Project > Assign Baselines
Assign as the Primary Baseline the
one already created.
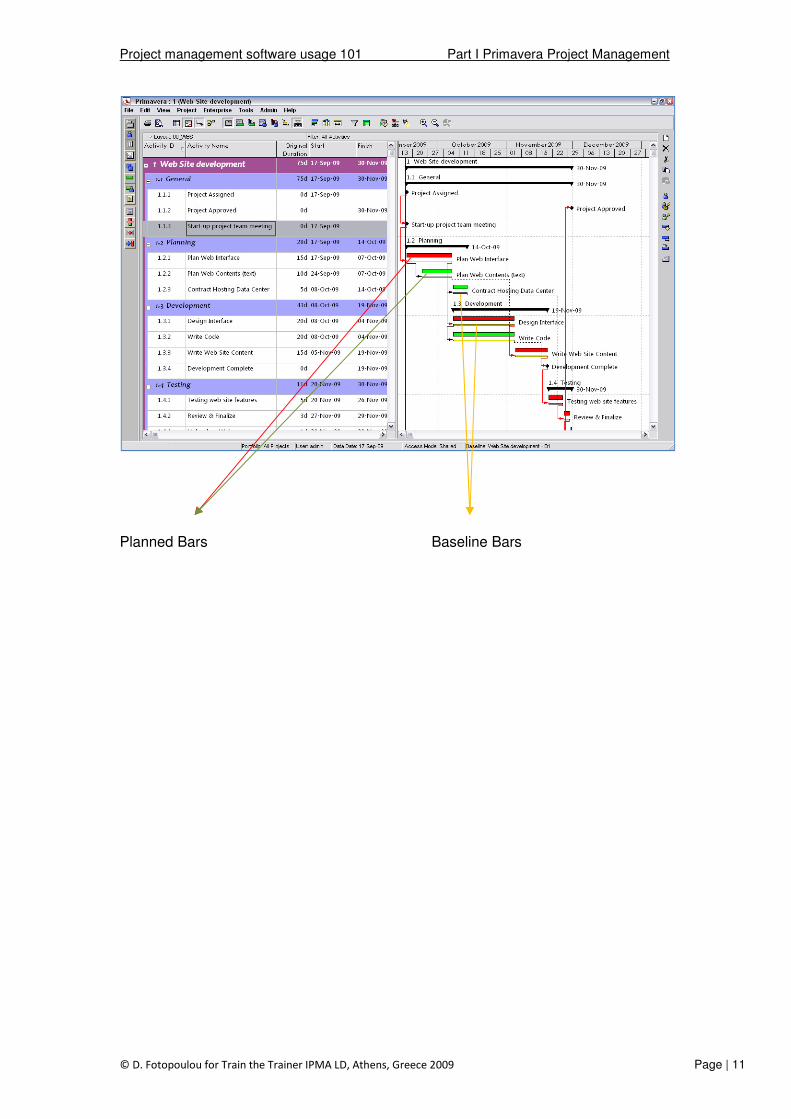
To view the baseline bars on the Gantt Chart, select the icon Bars and click on the
checkbox Display of the Primary Baseline.
Project management software usage 101 Part I Primavera Project Management
© D. Fotopoulou for Train the Trainer IPMA LD, Athens, Greece 2009 Page | 11
Planned Bars Baseline Bars
Project management software usage 101 Part I Primavera Project Management
© D. Fotopoulou for Train the Trainer IPMA LD, Athens, Greece 2009 Page | 12
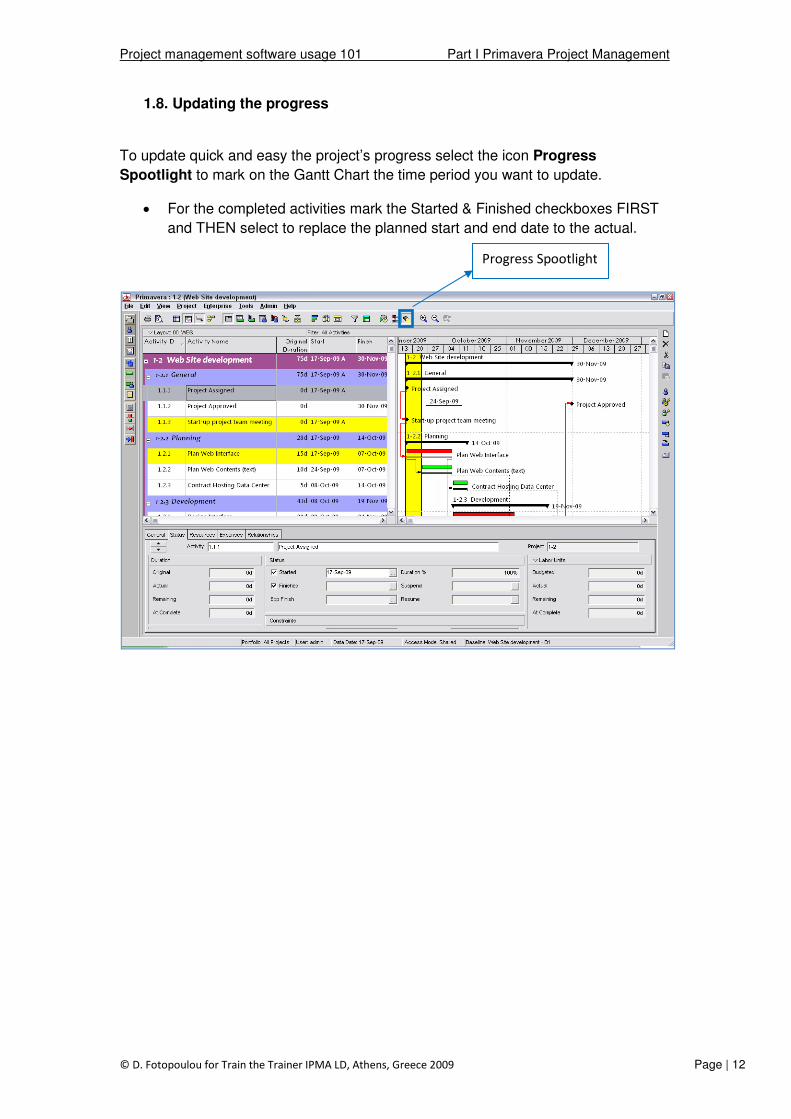
1.8. Updating the progress
To update quick and easy the project’s progress select the icon Progress
Spootlight to mark on the Gantt Chart the time period you want to update.
• For the completed activities mark the Started & Finished checkboxes FIRST
and THEN select to replace the planned start and end date to the actual.
Progress Spootlight

Project management software usage 101 Part I Primavera Project Management
© D. Fotopoulou for Train the Trainer IPMA LD, Athens, Greece 2009 Page | 13
• For activities that are on progress (actual started without having an actual end
date yet), select the Started checkbox only, select the actual date and fill the
duration percent complete or the remaining duration of the activity.
• To update resources usage, select the Resources and fill Actual Units cell.
The actual resource’s cost is automatically updated.
Fill the Remaining Duration or
the Duration percent complete.
Fill in the actual resources usage
Project management software usage 101 Part I Primavera Project Management
© D. Fotopoulou for Train the Trainer IPMA LD, Athens, Greece 2009 Page | 14
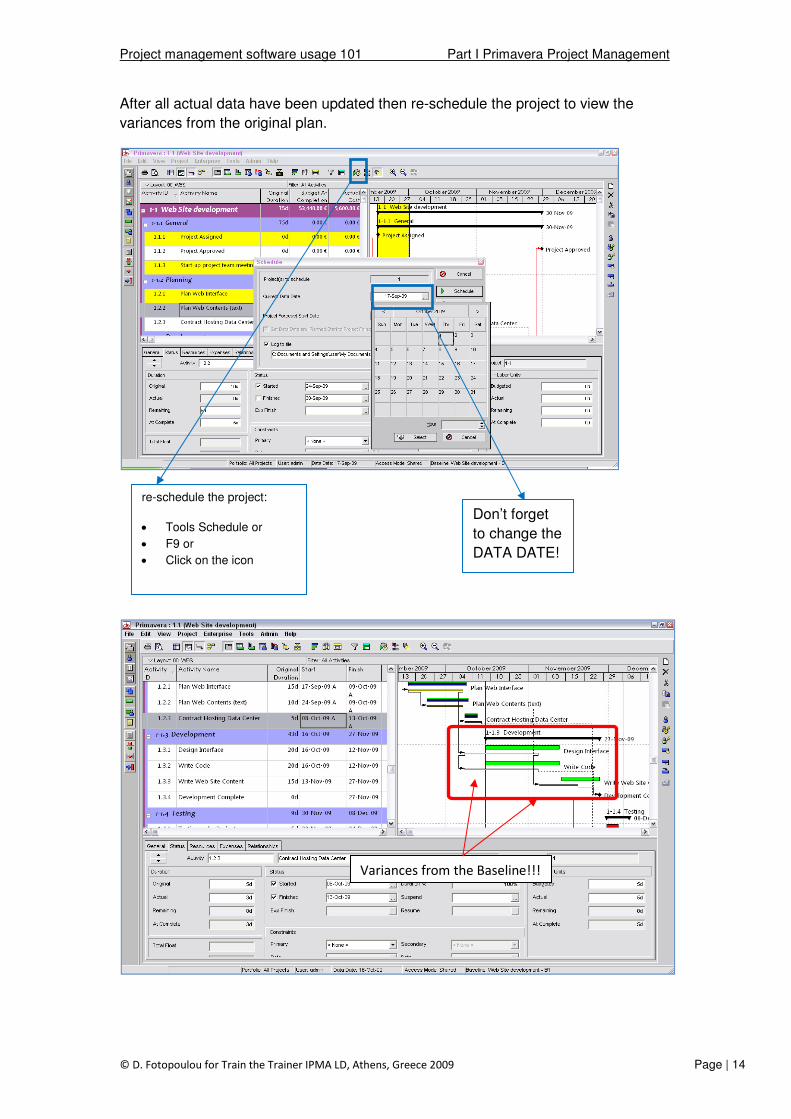
After all actual data have been updated then re-schedule the project to view the
variances from the original plan.
re-schedule the project:
• Tools Schedule or
• F9 or
• Click on the icon
Don’t forget
to change the
DATA DATE!
Variances from the Baseline!!!

Project management software usage 101 Part I Primavera Project Management
© D. Fotopoulou for Train the Trainer IPMA LD, Athens, Greece 2009 Page | 15
1.9. Earned Value Method – Tables and Diagrams
To view the Earned Value curve select the icon Activity Usage Profile.
Right click on the curve space (bottom layout) to display the Activity Usage Profile
Options.
To display in detail all Earned Value related costs select the icon Activity Usage
Spreadsheet.
Activity Usage Profile
Activity Usage Spreadsheet
Project management software usage 101 Part I Primavera Project Management
© D. Fotopoulou for Train the Trainer IPMA LD, Athens, Greece 2009 Page | 16
1.10. Reports and Printing Layouts
All data and views are printable on P6. You can print the layouts or create and print
specific reports.
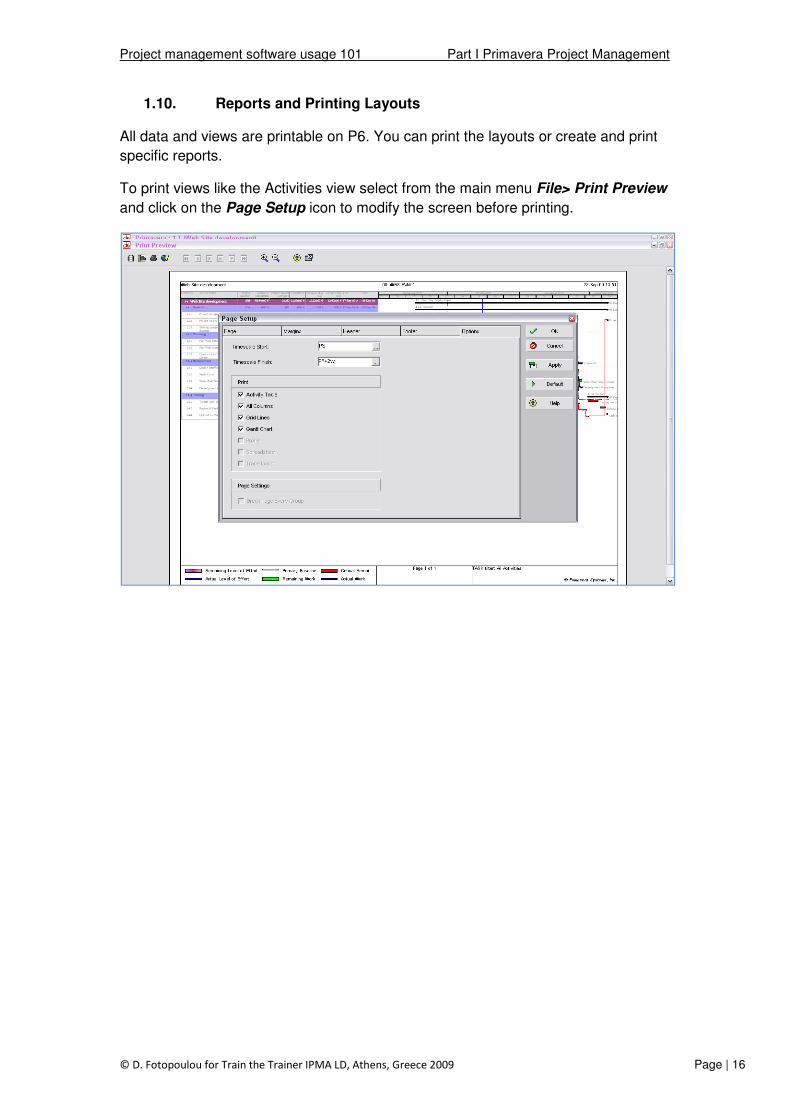
To print views like the Activities view select from the main menu File> Print Preview
and click on the Page Setup icon to modify the screen before printing.
Project management software usage 101
© D. Fotopoulou for Train the Trainer
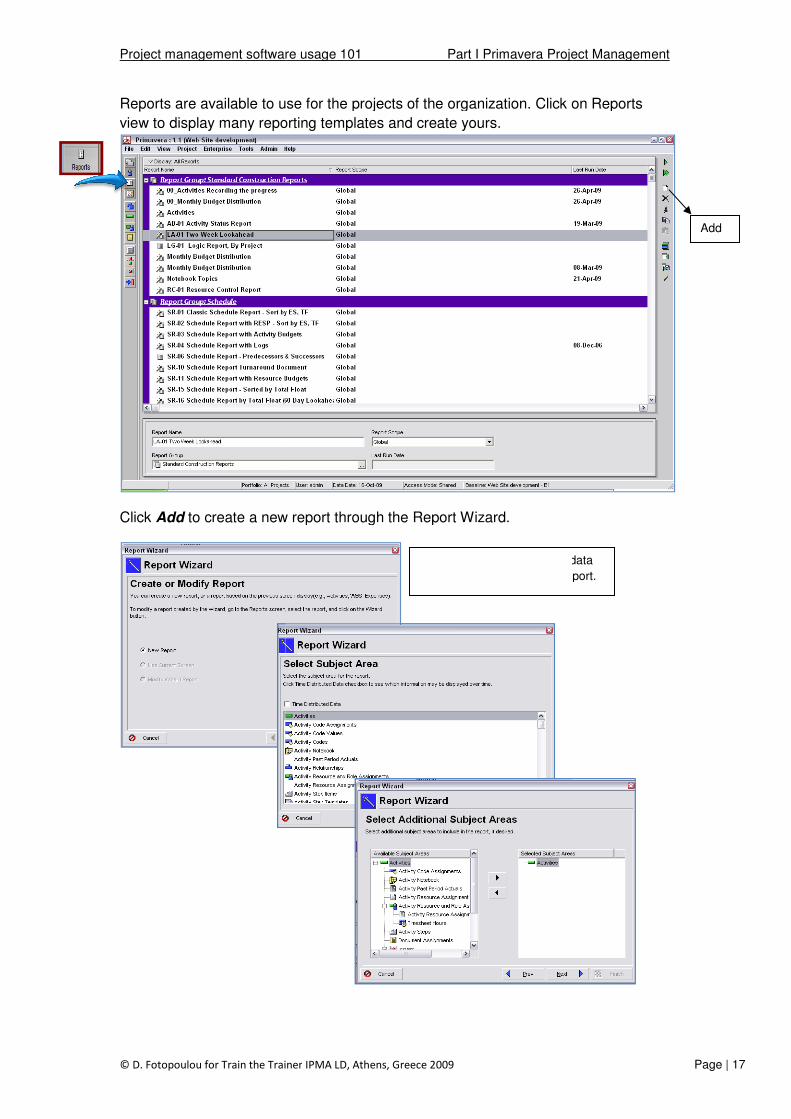
Reports are available to use for the projects of the organization.
view to display many reporting
Click Add to create a new report through the Report Wizard.
Project management software usage 101 Part I Primavera Project Management
rain the Trainer IPMA LD, Athens, Greece 2009
are available to use for the projects of the organization. Click on Reports
reporting templates and create yours.
to create a new report through the Report Wizard.
Use the wizard to select the data
you want to include on the report.
Part I Primavera Project Management
Page | 17
on Reports
Add
data
you want to include on the report.

Project management software usage 101 Part I Primavera Project Management
© D. Fotopoulou for Train the Trainer IPMA LD, Athens, Greece 2009 Page | 18
After typing the report’s title click on the Finish button and then click Run to view the
report.

Project management software usage 101 Part I Primavera Project Management
© D. Fotopoulou for Train the Trainer IPMA LD, Athens, Greece 2009 Page | 19
A Few, last details
You probably noticed that the ‘Save’ command never motioned so far. This is because P6
saves data automatically.
Whenever the button is there, click to view the options you got. Most of the times a
calendar is available to change the dates.
Right click to all white spaces in all views to explore the options you have.
In order to assign a relationship or a resource to an activity from a pop up window, you can
either double click on the selection or click on the Assign or Select button.
In the begging when updating an activity, verify that you have selected the right one.
Take your time, to learn P6 needs patient. Make mistakes and write them down. Don’t be
afraid to test it, it will not crash down!