p ˜˝˙˚ ˆ - portlock · portlock leap frog has been developed and designed to ... – the first...
TRANSCRIPT

P ro octl kUser Guide
LEAP FROG

Portlock Leap Frog User Guide
2
Portlock Leap Frog User GuidePortlock Install is furnished under a license agreement and may be used only in accordance with the terms of the agreement.
Date of Publication: February 8 , 2010
NO WARRANTY. The technical documentation is being delivered to you AS IS and Portlock Corporation makes no warranty as to its accuracy or use. Any use of the technical documentation or the information contained therein is at the risk of the user. Documentation may include technical errors, typographical errors or other inaccuracies. Portlock reserves the right to make changes without prior notice.
All technical documentation is the copyrighted work of Portlock Corporation. No part of this publication may be copied without the express written permission of Portlock Corporation, 8353 154th Avenue NE, Redmond, WA 98052.
Copyright © 2000-2010 Portlock Corporation. All Rights Reserved. Portlock, the Portlock logo and Portlock Leap Frog are trademarks of Portlock Corporation.
Other vendor product names mentioned in this guide may be trademarks or registered trademarks of their respective companies and are hereby acknowledged. Printed in the United States.
. . . . . . . . . . . . . . . . . . . . . . . . . . . . . . . . . . . . . . . . . . . . . . . . . . . . . . . . . . . . . . . . . . . . . . . . . . . . . . . . . . . . . . . . . . . .
. . . . . . . . . . . . . . . . . . . . . . . . . . . . . . . . . . . . . . . . . . . . . . . . . . . . . . . . . . . . . . . . . . . . . . . . . . . . . . . . . . . . . . . . . . .

Table of ContentsChapter 1: Overview . . . . . . . . . . . . . . . . . . . . . . . . . . . . . . . . . . . . . . . . . . . . . . . . . . . . . . . . . . . . . . . . . . . . . . . . . . . . . . . . . . . . . . . . . . . . . . . . . . . 4
1.1: Introduction to Portlock Leap Frog . . . . . . . . . . . . . . . . . . . . . . . . . . . . . . . . . . . . . . . . . . . . . . . . . . . . . . . . . . . . . . . . . . . . . . . . . . . . . . . . 4
1.2: Minimum System Requirements . . . . . . . . . . . . . . . . . . . . . . . . . . . . . . . . . . . . . . . . . . . . . . . . . . . . . . . . . . . . . . . . . . . . . . . . . . . . . . . . . 5
1.3: Microsoft Native (VHD) Boot Limitations . . . . . . . . . . . . . . . . . . . . . . . . . . . . . . . . . . . . . . . . . . . . . . . . . . . . . . . . . . . . . . . . . . . . . . . . . . 6
1.4: Portlock Leap Frog Limitations . . . . . . . . . . . . . . . . . . . . . . . . . . . . . . . . . . . . . . . . . . . . . . . . . . . . . . . . . . . . . . . . . . . . . . . . . . . . . . . . . . 6
1.5: Interface . . . . . . . . . . . . . . . . . . . . . . . . . . . . . . . . . . . . . . . . . . . . . . . . . . . . . . . . . . . . . . . . . . . . . . . . . . . . . . . . . . . . . . . . . . . . . . . . . . . . . . . 7
1.6: Languages . . . . . . . . . . . . . . . . . . . . . . . . . . . . . . . . . . . . . . . . . . . . . . . . . . . . . . . . . . . . . . . . . . . . . . . . . . . . . . . . . . . . . . . . . . . . . . . . . . . . . 8
1.7: Operating Portlock Leap Frog from the Windows Notification Area . . . . . . . . . . . . . . . . . . . . . . . . . . . . . . . . . . . . . . . . . . . . . . . . . . 9
1.8: Windows Shell Integration . . . . . . . . . . . . . . . . . . . . . . . . . . . . . . . . . . . . . . . . . . . . . . . . . . . . . . . . . . . . . . . . . . . . . . . . . . . . . . . . . . . . . . 9
1.9: Windows 7 Interface Integration . . . . . . . . . . . . . . . . . . . . . . . . . . . . . . . . . . . . . . . . . . . . . . . . . . . . . . . . . . . . . . . . . . . . . . . . . . . . . . . . 10
Chapter 2: Installation . . . . . . . . . . . . . . . . . . . . . . . . . . . . . . . . . . . . . . . . . . . . . . . . . . . . . . . . . . . . . . . . . . . . . . . . . . . . . . . . . . . . . . . . . . . . . . . . . 11
2.1: Downloading and Installing Portlock Leap Frog . . . . . . . . . . . . . . . . . . . . . . . . . . . . . . . . . . . . . . . . . . . . . . . . . . . . . . . . . . . . . . . . . . . . 11
2.2: Portlock Leap Frog ISO Image . . . . . . . . . . . . . . . . . . . . . . . . . . . . . . . . . . . . . . . . . . . . . . . . . . . . . . . . . . . . . . . . . . . . . . . . . . . . . . . . . . . 12
2.3: Entering a license key . . . . . . . . . . . . . . . . . . . . . . . . . . . . . . . . . . . . . . . . . . . . . . . . . . . . . . . . . . . . . . . . . . . . . . . . . . . . . . . . . . . . . . . . . . 13
2.4: Updating Portlock Leap Frog . . . . . . . . . . . . . . . . . . . . . . . . . . . . . . . . . . . . . . . . . . . . . . . . . . . . . . . . . . . . . . . . . . . . . . . . . . . . . . . . . 13
2.5: Uninstalling Portlock Leap Frog . . . . . . . . . . . . . . . . . . . . . . . . . . . . . . . . . . . . . . . . . . . . . . . . . . . . . . . . . . . . . . . . . . . . . . . . . . . . . . . . 13
Chapter 3: Creating a Windows 7 Bootable VHD . . . . . . . . . . . . . . . . . . . . . . . . . . . . . . . . . . . . . . . . . . . . . . . . . . . . . . . . . . . . . . . . . . . . . . . 14
3.1: System Configuration Check . . . . . . . . . . . . . . . . . . . . . . . . . . . . . . . . . . . . . . . . . . . . . . . . . . . . . . . . . . . . . . . . . . . . . . . . . . . . . . . . . . . . 14
3.2: Windows 7 Installation Media . . . . . . . . . . . . . . . . . . . . . . . . . . . . . . . . . . . . . . . . . . . . . . . . . . . . . . . . . . . . . . . . . . . . . . . . . . . . . . . . . . . . 15
3.3: Specify the Operating System Version to Apply . . . . . . . . . . . . . . . . . . . . . . . . . . . . . . . . . . . . . . . . . . . . . . . . . . . . . . . . . . . . . . . . . . . . 16
3.4: Specify the Virtual Disk (VHD) Parameters . . . . . . . . . . . . . . . . . . . . . . . . . . . . . . . . . . . . . . . . . . . . . . . . . . . . . . . . . . . . . . . . . . . . . . . . . 17
3.5: Installing Windows 7 . . . . . . . . . . . . . . . . . . . . . . . . . . . . . . . . . . . . . . . . . . . . . . . . . . . . . . . . . . . . . . . . . . . . . . . . . . . . . . . . . . . . . . . . . . . 18
3.6: Booting to VHD . . . . . . . . . . . . . . . . . . . . . . . . . . . . . . . . . . . . . . . . . . . . . . . . . . . . . . . . . . . . . . . . . . . . . . . . . . . . . . . . . . . . . . . . . . . . . . . 18
3.7: Rebooting to a specific operating system . . . . . . . . . . . . . . . . . . . . . . . . . . . . . . . . . . . . . . . . . . . . . . . . . . . . . . . . . . . . . . . . . . . . . . . . 20
Chapter 4: ISO Image Features . . . . . . . . . . . . . . . . . . . . . . . . . . . . . . . . . . . . . . . . . . . . . . . . . . . . . . . . . . . . . . . . . . . . . . . . . . . . . . . . . . . . . . . . 21
4.1: Mount ISO Image . . . . . . . . . . . . . . . . . . . . . . . . . . . . . . . . . . . . . . . . . . . . . . . . . . . . . . . . . . . . . . . . . . . . . . . . . . . . . . . . . . . . . . . . . . . . . . 21
4.2: Dismount ISO Image . . . . . . . . . . . . . . . . . . . . . . . . . . . . . . . . . . . . . . . . . . . . . . . . . . . . . . . . . . . . . . . . . . . . . . . . . . . . . . . . . . . . . . . . . . . 22
4.3: Burn ISO Image . . . . . . . . . . . . . . . . . . . . . . . . . . . . . . . . . . . . . . . . . . . . . . . . . . . . . . . . . . . . . . . . . . . . . . . . . . . . . . . . . . . . . . . . . . . . . . . 23
Chapter 5: Virtual Hard Disk (VHD) Features . . . . . . . . . . . . . . . . . . . . . . . . . . . . . . . . . . . . . . . . . . . . . . . . . . . . . . . . . . . . . . . . . . . . . . . . . . . 24
5.1: Attach Virtual Hard Disk . . . . . . . . . . . . . . . . . . . . . . . . . . . . . . . . . . . . . . . . . . . . . . . . . . . . . . . . . . . . . . . . . . . . . . . . . . . . . . . . . . . . . . . 24
5.2: Detach Virtual Hard Disk . . . . . . . . . . . . . . . . . . . . . . . . . . . . . . . . . . . . . . . . . . . . . . . . . . . . . . . . . . . . . . . . . . . . . . . . . . . . . . . . . . . . . . . 25
5.3: Create Virtual Hard Disk . . . . . . . . . . . . . . . . . . . . . . . . . . . . . . . . . . . . . . . . . . . . . . . . . . . . . . . . . . . . . . . . . . . . . . . . . . . . . . . . . . . . . . . . 26
5.4: Resize Virtual Disk . . . . . . . . . . . . . . . . . . . . . . . . . . . . . . . . . . . . . . . . . . . . . . . . . . . . . . . . . . . . . . . . . . . . . . . . . . . . . . . . . . . . . . . . . . . . . 27
5.5: Compact Virtual Disk . . . . . . . . . . . . . . . . . . . . . . . . . . . . . . . . . . . . . . . . . . . . . . . . . . . . . . . . . . . . . . . . . . . . . . . . . . . . . . . . . . . . . . . . . . 29
Chapter 6: Hard Disk Commands . . . . . . . . . . . . . . . . . . . . . . . . . . . . . . . . . . . . . . . . . . . . . . . . . . . . . . . . . . . . . . . . . . . . . . . . . . . . . . . . . . . . . . 30
6.1: Analyze Disk Drives . . . . . . . . . . . . . . . . . . . . . . . . . . . . . . . . . . . . . . . . . . . . . . . . . . . . . . . . . . . . . . . . . . . . . . . . . . . . . . . . . . . . . . . . . . . . 30
6.2: Disk Initialize . . . . . . . . . . . . . . . . . . . . . . . . . . . . . . . . . . . . . . . . . . . . . . . . . . . . . . . . . . . . . . . . . . . . . . . . . . . . . . . . . . . . . . . . . . . . . . . . . . 31
6.3: Create Partition . . . . . . . . . . . . . . . . . . . . . . . . . . . . . . . . . . . . . . . . . . . . . . . . . . . . . . . . . . . . . . . . . . . . . . . . . . . . . . . . . . . . . . . . . . . . . . . . 33
6.4: Create Boot Partition . . . . . . . . . . . . . . . . . . . . . . . . . . . . . . . . . . . . . . . . . . . . . . . . . . . . . . . . . . . . . . . . . . . . . . . . . . . . . . . . . . . . . . . . . . 35
Chapter 7: Boot Manager . . . . . . . . . . . . . . . . . . . . . . . . . . . . . . . . . . . . . . . . . . . . . . . . . . . . . . . . . . . . . . . . . . . . . . . . . . . . . . . . . . . . . . . . . . . . . 38
7.1: Overview . . . . . . . . . . . . . . . . . . . . . . . . . . . . . . . . . . . . . . . . . . . . . . . . . . . . . . . . . . . . . . . . . . . . . . . . . . . . . . . . . . . . . . . . . . . . . . . . . . . . . . 38
7.2: Windows Boot Environment . . . . . . . . . . . . . . . . . . . . . . . . . . . . . . . . . . . . . . . . . . . . . . . . . . . . . . . . . . . . . . . . . . . . . . . . . . . . . . . . . . . . 38
7.3: Boot Manager Features . . . . . . . . . . . . . . . . . . . . . . . . . . . . . . . . . . . . . . . . . . . . . . . . . . . . . . . . . . . . . . . . . . . . . . . . . . . . . . . . . . . . . . . . . 39
7.4: Install Windows Boot Manager . . . . . . . . . . . . . . . . . . . . . . . . . . . . . . . . . . . . . . . . . . . . . . . . . . . . . . . . . . . . . . . . . . . . . . . . . . . . . . . . . 39
Chapter 8: Apple Boot Camp . . . . . . . . . . . . . . . . . . . . . . . . . . . . . . . . . . . . . . . . . . . . . . . . . . . . . . . . . . . . . . . . . . . . . . . . . . . . . . . . . . . . . . . . . . 40
8.1: Boot Camp Assistant . . . . . . . . . . . . . . . . . . . . . . . . . . . . . . . . . . . . . . . . . . . . . . . . . . . . . . . . . . . . . . . . . . . . . . . . . . . . . . . . . . . . . . . . . . . 40
8.2: Portlock Leap Frog Boot Camp Wizard . . . . . . . . . . . . . . . . . . . . . . . . . . . . . . . . . . . . . . . . . . . . . . . . . . . . . . . . . . . . . . . . . . . . . . . . . . 42
8.3: Mac OS X - Selecting Startup OS . . . . . . . . . . . . . . . . . . . . . . . . . . . . . . . . . . . . . . . . . . . . . . . . . . . . . . . . . . . . . . . . . . . . . . . . . . . . . . . . 42
Chapter 9: Technical Reference Guide . . . . . . . . . . . . . . . . . . . . . . . . . . . . . . . . . . . . . . . . . . . . . . . . . . . . . . . . . . . . . . . . . . . . . . . . . . . . . . . . . 45
9.1: Portlock Leap Frog FAQ . . . . . . . . . . . . . . . . . . . . . . . . . . . . . . . . . . . . . . . . . . . . . . . . . . . . . . . . . . . . . . . . . . . . . . . . . . . . . . . . . . . . . . . . 45
9.2: Portlock Leap Frog Video . . . . . . . . . . . . . . . . . . . . . . . . . . . . . . . . . . . . . . . . . . . . . . . . . . . . . . . . . . . . . . . . . . . . . . . . . . . . . . . . . . . . . . . 46
9.3: What is a Virtual Hard Disk? . . . . . . . . . . . . . . . . . . . . . . . . . . . . . . . . . . . . . . . . . . . . . . . . . . . . . . . . . . . . . . . . . . . . . . . . . . . . . . . . . . . . . . 46
9.4: What is an ISO Image? . . . . . . . . . . . . . . . . . . . . . . . . . . . . . . . . . . . . . . . . . . . . . . . . . . . . . . . . . . . . . . . . . . . . . . . . . . . . . . . . . . . . . . . . . . 47
9.5: What is a WIM Image? . . . . . . . . . . . . . . . . . . . . . . . . . . . . . . . . . . . . . . . . . . . . . . . . . . . . . . . . . . . . . . . . . . . . . . . . . . . . . . . . . . . . . . . . . . 47
9.5: Portlock Leap Frog Mac OS X FAQ . . . . . . . . . . . . . . . . . . . . . . . . . . . . . . . . . . . . . . . . . . . . . . . . . . . . . . . . . . . . . . . . . . . . . . . . . . . . . . 48
Chapter 10: Technical Support . . . . . . . . . . . . . . . . . . . . . . . . . . . . . . . . . . . . . . . . . . . . . . . . . . . . . . . . . . . . . . . . . . . . . . . . . . . . . . . . . . . . . . . . . 50

Portlock Leap Frog User Guide
4
Chapter 1: Overview
1.1: Introduction to Portlock Leap FrogThis program will assist you in creating a bootable Virtual Hard Disk (VHD) for native Windows deployment with your Windows XP, Windows Vista, Windows 7, Windows Server 2008 R2 or Mac OS X Snow Leopard machine. This means that the VHD can be used as the running operating system on designated hardware without a virtual machine or hypervisor. This provides an excellent way for end users who wish to utilize the VHD technology and setup a dual-boot environment with Windows XP and Windows Vista without having to ‘Upgrade,’ or repartition the hard disk.
Portlock Leap Frog has been developed and designed to provide end users the ability to utilize the new VHD features from Windows 7 and Windows Server 2008 R2 in one easy to use wizard. Portlock Leap Frog eliminates steps for VHD boot setup, such as the need to first boot the system from the Windows install DVD as well as tools such as the ‘Disk Management’ console and command prompt tools such as ‘Diskpart’ and ‘BCDedit.’
Features
• Create a Windows 7 or Windows Server 2008 R2 bootable VHD
• VHD Support - Attach, Detach, Compact, Resize, Create
• ISO Support - Mount, Dismount, Burn, Verify
• Boot Manager - Modify the Windows boot environment
Chapter 1: Overview. . . . . . . . . . . . . . . . . . . . . . . . . . . . . . . . . . . . . . . . . . . . . . . . . . . . . . . . . . . . . . . . . . . . . . . . . . . . . . . . . . . . . . . . . . . .
. . . . . . . . . . . . . . . . . . . . . . . . . . . . . . . . . . . . . . . . . . . . . . . . . . . . . . . . . . . . . . . . . . . . . . . . . . . . . . . . . . . . . . . . . . .

Portlock Leap Frog User Guide
5
Chapter 1: Overview
1.2: Minimum System RequirementsThe following system requirements must be met in order to successfully create and manage a bootable Windows 7 VHD.
Platform support for installing to VHD (32-bit & 64-bit)
• Windows 7 Ultimate/Enterprise
• Windows Server 2008 R2
• Hyper-V Server 2008 R2
Platforms that Portlock Leap Frog supports configuring a multi-boot environment with a Windows 7 VHD (32-bit & 64-bit)
• Windows XP SP2/SP3. Note: Windows XP 64-bit Edition is not supported.
• Windows Server 2003
• Windows Vista SP1/SP2
• Windows 7 RC/RTM
• Windows Server 2008 and Windows Server 2008 R2
• Hyper-V Server 2008 R2
• Mac OS X10.6 Snow Leopard
• Mac OS X 10.6 Snow Leopard Server
• MS-DOS and DR-DOS
Note: Windows versions prior to Windows XP (95, 98, ME, NT, 2000) are NOT supported.
File System Requirements
• NTFS
Disk Requirements
• 10 GB of free disk space
Memory Requirements
• 500 MB minimum when running on Windows
• 1 GB minimum when running from the WinPE 3.0 Portlock Leap Frog Boot CD
Additional Notes
1. A Windows 7, Windows Server 2008 R2 or Microsoft Hyper-V Server 2008 R2 Installation DVD or ISO image is required for Windows installation.
2. Native-boot is supported on computers that have either BIOS-based or UEFI-based firmware.
. . . . . . . . . . . . . . . . . . . . . . . . . . . . . . . . . . . . . . . . . . . . . . . . . . . . . . . . . . . . . . . . . . . . . . . . . . . . . . . . . . . . . . . . . . .
. . . . . . . . . . . . . . . . . . . . . . . . . . . . . . . . . . . . . . . . . . . . . . . . . . . . . . . . . . . . . . . . . . . . . . . . . . . . . . . . . . . . . . . . . . . .

Portlock Leap Frog User Guide
6
Chapter 1: Overview
1.3: Microsoft Native (VHD) Boot Limitations1. Only Windows 7 Ultimate/Enterprise and Windows Server 2008 R2 are supported VHD platforms for
Windows install.
2. Bitlocker does NOT support Windows 7 when running from VHD.
3. Operating systems booted from a VHD do NOT support hibernation.
4. VHDs that have been compressed are NOT supported by native boot.
5. You can only attach a VHD that is located on an NTFS volume.
6. 2 TB (2048 GB) limit on VHD size.
7. Portlock Leap Frog does not support creating VHDs on a destination volume that is located on a Windows Dynamic Disk.
8. Portlock Leap Frog does NOT support creating a bootable VHD on a USB drive.
1.4: Portlock Leap Frog Limitations1. Systems that dual-boot with Linux are not supported.
2. Windows XP 64-bit Edition is not supported.
3. 640x480 resolution is not supported.
4. Differencing VHDs are not supported.
5. Portlock Leap Frog does NOT support creating a partition on a GPT formatted disk.
. . . . . . . . . . . . . . . . . . . . . . . . . . . . . . . . . . . . . . . . . . . . . . . . . . . . . . . . . . . . . . . . . . . . . . . . . . . . . . . . . . . . . . . . . . . .
. . . . . . . . . . . . . . . . . . . . . . . . . . . . . . . . . . . . . . . . . . . . . . . . . . . . . . . . . . . . . . . . . . . . . . . . . . . . . . . . . . . . . . . . . . .

Portlock Leap Frog User Guide
7
Chapter 1: Overview
1.5: Interface
All numbered items in the screenshot above are explained below:
1. Next – Click the Next button to move forward with creating a bootable Virtual Hard Disk (VHD) for native Windows deployment.
2. Tabs – To view and utilize additional features of Portlock Leap Frog, select a new tab.
3. Icons – The icons from the menu bar provide quick, one-click access to Portlock Leap Frog’s many features.
4. Menu – The Portlock Leap Frog features can also be accessed from the menu bar.
5. 6.1.7600.16385 – The first field is the version of the wimgapi.dll file that Portlock Leap Frog loaded. This file is retrieved from the version of the WAIK that is installed, or from the WinPE-based LeapFrog.iso file.
6. 8.0.7600.16385 – The second field is the version of Internet Explorer.
7. 6.1.7600.16385 – The third field is the version of bcdedit.exe (Boot Manager Configuration Database). The minimum supported version for VHDs is 6.1.7600.
8. Reboot – Users can choose from a drop-down menu to reboot to any installed operating system.
. . . . . . . . . . . . . . . . . . . . . . . . . . . . . . . . . . . . . . . . . . . . . . . . . . . . . . . . . . . . . . . . . . . . . . . . . . . . . . . . . . . . . . . . . . .
. . . . . . . . . . . . . . . . . . . . . . . . . . . . . . . . . . . . . . . . . . . . . . . . . . . . . . . . . . . . . . . . . . . . . . . . . . . . . . . . . . . . . . . . . . . .

Portlock Leap Frog User Guide
8
1.6: LanguagesPortlock Leap Frog can be displayed in several different languages. To change the language of Portlock Leap Frog, select one of the following languages from the “Language” tab, or via File > Language.
Supported Languages that Portlock Leap Frog Displays
• English
• Spanish
• Chinese
• Japanese
Chapter 1: Overview. . . . . . . . . . . . . . . . . . . . . . . . . . . . . . . . . . . . . . . . . . . . . . . . . . . . . . . . . . . . . . . . . . . . . . . . . . . . . . . . . . . . . . . . . . . .
. . . . . . . . . . . . . . . . . . . . . . . . . . . . . . . . . . . . . . . . . . . . . . . . . . . . . . . . . . . . . . . . . . . . . . . . . . . . . . . . . . . . . . . . . . .

Portlock Leap Frog User Guide
9
Chapter 1: Overview
1.7: Operating Portlock Leap Frog from the Windows Notification AreaUpon starting Portlock Leap Frog, an icon is displayed in the Windows Notification Area in the lower right hand corner of the screen. Right-clicking on this icon will display a list of Portlock Leap Frog commands. Note: The commands will be grayed-out if a dialog box is already open within Portlock Leap Frog.
Users can easily change the default operating system at next reboot by simply selecting Set default operating system and selecting the desired operating system from the menu.
1.8: Windows Shell IntegrationPortlock Leap Frog takes ownership of ISO and VHD file associations if another program has not already been assigned to those file types. When you are using Windows Explorer to browse files, locate and right-click on an ISO or VHD file. The file context menu will appear, and selecting one of the first three items at the top of the menu will automatically open that file in Portlock Leap Frog. You can also simply double-click (or press Enter) on the file and it will automatically open in Portlock Leap Frog.
VHD Windows Shell Integration
ISO Windows Shell Integration
. . . . . . . . . . . . . . . . . . . . . . . . . . . . . . . . . . . . . . . . . . . . . . . . . . . . . . . . . . . . . . . . . . . . . . . . . . . . . . . . . . . . . . . . . . .
. . . . . . . . . . . . . . . . . . . . . . . . . . . . . . . . . . . . . . . . . . . . . . . . . . . . . . . . . . . . . . . . . . . . . . . . . . . . . . . . . . . . . . . . . . . .
Portlock Leap Frog User Guide
10
Chapter 1: Overview
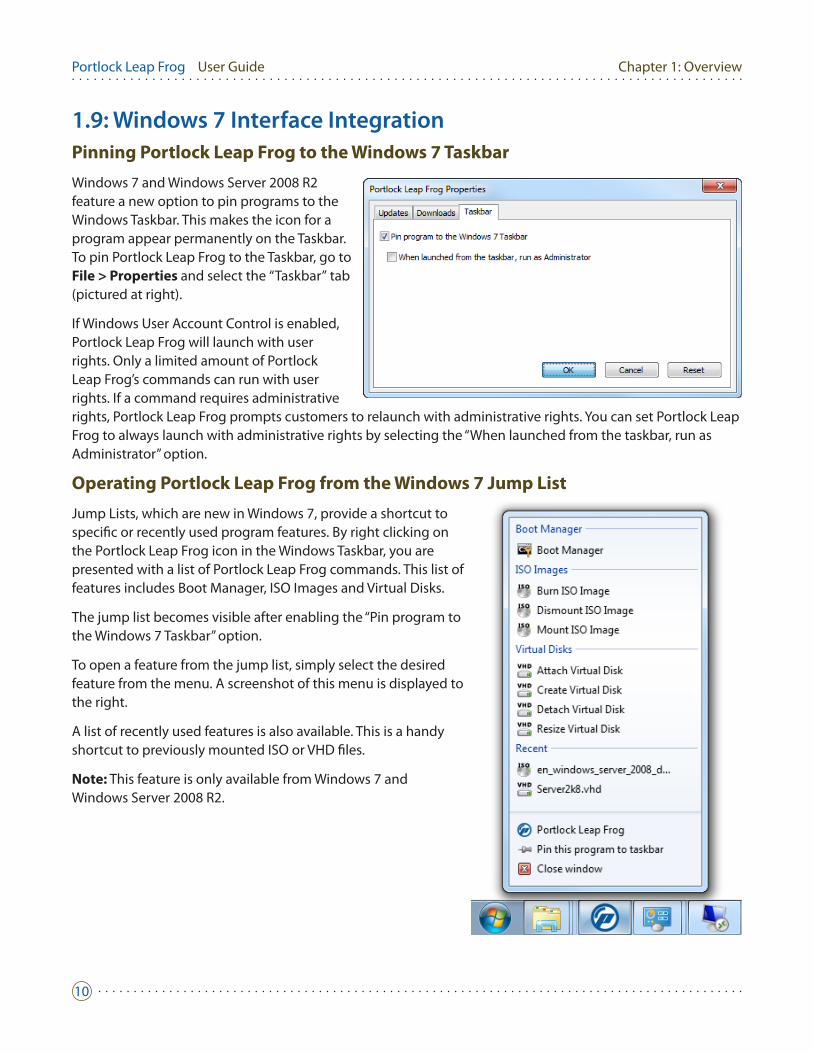
1.9: Windows 7 Interface IntegrationPinning Portlock Leap Frog to the Windows 7 Taskbar
Windows 7 and Windows Server 2008 R2 feature a new option to pin programs to the Windows Taskbar. This makes the icon for a program appear permanently on the Taskbar. To pin Portlock Leap Frog to the Taskbar, go to File > Properties and select the “Taskbar” tab (pictured at right).
If Windows User Account Control is enabled, Portlock Leap Frog will launch with user rights. Only a limited amount of Portlock Leap Frog’s commands can run with user rights. If a command requires administrative rights, Portlock Leap Frog prompts customers to relaunch with administrative rights. You can set Portlock Leap Frog to always launch with administrative rights by selecting the “When launched from the taskbar, run as Administrator” option.
Operating Portlock Leap Frog from the Windows 7 Jump List
Jump Lists, which are new in Windows 7, provide a shortcut to specific or recently used program features. By right clicking on the Portlock Leap Frog icon in the Windows Taskbar, you are presented with a list of Portlock Leap Frog commands. This list of features includes Boot Manager, ISO Images and Virtual Disks.
The jump list becomes visible after enabling the “Pin program to the Windows 7 Taskbar” option.
To open a feature from the jump list, simply select the desired feature from the menu. A screenshot of this menu is displayed to the right.
A list of recently used features is also available. This is a handy shortcut to previously mounted ISO or VHD files.
Note: This feature is only available from Windows 7 and Windows Server 2008 R2.
. . . . . . . . . . . . . . . . . . . . . . . . . . . . . . . . . . . . . . . . . . . . . . . . . . . . . . . . . . . . . . . . . . . . . . . . . . . . . . . . . . . . . . . . . . . .
. . . . . . . . . . . . . . . . . . . . . . . . . . . . . . . . . . . . . . . . . . . . . . . . . . . . . . . . . . . . . . . . . . . . . . . . . . . . . . . . . . . . . . . . . . .

Portlock Leap Frog User Guide
11
Chapter 2: Installation
2.1: Downloading and Installing Portlock Leap FrogPortlock Leap Frog can be downloaded from http://www.portlock.com/. Run our Windows installer package (MSI file) to install Portlock Leap Frog on your machine. The default installation path for the 32-bit version is “C:\Program Files\Portlock\Portlock Leap Frog” and the default installation path for the 64-bit version is “C:\Program Files (x86)\Portlock\Portlock Leap Frog”
After you install Portlock Leap Frog, you will have the option to launch Portlock Leap Frog, as indicated in red below.
Chapter 2: Installation
. . . . . . . . . . . . . . . . . . . . . . . . . . . . . . . . . . . . . . . . . . . . . . . . . . . . . . . . . . . . . . . . . . . . . . . . . . . . . . . . . . . . . . . . . . .
. . . . . . . . . . . . . . . . . . . . . . . . . . . . . . . . . . . . . . . . . . . . . . . . . . . . . . . . . . . . . . . . . . . . . . . . . . . . . . . . . . . . . . . . . . . .

Portlock Leap Frog User Guide
12
2.2: Portlock Leap Frog ISO ImageThe Portlock Leap Frog ISO Image includes additional files that are required for a number of Portlock Leap Frog functions. If you plan to use Portlock Leap Frog to mount ISO images and create/attach/resize/compact VHDs, you do not need to download the ISO image. If you plan on using Portlock Leap Frog for installing Windows to a bootable VHD, you will need to download the ISO image. The ISO file is approximately 280 MB. The majority of our customers have high-speed internet connections and can download the file in well under 10 minutes, but this process can take longer for those who have slower internet connections.
You can boot a virtual machine from the ISO file. You can also burn the ISO to a CD by selecting the “Burn ISO” icon on the Portlock Leap Frog toolbar. When the burning process completes, you can boot any system with the CD by inserting the CD into the drive and ensuring that the BIOS is configured to boot from CD/DVD.
ISO Image Location
Portlock Leap Frog saves the ISO image to the path listed below on Windows Vista, Windows 7 and Windows Server 2008:
• C:\Users\Username\AppData\Local\Portlock Leap Frog
Portlock Leap Frog saves the ISO image to the path listed below on Windows XP and Windows Server 2003:
• C:\Documents and Settings\Username\Local Settings\Application Data\Portlock Leap Frog
Note: The “AppData” and “Application Data” directories are hidden. To view these directories in Windows Explorer, you must manually set Explorer to display hidden files and folders.
Multi-threaded Downloads
To increase download speeds, select File > Properties > Downloads and select “Use 4 threads for downloads.” Windows limits the number of connections to one server to be TWO. Open Registry Editor by pressing the Windows key and R at the same time. This will open the “Run” dialog box. Type “regedit” (without quotes) and navigate to the following key:
• [HKEY_CURRENT_USER\Software\Microsoft\Windows\CurrentVersion\Internet Settings]
Add the following keys:
• “MaxConnectionsPer1_0Server”=dword:00000010
• “MaxConnectionsPerServer”=dword:00000008
Chapter 2: Installation. . . . . . . . . . . . . . . . . . . . . . . . . . . . . . . . . . . . . . . . . . . . . . . . . . . . . . . . . . . . . . . . . . . . . . . . . . . . . . . . . . . . . . . . . . . .
. . . . . . . . . . . . . . . . . . . . . . . . . . . . . . . . . . . . . . . . . . . . . . . . . . . . . . . . . . . . . . . . . . . . . . . . . . . . . . . . . . . . . . . . . . .

Portlock Leap Frog User Guide
13
2.3: Entering a license key After you purchase Portlock Leap Frog, a license key is emailed to you. When you first load Portlock Leap Frog, you will be prompted to enter a license key. Copy the license key from the email that was sent to you and paste it in this dialog box.
After you enter the key and press the “OK” button, Portlock Leap Frog will display a message that your key has been accepted.
Special note about entering license keys on Windows XP:
• If the Windows user is running as a “limited” account under XP then they will have to enter the key twice – once as a limited user and again as an admin.
• If the user is running as an “admin” account under XP then they will only have to enter they key once (it will be saved to HKEY_LOCAL_MACHINE), which the limited account can read but not create.
2.4: Updating Portlock Leap Frog Portlock Leap Frog automatically checks the Portlock web server to determine if a newer version is available. If an update is found, the “Updates” icon on the Portlock Leap Frog toolbar will change to “New Update.” Customers can also manually check for updates by pressing the “Updates” icon on the toolbar. The frequency that Portlock Leap Frog checks for updates can be adjusted via File > Properties.
2.5: Uninstalling Portlock Leap FrogPortlock Leap Frog can be uninstalled from the “Uninstall Portlock Leap Frog” shortcut in the Windows Start menu or from the Windows Control Panel.
Note: It is not required to uninstall an old version of Portlock Leap Frog prior to installing a newer version. The most recent Portlock Leap Frog installer will automatically remove old versions before installing the new version.
Chapter 2: Installation
. . . . . . . . . . . . . . . . . . . . . . . . . . . . . . . . . . . . . . . . . . . . . . . . . . . . . . . . . . . . . . . . . . . . . . . . . . . . . . . . . . . . . . . . . . .
. . . . . . . . . . . . . . . . . . . . . . . . . . . . . . . . . . . . . . . . . . . . . . . . . . . . . . . . . . . . . . . . . . . . . . . . . . . . . . . . . . . . . . . . . . . .

Portlock Leap Frog User Guide
14
Chapter 3: Creating a Windows 7 Bootable VHD*
*Note: Portlock Leap Frog can also create bootable VHDs for Windows Server 2008 R2 and Hyper-V Server 2008 R2.
3.1: System Configuration CheckTo begin creating a bootable VHD, click the “Windows 7” button at the top left of Portlock Leap Frog. This button is outlined in red in the screenshot to the right.
The Deployment Wizard will walk you through creating and applying a Windows 7 or Windows Server 2008 R2 VHD to a physical system for native boot.
Upon launching the Portlock Leap Frog Wizard, the application displays a few brief requirements that must be met in order for a successful VHD boot to take place.
The Portlock Leap Frog Wizard begins by performing several configuration checks starting with the operating system. Once the system check has determined that your system meets the minimum requirements, a green check mark will be displayed next to each field. If the minimum requirements are met the Next button will then become available to proceed to the next section of the wizard “Specify the Virtual Disk Parameters.”
For the “Destination” field a Change button is present. This provides the ability to change the destination of the VHD that will be created. This destination must reside on the physical host system.
Note: USB devices are NOT a supported destination for booting VHDs.
If your system does not meet the minimum requirements, the failed requirement will be displayed with a red “X” and description of the issue.
Once the Windows installation media has been decided, press Next in order to confirm the Boot Loader Configuration settings.
The Boot Loader Configuration is displayed with updated Master Boot Record (MBR) and Volume Boot Record (VBR) information.
Chapter 3: Creating a Windows 7 Bootable VHD. . . . . . . . . . . . . . . . . . . . . . . . . . . . . . . . . . . . . . . . . . . . . . . . . . . . . . . . . . . . . . . . . . . . . . . . . . . . . . . . . . . . . . . . . . . .
. . . . . . . . . . . . . . . . . . . . . . . . . . . . . . . . . . . . . . . . . . . . . . . . . . . . . . . . . . . . . . . . . . . . . . . . . . . . . . . . . . . . . . . . . . .

Portlock Leap Frog User Guide
15
3.2: Windows 7 Installation MediaFor the installation of Windows 7, Windows Server 2008 R2, or Hyper-V Server 2008, Portlock Leap Frog provides three media installation types.
1. Install Windows 7 from DVD: Requires the Windows 7 or Windows Server 2008 R2 install DVD. This applies to .ISO images that have been burned to DVD as well.
2. Install Windows 7 from ISO Image: Windows 7 and Windows Server 2008 R2 downloads are available from MSDN, TechNet or Software Assurance and are distributed in a .ISO format. Note: This requires access to either of these sites.
3. Install Windows 7 from WIM Image: By default the Windows 7 and Windows Server 2008 R2 WIM image that is required for installation is called “install.wim.” This file may be customized. However, customization is only recommended for advanced users. Note: For additional WIM management features, try Portlock License Manager.
Chapter 3: Creating a Windows 7 Bootable VHD
. . . . . . . . . . . . . . . . . . . . . . . . . . . . . . . . . . . . . . . . . . . . . . . . . . . . . . . . . . . . . . . . . . . . . . . . . . . . . . . . . . . . . . . . . . .
. . . . . . . . . . . . . . . . . . . . . . . . . . . . . . . . . . . . . . . . . . . . . . . . . . . . . . . . . . . . . . . . . . . . . . . . . . . . . . . . . . . . . . . . . . . .

Portlock Leap Frog User Guide
16
3.3: Specify the Operating System Version to ApplyIn this section of the Portlock Leap Frog Wizard we will specify the version of the Windows operating system that typically originates from the Windows 7 or Windows Server 2008 R2 installation DVD.
Some versions of the Windows install DVD include all versions of the Windows 7 or Windows Server 2008 R2 operating system. Portlock Leap Frog will extract these different OS versions from the media type and display them in the drop-down menu as shown below. If the “Ultimate” edition is present in the image, Portlock Leap Frog will automatically select that version.
Note: Only Windows 7 Ultimate/Enterprise, Windows Server 2008 R2 and Hyper-V Server 2008 R2 support VHD boot. If one of these operating systems is not selected, the following message will be displayed:
Chapter 3: Creating a Windows 7 Bootable VHD. . . . . . . . . . . . . . . . . . . . . . . . . . . . . . . . . . . . . . . . . . . . . . . . . . . . . . . . . . . . . . . . . . . . . . . . . . . . . . . . . . . . . . . . . . . .
. . . . . . . . . . . . . . . . . . . . . . . . . . . . . . . . . . . . . . . . . . . . . . . . . . . . . . . . . . . . . . . . . . . . . . . . . . . . . . . . . . . . . . . . . . .

Portlock Leap Frog User Guide
17
3.4: Specify the Virtual Disk (VHD) ParametersWhen creating the VHD, specify a location on the physical host including a file name where the VHD will exist. The Windows 7 or Windows Server 2008 R2 operating system will be installed to this VHD file.
Warning: This file is not protected and can be deleted.
• File Name: This will be the name of your VHD that will support your Windows 7 installation. This destination must reside on the physical system. The default name and location is C:\Windows7.vhd
• Disk Size: This will be the size of the VHD that will contain the Windows 7 or Windows Server 2008 R2 operating system.
Once the virtual disk parameters have been decided, press Next.
Chapter 3: Creating a Windows 7 Bootable VHD
. . . . . . . . . . . . . . . . . . . . . . . . . . . . . . . . . . . . . . . . . . . . . . . . . . . . . . . . . . . . . . . . . . . . . . . . . . . . . . . . . . . . . . . . . . .
. . . . . . . . . . . . . . . . . . . . . . . . . . . . . . . . . . . . . . . . . . . . . . . . . . . . . . . . . . . . . . . . . . . . . . . . . . . . . . . . . . . . . . . . . . . .

Portlock Leap Frog User Guide
18
3.5: Installing Windows 7Portlock Leap frog will begin creating the VHD for the Windows 7 installation from the information provided in the previous steps.
Once the VHD has been created, Portlock Leap Frog will automatically format the VHD with an NTFS file system and then begin installing the supported Windows operating system to the VHD.
Warning: When Portlock Leap Frog is running on Windows 7 or Windows Server 2008 R2 the Windows format dialog box will appear once the VHD is created. Choose Cancel as Portlock Leap Frog will automatically format the VHD.
3.6: Booting to VHDAfter the VHD is created and the Windows 7 or Windows Server 2008 R2 operating system has been installed, you are all set to boot to the VHD for the first time.
Chapter 3: Creating a Windows 7 Bootable VHD. . . . . . . . . . . . . . . . . . . . . . . . . . . . . . . . . . . . . . . . . . . . . . . . . . . . . . . . . . . . . . . . . . . . . . . . . . . . . . . . . . . . . . . . . . . .
. . . . . . . . . . . . . . . . . . . . . . . . . . . . . . . . . . . . . . . . . . . . . . . . . . . . . . . . . . . . . . . . . . . . . . . . . . . . . . . . . . . . . . . . . . .

Portlock Leap Frog User Guide
19
Reboot the physical system. From the screenshot to the right, you can see we now have multiple operating systems to choose from at boot up. In this example, Windows Vista was our physical host OS and Windows 7 Ultimate was installed to a VHD. To boot into the VHD simply use the arrow keys to navigate to the VHD operating system and hit the Enter key.
With Windows 7 Ultimate installed to the VHD we now need to finalize the installation setup. Windows 7 setup will begin installing devices and applying system settings.
Select the region, time and currency for your Windows 7 VHD.
Once the system has finished booting from the Windows 7 VHD, Windows Explorer will display both the host and VHD disk drives. From the Example below, drive C: is now the VHD and drive D: is the host operating system – in this case Windows Vista. This provides for easy access to files on the host operating system.
Chapter 3: Creating a Windows 7 Bootable VHD
. . . . . . . . . . . . . . . . . . . . . . . . . . . . . . . . . . . . . . . . . . . . . . . . . . . . . . . . . . . . . . . . . . . . . . . . . . . . . . . . . . . . . . . . . . .
. . . . . . . . . . . . . . . . . . . . . . . . . . . . . . . . . . . . . . . . . . . . . . . . . . . . . . . . . . . . . . . . . . . . . . . . . . . . . . . . . . . . . . . . . . . .

Portlock Leap Frog User Guide
20
3.7: Rebooting to a specific operating systemAfter installing an operating system to a bootable VHD, select the “Reboot” button on the toolbar and select the name of the VHD that you just created to reboot your machine with the new VHD. Once you boot into the new VHD, you can install Portlock Leap Frog and use the “Reboot” button in the toolbar to reboot to your original operating system.
Chapter 3: Creating a Windows 7 Bootable VHD. . . . . . . . . . . . . . . . . . . . . . . . . . . . . . . . . . . . . . . . . . . . . . . . . . . . . . . . . . . . . . . . . . . . . . . . . . . . . . . . . . . . . . . . . . . .
. . . . . . . . . . . . . . . . . . . . . . . . . . . . . . . . . . . . . . . . . . . . . . . . . . . . . . . . . . . . . . . . . . . . . . . . . . . . . . . . . . . . . . . . . . .

Portlock Leap Frog User Guide
21
Chapter 4: ISO Image FeaturesWindows 7 is commonly packaged as an ISO file. Select this option, locate your ISO image and mount it to emulate inserting a physical CD into your CD-ROM drive.
Supported ISO File Systems
• ISO 9660
• UDF
• Joliet
4.1: Mount ISO ImageMounting an ISO provides you with the abilitiy to access all files and directories within the .ISO file. Nearly all Windows operating systems are now downloadable as an ISO file.
To mount an ISO image select Mount an ISO Image from the ISO Images tab, or from ISO > Mount ISO Image of the file menu bar.
From the following dialog box select the Browse button to navigate to the ISO image. Once you have located the ISO image, select it and click Open. Select a drive letter to assign to the drive and then press the Mount button.
The drive letter that was assigned will be displayed after you mount the ISO image.You can now use Portlock Drive Explorer or Windows Explorer to navigate to the assigned drive letter and view all files within the ISO.
Note: ISO images can also be mounted over the network. Use Windows’ Map Network Drive utility or Portlock Drive Map to map a network drive. After you have connected to the drive, you can type the network path into the “File name” field (pictured above). The user must be authenticated to the remote system in order to access files on that system.
Chapter 4: ISO Image Features
. . . . . . . . . . . . . . . . . . . . . . . . . . . . . . . . . . . . . . . . . . . . . . . . . . . . . . . . . . . . . . . . . . . . . . . . . . . . . . . . . . . . . . . . . . .
. . . . . . . . . . . . . . . . . . . . . . . . . . . . . . . . . . . . . . . . . . . . . . . . . . . . . . . . . . . . . . . . . . . . . . . . . . . . . . . . . . . . . . . . . . . .

Portlock Leap Frog User Guide
22
4.2: Dismount ISO ImageTo dismount an ISO image from Portlock Leap Frog select ISO from the menu bar and select Dismount ISO Image. For instances where multiple ISO images are mounted, select the ISO to be dismounted and click Dismount.
Note: If you encounter problems when dismounting an ISO image, it is likely that another program, such as Windows Explorer, is accessing the files. Ensure that ISO files are not in use prior to dismounting them. In the example below, Windows Explorer is browsing files within the ISO, and dismounting the ISO image will not be possible until this window is closed, or until another option was selected (such as Local Disk C:).
Chapter 4: ISO Image Features. . . . . . . . . . . . . . . . . . . . . . . . . . . . . . . . . . . . . . . . . . . . . . . . . . . . . . . . . . . . . . . . . . . . . . . . . . . . . . . . . . . . . . . . . . . .
. . . . . . . . . . . . . . . . . . . . . . . . . . . . . . . . . . . . . . . . . . . . . . . . . . . . . . . . . . . . . . . . . . . . . . . . . . . . . . . . . . . . . . . . . . .

Portlock Leap Frog User Guide
23
4.3: Burn ISO ImageIf the “Verify media after write option” is selected, the ISO data will be verified once the ISO burn is complete.
Chapter 4: ISO Image Features
. . . . . . . . . . . . . . . . . . . . . . . . . . . . . . . . . . . . . . . . . . . . . . . . . . . . . . . . . . . . . . . . . . . . . . . . . . . . . . . . . . . . . . . . . . .
. . . . . . . . . . . . . . . . . . . . . . . . . . . . . . . . . . . . . . . . . . . . . . . . . . . . . . . . . . . . . . . . . . . . . . . . . . . . . . . . . . . . . . . . . . . .

Portlock Leap Frog User Guide
24
Chapter 5: Virtual Hard Disk (VHD) FeaturesOnce you create a bootable Windows 7 or Windows Server 2008 R2 VHD, you can access files from it while running from the Windows host by mounting the VHD.
5.1: Attach Virtual Hard DiskPortlock Leap Frog can attach fixed and dynamic VHDs. Differencing VHDs are not supported.
After selecting to Attach a Virtual Disk, all that is left to do is to navigate to the Virtual Hard Disk (VHD) that is to be mounted.
Once you have navigated to the destination of the VHD, select the VHD and click Open.
With the VHD selected and displayed in the “File name” field, select Attach.
Chapter 5: Virtual Hard Disk (VHD) Features. . . . . . . . . . . . . . . . . . . . . . . . . . . . . . . . . . . . . . . . . . . . . . . . . . . . . . . . . . . . . . . . . . . . . . . . . . . . . . . . . . . . . . . . . . . .
. . . . . . . . . . . . . . . . . . . . . . . . . . . . . . . . . . . . . . . . . . . . . . . . . . . . . . . . . . . . . . . . . . . . . . . . . . . . . . . . . . . . . . . . . . .

Portlock Leap Frog User Guide
25
5.2: Detach Virtual Hard DiskTo detach (dismount) a VHD from Portlock Leap Frog select VHD > Detach VHD from the menu bar.
Administrative rights are required to detach a VHD. If Portlock Leap Frog is running with User Rights, select “Yes” to restart the program with administrative rights and continue.
Note: Portlock Leap Frog can also be launched with Administrative Rights by selecting File > relaunch program with admin rights.
Chapter 5: Virtual Hard Disk (VHD) Features
. . . . . . . . . . . . . . . . . . . . . . . . . . . . . . . . . . . . . . . . . . . . . . . . . . . . . . . . . . . . . . . . . . . . . . . . . . . . . . . . . . . . . . . . . . .
. . . . . . . . . . . . . . . . . . . . . . . . . . . . . . . . . . . . . . . . . . . . . . . . . . . . . . . . . . . . . . . . . . . . . . . . . . . . . . . . . . . . . . . . . . . .

Portlock Leap Frog User Guide
26
5.3: Create Virtual Hard DiskCreating a new VHD from Portlock Leap Frog can be accomplished by selecting VHD > Create Virtual Disk from the menu bar. Check the box at the bottom to attach (mount) the virtual disk after creation.
Supported Virtual Disk Format:
• Fixed
• Expandable
Maximum virtual disk size
• Native Boot - 2 terabyte limit.
• Virtual PC (IDE Mode) - 128 GB limit.
• Hyper-V (IDE Mode) - 2 terabyte limit.
• Other (IDE Mode) - 128 GB limit.
Chapter 5: Virtual Hard Disk (VHD) Features
1
2
1
2
The “Fast Create” option creates a VHD much more quickly. Use thisoption if you are creating a VHDwhere security is not pertinent.
The “Attach (mount) the virtual disk after creation” option will make the virtual disk “active” so that you can add, copy, rename and delete files within the VHD Selecting this option will allow you to see the VHD in Windows Explorer.
. . . . . . . . . . . . . . . . . . . . . . . . . . . . . . . . . . . . . . . . . . . . . . . . . . . . . . . . . . . . . . . . . . . . . . . . . . . . . . . . . . . . . . . . . . . .
. . . . . . . . . . . . . . . . . . . . . . . . . . . . . . . . . . . . . . . . . . . . . . . . . . . . . . . . . . . . . . . . . . . . . . . . . . . . . . . . . . . . . . . . . . .

Portlock Leap Frog User Guide
27
5.4: Resize Virtual DiskPortlock Leap Frog features a Virtual Disk Resize Wizard. This wizard helps you change the size of a virtual disk. You can resize a volume by using free disk space on the host volume.
To resize a virtual disk, select the “VHD Boot” tab and then select “Resize a Microsoft Virtual disk (VHD). You may also find “Resize Virtual Disk” in the menu bar under “VHD.”
Resizing a VHD is a very useful command. Imagine if you installed Windows 7 to a VHD and originally allocated 10 GB of space for the VHD. Later, you might install several programs within the Windows 7 VHD and run out of space. In this case, just run Portlock Leap Frog’s Virtual Disk Resize Wizard and increase the size of the VHD.
Operating systems that support resizing both “Dynamic” and “Fixed” VHDs
• Windows 7
• Windows Server 2008 R2
• Hyper-V Server 2008 R2
• Windows Vista
• Windows Server 2003
• Windows XP
Chapter 5: Virtual Hard Disk (VHD) Features
. . . . . . . . . . . . . . . . . . . . . . . . . . . . . . . . . . . . . . . . . . . . . . . . . . . . . . . . . . . . . . . . . . . . . . . . . . . . . . . . . . . . . . . . . . .
. . . . . . . . . . . . . . . . . . . . . . . . . . . . . . . . . . . . . . . . . . . . . . . . . . . . . . . . . . . . . . . . . . . . . . . . . . . . . . . . . . . . . . . . . . . .

Portlock Leap Frog User Guide
28
Chapter 5: Virtual Hard Disk (VHD) Features. . . . . . . . . . . . . . . . . . . . . . . . . . . . . . . . . . . . . . . . . . . . . . . . . . . . . . . . . . . . . . . . . . . . . . . . . . . . . . . . . . . . . . . . . . . .
. . . . . . . . . . . . . . . . . . . . . . . . . . . . . . . . . . . . . . . . . . . . . . . . . . . . . . . . . . . . . . . . . . . . . . . . . . . . . . . . . . . . . . . . . . .

Portlock Leap Frog User Guide
29
Chapter 5: Virtual Hard Disk (VHD) Features
5.5: Compact Virtual DiskPortlock Leap Frog’s “Compact Virtual Disk” command can be found in the menu bar under the “VHD” menu, and also in the “VHD Boot” tab.
Compacting a virtual disk defragments the virtual disk host file. This increases the performance of virtual disks and also prepares a virtual disk for shrinking. Compaction can take a long time but can be interrupted and resumed at any time.
Supported VHD Type:
• Expandable
Enter the path to an expandable virtual disk and press the “Compact” button.
When Portlock Leap Frog finishes compacting the virtual disk, the message below will be displayed.
. . . . . . . . . . . . . . . . . . . . . . . . . . . . . . . . . . . . . . . . . . . . . . . . . . . . . . . . . . . . . . . . . . . . . . . . . . . . . . . . . . . . . . . . . . .
. . . . . . . . . . . . . . . . . . . . . . . . . . . . . . . . . . . . . . . . . . . . . . . . . . . . . . . . . . . . . . . . . . . . . . . . . . . . . . . . . . . . . . . . . . . .

Portlock Leap Frog User Guide
30
Chapter 6: Hard Disk Commands
6.1: Analyze Disk DrivesPortlock Leap Frog’s “Analyze Disk Drives” command provides a vast amount of technical information about every system hard disk. This information can be useful when troubleshooting system problems.
To analyze disk drives, select Tools > Anyalyze Disk Drives.
Administrative rights are required to view the Analyze Disk Drives utility. If Portlock Leap Frog is running with User Rights you will be provided with the dialog box to the right of this page. Select Yes to restart the program with administrative rights and continue.
Note: Portlock Leap Frog can also be launched with Administrative Rights by selecting File > Relaunch program with admin rights.
Chapter 6: Hard Disk Commands. . . . . . . . . . . . . . . . . . . . . . . . . . . . . . . . . . . . . . . . . . . . . . . . . . . . . . . . . . . . . . . . . . . . . . . . . . . . . . . . . . . . . . . . . . . .
. . . . . . . . . . . . . . . . . . . . . . . . . . . . . . . . . . . . . . . . . . . . . . . . . . . . . . . . . . . . . . . . . . . . . . . . . . . . . . . . . . . . . . . . . . .

Portlock Leap Frog User Guide
31
6.2: Disk InitializePortlock Leap Frog’s “Disk Initialize” command prepares a disk to be used. Many new hard disks must first be initialized before they can be written to. This command can also be useful if you want to quickly delete alll partitions on a drive. To initialize a disk, select Tools > Disk Initialize.
Select the disk drive to initlaize and press the “Next” button.
Chapter 6: Hard Disk Commands
. . . . . . . . . . . . . . . . . . . . . . . . . . . . . . . . . . . . . . . . . . . . . . . . . . . . . . . . . . . . . . . . . . . . . . . . . . . . . . . . . . . . . . . . . . .
. . . . . . . . . . . . . . . . . . . . . . . . . . . . . . . . . . . . . . . . . . . . . . . . . . . . . . . . . . . . . . . . . . . . . . . . . . . . . . . . . . . . . . . . . . . .

Portlock Leap Frog User Guide
32
Next, select either the MBR or GPT disk format. MBR is the most commonly used format. GPT can be useful for certain scenarios. Select GPT if you do not plan to install Windows on the disk, and if you want to create more than four partitions on a drive or if you want to create a partition that is greater than 2 terabytes.
Press “Finish” to initialize the disk.
Chapter 6: Hard Disk Commands. . . . . . . . . . . . . . . . . . . . . . . . . . . . . . . . . . . . . . . . . . . . . . . . . . . . . . . . . . . . . . . . . . . . . . . . . . . . . . . . . . . . . . . . . . . .
. . . . . . . . . . . . . . . . . . . . . . . . . . . . . . . . . . . . . . . . . . . . . . . . . . . . . . . . . . . . . . . . . . . . . . . . . . . . . . . . . . . . . . . . . . .

Portlock Leap Frog User Guide
33
Chapter 6: Hard Disk Commands
6.3: Create PartitionTo create a partition, select Tools > Create Partition. This will create an NTFS partition on the selected device and format the file system.
System Requirements• MBR-formatted disk
Note: Portlock Leap Frog cannot create partitions on GPT-formatted disks.
. . . . . . . . . . . . . . . . . . . . . . . . . . . . . . . . . . . . . . . . . . . . . . . . . . . . . . . . . . . . . . . . . . . . . . . . . . . . . . . . . . . . . . . . . . .
. . . . . . . . . . . . . . . . . . . . . . . . . . . . . . . . . . . . . . . . . . . . . . . . . . . . . . . . . . . . . . . . . . . . . . . . . . . . . . . . . . . . . . . . . . . .

Portlock Leap Frog User Guide
34
Chapter 6: Hard Disk Commands. . . . . . . . . . . . . . . . . . . . . . . . . . . . . . . . . . . . . . . . . . . . . . . . . . . . . . . . . . . . . . . . . . . . . . . . . . . . . . . . . . . . . . . . . . . .
. . . . . . . . . . . . . . . . . . . . . . . . . . . . . . . . . . . . . . . . . . . . . . . . . . . . . . . . . . . . . . . . . . . . . . . . . . . . . . . . . . . . . . . . . . .

Portlock Leap Frog User Guide
35
6.4: Create Boot PartitionThis command creates a Windows boot partition and installs the necessary Windows 7 boot manager files for a VHD boot environment. This is intended for secondary devices or systems that have no operating system installed.
To create a boot partition, select Tools > Create Boot Partition.
System Requirements• MBR-formatted disk
Note: Portlock Leap Frog cannot create partitions on GPT-formatted disks.
Chapter 6: Hard Disk Commands
. . . . . . . . . . . . . . . . . . . . . . . . . . . . . . . . . . . . . . . . . . . . . . . . . . . . . . . . . . . . . . . . . . . . . . . . . . . . . . . . . . . . . . . . . . .
. . . . . . . . . . . . . . . . . . . . . . . . . . . . . . . . . . . . . . . . . . . . . . . . . . . . . . . . . . . . . . . . . . . . . . . . . . . . . . . . . . . . . . . . . . . .

Portlock Leap Frog User Guide
36
Specify the disk drive you wish to create the NTFS file system on, then select “Next” to continue.
Next specify the size of the partition that will be created on the system, then select “Next” to continue.
Chapter 6: Hard Disk Commands. . . . . . . . . . . . . . . . . . . . . . . . . . . . . . . . . . . . . . . . . . . . . . . . . . . . . . . . . . . . . . . . . . . . . . . . . . . . . . . . . . . . . . . . . . . .
. . . . . . . . . . . . . . . . . . . . . . . . . . . . . . . . . . . . . . . . . . . . . . . . . . . . . . . . . . . . . . . . . . . . . . . . . . . . . . . . . . . . . . . . . . .

Portlock Leap Frog User Guide
37
Once “Finish” is selected Portlock Leap Frog will create and format the NTFS file system.
Chapter 6: Hard Disk Commands
. . . . . . . . . . . . . . . . . . . . . . . . . . . . . . . . . . . . . . . . . . . . . . . . . . . . . . . . . . . . . . . . . . . . . . . . . . . . . . . . . . . . . . . . . . .
. . . . . . . . . . . . . . . . . . . . . . . . . . . . . . . . . . . . . . . . . . . . . . . . . . . . . . . . . . . . . . . . . . . . . . . . . . . . . . . . . . . . . . . . . . . .

Portlock Leap Frog User Guide
38
Chapter 7: Boot Manager
7.1: OverviewBoot Manager is used to modify the Windows boot sequence by adding, deleting and modifying boot options and entries of a Windows operating system from a GUI based utility.
7.2: Windows Boot Environment When a system is first started the System BIOS code is executed by the PC. The BIOS then reads the Master Boot Record (MBR) from the boot device and transfers control to the boot code which is stored in the MBR. The boot manager then reads the boot entries from the Boot Configuration Data (BCD)store. It is this boot environment that provides a home for the Windows operating system and its applications.
Use Boot Manager to reorder your system’s boot sequence, or to remove undesired operating systems.
Open Boot Manager by selecting Tools > Boot Manager.
Administrative rights are required to open the Boot Manager utility. If Portlock Leap Frog is running with User Rights you will be provided with the dialog box to the right of this page. Select Yes to restart the program with administrative rights and continue.
After the Portlock Leap Frog Wizard has finished setting up a VHD for native boot, the VHD is automatically added to the Boot Manager and can be used to change the default boot settings for the physical system.
Chapter 7: Boot Manager. . . . . . . . . . . . . . . . . . . . . . . . . . . . . . . . . . . . . . . . . . . . . . . . . . . . . . . . . . . . . . . . . . . . . . . . . . . . . . . . . . . . . . . . . . . .
. . . . . . . . . . . . . . . . . . . . . . . . . . . . . . . . . . . . . . . . . . . . . . . . . . . . . . . . . . . . . . . . . . . . . . . . . . . . . . . . . . . . . . . . . . .

Portlock Leap Frog User Guide
39
7.3: Boot Manager Features• Move Up/Move Down: This changes the order that boot items are displayed in the boot menu when a
system boots. • Default: This sets the operating system that the computer will boot from • Delete: This deletes a boot entry. This command removes the entry from the boot menu, but it does
not delete the operating system from the disk drive. • Add: This command will add a virtual disk to the boot menu. • Timeout: This is the number of seconds that the boot menu will display a list of operating systems
when a system is booting. After this timeout the default OS will boot. • Rename: This button allows you to change the description of the Windows operating system.• Status: The Status column of Boot Manager will help differentiate between the current and default
operating system. • Device: The Device column of Boot Manager displays the partition or VHD that the operating system is
booting from. This will help to differentiate between similar entries.
7.4: Install Windows Boot ManagerInstalling Windows Boot Manager will update the “bootmgr” file of the system to 6.1.7600, which represents Windows 7. This version of the Windows Boot Manager is required for native VHD boot.
Administrative rights are required to install Windows Boot Manager. If Portlock Leap Frog is running with User Rights you will be provided with the following dialog box. Select Yes to restart the program with administrative rights and continue.
Note: Portlock Leap Frog can also be launched with Administrative Rights by selecting File > Relaunch program with admin rights.
To install/update the Windows Boot Manager go to Tools > Install Windows Boot Manager. If the system was running an older version of the “bootmgr” file, you will receive the following message:
Chapter 7: Boot Manager
. . . . . . . . . . . . . . . . . . . . . . . . . . . . . . . . . . . . . . . . . . . . . . . . . . . . . . . . . . . . . . . . . . . . . . . . . . . . . . . . . . . . . . . . . . .
. . . . . . . . . . . . . . . . . . . . . . . . . . . . . . . . . . . . . . . . . . . . . . . . . . . . . . . . . . . . . . . . . . . . . . . . . . . . . . . . . . . . . . . . . . . .

Portlock Leap Frog User Guide
40
Chapter 8: Apple Boot Camp
Chapter 8: Apple Boot Camp
8.1: Boot Camp AssistantSystem Requirements
• Mac OS X Snow Leopard (v10.6)
• Mac OS X Snow Leopard Server (v10.6)
• Boot Camp Update 3.1
• 16 GB of Free Disk Space
To create a Windows 7 bootable VHD on Mac OS X, you will need to use the Mac utility Boot Camp Assistant which can be found from the /Application/Utilities folder.
The Boot Camp Assistant will provide the ability to create a Windows partition on the Mac OS X system for the bootable VHD.
Mac OS X Snow Leopard Server: The server edition does not include Apple Boot Camp. To install Boot Camp on the server edition, insert the Mac OS X Snow Leopard installation CD into your drive, open Finder and browse to the directory “/Volumes/Mac OS X Install DVD/System/Installation/Packages”. Double click “BootCamp.pkg” to install the Boot Camp package on your system.
To begin select Continue.
. . . . . . . . . . . . . . . . . . . . . . . . . . . . . . . . . . . . . . . . . . . . . . . . . . . . . . . . . . . . . . . . . . . . . . . . . . . . . . . . . . . . . . . . . . . .
. . . . . . . . . . . . . . . . . . . . . . . . . . . . . . . . . . . . . . . . . . . . . . . . . . . . . . . . . . . . . . . . . . . . . . . . . . . . . . . . . . . . . . . . . . .

Portlock Leap Frog User Guide
41
Chapter 8: Apple Boot Camp
Depending on the amount of free space on your Mac OS X system, you can now partition the system equally with a Mac and Windows partition. This can be adjusted to suit your preferences.
Once a size is specified for the Windows partition, select the Partition button.
The Boot Camp Assistant will then begin the re-partitioning of the disk. Depending on the size of the disk and specified partition size, this may take a few minutes.
The Boot Camp Assistant will ask you to insert your Windows installation disc. Here you will instead insert the Portlock Leap Frog Boot CD. This will provide you with the ability to create a bootable Windows 7 VHD.
Once the Portlock Leap Frog Boot CD has been inserted, select Start Installation.
. . . . . . . . . . . . . . . . . . . . . . . . . . . . . . . . . . . . . . . . . . . . . . . . . . . . . . . . . . . . . . . . . . . . . . . . . . . . . . . . . . . . . . . . . . .
. . . . . . . . . . . . . . . . . . . . . . . . . . . . . . . . . . . . . . . . . . . . . . . . . . . . . . . . . . . . . . . . . . . . . . . . . . . . . . . . . . . . . . . . . . . .

Portlock Leap Frog User Guide
42
Chapter 8: Apple Boot Camp
8.2: Portlock Leap Frog Boot Camp WizardWith the Portlock Leap Frog Boot CD booted, the Apple Boot Camp Wizard will now prepare the Apple Boot Camp partition for Windows. This partition will be formatted with NTFS and the Windows 7 Boot Manager will be installed.
Select the “Boot Camp” icon at the top of the Portlock Leap Frog toolbar.
Click Next to continue.
From the drop down menu select the Boot Camp partition that was created using the Apple Boot Camp Assistant.
. . . . . . . . . . . . . . . . . . . . . . . . . . . . . . . . . . . . . . . . . . . . . . . . . . . . . . . . . . . . . . . . . . . . . . . . . . . . . . . . . . . . . . . . . . . .
. . . . . . . . . . . . . . . . . . . . . . . . . . . . . . . . . . . . . . . . . . . . . . . . . . . . . . . . . . . . . . . . . . . . . . . . . . . . . . . . . . . . . . . . . . .
Portlock Leap Frog User Guide
43
Chapter 8: Apple Boot Camp
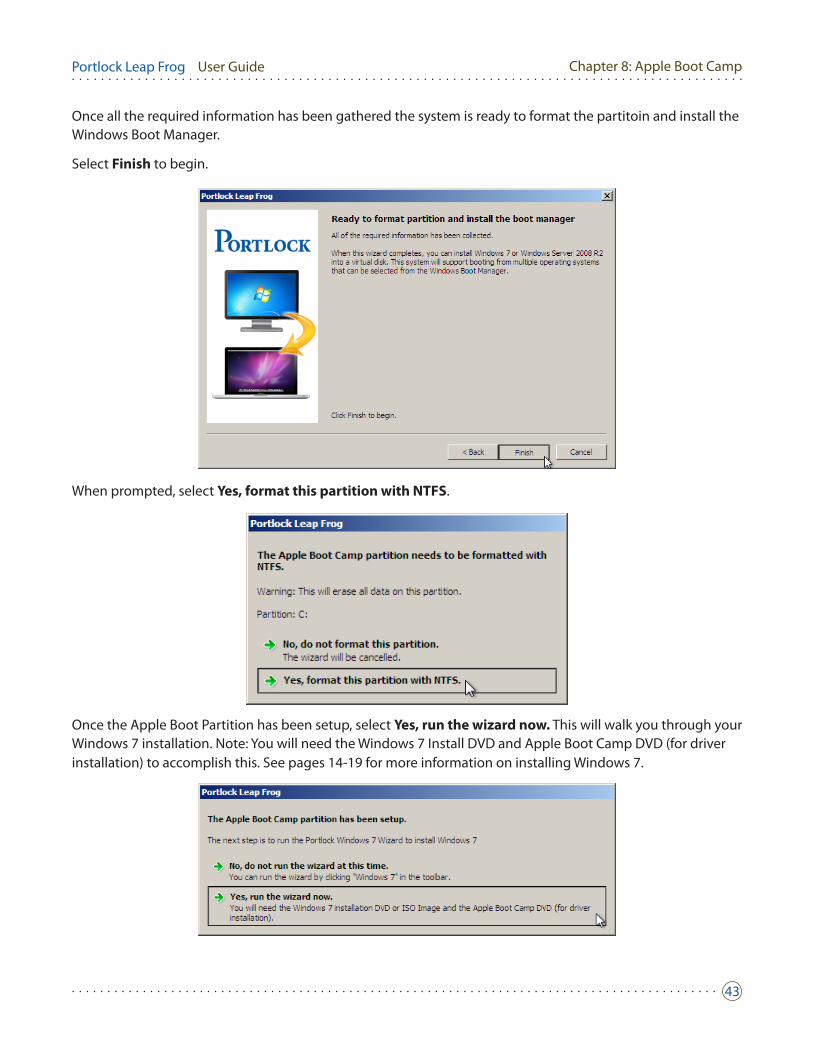
Once all the required information has been gathered the system is ready to format the partitoin and install the Windows Boot Manager.
Select Finish to begin.
When prompted, select Yes, format this partition with NTFS.
Once the Apple Boot Partition has been setup, select Yes, run the wizard now. This will walk you through your Windows 7 installation. Note: You will need the Windows 7 Install DVD and Apple Boot Camp DVD (for driver installation) to accomplish this. See pages 14-19 for more information on installing Windows 7.
. . . . . . . . . . . . . . . . . . . . . . . . . . . . . . . . . . . . . . . . . . . . . . . . . . . . . . . . . . . . . . . . . . . . . . . . . . . . . . . . . . . . . . . . . . .
. . . . . . . . . . . . . . . . . . . . . . . . . . . . . . . . . . . . . . . . . . . . . . . . . . . . . . . . . . . . . . . . . . . . . . . . . . . . . . . . . . . . . . . . . . . .

Portlock Leap Frog User Guide
44
Chapter 8: Apple Boot Camp
8.3: Mac OS X - Selecting Startup OSOnce the Windows 7 bootable VHD has been created, you will then be presented with booting options for Mac OS X and Windows 7 from several locations. Listed below are three different methods for selecting the desired operating system at system startup:
1. Hold the Option (Alt) key on the keyboard after powering on the machine, the Windows operating system will be available for selection.
2. Select the “Reboot” icon on the Portlock Leap Frog toolbar as displayed in the screenshot below and select either the Mac or Windows platform. Note: This requires that the Apple Boot Camp drivers are installed.
3. Use Apple’s “Startup Disk” utility and select the desired operating system.
• Select “System Preferences” from the Apple toolbar, as outlined in red in the screenshot below.
• Select Startup Disk in the System section of the System Preferences, as outlined in red in the screenshot to the right. From the Startup Disk you can now select the operating system that you wish to boot. Press the Restart button after selecting the operating system.
. . . . . . . . . . . . . . . . . . . . . . . . . . . . . . . . . . . . . . . . . . . . . . . . . . . . . . . . . . . . . . . . . . . . . . . . . . . . . . . . . . . . . . . . . . . .
. . . . . . . . . . . . . . . . . . . . . . . . . . . . . . . . . . . . . . . . . . . . . . . . . . . . . . . . . . . . . . . . . . . . . . . . . . . . . . . . . . . . . . . . . . .

Portlock Leap Frog User Guide
45
Chapter 9: Technical Reference Guide
9.1: Portlock Leap Frog FAQ Q I purchased Windows 7 Professional. Can I use this to setup a bootable VHD environment?
Yes, you can use Windows 7 Professional to setup a bootable VHD environment, however Windows 7 Professional cannot be installed into a VHD. Only Windows 7 Ultimate and Enterprise or Windows Server 2008 R2 (any version) can be installed into a VHD.
Q My physical system does not have an Intel®-VT or AMD-V™ processor. Can I still use VHD boot?
Yes. VHD boot is NOT dependent on hardware virtualization system requirements unlike virtual machines.
Q Can I take a VHD from my Microsoft Virtual PC environment and use it to VHD boot a system?
No. Previously created VHDs such as Microsoft Virtual PC VHDs cannot be used for booting natively to a physical system as Virtual PC uses a Pentium 3 HAL and this prevents the Virtual PC VHDs from being used as boot media.
Q How much memory is required on my host system for a Windows 7 VHD boot environment?
A minimum of 512 MB, however, 1 GB is recommended.
Q After I have booted into Windows 7 from a VHD can I still use “Windows XP Mode?”
Yes, However, Windows XP Mode requires an additional 1 GB of RAM, an additional 15 GB of disk space and a processor capable of hardware virtualization with Intel VT or AMD-V enabled.
Q I would like to setup several VHDs with Windows 7 and Windows Server 2008 R2. Is there a limitation to how many VHDs I can setup for a multi-boot system?
Yes, Windows 7 has a limit of 255 Boot Entries.
Q I created a Windows 7 VHD for testing new applications. I am currently booted to my host operating system and need to grab a few files from my VHD. Can I do this without booting back into the VHD?
Yes. Portlock Leap Frog provides the ability to simply attach (mount) a VHD. Once attached it is treated by Windows as a new device and you will have access to all the files from the VHD.
Q Is there a performance decrease from running Windows 7 from a VHD natively on my computer?
The decrease in performance when running a VHD natively is reported at an extremely low 3%.
Q Can I setup a native VHD Windows 7 or Windows Server 2008 R2 without a host operating system?
Yes. Portlock Leap Frog is also distributed with a WinPE based boot CD created for bare-metal systems.
Q Do I have to format the VHD volume as NTFS?
Yes. An NTFS volume is required for native VHD boot.
Q I am running Portlock Leap Frog in a Windows 7 OS that is booting from a VHD. Can I Create another VHD Boot operating system?
Chapter 9: Technical Reference Guide
. . . . . . . . . . . . . . . . . . . . . . . . . . . . . . . . . . . . . . . . . . . . . . . . . . . . . . . . . . . . . . . . . . . . . . . . . . . . . . . . . . . . . . . . . . .
. . . . . . . . . . . . . . . . . . . . . . . . . . . . . . . . . . . . . . . . . . . . . . . . . . . . . . . . . . . . . . . . . . . . . . . . . . . . . . . . . . . . . . . . . . . .

Portlock Leap Frog User Guide
46
Yes. Portlock Leap Frog is aware of the various boot environments. The new booting virtual disk will be stored on a supported drive and the correct boot loader will be updated with the new boot information.
Q Can I Create another VHD operating system and store the VHD within the VHD that I am booting from?
No. Booting virtual disks need to be stored on physical disk drives and not within other virtual disks.
Q Can I create a booting virtual disk on a USB disk drive?
No. The Windows 7 boot loader does not have support for virtual disks on USB devices. Only fixed disk drives are supported for VHD boot.
Q My system is Windows XP and when I formatted the disk drive I selected FAT32 for the file system. Portlock Leap Frog will not let me create a booting virtual disk on this drive. What can I do?
Convert your volume(s) to NTFS. Open Command Prompt. Click Start, point to All Programs, point to Accessories, and click Command Prompt. In the command prompt window, type: convert drive_letter: /fs:ntfs. Example “convert D: /fs:ntfs”
9.2: Portlock Leap Frog VideoPress play, sit back, and watch the magic performed by Portlock Leap Frog:
• http://www.portlock.com/support/training_videos/LeapFrog_XP_to_Windows_7.aspx
9.3: What is a Virtual Hard Disk?A Virtual Hard Disk (VHD) is a file formatted to be structurally identical to a physical Hard Drive. It is typically used in various operating system virtualization packages, and can be used to install a wide variety of operating systems (various versions of Microsoft Windows).
Currently the only way to boot into an OS that is installed in a VHD without a virtualization program (such as Microsoft Virtual PC) is for that operating system to be Windows 7 (Ultimate/Enterprise) or Windows Server 2008 R2. This is called VHD Native Boot. This means that a VHD can be used as the running operating system on designated hardware without a parent operating system, virtual machine or hypervisor. Furthermore, if you use native boot, you have full access to all devices and file system volumes on the physical computer, including the volumes inside the VHD.
Windows 7 support for native VHD boot
Native VHD Boot refers to the ability of a physical computer to mount and boot from an operating system contained within a VHD. Windows 7 supports this ability, both with and without a host operating system. Currently, only Windows 7 and Windows Server 2008 R2 are compatible with this feature.
Advantages of VHDs
Significant benefits result from the ability to boot a physical computer from a virtual hard drive:
• Ease of deployment: IT organizations can deploy standardized, pre-built configurations on a single VHD. As an example, software engineering organizations which need a specific set of tools for a particular project could simply pull the appropriately-configured VHD from a network location.
Chapter 9: Technical Reference Guide. . . . . . . . . . . . . . . . . . . . . . . . . . . . . . . . . . . . . . . . . . . . . . . . . . . . . . . . . . . . . . . . . . . . . . . . . . . . . . . . . . . . . . . . . . . .
. . . . . . . . . . . . . . . . . . . . . . . . . . . . . . . . . . . . . . . . . . . . . . . . . . . . . . . . . . . . . . . . . . . . . . . . . . . . . . . . . . . . . . . . . . .

Portlock Leap Frog User Guide
47
• Multiple operating system support: The addition of multiple operating systems to a computer no longer requires modifications to the Master Boot Record (MBR) or seperate disk partitions.
• Backup-and-Restore: Changes to the contents of a VHD (such as infection by a virus, or accidental deletion of critical files) can be easily undone.
Types of Virtual Hard Disks
• Fixed VHD – A fixed VHD is a file that is allocated to the size of the virtual disk. Example, if you create a virtual hard disk that is 2 gigabytes (GB) in size, the system will create a host file approximately 2 GB in size. Fisxed VHDs are recommended for produciton servers and VHD boot environments.
• Dynamic VHD – A dynamic VHD is a file that is as large as the actual data written to it at any give time. As more data is written, the file dynamically increases in size.
• Differencing VHD – A differencing VHD describes a modification of a parent image. This type of VHD is not independent; it depends on another VHD to be fully functional.
• Note: Both Fixed and Dynamic VHDs are supported by Portlock Leap Frog when creating a VHD. However, only Fixed VHDs are supported by Portlock Leap Frog for a bootable (native-boot) VHD.
Note: Both Fixed and Dynamic VHDs are supported by Portlock Leap Frog when creating a VHD. However, only Fixed VHDs are supported by Portlock Leap Frog for a bootable (native-boot) VHD.
9.4: What is an ISO Image?An ISO Image is an archive file (also known as a disc image) of an optical disk in a format defined by the International Organization for Standardization (ISO). ISO image files typically have a file extension of .ISO. The name ISO is taken from the ISO 9660 file system used with CD-ROM media, but an ISO image can also contain a UDF file system since UDF is backward-compatible with ISO 9660.
UDF (Universal Disk Format) is a relatively new ISO file system format and is considered to be a replacement for the ISO 9660 file system. It is now widely used for re-writable optical media.
As with any other archive, an ISO image includes all data of files contained on the archived CD/DVD, or any other disk format. They are stored in an uncompressed format. In addition to data of the files it also contains all the file system metadata, including boot code, structures, and attributes.
The most important feature of an ISO image is that it can be easily rendered or burned to a CD/DVD.
9.5: What is a WIM Image?The Windows Imaging Format (WIM) is a file-based disk image format. It was developed by Microsoft to deploy its latest Windows Vista and Windows Server 2008 operating systems, which use it as part of their standard installation procedure. This includes Windows 7 and Windows Server 2008 R2.
WIM images need to be deployed to an existing volume or partition as the toolset does not create low-level disk structures such as partitions, nor does it format them. Portlock Leap Frog assists in creating the VHD as well as applying the Windows WIM image to the volume created on the VHD.
WIM files can contain multiple disk images, which are referenced either by their numerical index or by their unique name.
Chapter 9: Technical Reference Guide
. . . . . . . . . . . . . . . . . . . . . . . . . . . . . . . . . . . . . . . . . . . . . . . . . . . . . . . . . . . . . . . . . . . . . . . . . . . . . . . . . . . . . . . . . . .
. . . . . . . . . . . . . . . . . . . . . . . . . . . . . . . . . . . . . . . . . . . . . . . . . . . . . . . . . . . . . . . . . . . . . . . . . . . . . . . . . . . . . . . . . . . .

Portlock Leap Frog User Guide
48
9.6 Portlock Leap Frog Mac OS X FAQ Q What do I need to install Windows 7 into a virtual disk for Native Boot on my Apple Mac?
• Intel-based Apple Mac (see supported platforms below)
• At least 16 GB of free space on the disk you’re installing on for 32-bit, or 20 GB for 64-bit (for Microsoft Windows and Windows-based applications)
• Portlock Leap Frog ISO Image burned to CD/DVD
• Mac OS X v 10.6 Snow Leopard installed on the system
• Boot Camp 3.1 Update
• Windows 7 Ultimate or Enterprise on DVD or an ISO Image accessible over the network
• Windows Server 2008 R2 on DVD or an ISO Image accessible over the network
• Note: OEM versions of WIndows 7 will NOT work as OEM versions are tied to vendor hardware. Since Apple does not ship Windows 7, there are no OEM versions of Windows 7 for Apple Macs.
Q Which Intel-based Macs support Windows 7 32-bit?
• iMac (17-inch, Early 2006)
• iMac (17-inch, Late 2006)
• iMac (20-inch, Early 2006)
• iMac (20-inch, Late 2006)
• MacBook Pro (15-inch, Early 2006)
• MacBook Pro (17-inch, Late 2006)
• MacBook Pro (15-inch, Late 2006)
• MacBook Pro (17-inch, Early 2006)
• Mac Pro (Mid 2006, Intel Xeon Dual-core 2.66GHz or 2GHz)
Q Which Intel-based Macs support Windows 7 64-bit?
• MacBook Pro (13-inch, Mid 2009)
• MacBook Pro (15-inch, Early 2008) and later
• MacBook Pro (17-inch, Early 2008) and later
• Mac Pro (Early 2008) and later
• iMac (21.5 inch, Late 2009)
• iMac (27-inch, Late 2009)
• iMac (27-inch, Quad Core, Late 2009)
• MacBook (13-inch, Late 2009)
Chapter 9: Technical Reference Guide. . . . . . . . . . . . . . . . . . . . . . . . . . . . . . . . . . . . . . . . . . . . . . . . . . . . . . . . . . . . . . . . . . . . . . . . . . . . . . . . . . . . . . . . . . . .
. . . . . . . . . . . . . . . . . . . . . . . . . . . . . . . . . . . . . . . . . . . . . . . . . . . . . . . . . . . . . . . . . . . . . . . . . . . . . . . . . . . . . . . . . . .

Portlock Leap Frog User Guide
49
Q How do I install Windows 7 into a virtual disk for Native Boot?
First, use Apple Software Update to ensure your computer’s Mac OS X operating system, Boot ROM, other firware and software are up-to-date before installing Windows 7. You’ll need the Portlock Leap Frog, Mac OS X v10.6 installation and Windows 7 installation disks. The general process is:
1. Launch Portlock Leap Frog using Boot Camp Setup Assistant (located in Application > Utilities), which partitions your hard drive and walks you through the installation process. Refer to the Boot Camp Installation & Setup Guide for more information.
2. Portlock Leap Frog will boot the system, and the Portlock Boot Camp Wizard will walk you through creating the virtual disk and boot environment.
3. After completing the Windows 7 installation, install the Apple Boot Camp Windows drivers from your Mac OS X v10.6 (or later) install DVD.
4. Upgrade the drivers to version 3.1 with Windows Apple Software Update, or manually download them from here.
Q My iMac (27-inch, Late 2009) displays a black screen during installation of Microsoft Windows 7 using the Boot Camp Assistant. How do i fix it?
The Windows 7 installer does not include required graphics or Bluetooth drivers for this computer. To obtain the necessary drivers and resolve the issue, see this article.
Q A blue screen appears when installing Windows 7 on my iMac computer with NVIDIA GeForce 7300 or 7600 GT, or Mac Pro with NVIDIA GeForce 7300 GT or Quadro FX 4500 graphics cards. How do i fix it?
Update your graphics card firmware. Please see this article for more information.
Q How do I choose the operating system that starts up (boots) my Mac?
After running Boot Camp Assistant and installing Windows 7 or Windows Server 2008 R2 to a VHD, hold the Option (Alt) key when you start up to switch between Microsoft Windows and Mac OS X. Use the Startup Disk control panel in Windows or Mac OS X Startup Disk preferences to set the default operating system to use each time the computer starts up.
Q How many native VHDs can I create on my Mac system?
Windows 7 has a limit of 255 Boot Entries
Q Can I use a Windows version prior to Windows 7 to install to a native VHD?
No. Only Windows 7 Ultimate and Enterprise or Windows Server 2008 R2 (any version) can be installed to a native VHD.
Q Can I create a bootable VHD on a USB disk drive rather than directly on my Mac system?
No. The Windows 7 boot loader does not have support for virtual disks on USB devices.
Q Can I install a Windows 7 native VHD to any version of Mac?
No. Windows 7 requires Mac OS X v10.6 Snow Leopard and the Boot Camp 3.1 Update.
Chapter 9: Technical Reference Guide
. . . . . . . . . . . . . . . . . . . . . . . . . . . . . . . . . . . . . . . . . . . . . . . . . . . . . . . . . . . . . . . . . . . . . . . . . . . . . . . . . . . . . . . . . . .
. . . . . . . . . . . . . . . . . . . . . . . . . . . . . . . . . . . . . . . . . . . . . . . . . . . . . . . . . . . . . . . . . . . . . . . . . . . . . . . . . . . . . . . . . . . .

Portlock Leap Frog User Guide
50
Chapter 10: Technical Support. . . . . . . . . . . . . . . . . . . . . . . . . . . . . . . . . . . . . . . . . . . . . . . . . . . . . . . . . . . . . . . . . . . . . . . . . . . . . . . . . . . . . . . . . . . .
. . . . . . . . . . . . . . . . . . . . . . . . . . . . . . . . . . . . . . . . . . . . . . . . . . . . . . . . . . . . . . . . . . . . . . . . . . . . . . . . . . . . . . . . . . .
Chapter 10: Technical SupportTechnical support via email is free and can be reached at [email protected].
Before Contacting Portlock Support...
• Ensure that you are using the latest version
• Refer to the Portlock Leap Frog FAQ
• Refer to the Portlock Leap Frog Video at: http://www.portlock.com/support/training_videos/LeapFrog_XP_to_Windows_7.aspx
The Portlock Corporation home page is located at http://www.portlock.com/.
North America
270 East Park Street, Suite C Butte, MT 59701
USA Tel: (406) 723.5200
Fax: (406) 723.5205
Europe
Vickers House Priestley Road Basingstoke RG24 9NP UK Tel: 44 (0) 1256 392990 Fax: 44 (0) 1256 473010

Thank you for reading the Portlock Leap Frog User Guide.
— End of document —