p-200 digital color printer - olympus corporation of the … dialog box shown above is an example...
TRANSCRIPT
DIGITAL COLOR PRINTER
P-200
Installation GuideThis Installation Guide explains how to install and use the OlympusP-200 Digital Printer software for Windows 95/98/Me.
Keep this manual booklet in an easily accessible place for futurereference.
User Registration
It is prohibited by copyright laws to duplicate this software and installation guide in whole or in part,
or to lease the software to a third party without permission from the copyright owners.
Olympus assumes no liability for any damages, loss of profit and any claims from third parties
resulting from the use of this software.
If this software contains any manufacturing defects, Olympus will replace it.
However, Olympus assumes no liability for any defects not related to manufacturing.
This software can only be used on designated equipment.
For the purpose of improvement, the specifications of the software may be subject to change
without notice.
Program ©2000 OLYMPUS OPTICAL CO., LTD. and its licensers
Program ©2000 Justway Co., Ltd.
Windows 95, Windows 98, and Windows Me are registered trademarks of Microsoft Corporation in the
United States of America and other countries.
IBM and PC/AT are registered trademarks of International Business Machines Corporation.
Other brand names and product names are registered trademarks or trademarks of their respective
owners.
The ™ and ® marks are omitted in the text of this booklet.
3

System Requirements ......................4
Installing the Software......................5
Easy installation
(plug & play)..................................5
Manual installation ........................7
Uninstallation ................................9
For high-speed operation..............9
Printing ............................................ 10
To cancel printing........................ 12
Tips for printing ........................... 13
Split Print......................................... 14
Adjusting the Image Quality ......... 16
Troubleshooting Guide................... 17
Table of Contents
4
System Requirements
The following hardware and software are required to install and run this soft-ware.
Computer: IBM PC/AT compatible machine with an i486SX or better CPUrunning Windows 95, 98 or Me (Pentium or better CPU recommended).Memory: 8 MB minimum (32 MB or more recommended, depending on theapplication to be printed).
Hard disk: Minimum 15 MB free (Recommendation: 30 MB or more). Morespace is required for larger images or multiple-page filesDisplay: Minimum 256-color graphics capability (Recommendation: 32,000
colors or more).
Disk drive: Floppy disk drive (required for installation).
Notes
This software may be upgraded without notice.
The screen images shown in this booklet may differ slightly from the actual screen
images displayed by the software.
The latest information about this software is recorded in the "Readme.txt" file on the
provided floppy disk. Be sure to read this file.
5

Installing the Software
Install the Windows 95/98/Me printer driver software on the provided floppy diskin your PC. This description uses a PC running Windows 98 as an example.
Select [Search for the best driver for your device] and click [Next].
Easy installation (plug & play)
1
2
Connect the printer to your PC.
Please refer to the printer's instruction manual for details on connecting the
printer to your PC.
Turn on the printer and the PC. Launch Windows.
The [Add New Hardware Wizard] dialog box appears. Click [Next] to continue.
3
6
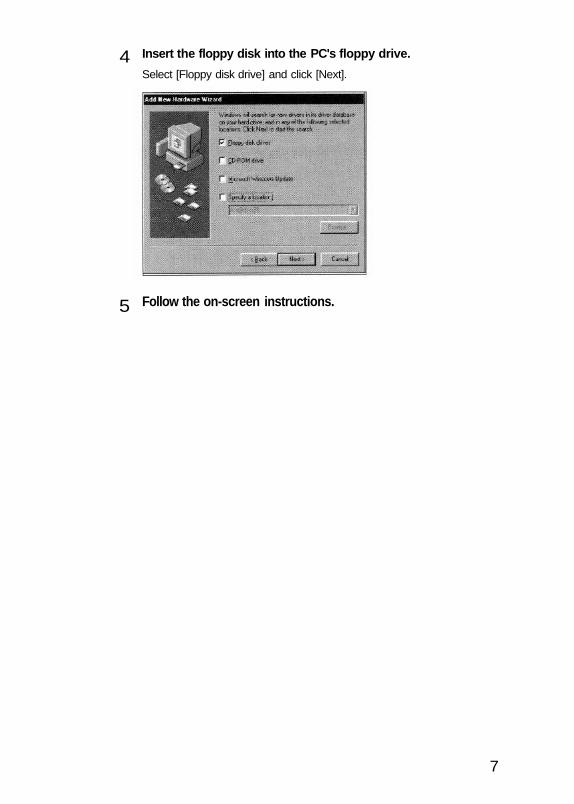
Insert the floppy disk into the PC's floppy drive.
Select [Floppy disk drive] and click [Next].
Follow the on-screen instructions.
4
5
7
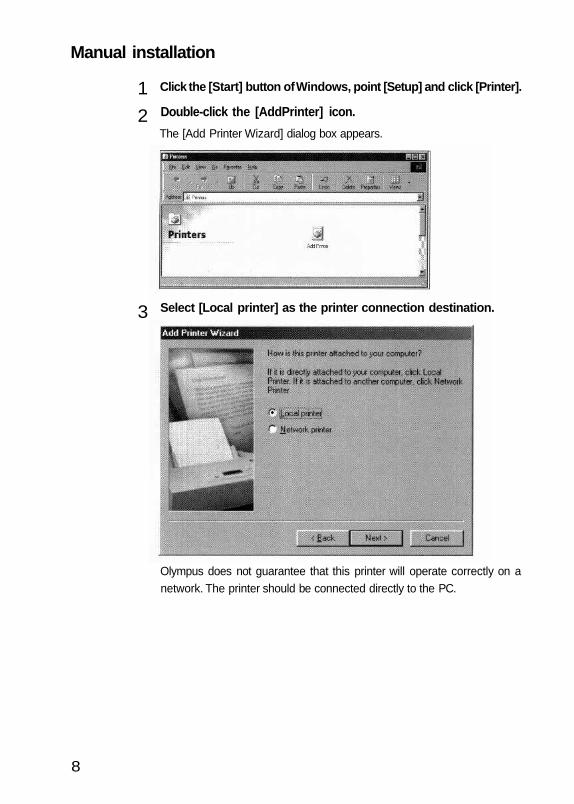
Manual installation
Click the [Start] button of Windows, point [Setup] and click [Printer].
Double-click the [AddPrinter] icon.
The [Add Printer Wizard] dialog box appears.
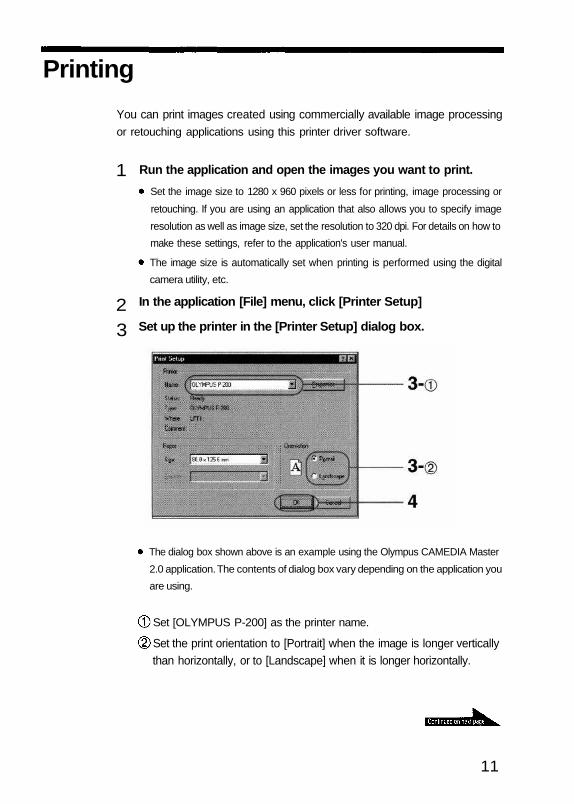
Select [Local printer] as the printer connection destination.
Olympus does not guarantee that this printer will operate correctly on anetwork. The printer should be connected directly to the PC.
2
3
8
1

Insert the floppy disk into the PC's floppy drive and select [Usedisk].
Set the floppy disk drive as the [Copy source of distributed file.]
The drive name of the floppy disk drive varies depending on the setup ofeach PC. Check your PC's instruction manual if you are not sure.
When you find the file, go on to the next step.
Set [LPT1: Printer port] as the port to be used by the printer.
Select whether the printer is used as the default printer or not.
Click [End] to complete installation.
4
567
Note
When "Insert Windows CD-ROM (or floppy disk)" is displayed during installation, insert
the specified CD-ROM or applicable floppy disk in the PC and click [OK], The required
file will be installed automatically. If Windows setup is started when the Windows CD-
ROM is inserted, cancel the Windows setup. The installation of the printer driver will
continue.
9

Uninstallation
When the printer driver software is no longer necessary, uninstall it as describedbelow.
Click the [Start] button of Windows, point [Setup] and click [Printer].
The [Printer] window appears.
Click the [OLYMPUS P-200] icon.
In the [File] menu, click [Delete].
Uninstall the printer driver by following the on-screen instructions.
For high-speed operation
To use the printer at a high speed, we recommend the printer port be used inthe ECP mode. This will reduce the data transfer time from the PC.
To switch to the ECP mode, BIOS setup is required. The setup method variesdepending on the PC. Please refer to your PC's instruction manual for BIOS
setup.
Notes
Data transfer time varies depending on PC.
Some printers are not compatible with the ECP mode. Take care when using more than
one printer.
2
34
10
1
Printing
You can print images created using commercially available image processingor retouching applications using this printer driver software.
Run the application and open the images you want to print.
Set the image size to 1280 x 960 pixels or less for printing, image processing or
retouching. If you are using an application that also allows you to specify image
resolution as well as image size, set the resolution to 320 dpi. For details on how to
make these settings, refer to the application's user manual.
The image size is automatically set when printing is performed using the digital
camera utility, etc.
In the application [File] menu, click [Printer Setup]
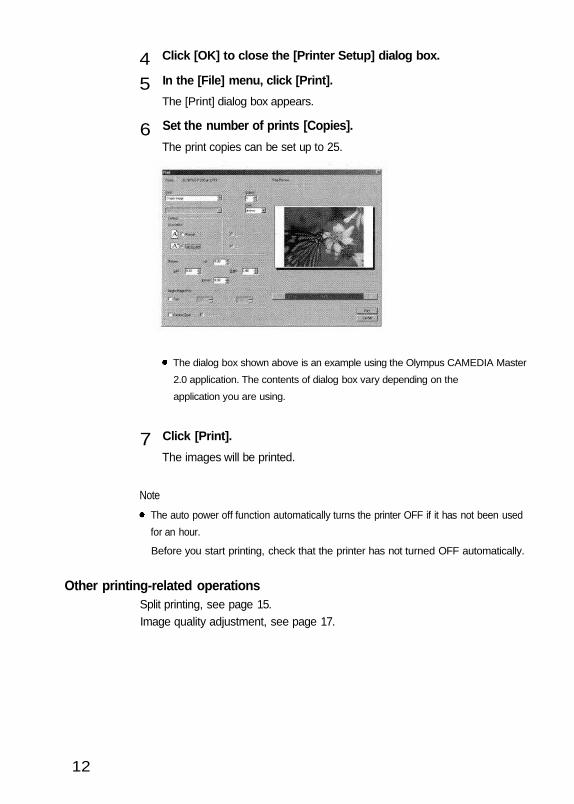
Set up the printer in the [Printer Setup] dialog box.
The dialog box shown above is an example using the Olympus CAMEDIA Master
2.0 application. The contents of dialog box vary depending on the application you
are using.
Set [OLYMPUS P-200] as the printer name.
Set the print orientation to [Portrait] when the image is longer verticallythan horizontally, or to [Landscape] when it is longer horizontally.
23
11
1
Click [OK] to close the [Printer Setup] dialog box.
In the [File] menu, click [Print].
The [Print] dialog box appears.
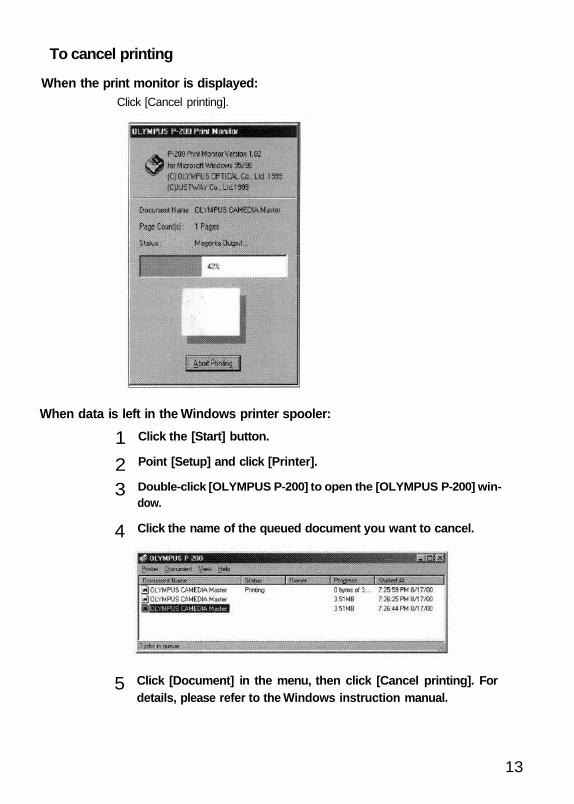
Set the number of prints [Copies].
The print copies can be set up to 25.
The dialog box shown above is an example using the Olympus CAMEDIA Master
2.0 application. The contents of dialog box vary depending on the
application you are using.
7 Click [Print].
The images will be printed.
Note
The auto power off function automatically turns the printer OFF if it has not been used
for an hour.
Before you start printing, check that the printer has not turned OFF automatically.
Other printing-related operationsSplit printing, see page 15.Image quality adjustment, see page 17.
45
6
12
To cancel printing
When the print monitor is displayed:Click [Cancel printing].
When data is left in the Windows printer spooler:
Click the [Start] button.
Point [Setup] and click [Printer].
Double-click [OLYMPUS P-200] to open the [OLYMPUS P-200] win-dow.
Click the name of the queued document you want to cancel.
Click [Document] in the menu, then click [Cancel printing]. Fordetails, please refer to the Windows instruction manual.
23
4
5
13
1
Tips for printing
To get the best printing results, be sure to read the instruction manual of theapplication you are using. Information on how to change the resolution andimage size is especially important. In addition, read the following tip.
Print in an environment with as large color display capability as possible.The number of available colors of some applications is determined according tothe display color setting of the PC used in printing. To print the best imagespossible, it is recommended to print from a system capable of displaying 64000colors or 16.77 million colors if possible.
Adjust the image size and resolution (with an application that prints imagesaccording to the resolution of the printer).
If the application in use is capable of adjusting the image resolution and size,set the resolution to 320 dpi and the size to 1280 x 960 pixels or smaller. (If the
image size in pixels is larger, the image may be printed on more than one sheetof print paper.)
14

Split Print
You can split a sheet of print paper into multiple planes and print thesame image on each of them.
In the [File] menu of the application, click [Print].
The [Print] dialog box appears.
Click [Properties].
[OLYMPUS P-200-LPT1: Properties] appears.
Set the split method in the [Paper] sheet.
2
3
15
1
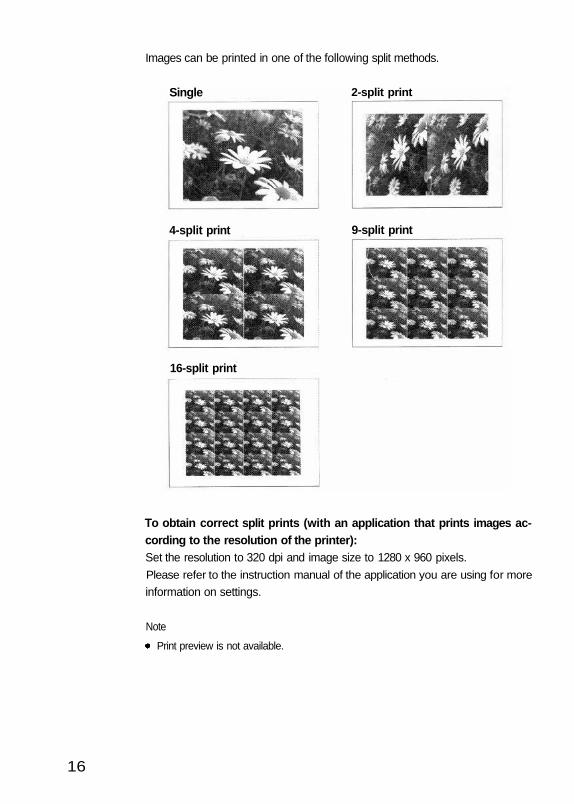
Images can be printed in one of the following split methods.
4-split print 9-split print
16-split print
To obtain correct split prints (with an application that prints images ac-cording to the resolution of the printer):Set the resolution to 320 dpi and image size to 1280 x 960 pixels.Please refer to the instruction manual of the application you are using for more
information on settings.
Note
Print preview is not available.
Single 2-split print
16
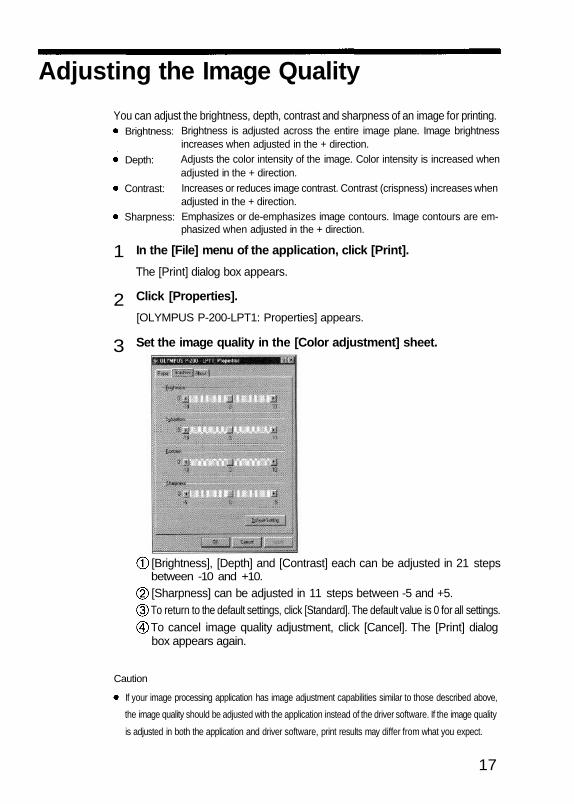
Adjusting the Image Quality
You can adjust the brightness, depth, contrast and sharpness of an image for printing.
[Brightness], [Depth] and [Contrast] each can be adjusted in 21 stepsbetween -10 and +10.
[Sharpness] can be adjusted in 11 steps between -5 and +5.To return to the default settings, click [Standard]. The default value is 0 for all settings.To cancel image quality adjustment, click [Cancel]. The [Print] dialogbox appears again.
Brightness:
Depth:
Contrast:
Sharpness:
Brightness is adjusted across the entire image plane. Image brightnessincreases when adjusted in the + direction.Adjusts the color intensity of the image. Color intensity is increased whenadjusted in the + direction.Increases or reduces image contrast. Contrast (crispness) increases whenadjusted in the + direction.Emphasizes or de-emphasizes image contours. Image contours are em-phasized when adjusted in the + direction.
In the [File] menu of the application, click [Print].
The [Print] dialog box appears.
Click [Properties].
[OLYMPUS P-200-LPT1: Properties] appears.
Set the image quality in the [Color adjustment] sheet.
2
3
Caution
If your image processing application has image adjustment capabilities similar to those described above,
the image quality should be adjusted with the application instead of the driver software. If the image quality
is adjusted in both the application and driver software, print results may differ from what you expect.
17
1
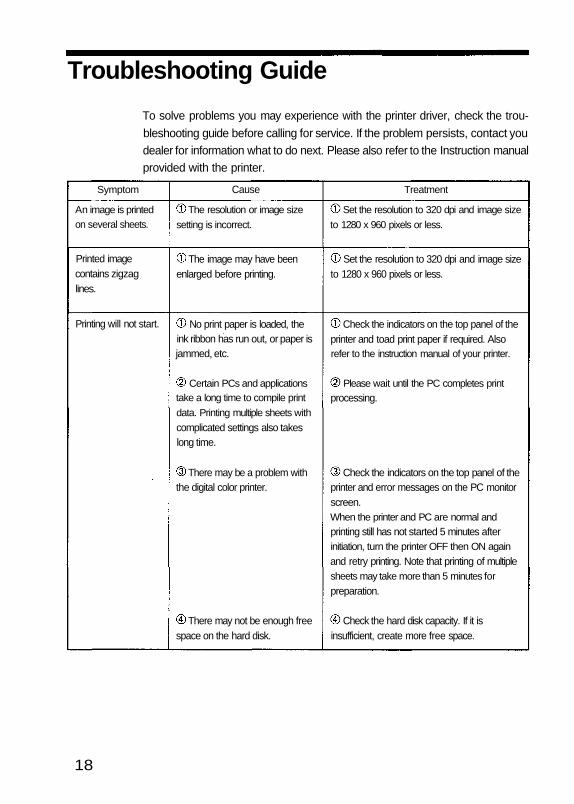
Troubleshooting Guide
To solve problems you may experience with the printer driver, check the trou-bleshooting guide before calling for service. If the problem persists, contact youdealer for information what to do next. Please also refer to the Instruction manualprovided with the printer.
Symptom
An image is printedon several sheets.
Printed imagecontains zigzaglines.
Printing will not start.
Cause
The resolution or image size
setting is incorrect.
The image may have beenenlarged before printing.
No print paper is loaded, theink ribbon has run out, or paper isjammed, etc.
Certain PCs and applicationstake a long time to compile print
data. Printing multiple sheets with
complicated settings also takeslong time.
There may be a problem withthe digital color printer.
There may not be enough freespace on the hard disk.
Treatment
Set the resolution to 320 dpi and image size
to 1280 x 960 pixels or less.
Set the resolution to 320 dpi and image sizeto 1280 x 960 pixels or less.
Check the indicators on the top panel of theprinter and toad print paper if required. Alsorefer to the instruction manual of your printer.
Please wait until the PC completes printprocessing.
Check the indicators on the top panel of theprinter and error messages on the PC monitorscreen.When the printer and PC are normal andprinting still has not started 5 minutes afterinitiation, turn the printer OFF then ON again
and retry printing. Note that printing of multiplesheets may take more than 5 minutes for
preparation.
Check the hard disk capacity. If it isinsufficient, create more free space.
18
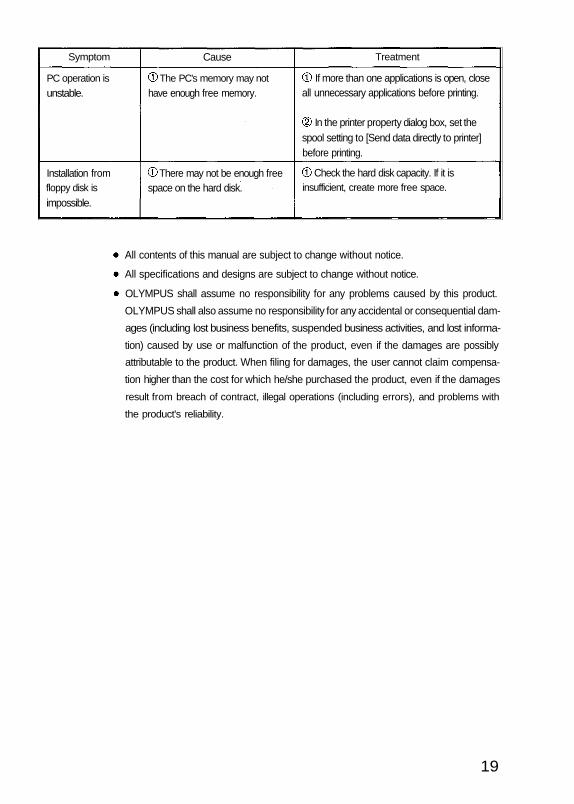
Symptom
PC operation is
unstable.
Installation fromfloppy disk is
impossible.
Cause
The PC's memory may not
have enough free memory.
There may not be enough freespace on the hard disk.
Treatment
If more than one applications is open, closeall unnecessary applications before printing.
In the printer property dialog box, set thespool setting to [Send data directly to printer]before printing.
Check the hard disk capacity. If it isinsufficient, create more free space.
All contents of this manual are subject to change without notice.
All specifications and designs are subject to change without notice.
OLYMPUS shall assume no responsibility for any problems caused by this product.
OLYMPUS shall also assume no responsibility for any accidental or consequential dam-
ages (including lost business benefits, suspended business activities, and lost informa-
tion) caused by use or malfunction of the product, even if the damages are possibly
attributable to the product. When filing for damages, the user cannot claim compensa-
tion higher than the cost for which he/she purchased the product, even if the damages
result from breach of contract, illegal operations (including errors), and problems with
the product's reliability.
19

OLYMPUS OPTICAL CO., LTD.San-Ei Building, 22-2, Nishi Shinjuku 1-chome, Shinjuku-ku, Tokyo, Japan.
(Customer support) Tel. 0426-42-7499 Tokyohttp://www.olympus.co.jp
OLYMPUS AMERICA INC.Two Corporate Center Drive, Melville, NY 11747-3157, U.S.A. Tel. 631-844-5000
(Customer support) Tel. 1-888-553-4448http://www.olympus.com
OLYMPUS OPTICAL CO. (EUROPA) GMBH.(Premises/Goods delivery) Wendenstraße 14-16, 20097 Hamburg, Germany. Tel. 040-237730
(Lelters) Postfach 10 49 08, 20034 Hamburg, Germany.http://www.olympus-europa.com
VT135101
P-200Digital Color Printer
InstructionsThank you for purchasing this Olympus digital color printer.Before using this product, read this manual carefully to ensure correctuse.
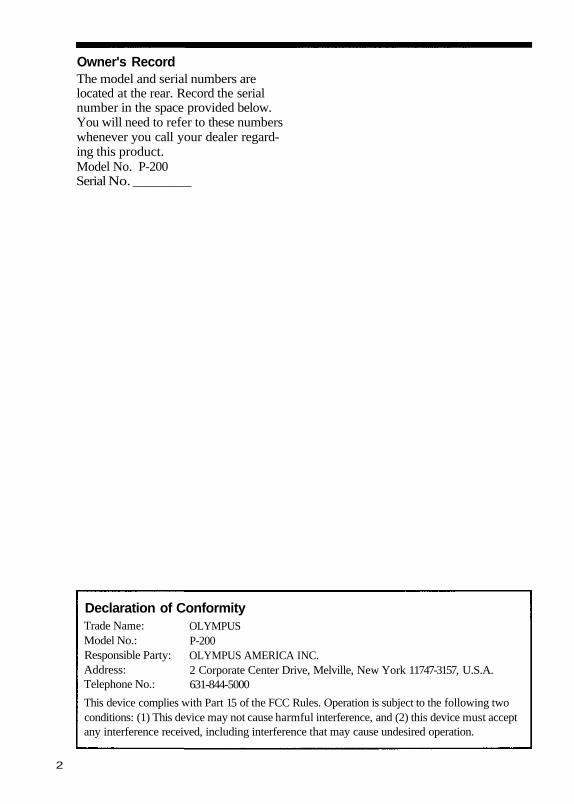
Owner's RecordThe model and serial numbers arelocated at the rear. Record the serialnumber in the space provided below.You will need to refer to these numberswhenever you call your dealer regard-ing this product.Model No. P-200Serial No. ______
Declaration of ConformityTrade Name:Model No.:Responsible Party:Address:Telephone No.:
OLYMPUSP-200OLYMPUS AMERICA INC.2 Corporate Center Drive, Melville, New York 11747-3157, U.S.A.631-844-5000
This device complies with Part 15 of the FCC Rules. Operation is subject to the following twoconditions: (1) This device may not cause harmful interference, and (2) this device must acceptany interference received, including interference that may cause undesired operation.
2

Table of Contents
Introduction............................................. 4
Precautions .............................................. 4
Safety precautions .................................. 5
Care and storage................................... 10
Getting StartedUnpacking the printer.......................... 11
What you can do with the P-200 digitalcolor printer........................................... 12
Identifying the parts............................. 13
SetupSetting up the printer ........................... 15
Connecting the power supply ...... 15Using print packs.................................. 17
Loading the ink ribbon cartridge ....... 18Handling the ink ribboncartridge........................................... 20
Loading print paper ............................. 21Loading print paper in the paperfeed cassette..................................... 21Installing the paper feed cassetteonto the printer............................... 22
Basic PrintingPrinting images recorded on the card(SmartMedia or CompactFlash)......... 23
Preparation...................................... 23Opening the card cover ................. 24Inserting the card into the printer'sslot.................................................... 24Printing............................................ 27
Other Printing FunctionsMaking split prints ............................... 31
Making split prints of the sameimage................................................ 31Index print....................................... 32
Printing all recorded images in aSmartMedia or CompactFlash card ... 34
Printing DPOF-reserved images......... 36
Printing the date ................................... 37
Adjusting the sharpness ...................... 39
For Your InformationTroubleshooting.................................... 40
If indicators light or blink ............. 41If print paper is jammed................ 42
About the ink ribbon cartridge andprint paper............................................. 44
Specifications......................................... 45
FCC notice ............................................. 46
Accessories............................................. 47
Print index ............................................. 48
3
IntroductionThank you for purchasing thisOLYMPUS digital color printer.
Read this manual and warrantycarefully. Keep them handy for futurereference and when requesting service.
Make sure that the date of purchase anddealer's name are included on yourwarranty.
PrecautionsBefore using the printer, read the safetyprecautions on pages 5 through 9.Always follow these precautions toensure safe and proper handling andoperation of your printer. Keep thismanual handy for future reference.
Duplication restrictionsIf duplicating documents with theprinter, pay special attention to thefollowing.
• Duplication of bank notes, coins, orsecurities is against the law.
• Duplication of blank certificates,licenses, passports, private securitiesor unused postal stamps is alsoagainst the law.
• Paintings, photographs, and booksunder copyright cannot be duplicatedwithout permission of the copyrightholder, unless you use the duplica-tions for private purposes.
Notes for illustrations used in thismanualIllustrations in this manual are forexplanatory purposes only. They maydiffer from what is actually displayedor printed.
4
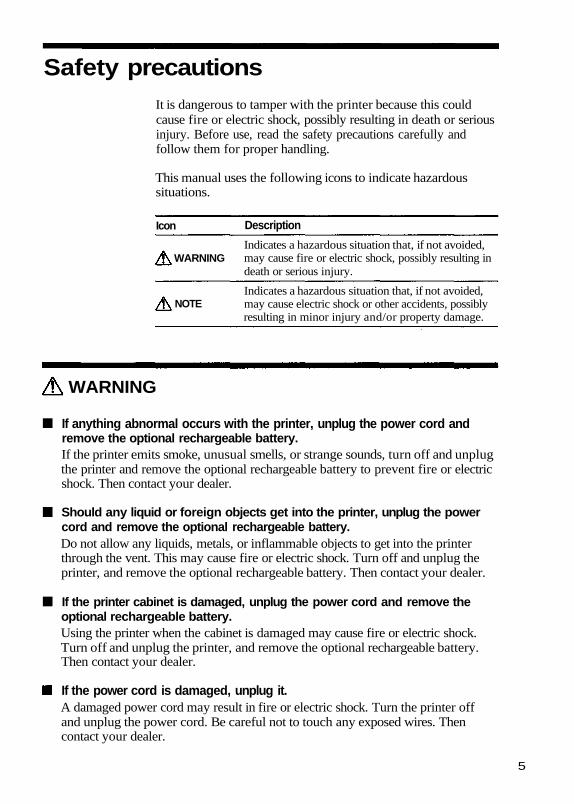
Safety precautionsIt is dangerous to tamper with the printer because this couldcause fire or electric shock, possibly resulting in death or seriousinjury. Before use, read the safety precautions carefully andfollow them for proper handling.
This manual uses the following icons to indicate hazardoussituations.
Icon Description
WARNING
NOTE
Indicates a hazardous situation that, if not avoided,may cause fire or electric shock, possibly resulting indeath or serious injury.
Indicates a hazardous situation that, if not avoided,may cause electric shock or other accidents, possiblyresulting in minor injury and/or property damage.
WARNING
If anything abnormal occurs with the printer, unplug the power cord andremove the optional rechargeable battery.If the printer emits smoke, unusual smells, or strange sounds, turn off and unplugthe printer and remove the optional rechargeable battery to prevent fire or electricshock. Then contact your dealer.
Should any liquid or foreign objects get into the printer, unplug the powercord and remove the optional rechargeable battery.Do not allow any liquids, metals, or inflammable objects to get into the printerthrough the vent. This may cause fire or electric shock. Turn off and unplug theprinter, and remove the optional rechargeable battery. Then contact your dealer.
If the printer cabinet is damaged, unplug the power cord and remove theoptional rechargeable battery.Using the printer when the cabinet is damaged may cause fire or electric shock.Turn off and unplug the printer, and remove the optional rechargeable battery.Then contact your dealer.
If the power cord is damaged, unplug it.A damaged power cord may result in fire or electric shock. Turn the printer offand unplug the power cord. Be careful not to touch any exposed wires. Thencontact your dealer.
5
WARNING
Do not damage the power cord.A damaged power cord may result in fire or electric shock.To prevent the cord from being damaged,DO NOT:Jerk the cord to pull it out.Bend the cord excessively.Heat the cord.Place heavy objects on the cord.Rewire the cord.
If the power cord is damaged, contact your dealer.
Do not disassemble or modify the printer.The printer has both hot and high voltage parts on the inside. To prevent anelectric shock or printer malfunction, do not attempt to disassemble or modify theprinter. For service or repair, contact your dealer.
Do not place liquids on the printer.If liquid gets into the printer, it may result in fire or electric shock.
Do not place heavy objects on the printer.Doing so may deform the printer cabinet, resulting in fire or electric shock. If theprinter falls or is dropped, it may be damaged.
Do not install the printer in the following places.To prevent fire, electric shock, and printer malfunction, do not install the printerin the following places.
Dusty, humid, or oily placesShould any dust or liquid get into the printer, it may result in fire or electricshock.Extremely hot placesDo not expose the printer to direct sunlight (for example, inside a car and on thedashboard) or extremely high temperatures (near a heater, for example). Doingso may deform the printer cabinet, resulting in fire or electric shock.
Use the printer in an environment with an ambient temperature between 41 to95°F (5 to 35°C) and humidity of 20 to 80%.
6

WARNING
Do not use the printer in the following places.Unstable or inclined surfaces.Places exposed to dust and other particles (such as outdoors, particularly on abeach).Places subject to rain and water drops, or enclosed places where condensationcould occur such as inside a plastic bag.
Do not use the printer with a power supply other than that specified.Incorrect voltage may damage printer parts, possibly resulting in fire or electricshock.
Connect the power cord correctly.For example, if the power cord is plugged in loosely, it may cause a fire or electricshock. Push the plug all the way into the outlet.
Make sure that excessive dust and foreign matter do not accumulate on thepower cord.Dust and foreign matter conduct electricity, which can cause fire and electricshock. If excessive dust and foreign matter accumulates on the cord, unplug thecord and clean it.
Immediately unplug the power cord when an electric storm starts outside.The induced electricity from storms may cause fire, electric shock, or printermalfunction.
Do not hold the power cord plug with wet hands.Doing so may cause an electric shock. Be sure your hands are dry before handling.
Do not overload the power outlet.This printer should be plugged into a separate 110-120 V AC, 60 Hz circuit. If theprinter is on a circuit with other appliances, an overload may cause fire or electricshock.
7

WARNING
Observe the following when using the optional B-200NH rechargeablebattery.
Never disassemble, destroy or short-circuit the battery, or throw it in a fire.Doing so may cause an explosion.To recharge the battery, mount it on the printer.If recharging does not finish even though specified recharging time (3 hours)has been exceeded, unplug the power cord to interrupt recharging.While the battery is being recharged, do not unplug the power cord. Insufficientrecharging may cause the battery service life to be reduced.Use the battery correctly; otherwise, an explosion may result.Note that the battery may generate heat when it is being recharged or right afterrecharging is complete.Dispose of the used battery according to local regulations.For details, refer to the instruction manual of the optional rechargeable battery.
8
NOTE
Do not block the vent.Doing so may cause the printer to heat up, possibly resulting in fire or electricshock.
Do not block the vent.Do not put the printer in the following places.- Place with poor ventilation- On a soft surface like a rug or bed
Do not put the printer on an unstable surface such as a shaky table.If the printer falls, it may injure someone. This could also damage the printer orcause the printer to malfunction.
Do not touch the non-user-serviceable parts inside the printer.Doing so may cause injury or burns. This applies especially to children and thoseunfamiliar with the printer.
Do not move the printer when the power cord is taut.Doing so may damage the cord, possibly resulting in fire or electric shock. Whenmoving the printer, unplug and bundle the power cord.
Do not pull the cord with a jerk.To unplug the power cord, hold it by the plug. Pulling on the cord may damage it,possibly resulting in fire or electric shock.
Unplug the power cord from the power outlet before cleaning the printer.Accidentally touching a non-user-serviceable part may cause electric shock.
Unplug the printer if it will not be used for an extended period of time (forexample, while you away on a long trip.)Otherwise, deteriorated insulation or leakage current may cause fire or electricshock.
Remove the optional rechargeable battery if the printer will not be used foran extended period of time.Otherwise, fluid leakage may occur.
When the optional rechargeable battery is not Installed, mount the rearcover.
9
Care and storageBeware of moisture condensation.Moisture condensation means that water vapor in the air becomes liquid andsticks to the printer surface. This phenomenon is caused by the following.
Rapidly heating the room in which the printer is placedCool air (from an air conditioner, etc.) blown directly at the printerMoving the printer from a cold place to a warm place
Moisture in the air will condense on the paper, deteriorating print quality orcausing paper jams.
Under conditions where moisture condensation has occurred or may occur, do notoperate the printer until it is dry or until there is no possibility that condensationwill occur.
Do not spray volatile solvent on the printer or allow the printer to be incontact with rubber or plastic products for an extended period of time.For example, spraying an insecticide on the printer or wiping it with thinner orbenzine may deteriorate or discolor the printer cabinet. Such deterioration anddiscoloring also occurs if the printer is in contact with rubber or plastic productsfor an extended period of time.
Operate the printer at least once every six months.If the printer is not used for an extended period of time, it may malfunction.Operate the printer at least once every six months.
Carry the printer with both hands.When lifting or carrying the printer, use both hands.
Transport the printer carefully.When transporting the printer, place it in the original box with the originalpacking material. If you don't have the original packaging, pack the printer withenough cushioning material to absorb any impacts during transportation. Be sureto remove the SmartMedia, CompactFlash and automatic feeder from the printer.
10

Getting Started
Unpacking the printer
Make sure that the following accessories are suppliedwith your printer. If you are missing any of theseaccessories, contact your dealer immediately.
E2AC AC power adapter (1)
Paper feed cassette (1)
CB-200UC power cord (1)
Rear cover (installed to the printer body)
Sample kit [Ink ribbon cartridge (1) and standardpaper (25 sheets)]Instruction manual (1)Limited warranty card (1)
Getting Started 11
What you can do with the P-200digital color printer
Easy printing of images recorded in SmartMedia orCompactFlashYou can print images from SmartMedia orCompactFlash recorded with Olympus digital cameras.
Making a variety of printsYou can make a variety of prints including split printswith multiple images on a single sheet and index printsshowing up to 30 recorded images on a single sheet.You can also print images with the date or adjust thecontour sharpness of printed images.
Printing of images from a PCThe P-200 can be connected to a PC and print imagesstored in the PC using the optional P-200 connectionkit. (For details on printing images from a PC, refer tothe Installation Guide provided with the optional P-200connection kit.)
High-quality overcoated printsThe standard print paper is coated with high-qualityovercoating featuring excellent storability and durabil-ity to preserve important pictures for an extendedperiod.
25-sheet continuous printingThe supplied paper feed cassette can supply up to 25sheets of print paper continuously to the printer.
Getting Started12

13
Identifying the parts
POWER button
Cooling fan window
PRINT button
Control panel
Card cover
Rechargeable battery unlock lever
DC power input connector
IEEE1284 26-pin parallel interfaceconnector
Paper feed cassette compartmentcover
Cartridge compartment lid
Ink ribbon cartridge
SmartMedia slot
CompactFlash slot
EJECT button
Getting Started
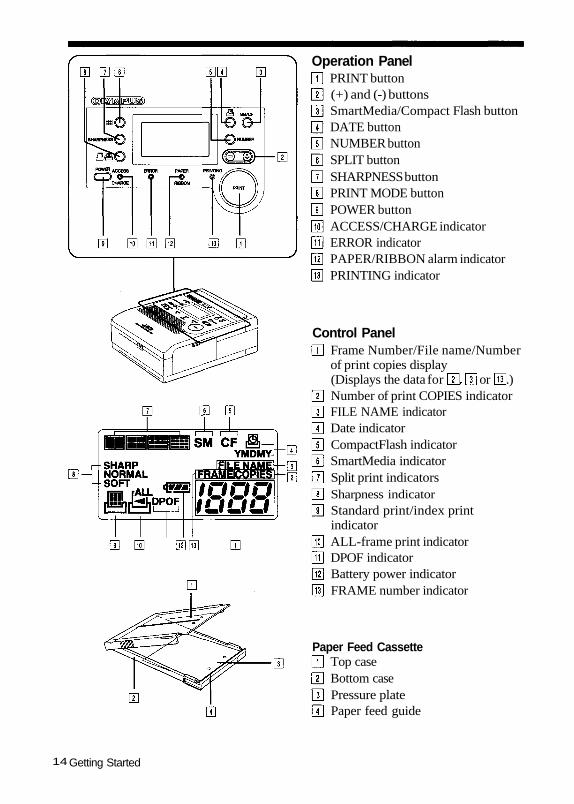
Operation PanelPRINT button(+) and (-) buttonsSmartMedia/Compact Flash buttonDATE buttonNUMBER buttonSPLIT buttonSHARPNESS buttonPRINT MODE buttonPOWER buttonACCESS/CHARGE indicatorERROR indicatorPAPER/RIBBON alarm indicatorPRINTING indicator
Control PanelFrame Number/File name/Numberof print copies display(Displays the data for or .)Number of print COPIES indicatorFILE NAME indicatorDate indicatorCompactFlash indicatorSmartMedia indicatorSplit print indicatorsSharpness indicatorStandard print/index printindicatorALL-frame print indicatorDPOF indicatorBattery power indicatorFRAME number indicator
Paper Feed CassetteTop caseBottom casePressure platePaper feed guide
Getting Started14

Setting up the printer
Connecting the power supplyTo supply power from the provided AC adapter1. Plug the printer power cord into the AC adapter.2. Plug the AC adapter power cord into a wall outlet,
then plug the other end of the printer power cordinto the printer's DC power input connector.
3. Press and hold the POWER button for more than 1.5seconds.
4. The printer turns ON with a beep tone, and thecontrol panel is displayed.
5. To turn the printer OFF, press and hold the POWERbutton for more than 1.5 seconds. The control panelwill turn off and the printer turns OFF with a shortbeep.
If you want to use the AC adapter as the powersupply to the printer, remove the rechargeablebattery if possible. This will help prevent deteriora-tion of the rechargeable battery.If the printer power cord is accidentally unpluggedfrom the printer during printing, turn the printerOFF, plug the printer power cord into the printer'sDC power input connector, and then turn the printerON again. Leaving the printer unplugged in printingmode may cause it to malfunction.
Setup
Setup 15

Notes• Recharging time varies
depending on theremaining battery powerand environmentalconditions.
• Even when the battery isinstalled, it is notrecharged while theprinter is set to ON.Recharging only takesplace when the printer isOFF.
• Once you startedrecharging, it isrecommended that youfully recharge the batterywithout interruption. (Donot turn the printer ONor OFF duringrecharging.)
• When a fully dischargedbattery is recharged, apre-charging period ofup to 1 minute takesplace before theACCESS/CHARGEindicator lights up. (Theindicator does not lightin the pre-chargingperiod.)
To supply power from the optional rechargeablebattery
1. Installing the battery1) Turn the printer OFF and unplug the AC adapter
power cord.2) Remove the rear cover.
3) Position the battery so that the marking on thebattery points in the same direction as the one on theprinter. Align the battery with the printer as shown inillustration 3), then push the entire battery toward theprinter.
4) While pushing the battery against the printer, slide thebattery toward the battery unlock lever until it clicks.
2. Recharging the battery1) Connect the AC adapter.2) The ACCESS/CHARGE indicator lights to indicate
that recharging has started.3) Recharging takes about 2.5 hours. The ACCESS/
CHARGE indicator turns off when recharging iscomplete.
3. Battery power operation1) Disconnect the AC adapter from the printer and turn
the printer ON.When the AC adapter is connected, the printer isalways powered by the AC adapter.The control panel shows the remaining battery power.
Setup16
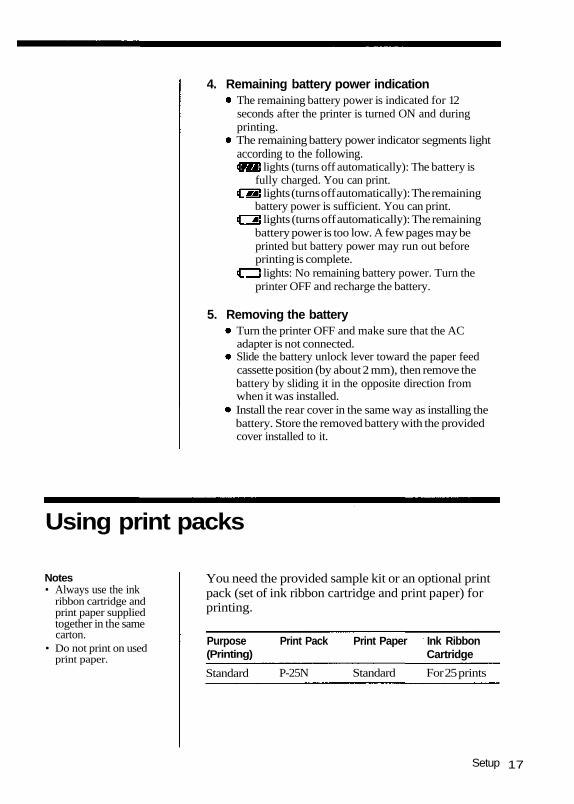
4. Remaining battery power indicationThe remaining battery power is indicated for 12seconds after the printer is turned ON and duringprinting.The remaining battery power indicator segments lightaccording to the following.
lights (turns off automatically): The battery isfully charged. You can print.
lights (turns off automatically): The remainingbattery power is sufficient. You can print.
lights (turns off automatically): The remainingbattery power is too low. A few pages may beprinted but battery power may run out beforeprinting is complete.
lights: No remaining battery power. Turn theprinter OFF and recharge the battery.
5. Removing the batteryTurn the printer OFF and make sure that the ACadapter is not connected.Slide the battery unlock lever toward the paper feedcassette position (by about 2 mm), then remove thebattery by sliding it in the opposite direction fromwhen it was installed.Install the rear cover in the same way as installing thebattery. Store the removed battery with the providedcover installed to it.
Using print packs
Notes• Always use the ink
ribbon cartridge andprint paper suppliedtogether in the samecarton.
• Do not print on usedprint paper.
You need the provided sample kit or an optional printpack (set of ink ribbon cartridge and print paper) forprinting.
Setup
Purpose(Printing)
Print Pack Print Paper Ink RibbonCartridge
Standard P-25N Standard For 25 prints
17
Loading the ink ribbon cartridge
Note• When using the ink
ribbon cartridgecompartment for the firsttime, remove the headprotection sheet from theinside.
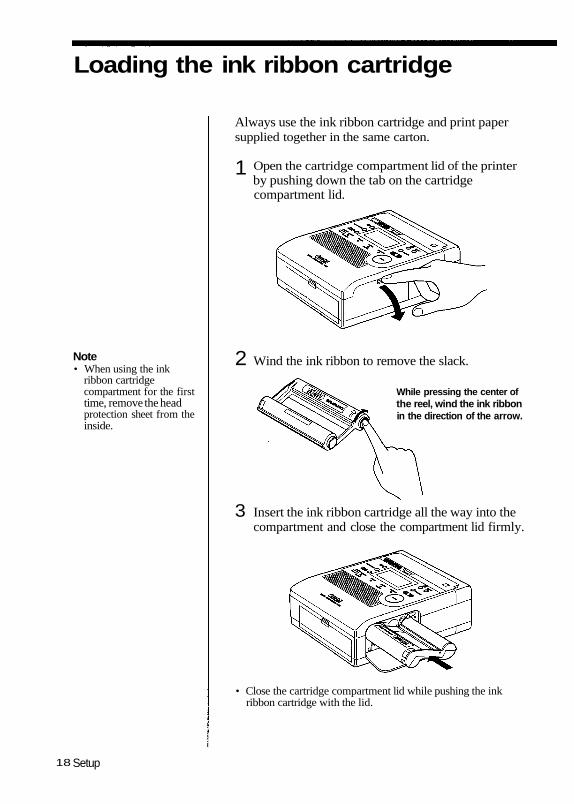
Always use the ink ribbon cartridge and print papersupplied together in the same carton.
Open the cartridge compartment lid of the printerby pushing down the tab on the cartridgecompartment lid.
Wind the ink ribbon to remove the slack.
While pressing the center ofthe reel, wind the ink ribbonin the direction of the arrow.
Insert the ink ribbon cartridge all the way into thecompartment and close the compartment lid firmly.
• Close the cartridge compartment lid while pushing the inkribbon cartridge with the lid.
Setup
2
3
18
1

If the cartridge compartment lid does not close:Remove the ink ribbon cartridge, and then re-insert it.
Cautions• The cartridge compartment may become very hot during or
after operation. Do not insert your finger or hand inside thecartridge compartment.
When placing an ink ribbon cartridge on something, stand it onits side to avoid deposition of dust on the ink ribbon. If yourtouch the ink ribbon or leave it in a place with excessive dust,fingerprints or dust may make clear printing impossible.
Setup 19
Storage precaution• Do not store an ink
ribbon cartridge in aplace subject to hightemperature orhumidity, excessivedust or direct sunlight.
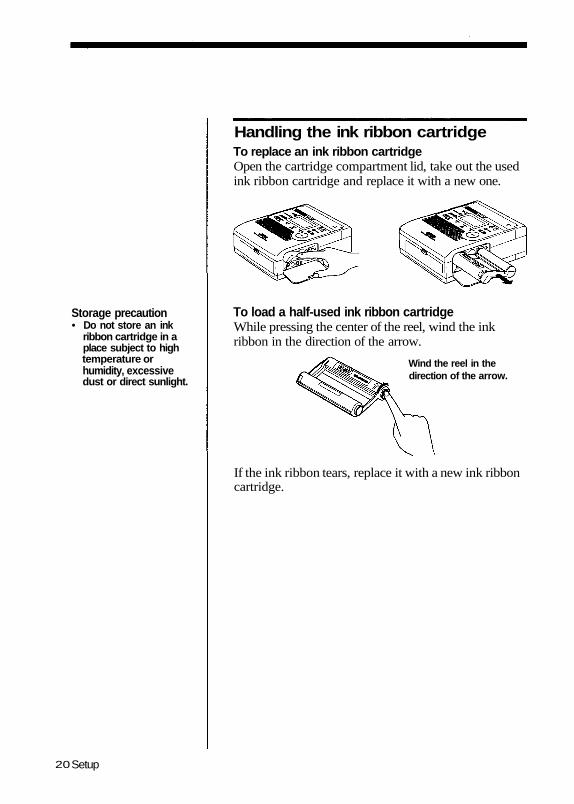
Handling the ink ribbon cartridgeTo replace an ink ribbon cartridgeOpen the cartridge compartment lid, take out the usedink ribbon cartridge and replace it with a new one.
To load a half-used ink ribbon cartridgeWhile pressing the center of the reel, wind the inkribbon in the direction of the arrow.
Wind the reel in thedirection of the arrow.
If the ink ribbon tears, replace it with a new ink ribboncartridge.
Setup20
Loading print paper
Cautions• Be careful not to stain or
damage the paper feedguide.
• Do not touch the printsurface (the glossysurface with nothingprinted on it) whenhandling print paper.
• Do not leave print paperin a place subject toexcessive dust. Clearprints cannot be obtainedif dust or fingerprints areinstalled on the printsurface.
• To prevent malfunction,use the dedicated printpaper only.
• The maximum numberof print paper sheets thatcan be placed in thepaper feed cassette is 25.Be careful not to exceedthis number whenadding print paper. If toomany print paper sheetsare loaded, the printermay jam.
• To prevent paper jam, donot fold or bend printpaper.
• Do not write on printpaper before printingimages on it. If you wantto write something, besure to write it afterprinting, using an oil-based ink. It is notpossible to print wordprocessor or typewritercharacters on printpaper.
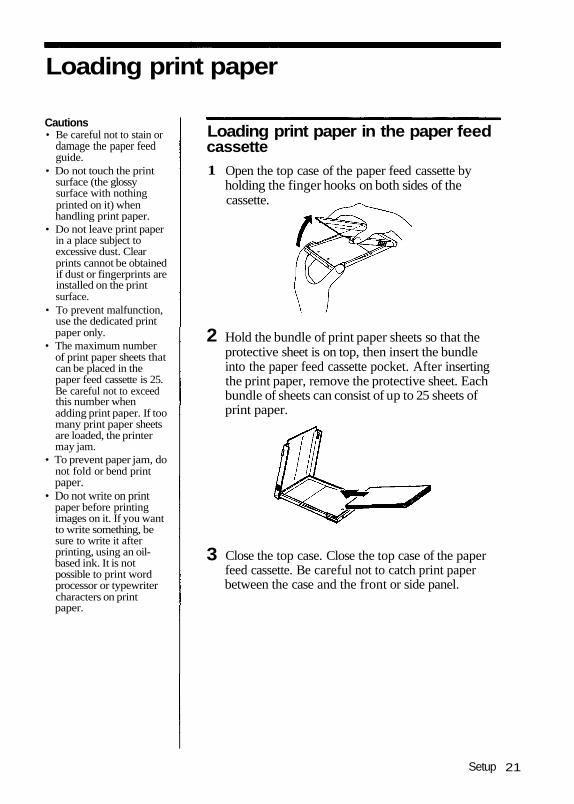
Loading print paper in the paper feedcassette
Open the top case of the paper feed cassette byholding the finger hooks on both sides of thecassette.
Hold the bundle of print paper sheets so that theprotective sheet is on top, then insert the bundleinto the paper feed cassette pocket. After insertingthe print paper, remove the protective sheet. Eachbundle of sheets can consist of up to 25 sheets ofprint paper.
Close the top case. Close the top case of the paperfeed cassette. Be careful not to catch print paperbetween the case and the front or side panel.
Setup
1
2
3
21
Note• If you need to transport
the paper feed cassettewith print paper loadedin it, put the paper feedcassette in a bag or othercontainer.
Storage precautions• Do not store print
paper in a place subjectto high temperature orhumidity, excessivedust or direct sunlight.
• When it is necessary toremove loaded printpaper from the printerand store it for a longperiod, store it in theoriginal bag in which theprint paper wassupplied.
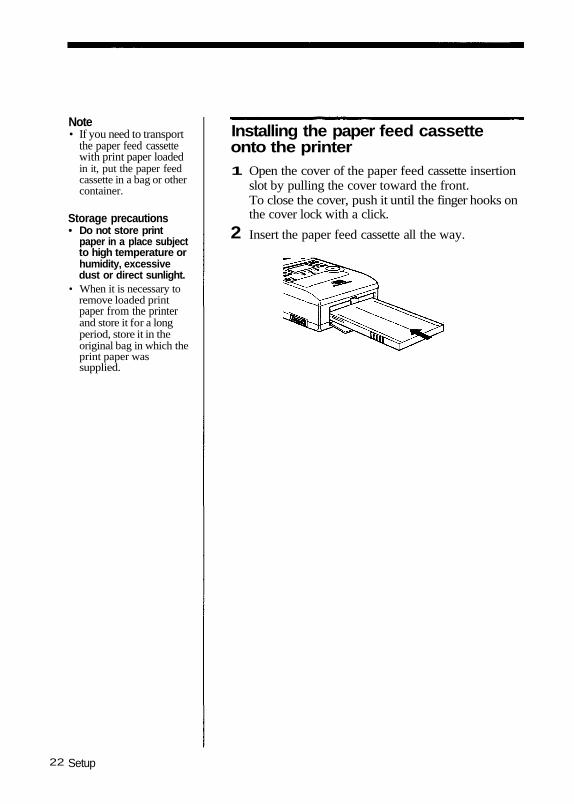
Installing the paper feed cassetteonto the printer
Open the cover of the paper feed cassette insertionslot by pulling the cover toward the front.To close the cover, push it until the finger hooks onthe cover lock with a click.
Insert the paper feed cassette all the way.
Setup
1
2
22
Basic Printing
Printing images recorded on the card(SmartMedia or CompactFlash)
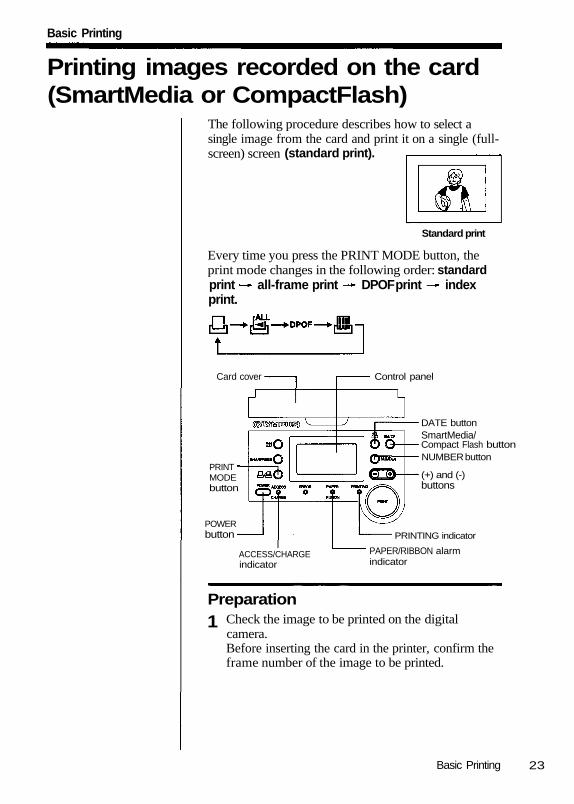
The following procedure describes how to select asingle image from the card and print it on a single (full-screen) screen
Standard print
Every time you press the PRINT MODE button, theprint mode changes in the following order:
PreparationCheck the image to be printed on the digitalcamera.Before inserting the card in the printer, confirm theframe number of the image to be printed.
Basic Printing
Card cover
PRINTMODEbutton
POWERbutton
Control panel
DATE buttonSmartMedia/Compact Flash buttonNUMBER button
(+) and (-)buttons
PRINTING indicator
PAPER/RIBBON alarmindicator
ACCESS/CHARGEindicator
standardprint all-frame print DPOF print indexprint.
(standard print).
23
1
Note• When you use a card that
contains images capturedby a different camera, theframe numbersdisplayed by yourcamera may notcorrespond with the onesshown by the printer. Tomake sure that theprinter prints the correctimage, use the indexprint function (see page33). Or, if your cameracan display file names,switch the printer'scontrol panel to file namedisplay to select theimage to be printed (seepage 27).
Cautions• If SmartMedia cannot be
inserted easily, do notforce it in, but remove it,check the SmartMediainsertion orientation andretry insertion from thebeginning.
• The image recorded inSmartMedia should beprinted as it wasrecorded using anOlympus digital camera.Proper display andprinting performancesare not guaranteed forimages that have beenretouched and saved ona PC or that have beenrecorded with anotherbrand of digital camera.
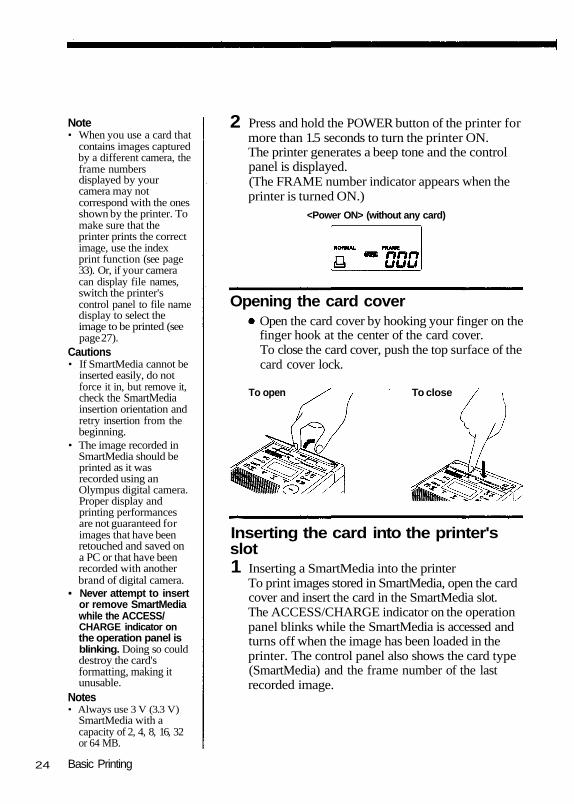
Press and hold the POWER button of the printer formore than 1.5 seconds to turn the printer ON.The printer generates a beep tone and the controlpanel is displayed.(The FRAME number indicator appears when theprinter is turned ON.)
<Power ON> (without any card)
Opening the card coverOpen the card cover by hooking your finger on thefinger hook at the center of the card cover.To close the card cover, push the top surface of thecard cover lock.
To open To close
Inserting the card into the printer'sslot
Inserting a SmartMedia into the printerTo print images stored in SmartMedia, open the cardcover and insert the card in the SmartMedia slot.The ACCESS/CHARGE indicator on the operationpanel blinks while the SmartMedia is accessed andturns off when the image has been loaded in theprinter. The control panel also shows the card type(SmartMedia) and the frame number of the lastrecorded image.
Basic Printing
2
1• Never attempt to insert
or remove SmartMediawhile the ACCESS/CHARGE indicator onthe operation panel isblinking. Doing so coulddestroy the card'sformatting, making itunusable.
Notes• Always use 3 V (3.3 V)
SmartMedia with acapacity of 2, 4, 8, 16, 32or 64 MB.
24
• SmartMedia cardsalways have priority,even when aCompactFlash card hasalready been insertedfirst. If you want to usedata from theCompactFlash card,press the SmartMedia/Compact Flash button toselect it.
• Keep the card cover openwhile SmartMedia isinserted in the printer.
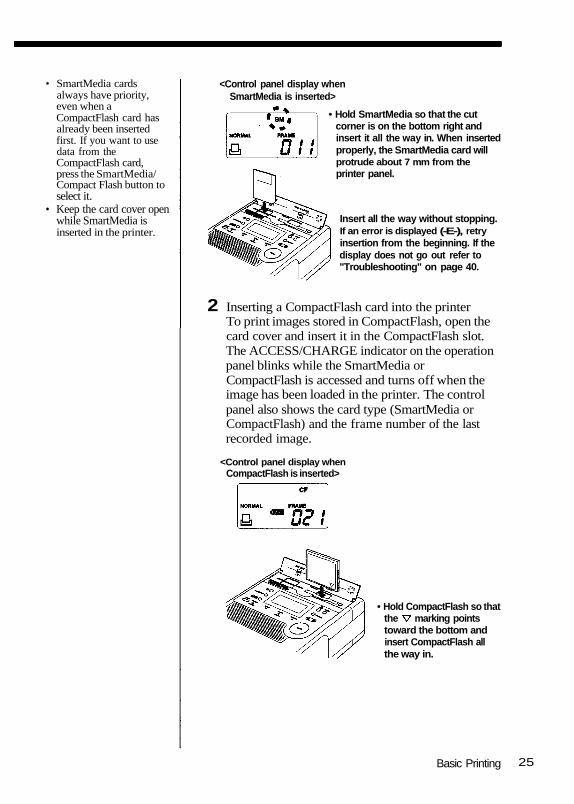
<Control panel display whenSmartMedia is inserted>
• Hold SmartMedia so that the cutcorner is on the bottom right andinsert it all the way in. When insertedproperly, the SmartMedia card willprotrude about 7 mm from theprinter panel.
Insert all the way without stopping.If an error is displayed (-E-), retryinsertion from the beginning. If thedisplay does not go out refer to"Troubleshooting" on page 40.
Inserting a CompactFlash card into the printerTo print images stored in CompactFlash, open thecard cover and insert it in the CompactFlash slot.The ACCESS/CHARGE indicator on the operationpanel blinks while the SmartMedia orCompactFlash is accessed and turns off when theimage has been loaded in the printer. The controlpanel also shows the card type (SmartMedia orCompactFlash) and the frame number of the lastrecorded image.
<Control panel display whenCompactFlash is inserted>
• Hold CompactFlash so thatthe marking pointstoward the bottom andinsert CompactFlash allthe way in.
Basic Printing
2
25

• If CompactFlash cannotbe inserted easily, do notforce it in, but remove it,check the CompactFlashinsertion orientation andretry insertion from thebeginning.
• The image recorded inCompactFlash should beprinted as it wasrecorded using anOlympus digital camera.Proper display andprinting performancesare not guaranteed forimages that have beenretouched and saved ona PC or that have beenrecorded with anotherbrand of digital camera.
• Never attempt to insertor removeCompactFlash while theACCESS/CHARGEindicator on theoperation panel isblinking.
Basic Printing
If an error is displayed (-E-) during insertion, retryinsertion from the beginning. To removeCompactFlash, press the EJECT button. If the displaydoes not go out, refer to "Troubleshooting" on page 40.If the EJECT button is already pressed in the lowposition, press it once to return it to the high positionthen press it again to eject. While the card is beingejected, the error display (-E-) may appear at times.Even if this happens, remove the card. (The errordisplay may also appear if the card is not removedafter ejection, but this is not a malfunction.)
Notes• Always use Type I (with
a capacity of no morethan 160 MB) or Type II(with a capacity of 340MB) Compact Flash.
• SmartMedia cardsalways have priority,even when aCompactFlash card hasalready been insertedfirst. If you want to usedata from theSmartMedia card, pressthe SmartMedia/CompactFlash button toselect it.
• Keep the card cover openwhile CompactFlash isinserted in the printer.
Cautions
Doing so coulddestroy theCompactFlashformatting, making itunusable.
26
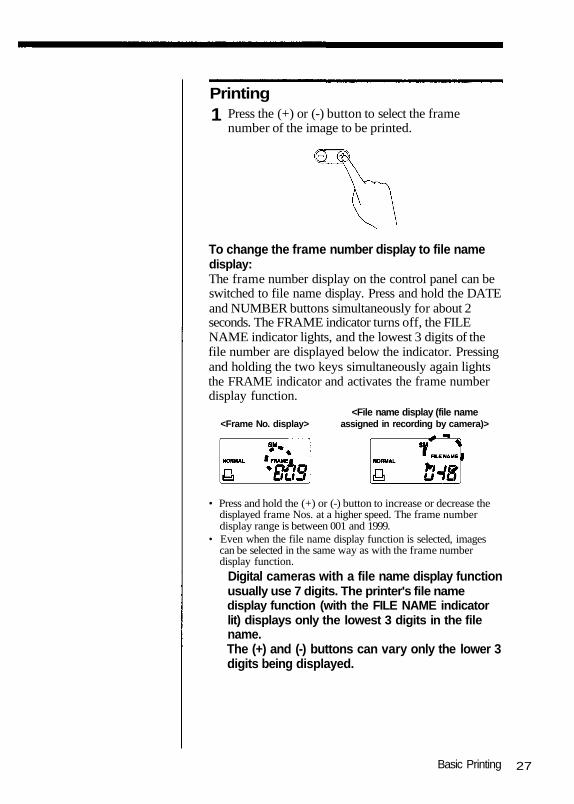
PrintingPress the (+) or (-) button to select the framenumber of the image to be printed.
To change the frame number display to file namedisplay:The frame number display on the control panel can beswitched to file name display. Press and hold the DATEand NUMBER buttons simultaneously for about 2seconds. The FRAME indicator turns off, the FILENAME indicator lights, and the lowest 3 digits of thefile number are displayed below the indicator. Pressingand holding the two keys simultaneously again lightsthe FRAME indicator and activates the frame numberdisplay function.
• Press and hold the (+) or (-) button to increase or decrease thedisplayed frame Nos. at a higher speed. The frame numberdisplay range is between 001 and 1999.
• Even when the file name display function is selected, imagescan be selected in the same way as with the frame numberdisplay function.
Digital cameras with a file name display functionusually use 7 digits. The printer's file namedisplay function (with the FILE NAME indicatorlit) displays only the lowest 3 digits in the filename.The (+) and (-) buttons can vary only the lower 3digits being displayed.
Basic Printing
<Frame No. display><File name display (file name
assigned in recording by camera)>
27
1
Note• If your digital camera
does not assign filenames using 7 digits, usethe frame numberdisplay function (withthe FRAME indicator lit).The corresponding framenumbers can be checkedby performing indexprinting (see page 33).
Caution• When the button
function is switched tothe frame numberdisplay function afterselecting more than oneprint copy, the COPIESindicator on the controlpanel blinks to indicatethat the number of printcopies selected is morethan one.
Use the following procedure to change thedisplay to show the higher 3 digits of the filename (the higher 3 digits of the file name arethe one that is displayed on the LCD screen ofthe digital camera).
Press the (+) and (-) buttons simultaneously for about 2 seconds.• The FILE NAME indicator blinks and the higher 4 digits are
displayed.Press the (+) or (-) button while FILE NAME blinks to displayhigher 3 digits of other files.• When no button is pressed for 3 seconds or more, the lower 4
digits for the newly selected higher 3 digits will be displayed.• To display the higher 3 digits again, restart the procedure
from step again.
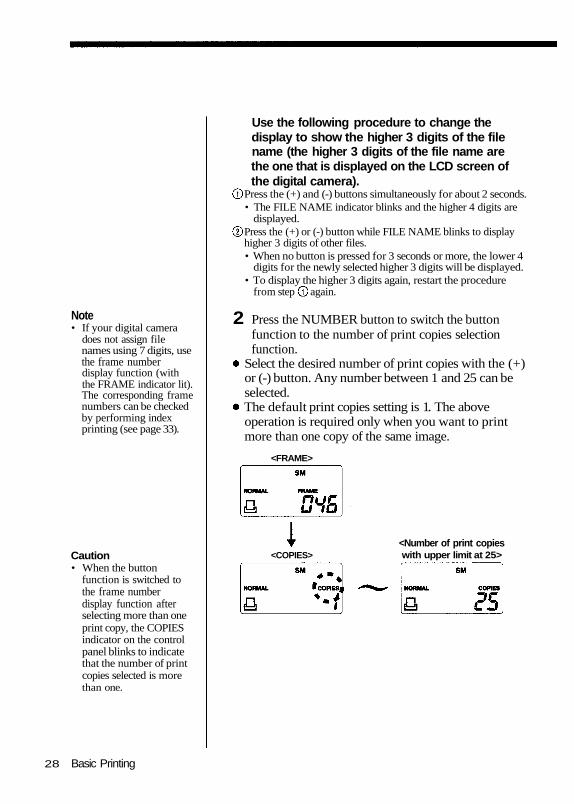
Press the NUMBER button to switch the buttonfunction to the number of print copies selectionfunction.
Select the desired number of print copies with the (+)or (-) button. Any number between 1 and 25 can beselected.The default print copies setting is 1. The aboveoperation is required only when you want to printmore than one copy of the same image.
<FRAME>
<Number of print copieswith upper limit at 25>
Basic Printing
<COPIES>
2
28
Cautions• Never attempt to insert
or remove theSmartMedia orCompactFlash card whilethe ACCESS/CHARGEindicator on theoperation panel isblinking. Otherwise, thecard's formatting may bedestroyed, making itunusable.
• Do not insert or removethe SmartMedia orCompactFlash cardduring printing.Otherwise, normalprinting may beimpossible, or the card'sformatting may bedestroyed, making itunusable.
• Never open the cartridgecompartment lid duringprinting. This can make itimpossible to remove theink ribbon cartridge orcause a paper jam.Should you open thecartridge compartmentlid by mistake, see page43.
• Never remove the paperfeed cassette duringprinting. This can make itimpossible to remove theink ribbon cartridge orcause a paper jam.Should you remove thepaper feed cassette bymistake, see page 43.
• Never move the printerduring printing. This canmake it impossible toremove the ink ribboncartridge or cause apaper jam.
Press the PRINT button.A short beep is generated, the ACCESS/CHARGEindicator blinks to indicate that the data is beingloaded, and the PRINTING indicator lights whenprinting starts.If print paper runs out during printing:The printer beeps repeatedly, and the PAPER/RIBBON alarm indicator on the top panel blinksrapidly (at intervals of about 0.25 second). Loadprint paper in the paper feed cassette. Theremaining image copies will be printedautomatically. Usually, the ink ribbon cartridge runsout at the same time as the print paper. When thisoccurs, replace the ink ribbon cartridge beforeadding print paper.If the ink ribbon cartridge runs out during printing:The printer beeps repeatedly, and the PAPER/RIBBON alarm indicator on the top panel blinksslowly (at intervals of about 0.5 second). Wait untilthe print paper comes out and then replace the inkribbon cartridge with a new one. The remainingimage copies will be printed automatically when thecartridge compartment lid is closed.
Basic Printing
3
29

• Do not disconnect theAC adapter duringprinting, even if theoptional rechargeablebattery is loaded in theprinter. Also do notconnect the AC adapterduring battery-poweredprinting operation.Otherwise, normalprinting may beimpossible.
• Do not disconnect theAC adapter or removethe optional rechargeablebattery during printing.This can make itimpossible to remove theink ribbon cartridge orcause a paper jam.Printer malfunction mayresult if the printer is leftin this condition. Shouldyou disconnect orremove the powersupply by mistake, turnthe printer ON again andrestart printing from thebeginning.
• The printing process isrepeated 4 times for eachprinted sheet. Therefore,you should never pullout a sheet by hand evenwhen it protrudes fromthe printer.
• Do not stack prints. Alsodo not allow the printsurface to come intoextended contact withPVC, plastic or an erasercontaining plastic.Otherwise, the printedimage may be transferredon it.
To cancel printing:Press and hold the POWER button for more than 1.5second. The control panel will turn off and the printerwill turn OFF.If printing is canceled, printing stops and the printerturns OFF. Printing of any non-print copies is alsocanceled.
Basic Printing30
Other Printing Functions
Making split prints
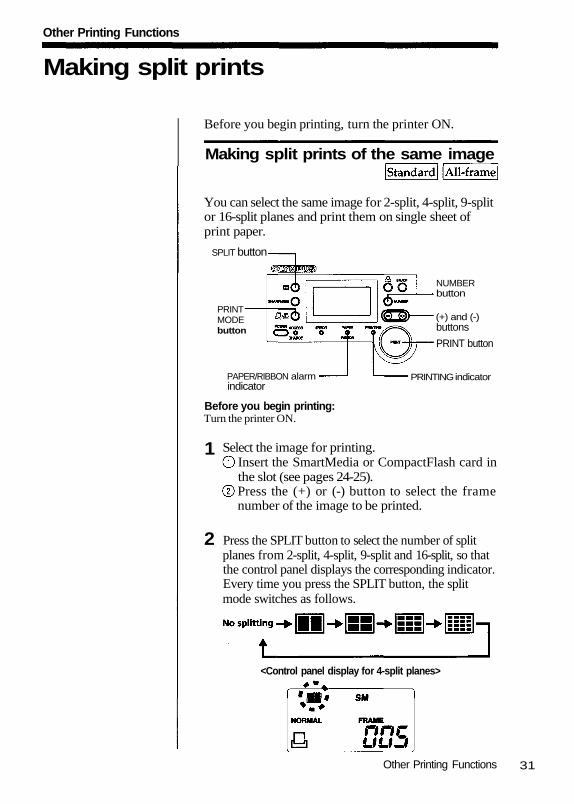
You can select the same image for 2-split, 4-split, 9-splitor 16-split planes and print them on single sheet ofprint paper.
SPLIT button
NUMBERbutton
(+) and (-)buttons
PRINT button
PRINTING indicatorPAPER/RIBBON alarmindicator
Before you begin printing:Turn the printer ON.
Select the image for printing.Insert the SmartMedia or CompactFlash card inthe slot (see pages 24-25).Press the (+) or (-) button to select the framenumber of the image to be printed.
Press the SPLIT button to select the number of splitplanes from 2-split, 4-split, 9-split and 16-split, so thatthe control panel displays the corresponding indicator.Every time you press the SPLIT button, the splitmode switches as follows.
<Control panel display for 4-split planes>
Other Printing Functions
2
Before you begin printing, turn the printer ON.
Making split prints of the same image
PRINTMODEbutton
31
1
Press the NUMBER button to select the number ofprint copies displaySelect the desired number of print copies with the(+) or (-) button. Any number between 1 and 25 canbe selected (see step 2 on page 28).
Press the PRINT button.The PRINTING indicator lights and the image willbe printed in the selected number of split planes(see step 3 on page 29).
You can print up to 30 successive images recorded in aSmartMedia or CompactFlash card on a single sheet ofprint paper by designating the last frame number ofthe desired 30 successive frame Nos. Index printing isuseful when you want to choose which image to printor you need an image list in the form of thumbnails.(While the file names assigned by digital cameras areusually composed of 7 digits, this printer prints onlyfiles whose highest three digits are the same anddistinguishes the file names by the lower 4 digits.When you want to change the higher 3 digits of the filenames, see page 27.)
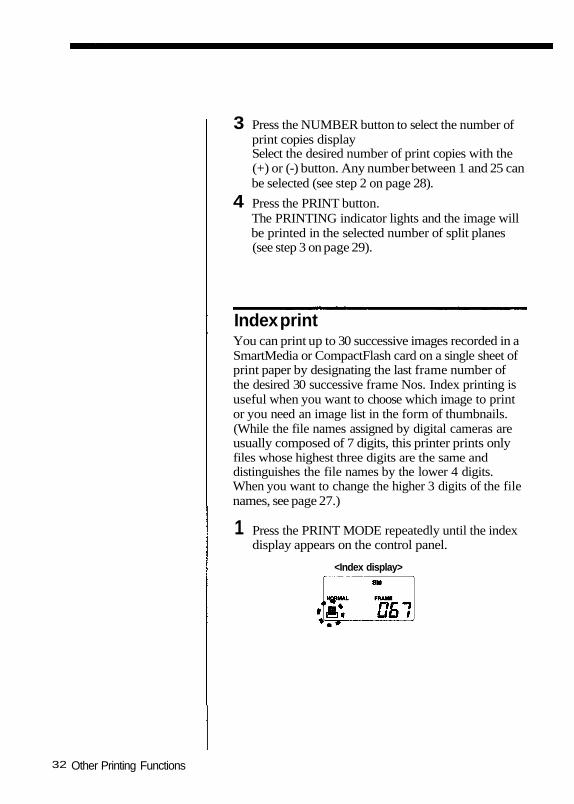
Press the PRINT MODE repeatedly until the indexdisplay appears on the control panel.
<Index display>
Other Printing Functions
3
4
1
Index print
32
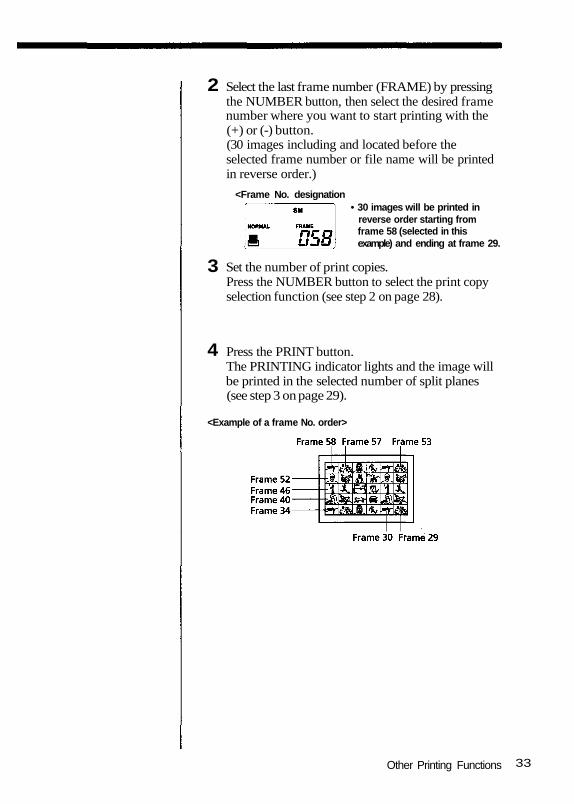
Select the last frame number (FRAME) by pressingthe NUMBER button, then select the desired framenumber where you want to start printing with the(+) or (-) button.(30 images including and located before theselected frame number or file name will be printedin reverse order.)
<Frame No. designation• 30 images will be printed in
reverse order starting fromframe 58 (selected in thisexample) and ending at frame 29.
Set the number of print copies.Press the NUMBER button to select the print copyselection function (see step 2 on page 28).
Press the PRINT button.The PRINTING indicator lights and the image willbe printed in the selected number of split planes(see step 3 on page 29).
<Example of a frame No. order>
Other Printing Functions
2
3
4
33
Printing all recorded images in aSmartMedia or CompactFlash card
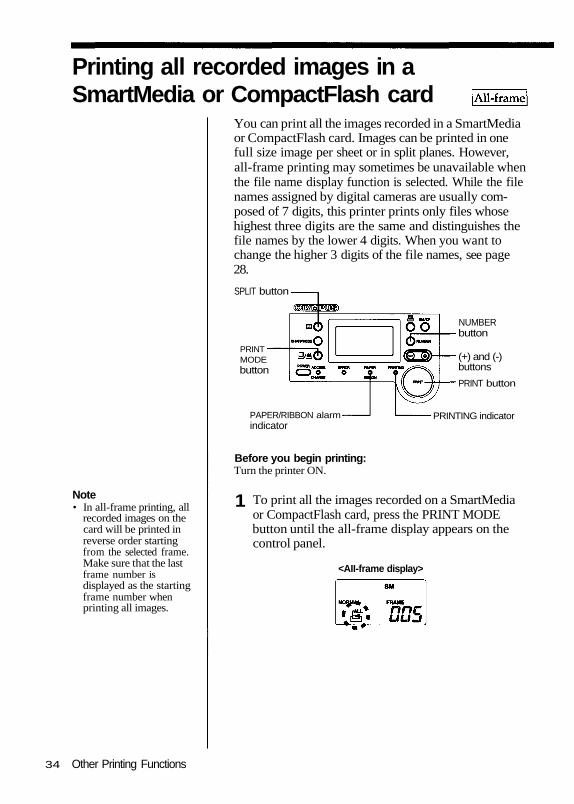
Note• In all-frame printing, all
recorded images on thecard will be printed inreverse order startingfrom the selected frame.Make sure that the lastframe number isdisplayed as the startingframe number whenprinting all images.
Other Printing Functions
You can print all the images recorded in a SmartMediaor CompactFlash card. Images can be printed in onefull size image per sheet or in split planes. However,all-frame printing may sometimes be unavailable whenthe file name display function is selected. While the filenames assigned by digital cameras are usually com-posed of 7 digits, this printer prints only files whosehighest three digits are the same and distinguishes thefile names by the lower 4 digits. When you want tochange the higher 3 digits of the file names, see page28.
SPLIT button
PAPER/RIBBON alarmindicator
NUMBERbutton
(+) and (-)buttons
PRINT button
PRINTING indicator
Before you begin printing:Turn the printer ON.
To print all the images recorded on a SmartMediaor CompactFlash card, press the PRINT MODEbutton until the all-frame display appears on thecontrol panel.
<AII-frame display>
PRINTMODEbutton
34
1

Press the NUMBER button to select the framenumber display function (FRAME).Select the first frame number to be printed with the(+) or (-) button. All-frame printing starts from theselected frame number, and images are printed inreverse order. During printing, the frame numberdisplay on the control panel shows the framenumber being printed. When all-frame printingends, the frame number selected at the beginning ofthe printing is displayed again.
Press the SPLIT button to select the desired numberof split planes.To print images one by one at full size, turn off allthe split indicators on the control panel.To print images one by one in split planes, turn onthe 2-split, 4-split, 9-split or 16-split indicator on thecontrol panel (see step 2 on page 31).
Press the NUMBER button to select the number ofprint copies selection function.Select the number of print copies with the (+) or (-)button. Any number between 1 and 25 can beselected (see step 2 on page 28).
Press the PRINT button.The PRINTING indicator lights and the image willbe printed in the selected number (see step 3 onpage 29).
Other Printing Functions
All-frame printing
2
3
4
35
Printing DPOF-reserved images
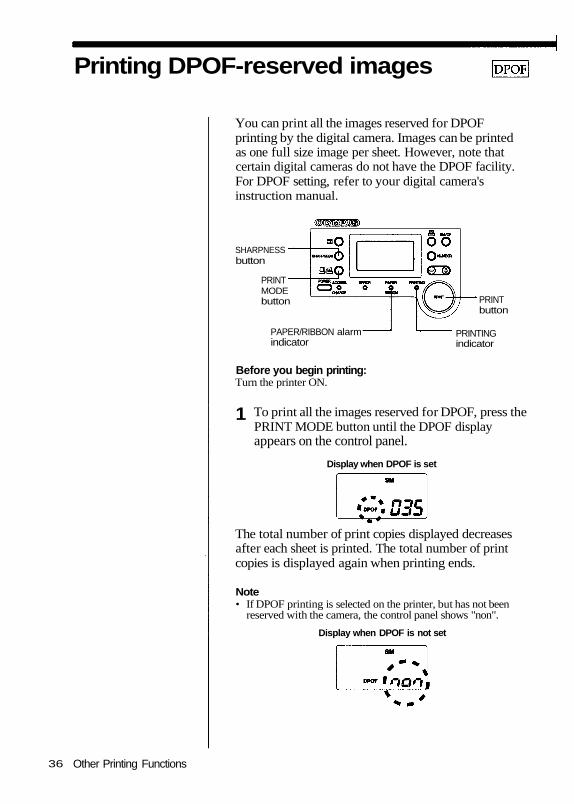
You can print all the images reserved for DPOFprinting by the digital camera. Images can be printedas one full size image per sheet. However, note thatcertain digital cameras do not have the DPOF facility.For DPOF setting, refer to your digital camera'sinstruction manual.
Before you begin printing:Turn the printer ON.
To print all the images reserved for DPOF, press thePRINT MODE button until the DPOF displayappears on the control panel.
Display when DPOF is set
Other Printing Functions
SHARPNESSbutton
PRINTMODEbutton PRINT
button
PAPER/RIBBON alarmindicator
PRINTINGindicator
The total number of print copies displayed decreasesafter each sheet is printed. The total number of printcopies is displayed again when printing ends.
Note• If DPOF printing is selected on the printer, but has not been
reserved with the camera, the control panel shows "non".
Display when DPOF is not set
36
1

Notes• DPOF allows printing of
images designated byOlympus digital camerasprovided with the DPOFreservation facility.
• When DPOF reservationis used, only sharpnesscan be adjusted with thisprinter.
• If trimming is specifiedin the DPOF reservation,printing may take longer.
• DPOF reservation iscompatible with dateprinting, print copiesselection and trimming.
Press the PRINT button.The PRINTING indicator lights and the image willbe printed in the selected number of split planes(see step 3 on page 29).
Printing the date
You can print the date recorded together with images ina SmartMedia or CompactFlash card.
SPLIT button
PRINTMODEbutton
PAPER/RIBBON alarmindicator
Date
DATE button
NUMBERbutton
(+) and (-)buttons
PRINT button
PRINTING indicator
• The date is set by the digital camera. For date setting, refer toyour digital camera's instruction manual.
Other Printing Functions
2
(Date printing)
37
Before you begin:
2
Select the image for printing.When the standard indicator or one of the splitprint indicators is selected above, press theNUMBER button to select the frame numberselection function. Then select the frame numberof the desired image with the (+) or (-) button.When the ALL-frame indicator is selected above,select the frame number where you want to startprinting.
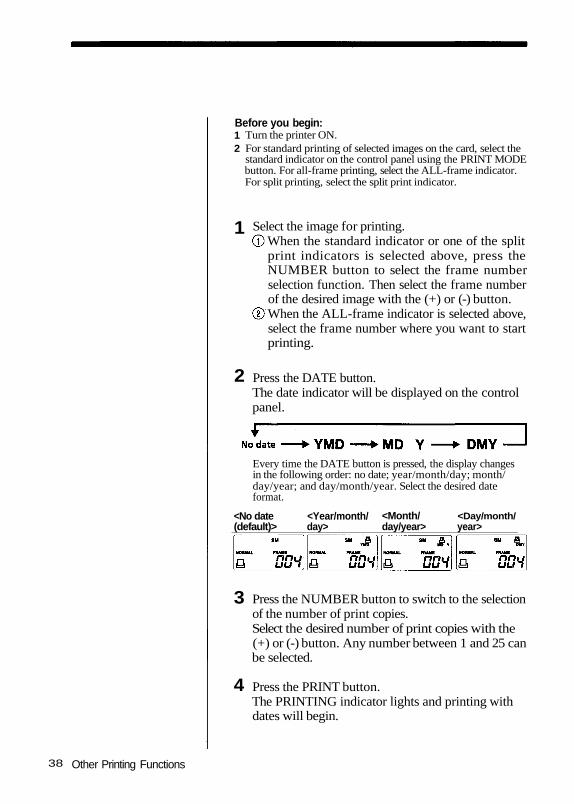
Press the DATE button.The date indicator will be displayed on the controlpanel.
Every time the DATE button is pressed, the display changesin the following order: no date; year/month/day; month/day/year; and day/month/year. Select the desired dateformat.
<No date(default)>
<Year/month/day>
<Month/day/year>
<Day/month/year>
Press the NUMBER button to switch to the selectionof the number of print copies.Select the desired number of print copies with the(+) or (-) button. Any number between 1 and 25 canbe selected.
Press the PRINT button.The PRINTING indicator lights and printing withdates will begin.
Other Printing Functions
2
3
4
Turn the printer ON.For standard printing of selected images on the card, select thestandard indicator on the control panel using the PRINT MODEbutton. For all-frame printing, select the ALL-frame indicator.For split printing, select the split print indicator.
38
1
1
Adjusting the sharpness
Note• With some types of
images, the contour maybe excessively enhanced.
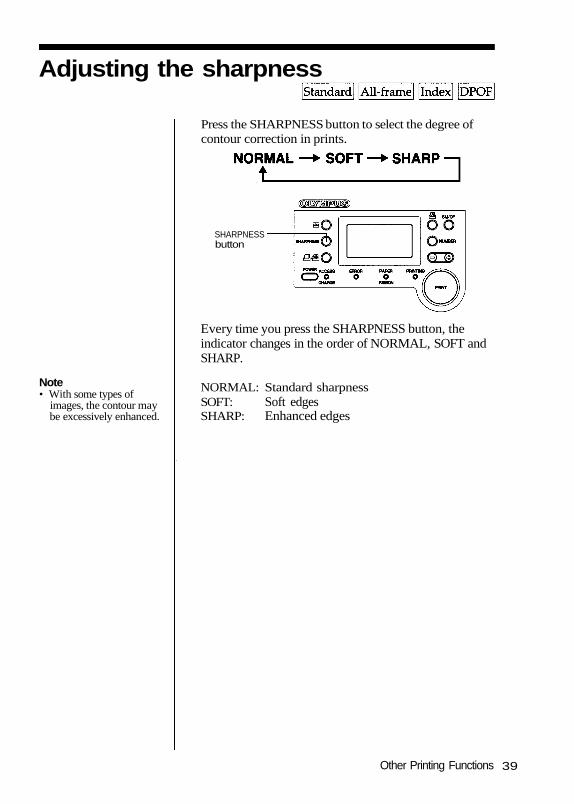
Press the SHARPNESS button to select the degree ofcontour correction in prints.
SHARPNESSbutton
Every time you press the SHARPNESS button, theindicator changes in the order of NORMAL, SOFT andSHARP.
Other Printing Functions
NORMAL:SOFT:SHARP:
Standard sharpnessSoft edgesEnhanced edges
39

For Your Information
Troubleshooting
Use the following measures to solve problems you mayexperience with your printer, and also read the Installa-tion Guide provided with the optional P-200 connec-tion kit. If the problem persists, contact you dealer.
For Your Information
Cannot turn the printer ON.The AC adapter is not connected.
Connect the AC adapter properly. (Page 15)Rechargeable battery is not installed.
Install the rechargeable battery. (Page 16)The remaining battery power is low.
Fully recharge the rechargeable battery. (Page 16)
Cannot operate the printer with any of operation buttons.When the ACCESS/CHARGE indicator blinks orPRINTING indicator lights, the printer is communicatingwith the PC.
The buttons on the printer are defeated duringcommunication. Wait a few moments. (Pages 24-25)
When only the battery frame is displayed on it, theremaining battery power is low.
Recharge the rechargeable battery. (Page 16)Cannot remove the ink ribbon cartridge.
The printer is OFF.Turn the printer ON again and wait until the mechani-cal sound stops.
Printing takes a long time to start.The printer takes a long time to print a TIFF file.
The printer takes about 3 minutes to print a 3-million-pixel TIFF image file. (Actual time varies depending onthe image size.) Wait until the file printing completes.
Trimming reserved by DPOF takes a long time.Trimming takes about 2 minutes. Wait until the fileprinting completes.
Cannot print.The ink ribbon cartridge is not installed.
Install an ink ribbon cartridge. (Page 18)The paper feed cassette is not installed.
Install the paper feed cassette. (Page 21)Print paper is jammed at the paper exit.
Remove jammed paper and retry printing. (Page 21)The printer cannot recognize the image format.
Printing from the card is not possible.Indicator(s) light(s) or blink(s).
See pages 41-42.
40
For Your Information
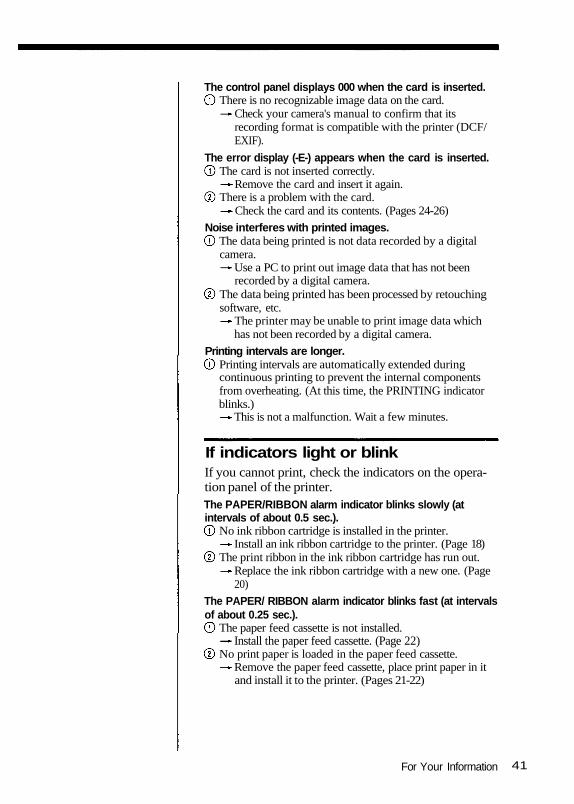
The control panel displays 000 when the card is inserted.There is no recognizable image data on the card.
Check your camera's manual to confirm that itsrecording format is compatible with the printer (DCF/EXIF).
The error display (-E-) appears when the card is inserted.The card is not inserted correctly.
Remove the card and insert it again.There is a problem with the card.
Check the card and its contents. (Pages 24-26)
Noise interferes with printed images.The data being printed is not data recorded by a digitalcamera.
Use a PC to print out image data that has not beenrecorded by a digital camera.
The data being printed has been processed by retouchingsoftware, etc.
The printer may be unable to print image data whichhas not been recorded by a digital camera.
Printing intervals are longer.Printing intervals are automatically extended duringcontinuous printing to prevent the internal componentsfrom overheating. (At this time, the PRINTING indicatorblinks.)
This is not a malfunction. Wait a few minutes.
If indicators light or blinkIf you cannot print, check the indicators on the opera-tion panel of the printer.The PAPER/RIBBON alarm indicator blinks slowly (atintervals of about 0.5 sec.).
No ink ribbon cartridge is installed in the printer.Install an ink ribbon cartridge to the printer. (Page 18)
The print ribbon in the ink ribbon cartridge has run out.Replace the ink ribbon cartridge with a new one. (Page20)
The PAPER/ RIBBON alarm indicator blinks fast (at intervalsof about 0.25 sec.).
The paper feed cassette is not installed.Install the paper feed cassette. (Page 22)
No print paper is loaded in the paper feed cassette.Remove the paper feed cassette, place print paper in itand install it to the printer. (Pages 21-22)
41
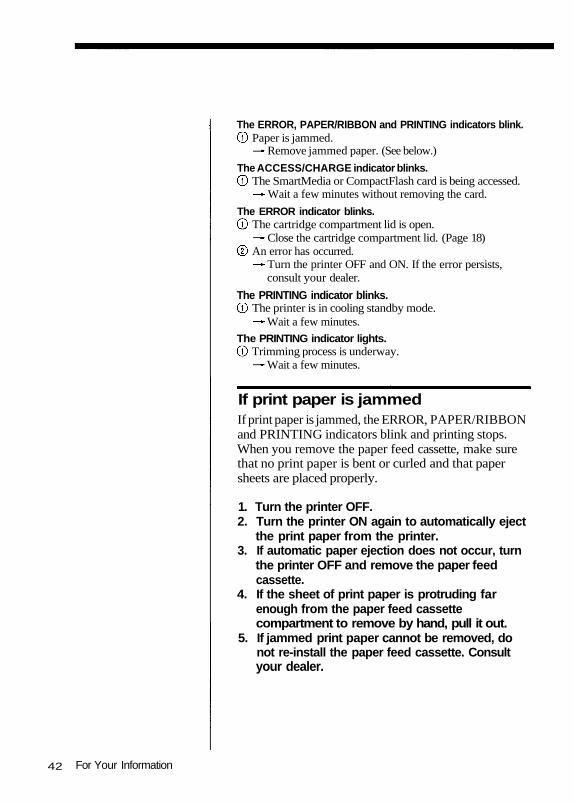
The ERROR, PAPER/RIBBON and PRINTING indicators blink.Paper is jammed.
Remove jammed paper. (See below.)
The ACCESS/CHARGE indicator blinks.The SmartMedia or CompactFlash card is being accessed.
Wait a few minutes without removing the card.
For Your Information
The ERROR indicator blinks.The cartridge compartment lid is open.
Close the cartridge compartment lid. (Page 18)An error has occurred.
Turn the printer OFF and ON. If the error persists,consult your dealer.
The PRINTING indicator blinks.The printer is in cooling standby mode.
Wait a few minutes.The PRINTING indicator lights.
Trimming process is underway.Wait a few minutes.
If print paper is jammedIf print paper is jammed, the ERROR, PAPER/RIBBONand PRINTING indicators blink and printing stops.When you remove the paper feed cassette, make surethat no print paper is bent or curled and that papersheets are placed properly.
1. Turn the printer OFF.2. Turn the printer ON again to automatically eject
the print paper from the printer.3. If automatic paper ejection does not occur, turn
the printer OFF and remove the paper feedcassette.
4. If the sheet of print paper is protruding farenough from the paper feed cassettecompartment to remove by hand, pull it out.
5. If jammed print paper cannot be removed, donot re-install the paper feed cassette. Consultyour dealer.
42
If you open the cartridge compartment lid bymistake during printing:
1. Close the cartridge compartment lid to eject printpaper automatically.
2. If the print paper is not ejected automatically, removethe paper feed cassette and remove the print paperprojecting from the paper feed cassette compartmentby hand.
If you remove the paper feed cassette by mistakeduring printing:
1. Printing of the current sheet will continue untilfinished. After the sheet has been ejected, the ERRORindicator will light. Install the paper feed cassette.
2. When the print paper feed operation stops and theERROR indicator lights —
If no print paper is seen through the inlet of thepaper feed cassette compartment, install the paperfeed cassette to eject print paper automatically.If a sheet of print paper is projecting from thepaper feed cassette compartment, remove it byhand. If the paper cannot be removed by hand oris stuck inside the paper feed cassettecompartment, do not install the paper feedcassette. Call your dealer.
For Your Information 43

About the ink ribbon cartridge andprint paper
For Your Information
Always use the ink ribbon cartridge and print paperspecified by Olympus.
They are available by ordering the followingOlympus model number (as of October 2000).Print Pack, Standard Set:The standard set contains an ink ribbon cartridgeand sheets of print paper.
The ink ribbon cartridge is not reusable.The ink ribbon cartridge is not reusable once theink ribbon runs out.When the ink ribbon runs out, the PAPER/RIBBON indicator blinks slowly (at intervals ofabout 0.5 second). Replace the ink ribbon cartridgewith a new one.
Do not use wet print paper.If you use wet print paper, printing is not possible andthe printer may also malfunction.
Do not use bent print paper. Otherwise, paper jammay result.When the printer is not to be used for an extendedperiod of time, remove the print paper from thepaper feed cassette and store the paper in a bag inorder to protect the paper from dust and preventpossible deformation.Do not open the packages containing the ink ribboncartridge and print paper until immediately beforeuse.Read the notes printed on the ink ribbon cartridgeand print paper packages.
Storage after printingDo not allow the print surface to come in contactwith scotch tape, a desk pad or an eraser containingplastic for an extended period of time. Otherwise, theprint surface may be discolored.Do not store ink ribbon cartridges and print paper ina place subject to direct sunlight, high temperature/humidity or in the reach of children.Dispose of a used ink ribbon cartridge in compliancewith the plastic waste disposal method prescribed byyour local authorities.
P-25N
44
Specifications
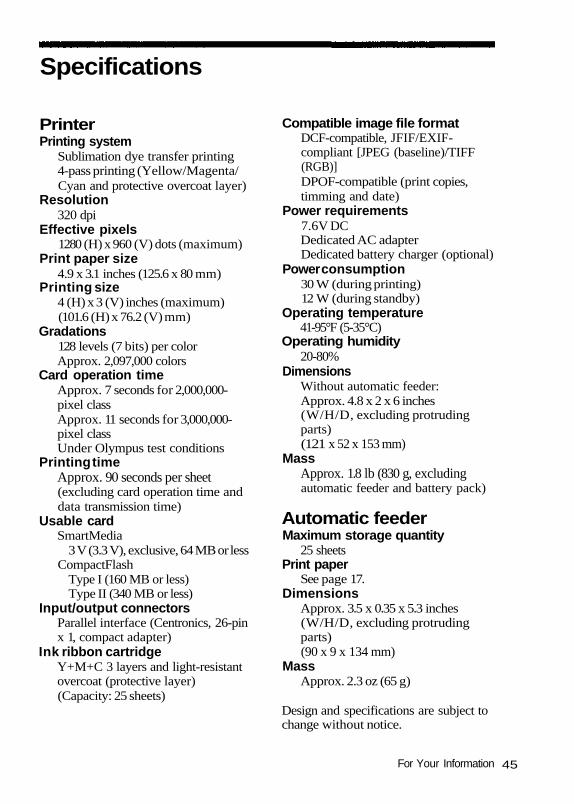
PrinterPrinting system
Sublimation dye transfer printing4-pass printing (Yellow/Magenta/Cyan and protective overcoat layer)
Resolution320 dpi
Effective pixels1280 (H) x 960 (V) dots (maximum)
Print paper size4.9 x 3.1 inches (125.6 x 80 mm)
Printing size4 (H) x 3 (V) inches (maximum)(101.6 (H) x 76.2 (V) mm)
Gradations128 levels (7 bits) per colorApprox. 2,097,000 colors
Card operation timeApprox. 7 seconds for 2,000,000-pixel classApprox. 11 seconds for 3,000,000-pixel classUnder Olympus test conditions
Printing timeApprox. 90 seconds per sheet(excluding card operation time anddata transmission time)
Usable cardSmartMedia
3 V (3.3 V), exclusive, 64 MB or lessCompactFlash
Type I (160 MB or less)Type II (340 MB or less)
Input/output connectorsParallel interface (Centronics, 26-pinx 1, compact adapter)
Ink ribbon cartridgeY+M+C 3 layers and light-resistantovercoat (protective layer)(Capacity: 25 sheets)
Compatible image file formatDCF-compatible, JFIF/EXIF-compliant [JPEG (baseline)/TIFF(RGB)]DPOF-compatible (print copies,timming and date)
Power requirements7.6V DCDedicated AC adapterDedicated battery charger (optional)
Power consumption30 W (during printing)12 W (during standby)
Operating temperature41-95°F (5-35°C)
Operating humidity20-80%
DimensionsWithout automatic feeder:Approx. 4.8 x 2 x 6 inches(W/H/D, excluding protrudingparts)(121 x 52 x 153 mm)
MassApprox. 1.8 lb (830 g, excludingautomatic feeder and battery pack)
Automatic feederMaximum storage quantity
25 sheetsPrint paper
See page 17.Dimensions
Approx. 3.5 x 0.35 x 5.3 inches(W/H/D, excluding protrudingparts)(90 x 9 x 134 mm)
MassApprox. 2.3 oz (65 g)
Design and specifications are subject tochange without notice.
For Your Information 45

FCC notice
This equipment generates and uses radio frequencyenergy and if not installed and used properly, that is, instrict accordance with the manufacturer's instructions,may cause interference to radio and television recep-tion. It has been type tested and found to comply withthe limits for a Class B computing device in accordancewith the specifications in Subpart J of Part 15 of FCCRules, which are designed to provide reasonableprotection against such interference in a residentialinstallation. However, there is no guarantee thatinterference will not occur in a particular installation. Ifthis equipment does cause interference to radio ortelevision reception, which can be determined byturning the equipment off and on, the user is encour-aged to try to correct the interference by one or more ofthe following measures:- reorient the receiving antenna- relocate the computer with respect to the receiver- move the computer away from the receiver- plug the computer into a different outlet so that
computer and receiver are on different branchcircuits.
If necessary, the user should consult the dealer or anexperienced radio-television technician for additionalsuggestions. The user may find the following bookletprepared by the Federal Communications Commissionhelpful: "How to Identify and Resolve Radio-TVInterference Problems." This booklet is available fromthe U.S. Government Printing Office, Washington,D.C., 20402, Stock No. 004-00-00345-4.
This digital apparatus does not exceed the Class Blimits for radio emissions from digital apparatus setout in the Radio Interference Regulation of the Cana-dian Department of Communications.
For Your Information46
Accessories
Print pack (standard set, P-25N)Dedicated rechargeable battery (B-200NH)PC connection kit, parallel (C-P20P)PC connection kit, USB (C-P20U)Gadget bag for P-200SmartMedia (8 MB/16 MB/32 MB/64 MB)
For Your Information
(as of October 2000)
47
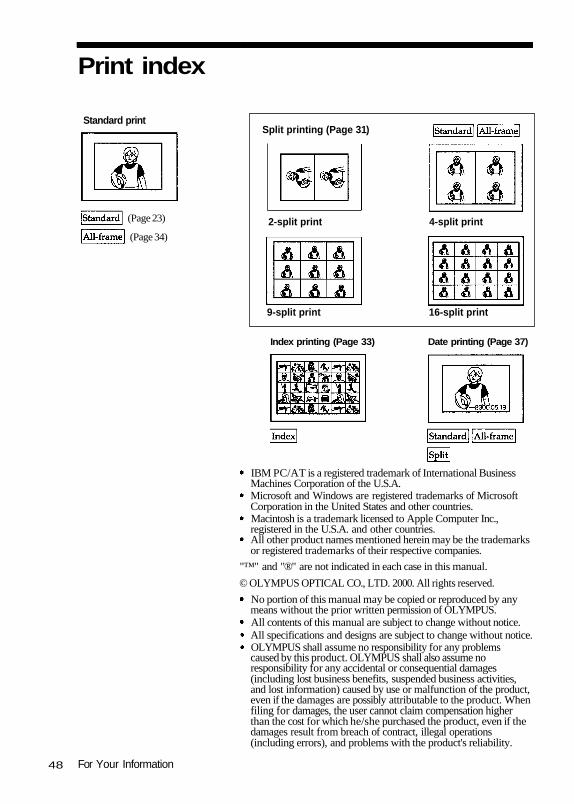
Print index
Standard print Split printing (Page 31)
2-split print 4-split print
9-split print 16-split print
Index printing (Page 33) Date printing (Page 37)
IBM PC/AT is a registered trademark of International BusinessMachines Corporation of the U.S.A.Microsoft and Windows are registered trademarks of MicrosoftCorporation in the United States and other countries.Macintosh is a trademark licensed to Apple Computer Inc.,registered in the U.S.A. and other countries.All other product names mentioned herein may be the trademarksor registered trademarks of their respective companies.
"™" and "®" are not indicated in each case in this manual.
© OLYMPUS OPTICAL CO., LTD. 2000. All rights reserved.
For Your Information
No portion of this manual may be copied or reproduced by anymeans without the prior written permission of OLYMPUS.All contents of this manual are subject to change without notice.All specifications and designs are subject to change without notice.OLYMPUS shall assume no responsibility for any problemscaused by this product. OLYMPUS shall also assume noresponsibility for any accidental or consequential damages(including lost business benefits, suspended business activities,and lost information) caused by use or malfunction of the product,even if the damages are possibly attributable to the product. Whenfiling for damages, the user cannot claim compensation higherthan the cost for which he/she purchased the product, even if thedamages result from breach of contract, illegal operations(including errors), and problems with the product's reliability.
(Page 23)
(Page 34)
48

OLYMPUS OPTICAL CO., LTD.San-Ei Building, 22-2, Nishi Shinjuku 1-chome, Shinjuku-ku, Tokyo, Japan.
(Customer support) Tel. 0426-42-7499 Tokyohttp://www.olympus.co.jp
OLYMPUS AMERICA INC.Two Corporate Center Drive, Melville, NY 11747-3157, U.S.A. Tel. 631-844-5000
(Customer support) Tel. 1-888-553-4448http://www.olympus.com
OLYMPUS OPTICAL CO. (EUROPA) GMBH.(Premises/Goods delivery) Wendenstraße 14-16, 20097 Hamburg, Germany. Tel. 040-237730
(Letters) Postfach 10 49 08, 20034 Hamburg, Germany.http://www.olympus-europa.com
VT134001 1100 6MJ