owner's manual · your light, compact xg-7 is a top-quality single-lens reflex...
TRANSCRIPT


OWNER'S MANUAL
e

www.orphancameras.com

Your l ight , compact XG-7 is a top-qual i ty s ing le- lens re f lex camerawhoseelect ron icsystem wil l control exposure for you automatical ly, freeing you for more enjoyment
and greater creativi ty. You can also override the.meter's automatic sett ing or set the
camera for fu l l manual operat ion. E lect romagnet ic shut ter re lease and un ique "Touch
switchl ' metering, head a host of other features. Attaching the accessory Auto Winder
G enables single-frame/continuous motor f i lm advance up to 2 frameslsec. Minolta's
special Auto Electrof lash 200X electronical ly switches the XG-7's shutter over for
strobe exposures when charged and signals f lash-ready in the f inder; i t also enablescont inuous-sequence f lash wi th the winder . Bes ides new MD lenses, your XG-7 usesv i r tua l ly a l l in terchangeable Rokkor-X and Cel t ic lenses made to date and a l lappl icable Minolta SLR system accessories.
Before using your camera for the f irst t ime, study this manual careful ly al l the way
through - or at least al l the sections needed to cover your own photographic needs. Asyou read, attach a lens to the camera body (see p. 10), load batteries, and handle your
XG-7 and acquaint yourself with i ts parts and features. Then load i t with f i lm andproceed to actual picture taking. In this way, you can take good photos and begin toreal ize the broad potential of your XG-7 r ight from the start. Be sure to keep thismanual for reference later as necessary.
Minolta precision lenses and accessories are manufactured under high quali ty
control standards and are designed to the performance requirements of Minolta camerabodies. We recommend Minolta Rokkor-X and Celt ic lenses and Minolta systemaccessories for al l types of photography.

CONTENTS
M A I N F E A T U R E S , . . . 4
N A M E S O F P A R T S . . . . 6
SUMMARY OF OPERATION( i n a u t o m a t i c ) . . . . . . . 9
ATTACHING AND REMOVING LENSES 1O
B A T T E R I E S A N D P O W E R . . . . . . . 1 1I n s t a l l i n g b a t t e r i e s . . . 1 1T e s t i n g b a t t e r i e s . . . . 1 2O p e r a t i n g s w i t c h . . . . 1 3Touchsw i t ch /opera t ingbu f ton . . . 13Cold-weather operation 14
LOADING AND ADVANCING F ILM . . . . 14Fif m advance lever and frame counter . . . 17
F I L M S P E E D . . . 1 8F i l m - s p e e d s e l e c t o r . . l gASA/DIN convers ion sca le . . . . . . 19
Memo holder
EXPOSURE CONTROLFUNDAMENTALS
METERING WITH THE XG-7
V IEWFINDER
AUTOMATIC EXPOSURE CONTROLAutomatic operationEyepiece cap . .
WAYS OF USING AUTO MODE
AUTOMATIC EXPOSUREADJUSTMENT . .
WHEN AND HOW MUCH TO USE
MANUAL EXPOSURE CONTROL"B" setting
HOLDING THE CAMERA
1 9
20
2 1
22
242425
26
29
30
3233
34
www.orphancameras.com

tl
FOCUSINGDepth of f ie ldDepth of - f ie ld scaleln f ra red index .
R E L E A S I N G T H E S H U T T E R
S E L F T I M E R
R E W I N D I N G A N D U N L O A D I N GF I L M
FLASH PHOTOGRAPHYSynch ron izat ionConnect ing f lash uni ts
USING OTHER THAN MD ANDMC LENSESAuto Rokkor lensesRF (mirror- type) and Manual-Preset
lenses
XG-7 SYSTEM ACCESSOR I ES
Auto Winder GAuto Electrof lash 200XRemote Cord S and L
STANDAR D.LENS SPECI F ICATIONS
C A M E R A S P E C I F I C A T I O N S
CARE AND STORAGE
3536363 738
40
4 1
434343
4444
44
45464748
49
50
52
t;

MAIN FEATURES
Fail+afe electronic €xposure systemIncorporat ing many of the features devel-
oped for Minol ta 's top electronic cameras, theXG-7 covers a wide range of photographiccond i t i ons . l t s e lec t ron ic shu t te r wh ich au to -mat ical ly locks to prevent overexposure andelectromagnet ic shut ter re lease wi th uniquetouch swi tch meter ing add to the handl ing easeof the camera.The XG-7's system features:o Ful l automat ic exposure by stepless shut ter
speeds f rom 1 /1000 to 1 sec . p lus f u l lmanua l se t t i ngs .
o Electromagnet ic shut ter re lease.o Unique Touch swi tch meter ing.o Shutter-re lease lock prevents overexposure
when l ight over meter 's range or bat terypower low.
o Two t iny s i lver-oxide bat ter ies as power. sou rce .
Solid-state information viewf indero Focusing can be done in three ways: By the
spl i t - image spot or micropr ism focusing aidor on the matte f ie ld.
. Automat ic shut ter speeds, indicated byLED 's a re v i s ib le wh i le you v iew.
o LED at "60" posi t ion bl inks as f lash-readysignal when Auto Electrof lash 20OX isat tached and charged.
Easy handling controlsLightweight and compact, the XG-7 is hu-
man engineered to f i t the user 's hands forsmooth operat ion:o Smooth short st roke f i lm advance.o Large easy to adjust shutter-speed dia,.o "Sof t - touch" e lectromagnet ic shut ter re-
lease.o Curve formed body wi th cushioned body
gr ip .o M ino l ta bayone t l ens moun t w i th l a rge
release but ton.o Balanced wi nder operat ion.
www.orphancameras.com
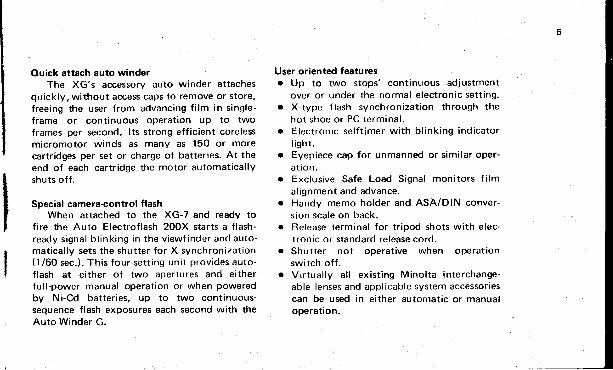
Ouick attach auto wind€rThe XG's accessory auto winder at taches
quickly, wi thout access caps to remove or store,f reeing the user f rom advancing f i lm in s ingle-f rame or cont inuous operat ion up to twoframes per second. lts strong efficient corelessmicromotor winds as many as 150 or morecartridges per set or charge of batteries. At theend of each cartridge the motor automaticallyshuts of f .
Special camera-control flashWhen attached to the XG-7 and ready to
f i re the Auto Electrof lash 200X star ts a f lash-ready s igna l b l i nk ing in the v iewf i nde r and au to -mat ical ly sets the shut ter for X synchronizat ion(1/60 sec.) . This four-set t ing uni t provides auto-f lash at e i ther of two apertures and ei therfu l l -power manual operat ion or when poweredby Ni-Cd bat ter ies, up to two cont inuous-sequence flash exposures each second with theAuto Winder G.
User oriented featureso Up to two stops' cont inuous adjustment
over or under the normal e lectronic set t ing.o X-type f lash synchronizat ion through the
ho t shoe o r PC te rm ina l .o E lec t ron ic se l f t imer w i th b l i nk ing ind ica to r
l ight .o Eyepiece cap for unmanned or s imi lar oper-
a t i on .o Exclusive Safe Load Signal moni tors
al ignment and advance.o Handy memo holder and ASA/DlN conver-
s ion scale on back.o Release terminal for t r ipod shots wi th e lec-
tronic or standard release cord.o Shutter not operat ive when operat ion
switch off.o Vir tual ly a l l ex ist ing Minol ta interchange-
able lenses and appl icable system accessor iescan be used in e i ther automat ic or manualoperat ion.

NAMES OF PARTS6
F i lm-advance lever
Touch swi tch/operat ing but ton
Frame-counter window
Safe Load Signal
Auto-set t ing re lease
Strap lug
Fi lm-speed window
Se lf- t i mer/battery-check ind icator
MC coup ler lug
Aperture scale
Depthof-field scale
Aperture ring
Distance scale
Hot shoe
Shu tter-speed/f u n ct io nselector
Main swi tch
Rewind crank
Back cover release knob
Lens-release button
Shutter release socket
X sync. termina l
ocus ing gr ip
www.orphancameras.com

Finder eyepiece
Shut ter cur ta in
Sprocket
Take<rp spool
Back cover
Pressure plate
Tripod socket
Winder te rmina l
Battery chamber cover
Rewind but ton
Auto-winder couple
Guide-p in socket

rs pagemode.easy I
o n i lnat i cvery
red oru tomaOW V€
steps picturXG-7 on auidea of ho
Theo f you rgeneral
SUMMARY OF OPERATION (on automat ic)
o u t l i n e u s eThey give at is to get
1 Check bat ter ies (see p. 12) 2
Set selector d ia l to "A"lp.24l-
perfect ly exposed pictures wi th th is camera andare keyed to corresponding sect ions of themanual for ready reference. This br ief guide
th i s 1c m (
v e a
7
Move main swi tch to" o N " ( p . 1 3 )
8 Se t l ens aper tu re (p .24 lI Adiust focus (p. 35)
www.orphancameras.com

may also be useful for good resul ts af ter you
have not used the camera for some t ime. l t is
not , however, a subst i ture for the detai led
Load f i lm p roPer lY ;c lose
"ousy (p . 14 )
ins t ruc t i ons in the res t o f t h i s manua l , wh ich
should be thoroughly studied for best resul ts.
tZ ir:i ' i i and remove rirm
6 Se t f i lm speed (p . 18 )
I t r / '
lQ ne tease shu t te r (P . 38 ) | ' l Turn power 611 (p. 131
ATTACHING AND REMOVING LENSES
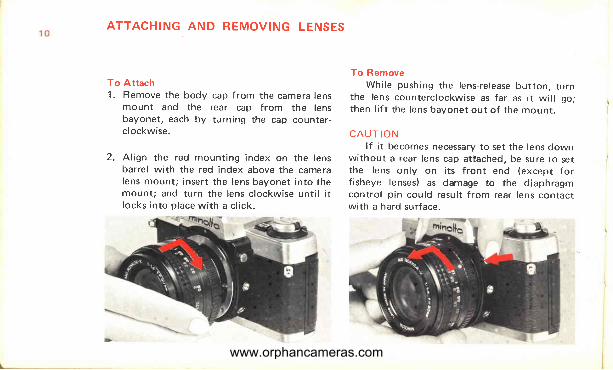
To Attach1. Remove the body cap f rom the camera lens
mount and the rear cap f rom the lensbayonet, each by turning the cap counter-c lockwise.
2. Al ign the red mount ing index on the lensbarrel wi th the red index above the cameralens mount; insert the lens bayonet into themoun t ; and tu rn the lens c lockw ise un t i l i tl ocks in to p lace w i th a c l i ck .
To RemoveWhi le push ing the lens - re lease bu t ton , tu rn
the lens counterc lockwise as far as i t wi l l go;then l i f t t he lens bayone t ou t o f t he moun t .
C A U T I O Nlf i t becomes necessary to set the lens down
without a rear lens cap at tached, be sure to setthe lens on ly on i t s f ron t end (excep t f o rf isheye lenses) as damage to the diaphragmcontrol p in could resul t f rom rear lens contactwi th a hard surface.
www.orphancameras.com

BATTERIES AND POWER
Two 1.S-vol t s i lver-oxide bat ter ies, Eveready5-76 or equivalent , supply the power for themeter, e lectronic exposure contro l , e lec-t romagnet ic re lease, e lectronic shut ter set t ings,and LED ind ica t ion .
C A U T I O No The shut ter wi l l not re lease when the
operat ing but ton is pushed i f : bat tery power
is too low; the operat ing swi tch is at"OFF," exposure condi t ions exceed therange of the automat ic exposure system.
o Do not use 1 .3v mercury bat ter ies, EvereadyEPX-675 o r equ iva len t , wh ich have a s im i la rshape.
N O T E. l f the camera is not be used for more than
two weeks, it is advisable to remove the
batteries.o Fresh spare batteries may be stored in
the bat tery holder provided wi th the camera
strap.
Instal l ing bat ter ies1 . Us ing a co in o r s im i la r ob jec t , t u rn the
batterychamber cover counterc lockwiseand remove i t .
2 . A f te r w ip ing te rm ina ls w i th a c lean d ryc lo th and hand l ing on ly by the edges , i nse r ttwo of the speci f ied bat ter ies plus (+) s ideout into the s leeve on the inside of thecover. ( l f bat ter ies are inserted imprdper ly,they wi l l not make contact , and no currentw i l l f l ow . )

3. Replace the cover and screw i t in c lockwiseas fa r as i t w i l l go .
Testing batteriesMove the main swi tch to a l ign the index
with "B.C." l f the red bat terycheck indicatoron the f ront of the camera l ights, bat ter ies areserviceable. When released, the main swi tch wi l lautomat ical ly move to the "ON" posi t ion.
Test bat ter ies immediately af ter insta l l ingthem. l f the indicator does not l ight , make surethat they are f resh and'have been insertedcorrect ly .
Bat ter ies should be tested f rom t ime to t imethereafter, preferably before starting each newrol l of f i lm and part icular ly before star t ingpicture- taking sessions or t r ips. A set of bat ter-ies wi l l general ly last for about one year in
9 /i ..! .a:?
t4 4 I ..t '1 !) -
? . . j . . 4 t t ' u ' . ' ? t
/A!t) ' v6 e J. . t : .) - 4 a)
. . \ 9 n l , e l . t r.4F a 2t4t@ 4,L;! al, , t ' : ;
6t, ,P! 4:s @'/ / . t :9 @ d,.. , : : i
lj'e lb!!r@ 46 t ' :4 4:1- ro.: F +tjt :, ) qtu) o' //'
www.orphancameras.com

Main swi tchTo operate the camera, move the main
switch to "ON." This a l lows current to f low tothe Touch swi tch/operat ing but ton. The mainswitch also serves as the self-timer and batterycheck swi tch.
To prevent accidental exposures and need-less bat tery drain, a lways be sure to move thema in sw i t ch to "OFF" when no t us ing thecamera.
Touch switch/operating buttonF inger contact with the Touch switch/-
operating button activates the camera's elec-t ronic shut ter and when the shut ter-speed/-funct ion selector is set at "A" (automat ic) ,powers the electronic exposure control andLED circui ts. l f proper contact wi th the touchswitch is not possib le ( i .e. , whi le wear ing glovesor when f ingers are dry) , s l ight pressure qn thebutton will also activate the camera.

N O T EWipe o f f any dus t o r d i r t t ha t m igh t
accumulate on the touch swi tch wi th a c leandry c lo th . Th is w i l l i nsu re good con tac t andproper operat ion.
Cold-weather operat ionBatter ies by nature tend to decrease in
capaci ty as the temperature goes down. Thoughthe s i lveroxide bat ter ies used for the XG-7 aresuper ior to most others in th is respect , i t a lsohappens wi th them.
l f o ld bat ter ies are used at temperaturebef ow OoC 132" Fl , the camera's e lectronicoperat ion may not be sat is factory. You shouldthus replace older bat ter ies wi th f resh onesbefore using your XG-7 in cold weather andcarry spare f resh bat ter ies wi th you dur ing suchuse. Bat tery ,capaci ty wi l l be restores to i tsnormal level when the bat ter ies are warmed totheir recommended operat ing temperaturerange.
L O A D I N G A N D A D V A N C I N G F I L M
After you have not used your camera forsome t ime, check the safe Load s ignal andframe counter to be sure that there is no f i lm inthe camera. l f the camera is unloaded proceedas fo l l ows :1 . Pu l l ou t on the back ' cover re lease knob
unt i I the camera back spr ings open.
t
www.orphancameras.com

2 . Leav ing the knob pu l l ed ou t , pos i t i on a f i lmcartr idge in the chamber wi th the project-ing-spool end toward the bot tom of thecamera. Then push the back-cover re leaseknob a l l t he way in , ro ta t i ng i t s l i gh t l y to doso i f necessary.
3. lnsert the end of the f i lm leader as showninto one of the s lots in the take-up spool sothat the tooth is engaged wi th a sprockethold near the end of the leader. Make surethat the end of the leader does not projectf rom another s lot between tabs or l thespoo l .

4. Operate the f i lm-advance lever s lowly unt i lthe f i lm has begun to wind f i rmly aroundthe take-up spool and the sprocket teeth areengaged with holes on both edges of thef i lm. l f the advance lever stops at the end ofa fu l l s t roke dur ing th is procedure, re leasethe shut ter and cont inue.
Close the camera back and push in on i tunt i l i t c l icks loaded.A red "S" should now appear opposite theindex in the f rame+ounter window. Ad-vance f i lm and re lease the shut ter unt i l theindex points to "1" on the f ramecounterd i a l .
5.
6.
L
www.orphancameras.com

7. A red bar should also now appear at theextreme lef t in the Safe Load Signal win-dow. This indicates that the f i lm is loadedand winding proper ly on the take-up spool .lf the Safe Load Signal does not appear orswings far to the r ight in the window, repeatsteps 1 through 6 to assure that f i lm isproperly engaged on the spool. As you
cont inue to take pictures, the red s ignal wi l lmove gradual ly toward the r ight in the win 'dow, indicat ing that f i lm is aJvancing prop-
e r l y .
C A U T I O NFi lm shou ld be hand led and load ing done in
subdued l ight - at least shaded f rom direct
sunl ight by the bodY.
Fi lm-advance lever and f rame counterThe f i lm-advance lever is designed wi th 30"
unengaged movement before the beginning ofi ts engaged stroke to a l low s iwnging i t out f romthe body so that the r ight thumb wi l l f i t
comfortably behind i t . Cont inuing to mbve the
lever through i ts engaged angle of 130' , ad-vances f i lm and f rame counter and cocks theshutter for the next exposure.

When the lever stops and resists furthermovement at the end of a f i lm, never at temptto force i t far ther. (See p. 41 for instruct ionson rew ind ing and un load ing f i lm . )
The counter automat ical ly resets for f i lmloading when the camera back is opened.
F I L M S P E E D
Each f i lm on the marke t has an ASA o r D INexposure- index number to indicate i ts sensi t iv i -ty to l ight . For correct exposure, the metermust be set for the ef fect ive exposure index ofthe f i lm in use .Setting fi lm speed
To do th is, l i f t up on the knur led r ing of theshutter-speed/funct ion selector and turn i t unt i l
www.orphancameras.com

the proper ASA indicat ion appears centered in
the f i lm-speed window and locks in that posi-
t ion when the ring is released. Marks between
numbered graduat ions indicate ASA numbers as
fol lows:
Memo holderAround the ASA/D lN convers ion tab le i s a
convenient frame that can be used to keepmemos handy wi th the camera. l t is just ther igh t s ize to ho ld the f i lm-box end, wh ich canbe inserted as a reminder of the f i lm in use.
25. 3 2o 4 O50o 5 4o 8 0
100o 125o 160
200o 25O. 3 2 0
400o 500o 640
800o 10OOo 1250
1600
ASA/DlN conversion scale
A conven ien t sca le fo r conver t ing DIN to
ASA f i lm-speed rat ings is located on the back
cover of the camera.

EXPOSURE.CONTROL FUNDAMENTALS
The two camera exposure-cont ro l se t t rngsare lens open ing (aper tu re) and shut te r speed.The s ize o f the aper tu re de termines the amounto f v o l u m e o f l i g h t r e a c h i n g t h e f i l m f r o m ag iven sub jec t and l igh t ing . The shut te r speedd e t e r m i n e s t h e l e n g t h o f t i m e t h i s l i g h t a c t supon the f i lm. Aper tu res are expressed inf -numbers , wh ich are la rger fo r smal l open ingsand v ice versa (e .g . , f 116 represents a smal lopen ing , f 12 a la rge one) . Shut te r speeds areexpressed in seconds or f rac t ions thereo f , wh ichare genera l l y the rec ip roca ls o f the numbers
, shown on shut te r -speed sca les (e .g . 60 = 1 /60s e c . , a n d 2 = 1 1 2 s e c . ) . A t u s u a l a p e r t u r e s , e a c hf - n u m b e r s e t t i n g ( e . g . , f / 8 ) l e t s i n t w i c e a s m u c hf i g h t a s t h e n e x t n u m e r i c a l l y l a r g e r o n e ( i l , 1 1 1a n d h a l f a s m u c h a s t h e n e x t s m a l l e r ( f / 5 . 6 ) .S i m i l a r l y , e a c h s h u t t e r s p e e d ( e . g . , 1 / 6 0 s e c . )a l l o w s l i g h t t o s t r i k e t h e f i l m t w i c e a s l o n g a s
t he nex t h igher speed (1 l12S l and ha l f as l ongas the next lower one (1/30). The intervalbetween two standard f-numbers (say, f /4 andt15 .6 l o r shu t te r speeds (say , 1 /15 and 1 /30 ) i sone "stop." Total exposure on the f i lm isdetermined by the combinat ion of aperture andspeed . O the r th ings be ing equa l , ' us ing the nex tsma l le r f -number ( i . e . , g i v ing one s top moreexposure) wi l l balance using the next h ighershut ter speed ( i .e. , g iv ing one stop less expo_sure), and so on. A great range of combinat ions(e .9 . , f / 5 .6 a t 113O, f 14 a t 1160 , f l 2 .B a t 11125 ,f 12 at 11250, etc.) wi i l thus y ietd the same tota lexposure. The speci f ic combinat ion you chooseunder g i ven l i gh t ing cond i t i ons w i l l dependupon the degree to which you want the greaterdepth of f ie ld (see p. 36) of smal ler aperturesand the greater movement-blur prevent ing abi l i_ty of faster speeds (p. 28).
I
4
I
www.orphancameras.com

l-l
I
2 1
METERING WITH THE XG-7(Automat ic mode only)
The "centra\-zone weighted overall" meter-ing svstem in your XG-7 emp\oys two CdS ce\\smounted behind the pentapr ism so that l ightf rom al l parts of the v iewf ie ld (p icture area) ismeasured but influence from a broad centralarea is greatest . Thus the reading should y ie ldsatisfactory exposure without ad justment aslong as the main subject area occupies a majorpart of the f rame.l f the subject area to be measured occupies arelat ively smal l part of the f rame, move thecamera so that the main subject f i l ls most ofthe f rame. Note the shut ter speed set t ing in th isposi t ion and compensate for the ex posuredi f ference wi th the shut ter-speed/funct ion se-lector or use manual speeds to set the samevalue when making the exposure f rom theor ig inal posi t ion. Further, i f the most impor-tant area is very much brighter or darker thanthe rest of the frame and does not fi l l most ofit, exposure should be decreased or increased
\^lith the same control from 112 to 2 stops, theexact amount varying with the specitic bright-ness difference and the effect desired. (p.29).
As with most metering systems, strongsources of direct l ight or other very bright areasmay inf luence the reading adversaly is a l lowedto dominate the f rame. 1
Though your XG-7 f inder is designed tominimize the ef fect on the meter of l ightenter ing through the f inder eyepiece underusual cond i t ions, care must be exerc ised toprevent th is especia l ly i f you wear g lasses. Use ofa rubber eyecup is fur ther recommended whenthe subject is in shade and the camera is insunl ight , when br ight s idel ight fa l ls between eyeand eyepice, or when stopdown meter ing isused, part icular ly at smal l apertures (see p. 44).When v iewing is unnecessary, the eyepiece cap(see p. 25) can be used to completely e l iminateth i s p rob lem. )

V I E W F I N D E R
As you look th rough the v iew-f i nde r o f you r XG-7 , you can see :$ Sp l i t - image /m ic rop r i sm focus ing
spot,O Shutter speed scale,
@ Ind ica to r LED 's (Au to modeon ly , show shu t te r speed be ingselected by the automat ic expo-sure system; in manual and auto-mat i c mode , LED a t "60" i s a l sof lash - ready s igna l )
@ le O over- or under-range indica-to rs (au to mode on ly )
For operat ion detai ls , see the fo l -lowing sect ion on exposure contro land focus ing .
www.orphancameras.com

rs*F'
i*l* i .r j , '

AUTOMATIC EXPOSURE CONTROL
Automatic operation1. Turn the shut ter-speed/funct ion selector to
al ign "A" wi th the index, at which point i tis locked to prevent accidental movement.
Set the desired lens opening by turning theaperture r ing on the lens barrel . The shut terspeed as indicated by lighted LED at ther ight of the f rame wi l l vary automat ical ly toyield proper exposure for the aperture andother settings with the light being metered.
2 .
4
l ight being metered.
www.orphancameras.com

3. l t is then only necessary to conf i rm focus(see p. 35), compose your p icture, andrelease the shut ter (p. 38).
4. The XG's accurate range of shutter opera-t ion on automat ic mode is 1/1000 to 1 sec. ,as indicated by the shutter speed scale.When the over-range indicator l ights, theshutter wi l l lock to prevent overexposure.Light ing of the under-range LED indicatesuse of a shutter speed longer than onesecond. For either, the aperture or othercondit ions should be adjusted so that anLED l ights wi th in the scale 's range.
NOTEo When the over-range indicator l ights, be sure
not to depress the operating button whileadjust ing the aperture or other condi t ions.This wil l cause the shutter to release at theinstant - IhE exposure is wi th in meter ingrange arQ?Egri\"di tlanted pictu re.
o To cont inuously provide more or less expo-sure on au tomat ic mode, see p .29 .
Eyepiece capFor remote or unmanned operat ion or when
the camera is set on a support and used wi thoutv iewing on automat ic mode, be sure to at tachthe eyepiece cap as shown. This wi l l preventunwanted l ight f rom exter ing through theeyepiece and affecting the meter reading andexposure when the eyepiece is not being shie ld-ed by the photographer 's head, as i t normal lywould be.
The eyepiece cap has a s lot that a l lowsthreading it on the camera strap to avoid lossand keep it handy for use.

WAYS OF USING AUTO MODE
On AUTO mode, your XG-7 w i l l se t theprecise shutter speed for proper exposure foryou automat ical ly . Even so, you have consider-able contro l over resul ts and can adiust , aper-ture and shut ter speed over considerable rangesto su i t the cond i t ions and yourse l f .
General useFor usual good personal p ictures wi th a
minimum of care where no part icular ef fect isdesired, s imply set the aperture as indicated inthe table. These guide set t ings wi l l provide asmuch depth o f f ie ld (see p .36) as poss ib lewhi le producing a shut ter speed fast enough tostop any subject mot ion and guard against b lurf rom camera movement (see p. 38).
Guide to sett ing aperture
ASA 25
S u n n y HazyS u n
H eavyOver-cast
Indoors
il8 il4 il2 f 1 1 . 4ASA 80 t 111 f 15.6 il4 f 1 1 . 4ASA l OO t 111 t 15.6 i l4 i l 1 . 4ASA 2OO i l 1 1 ilB i ls .6 il2ASA 4OO t 116 i l 1 1 il8 i l2 .8
(These are on ly gu ide l ines fo r typ ica l p ic tu retak ing s i tua t ions . For add i t iona l in fo rmat ionsee page 20. l
N O T EUse o f a s teady suppor t (p .3a) o r an e lec-
t ron ic f lash (p .a3) i s recommended fo r usewith shut ter speeds of 1/60 or s lower.
www.orphancameras.com

It
Creative apertu re controlThere may be t imes when i t wal l be most
important to set the lens aperture to obtain apart icular ef fect , such as render ing a certa inrange in sharp focus or emphasiz ing a subjectagainst an out-of- focus background. In th iscase, set the desired aperture, and let the
A: Large lens opening
camera select the shut ter speed. Smal l f -num-bers y ie ld a sha l low f ie ld o f sharp focus , as inExample A be low, wh i le la rge f -numbers g ivegreater depth of f ie ld, ds in Example B. Todetermine actual depth of f i led, use the depth-of- f i led scale (see p. 36)
B: Small lens opening

Creative shutter controlAt other t imes, the subject or ef fect you
want may make the shut ter speed more impor-tan t . In th is case, tu rn the aper tu re r ing un t i lthe l ighted LED indicates the required speed onthe f inder sca le ; exposure w i l l au tomat ica l l y becorrect . H igh shut ter speeds such as 1 /500 to1 /1000 sec . can " f reeze" fas t ac t ion , ds in
C: High shutter speed
Exampf e C below. Such s low speeds as 112 to 1sec. can be used to emphasize subject ffow ormo t i on , as i n Examp le D .
No matter how the camera is used, i t isimportant to support i t (see p. 34) and re leasethe shut ter proper ly (p. 38).
D: Low drutter sped
www.orphancameras.com
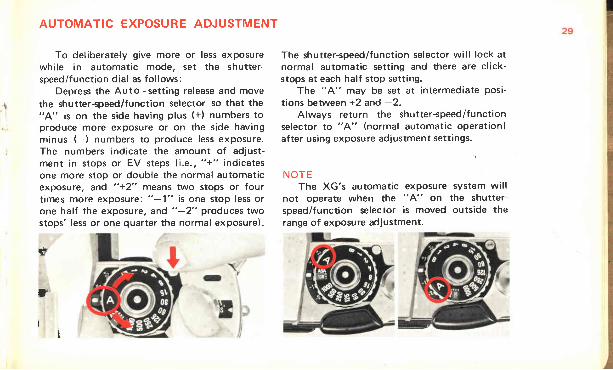
AUTOMATIC EXPOSURE ADJUSTMENT
To del iberately g ive more or less exposurewhi le in automat ic mode, set the shut ter-speed/funct ion dia l as fo l lows:
Depress the Auto -set t ing re lease and move
the shutter+peed/function selector so that the"A" is on the s ide having plus (+) numbers toproduce more exposure or on the s ide havingminus (- ) numbers to produce less exposure.The numbers indicate the amount of adlust-ment in stops or EV steps l i .e. , "+" indicatesone more stop or double the normal automat icexposure, and "+2" means two stops or fourt imes more exposure: " -1" is one stop less orone haff the exposure, and "-2" produces twostops' less or one quarter the normal exposure).
The shut ter-speed/funct ion selector wi l l lock atnormal automat ic set t ing and there are c l ick-stops at each half stop setting.
The "A" may be set at intermediate posi-
tions between +2 and -2.
Always return the shut ter€peed/f unct ionselector to "A" (normal automat ic operat ion)af ter using exposure adiustment set t ings.
N O T EThe XG's automat ic exposure system wi l l
not operate when the "A" on the shutter-speed/function selector is moved outside therange of exposure adiustment.
W
*
It

WHEN AND HOW MUCH TO ADJUST1. In s i tuat ions where there is a great contrast
difference between the subfect and back_ground and the most in lportant area isconsiderably darker than the area surround-ing at, set the " ̂ " on the Shutter-speed/-f unc t ion Se lec tor a t f rom +112 to +2 .examples of such ptctures are ones wi th.s t rong back l igh t ing and no f i l l - in i l l umina_t ion , such as Examples A and B, o r sub jec tsagainst a background of snow or l ight-colored sand, unless the br ight area occupies
A: Without adjustment
EXPOSU R Ea very smal l part of the image f rame.
2. l f the most important subject area is muchbrighter than the rest of the picture, set the" A" on the shutter-speed/function serectorf rom -1 to -2 . Examples o f th is k ind o fpicture are subjects in a spot l ight or shaf t ofsunl ight , or against a very dark background,as Examples C and D, Unless the backgroundoccupies only a smal l area in the imagef rame.
B: Exposure inc
www.orphancameras.com

3. As above, when copying documents pr intedon whi te stock or other subfects that arepredominant ly l igh t in co lo r , an ad jus tmentto +112 or more may be ca l led fo r . S imi la r -l y , you w i l l p robab ly want to make anadjustment f rom -1 to -2 for predominant-ly dark copy meter or that on a darkbac kgrou nd.
4. The above suggest ions wi l l serve as star tangpo in ts fo r t r ia l ; ind iv idua l cond i t ions andtaste wi l l of course determine exact f inalexposu re. 1
D: Exposure decreasedWithout adjustment

32 MANUAL EXPOSURE CONTROL
In s i tuat ions where the contrast d i f ferencebetween the subject area and the backgroundexceeds the available range of automatic ex-posure compensat ion, or when a desired photo-graphic effect requires a fixed speed, you willwant to use the XG's manual shut ter speed.
1. Whi le depressing the A uto - set t ing re lease i ffrom the " A" setting, turn the shutter-speed/function selector to align a steppedspeed with the index. Any shutter-speed and
lens-aperture combinat ion may then be setfor fu l l manual operat ion.
2. To determine the aperture and shutter speedsett ings by using the XG's meter ing system,move the shutter-speed/function selector tothe "A" ( Auto ) set t ing. Then adjust thelens aperture for the desired shutter speedand aperture combinat ion. Af ter not ing theshutter speed indicated by a l ighted LED,reposition the selector to that manual speedand take the picture.
www.orphancameras.com

"8" settingTurning the shut ter-speed/funct ion selector
to a l ign "8" wi th the index (whi le depressingthe Auto - setting release if from "A" setting)sets the camera for making "bulb" exposures.That is, the shutter will open when the operat-ing but ton is depressed and remain open unt i l i tis released.
N O T EWhen a standard cable re lease wi th the XG
and "B" set t ing, be sure not to let any metalpart of the re lease touch any metal part of thecamera body whi le the shut ter is open as th iswi l l cause the shut ter to c lose and end theexposure.

HOLDING THE CAMERA
Hold ing the camera secu re ly when expo-sures are made is as important as focusing. Evensl ight movement at the instant of exposure canresuf t in "b lu r red" photographs, especia l lywhen operat ing wi th s low shut ter speeds. Arecommendable way that perm its read y opera-t ion of important contro ls is shown here.
To ho ld the camera hor izon ta l l y , c rad le thebottom i f i t in the palm of the lef t hand wi ththe thumb and index or midd le f inger on thefocusing gr ip of the lens. These f ingers can alsobe used to turn the aperture r ing. Grasp thecamera body f i rmly wi th the r ight hand as
shown so that the index f inger rests on theopera t ion bu t ton . In th is pos i t ion , the thumbcan convenient ly operate the f i lm-advance le-ver.
The camera may be held in a vert icalposi t ion as shown (center) using the thumb ofthe r ight hand to push the shut ter re lease whi lethe lef t hand is used for support and focusing.Another possib i l i ty is to rotate the camera f romthe hor izontal posi t ion and hold i t so that therewind-crank end is cradled in the lef t hand asshown.
I
1,,,i
www.orphancameras.com

FOCUSING
The focusing screen of your XG-7 features aspl i t - image spot su rrounded by a band ofmic ropr isms in the center o f a mat te f ie ld .
To focus the camera v isua l l y w i th usua llenses, look through the v iewf inder wi th lens atfu l l aper tu re and tu rn the focus ing co l la r on thelens un t i l the upper and lower subfec t images in
the spot are exact ly a l igned wi th no brokenl ines between them and/or the subiect image inthe band does not shimmer or appear brokenup. A t th is po in t , the sub iec t image w i th in thefocusing aid should appear c learest and seem to
b lend w i th tha t on the mat te f ie ld a round i t .
Though the most sat is factory focusing aid
and method depend upon the condi t ions andpersonal preference of the photographer, theabove method may provide the best results withmedium wide-angle to medium telephoto focal
length lenses.Genera l l y speak ing , however , you w i l l p rob-
ably f ind that using the spl i t - image spot wi l lprovide the easiest way to focus with subiectshaving vert ical l ines; the micropr ism band for
lenses f rom medium wide-angle through'medi-um te lephoto, especia l ly wi th subiects nothaving vert ical l ines; and the matte f ie ld forlonger lenses or macro or other work involv ingconsiderable lens extension.

Depth of field
The distance behind and in f ront of thefocused distance wi th in which the image ap-pears acceptable sharp is called the depth off i e ld .
I t extends a greater d istance behind thefoucsed distance than in front and is deter-
to f/l6) and becomes greater the farther fromthe camera the lens is focused. lt decreases asthe lens is opened up (e.9. f /16 to f /21 and thecloser to the camera the lens is focused. Depthof field is greater for short focal length lensesthan for telephoto's at the same focused dis-
mined by three factors: the aperture s ize, the tance and aperture. l t is at i ts least for anydistance at which the lens is focused, and the given lens in normal mount ing when the lens isfocal length of the lens in use. Depth of f ie ld at maximum aperture (as when meter ing andincreases as the lens is stopped down (e.9. , f /2 focusing normal ly wi th Minol ta MD- or
th of sharp f ie
www.orphancameras.com

5m (about 16 f t . ) and the aperture is f /8, theappropriate graduations to left and right of theindex on the depthof- f ie ld scale indicate ac-ceptable sharpness from about 3.4m to 9.7m(approx . 11 to 32 f t . ) .
lnfrared indexFor proper focus when making pictures wi th
infrared radiat ion, f i rs t focus your subject wi th
visible l ight as described above, then attach a
red f i l ter and turn the focusing r ing to the r ight
to a l ign the point of proper focus on the
distance scale wi th the index designated wi th
smal l red "R" in the depth-of- f ie ld scale ' When
making color p ictures, fo l low the manufacture 'srecommendations to set focus.

38R E L E A S I N G T H E S H U T T E R
The way the camera is supported (see p. 341when exposures are made and how the shut teris released are as important as focusing for bestphotographic resul ts, and to avoid b lurredpictures due to camera movement dur ing ex-posure these factors become more crit ical theslower the shutter speed.
You may wish to use the figure "6O" on theshutter-speed scale as the reference point togauge the chance of camera movement. Whenthe LED l ights below i t , you should pay specia lattention to both camera and subject mo/e-ment in taking pictures.
With the possib le except ion of h ighestspeeds, the camera or hands hold ing i t shouldgeneral ly be f i rmly steadied against your face orbody when you release the shutter.
At slower speeds, it is advisable to steadythe camera against a doorframe, post, or otherf irm support while depressing the release.
The sh u tter$h'orrtdifrfi'Iba ret eased with aslow, steady squeeze{rever a quick jabpreferable whi le hold ing your breath.
D A N G E R O F B L U R F R O MCAM E RA/SUBJECT MOV EMENT
L E S S
I von rY
r000500?501256030r5El.
a
1
www.orphancameras.com

F o r m a x i m u m s h a r p n e s s w h e n m a k i n g e x -
p o s u r e s t o o l o n g t o p e r m i t h a n d - h o l d i n g t h e
c a m e r a , m o u n t i t o n a t r i p o d u s i n g t h e b u i l t - i n
socket on the bo t tom and t r ip the shut te r w i th
a M i n o l t a e l e c t r o n i c R e m o t e C o r d o r a s t a n d a r d
cab le re lease screwed in to the th readed socket
p r o v i d e d o n t h e s i d e o f t h e l e n s m o u n t .
l f t h e e y e p i e c e i s n o t b e i n g s h i e l d e d b y t h ep h o t o g r a p h e r ' s h e a d w h e n t h e s h u t t e r i s r e -
l e a s e d i n t h i s w a y , t h e e y e p i e c e c a p s h o u l d b e
u s e d ( s e e p . 2 5 } .

S E L F T I M E R
The electronic sel f t imer bui l t in to yourXG-7 can be used to delay re lease of the shut terfor about 1O seconds af ter actuat ion.
To operate it:1 . Advance the f i lm .2. With the shut ter-speed/funct ion selector at a
set t ing other than "B," move the mainsw i t ch to a l i gn the index w i th SELFT I M E R .
3. Depress the operat ing but ton. The bl ink ingl ight on the f ront of the camera wi l l indicatethe delay has been star ted. Approximately2.5 secs. before the exposure is made, the
indicator wi l l b l ink faster to s ignal the endof the delay. You may cancel the sel f t imerby mov ing the ma in sw i t ch to "OFF" .
N O T Eo After using the sel f t imer be sure to move
the ma in sw i t ch o f f o f t he "SELF-T lMER"set t i ng.
o l n au tomat i c mode , the se l f t imer w i l lcancel i f exposure condi t ions exceed theupper range of the meter ing system. Opera-t ion wi l l resume when aperture or othercondi t ions are adjusted so that exposurecondi t ions are wi th in meter ing range.
www.orphancameras.com

R E W I N D I N G A N D U N L O A D I N G F I L M
1. Push the rewi nd but ton.
Unfold the rewind crank and turn i t in thedirect ion indicated by the arrow on i t unt i lthe red Safe Load Signal bar moves out ofthe window to the lef t . You wi l l then feeltension on the f i lm increase and disappear,and the crank wi l l turn f reely.
2 .
t,{
ffi

FLASH PHOTOGRAPHY
3 . W h e n y o u a r e c e r t a i n t h a t t h e f i l m i sc o m p l e t e l y r e w o u n d , p u l l o u t t h e b a c k -cover re lease knob to open the back andremove the car t r idge .
www.orphancameras.com

Synchronizat ionYour XG-7 has shut ter contacts for X f lash
synchron iza t ion as fo l l ows :
N O T EAs indicated by the table, 1160 is the
max imum shutter speed for proper X syn-
chronizat ion. Slower speeds can also be used
under certa in condi t ions i f desired for part icu-
lar ef fects. Be sure not to use speeds faster than
1 /60 , ( i . e . 11125 and upward ) w i th e lec t ron ic
or auto- f lash uni ts.
Connecting flash unitsCord less c l i pon f l ash un t i s such as the Au to
Electrof lash 20OX are at tached and electr ical lyconnec ted by s imp ly s l i d ing them in to thecamera's hot shoe. Sync. cords of e i ther c l ip-onor bracket- type convent ional uni ts requir ingthem must be plugged into the cameras sync.terminal for operat ion.
Bracket- type f lash uni ts are at tached to thecamera by means of i ts t r ipod socket .
Type o f f lash
Synchron ized speedrange in seconds
On manua l mode(step speeds)
E l e c t r o n i c f l a s h( "s t robe" )
1 th rough 1 /60
C lass M o r MF f l ashbu lbs l t h r o u g h 1 1 1 5 , 8
C lass FP f l ashbu lbs 1 t h r o u g h 1 1 1 5 , B

USING OTHER THAN MD OR MC LENSES
Meter ing and exposure wi th Auto Rokkorlenses hav ing bu i l t i n p rev iew bu t tons , RFRokkor ( re f l ex -m i r ro r t ype ) , and Manua l -P rese tRokkor lenses is by the stopdown method asf o l l ows :
Auto Rokkor lenses1. Af ter focusing, depress the lens' preview
button to stop down the aperture.
With the shut ter-speed/funct ion selector setat "A," select an aperture as expla ined onpp.24 through 25. fhe v iewf inder f ie ld wi l ldarken as the lens is topped down, and thespl i t - image spot and micropr ism band maybecome unusable due to darkening.With the lens stopped down to the propertaking aperture or wi th the camera set formanual operat ion, re lease the shut ter .
RF (mirror- type) and Manualpreset lensesProceed as for Auto Rokkors above, except
that use of a stopdown but ton is not necessaryas meter ing and exposure are always made attaking aperture.
N O T E.: . . , Because they have nei ther meter coupl ing
;1.;;;r nor preview buttons, the Rokkor 35mm f 12.8CA Shi f t lens, Auto Bel lows I , and some AutoRokkor lenses can not be used wi th the XG-7on auto mode.
2 .
3 .
www.orphancameras.com


Auto winder GT h e A u t o W i n d e r G i s a n a u t o m a t i c f i l m
w i n d e r t h a t h e l p s t h e p h o t o g r a p h e r f o c u s h i sfu l l a t ten t ion on the c rea t ive aspec ts o f photo-g r a p h y b y r e m o v i n g t h e i n t e r r u p t i o n o f h a v i n gt o w i n d t h e f i l m a f t e r e a c h p i c t u r e . A t t a c h i n g i sgu ick and easy w i th no access caps to removeor s to re . Jus t a l igh t touch o f the shut te r re leasei s a l l t h a t i s r e q u i r e d t o t a k e e i t h e r s u c c e s s i v e o rs i n g l e f r a m e s w i t h t h e w i n d e r a u t o m a t i c a l l ya d v a n c i n g t h e f i l m a f t e r e a c h o n e . T h e w i n d e rd r i v e m e c h a n i s m s t o p s a u t o m a t i c a l l y a t t h e e n do f e a c h c a r t r i d g e a n d f i l m , c a n b e e a s i l y r e -w o u n d w i t h w i n d e r a t t a c h e d .
A l l o f t h e s e f e a t u r e s c o m b i n e w i t h t h e X G - 7to he lp you to capture the fas t paced ac t ion o fa spor ts car race or the f lee t ing express ions o f ac h i l d a t p l a y .
www.orphancameras.com

Auto Electroflash 2OOXThe Auto Electrof lash 200X is a new genera-
t ion au tomat ic - type f lash un i t tha t has beenspec ia l l y des igned fo r use w i th the XG-7 camerasystem.
After i t is at tached, a l l you need to do isselect any electronic set t ing, set the proper lensaper tu re , and tu rn the f lash on . When i tscapaci tor is f u l ly charged, the 2O0X star ts af lash ready s igna l b l ink ing in the v iewf inder andautomat ica l l y sw i tches the camera 's e lec t ron icshut ter set t ing to X-sync. ( 1 l60 sec. ) .
A ser ies SCR circui t insures fast recycle t ime(min . 0 .5 sec . ) and enab les the 200X, powered
by Ni-Cd bat ter ies, to make up to two cont in-

uous-sequence f lash exposures each second wi ththe Auto Winder G.
Wh i le i ts capaci tor is charging and themoni to r lamp is o f f , the 2OOX wi l l au tomat ica l -ly swi tch the camera's shut ter back to i tsindicated electronic set t ing. At th is t imemetered automat ic or manual exposures can bemade. Flash mode wi l l resume when the capaci-tor is charged and the f lash ready s ignal b l inks
Switching the power "OFF" cuts of f a l lf lash c i rcui ts and normal e lectronic operat ion isreturned to the XG-7. The camera may now beused in auto or manual mode even wi th theflash attached.
Remote Cord S and LThese cords are designed for operat ing the
XG-7 f rom a distance. Each screws into theshutter release socket on the side of the lensmount . The Cord S is 50cm (about 20 in . ) long ,whi f e the Cord L is 5m (16-1 12 t t . ) . fnese cordsfaci l i tate shots mounted on a t r ipod or remotewi ld l i fe p ic tu res . In combina t ion w i th the AutoWinder G, the Cord L can be used to makesingle or cont inuous sequenee exposures at thesubject posi t ion, f rom a remote locat ion, etc.
www.orphancameras.com

STANDARD LENS SPECIFICATIONS
3
Lens: Somm f 11 .7 MD Rokkor -X S0mm f 11 .4 MD Rokkor -X 58mm f 11 .2 MC Rokkor -X
Type: Meter-coupled Gauss-type standard lens
Construct ion: 6 elements in 5 groups 7 elements in 5 groups 7 elements in 5 groups
Angle o f v iew: 470 470 410
Coat ing: M ino l ta Achromat i c
Min. focusing dist . : 0.45m (1.48 ft .) 0 .45m (1 .48 f t . ) 0 .6m (2 f t . )
Diaphragm: Fu l ly automat ic meter-coupled
Aperture scale:1 . 7 , 2 . 8 , 4 , 5 . 6 , 8 , 1 1 , 1 6 1 .4 , 2 , 2 .8 , 4 ,5 .6 , 8 , 1 1 , 16 1 . 2 ,2 , 2 .8 , 4 ,5 .6 , 8 , 1 1 , 16
Each wi th fu l l and hal f c l ick-stops
Focusing: Double hel icoid system
Fi l ter thread diam.: 55mm
Dimensions: 064mm x 4omm162-1 12" x 1-9/16"1
064mm x 40mm(02-112" x 1-9 l16" l
70.5mm x 54mmlo2-13116" x2-118"1
Weight: 1959 (6-718 oz.) 245s (8-5/8 oz.) a759 (16-314 oz. l

50SPECIFICATIONS
Type:Lens moun t :
Auto-exposu re control :
Sh u t ter :
Meter ing:
Fi lm-speed range:Auto-exposure
adjustment:M i r ro r :
V iewf i nde r :
35mm single{ens ref lex wi th automat ic and fu l l manual exposure contro lM ino l ta sLR bayone t ,54" ro ta t i ng ang le ; coup l i ng fo r fu l l -aper tu remete r ing and au tomat i c d iaphragm con t ro l w i th M ino l ta MD and MC lenses(s tandard lenses MD Rokkor -X 5omm f 11 .4 , f 11 .7 o r MC Rokkor -X 5gmmf 11 .2 ; see p .49 fo r spec i f i ca t i ons )specia l low-vol tage, low-current computer c i rcui t , actuated by contact orpressure on " touch swi tch" operat ing but ton, var ies the shut ter speedcont inuously and steplessly to y ie ld proper exposure according to meter ingsystem indicat ion at the aperture, f i lm speed, and exposure adjustment setAuto-exposure range: EV 2 to Ev 17 (e.g. , 1 12 sec. at+11.4 to 1 l1o0o atI l 1 1 l a t A S A 1 0 0 w i t h f / 1 . 4 t e n sHor izontal - t raverse focal-p lane type; e lectronical ly contro l led speeds:1/1000 to 1 sec. ,steplessly on automat ic mode or in steps on manual modeFul l -aperture TTL averaging type wi th more inf luence f rom broad centra lzone of screen, by two cds cel ls mounted on ei ther s ide of the eyepiece atthe rear of the pentapr ismASA 25 to 1600 set on the shut ter-speed/funct ion selectorUp to t2 EV cont inuous adjustment of automat ic exposure wi th 1 12 Evcf ick-stops and lock at"A" {zero set t ing)Oversize quick-return type (PO value: 123mm)Eye{evel f ixed pentapr ism type showing 93% of 24 x 36mm f i lm-frameareaMagn i f i ca t i on :0 .9x w i th 50mm s tandard lens focused a t i n f i n i t y ;Matte-Fresnel- f ie ld focusing screen wi th centra l hor izontal ly or ientedspl i t - image focusing spot surrounded by micropr ism band; stepless speeds
www.orphancameras.com

Flash sync:
indicated by 1O l ight-emit t ing diodes; LED over- /under-range indicators; 51
LED at posi t ion also bl inks as f lash-ready s ignal wi th AutoElectroflash 200XPC terminal and hot shoe for X sync. (d isconnectwhen uni t no instal led):Electronic flash synchronizes at 1/60 sec. and slower step or steplessspeeds; Class MF, M, FP f lashbulbs synchronize at 1115 or s lower speeds.Extra contact on hot shoe receives signal from camera-control contact ofAuto Electroflash 2OOXMotor ized: Through bui l t - in coupler key wi th accessory Auto Winder G
Manual : By lever wi th s ingle 130o stroke af ter 30" unengaged movement
Film-advance release button for rewinding; advancing-type frame coLnter
and Safe Load Signal that indicates f i lm loading and advancing condi t ions
Two 1.5v silver-oxide cells contained in camera base power both auto
exposure control and shutter's electronically goverened operationLED battery check indicator l ights when operating switch in battery checkposi t ionShutter will not release when voltage too low for proper operationElectronic, LED indicated types; approximately 10 sec. delay4+lot take-up spool; detachable back cover with memo holder andASA-Dl N conversion scale52 x BB x 138mm Q x 3-7 116 x 5-5/B in.)505g (17-13116 oz.) wi thout leni and power cel lsExclusive Auto Winder G, Auto Electroflash 2OOX, Remote Cord S 50cm(20- in.) and Remote Cord L 5m (16-f t . ) ; MD, MC, and other interchangea-ble Rokkor lenses and appl icable Minol ta SLR system accessor ies
Fi lm advance:
Power:
Sel f - t imer:Other:
Size and weight :
Accessories:

CARE AND STORAGE
o As wi th a l l h ighprecis ion instruments, nopart of your XG-7 should ever to forced atany t ime. l f operat ion is not as you th ink i tshould be, careful ly restudy the appl icableinstruct ions or consul t an author izedMinolta service representative.
o Always keep your camera in its case withthe lens capped when not in use.
o Never subject your camera to shock, h ighheat and/or humidi ty, water , or harmfulchemicals or gases.
o Never lubricate any part of the body or lens.o Always use a body cap when a lens is not
installed on the body. Keep lenses, properlycapped front and rear, in their cases whennot in use.
o Never touch the shutter curtains or anythinginside the front of the body with thefingers. These parts and the inside of theback should be dusted with a soft brushfrom time to time as necessary, with partic-ular care never to exert pressure on theshutter curtains.
o Never touch lens or other glass surfaces withthe fingers. lf necessary, remove loose mat-ter f rom them with a b lower lens brush. Usespecial photographic lens tissue or a softclean cloth to remove smudges or finger-p r in t s w i th a gen t le c i r cu la r mo t ion . On ly i fabsolutely necessary, the tissue may bemoistened very s l ight ly wi th not more thanone drop of a satisfactory quick-evaporatingf lu id c leaner specia l ly compounded for pho-tographic lenses. Such f lu ids must never bedropped direct ly on the glass surface.
o Smudges or f ingerpr ints on the mirror maybe removed wi th lens t issue s l ight ly mois-tened wi th lens-c leaning f lu id as above.
. External camera and lense-barrel - but notglass - surfaces may be wiped with a soft,sil icone-treated cl oth.
o Never leave the shutter cocked when thecamera is to be stored overnight or longer. ltis advisable to operate the fi lm advance andrelease the shutter once or twice from timeto tame during extended storage.
www.orphancameras.com

Ii
o lf the camera is not to be used for more
than two weeks, the batteries should be
removed.. lf the camera is to be stored for a long
per iod of t ime, body and lens should be
returned to their or ig inal packing and kept
in a cool , dry Place awaY from dust orchemicals, preferably in an ai r t ight con-
ta iner wi th a dry ing agent such as s i l ica gel .
Specifications subject to change without notice
f# Minot ta Camera Co., Ltd. ,30, 2-Chome, Azuchi-Machi , Higashi-Ku, Osaka 541, Japan
Mino l ta Corpora t ion , 101 Wi l l i ams Dr i ve , Ramsey , New Je rsey 07446 , U .S .A . - -
Minol ta Camera (Canada) lnc. , 1344 Fewster Dr ive, Mississauga, Ontar io L4W, 1A4, Canada
Minol ta Camera Handelsgesel lschaf t m.b.H., Kurt-Fischer-Strasse 50, D-2070 Ahrensburg, West Germany
Minol ta France S.A. , Tour Albert 1er, 65 Avenue de Colmar, F-92508 Ruei l -Malmaison, France
. M ino l ta Hong Kong L im i ted ,4g Cha tham Road , Kow loon , Hong Kong
Minol ta Singapore (Pte) Ltd. , Tong Fong Bldg. , 52-E, Chin Swee Road, Singapore 3
t_

I 7r+
fhinoltq i:' | \o LrA r,.rASrERS p'{orocRApHy
e)1977 Minol ta Camera Co., Ltd. under the Berne Convent ion andx@7 711E-A2. Universal copyr ight convent ion
. pr inted in Japan
4, \ www.orphancameras.com