owner’s manual - autopetfeeder · owner’s manual auto koi feeder ... this is owner’s manual...
TRANSCRIPT

MODEL NO.2000PFS2000PFM2000PFL
Model and serial number may befound at the rear of the feeder base.
Please record both model and serialnumber in a safe place for future use.
Where Purchased :
Date purchased : Month
: Day
: Year
Model No. :
Serial # :
This Owner’s Manual containsinformation for all models.
Read and keep this manual for futurereference.
This manual contains importantinformation on Safety, Assembly,Operation and Maintenance.
Owner’s Manual
Auto koi feeder - Pond �sh feeder Outdoor feeder
Ergo Systems Inc. Rev # : 1.1

2
Congratulations on purchasing the “ Auto koi feeder - Pond �sh feeder - Outdoor feeder “. You will now have more timeon your hands. Before you can use this appliance you need to follow some simple steps to assemble the Auto koi feederPond �sh feeder - Outdoor feeder and program the digital timer.
DO NOT RETURN THE PRODUCT TO THE STORECall 1-888 ERGOSYS (1-888-374-6797)
If there are missing parts. Check all packing for missingparts prior to discarding the package.
Important: This is Owner’s Manual for Auto koi feeder - Pond Fish feeder - Outdoor feeder.
Please do not discard this.
LIMITED WARRANTYPlease read this warranty carefully. Ergo Systems Inc. will warranty this product to be free from manufacturing defects,including workmanship, when assembled and operated according to operating instructions enclosed with this product, fora period of ninety (90) days from the date of original purchase. This warranty is non-transferable and applies solely to theoriginal purchaser and does not extend to subsequent owners of this product. Please register your product athttp://www.autopetfeeder.com.
1. Repair service for a period of ninety (90) days from the date of original purchase at no charge for parts and labor withproof of purchase.
2. Replacement of defective parts for a period of 12 months from the date of original purchase with proof of purchase.(Labor not included after initial ninety (90) days.)
3. This warranty does not cover cost incurred in the shipping of the product to and from Ergo Systems Inc. for service.Shipping to Ergo Systems Inc. must be prepaid and insured by UPS or other parcel delivery services.
THIS WARRANTY IS VOID IF THE PRODUCT IS:
1. Damaged due to negligence, abuse, misuse, accident, tampering, alteration, faulty installation and / oracts of God.
2. Used for commercial applications or rentals.
3. M or repaired by anyone other than Ergo Systems Inc.
The extent of Ergo Systems Inc. under this limited warranty is the repair or replacement of the product at the solediscretion of Ergo Systems Inc. In no event shall Ergo Systems Inc.’s liability exceed the purchase price paid by thepurchaser. Under no circumstances shall Ergo Systems Inc. be liable for any loss, direct, indirect, incidental, foreseen,unforeseen, special or consequential damage arising out of or in connection with the use of this product.This warranty is valid only in the United States of America and Canada.
Before you call us, please have the followinginformation ready.
1. Details of purchase like invoice number(found on the bill or invoice)
2. Name and model number of the product(found on the manual and on the carton.)
3. Actual problem after following the instructions.
4. List of missing parts.

3
Reviewing these important safety alert symbols
When you see this Safety Symbol on the following pages, it will alert youto the possibility of damage to your Pet Feeder, if you do not complywith the corresponding instructions. The hazard may come fromsomething mechanical or electrical. Read the instructions carefully.
Tools required
Carpenter’s Level Tape Measure Pencil 1/4” and 9/32”Drill Bits
remmaH walCrettuC eriWsreilPllirD
SAE / METRIC Sockets Screwdriver Customer Supplied Plywood
Use of improper tools may cause damage to the feeder.The following parts are provided in the Auto koi feeder - Pond �sh feeder - Outdoor feeder Box.
Tee Nuts
Qty 5
Bolts 1/2 inch long
Qty 5
Washers
Qty 5
Screws
Qty 3

Wir
ing
Dia
gra
m
Elec
tric
al h
azar
ds:
1.
U
se G
FI s
ocke
t ins
ide
hom
e to
con
nect
the
feed
er.
2.
W
hile
inst
allin
g th
e fe
eder
mak
e su
re th
e el
ectr
ical
con
nect
ion
to th
e fe
eder
is d
isco
nnec
ted.
3.
P
lug
in th
e tim
er u
nit a
nd tr
ansf
orm
er in
side
the
hous
e or
gar
age.
The
tim
er a
nd tr
ansf
orm
er is
not
wat
erp
roof
.4.
Do
not u
se e
xten
sion
cor
ds.
5.
U
se a
qua
lifie
d ce
rtifi
ed e
lect
ricia
n to
do
the
wiri
ng.
4

5
List of parts in the Auto koi feeder - Pond�sh feeder - Outdoor feeder Box Components
1. Pet Feeder base
2. Food Storage Container Cover
3. Food Storage Container
4. Digital Timer
5. Flow Pipe
6. F-Clamp
7. R-Clamp
8. Studs / Screws / Nuts in a bag
9. Waterproof feeder cover
Pet Feeder Base
Food Storage Container
Digital Timer
Food Storage Container Cover
1
2
4
3
Flow pipe
5

6
Assembly
Step 1
F-Clamp R-Clamp Screw Bag
6 7
9
8
The Auto koi feeder - Pond �sh feeder - Outdoor feeder is invertedupside down and the R-Clamp is screwed to the base using thethree screws provided.
Take out the Auto koi feeder - Pond �sh feeder-Outdoor feeder from the box.
Step 2
7
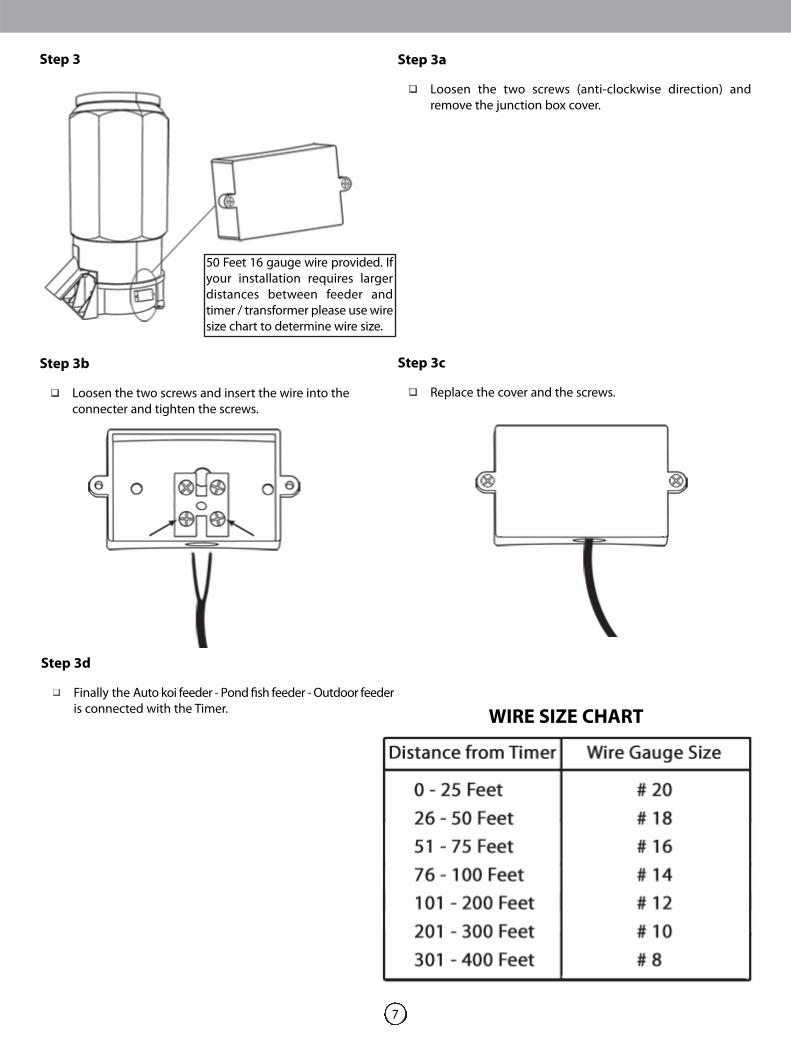
Step 3
Loosen the two screws (anti-clockwise direction) andremove the junction box cover.
Step 3a
Loosen the two screws and insert the wire into theconnecter and tighten the screws.
Step 3b
Replace the cover and the screws.
Step 3c
WIRE SIZE CHARTFinally the Auto koi feeder - Pond �sh feeder - Outdoor feederis connected with the Timer.
Step 3d
50 Feet 16 gauge wire provided. Ifyour installation requires largerdistances between feeder andtimer / transformer please use wiresize chart to determine wire size.
8
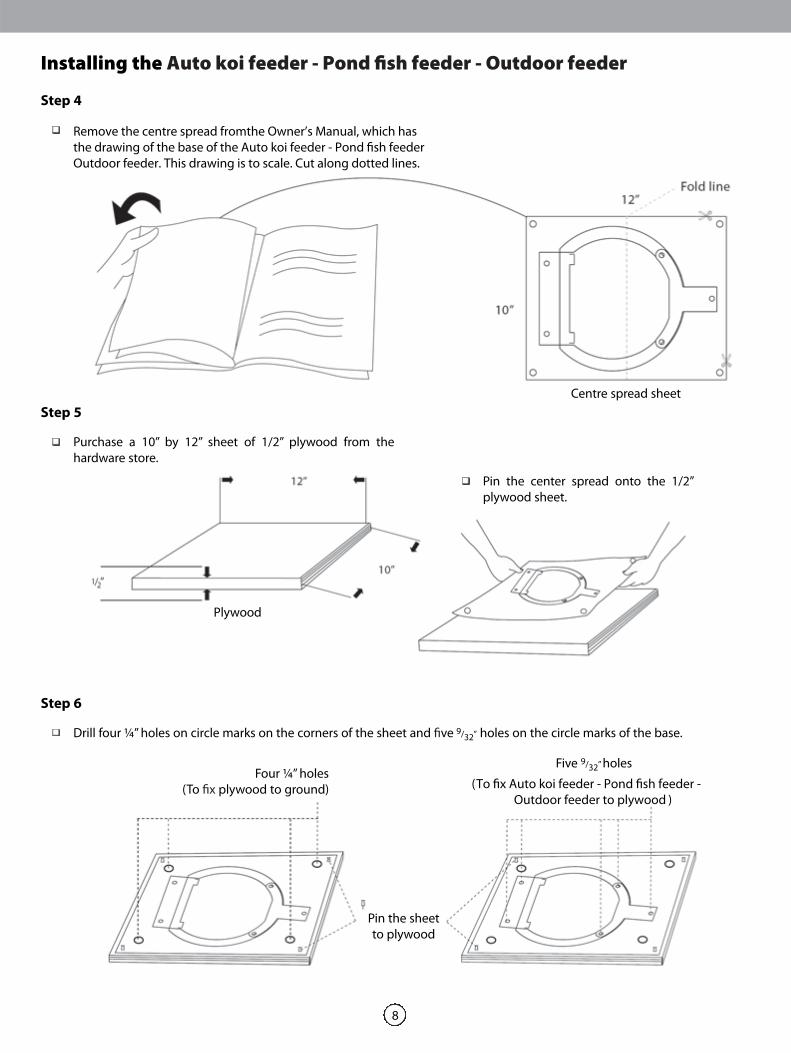
Installing the
Remove the centre spread fromthe Owner’s Manual, which hasthe drawing of the base of the Auto koi feeder - Pond �sh feeder Outdoor feeder. This drawing is to scale. Cut along dotted lines.
Step 4
Centre spread sheet
Purchase a 10” by 12” sheet of 1/2” plywood from thehardware store.
Step 5
Plywood
Pin the center spread onto the 1/2”plywood sheet.
Pin the sheetto plywood
Four ¼” holes(To plywood to ground)
Five 9/32” holes
(To �x Auto koi feeder - Pond �sh feeder - Outdoor feeder to plywood )
Drill four ¼” holes on circle marks on the corners of the sheet and ve 9/32” holes on the circle marks of the base.
Step 6
9
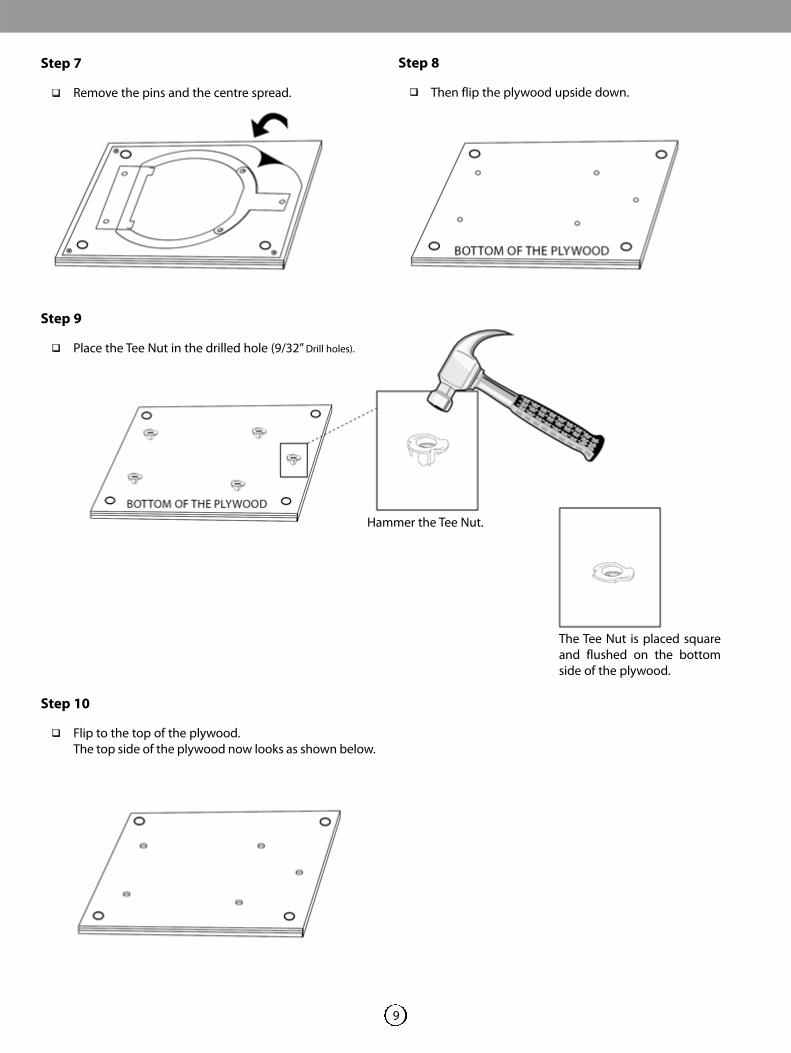
Remove the pins and the centre spread.
Step 7
Then flip the plywood upside down.
Step 8
Place the Tee Nut in the drilled hole (9/32” Drill holes).
Step 9
Hammer the Tee Nut.
The Tee Nut is placed squareand flushed on the bottomside of the plywood.
Flip to the top of the plywood.The top side of the plywood now looks as shown below.
Step 10

The bolt after installation. Fixall the 5 bolts in the same way.
10
Place the Auto koi feeder - Pond �sh feeder - Outdoor feeder on the plywoodsheet and align to the Tee Nut treads.
Step 11
Place the washer on the hole.Place the bolt and tread it intothe Tee Nut and tighten.
Pick up the entire assembly carefully andplace it next to the location where theAuto koi feeder - Pond �sh feeder - Outdoor feeder is to be installed.Adjust the position as needed and markthe location of the four holes on theplywood to the surface that you wishto mount.
Step 12
Remove the 5 bolts (along with washers) and thefeeder from the pressure treated plywood sheet andmount the plywood sheet to the chosen spot withscrews or concrete nails depending on the mountingsurface. (screws / nails are customer provided)
Step 13
Make sure that the plywood sheet is mounted levelto the ground. Use a level to check this.
Mark location
Mount to ground

11
Place the Feeder on the plywood making sure that the cable isunderneath the R-Clamp and fasten it to the plywood sheetusing the 5 bolts. Repeat step no: 18
Step 14
Run wire underground and connect to transformer.Ref. to page # 4.
Cable underneath the R-Clamp
The waterproof body cover is slid from the top of the Feeder so as to cover theFeeder completely. The cover is fastened in position using the Velcro strapsprovided. The waterproof cap is then used to cover the top of the Feeder.
Step 15
Cap
Feed hole
Velcro location
The assembly of Auto koi feeder - Pond �sh feeder - Outdoor feeder is now complete.
The installation of Auto Auto koi feeder - Pond eeder - Outdoor feeder is complete.

12
TIMER PROGRAMMING
ON and OFF based on the timer settings.
First time use : Connect your digital timer unit into the wall socket. This will charge the internal battery ifyou are using the timer for the �rst time. Reset it by pressing the Master Reset button using a small pin suchas a paperclip. This will reset the timer. All other programming functions can perform without plugging thetimer in to the wall socket.
This is the digital timer unit for the Auto koi feeder - Pond �sh feeder - Outdoor feeder. The timer switches the Auto koi feeder - Pond �sh feeder - Outdoor feeder
NOTE:The timer may have to be charged for 10 minutes prior to use if the timer display is blank. Press the Master Resetbutton after 5 minutes while the timer is charging.

13
Press and hold the CLOCK button. Press the MINUTEbutton to set the minutes.
2.1 Setting the Current Time
Press and hold the CLOCK button. While holding the CLOCKbutton press the WEEK button to set the day of the week.
Press and hold the CLOCK button. Now press the HOURbutton to set the hour.
Fig 1
Fig 2
Fig 3
14
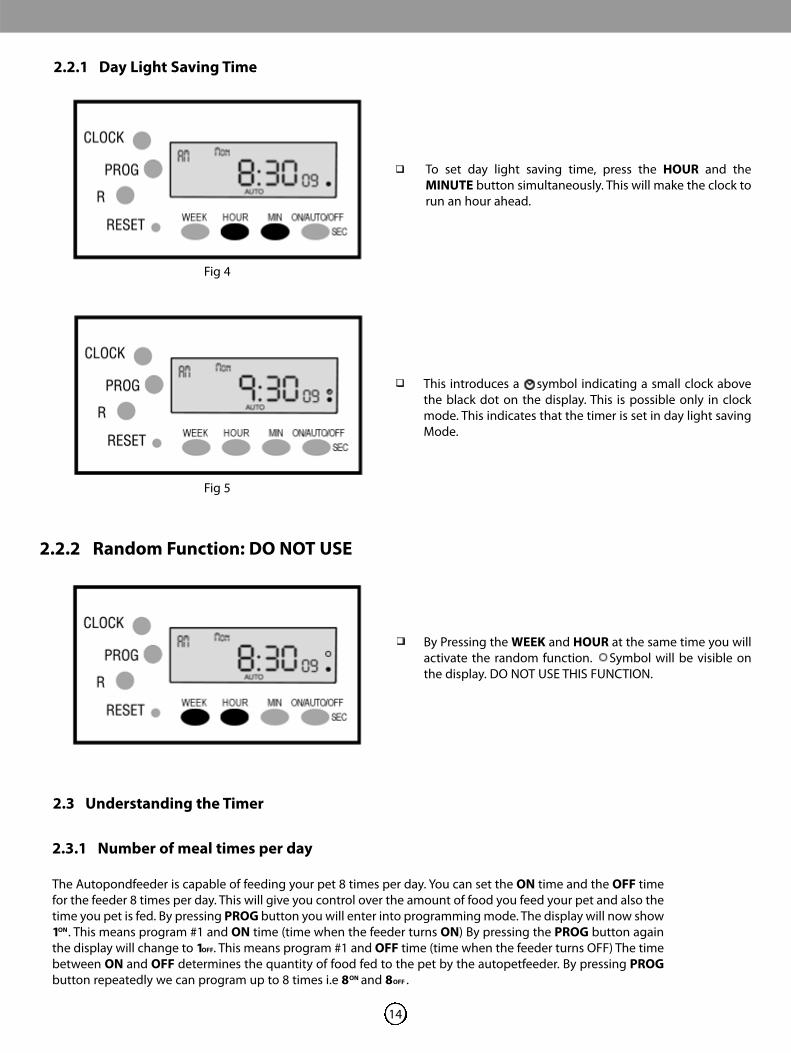
To set day light saving time, press the HOUR and theMINUTE button simultaneously. This will make the clock torun an hour ahead.
2.2.1 Day Light Saving Time
Fig 4
Fig 5
2.3 Understanding the Timer
The Autopondfeeder is capable of feeding your pet 8 times per day. You can set the ON time and the OFF timefor the feeder 8 times per day. This will give you control over the amount of food you feed your pet and also thetime you pet is fed. By pressing PROG button you will enter into programming mode. The display will now show1 . This means program #1 and ON time (time when the feeder turns ON) By pressing the PROG button againthe display will change to 1 . This means program #1 and OFF time (time when the feeder turns OFF) The timebetween ON and OFF determines the quantity of food fed to the pet by the autopetfeeder. By pressing PROGbutton repeatedly we can program up to 8 times i.e 8 and 8 .
2.3.1 Number of meal times per day
ON
OFF
ONOFF
By Pressing the WEEK and HOUR at the same time you willactivate the random function. Symbol will be visible onthe display. DO NOT USE THIS FUNCTION.
2.2.2 Random Function: DO NOT USE
This introduces a symbol indicating a small clock abovethe black dot on the display. This is possible only in clockmode. This indicates that the timer is set in day light savingMode.
15
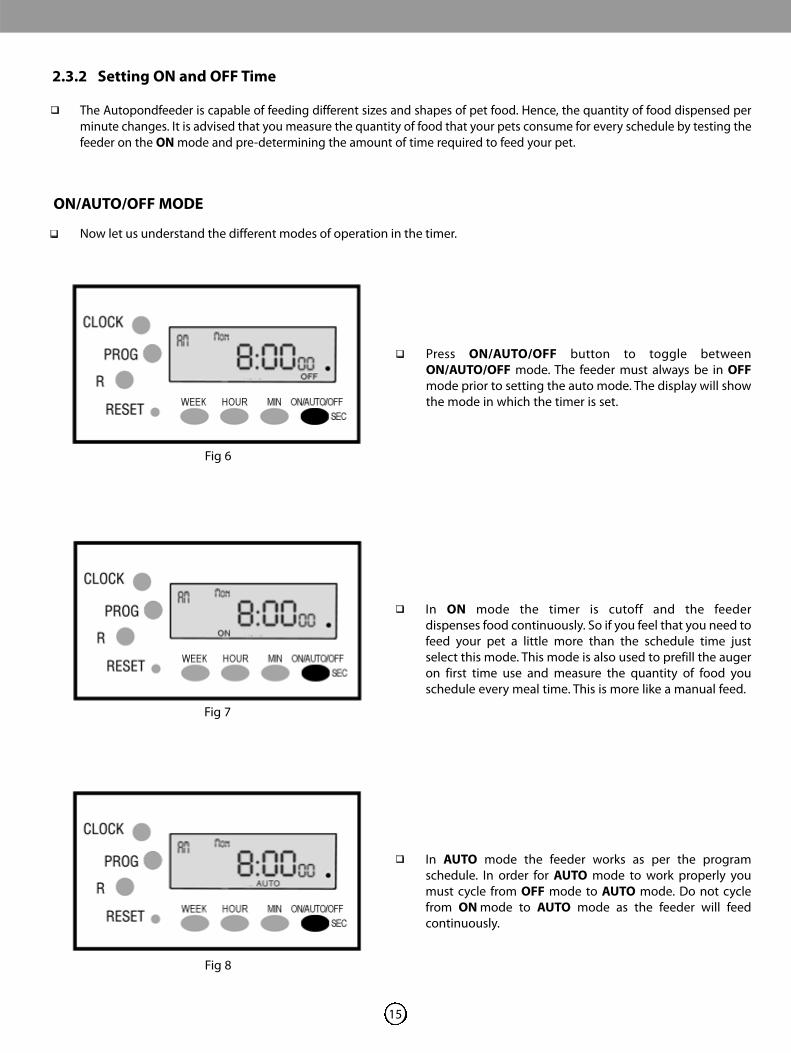
The Autopondfeeder is capable of feeding different sizes and shapes of pet food. Hence, the quantity of food dispensed perminute changes. It is advised that you measure the quantity of food that your pets consume for every schedule by testing thefeeder on the ON mode and pre-determining the amount of time required to feed your pet.
ON/AUTO/OFF MODE
Now let us understand the different modes of operation in the timer.
Press ON/AUTO/OFF button to toggle betweenON/AUTO/OFF mode. The feeder must always be in OFFmode prior to setting the auto mode. The display will showthe mode in which the timer is set.
In ON mode the timer is cutoff and the feederdispenses food continuously. So if you feel that you need tofeed your pet a little more than the schedule time justselect this mode. This mode is also used to prefill the augeron first time use and measure the quantity of food youschedule every meal time. This is more like a manual feed.
Fig 6
Fig 7
In AUTO mode the feeder works as per the programschedule. In order for AUTO mode to work properly youmust cycle from OFF mode to AUTO mode. Do not cyclefrom ON mode to AUTO mode as the feeder will feedcontinuously.
Fig 8
2.3.2 Setting ON and OFF Time
16
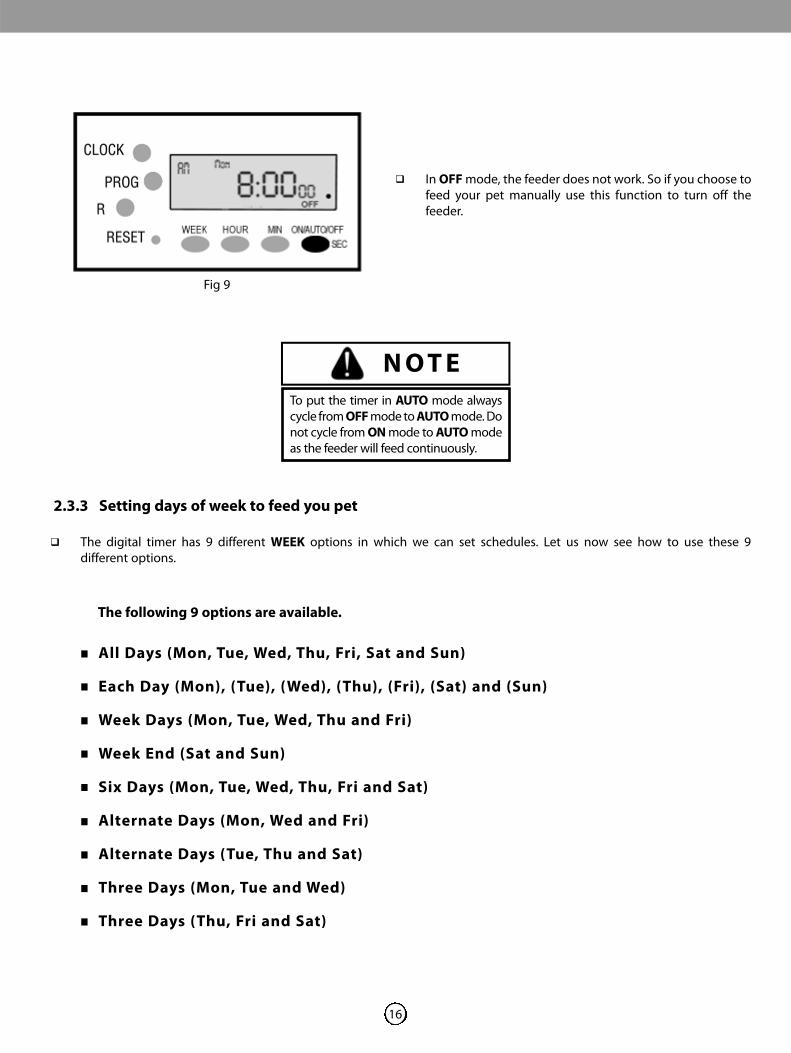
In OFF mode, the feeder does not work. So if you choose tofeed your pet manually use this function to turn off thefeeder.
2.3.3 Setting days of week to feed you pet
The digital timer has 9 different WEEK options in which we can set schedules. Let us now see how to use these 9different options.
The following 9 options are available.
All Days (Mon, Tue, Wed, Thu, Fri, Sat and Sun)
Each Day (Mon), (Tue), (Wed), (Thu), (Fri), (Sat) and (Sun)
Week Days (Mon, Tue, Wed, Thu and Fri)
Week End (Sat and Sun)
Six Days (Mon, Tue, Wed, Thu, Fri and Sat)
Alternate Days (Mon, Wed and Fri)
Alternate Days (Tue, Thu and Sat)
Three Days (Mon, Tue and Wed)
Three Days (Thu, Fri and Sat).........
Fig 9
To put the timer in AUTO mode alwayscycle from OFF mode to AUTO mode. Donot cycle from ON mode to AUTO modeas the feeder will feed continuously.
N O T E

17
2.3.4 Setting the days of Week
Press PROG button to enter in to the prog mode. The display will show 1 which means that we aresetting the 1st schedule ON time.
Press the WEEK button once and the display will show alldays option.
Fig 10
Fig 11
This option will set a common schedule for the entire week and this is recommended for all pet owners unless there arespecial requirements.
Press WEEK button again and the display will show the eachday option. This is the 2nd option, where the user can selectdifferent schedule that can be programmed for each day ofweek. Toggle through the days of the WEEK by pressing theweek button.
Fig 12
ON
Let us now understand how to set ON and OFF time schedule for the Autopet feeder.

18
Pressing WEEK button again will give you the week daysoption. This display will show Mon-Fri. The scheduleprogrammed in this option will work on week days.
Fig 13
Pressing WEEK button once again will lead to the weekendoption. This display will show sat & sun. The scheduleprogrammed in this option will work on weekends.
Press WEEK button to go to the 5th option, six days. You canschedule your feeder for six days from mon - sat with thisoption.
Fig 14
Fig 15
19
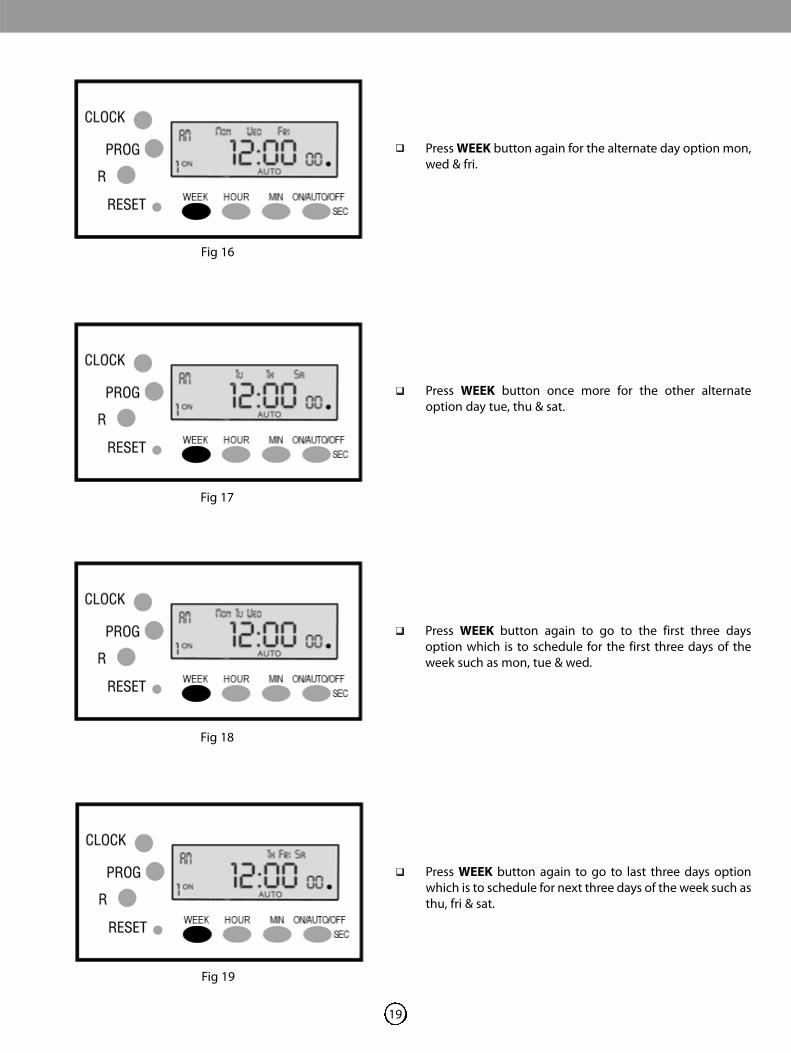
Press WEEK button again for the alternate day option mon,wed & fri.
Press WEEK button once more for the other alternateoption day tue, thu & sat.
Fig 16
Fig 17
Press WEEK button again to go to the first three daysoption which is to schedule for the first three days of theweek such as mon, tue & wed.
Fig 18
Press WEEK button again to go to last three days optionwhich is to schedule for next three days of the week such asthu, fri & sat.
Fig 19

20
Press R button to erase each schedules.
2.4 Erasing all Schedules
Fig 20
2.5 Timer Programming Examples:-
Let us set a schedule of ON time for 8 a.m. and OFF time of 8 hours, 1minute & 30seconds. After 1minute & 30seconds thefeeder will turn OFF.
Press PROG button to enter in to program mode. The displaywill show 1 which means that we are setting the 1st
schedule ON time.
Fig 21
2.5.1
ON
NOTE:If you don’t press a button while in program mode you will be taken back to CLOCK mode.
Press WEEK button once and the display will showMon-Sun. This is the recommended program for all daysof week
Fig 22
2.5.2

21
Press the HOUR button till the display shows 8.
Press the MINUTE button till the display shows 00.
Fig 23
Fig 24
2.5.3
2.5.4
Press the ON/AUTO/OFF button till the display shows 00seconds. The ON time is now set to 8 a.m.
Fig 25
2.5.5
Press the PROG button again and the display will show 1 which means that we are setting the first schedule forthe OFF time.
Fig 26
2.5.6
OFF

22
Press the HOUR button till the display shows 8.
Press the MINUTE button until display shows 8.01.
Press the ON/AUTO/OFF button till the display shows 30seconds. The OFF time is now set to 8hrs 1 min & 30 sec. Thefeeder time will be for 1 min and 30 sec.
Fig 28
Fig 29
Fig 30
2.5.8
2.5.9
2.5.10
Press the WEEK button once and the display will showMon-Sun. This is the recommended days of week set in 1 .
Fig 27
2.5.7
ON
NOTE:Select the same week option (Mon, Tu, Wed, Th, Fri, Sa, Su) in ON time & OFF time.

23
Press the PROG button again. The display shows 2 whichmeans that we are setting the second feed.
Repeat programming from no. 2.5.2 to 2.5.10 to completeprogramming for the second feed time. Repeat the processfor the remaining programs (3 to 8).
Press the CLOCK button to exit from the PROG mode.
Connect the 24 VAC Transformer of the Auto koi feederPond �sh feeder - Outdoor feeder into the timer socket.
Fig 32
Fig 31
2.5.11
2.5.12
ON
2.6.1
2.6 Connecting the into the Timer
2.6.2
Plug the timer into an 110 VAC GFI wall socket.
Now the Auto koi feeder - Pond fish feeder - Outdoor feeder is ready to feed your pet as per your schedule
.
Fig 34
Fig 33

24
Maintenance
Your Auto koi feeder - Pond �sh feeder - Outdoor feeder is easy to dismantle, clean and to assemble. Befor cleaning disconnect timer and power outlet. Below steps will make your cleaning process easier.
Pull up the F-Clampto remove it fromthe T-slot.
Remove the Flow Pipe inserted above the F-Clamp from itsscrewed position.
Step 1
Position of Flow pipe
Step 2
Remove the F-Clamp from the T-slot.
Step 3
Unscrew the food container cover as shown in Fig 2.
Step 4
Fig 5
Fig 1 Fig 2
Fig 3
Fig 4
25
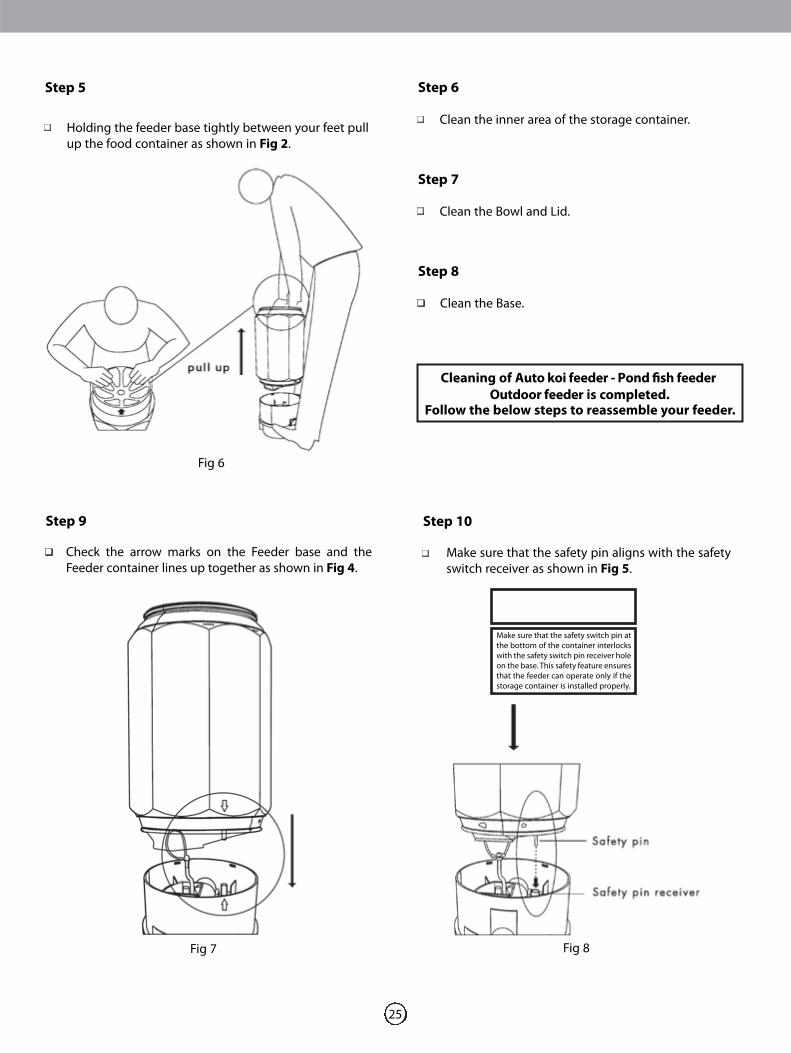
Holding the feeder base tightly between your feet pullup the food container as shown in Fig 2.
Step 5
Fig 6
Check the arrow marks on the Feeder base and theFeeder container lines up together as shown in Fig 4.
Make sure that the safety pin aligns with the safetyswitch receiver as shown in Fig 5.
Make sure that the safety switch pin atthe bottom of the container interlockswith the safety switch pin receiver holeon the base. This safety feature ensuresthat the feeder can operate only if thestorage container is installed properly.
Step 9
Fig 7 Fig 8
Step 10
Clean the inner area of the storage container.
Step 6
Clean the Bowl and Lid.
Clean the Base.
Step 7
Step 8
Cleaning of Auto koi feeder - Pond �sh feeder Outdoor feeder is completed.
Follow the below steps to reassemble your feeder.

Then the bottle is pressed into the base as shown.
Step 11
Fig 9
Replace the food container cover.
Step 12
Fig 10
The F-Clamp is aligned with the T-slots on thePet Feeder body.
Step 13
push down the F-Clampin the T-slot
Final position of F-Clamp
Fig 11Fig 12
Fig 13
26

The �ow pipe is inserted above the F-Clamp and is screwed inposition.
Step 14
Final position of Flow pipe
The waterproof body cover is slid from the top of the Feeder so as to cover theFeeder completely. The cover is fastened in position using the Velcro strapsprovided. The waterproof cap is then used to cover the top of the Feeder.
Step 15
Cap
Feed hole
Velcro location
The assembly of Auto koi feeder - Pond �sh feeder - Outdoor feeder is now complete.Connect timer to the power outlet and start feeding your loved ones with your clean Feeder.
27
Fig 14Fig 15
Fig 16 Fig 17

Ergo Systems Inc., Toll-Free Phone. US only1-888-ERGOSYS(1-888-374-6797)
International Phone1-630-543-7686
Fax1-866-899-5389
Websitehttp://www.autopetfeeder.com
Warranty Registrationhttp://www.autopetfeeder.com/warranty.asp